Spicy Salmon Fried Sushi Rolls

Spicy Salmon Fried Sushi Rolls

Spicy Salmon Fried Sushi Rolls

Spicy Salmon Fried Sushi Rolls

May 24, 2024 by Kimberly

Spicy salmon meets crispy, fried perfection in this delightful dish. With a kick of heat, rich flavors, and a comforting texture, every bite offers a cozy yet exciting sushi experience.

This website uses affiliate links which may earn commission for purchases made at no additional cost to you.

TOTAL TIME

1 hr + 15 min

SERVES

4 portions

DIET

omnivore

EVERY RECIPE DESERVES

A Little Love Letter

Imagine if your favorite spicy tuna roll and a sizzling tempura dish had a delicious rendezvous. Sounds intriguing, right? Well, let me introduce you to Crispy Spicy Salmon Sushi Rolls. They’re bursting with the bold flavors of traditional sushi but transformed into a delightful fried sensation. Wrapped in a light, crispy coating with a kick of spicy salmon nestled inside, you’ve just discovered your new favorite dish. Perfect for any gathering or a tantalizing meal at home!

Serve these deep-fried spicy salmon rolls hot and crispy. Cut each roll into six even pieces for easy sharing. Drizzle them generously with the two sauces – a spicy mayo-Sriracha sauce and a sweet and savory soy-mirin sauce. For the final touch, sprinkle sesame seeds and thinly sliced spring onions over the top for a beautiful contrast in color and a burst of freshness. These rolls are packed with flavor, but if you enjoy a bit more heat, they also pair wonderfully with a dab of wasabi. This delightful combination of textures and tastes makes them a standout dish at any gathering.

Due to their crispy nature, it’s best to enjoy these spicy salmon rolls fresh. Once fried, they tend to lose their crunchiness if stored, so they are not recommended for later consumption. However, if you find yourself with leftovers, you can briefly re-fry them to bring back some of the crispiness. But really, these rolls are so delicious, consider it the perfect excuse to indulge and enjoy them all in one sitting!

Hi, I'm Kimberly!

Hi, I'm Kimberly.

A hopeless romantic when it comes to food. Every recipe I share is a love letter to food itself. I’m so glad you’re here. Make yourself at home and stay a while.

Love,
Kimberly

Kimberly the Zett Signature

If you want to get to know me better,
click here!


Spicy Salmon Fried Sushi Rolls

LET’S MAKE A PIECE OF HAPPINESS

Print
clock clock iconcutlery cutlery iconflag flag iconfolder folder iconinstagram instagram iconpinterest pinterest iconfacebook facebook iconprint print iconsquares squares iconheart heart iconheart solid heart solid icon
Spicy Salmon Fried Sushi Rolls

Spicy Salmon Fried Sushi Rolls


5 Stars 4 Stars 3 Stars 2 Stars 1 Star

5 from 1 review

  • Author: Kimberly
  • Total Time: 75 min
  • Yield: 4

Description

GOOD TO HAVE ON HAND

  • sharp knife
  • cutting board
  • rice cooker (or pot)
  • three small pots (or one that you wash twice)
  • two small bowls
  • squeeze bottles (or tablespoons)
  • two medium-sized bowls
  • bamboo rolling mat (called Makisu)
  • plastic wrap
  • large bowl
  • whisk
  • drinking glass
  • two flat dishes
  • two forks
  • foam spoon


Ingredients

Units Scale
SUSHI RICE
  • 150 grams sushi rice
  • 2 tbsp rice vinegar
  • 1 tbsp white sugar
  • 1/2 tsp salt
LIGHT SAUCE
  • 50 grams mayonnaise
  • 10 grams Sriracha (or any other hot sauce you like)
DARK SAUCE
  • 50 grams soy sauce
  • 50 grams Mirin
  • 50 grams white sugar
TEMPURA BATTER
  • 100 grams all-purpose flour
  • 100 grams corn starch
  • 1 egg
  • 100 milliliters ice-cold water
  • 1/2 tsp salt
FILLING
  • 150 grams salmon filet
  • 2 tbsp Sriracha (or any other hot sauce you like)
OTHER INGREDIENTS
  • 2 full-sized Nori sheets
  • 70 grams Panko (or regular bread crumbs)
  • 500 milliliters deep-frying oil
  • sesame seeds
  • spring onions

Instructions

  1. Let’s start with the sushi rice: Wash the rice under cold water until the water runs clear. This is important as it removes all the starch and prevents the rice from becoming mushy. Now, place the rice in a rice cooker or pot and add 400ml (1 + 2/3 cup) of water. I use a little less than 1:1.5 ratio rice to water, as there’s still water left on the rice from washing. Let the rice cook.
  2. To get that authentic sushi flavor, the rice will be soaked in a sauce. For this, heat rice vinegar, sugar, and salt in a small pot until the sugar and salt have dissolved. Set aside to cool. As it cools, the sauce will thicken slightly.
  3. Now, let’s prepare the salmon filling. Rinse the salmon under cold water, dry it, then chop it into rough cubes. In a bowl, mix it with Sriracha, and it’s ready. Keep the salmon chilled until use.
  4. By now, the rice should be cooked. Transfer it to a medium-sized bowl and pour over the rice vinegar-sugar-salt sauce. Mix everything until the sauce is distributed and absorbed by the rice. Let the rice cool completely.
  5. Meanwhile, prepare the topping sauces. For the light sauce, simply mix mayonnaise and Sriracha, thinning it with a bit of water to make it easier to spread. For the dark sauce, heat soy sauce, Mirin, and sugar in a small pan or pot until the sugar dissolves. Set aside to cool. Once the sauce is cold, it will thicken a bit. I like to pour the sauces into squeeze bottles, but you can also spoon them over the sushi later or use them for dipping. Keep the sauces chilled until use.
  6. In the meantime, you can prepare your work surface. Take a bamboo rolling mat, also known as Makisu, and wrap it on both sides with a layer of plastic wrap. Press the ends well onto the mat. Then fill a medium-sized bowl with a little water, as you’ll need it for your fingers to prevent the rice from sticking to them. Then you’ll need a cutting board and a sharp knife to halve the rolls. Finally, halve your Nori sheets and set them aside.
  7. Once the rice is cold, you can start rolling. Place the Makisu with the sticks horizontally in front of you. Place a Nori sheet with the shiny, smooth side down on the bamboo mat. Dip your fingers in the water and take about 1 heaped tablespoon of rice, spreading it with your fingers on the Nori sheet. It takes a bit of practice to handle the rice, but just take your time and moisten your fingers again if it becomes difficult to spread the rice. I press and push it in the direction I want it. I leave about 1/2-1cm (0.2″-0.4″) free at the top edge of the Nori sheet. When the rice is evenly distributed, turn the Nori sheet over so that the rice side is now facing down. Place a strip of the salmon filling in the center of the Nori sheet, a bit more than a finger thick. Now roll the Nori sheet so that the bottom end lands directly over the salmon filling. Then press everything tightly from the outside, then close the roll with a twist and press again. Take the finished sushi roll and halve it on the cutting board. Proceed the same way with the other rolls and set them aside.
  8. Now prepare the tempura batter. Mix flour, cornstarch, and salt in a large bowl. In a glass, stir the egg and ice-cold water starting with 100ml (3.5 oz) of water, and pour it into the dry ingredients. Quickly whisk everything until it’s creamy. If the batter is too thick, add 1 tablespoon of water and stir. We aim for a creamy-thick consistency. Better too thick than too thin, so really only adjust the water carefully. It also depends on how much liquid the egg brings. Pour the batter into a flat dish. Do the same with the Panko.
  9. Now you can bread the rolls. Take two forks and place the first roll in the tempura batter, distributing the batter over the entire roll. You can also gently turn it. Lift it up and let the excess batter drip off. Now place the roll directly into the Panko and press it onto the roll with the forks. You should now have a compact roll where the batter adheres well and nothing drips. Bread the rolls one by one and set aside.
  10. Now heat the frying oil to 190°C/375°F in a small, deep pot. Make sure to use enough oil so that the rolls can be completely submerged. I used solid vegetable fat in block form. Once the temperature is reached, place two rolls at a time into the oil. Be careful as the oil may bubble when the rolls are added. It’s best to use a foam spoon for this. The temperature will then drop to about 175°C/347°F. Fry the rolls in the oil for a total of 5 minutes. Each roll only absorbs about 10g (1/3 oz) of fat. I weighed the fat before and after 😀 This is because the fat is hot enough to instantly seal the crust. That’s why it’s also important to bring the fat to the right temperature. If the fat is too cold, the roll absorbs more fat and becomes soggy and not crispy.
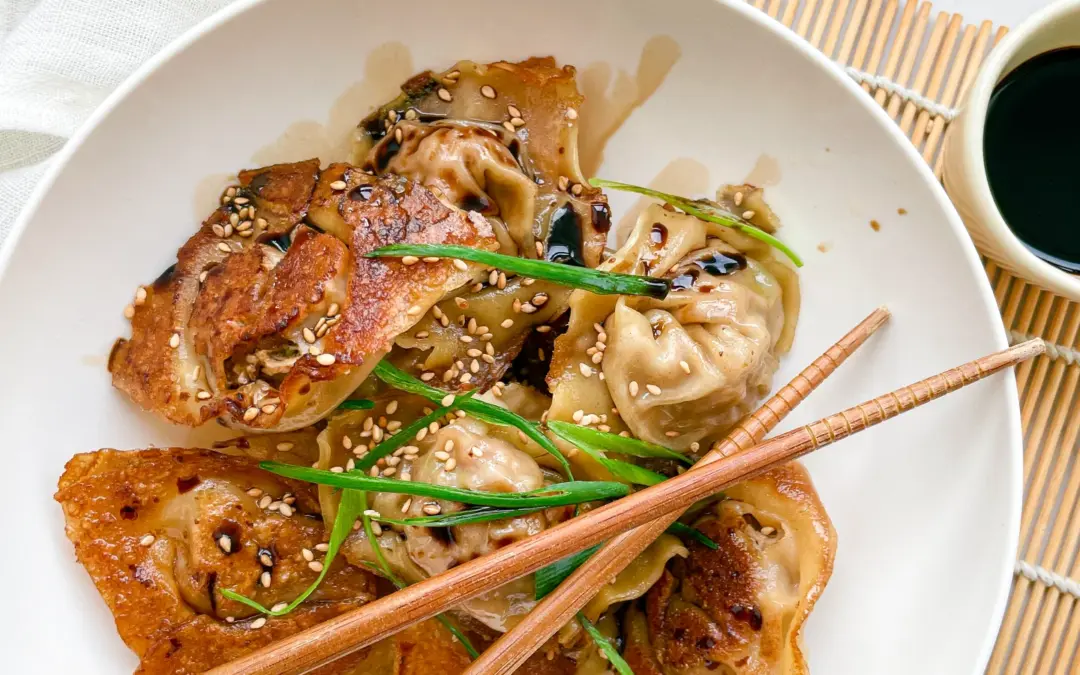
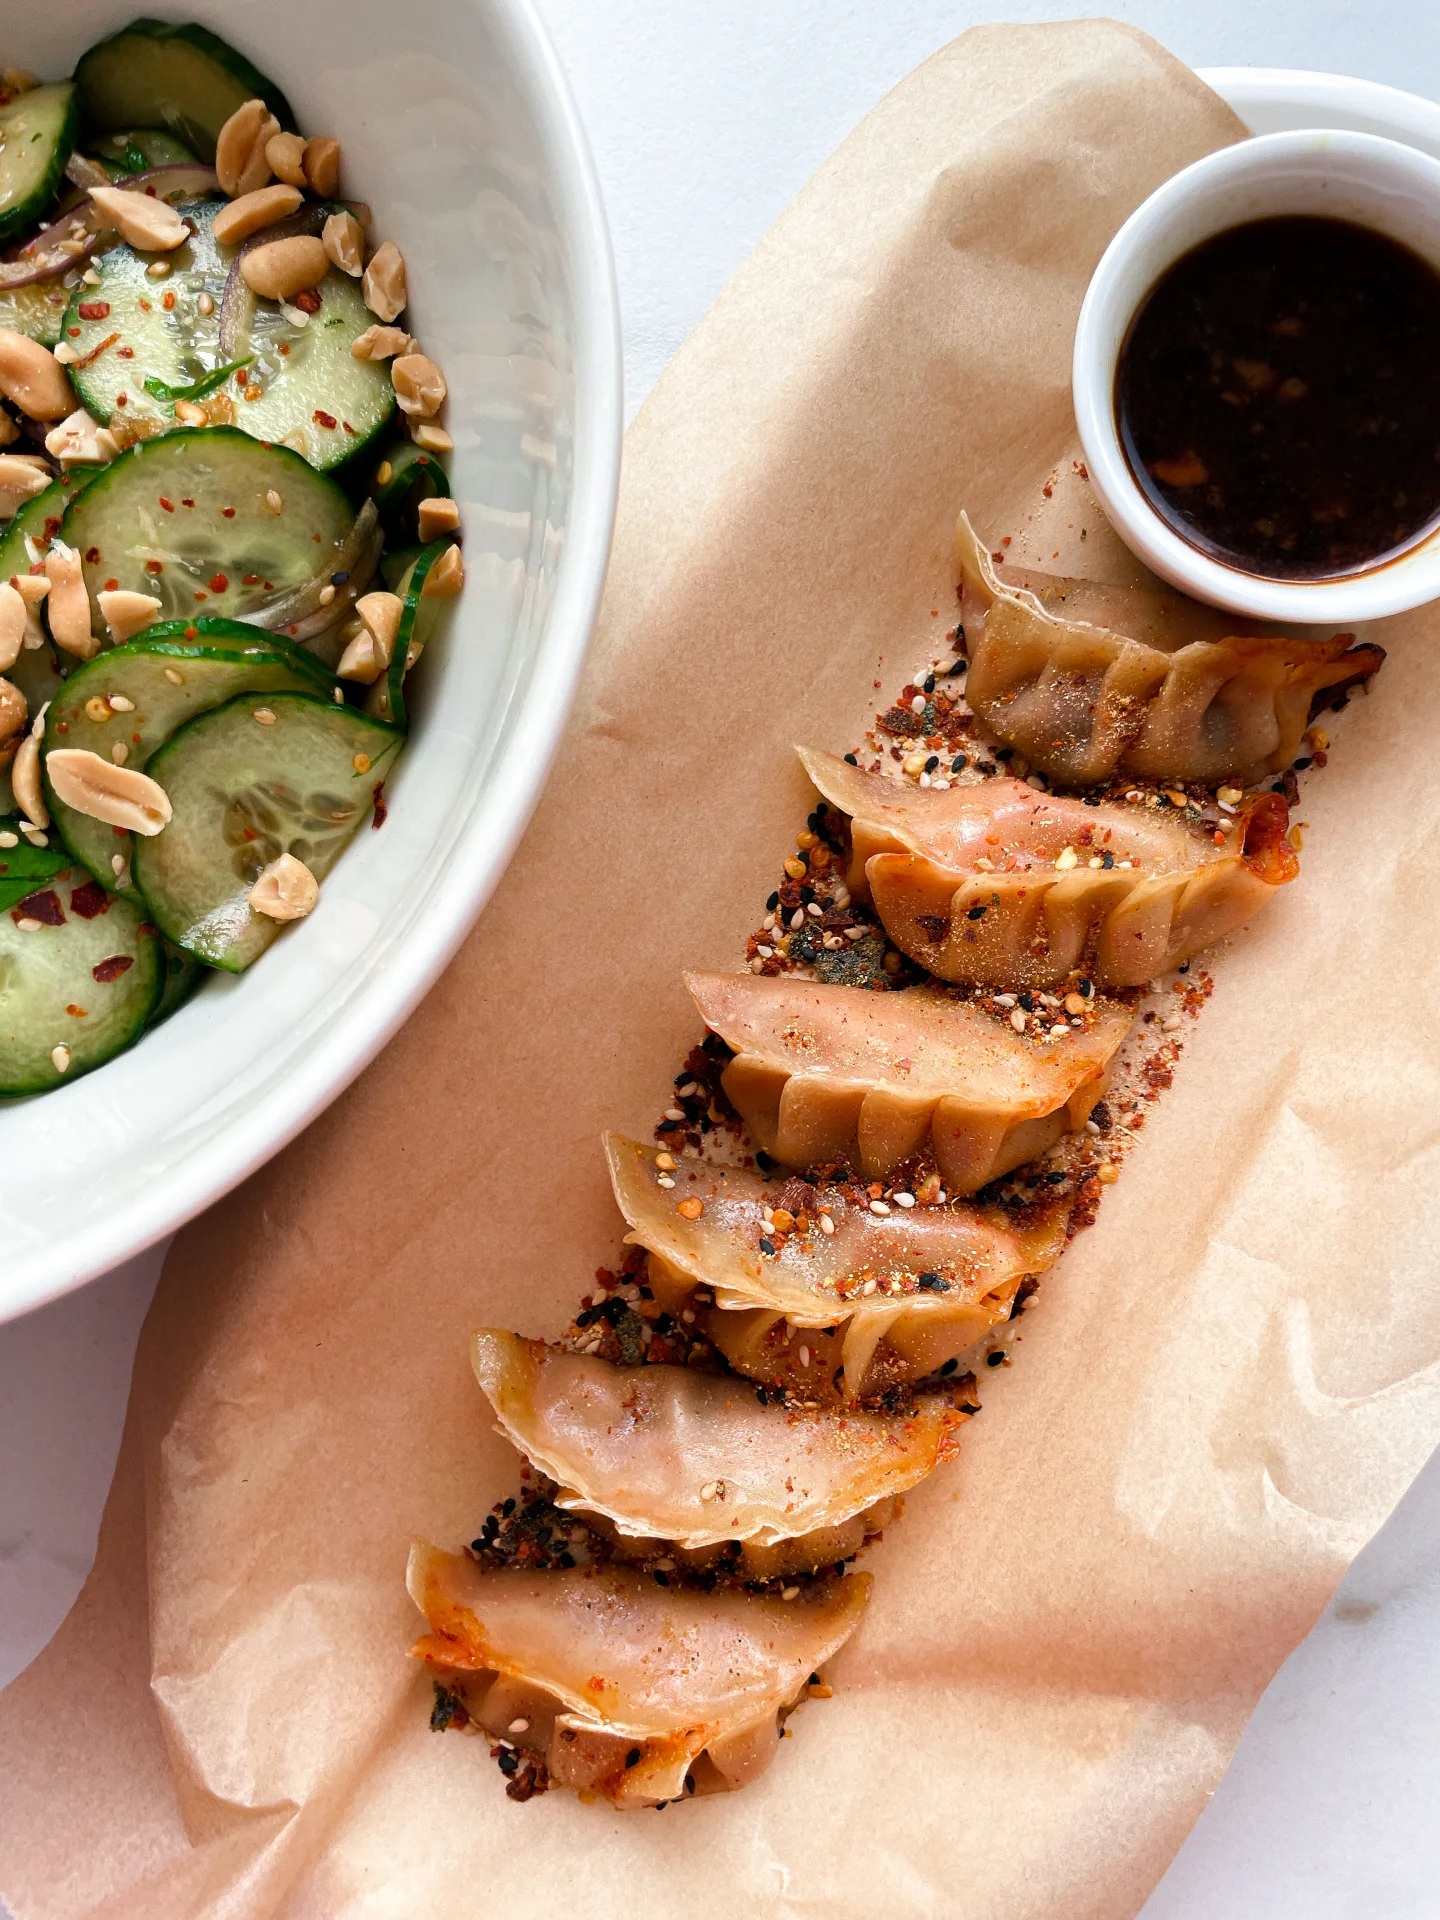
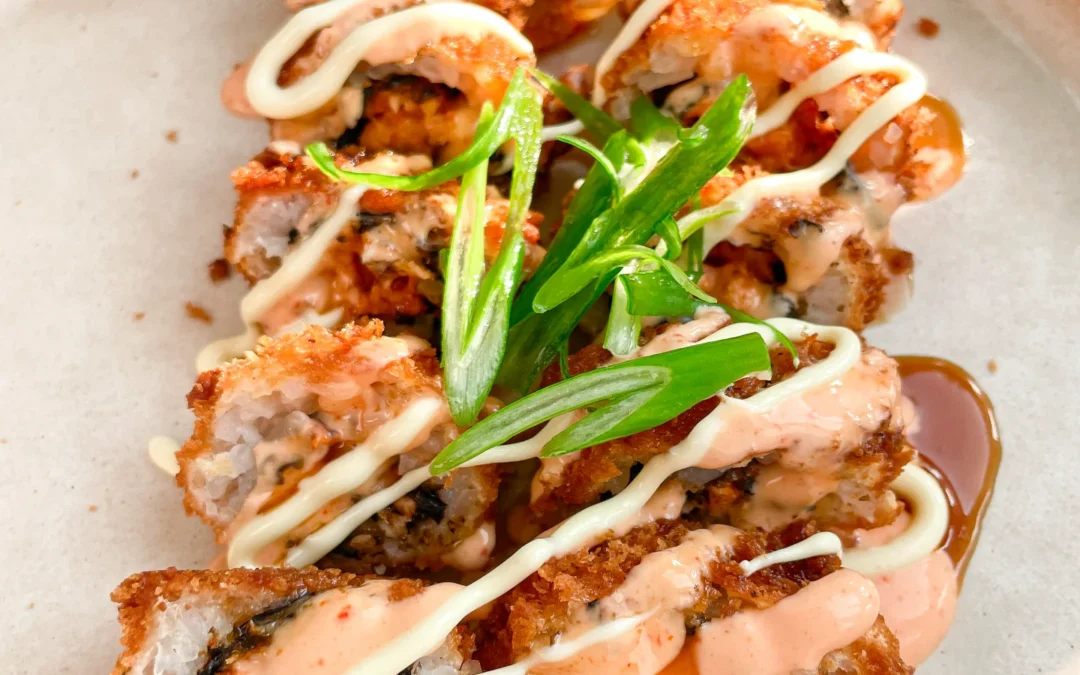
  11. When the rolls are done frying, remove them from the fat and let them drain on a rack and cool slightly. Cut the rolls into 6 pieces each and arrange them on a plate. Next, drizzle the light and dark sauces over the rolls in a zigzag direction. Finally, you can sprinkle some sesame and finely chopped spring onions as a topping.

Notes

The calorie information may vary depending on the product used, country and region.

  • Passive Time: 20 min
  • Cook Time: 55 min

CRAVING MORE?

Follow along here & don’t forget to subscribe to my substack!

Juicy Pan-Fried Pork Dumplings

Juicy Pan-Fried Pork Dumplings

Juicy Pan-Fried Pork Dumplings

Juicy Pan-Fried Pork Dumplings

March 12, 2024 by Kimberly

Dive into the world of flavors with these pan-fried pork Dumplings! Perfectly golden, irresistibly tasty, and just the right crunch to satisfy your cravings.

This website uses affiliate links which may earn commission for purchases made at no additional cost to you.

TOTAL TIME

1 hr + 15 min

SERVES

40 dumplings

DIET

omnivore

EVERY RECIPE DESERVES

A Little Love Letter

Discover the joy of making juicy pan-fried pork Dumplings at home! A staple in Asian cuisine, these dumplings are a perfect blend of juicy filling and crispy skin. Easy to make and incredibly delicious, they’re sure to become a family favorite. Whether you’re a dumpling enthusiast or a first-timer, follow this simple guide to bring a taste of tradition into your kitchen.

Serve these golden delights with a side of dumpling dipping sauce. These juicy pan-fried pork Dumplings are best enjoyed hot, allowing the flavors to truly shine. They make a fantastic appetizer, a satisfying main, or a delightful side dish. Pair with a fresh cucumber salad or a steaming bowl of soup to complete a mouthwatering meal that’s sure to impress.

Store leftover dumplings in an airtight container in the refrigerator for up to three days. Reheat in a pan to retain their crispiness or microwave if in a hurry. You can also freeze them immediately after filling, so you always have fresh dumplings on hand.

Hi, I'm Kimberly!

Hi, I'm Kimberly.

A hopeless romantic when it comes to food. Every recipe I share is a love letter to food itself. I’m so glad you’re here. Make yourself at home and stay a while.

Love,
Kimberly

Kimberly the Zett Signature

If you want to get to know me better,
click here!


Juicy Pan-Fried Pork Dumplings

LET’S MAKE A PIECE OF HAPPINESS

Print
.tasty-recipe-responsive-iframe-container-9b34b8b4 { position: relative; overflow: hidden; padding-top: 177.62%; } .tasty-recipe-responsive-iframe-container-9b34b8b4 iframe { position: absolute; top: 0; left: 0; width: 100%; height: 100%; border: 0; } clock clock iconcutlery cutlery iconflag flag iconfolder folder iconinstagram instagram iconpinterest pinterest iconfacebook facebook iconprint print iconsquares squares iconheart heart iconheart solid heart solid icon
Juicy Pan-Fried Pork Dumplings

Juicy Pan-Fried Pork Dumplings


  • Author: Kimberly
  • Total Time: 75 min
  • Yield: 40

Description

GOOD TO HAVE ON HAND

  • sharp knife
  • cutting board
  • large bowl
  • small bowl
  • large pan with lid


Ingredients

Units Scale
  • 40 dumpling wrappers
  • 400 grams minced pork
  • 1 tbsp minced ginger
  • 4 garlic cloves
  • 3 spring onions
  • 1 egg
  • 1 tbsp soy sauce
  • 1 tbsp oyster sauce
  • 1 tsp sesame oil
  • 1/4 tsp salt
  • 1/4 tsp ground pepper
  • all-purpose flour
  • neutral cooking oil

Instructions

  1. Defrost the dumpling wrappers if necessary.
  2. Peel the ginger, finely chop or grate and add to a large bowl.
  3. Peel and finely chop or crush the garlic cloves and add to the ginger in the large bowl.
  4. Separate the spring onions into whites and greens. Cut the white part into fine rings and add to the bowl with the ginger and garlic. Cut the green part into fine strips. Set aside.
  5. Also add the ground meat into the large bowl. Additionally, add: 1/4 tsp salt, 1/4 tsp ground pepper, one egg, 1 tbsp oyster sauce, 1 tbsp soy sauce, and 1 tsp sesame oil. Mix the entire mixture with two chopsticks and set aside.
  6. As preparation for your dumplings, sprinkle a work surface or serving plate with a little flour, so you can place your filled dumplings there before frying them. Without flour, the dough would stick to the surface after a while.
  7. Now, it’s time to fill the dumplings. For this, you will need the bowl with your filling, a small bowl with fresh, cold water, a teaspoon, and the dumpling wrappers.
  8. For the filling and folding feel free to watch my video on this (located at the bottom of this page) as visuals always help 😉 Fill each dumpling wrapper with about 1 tsp of filling. Place the filling in the center of the wrapper. Dab a bit of the cold water on one half of the edges of the wrapper along the edge with a finger. Fold the wrapper in half so that the filling is enclosed by the edges. Press the edges tightly together. Once you have enclosed the filling in the dough, take the two rear corners, moisten one corner from one side and fold the corners onto each other from behind. Press tightly and place the dumpling on the floured work surface. Continue this process until for the remaining dumpling wrappers. For 40 dumplings, this can take about 15 to 30 minutes, depending on your speed.
  9. If you want to freeze the dumplings, I recommend doing it now and not after the dumplings have been fried.
  10. Once you have finished all the dumplings, heat a large pan over medium heat. Add 1 tbsp of oil to the pan and place as many dumplings as you can fit on the flat side in the pan. Let them fry for a few minutes until the bottom has become crispy. Then reduce the heat to low and pour a little water into the pan. Immediately cover the pan with the lid. Be careful that the oil in the pan is not too hot, otherwise there is a risk of burning. The dumplings will now be steamed with the water in the pan. Keep the lid closed until the dumpling skins have become translucent. This can take about 10-15 minutes. If they are not yet translucent and there is no more water in the pan, simply add some more. Now you can remove the lid and turn the heat back up to medium. Let them fry for about 5 more minutes without the lid, so that the bottom of the dumplings can become crispy again. Remove the dumplings from the pan and process the next batch in the same way.
  11. When all the dumplings are done, serve them in a bowl with this dumpling dipping sauce and the green parts of the spring onion. You can also top them with roasted sesame seeds if you like.
  • Passive Time: 30 min
  • Cook Time: 45 min

CRAVING MORE?

Follow along here & don’t forget to subscribe to my substack!

Kimchi Scallion Pancake

Kimchi Scallion Pancake

Kimchi Scallion Pancake

Kimchi Scallion Pancake

February 29, 2024 by Kimberly

Experience the sizzling joy of a Kimchi Scallion Pancake! Perfect for sharing, these crispy delights blend zesty kimchi and fresh scallions for a mouthwatering treat.

This website uses affiliate links which may earn commission for purchases made at no additional cost to you.

TOTAL TIME

20 min

SERVES

2 pancakes

DIET

vegan

EVERY RECIPE DESERVES

A Little Love Letter

Dive into the flavorful world of Korean cuisine with my Kimchi Scallion Pancakes! These savory pancakes offer a delightful combination of tangy kimchi and aromatic scallions, pan-fried to golden perfection. Whether you’re a seasoned foodie or new to Korean flavors, these pancakes are sure to spice up your mealtime!

Serve these sizzling Kimchi Scallion Pancakes hot off the pan for the best experience. They’re perfect as a hearty breakfast, a unique appetizer, or a side dish for your main meals. Pair them with a dipping sauce made from soy sauce, sriracha and lemon juice to elevate their flavor. Cut them into wedges, and share the joy with friends and family.

Store leftover pancakes in the refrigerator, wrapped tightly in plastic wrap or in an airtight container. They’ll stay fresh for up to two days. Reheat in a pan over medium heat to retain their crispiness and flavor.

Hi, I'm Kimberly!

Hi, I'm Kimberly.

A hopeless romantic when it comes to food. Every recipe I share is a love letter to food itself. I’m so glad you’re here. Make yourself at home and stay a while.

Love,
Kimberly

Kimberly the Zett Signature

If you want to get to know me better,
click here!


Kimchi Scallion Pancake

LET’S MAKE A PIECE OF HAPPINESS

Print
.tasty-recipe-responsive-iframe-container-0e6b1b18 { position: relative; overflow: hidden; padding-top: 177.62%; } .tasty-recipe-responsive-iframe-container-0e6b1b18 iframe { position: absolute; top: 0; left: 0; width: 100%; height: 100%; border: 0; } clock clock iconcutlery cutlery iconflag flag iconfolder folder iconinstagram instagram iconpinterest pinterest iconfacebook facebook iconprint print iconsquares squares iconheart heart iconheart solid heart solid icon
Kimchi Scallion Pancake

Kimchi Scallion Pancake


  • Author: Kimberly
  • Total Time: 20 min
  • Yield: 2

Description

GOOD TO HAVE ON HAND

  • sharp knife
  • cutting board
  • medium bowl
  • medium sized pan


Ingredients

Units Scale
  • 100 grams kimchi
  • 3 spring onions
  • 100 grams all-purpose flour
  • 20 grams cornstarch
  • 1/2 tsp turmeric
  • 1/4 tsp baking powder
  • 1/4 tsp salt
  • 100 milliliters water
  • 2 tsp clarified butter

Instructions

  1. Roughly chop the kimchi and place in a medium-sized bowl with 2 tbsp of its marinade.
  2. Wash the spring onions and cut into fine strips. Set aside a small portion of the green strips as a topping for later. Add the rest to the bowl.
  3. Now add the flour, cornstarch, water, salt, turmeric and baking powder to the kimchi and spring onions in the bowl and mix to form a smooth batter.
  4. Heat a medium-sized frying pan with 1 tsp clarified butter. Pour half of the batter into the pan and fry on both sides until crispy. Now add another teaspoon of clarified butter to the pan and fry the second half of the batter in the pan.
  5. Cut the kimchi pancake into large pieces, serve hot on a plate and top with the remaining green spring onions.
  • Cook Time: 20 min

CRAVING MORE?

Follow along here & don’t forget to subscribe to my substack!

Garlic Soy Edamame

Garlic Soy Edamame

Garlic Soy Edamame

Garlic Soy Edamame

January 14, 2024 by Kimberly

A flavorful, healthy snack! Perfectly cooked, bursting with savory garlic and soy goodness. It’s absolutely delicious and nutritious!

This website uses affiliate links which may earn commission for purchases made at no additional cost to you.

TOTAL TIME

10 min

SERVES

1 bowl

DIET

vegan

EVERY RECIPE DESERVES

A Little Love Letter

Discover the charm of Garlic Soy Edamame, an exquisite fusion of flavors that’s both simple and sophisticated. This dish, a star in its own right, combines the tender crunch of edamame beans with a tantalizing mix of garlic and soy sauce. It’s a culinary delight that showcases the beauty of minimal ingredients creating maximum impact, offering a taste experience that’s as nutritious as it is delicious.

Garlic Soy Edamame is a versatile dish that shines in its simplicity. Serve it warm as a delightful starter or a light yet satisfying snack. The glistening, flavorful pods invite diners to engage with their food, peeling back the pods to reveal the tasty beans inside. It’s an excellent accompaniment to a variety of dishes, adding a pop of flavor and texture. Ideal for casual get-togethers or as a healthful treat any time of the day.

To store leftover Garlic Soy Edamame, let it cool to room temperature first. Then, place it in an airtight container and refrigerate. It stays fresh for up to three days. For longer storage, you can freeze the edamame in a sealed bag, ready to reheat and enjoy anytime.

Hi, I'm Kimberly!

Hi, I'm Kimberly.

A hopeless romantic when it comes to food. Every recipe I share is a love letter to food itself. I’m so glad you’re here. Make yourself at home and stay a while.

Love,
Kimberly

Kimberly the Zett Signature

If you want to get to know me better,
click here!


Garlic Soy Edamame
Garlic Soy Edamame

LET’S MAKE A PIECE OF HAPPINESS

Print
.tasty-recipe-responsive-iframe-container-c19fa4ce { position: relative; overflow: hidden; padding-top: 177.62%; } .tasty-recipe-responsive-iframe-container-c19fa4ce iframe { position: absolute; top: 0; left: 0; width: 100%; height: 100%; border: 0; } clock clock iconcutlery cutlery iconflag flag iconfolder folder iconinstagram instagram iconpinterest pinterest iconfacebook facebook iconprint print iconsquares squares iconheart heart iconheart solid heart solid icon
Garlic Soy Edamame

Garlic Soy Edamame


  • Author: Kimberly
  • Total Time: 10 min
  • Yield: 1

Description

GOOD TO HAVE ON HAND

  • sharp knife
  • cutting board
  • small pot
  • small pan


Ingredients

Units Scale
  • 250 grams edamame with skin
  • 1/4 tsp sesame oil
  • 1/8 tsp chili flakes
  • 1/4 tsp honey
  • 1 garlic clove
  • 1 tbsp soy sauce
  • 1/4 tsp rice vinegar

Instructions

  1. Fill a small pot with water and bring to boil. Cook the edamame in their skins in the boiling water for approx. 5 minutes.
  2. In the meantime, stir together the sesame oil, chili flakes, honey, soy sauce, rice vinegar and crushed garlic in a small pan and heat over a medium heat while stirring.
  3. Remove the edamame from the water and add to the sauce in the pan. Toss briefly and serve in a bowl.
  • Cook Time: 10 min

CRAVING MORE?

Follow along here & don’t forget to subscribe to my substack!

Finger Food Beef Wellington

Finger Food Beef Wellington

Finger Food Beef Wellington

Finger Food Beef Wellington

December 1, 2023 by Kimberly

Enjoy the fancy version of Beef Wellington in bite-sized form. Enjoy tender beef wrapped in buttery batter and create a delicious and premium snack. Perfect for adding a touch of class to any gathering or occasion, a simple yet sophisticated treat that everyone will enjoy.

This website uses affiliate links which may earn commission for purchases made at no additional cost to you.

TOTAL TIME

45 min

SERVES

16 bites

DIET

omnivore

EVERY RECIPE DESERVES

A Little Love Letter

Take your event to the next level with these mini beef wellingtons, as a symphony of flavors unfolds with every bite, seamlessly blending mushrooms, Parma ham and a touch of Dijon mustard. This exquisite combination offers a sophisticated taste sensation in each delicious, finger-friendly parcel – perfect for adding a touch of gourmet flair to your party or event.

Present these delicious Beef Wellington finger foods at your Christmas party or on Christmas Eve, for example. These beef bites can be enjoyed on their own or with my spicy Cumberland sauce for an extra festive kick. With their delicious flavors, these canapés will enhance your Christmas party and are an irresistible and perfect addition to your festive table.

To ensure optimum freshness, keep Beef Wellington wrapped in plastic wrap, beeswax cloths, aluminum foil or an airtight container in the refrigerator for up to two days. If you plan to store them for longer, freeze them in an airtight container, making sure to separate the layers with parchment paper. When you’re ready to enjoy the Wellingtons, reheat them in the oven to keep the batter crispy. Defrost frozen Wellingtons in the fridge before reheating to ensure they retain their delicious texture.

Hi, I'm Kimberly!

Hi, I'm Kimberly.

A hopeless romantic when it comes to food. Every recipe I share is a love letter to food itself. I’m so glad you’re here. Make yourself at home and stay a while.

Love,
Kimberly

Kimberly the Zett Signature

If you want to get to know me better,
click here!


Finger Food Beef Wellington

LET’S MAKE A PIECE OF HAPPINESS

Print
.tasty-recipe-responsive-iframe-container-a86b6519 { position: relative; overflow: hidden; padding-top: 177.62%; } .tasty-recipe-responsive-iframe-container-a86b6519 iframe { position: absolute; top: 0; left: 0; width: 100%; height: 100%; border: 0; } clock clock iconcutlery cutlery iconflag flag iconfolder folder iconinstagram instagram iconpinterest pinterest iconfacebook facebook iconprint print iconsquares squares iconheart heart iconheart solid heart solid icon
Finger Food Beef Wellington

Finger Food Beef Wellington


  • Author: Kimberly
  • Total Time: 35 min
  • Yield: 16

Description

RECOMMENDED EQUIPMENT

  • sharp knife
  • chopping board
  • food processor if necessary
  • small bowl
  • small pan
  • kitchen basting brush

Ingredients

Units Scale
MUSHROOM FILLING
  • 1 shallot
  • 1 tbsp butter
  • 180 grams mushrooms
  • 1 tsp dried thyme
  • 1 tbsp fresh parsley
  • 3 tbsp port wine (or any other red wine)
  • salt
  • pepper
INDIVIDUAL INGREDIENTS
  • 1 store-bought puff pastry
  • 200 grams beef fillet
  • 100 grams prosciutto di parma
  • 1 tbsp butter
  • 1 tsp dijon mustard
  • 1 egg
  • salt
  • pepper

Instructions

  1. Cut the mushrooms and shallot into very small pieces or pulse briefly in a food processor. Finely chop the parsley. Cut the puff pastry into 16 equal squares and tear the Prosciutto di Parma into 16 pieces. Crack an egg into a bowl and whisk it.
  2. Start by heating a large pan over medium heat and add the chopped mushrooms without any fat. Let them cook until all the water has evaporated and they start to brown slightly. This step keeps them from turning mushy later. Once they’re lightly browned, add a tablespoon of butter and stir. Add the chopped shallot and fry together until the shallots are soft. Deglaze the pan with three tablespoons of red wine and let it reduce for about 5–8 minutes until no liquid remains on the bottom. Stir in the chopped parsley, dried thyme, and season with salt and pepper. Remove the pan from the heat and let the mixture cool slightly.
  3. While the mushroom mixture cools, heat another pan with one tablespoon of butter and quickly sear the beef fillet on all sides so that it’s browned on the outside but still raw inside. Take it out of the pan, let it rest briefly, and cut it into 16 equal pieces.
  4. Now assemble the parcels: place a piece of Prosciutto on each puff pastry square, leaving a small border around the edges. Spoon about half a teaspoon of the mushroom mixture onto each piece of ham, then place a piece of beef on top. Brush the beef with a little mustard, then roll up the pastry and seal the edges well.
  5. Place all the pieces on a baking tray lined with parchment paper and put them in the fridge while you preheat the oven to 200°C (390°F). When the oven is ready, take them out, make a few diagonal cuts on top of each piece, and brush with the beaten egg.
  6. Bake for about 10 minutes, or until the pastry is golden and crisp. If the beef pieces are very thin, they might not stay medium in the center but they’ll still be incredibly tender and melt in your mouth. Serve warm, ideally with Cumberland sauce.
  • Cook Time: 35 min

CRAVING MORE?

Follow along here & don’t forget to subscribe to my substack!