Caramalized French Toast with Vanilla Yogurt & Passionfruit Glaze

Caramalized French Toast with Vanilla Yogurt & Passionfruit Glaze

Caramalized French Toast with Vanilla Yogurt & Passionfruit Glaze

Karamellisierter French Toast mit Vanillejoghurt und Passionsfruchtglasur

March 10, 2025 by Kimberly

Indulge in golden, caramel-kissed French toast paired with creamy vanilla yogurt and a tangy passionfruit drizzle. A breakfast that feels like a sunlit morning in paradise.

25 MINUTES

EINFACH

VEGETARISCH

FRANZÖSISCH

2 PORTIONS

SÜßES

BRUNCH

FRÜHSTÜCK

GANZJÄHRIG

INFORMATIONEN

ÜBER DIESES REZEPT

This is not your basic French toast. We’re talking crispy, caramelized edges, a creamy vanilla yogurt topping, and a tangy passionfruit glaze that adds just the right amount of freshness. It’s that perfect balance of buttery, crunchy, and melt-in-your-mouth softness that makes brunch feel extra. Whether you’re treating yourself on a slow Sunday morning or trying to impress someone with minimal effort, this dish is a guaranteed win. Think tropical, cozy, and just fancy enough to feel special without the hassle.

How to serve
This one shines brightest when served fresh off the pan: crispy and golden. Drizzle that passionfruit glaze generously, dollop some vanilla yogurt on top, and let it all melt together in the best way.

How to store
French toast is best enjoyed fresh, but if you have leftovers, store them in an airtight container in the fridge for up to one day. Reheat in a pan to keep the crispiness. The yogurt and glaze should be stored separately and added just before serving.

Hi, I'm Kimberly!

Hi, ich bin Kimberly.

Meine Rezepte sind für alle, die an den Zauber von selbstgemachtem Essen glauben. An Butter, die auf warmem Brot schmilzt. An Lieblingsrezepte, die man weiterschenken möchte. Und an das stille Glück, das in einem einfachen, gut gemachten Gericht steckt. Willkommen an meinem Tisch,

Kimberly the Zett Signature

Wenn du mehr über mich erfahren möchtest, klicke hier!


Caramalized French Toast with Vanilla Yogurt & Passionfruit Glaze
“Let’s make a piece of happiness”
Print
clock clock iconcutlery cutlery iconflag flag iconfolder folder iconinstagram instagram iconpinterest pinterest iconfacebook facebook iconprint print iconsquares squares iconheart heart iconheart solid heart solid icon
Caramalized French Toast with Vanilla Yogurt & Passionfruit Glaze

Caramalized French Toast with Vanilla Yogurt & Passionfruit Glaze


5 Stars 4 Stars 3 Stars 2 Stars 1 Star

5 from 2 reviews

  • Autor: Kimberly
  • Dauer: 25 min
  • Portionen: 2

Description

Empfohlenes Equipment

  • large pan
  • shallow dish
  • small saucepan
  • small bowl
  • kitchen torch

Zutaten

EINHEITEN MENGE
PASSIONFRUIT GLAZE
  • 100 g passionfruit purée
  • 100 g weißer Zucker
  • 25 g water
FRENCH TOAST
  • 4 slices brioche bread
  • 75 g cow milk
  • 1 egg
  • 1 tsp vanilla extract
  • butter for frying
  • sugar for the crust
TOPPING
  • 3 tbsp yogurt
  • 1 tsp vanilla extract
  • 2 passionfruits

ZUBEREITUNG

  1. In a small saucepan, combine the passion fruit purée, water, and sugar. Stir and bring to a gentle simmer over medium heat. Let it cook for 15–20 minutes until it thickens into a syrup-like consistency. Remove from heat and let it cool slightly. It will thicken a bit more as it cools.
  2. In a small bowl, mix the yogurt with vanilla extract (or fresh vanilla) until smooth. Set aside.
  3. In a shallow dish, whisk together the eggs, milk, and vanilla extract. Dip each slice of brioche into the egg mixture, making sure both sides are evenly coated. In a pan over medium heat, melt the butter and cook the brioche slices until golden brown and crispy on both sides. Remove from the pan.
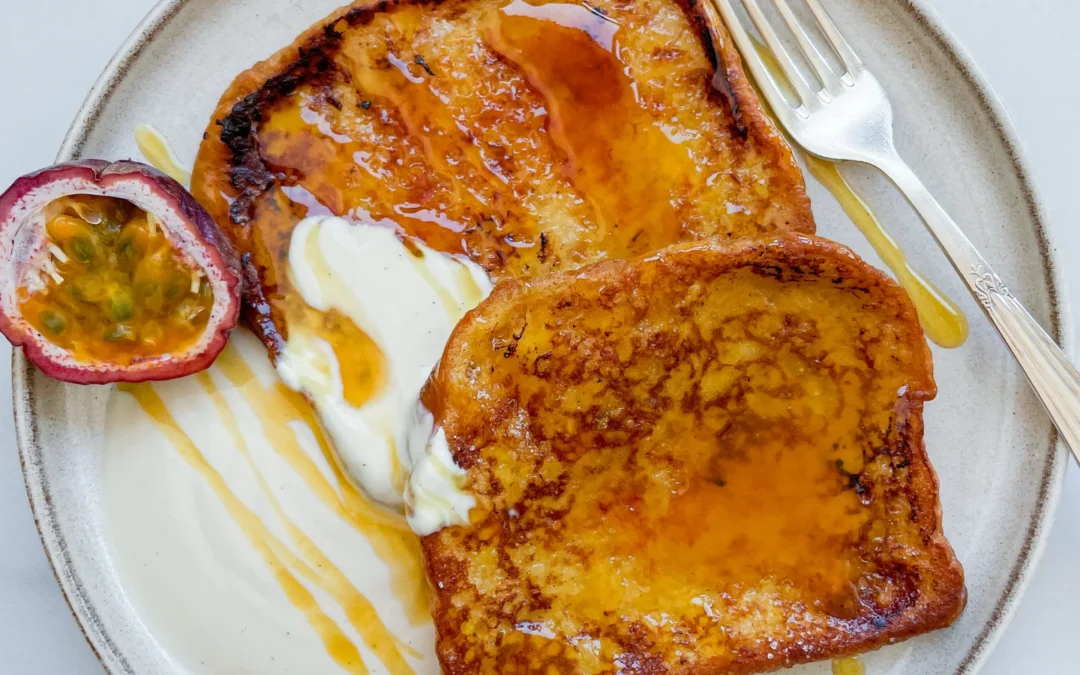
  4. Sprinkle a thin layer of sugar over each slice of French toast. Using a kitchen torch, caramelize the sugar until it turns golden and crisp.
  5. Place two slices of caramelized French toast on a plate. Top with a generous dollop of vanilla yogurt and drizzle with the passion fruit glaze.
  6. Cut a fresh passion fruit in half and scoop the pulp over the toast for an extra burst of flavor. Serve immediately and enjoy!

  • Cook Time: 25 min

Brownie Batter Chocolate Hummus

Brownie Batter Chocolate Hummus

Brownie Batter Chocolate Hummus

Brownie Batter Chocolate Hummus

February 18, 2025 by Kimberly

This ultra-creamy, rich chocolate dip tastes like straight-up brownie batter but is secretly packed with good-for-you ingredients. Perfect for spreading, dipping, or just eating by the spoonful…no judgment here!!

10 MINUTES

EINFACH

VEGAN

INTERNATIONAL

4 PORTIONS

CREMIGES
SÜßES

ALLTAG

SNACKS
DESSERT

GANZJÄHRIG

INFORMATIONEN

ÜBER DIESES REZEPT

If you’ve never tried sweet hummus before, this one’s about to change your life. Imagine the rich, fudgy taste of brownie batter but in a smooth, creamy dip that also happens to be good for you. No refined sugar, no weird additives, just simple ingredients blending into pure chocolatey magic. Whether you’re dipping fruit, spreading it on toast, or eating it straight from the jar (I see you), this is your new go-to for a guilt-free chocolate fix.

How to serve
Swipe it onto warm toast, pair it with strawberries, banana slices, or apple wedges, or go all in and dunk some pretzels for that sweet-salty combo. Feeling extra? Stir it into oatmeal, drizzle it over pancakes, or layer it in a yogurt parfait for a next-level treat.

How to store
Store your chocolate hummus in an airtight container in the fridge for up to 4 days, but let’s be real, it won’t last that long. If it thickens up, just stir in a splash of plant milk to bring back that creamy goodness. Freezing? Not recommended, it’s best fresh!

Hi, I'm Kimberly!

Hi, ich bin Kimberly.

Meine Rezepte sind für alle, die an den Zauber von selbstgemachtem Essen glauben. An Butter, die auf warmem Brot schmilzt. An Lieblingsrezepte, die man weiterschenken möchte. Und an das stille Glück, das in einem einfachen, gut gemachten Gericht steckt. Willkommen an meinem Tisch,

Kimberly the Zett Signature

Wenn du mehr über mich erfahren möchtest, klicke hier!


Brownie Batter Chocolate Hummus
“Let’s make a piece of happiness”
Print
.tasty-recipe-responsive-iframe-container-7f61d80f { position: relative; overflow: hidden; padding-top: 56.3%; } .tasty-recipe-responsive-iframe-container-7f61d80f iframe { position: absolute; top: 0; left: 0; width: 100%; height: 100%; border: 0; } clock clock iconcutlery cutlery iconflag flag iconfolder folder iconinstagram instagram iconpinterest pinterest iconfacebook facebook iconprint print iconsquares squares iconheart heart iconheart solid heart solid icon
Brownie Batter Chocolate Hummus

Brownie Batter Chocolate Hummus


  • Autor: Kimberly
  • Dauer: 10 min
  • Portionen: 4

Description

Empfohlenes Equipment

  • Küchenmaschine
  • sieve

Zutaten

EINHEITEN MENGE
  • 265 g canned chickpeas, drained
  • 2 tbsp tahini
  • 60 g unsweetened cocoa powder
  • 4 tbsp date syrup
  • 1 tsp vanilla extract
  • 1/4 tsp salt
  • 2 tbsp coconut oil
  • 2 tbsp milk of choice
  • 1/2 cup ice cubes
  • fruits of your choice for dipping - strawberries, bananas, apples...

ZUBEREITUNG

  • Drain the chickpeas and rinse them under cold water. Add them to a food processor.
  • Next, add tahini, vanilla, unsweetened cocoa powder, coconut oil, salt, date syrup, and milk. Blend on high speed until it forms a thick paste. Then, gradually add ice cubes. Just enough to make it super fluffy and creamy.
  • Transfer to a bowl and enjoy with your favorite fruits or cracker!!

Everything But The Bagel Seasoning

Everything But The Bagel Seasoning

Everything But The Bagel Seasoning

Everything But The Bagel Seasoning

February 10, 2025 by Kimberly

This crunchy, garlicky, toasty magic takes anything from basic to brilliant. Sprinkle it on eggs, avo toast, or even buttered bread, and suddenly, breakfast feels like a weekend brunch moment.

5 MINUTES

EINFACH

VEGAN

US AMERIKANISCH

11 TBSP (110g)


KNUSPRIGES

ALLTAG

TOPPING


GANZJÄHRIG

INFORMATIONEN

ÜBER DIESES REZEPT

If you’ve ever wished your food had that little extra something, this crunchy, garlicky, nutty magic – this is the answer. Inspired by the iconic everything bagel topping, this homemade blend is an absolute game-changer. Sprinkle it on avo toast, eggs, cottage cheese, or even a basic buttered bread slice – it instantly upgrades anything. And the best part? You can whip it up in minutes with pantry staples.

How to serve
This seasoning is the ultimate finishing touch for pretty much everything. Stir it into cream cheese for an instant dip, sprinkle it over popcorn for a salty-savory snack, or coat roasted veggies in olive oil and this mix before baking for an unreal crunch. It’s also a next-level game-changer for grilled cheese, scrambled eggs, and even fried rice.

How to store
Keep your seasoning blend fresh by storing it in an airtight jar in a cool, dry spot. It stays crunchy and flavorful for up to six months (if you don’t use it all before then). A quick shake before each use keeps the flavors evenly distributed.

Hi, I'm Kimberly!

Hi, ich bin Kimberly.

Meine Rezepte sind für alle, die an den Zauber von selbstgemachtem Essen glauben. An Butter, die auf warmem Brot schmilzt. An Lieblingsrezepte, die man weiterschenken möchte. Und an das stille Glück, das in einem einfachen, gut gemachten Gericht steckt. Willkommen an meinem Tisch,

Kimberly the Zett Signature

Wenn du mehr über mich erfahren möchtest, klicke hier!


Everything But The Bagel Seasoning
“Let’s make a piece of happiness”
Print
clock clock iconcutlery cutlery iconflag flag iconfolder folder iconinstagram instagram iconpinterest pinterest iconfacebook facebook iconprint print iconsquares squares iconheart heart iconheart solid heart solid icon
Everything But The Bagel Seasoning

Everything But The Bagel Seasoning


  • Autor: Kimberly
  • Dauer: 5 min
  • Portionen: 110g / 11 tbsp

Description

Empfohlenes Equipment

  • small bowl
  • airtight container

Zutaten

  • 6 tsp white sesame seeds
  • 5 tsp dried minced onion
  • 4 tsp black sesame seeds
  • 4 tsp dried minced garlic
  • 4 tsp sea salt
  • 3 tsp poppy seeds

ZUBEREITUNG

Add all spices to a bowl, mix well, and transfer to an airtight container.

  • Prep Time: 5 min

Baked Falafel

Baked Falafel

Baked Falafel

Baked Falafel

February 2, 2025 by Kimberly

Crispy on the outside, soft and herby inside! These golden bites are the ultimate flavor bomb. Packed with chickpeas, garlic, and spices, they’re the kind of snack you’ll keep reaching for.

40 MINUTES

EINFACH

VEGAN

MITTLERER OSTEN

24 FALAFEL BALLS

KNUSPRIGES

PICKNICK

SNACKS

GANZJÄHRIG

INFORMATIONEN

ÜBER DIESES REZEPT

Golden, crispy, and packed with bold flavors!! These herby chickpea bites are everything you want in a falafel, minus the frying. They’re light but satisfyingly crunchy, loaded with garlic, cumin, and fresh herbs for that perfect balance of flavor. Whether you stuff them in a warm pita, toss them over a fresh salad, or dip them in creamy tahini sauce, they’re the kind of meal that feels both nourishing and indulgent. And the best part? They’re baked, not fried, so you get all the crunch without the extra oil.

How to serve
These little crispy gems are beyond versatile! Tuck them into warm pita with fresh veggies and a drizzle of tahini for a classic falafel wrap. Throw them over a big salad with cucumbers, tomatoes, and a lemony dressing for a light but filling meal. Or just dunk them straight into hummus (no judgment here). Want to level it up? Pair them with roasted veggies, herby yogurt sauce, or even a spicy harissa dip.

How to store
Got leftovers? Pop them in an airtight container in the fridge for up to 4 days. Reheat them in the oven or air fryer at 180°C (350°F) for about 5 minutes to keep that crispy magic alive. For long-term storage, freeze them on a baking sheet before transferring them to a bag – just bake straight from frozen when you’re ready!

Hi, I'm Kimberly!

Hi, ich bin Kimberly.

Meine Rezepte sind für alle, die an den Zauber von selbstgemachtem Essen glauben. An Butter, die auf warmem Brot schmilzt. An Lieblingsrezepte, die man weiterschenken möchte. Und an das stille Glück, das in einem einfachen, gut gemachten Gericht steckt. Willkommen an meinem Tisch,

Kimberly the Zett Signature

Wenn du mehr über mich erfahren möchtest, klicke hier!


Baked Falafel
Baked Falafel
Baked Falafel
Baked Falafel
“Let’s make a piece of happiness”
Print
.tasty-recipe-responsive-iframe-container-d95e8b1e { position: relative; overflow: hidden; padding-top: 56.3%; } .tasty-recipe-responsive-iframe-container-d95e8b1e iframe { position: absolute; top: 0; left: 0; width: 100%; height: 100%; border: 0; } clock clock iconcutlery cutlery iconflag flag iconfolder folder iconinstagram instagram iconpinterest pinterest iconfacebook facebook iconprint print iconsquares squares iconheart heart iconheart solid heart solid icon
Baked Falafel

Baked Falafel


  • Autor: Kimberly
  • Dauer: 12-24 hrs + 40 min
  • Portionen: 24 falafel balls

Description

Empfohlenes Equipment

  • medium mixing bowl
  • Küchenmaschine
  • small cookie scoop (or tablespoon)

Zutaten

EINHEITEN MENGE
  • 250 g dry chickpeas
  • 2 EL Olivenöl
  • 2 tsp baking powder
  • 5 g fresh parsley
  • 5 g fresh cilantro
  • 5 leaves fresh mint
  • 1 yellow onion
  • 4 garlic cloves
  • 1 tsp salt
  • 1 tsp paprika
  • 1 tsp cumin
  • 1 tsp za'atar
  • 1/2 tsp white pepper

ZUBEREITUNG

  1. Soak the dried chickpeas in 750ml (3 cups) of cold water for about 12-24 hours and store them in the fridge. The next day, drain, rinse, and let them sit for a moment to remove excess water. Preheat the oven to 220°C / 428°F (fan-assisted).
  2. Add the chickpeas along with the other ingredients to a food processor and blend until you get a crumbly yet moldable mixture. Use a small cookie scoop to shape the mixture into 30g/1oz falafel balls and place them on a baking sheet lined with parchment paper. Bake for about 25-30 minutes until golden brown.
  • Passive Time: 12-24 hrs
  • Cook Time: 40 min

Cinnamon Swirl Pancakes with Cream Cheese Frosting

Cinnamon Swirl Pancakes with Cream Cheese Frosting

Cinnamon Swirl Pancakes with Cream Cheese Frosting

Cinnamon Swirl Pancakes with Cream Cheese Frosting

December 27, 2024 by Kimberly

These fluffy pancakes with a dreamy cinnamon swirl and creamy frosting hit differently – like your favorite café breakfast, but homemade. Sweet, cozy vibes with every bite, perfect for lazy mornings or brunch.

25 MINUTES

EINFACH

VEGETARISCH

INT.

450 PER PORTION

SÜßES
KUSCHELIGES

ALLTAG

FRÜHSTÜCK

HERBST
WINTER

INFORMATIONEN

ÜBER DIESES REZEPT

Imagine this: a stack of fluffy, golden pancakes, swirled with a rich, caramelized cinnamon filling and topped with a silky cream cheese frosting. It’s like the lovechild of your favorite cinnamon rolls and café-style pancakes. These pancakes bring a mix of indulgence and cozy comfort to your weekend mornings without the fuss. Perfect for brunch, date mornings, or when you want to impress yourself. So easy, yet so extra.

How to serve
Serve these pancakes warm and stacked high. Drizzle a little extra cream cheese frosting on top for those irresistible slow-dripping vibes, and sprinkle with a dash of cinnamon. If you’re feeling fancy, a splash of maple syrup doesn’t hurt. Pair them with a steaming cup of coffee, chai latte, or even hot cocoa for the ultimate breakfast experience. These pancakes are brunch perfection, ready to elevate any slow morning.

How to store
Store leftover pancakes in an airtight container in the fridge for up to 2 days. Reheat gently in the microwave or a non-stick pan over low heat. Keep the frosting separate, in the fridge, and add it fresh when serving to maintain its creamy texture.

Hi, I'm Kimberly!

Hi, ich bin Kimberly.

Meine Rezepte sind für alle, die an den Zauber von selbstgemachtem Essen glauben. An Butter, die auf warmem Brot schmilzt. An Lieblingsrezepte, die man weiterschenken möchte. Und an das stille Glück, das in einem einfachen, gut gemachten Gericht steckt. Willkommen an meinem Tisch,

Kimberly the Zett Signature

Wenn du mehr über mich erfahren möchtest, klicke hier!


Cinnamon Swirl Pancakes with Cream Cheese Frosting
“Let’s make a piece of happiness”
Print
.tasty-recipe-responsive-iframe-container-df782b5e { position: relative; overflow: hidden; padding-top: 56.3%; } .tasty-recipe-responsive-iframe-container-df782b5e iframe { position: absolute; top: 0; left: 0; width: 100%; height: 100%; border: 0; } clock clock iconcutlery cutlery iconflag flag iconfolder folder iconinstagram instagram iconpinterest pinterest iconfacebook facebook iconprint print iconsquares squares iconheart heart iconheart solid heart solid icon
Cinnamon Swirl Pancakes with Cream Cheese Frosting

Cinnamon Swirl Pancakes with Cream Cheese Frosting


  • Autor: Kimberly
  • Dauer: 25 min
  • Portionen: 4-6

Description

Empfohlenes Equipment

  • mixing bowl
  • whisk
  • two small bowls
  • piping bag
  • large pan

Zutaten

EINHEITEN MENGE
PANCAKE BATTER
  • 1 egg
  • 55 g neutral oil
  • 1 tbsp white sugar
  • pinch of salt
  • 250 milliliter full-fat milk
  • 2 tsp baking powder
  • 200 g all-purpose flour
  • 1-2 tbsp butter for frying
CINNAMON SWIRL
  • 60 g butter
  • 50 g brown sugar
  • 1 tbsp cinnamon
CREAM CHEESE FROSTING
  • 100 g cream cheese
  • 1.5 tbsp milk
  • 1 tbsp lemon juice
  • 20 g powdered sugar

ZUBEREITUNG

  1. For the pancake batter, whisk the egg with sugar, canola oil, salt, and milk in a large bowl until well combined. Then add the flour and baking powder, and mix everything thoroughly with a whisk until you get a smooth batter. Set the batter aside briefly.
  2. For the cinnamon swirl, combine the room-temperature soft butter (don’t melt it in the microwave or on the stove, otherwise, the consistency will be too runny, and the swirl will lose its shape when cooked) with brown sugar and cinnamon in a small bowl. Put the mixture into a piping bag or a plastic bag and set it aside.
  3. For the frosting, mix powdered sugar, cream cheese, milk, and lemon juice in a bowl until smooth. Add a little more milk if you need a runnier consistency. Set this aside as well.
  4. Heat a large pan over medium heat and add a small piece of butter. Once the butter forms small bubbles, spoon 1-1.5 tablespoons of batter per pancake into the pan. Let them cook briefly until the pancakes start forming small bubbles around the edges.
  5. Now, cut a small hole in the piping bag with the butter-sugar-cinnamon mixture. Pipe the mixture onto the pancakes in a swirl pattern. Cover the pan with a lid and let the pancakes finish cooking on the lowest heat setting until fully cooked through. Important: Don’t flip the pancakes! Otherwise, the swirl will disappear.
  6. Carefully remove the finished pancakes from the pan, spread them with the cream cheese frosting, and enjoy!
  • Passive Time:
  • Cook Time: 25 min

de_DEDeutsch