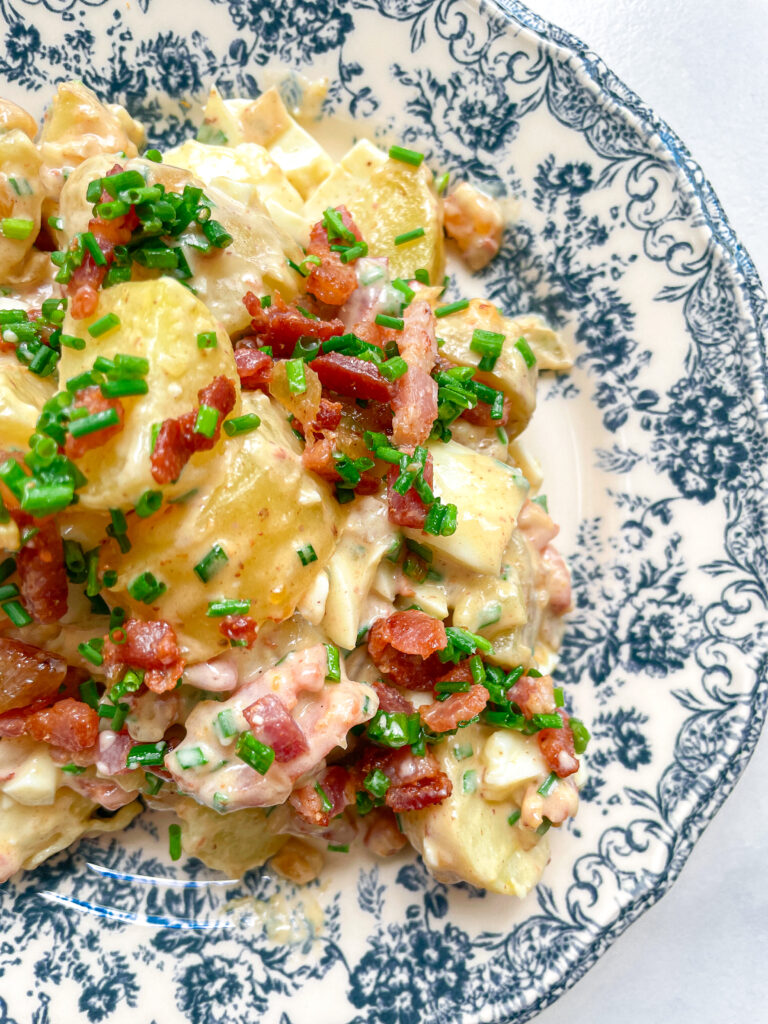
Potato Salad with Eggs Bacon Pickles & Caramalized Onions

Potato Salad with Eggs Bacon Pickles & Caramalized Onions

Potato Salad with Eggs Bacon Pickles & Caramalized Onions

Potato Salad with Eggs Bacon Pickles & Caramalized Onions

November 24, 2024 by Kimberly

Dive into a delicious story with our creamy potato salad! Imagine boiled eggs, smoky bacon, tangy pickles, and sweet caramelized onions coming together for a magical taste in every bite.

This website uses affiliate links which may earn commission for purchases made at no additional cost to you.

TOTAL TIME

1 hr + 20 min

SERVES

8 portions

DIET

omnivore

EVERY RECIPE DESERVES

A Little Love Letter

Step into a world of flavor with this Potato Salad featuring the perfect quartet of ingredients – eggs, bacon, pickles, and caramelized onions. This delightful twist on a classic dish promises a harmonious blend of creamy textures and mouthwatering tastes.

Present this Potato Salad on a festive platter, allowing the vibrant colors and aromas to captivate your guests. Garnish with fresh chives for a burst of color. Ideal as a side dish for barbecues or picnics, this salad also shines as a standalone star at family gatherings. Serve chilled and watch as each forkful becomes a symphony of flavors. 

To maintain the salad’s freshness, store any leftovers in an airtight container in the refrigerator for up to three days. Gently toss before serving to restore its creamy consistency. While this salad is best enjoyed fresh, you can prepare it a day ahead and refrigerate, adding the bacon just before serving to retain its crispiness.

Hi, I'm Kimberly!

Hi, I'm Kimberly.

A hopeless romantic when it comes to food. Every recipe I share is a love letter to food itself. I’m so glad you’re here. Make yourself at home and stay a while.

Love,
Kimberly

Kimberly the Zett Signature

If you want to get to know me better,
click here!


Potato Salad with Eggs Bacon Pickles & Caramalized Onions

LET’S MAKE A PIECE OF HAPPINESS

Print
clock clock iconcutlery cutlery iconflag flag iconfolder folder iconinstagram instagram iconpinterest pinterest iconfacebook facebook iconprint print iconsquares squares iconheart heart iconheart solid heart solid icon
Potato Salad with Eggs Bacon Pickles & Caramalized Onions

Potato Salad with Eggs Bacon Pickles & Caramalized Onions


5 Stars 4 Stars 3 Stars 2 Stars 1 Star

No reviews

  • Author: Kimberly
  • Total Time: 80 min
  • Yield: 8 portions 1x

Description

RECOMMENDED EQUIPMENT
  • sharp knife
  • chopping board
  • peeler
  • large pot
  • small pot
  • large pan
  • large salad bowl
  • medium bowl

Ingredients

Units Scale
SALAD COMPONENTS
  • 1 kilogramm potatoes
  • 250 grams bacon
  • 200 grams onion
  • 1 tbsp butter
  • 150 grams pickles
  • 8 eggs
DRESSING
  • 200 grams mayonnaise
  • 4-6 tbsp white wine vinegar
  • 3 tbsp chives
  • 4 tsp Dijon mustard
  • salt & pepper to taste

Instructions

PREPARATIONS

  • Peel the potatoes and cut into medium-sized pieces.
  • Peel the onions and cut into small pieces.
  • Cut the pickles into small pieces.
  • Cut the chives into small rolls.

INSTRUCTIONS

  1. Cook the potatoes in a large pot filled with salted water until done.
  2. Meanwhile, fill a small pot with water and bring to the boil. As soon as the water boils, add the eggs and cook for 8 minutes until firm. Drain the potatoes and eggs and set both aside to cool. It’s best to let the eggs cool in an ice bath to prevent them from cooking further.
  3. Caramelize the onions in 1 tbsp butter and a bit of salt in a pan for about 30 minutes. Remove the onions from the pan and fry the bacon until crispy. There may be a residue – the best way to deglaze this is with a dash of white wine or stock to release the wonderful aromas from the bottom of the pan.
  4. Now peel the eggs and separate the yolks from the whites. Cut the egg whites into small pieces and set aside. Place the egg yolks in a medium-sized bowl. Add the fried bacon, caramelized onions, chives, pickles, dijon mustard, mayonnaise and white wine vinegar to the bowl. Stir everything together and season to taste with salt and pepper. Fold in the chopped egg white pieces. The mixture should taste very over-seasoned, as the potatoes will take away a lot of the flavor when they are mixed in later.
  5. When the potatoes are cooled cut them in coarse pieces, add them to the salad cream and mix everything well. Season to taste and serve.
  • Prep Time: 20 min
  • Passive Time: 40 min
  • Cook Time: 20 min

CRAVING MORE?

Follow along here & don’t forget to subscribe to my substack!

Pink Grapefruit Cardamom Chutney

Pink Grapefruit Cardamom Chutney

Pink Grapefruit Cardamom Chutney

Pink Grapefruit Cardamom Chutney

October 30, 2024 by Kimberly

A chutney that brings out the best in so many dishes – sweet, tangy, and spiced with cardamom, this pink grapefruit version adds a unique twist to meals from brunch spreads to savory dinners!

This website uses affiliate links which may earn commission for purchases made at no additional cost to you.

TOTAL TIME

1 hr + 20 min

SERVES

8 tbsp

DIET

vegan

EVERY RECIPE DESERVES

A Little Love Letter

Imagine a chutney that surprises you with every bite – a unique mix of pink grapefruit, cardamom, ginger & cinnamon balancing sweetness and spice in the freshest way. It’s a versatile addition that shines on breakfast toast, pairs perfectly with your favorite cheese board, and even makes savory dishes like grilled meats and veggies pop with vibrant flavor. With a quick prep and simple ingredients, it’s a recipe you’ll love making again and again for that extra zing.

This chutney works wonders as a dipping sauce, spread, or finishing touch. Try it with cheeses like brie or goat cheese for a dreamy pairing that feels just a bit gourmet. It’s delicious alongside roasted chicken or even mixed into a salad dressing for a twist. If you’re in the mood for brunch vibes, layer it on toast with cream cheese or as a sandwich spread – honestly, it’s so versatile, you’ll find yourself using it with everything! For an extra flavor boost, try swapping regular oil with my Grapefruit Oil!

Keep this chutney fresh by storing it in an airtight container in the fridge for up to two weeks. The flavors deepen over time, so it only gets better with each passing day. Just give it a stir before serving to rediscover that zingy brightness!

Hi, I'm Kimberly!

Hi, I'm Kimberly.

A hopeless romantic when it comes to food. Every recipe I share is a love letter to food itself. I’m so glad you’re here. Make yourself at home and stay a while.

Love,
Kimberly

Kimberly the Zett Signature

If you want to get to know me better,
click here!


Pink Grapefruit Cardamom Chutney

LET’S MAKE A PIECE OF HAPPINESS

Print
clock clock iconcutlery cutlery iconflag flag iconfolder folder iconinstagram instagram iconpinterest pinterest iconfacebook facebook iconprint print iconsquares squares iconheart heart iconheart solid heart solid icon
Pink Grapefruit Cardamom Chutney

Pink Grapefruit Cardamom Chutney


  • Author: Kimberly
  • Total Time: 80 min
  • Yield: 8 1x

Description

Recommended Equipment

  • sharp knife
  • cutting board
  • small pot
  • jar with a screw-top lid

Ingredients

Units Scale
  • 2 pink grapefruits
  • 1-2 tbsp oil
  • 1 red onion
  • 1 tsp ginger, grated
  • 1 tsp cardamon, ground
  • 1 cinnamon stick
  • 100 grams brown sugar
  • 50 milliliters apple cider vinegar
  • 1 fresh chili pepper
  • pinch of salt

Instructions

PREPARATIONS

  • Rinse a screw-top jar with boiling water and let it drain. Set aside until the chutney is ready to be poured in. The jar should be large enough to hold about 200g.

INSTRUCTIONS

  1. Peel the grapefruits and remove the flesh, making sure to get rid of all the bitter white skin. Cut the fruit segments into small pieces, separating as much of the transparent skin as possible. Set aside.
  2. Peel the onion and ginger. Dice the onion into small pieces and finely chop or grate the ginger. Sauté both with a cinnamon stick and 1 tsp ground cardamom in a pot with 1-2 tbsp of oil over medium heat until the onion softens and the spices become fragrant. Meanwhile, chop the fresh chili pepper into small pieces and add it to the pot.
  3. Next, add the brown sugar to the pot and bring it to a low boil until the sugar melts.
  4. Now, add the grapefruit pieces, apple cider vinegar, and salt to the pot, stirring well. Let everything simmer on low heat for about 20 minutes until it starts to thicken. Adjust seasoning to taste, remove the cinnamon stick, and transfer the chutney to the jar. Seal and allow it to cool completely.
  • Prep Time: 5 min
  • Passive Time: 60 min
  • Cook Time: 15 min

CRAVING MORE?

Follow along here & don’t forget to subscribe to my substack!

White Chocolate Cookies with Blue Spirulina Butter Cream Frosting

White Chocolate Cookies with Blue Spirulina Butter Cream Frosting

White Chocolate Cookies with Blue Spirulina Butter Cream Frosting

White Chocolate Cookies with Blue Spirulina Butter Cream Frosting

October 22, 2024 by Kimberly

Imagine biting into soft, buttery cookies with creamy frosting that’s as vibrant as the sky. These dreamy bites combine sweet indulgence with a fun, colorful twist that feels like pure joy!

This website uses affiliate links which may earn commission for purchases made at no additional cost to you.

TOTAL TIME

1 hr + 30 min

SERVES

12 cookies

DIET

vegetarian

EVERY RECIPE DESERVES

A Little Love Letter

Ready to level up your cookie game? These soft, melt-in-your-mouth treats bring together creamy white chocolate and a frosting that’s as eye-catching as it is delicious. The vibrant blue spirulina frosting not only adds a pop of color but also gives a playful, natural twist to the classic buttercream. Perfect for making an impression at parties or just when you’re craving something special, these cookies are the kind of treat that feels like a celebration with every bite.

These cookies are best served at room temperature, giving that perfect balance between a tender bite and creamy frosting. They’re ideal for a dessert table or as a show-stopping treat for a special occasion. You can serve them alongside a cup of tea, coffee, or even milk for the ultimate comfort experience. And let’s be real, they make for a pretty impressive addition to any cookie swap or holiday gathering.

To keep these cookies fresh, store them in an airtight container in the fridge for up to a 5 days. You can also freeze them (without the frosting) for up to a month and just whip up the buttercream fresh when you’re ready to serve.

Hi, I'm Kimberly!

Hi, I'm Kimberly.

A hopeless romantic when it comes to food. Every recipe I share is a love letter to food itself. I’m so glad you’re here. Make yourself at home and stay a while.

Love,
Kimberly

Kimberly the Zett Signature

If you want to get to know me better,
click here!


White Chocolate Cookies with Blue Spirulina Butter Cream Frosting

LET’S MAKE A PIECE OF HAPPINESS

Print
clock clock iconcutlery cutlery iconflag flag iconfolder folder iconinstagram instagram iconpinterest pinterest iconfacebook facebook iconprint print iconsquares squares iconheart heart iconheart solid heart solid icon
White Chocolate Cookies with Blue Spirulina Butter Cream Frosting

White Chocolate Cookies with Blue Spirulina Butter Cream Frosting


  • Author: Kimberly
  • Total Time: 1 hr + 30 min
  • Yield: 12 1x

Description

Recommended Equipment

  • small pot (or microwave)
  • two medium-sized bowls
  • whisk
  • spatula
  • sharp knife
  • cutting board
  • cookie scoop
  • parchment paper

Ingredients

Units Scale
COOKIE DOUGH
  • 120 grams butter
  • 100 grams brown sugar
  • 100 grams white sugar
  • 2 tsp vanilla extract
  • 1 egg
  • 220 grams all-purpose flour
  • 1/2 tsp salt
  • 1/2 tsp baking soda
  • 150 grams white chocolate
BUTTERCREAM
  • 200 grams butter
  • 300 grams powdered sugar
  • 1 tbsp heavy cream
  • 1 tsp blue spirulina powder

Instructions

  1. Melt the butter in a small pot or microwave. In a medium-sized bowl, whisk together the melted butter, brown and white sugar, and vanilla extract for a few minutes. Then add the egg and mix again. Set aside.
  2. In another bowl, mix together the flour, baking soda, and salt. Set aside.
  3. Roughly chop the white chocolate and add it to the wet ingredients as well as the dry ingredients. Then mix with a spatula until there are no more visible streaks of flour.
  4. Use a medium-sized cookie scoop to form 12 evenly sized dough balls and place them on parchment paper. Chill the dough balls in the fridge for at least 1 hour.
  5. A few minutes before baking, preheat the oven to 150°C / 302°F. Place the cookies on a parchment-lined baking sheet, leaving enough space between them, and bake for 12-13 minutes or until the edges are lightly golden. Take them out of the oven and let them cool on a rack for about 10 minutes.
  6. Now, make the frosting. I recommend preparing it once the cookies have reached room temperature so the buttercream doesn’t melt when adding to the cookies. In a mixing bowl, beat the softened butter with an electric mixer until smooth and nearly white.
  7. Gradually add the powdered sugar, starting on low speed and then increasing to medium, mixing for 1 to 2 minutes until fully combined.
  8. Mix the cream with the spirulina powder and add it to the buttercream. Stir everything together until you get a vibrant blue color. Fill a piping bag with the buttercream, and once the cookies have cooled to room temperature, decorate them. Alternatively, you can spread the buttercream with a knife. Optionally, sprinkle a bit of spirulina powder on top of the frosting.
  • Passive Time: 1 hr + 20 min
  • Cook Time: 12 min

CRAVING MORE?

Follow along here & don’t forget to subscribe to my substack!

Pumpkin Oil

Pumpkin Oil

Pumpkin Oil

Pumpkin Oil

October 12, 2024 by Kimberly

This rich oil is infused with the essence of pumpkin, adding a velvety warmth and earthy sweetness to any dish. Perfect for drizzling on salads, soups, or roasted veggies!

This website uses affiliate links which may earn commission for purchases made at no additional cost to you.

TOTAL TIME

65 min

SERVES

1 cup / 250 ml

DIET

vegan

EVERY RECIPE DESERVES

A Little Love Letter

Pumpkin-infused oil is a total game-changer for your fall dishes! It’s packed with the natural flavors and warmth of pumpkin, giving a subtle, earthy sweetness to everything it touches. Whether you’re drizzling it over a fresh salad, using it as a finishing oil for soups, or adding a luxurious touch to roasted veggies, this infused oil brings a comforting, cozy vibe to any meal. Plus, it’s super easy to make at home and keeps your cooking fresh and seasonal.

You’ll love using this pumpkin-infused oil as a finishing touch! Drizzle it over a hearty bowl of soup, use it to elevate your favorite salads, or even toss roasted veggies in it for an extra layer of fall flavor. The velvety richness and beautiful color also make it perfect for adding a gourmet vibe to your meals without any fuss. Experiment with it as a dip for bread or mix it into your favorite dressings! Maybe you want to try it out with this Pumpkin Tarte Flambée with Bacon Walnuts Gorgonzola & Lamb’s Lettuce.

Store your pumpkin-infused oil in a clean, airtight bottle or jar, and keep it in a cool, dark place, like a pantry. It should last for about 1-2 months, but make sure to give it a good shake before using to keep the flavors mixed.

Hi, I'm Kimberly!

Hi, I'm Kimberly.

A hopeless romantic when it comes to food. Every recipe I share is a love letter to food itself. I’m so glad you’re here. Make yourself at home and stay a while.

Love,
Kimberly

Kimberly the Zett Signature

If you want to get to know me better,
click here!


Pumpkin Oil
Pumpkin Oil
Pumpkin Oil
Pumpkin Oil

LET’S MAKE A PIECE OF HAPPINESS

Print
clock clock iconcutlery cutlery iconflag flag iconfolder folder iconinstagram instagram iconpinterest pinterest iconfacebook facebook iconprint print iconsquares squares iconheart heart iconheart solid heart solid icon
Pumpkin Oil

Pumpkin Oil


  • Author: Kimberly
  • Total Time: 65 min
  • Yield: 1 cup / 250 ml 1x

Description

This recipe uses affiliate links which may earn commission for purchase made at no additional cost to you.

RECOMMENDED EQUIPMENT


Ingredients

Units Scale
  • 150 grams hokkaido pumpkin
  • 250 milliliters oil

Instructions

  1. Chop the pumpkin in half and scrape out all the seeds. Cut the flesh into coarse pieces and put them into the blender. Pour in the oil. Blend on the highest setting until it becomes a thick consistency and no coarse pieces of pumpkin are longer visible.
  2. Pour the mixture from the blender into a medium-sized pot and heat it over medium heat, constantly stirring, to a temperature of about 102°-103°C (215°-217°F). Then, let the oil simmer with the lid partially on for the next 30 minutes. Stir only occasionally, making sure the temperature remains steady and nothing gets burned. The cooking time is essential for all the water to evaporate. You’ll know all the water has evaporated when the oil in the pot barely bubbles anymore – so if it’s still bubbling vigorously, keep it simmering.
  3. At the end of the cooking process, prepare a bowl large enough to fit the medium-sized pot, filled with cold water and a handful of ice cubes. Also, hang a fine mesh sieve strainer over a medium-sized bowl.
  4. Now, place the pot in the ice water and stir to stop the cooking process. Once the oil is almost cold, remove the pot from the water and pour the oil into the first fine mesh sieve to catch the coarse particle.
  5. Then, pour the oil into the second fine mesh sieve, which you before equipped with a coffee filter, to catch the remaining finer particles.
  6. Allow the oil to drip through for about 30 minutes or maybe less depending on how many remaining particles are in the coffee filter. Once all the oil has passed through the coffee filter, transfer the collected amount of oil into an oil bottle. Store in the refrigerator for up to 1-2 weeks.
  • Prep Time: 5 min
  • Passive Time: 30 min
  • Cook Time: 30 min

CRAVING MORE?

Follow along here & don’t forget to subscribe to my substack!

Tomato Soup & Caramalized Onion Grilled Cheese Sandwich

Tomato Soup & Caramalized Onion Grilled Cheese Sandwich

Tomato Soup & Caramalized Onion Grilled Cheese Sandwich

Tomato Soup & Caramalized Onion Grilled Cheese Sandwich

October 6, 2024 by Kimberly

This is not your typical tomato soup…Imagine cozying up with a velvety, rich soup layered with additional bold flavors like carrots and red wine. Pair this with a gooey, melty onion-studded sandwich and you’ve got pure comfort with a gourmet twist.

This website uses affiliate links which may earn commission for purchases made at no additional cost to you.

TOTAL TIME

1 hr + 20 min

SERVES

4 portions

DIET

vegetarian

EVERY RECIPE DESERVES

A Little Love Letter

There’s nothing like a comforting bowl of tomato soup – except when it’s taken to the next level! This version is bursting with extra flavors from sweet carrots, rich tomato paste, and a splash of red wine, making each spoonful deeply satisfying and a little more gourmet than your everyday soup. Paired with a gooey grilled cheese sandwich layered with caramelized onions, it’s the perfect cozy meal that will make you feel like you’re indulging in something truly special.

Serve this soup hot, with a side of crispy grilled cheese fresh from the pan. The soft caramelized onions in the sandwich bring a sweetness that balances perfectly with the rich, slightly tangy soup. For an added touch, top your soup with a drizzle of cream or olive oil, or even some fresh herbs for a pop of color and flavor. This combo is perfect for a chilly evening in, or a quick but luxurious lunch.

Leftovers? No problem! Keep the soup in an airtight container in the fridge for up to three days, and reheat gently on the stove to preserve its rich flavors. The grilled cheese is best fresh, but you can revive it in a hot pan for a quick crisp-up.

Hi, I'm Kimberly!

Hi, I'm Kimberly.

A hopeless romantic when it comes to food. Every recipe I share is a love letter to food itself. I’m so glad you’re here. Make yourself at home and stay a while.

Love,
Kimberly

Kimberly the Zett Signature

If you want to get to know me better,
click here!


Tomato Soup & Caramalized Onion Grilled Cheese Sandwich

LET’S MAKE A PIECE OF HAPPINESS

Print
clock clock iconcutlery cutlery iconflag flag iconfolder folder iconinstagram instagram iconpinterest pinterest iconfacebook facebook iconprint print iconsquares squares iconheart heart iconheart solid heart solid icon
Tomato Soup & Caramalized Onion Grilled Cheese Sandwich

Tomato Soup & Caramalized Onion Grilled Cheese Sandwich


  • Author: Kimberly
  • Total Time: 1 hour 20 minutes
  • Yield: 4 1x

Description

Recommended Equipment

  • large baking dish
  • sharp knife
  • cutting board
  • large pan
  • peeler
  • large pot
  • immersion blender (or stand mixer)

Ingredients

Units Scale
OVEN VEGGIES
  • 1 kilogram tomatoes (I used San Marzano)
  • 1 red bell pepper
  • 2 carrots
  • 2 shallots
  • 12 garlic cloves
  • 3 tbsp olive oil
  • salt
CARAMALIZED ONIONS FOR GRILLES CHEESE
  • 8 small white onions
  • 2 tsp butter
  • 1 tbsp balsamic vinegar
  • salt
SOUP BASE
  • 1 tsp butter
  • 4 small white onions
  • 1/2 tsp chili flakes
  • 2 tbsp tomato paste
  • 80 milliliters red wine
SOUP
  • 400 milliliters vegetable broth
  • 200 milliliters heavy cream (save some for garnish)
  • 10 grams fresh basil (save some for garnish)
  • salt, pepper & cayenne pepper to taste
GRILLED CHEESE
  • 8 slices bread of your choice (I used regular white flat breads)
  • 200 grams cheese of your choice (I used an cheddar & medium-aged gouda)
  • butter

Instructions

  1. Preheat your oven to 150°C / 300°F. Wash the tomatoes and bell peppers, then dry them well. Get a large baking dish ready. Quarter the tomatoes, remove the seeds from the bell peppers, and roughly chop them. Peel the carrots and cut them into large chunks too. Peel the shallots and garlic. Now, put everything in the baking dish, drizzle with a little olive oil and sprinkle some salt over the veggies. Toss them to coat evenly, then place the baking dish in the oven for 40 minutes. After 40 minutes, increase the temperature to 210°C / 410°F and roast for another 15 minutes.
  2. While the veggies are roasting, you can prepare the caramelized onions for the grilled cheese sandwiches. Peel the onions and slice them thinly. Add 1 teaspoon of butter to a large pan and let it melt. Add the onion slices, sprinkle a bit of salt on top, and cook on low heat, stirring regularly for about 10-15 minutes.
  3. Now, peel the onions for the soup base and cut them roughly. Set them aside. Pick the basil leaves from their stems, wash them, and dry them well. Set them aside too.
  4. After 10-15 minutes, the onions in the pan will have left some fond (browned bits) at the bottom. This is the time to add another teaspoon of butter and cook the onions for another 10-15 minutes. Once the onions are soft and golden brown, add a splash of balsamic vinegar and cook for another 1-2 minutes. Transfer the caramalized onions to a bowl and set the pan back on the stove to make the soup base.
  5. Add another teaspoon of butter to the pan and sauté the roughly chopped onions over medium heat. After a few minutes, add the chili flakes and stir well. After a few more minutes, stir in the tomato paste so that all the onions are coated evenly. Let it cook for a few minutes. Then, deglaze with the red wine and let it simmer until it reduces to a thick, creamy paste. Set the pan aside.
  6. Grab a large pot and transfer the roasted vegetables (along with any juices) into it once they’re done. Add the soup base from the pan, the vegetable broth, and the basil leaves. Use an immersion blender to blend everything until you reach the desired consistency. Finally, stir in the cream. Season the soup with salt, pepper, and cayenne to taste. Keep the soup on low heat and bring it to a simmer.
  7. Meanwhile, make the grilled cheese sandwiches. Heat a pan over low-medium heat. While the pan heats up, spread a thin layer of butter on the outside of each slice of bread. Grate the cheese. Place half of the buttered bread (butter side down) in the pan, then evenly distribute the cheese and caramelized onions on top. Cover the pan with a lid and wait for the cheese to start melting. Once it does, place the remaining slices of bread (butter side up) on top. Use a spatula to flip the sandwiches so they can brown on the other side.
  8. While the sandwiches are finishing, ladle the soup into bowls and optionally garnish with a drizzle of walnut oil, some cream, and fresh basil. Once the other side of the grilled cheese is crispy, take them out of the pan and cut them however you like – halves, triangles, strips, or small squares – depending on how you prefer them with your soup.
  • Cook Time: 80 min

CRAVING MORE?

Follow along here & don’t forget to subscribe to my substack!

Cinnamon Rolls

Cinnamon Rolls

Cinnamon Rolls

Cinnamon Rolls

October 2, 2024 by Kimberly

When the days get shorter and autumn rolls in, there’s nothing better than a tray of freshly baked cinnamon rolls. Soft yeast dough, cinnamon, sugar, and a creamy glaze make this recipe my ultimate comfort classic, one that has become a yearly tradition in our home. Cozy, indulgent, and just perfect for marking the start of fall. These cinnamon rolls are fluffy, sweet, and impossible to resist, filling your kitchen with the scent of warm spices. A bake that turns any chilly day into a cozy moment of pure comfort.

This website uses affiliate links which may earn commission for purchases made at no additional cost to you.

TOTAL TIME

100 min

SERVES

12 rolls

DIET

vegetarian

EVERY RECIPE DESERVES

A Little Love Letter

There are recipes that feel less like baking and more like holding onto a little piece of childhood. For me, that’s cinnamon rolls. As you might know, I was born and raised in Germany. And when I was a kid, American products were nowhere to be found in German stores. Reese’s? Never heard of them. Five Guys? Not a clue. We had amazing German bakeries, of course, where they offered raisin swirls, streusel buns, all sorts of cakes, breads, but never those soft, fluffy, cream-covered rolls I had only seen in American movies.

Even back then, I was already a little food enthusiast, but I couldn’t imagine what cinnamon rolls might taste like. Sweet and soft, for sure, but beyond that? So at some point, since they simply didn’t exist in Germany, I created my very own cinnamon roll recipe, exactly the way my childhood self would have dreamed them. Pillowy, fluffy, full of cinnamon and sugar, with a creamy glaze that melts into the warm rolls.

And maybe that’s why I love them so much to this day, because they carry that little spark of wonder with them. The rolls are delicious, of course, but they’re also a reminder that food can hold stories, dreams, and even a sense of belonging. It’s a recipe that turned from imagination into reality.

Today, they’ve become a tradition. Every autumn, I pull out this recipe again. The kitchen filling with the scent of cinnamon, everyone at home knowing that cinnamon roll season has officially begun. I love to enjoy them with a big latte or a German Eggnog, lit a cozy candle, and suddenly the world feels just a little more whole again.

Hi, I'm Kimberly!

Hi, I'm Kimberly.

A hopeless romantic when it comes to food. Every recipe I share is a love letter to food itself. I’m so glad you’re here. Make yourself at home and stay a while.

Love,
Kimberly

Kimberly the Zett Signature

If you want to get to know me better,
click here!


Cinnamon Rolls
Cinnamon Rolls
Cinnamon Rolls
Cinnamon Rolls

LET’S MAKE A PIECE OF HAPPINESS

Print
clock clock iconcutlery cutlery iconflag flag iconfolder folder iconinstagram instagram iconpinterest pinterest iconfacebook facebook iconprint print iconsquares squares iconheart heart iconheart solid heart solid icon
Cinnamon Rolls

Cinnamon Rolls


5 from 1 review

  • Author: Kimberly
  • Total Time: 100 min
  • Yield: 12 rolls 1x

Description

When the days get shorter and autumn rolls in, there’s nothing better than a tray of freshly baked cinnamon rolls. Soft yeast dough, cinnamon, sugar, and a creamy glaze make this recipe my ultimate comfort classic, one that has become a yearly tradition in our home. Cozy, indulgent, and just perfect for marking the start of fall. These cinnamon rolls are fluffy, sweet, and impossible to resist, filling your kitchen with the scent of warm spices. A bake that turns any chilly day into a cozy moment of pure comfort.

GOOD TO HAVE ON HAND

  • small bowl
  • small whisk
  • large bowl
  • plastic wrap
  • two medium bowls
  • rolling pin
  • sharp knife
  • baking dish
  • oven

Ingredients

Units Scale
DOUGH
  • 500 grams bread flour (in Germany that's Type 550)
  • 170 grams yogurt
  • 1/2 tsp salt
  • 1 egg
  • 130 milliliters full-fat milk
  • 1 tbsp white sugar
  • 21 grams fresh yeast
FILLING
  • 115 grams butter, room temperature
  • 150 grams brown sugar
  • 2 tbsp cinnamon
  • 1/4 tsp salt
  • 100 milliliters heavy cream
  • 50 milliliters cinnamon oil (optional)
FROSTING
  • 120 grams cream cheese
  • 120 grams powdered sugar
  • 50 grams butter, room temperature
  • 1 tsp vanilla extract
  • 1 tsp lemon juice

Instructions

  1. First, we activate the fresh yeast. Heat 130ml full-fat milk to a temperature between 32°C and 38°C (90°F to 100°F). Add 1 tbsp white sugar and stir well. Crumble in 21g fresh yeast and whisk until fully dissolved. Let the mixture sit for 5 minutes. You should see small bubbles forming on the surface by then.
  2. Meanwhile, in a large bowl, add 500g bread flour (Type 550 in Germany), 1/2 tsp salt, 170g yogurt, and 1 egg. Pour in the yeast mixture and stir everything together with a wooden spoon. Transfer the dough to a clean work surface and knead by hand for about 10–15 minutes. The goal is to get a smooth and elastic dough. Using an electric mixer will cut the time in half. The dough is ready when you can stretch a piece thin enough to let light through without tearing. Place the dough back in the bowl and cover it with plastic wrap to keep it from drying out. Let it rise in a warm, draft-free spot for about an hour until it doubles in size.
  3. In the meantime, prepare the filling. Mix together 115g room-temperature butter, 150g brown sugar, 2 tbsp cinnamon, and 1/4 tsp salt into a creamy mixture. Set it aside at room temperature.
  4. Next, prepare the frosting. Mix together 120g cream cheese, 120g powdered sugar, 50g room-temperature butter, 1 tsp vanilla extract, and 1 tsp lemon juice until smooth and creamy. Store in the fridge until ready to use.
  5. After the dough has risen for an hour, it should have doubled in size and is ready to work with. Prepare a large baking dish. Transfer the dough to a lightly floured, clean surface and roll it out to a 50×30 cm (about 20×12 inch) rectangle. Spread the butter-sugar-cinnamon mixture evenly over the dough. Then, cut the dough lengthwise into 12 equal strips. Roll each strip into a spiral and place them in the baking dish, forming 3 rows of 4 rolls. Let the rolls rise again for another 30 minutes.
  6. About 10 minutes before the rising time is up, preheat the oven to 190°C (375°F). Once the rolls have risen, pour 100ml heavy cream and, if you like, 50ml cinnamon oil in between the rolls. Bake for 20–25 minutes until the tops are golden brown. Be careful not to overbake them, as they may become dry.
  7. Remove the rolls from the oven and let them cool for about 10 minutes. Take the frosting out of the fridge and spread it evenly over the warm rolls. Enjoy!
  • Prep Time: 15 min
  • Passive Time: 60 min
  • Cook Time: 25 min

CRAVING MORE?

Follow along here & don’t forget to subscribe to my substack!