Caramelized Bacon Fried Goat Cheese Salad with Blackberry Balsamic Vinaigrette

Caramelized Bacon Fried Goat Cheese Salad with Blackberry Balsamic Vinaigrette

Caramelized Bacon Fried Goat Cheese Salad with Blackberry Balsamic Vinaigrette

Caramelized Bacon Fried Goat Cheese Salad with Blackberry Balsamic Vinaigrette

August 13, 2024 by Kimberly

Indulge in this irresistibly crunchy, savory-sweet salad that’s bursting with flavor. Each bite is a vibrant mix of textures and tastes, making it the ultimate comfort food meets gourmet delight.

This website uses affiliate links which may earn commission for purchases made at no additional cost to you.

TOTAL TIME

30 min

SERVES

2 portions

DIET

omnivore

EVERY RECIPE DESERVES

A Little Love Letter

Imagine sitting down to a salad that feels like a hug on a plate – some warm components, some crispy ones, and bursting with flavors that dance together perfectly. The savory crunch of caramelized bacon paired with the creamy, tangy goat cheese is an experience in itself. Add in the fresh burst of blackberries, crisp cucumber, and the subtle sweetness of pear, and you’ve got a dish that’s not just a salad but a full-on flavor journey.

This salad is perfect as a main dish or a side, but honestly, it’s so good you’ll want to make it the star of the meal. Serve it on a large platter, allowing all those gorgeous colors to pop. Drizzle the blackberry balsamic vinaigrette just before serving for that fresh, tangy finish. Pair it with a light white wine or sparkling water with a splash of lemon, and you’ve got yourself a meal that feels like a treat.

If you’ve got leftovers, store the salad and dressing separately to keep everything crisp and fresh. Place the salad in an airtight container in the fridge, and it should stay good for about 1-2 days. The vinaigrette can be stored in a jar for up to three days.

Hi, I'm Kimberly!

Hi, I'm Kimberly.

A hopeless romantic when it comes to food. Every recipe I share is a love letter to food itself. I’m so glad you’re here. Make yourself at home and stay a while.

Love,
Kimberly

Kimberly the Zett Signature

If you want to get to know me better,
click here!


Caramelized Bacon Fried Goat Cheese Salad with Blackberry Balsamic Vinaigrette

LET’S MAKE A PIECE OF HAPPINESS

Print
clock clock iconcutlery cutlery iconflag flag iconfolder folder iconinstagram instagram iconpinterest pinterest iconfacebook facebook iconprint print iconsquares squares iconheart heart iconheart solid heart solid icon
Caramelized Bacon Fried Goat Cheese Salad with Blackberry Balsamic Vinaigrette

Caramelized Bacon Fried Goat Cheese Salad with Blackberry Balsamic Vinaigrette


5 Stars 4 Stars 3 Stars 2 Stars 1 Star

No reviews

  • Author: Kimberly
  • Total Time: 30 min
  • Yield: 2

Description

Recommended Equipment

  • tall container
  • hand blender
  • sharp knife
  • cutting board
  • three deep plates
  • small frying pan
  • oven
  • salad bowl

Ingredients

Units Scale
VINAIGRETTE
  • 50 grams blackberries
  • 1 tbsp balsamic vinegar
  • 2 tbsp olive oil
  • 1 tbsp honey
  • 1 tsp Dijon mustard
  • 1 garlic clove
  • salt, pepper & cayennepepper to taste
GOAT CHEESE
  • 100 grams goat cheese
  • 2 tbsp all purpose flour
  • 1 egg
  • 2 tbsp breadcrumbs
  • 2 tbsp panko
  • 1 tsp dried thyme
  • clarified butter for frying
BACON
  • 50 grams bacon
  • brown sugar
SALAD
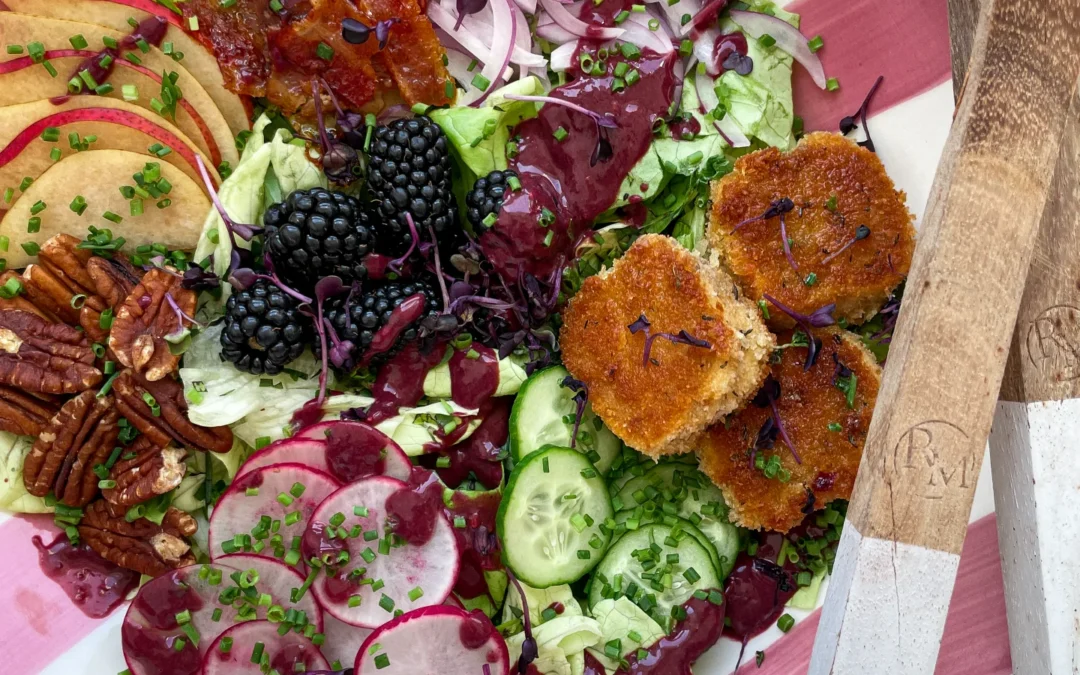
  • 150 grams mixed green salad
  • 50 grams blackberries
  • 1 small red onion
  • 2 tbsp pecan nuts
  • 1/4 cucumber
  • 1/2 pear
  • 2 radishes
  • chives

Instructions

  1. In a tall container, add all the ingredients for the vinaigrette and blend with a hand blender until you get a smooth dressing. If it seems too thick, you can add 1-2 tablespoons of cold water. Place it in the fridge until ready to use.
  2. Next, cut the salad into bite-sized pieces, wash thoroughly, and place in a salad bowl. Wash the chives thoroughly as well, and cut them into fine rings.
  3. Wash and dry the radishes, cucumber, and pear. Peel the red onion. Slice everything thinly and distribute over the salad, along with the blackberries.
  4. Preheat the oven to 180°C / 350°F. Lay the bacon strips on a sheet of baking paper and sprinkle each strip with about 1/2 teaspoon of brown sugar and a pinch of cayenne pepper. Bake for about 10 minutes or until the sugar has melted and caramelized.
  5. Now prepare three small deep plates. Fill the first one with wheat flour, beat an egg with salt in the second, and mix breadcrumbs, panko, and thyme in the third. Cut the goat cheese into thick slices, then coat each slice first in flour, then in the egg, and finally in the breadcrumb-panko mixture. Press everything down firmly.
  6. Take the bacon out of the oven and let it cool. Once cooled, tear it into pieces and sprinkle over the salad.
  7. Heat some clarified butter in a pan and fry the goat cheese rounds until crispy on all sides. Place them on the salad.
  8. Finally, sprinkle a bit of chives on top as a garnish. Drizzle the vinaigrette over the salad just before serving.
  • Cook Time: 30 min

CRAVING MORE?

Follow along here & don’t forget to subscribe to my substack!

Poppyseed Crepe with Lemon Pastry Cream & Blueberry Meringue

Poppyseed Crepe with Lemon Pastry Cream & Blueberry Meringue

Poppyseed Crepe with Lemon Pastry Cream & Blueberry Meringue

Poppyseed Crepe with Lemon Pastry Cream & Blueberry Meringue

August 11, 2024 by Kimberly

Delight in every bite with these poppyseed crepes! Filled with zesty lemon cream and topped with crunchy blueberry meringue, it’s like a sunny day wrapped up just for you.

This website uses affiliate links which may earn commission for purchases made at no additional cost to you.

TOTAL TIME

2 hrs + 30 min

SERVES

6 portions

DIET

vegetarian

EVERY RECIPE DESERVES

A Little Love Letter

Get ready to elevate your dessert game with these fabulous poppyseed crepes. Imagine the nutty crunch of poppyseeds paired with a tangy soft lemon pastry cream and a crunchy blueberry meringue on top. It’s a treat that’s perfect for a special Sunday dessert or impressing friends at brunch. Each bite is a delightful mix of flavors and textures that will make you feel like you’re dining at a chic café.

For a picture-perfect breakfast, fold the crepes elegantly and fill them with a generous dollop of lemon pastry cream and a swirl of blueberry sauce. Sprinkle some crunched blueberry meringue on top. A drizzle of honey and a few fresh blueberries will add the final touch.

To keep your poppyseed crepes fresh, store any leftovers in an airtight container in the fridge. They’ll stay good for about a day. You can also prepare everything in advance and enjoy them when you’re ready.

Hi, I'm Kimberly!

Hi, I'm Kimberly.

A hopeless romantic when it comes to food. Every recipe I share is a love letter to food itself. I’m so glad you’re here. Make yourself at home and stay a while.

Love,
Kimberly

Kimberly the Zett Signature

If you want to get to know me better,
click here!


Poppyseed Crepe with Lemon Pastry Cream & Blueberry Meringue

LET’S MAKE A PIECE OF HAPPINESS

Print
.tasty-recipe-responsive-iframe-container-5518dd0d { position: relative; overflow: hidden; padding-top: 56.3%; } .tasty-recipe-responsive-iframe-container-5518dd0d iframe { position: absolute; top: 0; left: 0; width: 100%; height: 100%; border: 0; } clock clock iconcutlery cutlery iconflag flag iconfolder folder iconinstagram instagram iconpinterest pinterest iconfacebook facebook iconprint print iconsquares squares iconheart heart iconheart solid heart solid icon
Poppyseed Crepe with Lemon Pastry Cream & Blueberry Meringue

Poppyseed Crepe with Lemon Pastry Cream & Blueberry Meringue


  • Author: Kimberly
  • Total Time: 2 hr + 30 min
  • Yield: 6

Description

Recommended Equipment

  • two small pots
  • vegetable peeler
  • medium-sized bowl
  • whisk
  • two mixing bowls
  • electric mixer
  • mortar & pestle
  • spatula
  • small frying pan
  • spatula

Ingredients

Units Scale
BATTER
  • 90 milliliters full-fat milk
  • 60 milliliters water
  • 1 egg
  • 1 tbsp melted butter
  • 1 tbsp poppyseeds
  • zest of 1/2 lemon
  • 60 grams all-purpose flour
  • 1/8 tsp salz
LEMON PASTRY CREAM
  • 90 milliliters full-fat milk
  • 90 milliliters heavy cream
  • 2 egg yolks
  • 50 grams white sugar
  • 1 tsp vanilla extract
  • 1 tbsp flour
  • zest of 1 lemon
BLUEBERRY MERINGUE
  • 2 egg whites
  • 100 grams white sugar
  • pinch of salt
  • 1/8 tsp cream of tartar
  • 1.5 tbsp freeze-dried blueberries
BLUEBERRY SAUCE
  • 100 grams frozen blueberries
  • juice of 1/2 lemon
  • 1 tsp white sugar
  • pinch of salt
TOPPINGS
  • fresh blueberries
  • honey

Instructions

  1. Start by preparing the blueberry meringue. Preheat the oven to 100°C (212°F) with the fan on. Separate two eggs and place the egg whites into a bowl. Save the yolks for later, as you’ll use them to make the lemon pastry cream. Add a pinch of salt and the cream of tartar to the egg whites. Measure out the sugar and set it aside in a small bowl. Using an electric hand mixer, beat the egg whites on medium to high speed until they start to stiffen. Gradually add the sugar while continuing to beat the mixture until the egg whites are creamy, firm, glossy, and snow-white.
  2. Prepare the blueberry powder. Use a mortar and pestle to grind the freeze-dried blueberries into a fine powder. Gently fold the powder into the egg white mixture using a spatula until the mixture turns a light lavender color.
  3. Shape the meringues. Line a baking sheet with parchment paper. Using two tablespoons, spoon the egg white mixture onto the parchment, forming six individual mounds. Place the baking sheet in the oven for about 2 hours.
  4. Make the crepe batter. In a mixing bowl, combine flour, salt, milk, water, egg, melted butter, lemon zest, and poppy seeds. Stir until smooth, then refrigerate the batter for about 30 minutes.
  5. Prepare the lemon cream. In a small pot, combine milk and cream. Use a peeler to remove large strips of zest from a lemon, ensuring they are big enough to remove later. Heat the pot over medium heat, stirring occasionally to prevent a skin from forming. Heat until it begins to steam. Remove from the heat and set aside.
  6. Mix the lemon pastry cream. In a heatproof glass or metal bowl, combine the reserved egg yolks with flour, sugar, and vanilla extract. Stir until you have a smooth, creamy mixture.
  7. Combine and cook the cream. Gradually pour the warm milk and cream mixture into the egg yolk mixture, stirring constantly. Rinse the pot and fill it halfway with water. Bring the water to a simmer over medium heat, then place the bowl with the cream mixture over the pot, creating a double boiler. Heat the mixture to about 78°C (172°F) while stirring continuously, until it thickens to a creamy consistency. Once thickened, remove the bowl from the heat. Cover the cream with plastic wrap, pressing it directly onto the surface to prevent a skin from forming, and refrigerate.
  8. Prepare the blueberry sauce. In a small pot, combine the frozen blueberries with lemon juice, sugar, and a pinch of salt. Simmer over medium heat until the blueberries release their juices. Set aside.
  9. Cool the meringues. Once the meringues have finished baking, remove them from the oven and allow them to cool slightly.
  10. Cook the crepes. Heat a 20cm (8-inch) frying pan over medium heat. Add a small amount of butter, then wipe out the excess with a paper towel, leaving only a thin film. Pour about 4 tablespoons of batter into the pan, swirling quickly to spread it evenly. Cook for 1-2 minutes on one side, then flip and cook for another 30 seconds to 1 minute. Repeat with the remaining batter.
  11. Assemble the dish. Spread lemon pastry cream over each crepe, fold in half, then fold again to form a triangle. Drizzle the blueberry sauce over the crepes, crumble one meringue over each serving, and garnish with fresh blueberries and a drizzle of honey. Enjoy immediately!
  • Passive Time: 1 hr 30 min
  • Cook Time: 60 min

CRAVING MORE?

Follow along here & don’t forget to subscribe to my substack!

Red Bell Pepper Oil

Red Bell Pepper Oil

Red Bell Pepper Oil

Red Bell Pepper Oil

August 8, 2024 by Kimberly

Feel the warmth and zest of Mediterranean cuisine with this aromatic red pepper oil. Perfect for drizzling on salads, pastas, or grilled veggies, it’s pure culinary bliss!

This website uses affiliate links which may earn commission for purchases made at no additional cost to you.

TOTAL TIME

70 min

SERVES

1 cup / 250 ml

DIET

vegan

EVERY RECIPE DESERVES

A Little Love Letter

Ready to spice up your kitchen game? This aromatic red pepper oil is your new go-to for adding a touch of Mediterranean magic to any dish. This infused oil is bursting with flavor, perfect for drizzling over your favorite salads, pastas, or even grilled veggies. Trust me, once you try this, you’ll be hooked on its zesty and rich taste. Plus, it’s super easy to make at home!

This vibrant red pepper oil is incredibly versatile. Drizzle it over fresh greens for a flavorful salad dressing, or toss it with pasta for an instant gourmet touch. It’s also fantastic for marinating meats or veggies before grilling, adding a delicious depth of flavor. Try brushing it over warm, crusty bread for a simple yet sensational appetizer. No matter how you use it, this oil elevates every meal to new heights. I like to serve it with these Turkish Beef Manti in Yogurt Sauce.

Keep it in a clean oil bottle or jar, and store it in a cool, dark place. It should stay fresh for up to 1-2 weeks.

Hi, I'm Kimberly!

Hi, I'm Kimberly.

A hopeless romantic when it comes to food. Every recipe I share is a love letter to food itself. I’m so glad you’re here. Make yourself at home and stay a while.

Love,
Kimberly

Kimberly the Zett Signature

If you want to get to know me better,
click here!


Red Bell Pepper Oil
Red Bell Pepper Oil
Red Bell Pepper Oil
Red Bell Pepper Oil

LET’S MAKE A PIECE OF HAPPINESS

Print
.tasty-recipe-responsive-iframe-container-47193c66 { position: relative; overflow: hidden; padding-top: 56.3%; } .tasty-recipe-responsive-iframe-container-47193c66 iframe { position: absolute; top: 0; left: 0; width: 100%; height: 100%; border: 0; } clock clock iconcutlery cutlery iconflag flag iconfolder folder iconinstagram instagram iconpinterest pinterest iconfacebook facebook iconprint print iconsquares squares iconheart heart iconheart solid heart solid icon
Red Bell Pepper Oil

Red Bell Pepper Oil


  • Author: Kimberly
  • Total Time: 70 min
  • Yield: 1 cup / 250 ml

Description

RECOMMENDED EQUIPMENT

  • blender
  • medium-sized saucepan
  • whisk
  • a bowl which the medium saucepan fits into
  • 2 medium-sized bowls
  • 2 fine sieves
  • oil bottle
  • ice cubes
  • coffee filter

Ingredients

Units Scale
  • 1 red bell pepper
  • 250 milliliters cold-pressed rapeseed oil

Instructions

  1. Chop the bell pepper in coarse pieces and remove all seeds. Put the bell pepper pieces into the blender. Pour in the oil. Blend on the highest setting until it becomes a thick consistency and no pieces of bell pepper are longer visible.
  2. Pour the mixture from the blender into a medium-sized pot and heat it over medium heat, constantly stirring, to a temperature of about 102°-103°C (215°-217°F). Then, let the oil simmer with the lid partially on for the next 35 minutes. Stir only occasionally, making sure the temperature remains steady and nothing gets burned. The cooking time is essential for all the water to evaporate. You’ll know all the water has evaporated when the oil in the pot barely bubbles anymore – so if it’s still bubbling vigorously, keep it simmering.
  3. At the end of the cooking process, prepare a bowl large enough to fit the medium-sized pot, filled with cold water and a handful of ice cubes. Also, hang a fine mesh sieve strainer over a medium-sized bowl.
  4. Now, place the pot in the ice water and stir to stop the cooking process. Once the oil is almost cold, remove the pot from the water and pour the oil into the first fine mesh sieve to catch the coarse particle.
  5. Then, pour the oil into the second fine mesh sieve, which you before equipped with a coffee filter, to catch the remaining finer particles.
  6. Allow the oil to drip through for about 30 minutes or maybe more depending on how many remaining particles are in the coffee filter. Once all the oil has passed through the coffee filter, transfer the collected amount of oil into an oil bottle. Store in the refrigerator for up to 1-2 weeks.
  • Prep Time: 5 min
  • Passive Time: 30 min
  • Cook Time: 35 min

CRAVING MORE?

Follow along here & don’t forget to subscribe to my substack!

Turkish Beef Manti in Yogurt Sauce

Turkish Beef Manti in Yogurt Sauce

Turkish Beef Manti in Yogurt Sauce

Turkish Beef Manti in Yogurt Sauce

August 8, 2024 by Kimberly

Experience a taste of Turkey with this comforting, homemade dumpling dish. Tender beef manti drenched in creamy yogurt sauce with a spicy tomato and red pepper kick. Simply irresistible!

This website uses affiliate links which may earn commission for purchases made at no additional cost to you.

TOTAL TIME

2 hrs + 15 min

SERVES

4 portions

DIET

vegetarian

EVERY RECIPE DESERVES

A Little Love Letter

Today, I’m bringing a slice of Turkey straight to your kitchen with a recipe that’s sure to warm your heart and tantalize your taste buds. Imagine soft, beef-filled dumplings, each bite bursting with rich flavors, sitting in a creamy yogurt sauce that’s perfectly balanced by a spicy tomato and red pepper kick. This dish is the epitome of comfort food and is sure to become a favorite in your home.

When it comes to serving this delightful dish, presentation is key. Arrange cool, creamy yogurt sauce on a large platter, then place the tender beef dumplings on top. Finish off with the vibrant, spicy tomato and red pepper oil for a pop of color and flavor. Garnish with a sprinkle of sumac and dried mint. Pair it with a side of warm, crusty bread to soak up every bit of that delicious sauce.

If you have any leftovers (though I doubt you will!), store them in an airtight container in the refrigerator for up to three days. To reheat, simply warm them up in a microwave or on the stove, adding a splash of water to keep the dumplings moist and tender.

Hi, I'm Kimberly!

Hi, I'm Kimberly.

A hopeless romantic when it comes to food. Every recipe I share is a love letter to food itself. I’m so glad you’re here. Make yourself at home and stay a while.

Love,
Kimberly

Kimberly the Zett Signature

If you want to get to know me better,
click here!


Turkish Beef Manti in Yogurt Sauce

LET’S MAKE A PIECE OF HAPPINESS

Print
.tasty-recipe-responsive-iframe-container-14626b4b { position: relative; overflow: hidden; padding-top: 56.3%; } .tasty-recipe-responsive-iframe-container-14626b4b iframe { position: absolute; top: 0; left: 0; width: 100%; height: 100%; border: 0; } clock clock iconcutlery cutlery iconflag flag iconfolder folder iconinstagram instagram iconpinterest pinterest iconfacebook facebook iconprint print iconsquares squares iconheart heart iconheart solid heart solid icon
Turkish Beef Manti in Yogurt Sauce

Turkish Beef Manti in Yogurt Sauce


  • Author: Kimberly
  • Total Time: 2 hrs + 15 min
  • Yield: 4

Description

Recommended Equipment

  • shallow bowl
  • plastic wrap
  • two medium-sized bowls
  • grater
  • small pot
  • large plate
  • kitchen towel
  • rolling pin
  • sharp knife
  • medium-sized pot
  • slotted spoon

Ingredients

Units Scale
DOUGH
  • 240 grams all-purpose flour
  • 1 egg
  • 1/2 tsp salt
  • 80 milliliters water
FILLING
  • 250 grams minced beef
  • 1 small white onion
  • 2 tbsp red bell pepper oil
  • 1 tbsp minced fresh parsley
  • 1/2 tsp salt
  • 1/2 tsp ground pepper
  • 1/4 tsp cumin
  • 1/4 tsp chili flakes
YOGURT SAUCE
  • 600 grams
  • 6 garlic cloves
  • 1/8 tsp salt
TOMATO BELL PEPPER OIL SAUCE
  • 6 tbsp red bell pepper oil
  • 2 tbsp tomato paste
  • 2 tsp sumach
  • 2 tsp dried mint
  • pinch of salt
TOPPINGS
  • dried mint
  • sumach
  • parsely

Instructions

  1. First, you’ll prepare the Manti dough. Take a shallow bowl, add flour and sugar, and mix them together. Create a large well in the middle and crack the egg into it. Beat the egg with a fork and then add water. Mix everything with the fork until it forms a dough. Transfer the dough to a clean work surface and knead it into a smooth ball. If the dough is too sticky, add a bit more flour. Place the dough back in the bowl, cover it with plastic wrap, and let it rest for at least 1 hour.
  2. Next, take a medium-sized bowl and add the ground meat. Peel the onion and grate it directly into the bowl with the meat. Chop the parsley and add it to the meat as well. Season the meat with cumin, chili, salt, and pepper. Put the meat mixture in the fridge until you’re ready to use it.
  3. For the yogurt sauce, mix the yogurt with some salt. Peel the garlic cloves and grate them directly into the yogurt. Stir everything well and refrigerate until needed.
  4. To prepare the tomato-pepper sauce, mix the red pepper oil, tomato paste, sumac, mint, and a pinch of salt in a small pot. Place the pot on the stove but don’t heat it yet. We’ll get to this later.
  5. Take a large plate and sprinkle a thin layer of flour on it. Set it aside, you’ll need it soon to place your finished Manti. Also, prepare a clean kitchen towel to cover the Manti so they don’t dry out.
  6. Once the dough has rested, sprinkle a bit of flour on a clean work surface and place your dough ball on it. Sprinkle some flour on the dough ball as well. Roll out the dough into a rectangular shape measuring 36×50 cm / 14×20”. Cut the dough into squares measuring 6×6 cm / 2.3×2.3” using a pizza cutter or a sharp knife. You should get about 45-50 Manti squares from the dough.
  7. Place 1/2 to 1 teaspoon of filling on each square and fold them into Manti. To do this, bring the diagonal corners together and then fold the open corners towards the center, pressing the seams together. They should look like little envelopes.
  8. Take your 4 serving plates and evenly distribute the yogurt sauce on them. Set the plates aside.
  9. Fill a medium-sized pot about 3/4 full with water and bring it to a boil. Once the water is boiling, reduce the heat to medium and let it simmer. Add all the Manti to the water and cook for about 6-7 minutes.
  10. While the Manti are cooking, heat the pot with the tomato paste and red pepper oil over low heat. Stir well and keep it on low heat until the Manti are ready.
  11. Once the Manti are cooked, use a slotted spoon to remove them from the water and place them directly on the yogurt sauce on the plates. Pour the tomato-pepper oil sauce over the Manti and sprinkle with a bit of sumac and dried mint to finish.
  • Passive Time: 40 min
  • Cook Time: 1 hr + 35 min

CRAVING MORE?

Follow along here & don’t forget to subscribe to my substack!

Double Chocolate Cookies with Strawberry Frosting

Double Chocolate Cookies with Strawberry Frosting

Double Chocolate Cookies with Strawberry Frosting

Double Chocolate Cookies with Strawberry Frosting

August 6, 2024 by Kimberly

Indulge in these rich, chocolaty cookies topped with a sweet, creamy & fruity frosting. Every bite is a heavenly mix of chocolate bliss and strawberry freshness, perfect for satisfying your sweet tooth!

This website uses affiliate links which may earn commission for purchases made at no additional cost to you.

TOTAL TIME

2 hrs + 35 min

SERVES

8 cookies

DIET

vegetarian

EVERY RECIPE DESERVES

A Little Love Letter

Today, I’m thrilled to share a recipe that’s bound to become your new favorite: rich, double chocolate cookies topped with a luscious strawberry frosting. These cookies are the ultimate treat for any chocolate lover, with a fruity twist that makes them extra special. They’re perfect for any occasion, whether you’re hosting a party or just indulging in a cozy night at home. Let’s dive into the delicious details!

Arrange them on a cute platter, and don’t be shy with the strawberry frosting – a generous dollop on each cookie makes them look and taste irresistible. These cookies are great for dessert tables, afternoon tea, or a sweet snack anytime. Pair them with a cold glass of milk or a hot cup of coffee for the ultimate treat.

If you have any leftovers (though that’s unlikely!), store the cookies in an airtight container. They’ll stay fresh at room temperature for up to three days. For longer storage, you can keep them in the fridge for up to a week. Just bring them to room temperature before enjoying them again to get that perfect, soft texture.

Hi, I'm Kimberly!

Hi, I'm Kimberly.

A hopeless romantic when it comes to food. Every recipe I share is a love letter to food itself. I’m so glad you’re here. Make yourself at home and stay a while.

Love,
Kimberly

Kimberly the Zett Signature

If you want to get to know me better,
click here!


Double Chocolate Cookies with Strawberry Frosting

LET’S MAKE A PIECE OF HAPPINESS

Print
.tasty-recipe-responsive-iframe-container-d7ee0454 { position: relative; overflow: hidden; padding-top: 56.3%; } .tasty-recipe-responsive-iframe-container-d7ee0454 iframe { position: absolute; top: 0; left: 0; width: 100%; height: 100%; border: 0; } clock clock iconcutlery cutlery iconflag flag iconfolder folder iconinstagram instagram iconpinterest pinterest iconfacebook facebook iconprint print iconsquares squares iconheart heart iconheart solid heart solid icon
Double Chocolate Cookies with Strawberry Frosting

Double Chocolate Cookies with Strawberry Frosting


  • Author: Kimberly
  • Total Time: 2 hrs + 35 min
  • Yield: 8 cookies

Description

Recommended Equipment

  • sharp knife
  • cutting board
  • small bowl
  • small pot (or microwave)
  • three medium bowls
  • whisk
  • spatula
  • mortar & pestle

Ingredients

Units Scale
COOKIE DOUGH
  • 120 grams all-purpose flour
  • 80 grams cocoa powder
  • 35 grams cornstarch
  • 1 tsp baking powder
  • 1/2 tsp salt
  • 140 grams butter
  • 150 grams brown sugar
  • 50 grams white sugar
  • 100 grams milk chocolate
  • 1 egg
  • 1 egg yolk
STRAWBERRY FROSTING
  • 20 grams freeze-dried strawberries
  • 75 grams butter
  • 75 grams cream cheese
  • 175 grams powdered sugar
TOPPINGS
  • milk chocolate
  • freeze-dried strawberries
 

Instructions

PREPARATIONS

  • Chop the chocolate into coarse pieces.
  • Melt the butter for the cookie dough in a pot or microwave.
  • Bring the butter for the frosting to room temperature.

INSTRUCTIONS

  1. In a medium bowl, mix together flour, cornstarch, cocoa powder, baking powder, and salt. Set aside.
  2. In another medium bowl, combine the brown and white sugar. Add the melted butter and whisk until creamy.
  3. Add one whole egg and one egg yolk, whisking until the mixture becomes thick.
  4. Next, add the dry ingredients from the other bowl and mix slightly, then add the chocolate and combine until no flour is visible. Be careful not to overmix.
  5. Form the dough into 8 equal-sized balls and place them in a container that fits in the fridge. Chill the cookie dough balls for at least 2 hours. If you want to prepare the dough ahead, you can refrigerate it for up to 48 hours.
  6. Preheat the oven to 220°C / 425°F (top/bottom heat). Once the oven is hot, place the cookies on a baking sheet lined with parchment paper and bake for 8 minutes.
  7. Remove the baking sheet from the oven and let the cookies cool for 15 minutes.
  8. Meanwhile, prepare the strawberry frosting: Beat room-temperature butter with an electric mixer in a medium bowl until pale yellow and fluffy. Add cream cheese and mix again. Then, add powdered sugar and mix for another 1-2 minutes until creamy.
  9. Grind the freeze-dried strawberries into a fine powder using a mortar and pestle or a powerful food processor. Add the strawberry powder to the frosting and mix until it turns a lovely pink color.
  10. Once the cookies have cooled and are no longer warm, spread 1 tablespoon of strawberry frosting evenly on each cookie.
  11. Optionally, sprinkle with some melted chocolate and crushed freeze-dried strawberries.
  • Prep Time: 5 min
  • Passive Time: 2 hrs
  • Cook Time: 30 min

CRAVING MORE?

Follow along here & don’t forget to subscribe to my substack!

Pork Tenderloin with Parmesan Herb Crust Potato Puree & Gremolata

Pork Tenderloin with Parmesan Herb Crust Potato Puree & Gremolata

Pork Tenderloin with Parmesan Herb Crust Potato Puree & Gremolata

Pork Tenderloin with Parmesan Herb Crust Potato Puree & Gremolata

August 4, 2024 by Kimberly

Imagine savoring tender pork fillet with a crispy, cheesy herb crust, paired with velvety potato puree and a zesty gremolata. It’s comfort food with a gourmet twist, perfect for any occasion!

This website uses affiliate links which may earn commission for purchases made at no additional cost to you.

TOTAL TIME

60 min

SERVES

4 portions

DIET

omnivore

EVERY RECIPE DESERVES

A Little Love Letter

Today, I’m sharing one of my all-time favorite recipes: tender pork fillet with a crispy Parmesan herb crust, served alongside a silky potato puree and topped with a vibrant gremolata. This dish is a delightful blend of comforting flavors and elegant presentation, perfect for impressing guests or treating yourself to something special. Let’s dive into this tasty adventure!

Start by slicing the pork tenderloin into medallions, ensuring each piece showcases that beautiful herb crust. Arrange them neatly on a bed of creamy potato puree, then generously sprinkle the gremolata on top for a burst of fresh flavor. Pair it with a side of roasted vegetables or a simple green salad to complete this gourmet experience. Trust me, your dinner table has never looked this good!

If you have leftovers (which is rare because it’s so delicious!), store the pork and potato puree separately in airtight containers. They’ll stay fresh in the fridge for up to three days. When you’re ready to enjoy them again, reheat gently in the oven or microwave, and don’t forget to add a fresh sprinkle of gremolata before serving.

Hi, I'm Kimberly!

Hi, I'm Kimberly.

A hopeless romantic when it comes to food. Every recipe I share is a love letter to food itself. I’m so glad you’re here. Make yourself at home and stay a while.

Love,
Kimberly

Kimberly the Zett Signature

If you want to get to know me better,
click here!


Pork Tenderloin with Parmesan Herb Crust Potato Puree & Gremolata

LET’S MAKE A PIECE OF HAPPINESS

Print
clock clock iconcutlery cutlery iconflag flag iconfolder folder iconinstagram instagram iconpinterest pinterest iconfacebook facebook iconprint print iconsquares squares iconheart heart iconheart solid heart solid icon
Pork Tenderloin with Parmesan Herb Crust Potato Puree & Gremolata

Pork Fillet with Parmesan Herb Crust Potato Puree & Gremolata


  • Author: Kimberly
  • Total Time: 1 hour
  • Yield: 4

Description

Recommended Equipment

  • sharp knife
  • cutting board
  • medium-sized bowl
  • small bowl
  • grater
  • medium-sized pot
  • oven
  • large pan
  • thermometer
  • small pot (or microwave)
  • potato masher
  • fine sieve

Ingredients

Units Scale
PORK TENDERLOIN
  • 500 grams pork tenderloin
  • 1 tbsp clarified butter
  • salt
PARMESAN HERB CRUST
  • 10 grams fresh parsley
  • 5 grams fresh chives
  • 2.5 grams fresh rosemary
  • 2.5 grams fresh thyme
  • 20 grams parmesan
  • 20 grams panko bread crumbs
  • 1/2 tsp Dijon mustard
  • 1 tbsp butter
  • 10 grams walnuts
POTATO PUREE
  • 1 kilogramm potatoes
  • 150 milliliters full-fat milk
  • 30 grams butter
  • salt, pepper & nutmeg to taste
GREMOLATA
  • 10 grams fresh parsley
  • 1 garlic clove
  • 4 tbsp Green Apple Oil
  • juice of half a lemon
  • salt & pepper to taste

Instructions

PREPARATIONS

  • The pork tenderloin should be at room temperature, so take it out of the fridge about 1 hour before cooking.
  • Here is the recipe for the Green Apple Oil. You’ll need about 4-5 tablespoons of it.

INSTRUCTIONS

  1. First, prepare the Parmesan herb crust. Finely chop parsley, chives, rosemary, thyme, and walnuts. Grate the Parmesan finely. Mix everything together with panko, Dijon mustard, and melted butter in a medium-sized bowl until you get a crumbly mixture. Set aside.
  2. Finely chop the parsley and place it in a small bowl. Peel the garlic clove, grate it finely, and add it to the parsley. Halve the lemon and add the juice of one half. Now add the Green Apple Oil and mix everything well. Season with salt and pepper. Set aside.
  3. Next, fill a medium-sized pot with cold water. Peel the potatoes, cut them into large pieces, and place them in the water. Boil the potatoes for about 20 minutes.
  4. Meanwhile, preheat the oven to 150°C / 300°F. Wash the pork tenderloin and dry it well. Trim the meat, removing the silver skin and any white fat with a sharp knife. Rub a little salt all over the meat and set aside.
  5. Heat some clarified butter in a pan and sear the meat on all sides. Remove the meat from the pan and place it on a baking sheet. Spread the herb crust evenly over the entire meat and press it down well. Place the meat in the oven and cook for about 20 minutes until the internal temperature reaches about 55°C / 131°F.
  6. In a small pot or microwave, warm the milk and butter until the butter has melted. Set aside. Once the potatoes are soft, drain the water and pour the warm milk and melted butter over the potatoes. Mash the mixture with a potato masher. Season with salt, white pepper, and grated nutmeg. If you want the mash to be even finer, you can push the potato mixture through a fine sieve. Keep the mashed potatoes warm.
  7. When the meat has reached its internal temperature, take it out of the oven and let it rest for 3-5 minutes. During this time, the internal temperature will rise to about 60/61°C /140/142°F, making it tender and slightly pink inside.
  8. While the meat is resting, divide the mashed potatoes among the plates. After the resting time, cut the meat into thick slices with a sharp knife and place them upright next to the mashed potatoes. Spread the gremolata over the mashed potatoes. Finally, drizzle a little Green Apple Oil on the plate for garnish.


  • Cook Time: 60 min

CRAVING MORE?

Follow along here & don’t forget to subscribe to my substack!