Lemony Spring Chicken Soup with Chive Oil

Lemony Spring Chicken Soup with Chive Oil

Lemony Spring Chicken Soup with Chive Oil

Lemony Spring Chicken Soup with Chive Oil

April 13, 2025 by Kimberly

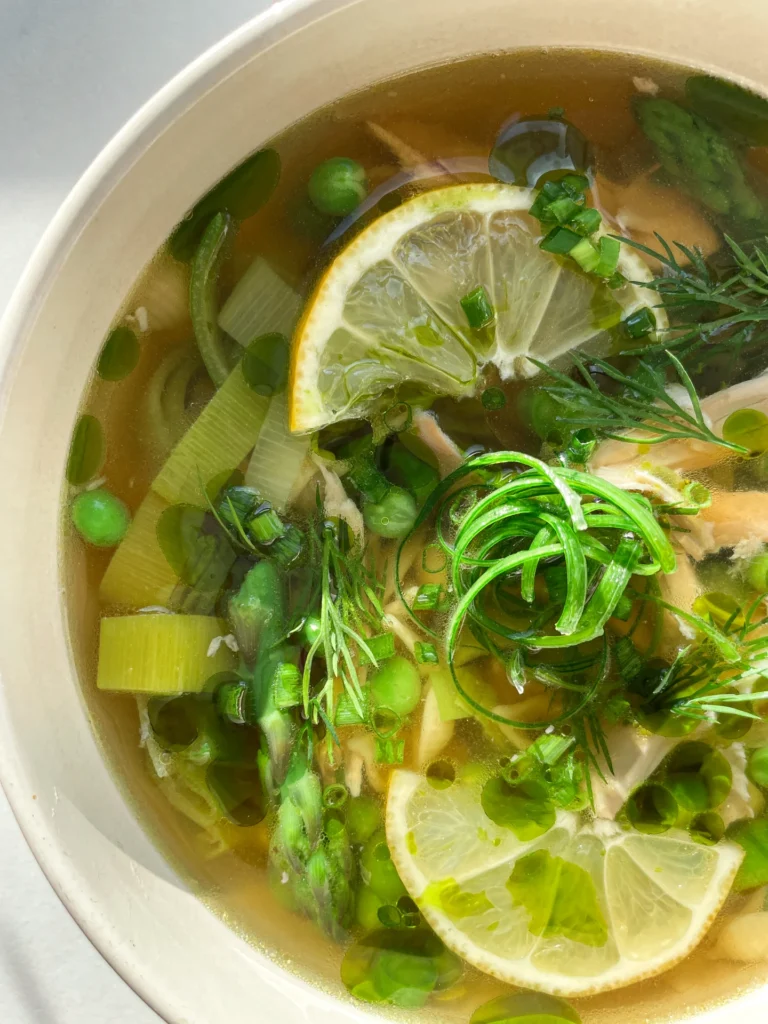
This clear chicken soup with tiny noodles and spring vegetables is true comfort food, inspired by the classic German wedding soup. With tender chicken, little noodles, fresh greens, and that finishing drizzle of chive oil, it’s the perfect broth for both special occasions and cozy Sundays. A timeless recipe full of flavor, ideal for spring, and a real bowl of soul-soothing comfort.

This website uses affiliate links which may earn commission for purchases made at no additional cost to you.

TOTAL TIME

4 hrs  + 45 min


SERVES

2 portions

DIET

omnivore

EVERY RECIPE DESERVES

A Little Love Letter

There are dishes that are so much more than just food. They are memories and little time machines. For me, that’s exactly what a clear chicken broth with all the fixings is. The one my grandmother always made for me when I was a child. In Germany, it’s called Hochzeitssuppe, or wedding soup. And honestly, the moment I hear the name, I can picture her standing at the stove, stirring that steaming pot of soup. It was this broth that filled her house with warmth and comfort. It was simply Grandma’s soup, and with every spoonful, you knew you were home.

Today, years later, I cook my own version. Still clear, still light, and with the same amount of love. Chicken bones, vegetables, and a little patience. But also with a touch of my own style. I love finishing it with my homemade chive oil, which makes the soup not only prettier but also a little more exciting.

This is not the kind of soup you throw together on the side. It asks for attention, a bit of devotion. And that’s exactly what makes it special. You take your time and in the end, you get something that warms not just your stomach, but also your heart.

And that’s why I’m sharing this recipe with you. Maybe it will become more than just a broth for you too. Maybe it’s the scent that fills your home when the first spring rain falls outside. Or the dish you cook for people you love. Just like my grandmother once did for me.


Hi, I'm Kimberly!

Hi, I'm Kimberly.

A hopeless romantic when it comes to food. Every recipe I share is a love letter to food itself. I’m so glad you’re here. Make yourself at home and stay a while.

Love,
Kimberly

Kimberly the Zett Signature

If you want to get to know me better,
click here!


Lemony Spring Chicken Soup with Chive Oil

LET’S MAKE A PIECE OF HAPPINESS

Print
clock clock iconcutlery cutlery iconflag flag iconfolder folder iconinstagram instagram iconpinterest pinterest iconfacebook facebook iconprint print iconsquares squares iconheart heart iconheart solid heart solid icon
Lemony Spring Chicken Soup with Chive Oil

Lemony Spring Chicken Soup with Chive Oil


5 Stars 4 Stars 3 Stars 2 Stars 1 Star

No reviews

  • Author: Kimberly
  • Total Time: 4 hrs + 45 min
  • Yield: 2 1x

Description

This clear chicken soup with tiny noodles and spring vegetables is true comfort food, inspired by the classic German wedding soup. With tender chicken, little noodles, fresh greens, and that finishing drizzle of chive oil, it’s the perfect broth for both special occasions and cozy Sundays. A timeless recipe full of flavor, ideal for spring, and a real bowl of soul-soothing comfort.

GOOD TO HAVE ON HAND

  • large pot
  • small pot
  • fine mesh strainer
  • cheesecloth
  • sharp knife
  • cutting board

For the consommé version, you’ll also need:

  • an extra small pot
  • whisk
  • small bowls

Ingredients

Units Scale
CHICKEN STOCK
  • 3 liters cold water
  • 2 carrots
  • 4 small yellow onions
  • 1 leek (only the green part)
  • 2 bay leaves
  • 3 sprigs of fresh thyme
  • 1 tsp black pepper corns
  • 1 lemon
  • 4 garlic cloves
  • 1 kilogram skin-on, bone-in chicken thighs
  • 4 egg whites (only for the Consommé version)
SOUP COMPONENTS
  • 10 stems green asparagus
  • 1 leek (only the white part)
  • 100 grams frozen peas
  • 100 grams tiny pasta shells
TOPPINGS
  • fresh dill
  • fresh chives
  • scallions
  • 1 lemon
  • homemade chive oil

Instructions

  1. Peel the carrots, trim the ends, and slice. Cut the roots off the onions and halve them. Separate the white and green parts of the leek. Wash the green part thoroughly and cut it into large pieces. Halve the lemon. Peel the garlic cloves. Pat the chicken thighs dry with paper towels.
  2. Heat a large pot over medium heat (no oil). Place the onion halves cut side down and let them brown. Then add the carrots, leek, lemon, herbs, peppercorns, and chicken thighs. Pour in 3 liters of cold water.
  3. Slowly bring the pot to a gentle simmer, do not let it boil. Skim off any foam with a spoon. Let it cook uncovered on the lowest heat for 4 to 8 hours, making sure it stays at a gentle simmer. Skim off any foam occasionally and add cold water if too much evaporates.
  4. In the meantime, prepare the chive oil and store it in the fridge until needed.
  5. Once the broth is done, remove it from the heat. Take out the chicken thighs, let them cool, and then shred the meat from the bones and set it aside for later. Remove the vegetables with a slotted spoon. Strain the broth first through a fine mesh strainer and then through cheesecloth for a clear result.

If you’d like to turn your broth into a clarified consommé, follow the next steps. If not, jump to the section “Simple Version.”

Consommé Version

  1. Let the broth cool slightly so it’s warm but not hot. In a bowl, whisk 4 egg whites just until frothy. Stir them into the broth. Let everything sit over medium heat for about 15–20 minutes, do not boil, or the egg whites will curdle.Over time, a layer of egg whites will form and trap any remaining fat or cloudiness. Gently remove this layer and strain the broth again: first through a fine mesh strainer, then through cheesecloth. The result: a crystal-clear consommé.
  2. Reheat the consommé and season with salt (about 5–7g per liter). Keep it hot.
  3. Slice the white part of the leek into rings and wash well. Slice the asparagus into chunks or thin rounds. Finely slice the green part of the scallions for topping.Optional extra step for curly scallion strips: Slice the tube lengthwise and open it up. Place the inside facing up and gently scrape off the slimy layer with a knife. Slice into thin strips and store in a bowl of ice water until serving.
  4. Boil two small pots of salted water. In one, cook the noodles al dente. In the other, blanch the leeks first, then asparagus, and finally the peas. Place each component in a small bowl and set aside.
  5. To serve, layer noodles, vegetables, and shredded chicken into serving bowls and pour hot consommé over. Top with freshly ground black pepper, fresh dill, chives, scallions, lemon slices, a squeeze of lemon juice, and a drizzle of chive oil.

Simple Version

  1. Reheat the broth and season with salt (5–7g per liter). Keep it hot.
  2. Slice the leek into rings and rinse thoroughly. Cut the asparagus into chunks or thin slices. Finely slice the green part of the scallions for topping.
  3. Bring a small pot of salted water to a boil and cook the noodles al dente.
  4. Add the leeks to the broth and simmer until soft. Then add asparagus and peas, cooking for another 5 minutes. Finally, stir in the shredded chicken and cooked noodles. Simmer everything for 1–2 minutes until heated through.
  5. Adjust seasoning with salt, pepper, and lemon juice. Serve hot in deep bowls, topped with fresh dill, chives, scallions, lemon slices, and chive oil.

Notes

  • This soup takes time, but it rewards you with depth and flavor.
  • This recipe yields about 2.5 liters of finished chicken stock. You’ll use 1 liter for the soup, the rest keeps for 2–3 days in the fridge or 2–3 months in the freezer for future recipes.
  • Prep Time: 15 min
  • Passive Time: 4 hrs
  • Cook Time: 30 min

CRAVING MORE?

Follow along here & don’t forget to subscribe to my substack!

Homemade Kimchi

Homemade Kimchi

Homemade Kimchi

Homemade Kimchi

April 2, 2025 by Kimberly

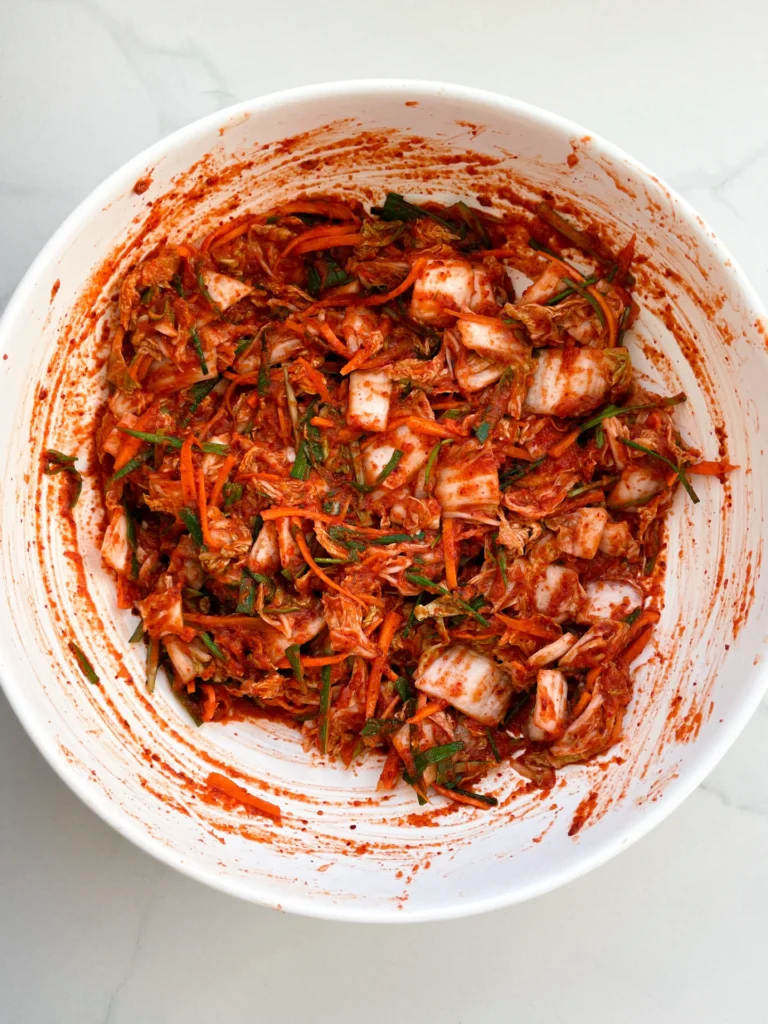
Slightly chaotic, deeply flavorful, and kind of addictive. This spicy little side dish doesn’t ask for attention, it demands it. Make it once and suddenly you’re that person who ferments things.

This website uses affiliate links which may earn commission for purchases made at no additional cost to you.

TOTAL TIME

45 min + 2 days

SERVES

16 portions

DIET

vegan

EVERY RECIPE DESERVES

A Little Love Letter

This is one of those recipes that feels a little chaotic while you’re making it. You’re chopping cabbage, blending weird things together, your kitchen smells slightly suspicious, and then magic. A few days later, you have the tangy, spicy, crunchy goodness that is homemade kimchi. It’s bold, a little wild, and honestly kind of addictive. If you’ve never made fermented food before, this is your sign. It’s easier than it looks and way more fun.

Kimchi is one of the most iconic Korean staples for a reason. It’s a powerhouse of flavor and a probiotic dream that happens to be absolutely delicious with basically anything. My favorite way to eat this? Straight from the jar, if I’m being honest. But if we’re being civilized: layer it into rice bowls, stir into fried rice, top a savory pancake, or tuck it into sandwiches. Kimchi also loves melted cheese…trust me on this one. It’s the punchy, spicy friend that turns boring meals into actual moments. And once you start adding it to things, you won’t want to stop.

Store your kimchi in a clean, airtight container in the fridge once it’s done fermenting (after about 2–3 days). It’ll keep for weeks, actually, it gets more flavorful the longer it sits. Just make sure to use a clean fork every time, and you’re golden.

Hi, I'm Kimberly!

Hi, I'm Kimberly.

A hopeless romantic when it comes to food. Every recipe I share is a love letter to food itself. I’m so glad you’re here. Make yourself at home and stay a while.

Love,
Kimberly

Kimberly the Zett Signature

If you want to get to know me better,
click here!


Homemade Kimchi
Homemade Kimchi
Homemade Kimchi
Homemade Kimchi

LET’S MAKE A PIECE OF HAPPINESS

Print
clock clock iconcutlery cutlery iconflag flag iconfolder folder iconinstagram instagram iconpinterest pinterest iconfacebook facebook iconprint print iconsquares squares iconheart heart iconheart solid heart solid icon
Homemade Kimchi

Homemade Kimchi


  • Author: Kimberly
  • Total Time: 2 days + 45 min

Description

RECOMMENDED EQUIPMENT

  • two large mixing bowls
  • a sharp knife
  • cutting board
  • blender
  • small saucepan
  • airtight container for storage

Ingredients

Units Scale
VEGGIES
  • 1 napa cabbage
  • 2 carrots
  • 6 green onions
  • 4 liter cold water
  • 100 grams sea salt
CHILI PASTE
  • 2 yellow onions
  • 1 apple or nashi pear
  • 1 garlic bulb
  • 1 thumb-sized piece of ginger
  • 2 tbsp fish sauce
  • 1 tbsp soy sauce
  • 1 tbsp mini shrimp
  • 4 tbsp water
  • 8 tbsp gochugaru (Korean chili flakes)
RICE FLOUR SLURRY
  • 3 tbsp rice flour
  • 200 milliliter water

Instructions

  1. Quarter the napa cabbage lengthwise, then chop it into bite-sized pieces. Place it in one of the large bowls and cover completely with cold water. Add a generous amount of sea salt and mix well with your hands or a spoon. To keep the cabbage submerged, weigh it down with a plate and something heavy. Let it soak for 30–45 minutes.
  2. While the cabbage is soaking, peel and julienne the carrots. Thinly slice the green part of the scallions. Set both aside, they’ll be folded into the paste later.
  3. Peel the apple, onion, garlic, and ginger. Toss everything into a blender with a splash of water. If you’re using mini shrimp, add those now. Pour in the fish sauce and soy sauce, then blend until smooth and pulpy.
  4. Transfer the paste to your second large bowl. Stir in the gochugaru (Korean chili flakes) until the mixture is a vibrant, rich red and has a spreadable texture.
  5. In a small saucepan, combine water and rice flour to make the slurry. Heat gently, stirring constantly, until it thickens into a sticky, glue-like consistency. Let it cool for a few minutes, then stir it into the chili paste mixture.
  6. Add the sliced carrots and scallions to the paste. Stir well until everything is evenly coated and combined.
  7. Drain the soaked cabbage, rinse it under cold water, and gently squeeze out the excess liquid. Add it to the bowl with the red paste and (with gloves, highly recommended!) mix everything thoroughly until all the cabbage is coated.
  8. Spoon the kimchi mixture into a clean, airtight container. Press it down firmly to eliminate air pockets. Wipe the edges, cover with plastic wrap, and seal tightly. Leave it at room temperature for about two days to ferment.
  9. After two days, your kimchi will be lightly fermented and ready to taste. If you like it funkier and more sour, give it another day on the counter. After that, pop it in the fridge, it’ll keep for several weeks and just keeps getting better.
  • Passive Time: 2 days
  • Cook Time: 45 min

CRAVING MORE?

Follow along here & don’t forget to subscribe to my substack!

Raspberry Marble Cookies with Passionfruit Ganache

Raspberry Marble Cookies with Passionfruit Ganache

Raspberry Marble Cookies with Passionfruit Ganache

Raspberry Marble Cookies with Passionfruit Ganache

March 20, 2025 by Kimberly

Crispy edges, buttery soft inside, with swirls of tart raspberry and creamy white chocolate passionfruit ganache on top. A cookie that tastes like golden hour on a summer evening.

This website uses affiliate links which may earn commission for purchases made at no additional cost to you.

TOTAL TIME

2 hrs + 20 min

SERVES

10 cookies

DIET

vegetarian

EVERY RECIPE DESERVES

A Little Love Letter

If cookies had a main character moment, this would be it. Buttery soft with just the right chew, these beauties have swirls of tart raspberry and are topped with the dreamiest white chocolate passionfruit ganache. They’re bright, fruity, and just a little fancy, but still easy enough to whip up on a random Tuesday. If you love that perfect balance between rich, creamy, and slightly tangy, these cookies are about to become your new obsession.

These cookies shine on their own but pairing them with a cozy drink takes them to another level. A cup of earl grey, a matcha latte, or even an iced vanilla coffee would complement the tart-sweet balance perfectly.

Store the cookies in an airtight container at room temperature for up to 3 days. Keep the ganache separately in the fridge and spread it on just before serving.

Hi, I'm Kimberly!

Hi, I'm Kimberly.

A hopeless romantic when it comes to food. Every recipe I share is a love letter to food itself. I’m so glad you’re here. Make yourself at home and stay a while.

Love,
Kimberly

Kimberly the Zett Signature

If you want to get to know me better,
click here!


Raspberry Marble Cookies with Passionfruit Ganache

LET’S MAKE A PIECE OF HAPPINESS

Print
clock clock iconcutlery cutlery iconflag flag iconfolder folder iconinstagram instagram iconpinterest pinterest iconfacebook facebook iconprint print iconsquares squares iconheart heart iconheart solid heart solid icon
Raspberry Marble Cookies with Passionfruit Ganache

Raspberry Marble Cookies with Passionfruit Ganache


  • Author: Kimberly
  • Total Time: 20 min + 2 hrs
  • Yield: 10 1x

Description

RECOMMENDED EQUIPMENT

  • electric mixer
  • mixing bowl
  • medium-sized bowl
  • piping bag
  • mortar & pestle
  • small cookie scoop

Ingredients

Units Scale
COOKIE DOUGH
  • 120 grams butter, soft
  • 100 grams brown sugar
  • 50 grams white sugar
  • 2 tsp vanilla extract
  • 1 egg
  • 220 grams all-purpose flour
  • 1/2 tsp salt
  • 1/2 tsp baking powder
  • 1/4 tsp baking soda
  • 15 grams freeze-dried raspberries
PASSIONFRUIT GANACHE
  • 200 grams white chocolate
  • 100 grams heavy cream
  • 60 grams passionfruit purée

Instructions

  1. Add soft butter, brown sugar, white sugar, and vanilla extract to the mixing bowl of a stand mixer. Beat until light and fluffy.

  2. Mix in the egg just until combined. Then, add flour, salt, baking powder, and baking soda, mixing until no streaks of flour remain. Be careful not to overmix.

  3. Divide the dough into two equal portions. Keep one half in the mixer and set the other aside. Grind the freeze-dried raspberries into a fine powder, then mix them into the dough in the mixer. You should now have one pink and one yellow dough.

  4. Scoop equal portions of both doughs using a small cookie scoop. Press the two differently colored balls together, tear them apart in the middle, and press them back together for a marbled look. Shape into round balls, place them on a parchment-lined tray, and refrigerate.

  5. Heat the heavy cream in a small saucepan until it starts forming small bubbles around the edges. Meanwhile, finely chop or grate the white chocolate and place it in a bowl. Pour the hot cream over the chocolate and let it sit for 3-4 minutes before stirring until smooth. Mix in the passionfruit purée until fully combined. Cover the ganache with plastic wrap directly on the surface to prevent skin from forming and refrigerate for at least 2 hours or overnight until set.

  6. Once the ganache is set, preheat the oven to 175°C / 350°F. Place the chilled cookie dough balls on a parchment-lined baking sheet, leaving enough space between them. Bake for 13 minutes, then let them cool on a wire rack.

  7. Once firm, transfer the ganache to a mixing bowl and whip until it reaches a buttercream-like consistency. Fill a piping bag fitted with a nozzle and pipe a swirl of ganache onto the center of each cooled cookie. Sprinkle with crushed freeze-dried raspberries for decoration.

  • Passive Time: 2 hrs
  • Cook Time: 20 min

CRAVING MORE?

Follow along here & don’t forget to subscribe to my substack!

Creamy Passionfruit Curd Cheesecake

Creamy Passionfruit Curd Cheesecake

Creamy Passionfruit Curd Cheesecake

Creamy Passionfruit Curd Cheesecake

March 18, 2025 by Kimberly

Rich, creamy cheesecake meets silky passionfruit curd on a buttery vanilla cookie crust. Sweet, tangy, smooth like sunshine in dessert form. Perfectly indulgent, slightly messy, and impossible to eat just one slice.

This website uses affiliate links which may earn commission for purchases made at no additional cost to you.

TOTAL TIME

60 min + overnight

SERVES

8 slices

DIET

vegetarian

EVERY RECIPE DESERVES

A Little Love Letter

This cheesecake is for those who love their desserts creamy, tangy, and just a little extra. A smooth, rich filling sits on a buttery vanilla cookie crust, finished with a silky passionfruit curd that’s sweet, tart, and totally addictive. It’s got just the right balance: light yet indulgent, classic yet tropical. Whether you’re making this for a special occasion or just because you need something incredible in your fridge, this is the kind of dessert that makes people stop mid-bite.

Serve this best chilled, straight from the fridge. It’s perfect on its own but also pairs well with a strong espresso, a glass of dessert wine, or, let’s be real, just a fork and five minutes of alone time.

Store leftovers in an airtight container in the fridge for up to 4 days. The texture stays beautifully creamy, and the curd keeps its glossy finish.

Hi, I'm Kimberly!

Hi, I'm Kimberly.

A hopeless romantic when it comes to food. Every recipe I share is a love letter to food itself. I’m so glad you’re here. Make yourself at home and stay a while.

Love,
Kimberly

Kimberly the Zett Signature

If you want to get to know me better,
click here!


Creamy Passionfruit Curd Cheesecake

LET’S MAKE A PIECE OF HAPPINESS

Print
clock clock iconcutlery cutlery iconflag flag iconfolder folder iconinstagram instagram iconpinterest pinterest iconfacebook facebook iconprint print iconsquares squares iconheart heart iconheart solid heart solid icon
Creamy Passionfruit Curd Cheesecake

Creamy Passionfruit Curd Cheesecake


  • Author: Kimberly
  • Total Time: 60 min + overnight
  • Yield: 8-16 slices 1x

Description

RECOMMENDED EQUIPMENT

  • oven
  • 28 cm / 11” cake pan
  • deep baking tray or dish larger than the cake pan
  • food processor
  • large mixing bowl
  • whisk
  • aluminum foil
  • small pot

Ingredients

Units Scale
CRUST
  • 200 grams golden Oreo cookies (without cream filling)
  • 100 grams butter
FILLING
  • 600 grams cream cheese
  • 130 grams white sugar
  • 160 grams creme fraiche
  • 1 tsp vanilla extract
  • 2 eggs
PASSIONFRUIT CURD
  • 2 passionfruits
  • 85 grams white sugar
  • 40 grams butter
  • 50 grams heavy cream
  • 1 tbsp cornstarch
  • cold water

Instructions

  1. Preheat the oven to 175°C / 347°F (convection). Fill a deep baking tray or a dish large enough to fit the cake pan with water. The water should reach about halfway up the sides of the cake pan. Set aside.
  2. Prepare the crust. Carefully twist apart the Oreo cookies and scrape off the cream filling. Add the cookies to a food processor and pulse briefly. Add the softened butter and mix for about 20 seconds until the mixture becomes crumbly and holds together. Press the mixture evenly into the bottom of a cake pan. Set aside.
  3. Make the filling. In a large mixing bowl, whisk the cream cheese until smooth and creamy. Add the sugar and whisk again until fully combined. Stir in the crème fraîche and vanilla extract. Add one egg and mix until just combined, then add the second egg, mixing only until incorporated. Be careful not to overmix to avoid incorporating too much air.
  4. Assemble the cheesecake. Pour the cheesecake filling over the crust and spread evenly. Lay two sheets of aluminum foil flat and place the cake pan in the center. Fold the foil up around the pan to prevent water from seeping in. Place the cake pan in the prepared water bath and transfer to the middle rack of the oven. Bake for about 40 minutes until the top is completely pale, the edges are set, and the center still jiggles slightly.
  5. Make the passionfruit curd. While the cheesecake bakes, scoop the passionfruit pulp into a small pot, add the sugar, and bring to a simmer over medium heat. Add the butter and let it melt. Finally, stir in the heavy cream and bring to a brief boil before removing from the heat. In a small bowl, whisk the cornstarch with 1 tablespoon of water until smooth, then pour it into the passionfruit mixture. Stir and bring to a boil once more. Let cool for about 30 minutes.
  6. Cool the cheesecake gradually. After 40 minutes, turn off the oven and open the door completely. Let the cheesecake sit inside for 20 minutes to prevent sudden temperature changes, which could cause cracks.
  7. Check the curd consistency. It should be creamy and spreadable, but not runny. If it’s too thick, mix in a small amount of water. Set aside and let it cool completely.
  8. Remove the cheesecake from the water bath. Take off the aluminum foil and run a sharp knife around the edges to loosen it, but leave the cake ring on. Let the cheesecake cool at room temperature.
  9. Finish and chill. Once the cheesecake has cooled to room temperature, carefully spread the passionfruit curd over the top. Transfer to the fridge and let set for at least 6 hours or overnight before serving.
  • Passive Time: overnight
  • Cook Time: 60 min

CRAVING MORE?

Follow along here & don’t forget to subscribe to my substack!

Cottage Pie

Cottage Pie

Cottage Pie

Cottage Pie

December 23, 2024 by Kimberly

Rich, slow-cooked beef with a creamy, cheesy potato topping. This cozy classic feels like home but leveled up – every bite is hearty, comforting, and completely irresistible. Perfect for chilly nights!

This website uses affiliate links which may earn commission for purchases made at no additional cost to you.

TOTAL TIME

4 hrs

SERVES

4 portions

DIET

omnivore

EVERY RECIPE DESERVES

A Little Love Letter

Imagine tender, slow-cooked beef paired with a golden, cheesy mashed potato topping – this is comfort food on a whole new level. Combining ground beef and flavorful slow-cooked shank meat, this dish delivers a rich, savory filling that melts in your mouth. The creamy Parmesan and cream cheese mashed potatoes bring the perfect finishing touch, creating a meal that’s hearty, satisfying, and unforgettable. Whether it’s a family dinner or meal-prep hero, this pie is your go-to cozy classic.

Serve this dish fresh from the oven with a crisp salad for balance. For extra flair, sprinkle some fresh herbs like parsley or thyme on top before serving. This dish is perfect for casual family dinners or even a dinner party – it’s the kind of meal that gets everyone asking for seconds. Pair it with a glass of red wine or a comforting cup of tea, and you’re all set.

Store any leftovers in an airtight container in the fridge for up to 3 days. Reheat in the oven or microwave until piping hot. For freezing, wrap the dish tightly and freeze for up to a month. Defrost in the fridge overnight before reheating.

Hi, I'm Kimberly!

Hi, I'm Kimberly.

A hopeless romantic when it comes to food. Every recipe I share is a love letter to food itself. I’m so glad you’re here. Make yourself at home and stay a while.

Love,
Kimberly

Kimberly the Zett Signature

If you want to get to know me better,
click here!


Cottage Pie
Cottage Pie
Cottage Pie
Cottage Pie

LET’S MAKE A PIECE OF HAPPINESS

Print
clock clock iconcutlery cutlery iconflag flag iconfolder folder iconinstagram instagram iconpinterest pinterest iconfacebook facebook iconprint print iconsquares squares iconheart heart iconheart solid heart solid icon
Cottage Pie

Cottage Pie


5 from 1 review

  • Author: Kimberly
  • Total Time: 4 hrs
  • Yield: 6 1x

Description

Recommended Equipment

  • medium pot
  • sharp knife
  • cutting board
  • large pot with lid
  • vegetable peeler
  • medium pot with lid
  • small pot
  • cheese grater
  • potato masher
  • ovenproof pan

Ingredients

Units Scale
SHANK MEAT & STOCK
  • 800 grams beef shanks
  • 500 grams beef marrow bones
  • 1 liter water
  • 1 white onion
  • 3 carrots
  • 3 celery sticks
  • 1 tbsp olive oil
  • 1 tbsp tomato paste
  • 2 bay leaves
  • 1 tsp black pepper corns
  • 1 tsp coriander seeds
MASHED POTATOES
  • 1 kilogram russet potatoes
  • 300 milliliter full-fat cow milk
  • 100 grams butter
  • 100 grams cream cheese
  • 50 grams parmesan
  • 2 tbsp chives
  • salt, pepper & nutmeg to taste
MEAT FILLING
  • 2 tbsp oil
  • 500 grams minced beef
  • 300 grams shank meat (prepared earlier from the shanks)
  • 1 white onion
  • 6 garlic cloves
  • 2 carrots
  • 150 grams frozen peas
  • 600 milliliter beef stock (prepared earlier from the shanks & bones)
  • 2 tbsp tomato paste
  • 1-2 tbsp all-purpose flour
  • 1 tbsp Worcestershire sauce
  • 2 bay leaves
  • 1 tsp dried thyme
  • 1/2 tsp dried rosemary
  • 1 tsp paprika powder
  • 1/4 tsp cinnamon
  • 1/4 tsp brown sugar
  • 1/8 tsp nutmeg
  • salt & pepper to taste
  • 2 tbsp fresh parsley

Instructions

PREPARATIONS

  • Place the beef shanks on a rack over a drip tray or a deep baking sheet lined with parchment paper. Roast in the oven at 250°C on the grill setting for about 25 minutes, until browned and starting to render fat.
  • Meanwhile, cut carrots, onions, and celery into large chunks. Sauté the veggies with crushed coriander seeds and peppercorns in a large pot with a bit of olive oil. Stir in tomato paste and cook for another 1–2 minutes.
  • Add water to the pot and toss in bay leaves.
  • Remove the beef shanks and bones from the oven and add them to the pot. Cover with the lid and simmer for about 2 hours.
  • Once the cooking time is up, strain the broth through a sieve into a measuring cup. Discard the vegetables and bones, and set the meat aside in a bowl. If you want to go the extra mile, strain the broth through a cheesecloth, though it’s not essential for this recipe. You’ll need 600 milliliters of broth and all the meat for this cottage pie.

INSTRUCTIONS

  1. Peel and halve the potatoes, then place them in a medium pot with cold water. Bring to a boil and cook until soft, about 20 minutes.
  2. Meanwhile, gently heat milk and butter in a small pot until the butter melts. Grate Parmesan and slice chives into fine rings—set both aside. Finely dice the onion, peel the garlic, and dice the carrots into small cubes. Weigh the peas and set everything aside.
  3. Once the potatoes are soft, drain the water. Add the warm milk-butter mixture and mash the potatoes. Stir in cream cheese and Parmesan, then season with nutmeg, salt, and pepper. Finally, fold in the chives. Cover and set the pot aside.
  4. Heat olive oil in a large pot or ovenproof pan. Sear the ground beef, remove it, and set aside.
  5. Add the onions and carrots to the pan and sauté briefly. Press or finely grate the garlic, sauté for a moment, then stir in tomato paste and cook briefly as well.
  6. Dust with flour and stir well. Add the ground beef and beef shank meat, then deglaze with the beef broth. Stir in Worcestershire sauce, bay leaves, thyme, rosemary, paprika, cinnamon, brown sugar, nutmeg, salt, and pepper. Simmer for about 20 minutes or until the carrots are soft. While it simmers, finely chop the parsley.
  7. Once the carrots are soft, stir in the peas and parsley. Preheat the oven to 180°C. Spread the meat mixture evenly into an ovenproof dish. Smooth it out, then spread the mashed potatoes on top, smoothing and optionally decorating the surface.
  8. Bake for 15–20 minutes, until the edges are bubbling. Switch to the grill setting and cook for 5–7 minutes until the mashed potato topping turns golden brown. Let the cottage pie rest briefly before serving.
  • Prep Time: 2 hrs + 30 min
  • Passive Time: 45 min
  • Cook Time: 45 min

CRAVING MORE?

Follow along here & don’t forget to subscribe to my substack!

Vanilla Parfait with Chocolate Soil

Vanilla Parfait with Chocolate Soil

Vanilla Parfait with Chocolate Soil

Vanilla Parfait with Chocolate Soil

December 20, 2024 by Kimberly

This creamy vanilla parfait melts like a dream, paired with crunchy, bittersweet chocolate soil for a texture and flavor explosion. Dessert vibes: fancy enough to impress, cozy enough to devour solo.

This website uses affiliate links which may earn commission for purchases made at no additional cost to you.

TOTAL TIME

4 hrs + 40 min

SERVES

10 portions

DIET

vegetarian

EVERY RECIPE DESERVES

A Little Love Letter

If you’re looking for a dessert that feels both luxurious and approachable, this vanilla parfait with chocolate soil is it. The creamy, rich vanilla base perfectly contrasts the crunchy, bittersweet chocolate soil, creating a balance of flavors and textures. It’s the kind of dessert that wows at a dinner party but is easy enough to whip up for yourself when you need a little indulgence. Bonus: it’s no-bake and totally make-ahead friendly!

Serve your parfait chilled in elegant bowls or plates for the ultimate dessert presentation. Spoon the creamy vanilla layer first and top with a generous sprinkle of chocolate soil for that perfect crunch. Want to elevate it even more? Add fresh berries, a drizzle of caramel or even a few drops of this Mint Oil.

Keep the parfait in an airtight container in the freezer for up to one week. Store the chocolate soil separately in a dry container to maintain its crunch. Assemble right before serving.

Hi, I'm Kimberly!

Hi, I'm Kimberly.

A hopeless romantic when it comes to food. Every recipe I share is a love letter to food itself. I’m so glad you’re here. Make yourself at home and stay a while.

Love,
Kimberly

Kimberly the Zett Signature

If you want to get to know me better,
click here!


Vanilla Parfait with Chocolate Soil

LET’S MAKE A PIECE OF HAPPINESS

Print
clock clock iconcutlery cutlery iconflag flag iconfolder folder iconinstagram instagram iconpinterest pinterest iconfacebook facebook iconprint print iconsquares squares iconheart heart iconheart solid heart solid icon
Vanilla Parfait with Chocolate Soil

Vanilla Parfait with Chocolate Soil


5 from 1 review

  • Author: Kimberly
  • Total Time: 4 hrs + 40 min
  • Yield: 10-12 1x

Description

Recommended Equipment

  • two glass or metal mixing bowls
  • two small bowls
  • baking tray
  • small pot
  • whisk
  • silicone spatula
  • fine mesh strainer
  • molds for the parfait

Ingredients

Units Scale
PARFAIT
  • 4 egg yolks
  • 100 grams powdered sugar
  • 400 grams heavy cream
  • 1 vanilla pod
CHOCOLATE SOIL
  • 60 grams powdered sugar
  • 100 grams all-purpose flour
  • 15 grams unsweetened cocoa powder
  • 1/4 tsp salt
  • 50 grams butter
  • 1 tsp ground coffee

Instructions

  1. Whip the cream until stiff peaks form, then place it in the fridge to keep cold.
  2. Separate the eggs, placing the yolks in a glass or metal bowl. Scrape the vanilla pod and add the seeds to the yolks.
  3. Sift the powdered sugar through a fine mesh strainer into the yolks. Mix well with the vanilla seeds.
  4. Place the bowl over a pot of simmering water (double boiler setup), ensuring only the steam touches the bowl. Whisk the mixture until it reaches 80 °C (176 °F).
  5. Prepare an ice bath (a bowl with cold water and ice cubes). Once the yolk mixture reaches 80 °C, place the bowl in the ice bath and whisk until the mixture cools and becomes thick, sticky, and creamy.
  6. Gently fold the chilled whipped cream into the cooled yolk mixture using a silicone spatula until fully combined.
  7. Pour the parfait mixture into molds and freeze for about 4 hours.
  8. For the chocolate soil, preheat the oven to 160 °C (320 °F).
  9. Combine sugar, flour, cocoa powder, salt, and ground coffee in a bowl.
  10. Melt the butter and add it to the dry ingredients. Mix with your hands until a crumbly texture forms.
  11. Spread the mixture evenly on a small baking tray and bake for about 10 minutes.
  12. Remove the tray from the oven, let the mixture cool, then crumble it into pieces. Store in an airtight container.
  13. To serve, unmold the parfaits, arrange them on plates, and decorate with the chocolate soil around them.
  14. Optional: Garnish with mint oil, berry compote, marzipan sauce, or chocolate sauce.
  • Passive Time: 4 hours
  • Cook Time: 40 min

CRAVING MORE?

Follow along here & don’t forget to subscribe to my substack!