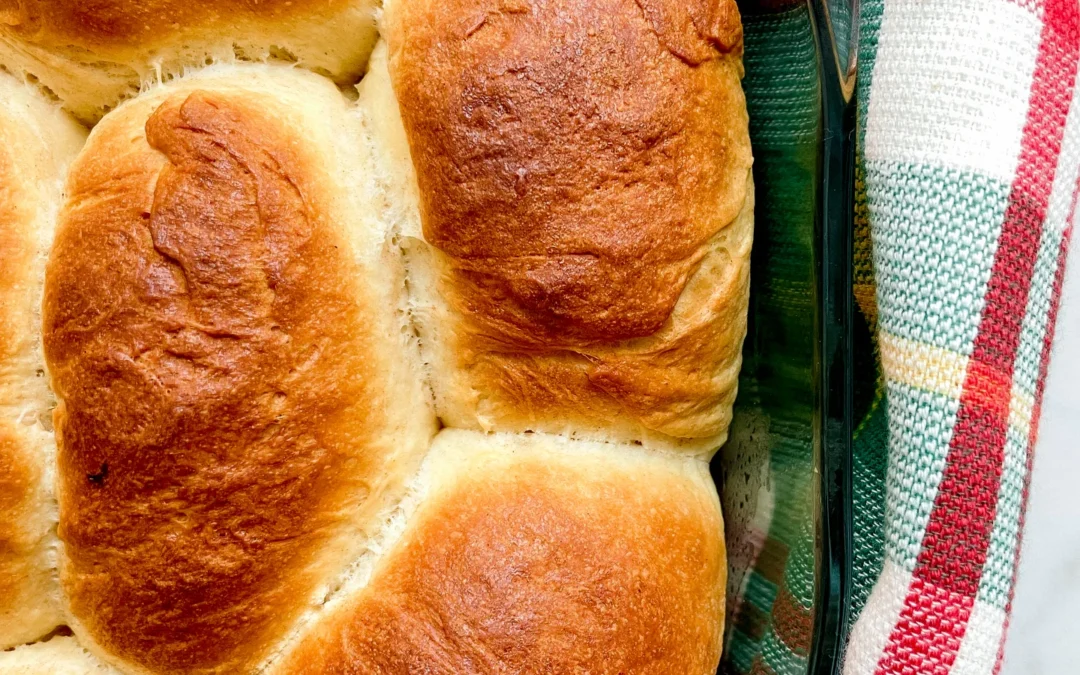
Milk Buns with Gingerbread Filling

Milk Buns with Gingerbread Filling

Milk Buns with Gingerbread Filling

Milk Buns with Gingerbread Filling

December 16, 2024 by Kimberly

Soft, fluffy buns filled with a creamy spiced mascarpone chocolate magic that tastes like a cozy holiday hug. Perfectly baked for that melt-in-your-mouth festive treat you didn’t know you needed.

This website uses affiliate links which may earn commission for purchases made at no additional cost to you.

TOTAL TIME

2 hrs

SERVES

10 buns

DIET

vegetarian

EVERY RECIPE DESERVES

A Little Love Letter

Imagine biting into a soft, cloud-like bun filled with a creamy mix of spiced mascarpone, chocolate, and gingerbread vibes. That’s this recipe – an edible holiday dream! These buns are everything cozy wrapped up in one delicious bite. Whether you’re serving them at a festive brunch or enjoying one with your afternoon coffee, they’re the ultimate way to make your kitchen smell like Christmas and your taste buds very, very happy.

Serve these buns warm for the best experience! They’re perfect as they are, but you can glaze them with a spiced sugar syrup or a light gingerbread oil drizzle for an extra festive touch. Pair them with a steaming cup of hot chocolate, a chai latte, or even mulled wine for maximum holiday vibes. Pro tip: Sprinkle a little powdered sugar on top for that snow-dusted look – it’s giving cozy holiday bakery.

Keep your buns soft and fresh by storing them in an airtight container at room temperature for up to 2 days. To enjoy them later, reheat gently in the oven or microwave for that just-baked taste. You can also freeze them and defrost as needed!

Hi, I'm Kimberly!

Hi, I'm Kimberly.

A hopeless romantic when it comes to food. Every recipe I share is a love letter to food itself. I’m so glad you’re here. Make yourself at home and stay a while.

Love,
Kimberly

Kimberly the Zett Signature

If you want to get to know me better,
click here!


Milk Buns with Gingerbread Filling

LET’S MAKE A PIECE OF HAPPINESS

Print
clock clock iconcutlery cutlery iconflag flag iconfolder folder iconinstagram instagram iconpinterest pinterest iconfacebook facebook iconprint print iconsquares squares iconheart heart iconheart solid heart solid icon
Milk Buns with Gingerbread Filling

Milk Buns with Gingerbread Filling


5 Stars 4 Stars 3 Stars 2 Stars 1 Star

No reviews

  • Author: Kimberly
  • Total Time: 2 hours
  • Yield: 10-12

Description

Recommended Equipment

  • large mixing bowl
  • medium bowl
  • plastic wrap
  • rolling pin

Ingredients

Units Scale
MILK BUNS
  • 500 grams all-purpose flour (type 550 in Germany)
  • 1 tsp salt
  • 1 egg
  • 50 grams white sugar
  • 7 grams dry active yeast
  • 200 milliliter full-fat cow milk
  • 100 grams butter
GINGERBREAD FILLING
  • 125 grams mascarpone
  • 50 grams milk chocolate
  • 15 grams powdered sugar
  • pinch of salt
  • 1 tsp cinnamon
  • 1/2 tsp clove, ground
  • 1/4 tsp ginger, ground
  • 1/4 tsp allspice, ground
  • 1/8 tsp cardamom, ground
  • 1/8 tsp nutmeg, ground
  • 25 grams candied oranges
  • 25 grams hazelnuts, chopped & roasted
GLAZE
  • 2 tbsp butter
  • 2 tbsp heavy cream

Instructions

  1. For the yeast dough, heat milk, butter until melted in a small saucepan to 35°C (95°F). Add 1 tsp of the sugar and the yeast and stir until dissolved. Let sit for about 3-4 minutes until bubbles form.
  2. Meanwhile, in a large mixing bowl, whisk together the egg, sugar, and salt. Add the yeast-butter-milk mixture and the flour, then knead into a smooth dough. Cover the bowl with plastic wrap and let it rest for about 40 minutes, until the dough has doubled in size.
  3. In the meantime, prepare the gingerbread cream. In a bowl, mix mascarpone, powdered sugar, cinnamon, cardamom, cloves, allspice, nutmeg, and ginger. Melt the chocolate and stir it into the mascarpone mixture. Finally, fold in chopped hazelnuts and candied orange pieces, mix well, and set aside.
  4. Once the dough has doubled in size, transfer it to a lightly floured surface. Knead it briefly and shape it into a long roll. Divide the roll into 10-12 equal pieces. Flatten each piece and spread 1 tablespoon of gingerbread cream on top, leaving a 1 cm border. Roll them up from the bottom. Pinch the ends tightly to prevent the filling from leaking while baking.
  5. Place the rolls into a baking dish, cover again with plastic wrap, and let them rise for another 40 minutes.
  6. Preheat the oven to 190°C (375°F) during the second rise.
  7. Just before baking, brush the rolls with a mixture of cream and melted butter.
  8. Bake the rolls for about 20-25 minutes until golden brown.
  • Passive Time: 100 min
  • Cook Time: 20 min

CRAVING MORE?

Follow along here & don’t forget to subscribe to my substack!

Garlic Parmesan Butter Knots & Grated Tomato Dip

Garlic Parmesan Butter Knots & Grated Tomato Dip

Garlic Parmesan Butter Knots & Grated Tomato Dip

Garlic Parmesan Butter Knots & Grated Tomato Dip

September 2, 2024 by Kimberly

Indulge in warm, buttery knots with a savory garlic kick, paired perfectly with a fresh and tangy tomato dip. This treat feels like a cozy hug for your taste buds.

This website uses affiliate links which may earn commission for purchases made at no additional cost to you.

TOTAL TIME

2x overnight + 7 hrs + 45 min

SERVES

11 knots

DIET

vegetarian

EVERY RECIPE DESERVES

A Little Love Letter

Get ready to cozy up with these irresistible, buttery garlic knots that are as delicious as they are easy to make. Packed with savory garlic and parmesan, these warm, soft knots are the ultimate comfort food snack. Paired with a fresh, tangy tomato dip, they’re perfect for sharing with friends or enjoying on your own. Whether you’re hosting a party or just craving something deliciously savory, these knots are sure to become a favorite in your recipe collection.

These garlic parmesan knots are best served warm, straight out of the oven. Serve alongside a bowl of the grated tomato dip for a refreshing contrast to the rich, buttery flavor. This dish makes a great appetizer or a tasty side for soups and salads.

To keep these knots fresh, store them in an airtight container at room temperature for up to two days. If you need to keep them longer, freeze them in a sealed bag for up to a month. Reheat in the oven at a low temperature to bring back that fresh-from-the-oven warmth. The tomato dip can be stored in the fridge for up to three days, and it’s best served slightly chilled.

Hi, I'm Kimberly!

Hi, I'm Kimberly.

A hopeless romantic when it comes to food. Every recipe I share is a love letter to food itself. I’m so glad you’re here. Make yourself at home and stay a while.

Love,
Kimberly

Kimberly the Zett Signature

If you want to get to know me better,
click here!


Garlic Parmesan Butter Knots & Grated Tomato Dip

LET’S MAKE A PIECE OF HAPPINESS

Print
.tasty-recipe-responsive-iframe-container-cda6d5af { position: relative; overflow: hidden; padding-top: 56.3%; } .tasty-recipe-responsive-iframe-container-cda6d5af iframe { position: absolute; top: 0; left: 0; width: 100%; height: 100%; border: 0; } clock clock iconcutlery cutlery iconflag flag iconfolder folder iconinstagram instagram iconpinterest pinterest iconfacebook facebook iconprint print iconsquares squares iconheart heart iconheart solid heart solid icon
Garlic Parmesan Butter Knots & Grated Tomato Dip

Garlic Parmesan Butter Knots & Grated Tomato Dip


  • Author: Kimberly
  • Total Time: 2x over night + 7 hrs + 45 min
  • Yield: 11 knots

Description

Recommended Equipment

  • tall glass with a lid
  • two large bowls
  • spatula
  • two medium-sized bowls
  • grater
  • sharp knife
  • cutting board

Ingredients

Units Scale
PRE-DOUGH
  • 50 grams pizza flour (in Germany Typ 00)
  • 50 grams water, luke warm
  • 1/8 tsp dry active yeast
DOUGH
  • 250 grams pizza flour (in Germany Typ 00)
  • 150 grams water, room temperature
  • 1/8 tsp dry active yeast
  • 1 tsp salt
BUTTE PARMESAN GARLIC SAUCE
  • 50 grams butter
  • 20 grams parmesan
  • 8 garlic cloves
  • 2 tbsp fresh parsley
  • pinch of salt
GRATED TOMATO DIP
  • 3 mid-sized tomatoes
  • 1 tbsp olive oil
  • pinch of salt

Instructions

PREPARATIONS

  • Evening before Day 1: Prepare the pre-dough. Mix flour, dry active yeast, and water in a tall glass until no lumps remain and the consistency is sticky. Cover loosely with a lid and let it sit at room temperature overnight.
  • Day 1: Combine the pre-dough from the first evening with the dough ingredients in a medium-sized bowl. Stir with a wooden spoon until everything just comes together. Use a dough scraper or spatula to clean the sides of the bowl. Cover the bowl tightly with plastic wrap and let it rest for 30 minutes. After this time, grab the dough with a wet hand on one side, gently lift it, and fold it over onto the other side. Continue this process until the dough has been lifted and folded all the way around. Repeat this step 3 more times, every 30 minutes. After the 4th stretch and fold, shape the dough into a round ball with a taut surface and place it back in the bowl. Cover the bowl tightly with a lid or plastic wrap and refrigerate overnight.
  • Day 2: Take the dough out of the fridge and divide it into 11-12 equal portions with 50g / 1.8o each on a lightly floured surface. Roll each portion into a long dough rope, then form a knot and press the ends together on the back of the knot. Place the knots on a baking sheet lined with parchment paper, leaving enough space between them. Cover them with a damp kitchen towel and let them rise at room temperature for the next 3 hours. Preheat the oven to 190°C / 375°F towards the end of the rising time.

INSTRUCTIONS

  1. Once the oven is hot, place the baking sheet with the dough knots in the oven and bake for about 15 minutes. Then, brown them for an additional 5 minutes using the grill function at 250°C / 480°F.
  2. Meanwhile, prepare the butter-parmesan sauce. Melt butter in a medium-sized bowl, then finely grate the parmesan into it. Peel the garlic and either grate or press it into the bowl. Finely chop the parsley and add it to the bowl as well. Mix everything together and season with a pinch of salt. Set aside.
  3. For the dip, finely grate the tomatoes, leaving the skin behind (it won’t be used in the dip). Transfer the grated tomatoes to a bowl, mix with a bit of olive oil and salt, and pour into a small serving dish.
  4. Take the knots out of the oven and immediately place them in a large bowl. Pour the butter-parmesan sauce over them and toss well to coat each knot. Transfer the knots to a basket and serve with the dip. They taste best warm and fresh from the oven.
  • Prep Time: 25 min
  • Passive Time: 2x over night + 7 hrs
  • Cook Time: 20 min

CRAVING MORE?

Follow along here & don’t forget to subscribe to my substack!

Garlic Herb Pull Apart Bread

Garlic Herb Pull Apart Bread

Garlic Herb Pull Apart Bread

Garlic Herb Pull Apart Bread

May 30, 2024 by Kimberly

Garlic Herb Pull Apart Bread is the perfect addition to any meal, bringing together the flavors of fresh garlic and herbs in a soft, pull-apart bread.

This website uses affiliate links which may earn commission for purchases made at no additional cost to you.

TOTAL TIME

2 hrs + 50 min

SERVES

10 portions

DIET

vegetarian

EVERY RECIPE DESERVES

A Little Love Letter

Garlic Herb Pull Apart Bread is the perfect addition to any meal, bringing together the flavors of fresh garlic and herbs in a soft, pull-apart bread. This bread is not only delicious but also incredibly fun to eat, making it a hit at parties and family gatherings.

Serve this mouthwatering Garlic Herb Pull Apart Bread as an appetizer at your next party or alongside a big salad. It’s also perfect for dipping into soups and stews, or simply enjoy it on its own. The combination of herbs and garlic makes every bite a delightful experience.

To store your leftover Garlic Herb Pull Apart Bread, wrap it tightly in aluminum foil and keep it at room temperature for up to 2 days. For longer storage, place it in an airtight container and refrigerate for up to 4 days. Reheat in the oven to bring back its fresh-baked taste and texture.

Hi, I'm Kimberly!

Hi, I'm Kimberly.

A hopeless romantic when it comes to food. Every recipe I share is a love letter to food itself. I’m so glad you’re here. Make yourself at home and stay a while.

Love,
Kimberly

Kimberly the Zett Signature

If you want to get to know me better,
click here!


Garlic Herb Pull Apart Bread

LET’S MAKE A PIECE OF HAPPINESS

Print
.tasty-recipe-responsive-iframe-container-45760a81 { position: relative; overflow: hidden; padding-top: 56.3%; } .tasty-recipe-responsive-iframe-container-45760a81 iframe { position: absolute; top: 0; left: 0; width: 100%; height: 100%; border: 0; } clock clock iconcutlery cutlery iconflag flag iconfolder folder iconinstagram instagram iconpinterest pinterest iconfacebook facebook iconprint print iconsquares squares iconheart heart iconheart solid heart solid icon
Garlic Herb Pull Apart Bread

Garlic Herb Pull Apart Bread


5 from 1 review

  • Author: Kimberly
  • Total Time: 2 hours 50 min
  • Yield: 10

Description

GOOD TO HAVE ON HAND

  • baking pan (I used a 28x8cm / 11”x3” loaf pan)
  • large bowl
  • measuring cup
  • plastic wrap (or kitchen towel)
  • small bowl
  • sharp knife
  • cutting board
  • garlic press
  • rolling pin


Ingredients

Units Scale
DOUGH
  • 600 grams all-purpose flour
  • 42 grams fresh yeast
  • 2 tsp sugar
  • 2 tsp salt
  • 50 milliliters oil of your choice (I used cold-pressed rapeseed oil)
  • 350 milliliters lukewarm water
FILLING
  • 5 garlic cloves
  • 30 grams fresh herbs (I used thyme, oregano, basil, rosemary & parsley)
  • 125 grams soft butter
  • salt & pepper

Instructions

  1. For the dough, mix flour, sugar, and salt in a large bowl. In a measuring cup, measure out the lukewarm water, crumble in the fresh yeast, and stir until the yeast dissolves. Add the yeast water and olive oil to the flour-sugar-salt mixture and mix until a sticky dough forms. Cover the bowl with plastic wrap or a damp towel and set aside for 10 minutes.
  2. With a wet hand, grab one side of the dough, lift it up, and fold it into the middle. Repeat with the other three sides. Let the dough rest for another 10 minutes, then repeat the folding process and let the dough rise, covered, for 1 hour.
  3. Meanwhile, prepare the filling. Finely chop the herbs and peel the garlic cloves, then either finely chop them or use a garlic press. In a small bowl, mix the softened butter, herbs, garlic, salt, and pepper into a paste and set aside (do not refrigerate, the butter should remain spreadable). Prepare the baking pan by either greasing it with a bit of butter or lining it with parchment paper, and set aside.
  4. After the dough has risen for an hour, perform one final round of folding and let it rise, covered, for another hour.
  5. Turn the dough out onto a clean, lightly floured surface and roll it out into a rectangle about 1/2” thick. Spread the butter-garlic-herb paste evenly over the dough. Cut the dough into strips about 8cm / 3” wide. Fold each strip like an accordion and place them upright in the baking pan with the buttered side facing up. Repeat with all the strips, pressing the dough snugly into the pan. Preheat the oven to 200°C / 392°F. Bake the dough for about 30 minutes. Serve warm or let cool. And now enjoy this piece of happiness 🙂

Notes

The calorie information may vary depending on the product used, country and region.

  • Passive Time: 2 hours 30 min
  • Cook Time: 20 min

CRAVING MORE?

Follow along here & don’t forget to subscribe to my substack!