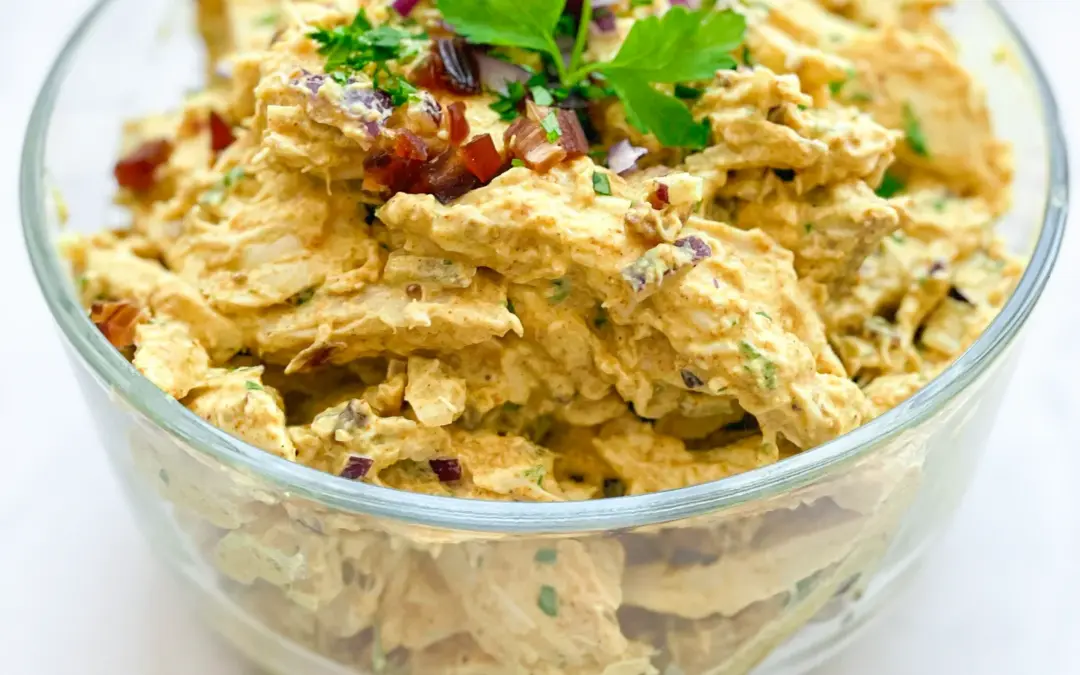
Curry Chicken Spread

Curry Chicken Spread

Curry Chicken Spread

Curry Chicken Spread

January 12, 2024 by Kimberly

Get ready for a taste adventure with my Curry Chicken Spread! Rich, spicy, and full of flavor, it’s perfect for sandwiches or as a savory snack dip!

This website uses affiliate links which may earn commission for purchases made at no additional cost to you.

TOTAL TIME

30 min

SERVES

6 portions

DIET

omnivore

EVERY RECIPE DESERVES

A Little Love Letter

Embark on a culinary journey with our Curry Chicken Spread, a fusion of bold flavors and textures. This spread is a delightful blend of tender chicken, aromatic spices, and creamy elements, creating a versatile and irresistible addition to any meal. It’s an exotic twist on traditional spreads, perfect for those who crave something uniquely flavorful and satisfying.

Curry Chicken Spread is incredibly versatile. Spread it generously on crusty bread or crackers for a quick, savory snack. It’s also fantastic in sandwiches, adding a flavorful kick to your lunch. For a more elegant presentation, use it as a dip with a platter of fresh vegetables or pita chips at your next party. The rich curry flavors blend beautifully with the chicken, making it a hit at any dining occasion.

To store the Curry Chicken Spread, place it in an airtight container and refrigerate. It will stay fresh for up to 3-4 days.

Hi, I'm Kimberly!

Hi, I'm Kimberly.

A hopeless romantic when it comes to food. Every recipe I share is a love letter to food itself. I’m so glad you’re here. Make yourself at home and stay a while.

Love,
Kimberly

Kimberly the Zett Signature

If you want to get to know me better,
click here!


Curry Chicken Spread

LET’S MAKE A PIECE OF HAPPINESS

Print
clock clock iconcutlery cutlery iconflag flag iconfolder folder iconinstagram instagram iconpinterest pinterest iconfacebook facebook iconprint print iconsquares squares iconheart heart iconheart solid heart solid icon
Curry Chicken Spread

Curry Chicken Spread


5 Stars 4 Stars 3 Stars 2 Stars 1 Star

No reviews

  • Author: Kimberly
  • Total Time: 30 min
  • Yield: 6

Description

GOOD TO HAVE ON HAND

  • sharp knife
  • cutting board
  • medium sized bowl


Ingredients

Units Scale
  • 450 grams chicken breast
  • 1 red onion
  • 4 dates
  • a few stems parsley
  • 150 grams yoghurt
  • 3 tsp curry powder
  • 1 garlic clove
  • 1 tbsp lemon juice
  • 1 tsp Dijon mustard
  • salt & pepper to taste

Instructions

  1. Peel the onion and cut into small pieces. Pluck the parsley leaves from the sprigs and chop finely. Cut the dates into small pieces.
  2. Boil the chicken breasts in hot water for about 15 minutes and then shred them.
  3. In a medium bowl, mix the yogurt with the mustard, lemon juice, garlic, curry, salt and pepper and season to taste.
  4. Stir in the finely diced onions, dates and parsley.
  5. Finally, add the shredded chicken and mix everything well.
  • Passive Time: 15 min
  • Cook Time: 15 min

CRAVING MORE?

Follow along here & don’t forget to subscribe to my substack!

Apple Chia Pudding

Apple Chia Pudding

Apple Chia Pudding

Apple Chia Pudding

January 9, 2024 by Kimberly

Apple Chia Pudding is an exhilarating and nutritious treat! Bursting with fresh apples, hearty chia seeds, and a sprinkle of warm cinnamon, it’s an irresistibly yummy snack!

This website uses affiliate links which may earn commission for purchases made at no additional cost to you.

TOTAL TIME

40 min

SERVES

1 bowl

DIET

vegan

EVERY RECIPE DESERVES

A Little Love Letter

Indulge in the delightful fusion of flavors with this Apple Chia Pudding – a perfect blend of health and taste. This pudding combines the natural sweetness of apples with the nutritional powerhouse of chia seeds, all enhanced by a subtle hint of cinnamon. Ideal for any time of the day, this pudding is a must-try for all health-conscious gourmets.

Serve this Apple Chia Pudding in glasses or bowls to elevate its visual appeal. Top it with a few apple slices and a sprinkle of cinnamon for an extra burst of flavor. It pairs wonderfully with a drizzle of honey for added richness. Enjoy it as a refreshing breakfast, a satisfying snack, or a light dessert that leaves you feeling fulfilled yet light.

For storing simply keep it in an airtight container in the refrigerator. It stays fresh for up to three days. For the best flavor, give it a gentle stir before serving. This makes it a convenient option for meal prepping or satisfying sudden cravings.

Hi, I'm Kimberly!

Hi, I'm Kimberly.

A hopeless romantic when it comes to food. Every recipe I share is a love letter to food itself. I’m so glad you’re here. Make yourself at home and stay a while.

Love,
Kimberly

Kimberly the Zett Signature

If you want to get to know me better,
click here!


Apple Chia Pudding
Apple Chia Pudding

LET’S MAKE A PIECE OF HAPPINESS

Print
.tasty-recipe-responsive-iframe-container-c1e302ff { position: relative; overflow: hidden; padding-top: 177.62%; } .tasty-recipe-responsive-iframe-container-c1e302ff iframe { position: absolute; top: 0; left: 0; width: 100%; height: 100%; border: 0; } clock clock iconcutlery cutlery iconflag flag iconfolder folder iconinstagram instagram iconpinterest pinterest iconfacebook facebook iconprint print iconsquares squares iconheart heart iconheart solid heart solid icon
Apple Chia Pudding

Apple Chia Pudding


  • Author: Kimberly
  • Total Time: 40 min
  • Yield: 1

Description

GOOD TO HAVE ON HAND

  • sharp knife
  • chopping board
  • medium-sized bowl
  • peeler (or sharp knife)


Ingredients

Units Scale
PUDDING
  • 1/2 apple of choice - I used Cripps Pink
  • 4 tbsp chia seeds
  • 250 milliliters milk of choice (I used soy milk)
  • 2 tbsp yoghurt
TOPPINGS
  • 1/8 tsp cinnamon
  • 1/2 apple in slices

Instructions

  1. Wash, halve and core the apple. Cut one half into small pieces and place in a medium-sized bowl. Cut the other half into thin slices and set aside.
  2. Add chia seeds, milk and yogurt to the apples in the bowl. Mix everything together and place in the fridge for at least 30 minutes. You can also prepare this as an overnight dish.
  3. Take the bowl out of the fridge and top with the apple slices and cinnamon.
  • Passive Time: 30 min
  • Cook Time: 10 min

CRAVING MORE?

Follow along here & don’t forget to subscribe to my substack!

Pumpkin Coconut Soup

Pumpkin Coconut Soup

Pumpkin Coconut Soup

Pumpkin Coconut Soup

Janaury 8, 2024 by Kimberly

Pumpkin coconut soup is a delightful and nourishing treat! Its rich, creamy texture and the perfect blend of sweet pumpkin and exotic coconut milk is absolutely irresistible.

This website uses affiliate links which may earn commission for purchases made at no additional cost to you.

TOTAL TIME

55 min

SERVES

4 bowls

DIET

vegan

EVERY RECIPE DESERVES

A Little Love Letter

Welcome to the world of flavors with my Pumpkin Coconut Soup! This dish is a perfect blend of the sweetness of pumpkin and the creamy richness of coconut milk, creating a comfort food that is both nutritious and delicious. Ideal for chilly days or when you’re in the mood for something soothing, this soup promises to warm your heart.

Serve this Pumpkin Coconut Soup hot, garnished with a sprinkle of fresh herbs like cilantro or parsley for an added burst of flavor. A swirl of cream or a few pumpkin seeds on top can add a delightful texture and look. Pair it with crusty bread or a light salad for a complete meal. Its vibrant color and enticing aroma make it a great starter for dinners or a stand-alone dish for a cozy night in.

To store the leftover soup, let it cool to room temperature and then transfer it into an airtight container. It can be kept in the refrigerator for up to 3 days. For longer storage, freeze the soup in suitable portions. When ready to enjoy again, simply thaw and reheat, adjusting the consistency with a little water or broth if necessary. This soup retains its flavor well, making it a great make-ahead dish for busy days.

Hi, I'm Kimberly!

Hi, I'm Kimberly.

A hopeless romantic when it comes to food. Every recipe I share is a love letter to food itself. I’m so glad you’re here. Make yourself at home and stay a while.

Love,
Kimberly

Kimberly the Zett Signature

If you want to get to know me better,
click here!


Pumpkin Coconut Soup

LET’S MAKE A PIECE OF HAPPINESS

Print
.tasty-recipe-responsive-iframe-container-681c2b53 { position: relative; overflow: hidden; padding-top: 177.62%; } .tasty-recipe-responsive-iframe-container-681c2b53 iframe { position: absolute; top: 0; left: 0; width: 100%; height: 100%; border: 0; } clock clock iconcutlery cutlery iconflag flag iconfolder folder iconinstagram instagram iconpinterest pinterest iconfacebook facebook iconprint print iconsquares squares iconheart heart iconheart solid heart solid icon
Pumpkin Coconut Soup

Pumpkin Coconut Soup


  • Author: Kimberly
  • Total Time: 55 min
  • Yield: 4

Description

GOOD TO HAVE ON HAND

  • sharp knife
  • cutting board
  • large pot
  • hand blender (or blender)


Ingredients

Units Scale
SOUP BASE
  • 1 kilogramm hokkaido pumpkin
  • 2 carrots
  • 2 potatoes
  • a small thumb-sized piece of ginger
  • 1 onion
  • 2 garlic cloves
  • 1 tbsp clarified butter
  • 400 milliliters coconut milk
  • 700 milliliters vegetable broth
SPICES
  • 1/2 tsp salt
  • 1/2 tsp pepper
  • 1/2 grated nutmeg
  • 5 tbsp soy sauce
  • juice of half a lemon
TOPPINGS
  • parsley
  • a splash of coconut milk
  • a splash of soy sauce
  • freshly cracked black pepper
  • pumpkinseeds

Instructions

  1. Remove the seeds from the pumpkin and cut it into large pieces. If you use a Hokkaido pumpkin, you don’t need to peel it.
  2. Peel and roughly chop the carrots, potatoes, onions, ginger and garlic. Cut the lemon in half.
  3. Heat the clarified butter in a large pot and sauté the onions until translucent. Then add the pumpkin, carrot, potatoes, ginger and garlic. Sauté everything for about 5 minutes until the vegetables have taken on a little color and smell aromatic.
  4. Pour in the vegetable broth and cook for about 30 minutes until soft. Then finely puree the mixture as desired.
  5. Then stir in the coconut milk and season to taste with salt, pepper, soy sauce, lemon juice and nutmeg. Garnish with parsley, coconut milk, soy sauce and pumpkin seeds.
  • Passive Time: 30 min
  • Cook Time: 25 min

CRAVING MORE?

Follow along here & don’t forget to subscribe to my substack!

Light & Flavorful Blueberry Banana Cupcakes with Cream Cheese Frosting

Light & Flavorful Blueberry Banana Cupcakes with Cream Cheese Frosting

Light & Flavorful Blueberry Banana Cupcakes with Cream Cheese Frosting

Light & Flavorful Blueberry Banana Cupcakes with Cream Cheese Frosting

January 6, 2024 by Kimberly

Enjoy our Blueberry Banana Cupcakes, a refined sugar-free recipe, topped with creamy cheese frosting for a light, sweet delight blending natural fruitiness with rich smoothness.

This website uses affiliate links which may earn commission for purchases made at no additional cost to you.

TOTAL TIME

25 min

SERVES

12 cupcakes

DIET

vegetarian

EVERY RECIPE DESERVES

A Little Love Letter

These blueberry banana cupcakes are the kind of bake that instantly fills your kitchen with the scent of something cozy and inviting. They’re incredibly soft and light, made with ripe mashed bananas that add natural sweetness and moisture, and pockets of juicy blueberries that burst gently as they bake. Each bite feels fresh and bright, yet comforting in that nostalgic, homemade way.

What makes them truly special is how effortless they are: simple ingredients, a quick batter, and a result that tastes far more impressive than the time it takes to make them. They’re the kind of cupcakes you can whip up on a slow Sunday morning or bring to a last-minute gathering—and they’ll always feel like a thoughtful, homemade treat.

Once cooled, they’re topped with a silky, slightly tangy cream cheese frosting that pairs beautifully with the fruitiness of the cupcakes. It adds just the right amount of richness without overpowering the delicate flavors. Together, it’s a combination that feels both light and indulgent—perfect for brunch, spring and summer celebrations, or any moment that needs a little piece of happiness baked into it.

Hi, I'm Kimberly!

Hi, I'm Kimberly.

A hopeless romantic when it comes to food. Every recipe I share is a love letter to food itself. I’m so glad you’re here. Make yourself at home and stay a while.

Love,
Kimberly

Kimberly the Zett Signature

If you want to get to know me better,
click here!


Light & Flavorful Blueberry Banana Cupcakes with Cream Cheese Frosting

LET’S MAKE A PIECE OF HAPPINESS

Print
.tasty-recipe-responsive-iframe-container-8634009c { position: relative; overflow: hidden; padding-top: 177.62%; } .tasty-recipe-responsive-iframe-container-8634009c iframe { position: absolute; top: 0; left: 0; width: 100%; height: 100%; border: 0; } clock clock iconcutlery cutlery iconflag flag iconfolder folder iconinstagram instagram iconpinterest pinterest iconfacebook facebook iconprint print iconsquares squares iconheart heart iconheart solid heart solid icon
Light & Flavorful Blueberry Banana Cupcakes with Cream Cheese Frosting

Light & Flavorful Blueberry Banana Cupcakes with Cream Cheese Frosting


  • Author: Kimberly
  • Total Time: 25 min
  • Yield: 12 cupcakes

Description

GOOD TO HAVE ON HAND

  • cupcake tin
  • baking paper
  • large bowl
  • medium bowl
  • hand mixer


Ingredients

Units Scale
CUPCAKES
  • 3 ripe bananas
  • 50 milliliters coconut oil
  • 80 grams agave syrup
  • 1 egg
  • 1 tsp vanilla extract
  • 180 grams all-purpose flour
  • 1 tsp baking soda
  • 1 tsp baking powder
  • 1/2 tsp salt
  • 160 grams frozen blueberries
FROSTING
  • 230 grams cream cheese
  • 250 grams yogurt
  • 50 milliliters agave syrup
  • 1 tsp lemon juice
  • 1/2 tsp vanilla extract

Instructions

  1. Preheat the oven to 180°C (350°F) and line a 12-cup cupcake tin with baking paper and set aside.
  2. In a large bowl, mash the bananas with a fork to a mash. Mix in the coconut oil, agave syrup, egg and vanilla.
  3. Now add the flour, baking soda, baking powder and salt to the bowl and mix everything together until a creamy dough forms, do not overmix. Fold in the blueberries but set aside about 1 tablespoon of them for later.
  4. Fill the cupcake tins about 2/3 full. Now bake for 16 minutes. I bake them in two batches of 6 so that the cupcakes have more room to rise.
  5. Meanwhile, prepare the cream cheese frosting. Place the cream cheese, yoghurt, agave syrup, vanilla extract and lemon juice in a mixing bowl and beat with a hand mixer until stiff peaks form and a firm cream has formed,
  6. Take the cupcakes out of the oven and leave to cool on a wire rack. As soon as the cupcakes are at room temperature, the frosting can be spread on top. Warm the remaining blueberries in a small pot or in the microwave until they turn into a sauce. Let it cool and pour the sauce over the cupcakes just before serving.
  • Passive Time: 10 min
  • Cook Time: 15 min

CRAVING MORE?

Follow along here & don’t forget to subscribe to my substack!

Banana Bliss Smoothie with Poppy Seeds Marzipan & Almond Butter

Banana Bliss Smoothie with Poppy Seeds Marzipan & Almond Butter

Banana Bliss Smoothie with Poppy Seeds Marzipan & Almond Butter

Banana Bliss Smoothie with Poppy Seeds Marzipan & Almond Butter

January 4, 2024 by Kimberly

Savor this delightful smoothie, blending sweet bananas and almond butter with a hint of marzipan. It’s a creamy, refreshing treat that’s both nutritious and delicious!

This website uses affiliate links which may earn commission for purchases made at no additional cost to you.

TOTAL TIME

5 min

SERVES

1 drink

DIET

vegan

EVERY RECIPE DESERVES

A Little Love Letter

Indulge in the unique blend of flavors with our special smoothie, perfect for any time of the day. This recipe combines the creaminess of bananas and almond butter with subtle, sweet hints, creating a truly delightful beverage. Whether you need a morning pick-me-up or a refreshing afternoon treat, this smoothie offers a delicious way to energize and satisfy your taste buds.

Serve this smoothie chilled for the best experience. Pour it into a glass and garnish with a slice of lemon on the rim for an elegant touch. If you’re feeling creative, sprinkle a few extra poppy seeds on top for a beautiful presentation. It’s ideal for breakfast, a quick snack, or even as a light dessert.

To keep this smoothie fresh, store it in an airtight glas jar for up to 2 days. Give it a good stir or a quick blend before serving, as the ingredients may separate over time.

Hi, I'm Kimberly!

Hi, I'm Kimberly.

A hopeless romantic when it comes to food. Every recipe I share is a love letter to food itself. I’m so glad you’re here. Make yourself at home and stay a while.

Love,
Kimberly

Kimberly the Zett Signature

If you want to get to know me better,
click here!


Banana Bliss Smoothie with Poppy Seeds Marzipan & Almond Butter

LET’S MAKE A PIECE OF HAPPINESS

Print
.tasty-recipe-responsive-iframe-container-c42a91bf { position: relative; overflow: hidden; padding-top: 177.62%; } .tasty-recipe-responsive-iframe-container-c42a91bf iframe { position: absolute; top: 0; left: 0; width: 100%; height: 100%; border: 0; } clock clock iconcutlery cutlery iconflag flag iconfolder folder iconinstagram instagram iconpinterest pinterest iconfacebook facebook iconprint print iconsquares squares iconheart heart iconheart solid heart solid icon
Banana Bliss Smoothie with Poppy Seeds Marzipan & Almond Butter

Banana Bliss Smoothie with Poppy Seeds Marzipan & Almond Butter


  • Author: Kimberly
  • Total Time: 5 min
  • Yield: 1

Description

GOOD TO HAVE ON HAND

  • blender


Ingredients

Units Scale
  • 1 banana
  • 2 tsp almond butter
  • 1 tsp lemon juice
  • 1 tsp agave syrup
  • 1 tbsp marzipan
  • 1 tsp poppy seeds
  • 1/8 tsp cinnamon
  • 200 milliliters water

Instructions

  • Peel the banana and put it into the blender in large chunks. Pluck the marzipan into small pieces and add to the blender. Then add the almond butter, lemon juice, agave syrup, poppy seeds, cinnamon and water. Puree everything on the highest setting for 1-2 minutes. Pour into a jar or bottle.
  • Cook Time: 5 min

CRAVING MORE?

Follow along here & don’t forget to subscribe to my substack!

Creamy Salsiccia & Caramalized Onion Pasta

Creamy Salsiccia & Caramalized Onion Pasta

Creamy Sausage & Caramalized Onion Pasta with Salsiccia

Creamy Salsiccia & Caramalized Onion Pasta

December 28, 2023 by Kimberly

Get ready for a cozy, indulgent meal! This pasta brings together rich, creamy flavors with a hint of spice and deep caramelized sweetness, perfect for a relaxing night in.

This website uses affiliate links which may earn commission for purchases made at no additional cost to you.

TOTAL TIME

40 min

SERVES

2-3 portions

DIET

omnivore

EVERY RECIPE DESERVES

A Little Love Letter

If you’re craving a comforting meal that’s both rich and full of flavor, this creamy pasta with sausage and caramelized onions will be your new favorite! Each bite is a perfect blend of deep, slow-cooked sweetness from the onions, paired with the bold, savory flavors of Italian sausage, all wrapped up in a smooth, creamy sauce. It’s an easy recipe that feels like a cozy hug on a plate, ideal for any night when you just want to treat yourself.

Serve this pasta piping hot, topped with freshly grated Parmesan and a sprinkle of parsley for extra color and flavor. Pair it with a light side salad or some crusty bread to soak up every bit of that creamy sauce. This dish shines with a glass of white wine, which complements the richness beautifully. It’s perfect for a weeknight dinner that feels like a restaurant treat or even a cozy date night at home.

Store any leftovers in an airtight container in the fridge for up to three days. To reheat, add a splash of stock in a pan over low heat, stirring occasionally until warmed through. It’s almost as good as fresh!

Hi, I'm Kimberly!

Hi, I'm Kimberly.

A hopeless romantic when it comes to food. Every recipe I share is a love letter to food itself. I’m so glad you’re here. Make yourself at home and stay a while.

Love,
Kimberly

Kimberly the Zett Signature

If you want to get to know me better,
click here!


Creamy Sausage & Caramalized Onion Pasta with Salsiccia

LET’S MAKE A PIECE OF HAPPINESS

Print
.tasty-recipe-responsive-iframe-container-99f09687 { position: relative; overflow: hidden; padding-top: 56.3%; } .tasty-recipe-responsive-iframe-container-99f09687 iframe { position: absolute; top: 0; left: 0; width: 100%; height: 100%; border: 0; } clock clock iconcutlery cutlery iconflag flag iconfolder folder iconinstagram instagram iconpinterest pinterest iconfacebook facebook iconprint print iconsquares squares iconheart heart iconheart solid heart solid icon
Creamy Sausage & Caramalized Onion Pasta with Salsiccia

Creamy Salsiccia & Caramalized Onion Pasta


  • Author: Kimberly
  • Total Time: 40 min
  • Yield: 2

Description

GOOD TO HAVE ON HAND

  • large pan
  • sharp knife
  • cutting board
  • large pot


Ingredients

Units Scale
  • 160 grams pasta of your choice (I used Tagliatelle)
  • 4 mid-sized white onions
  • 1 tsp butter
  • 1 tbsp olive oil
  • 150 grams fennel salsiccia
  • 2 garlic cloves
  • 1 tbsp tomato paste
  • 1 tsp dried oregano
  • 1 tsp smoked paprika powder
  • 1 tbsp balsamic vinegar
  • 1 tsp Dijon mustard
  • 50 milliliter dry white wine
  • 100 milliliter heavy cream
  • salt & pepper to taste
  • parmesan, for topping
  • fresh parsley, for topping

Instructions

PREPARATIONS

  • Peel the onions and cut them into thin half-rings. Set aside.
  • Remove the casing from the Salsiccia (or keep it on if it’s edible). Cut the sausage into small pieces and set aside.
  • Peel the garlic cloves. Set aside.

INSTRUCTIONS

  1. Place a large pan over medium heat and add butter. Toss in the onions and season with a pinch of salt. Lower the heat and let the onions cook down for about 15 minutes, until they’re soft and golden. Then, remove the onions from the pan.
  2. Put the pan back on the stove, add some olive oil, and heat it up. Add the Salsiccia, breaking it up with a wooden spoon so it resembles coarse ground meat. Turn the heat up to medium and cook until the pieces are golden brown.
  3. Mix in smoked paprika, tomato paste, and oregano, and let it cook briefly until it smells fragrant. Add the garlic to the pan – either finely grate it or press it through a garlic press. Put the onions back in the pan and mix everything well. Now, deglaze with white wine, scraping up the browned bits from the bottom. Add balsamic vinegar and mustard. Pour in the cream and let it simmer on low heat. Season generously with salt and pepper to taste.
  4. Meanwhile, cook the pasta al dente according to package instructions. Save a bit of the pasta water when draining. Add the pasta and some of the pasta water to the pan, tossing it all together until the creamy sauce coats the pasta. Serve on plates, topped with freshly grated Parmesan and parsley.
  • Prep Time: 10 min
  • Passive Time: 15 min
  • Cook Time: 15 min

CRAVING MORE?

Follow along here & don’t forget to subscribe to my substack!