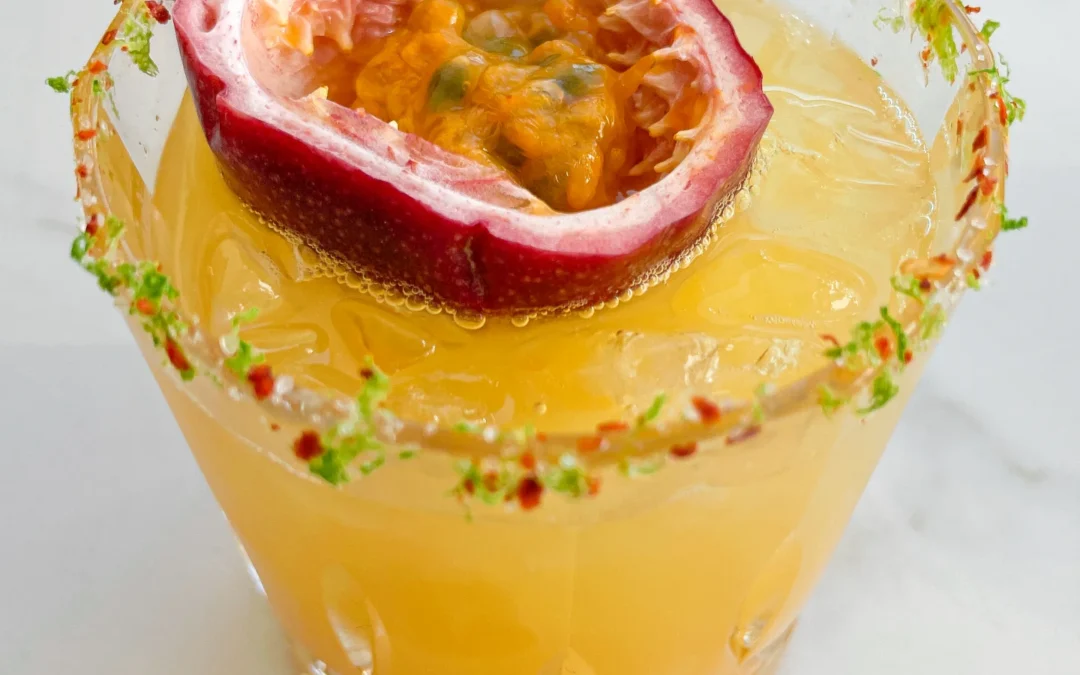
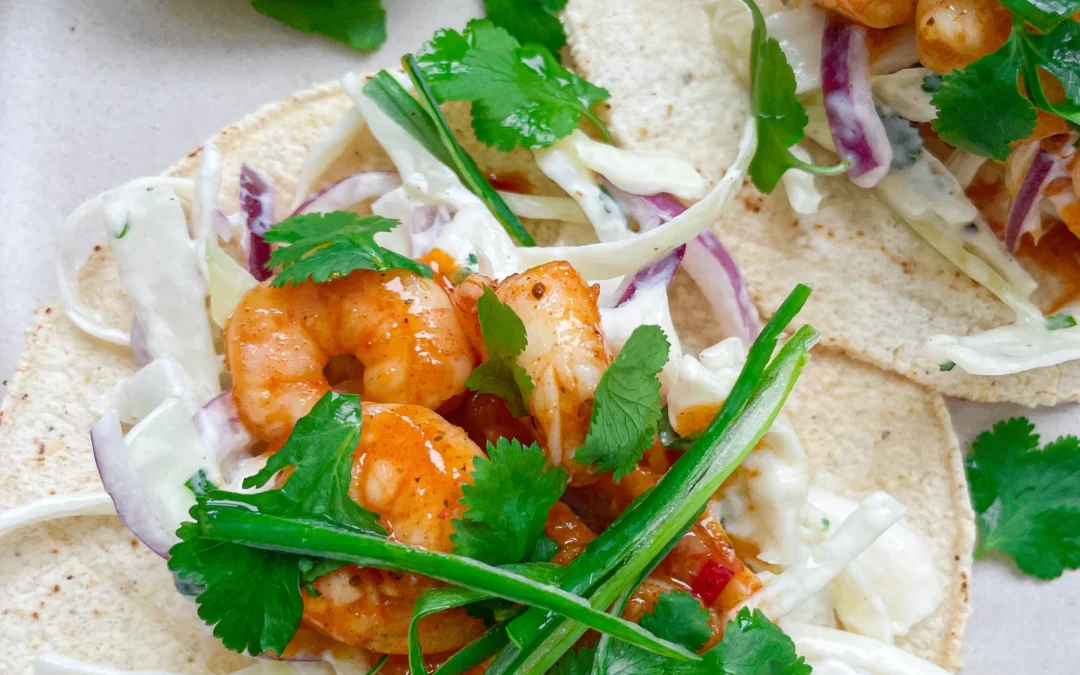
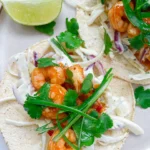
Chocolate Mint Oil

Chocolate Mint Oil

Chocolate Mint Oil

Chocolate Mint Oil

December 20, 2024 by Kimberly

This infused oil is minty-fresh and oh-so-delicious, even if the chocolate vibes didn’t show up. Perfect for drizzling on salads or desserts – it’s a happy accident you’ll love.

40 MINUTES

ADVANCED

VEGAN

ENGLISH

40 PER TSP

REFRESHING

MICHELIN

OIL

ALL YEAR

INTRODUCTION

ABOUT THE RECIPE

Not every recipe turns out as expected, but sometimes the result is even better! This Chocolate Mint Oil was supposed to capture both chocolate and mint flavors, but only the fresh, vibrant mint transferred – and honestly? It’s absolutely delicious. The cocoa nibs didn’t quite make the impact I hoped for, but the minty finish is so versatile and refreshing. Perfect for sweet and savory dishes, this oil still deserves a spot in your kitchen.

How to serve
Drizzle this minty oil over fresh salads for a herby twist or use it to finish a dessert like brownies, ice cream, or fruit salads. It also works as a light drizzle over roasted vegetables, adding a subtle mint freshness to balance the flavors. For an unexpected yet delicious pairing, try it with lamb or feta cheese for a Mediterranean-inspired vibe. Versatile and fresh, it’s a little experiment gone right. For an extravagant dessert with a wow factor, you absolutely have to try this oil on my Vanilla Parfait with Chocolate Soil!

How to store
Store this infused oil in a clean, airtight bottle in the fridge for up to one week.

Hi, I'm Kimberly!

Hi, I'm Kimberly.

A passionate food lover who believes in the magic of homemade deliciousness that spreads love and warmth. Join me on this culinary adventure as I prepare wonderful dishes and let’s spread some happiness together!

Kimberly the Zett Signature

If you want to get to know me better, click here!


Chocolate Mint Oil
Chocolate Mint Oil
Chocolate Mint Oil
„Let’s make a piece of happiness“
Print
clock clock iconcutlery cutlery iconflag flag iconfolder folder iconinstagram instagram iconpinterest pinterest iconfacebook facebook iconprint print iconsquares squares iconheart heart iconheart solid heart solid icon
Chocolate Mint Oil

Chocolate Mint Oil


5 Stars 4 Stars 3 Stars 2 Stars 1 Star

No reviews

  • Author: Kimberly
  • Total Time: 40 min
  • Yield: 1 cup / 250 ml 1x

Description

RECOMMENDED EQUIPMENT

  • blender
  • medium-sized saucepan
  • whisk
  • a bowl which the medium saucepan fits into
  • 2 medium-sized bowls
  • 2 fine mesh strainers
  • oil bottle
  • ice cubes
  • coffee filter

Ingredients

Units Scale
  • 15 grams cocoa nibs
  • 15 grams fresh mint
  • 250 milliliter rapeseed oil

Instructions

  1. Put cocoa nibs and leaves of the mint into the blender. Pour in the oil. Blend on the highest setting until it no coarse pieces are longer visible.
  2. Pour the mixture from the blender into a medium-sized pot and heat it over medium heat, constantly stirring, to a temperature of about 102°-103°C (215°-217°F). Then, let the oil simmer with the lid partially on for the next 10 minutes. Stir only occasionally, making sure the temperature remains steady and nothing gets burned.
  3. At the end of the cooking process, prepare a bowl large enough to fit the medium-sized pot, filled with cold water and a handful of ice cubes. Also, hang a fine mesh sieve strainer over a medium-sized bowl.
  4. Now, place the pot in the ice water and stir to stop the cooking process. Once the oil is almost cold, remove the pot from the water and pour the oil into the first fine mesh sieve to catch the coarse particle.
  5. Then, pour the oil into the second fine mesh sieve, which you before equipped with a coffee filter, to catch the remaining finer particles.
  6. Allow the oil to drip through for about 30 minutes or maybe less depending on how many remaining particles are in the coffee filter. Once all the oil has passed through the coffee filter, transfer the collected amount of oil into an oil bottle. Store in the refrigerator for up to 1 week.
  • Passive Time: 30 min
  • Cook Time: 10 min

Cranberry Orange Oil

Cranberry Orange Oil

Cranberry Orange Oil

Cranberry Orange Oil

December 18, 2024 by Kimberly

This experiment began as cranberry-orange oil, but cranberries stayed quiet. Orange zest, though? It took center stage with bold flavor and vibrant color – a happy twist on the original plan.

35 MINUTES

ADVANCED

VEGAN

INT.

40 PER TSP

REFRESHING

MICHELIN

OIL

ALL YEAR

INTRODUCTION

ABOUT THE RECIPE

This was supposed to be a cranberry-orange oil experiment – a vibrant mix of sweet and tangy. But let me tell you, cranberries completely flopped! They gave neither color nor flavor to the oil. On the bright side, orange zest came to the rescue and brought everything I hoped for: a rich citrusy flavor and stunning golden hue. Sometimes experiments don’t go as planned, but this one ended on a high note!

How to serve
This zesty orange oil is perfect for elevating simple dishes. Drizzle it over a fresh salad, pair it with crusty bread and a sprinkle of flaky salt, or stir it into your favorite salad dressing for a pop of citrusy freshness. It’s also amazing for roasting veggies or adding a little flair to a cheese platter. While the cranberries didn’t work out, the orange zest shines in every bite! But if you’re looking for a great recipe with cranberries, though, I can highly recommend my Cranberry Orange Glazed Pork Roast

How to store
Transfer your oil to a clean, airtight bottle and store it in a cool, dark place. It’s best enjoyed within one week to keep that citrus flavor vibrant.

Hi, I'm Kimberly!

Hi, I'm Kimberly.

A passionate food lover who believes in the magic of homemade deliciousness that spreads love and warmth. Join me on this culinary adventure as I prepare wonderful dishes and let’s spread some happiness together!

Kimberly the Zett Signature

If you want to get to know me better, click here!


Cranberry Orange Oil
„Let’s make a piece of happiness“
Print
clock clock iconcutlery cutlery iconflag flag iconfolder folder iconinstagram instagram iconpinterest pinterest iconfacebook facebook iconprint print iconsquares squares iconheart heart iconheart solid heart solid icon
Cranberry Orange Oil

Cranberry Orange Oil


  • Author: Kimberly
  • Total Time: 35 min
  • Yield: 1 cup / 250 ml 1x

Description

RECOMMENDED EQUIPMENT

  • blender
  • medium-sized saucepan
  • whisk
  • a bowl which the medium saucepan fits into
  • 2 medium-sized bowls
  • 2 fine sieves
  • oil bottle
  • ice cubes
  • coffee filter

Ingredients

Units Scale
  • 50g fresh cranberries
  • 1 orange
  • 250 milliliter neutral oil

Instructions

  1. Wash the cranberries and zest the orange. Put everything into the blender. Pour in the oil. Blend on the highest setting until only tiny pieces are visible.
  2. Pour the mixture from the blender into a medium-sized pot and heat it over medium heat to a temperature of about 102°-103°C (215°-217°F), and maintain this temperature for the next 10 minutes. Stir occasionally, making sure the temperature remains steady and nothing gets burned.
  3. Prepare a bowl large enough to fit a medium-sized pot, and fill it with cold water and a handful of ice cubes. Also, hang a fine sieve strainer over one medium-sized bowl and another fine sieve strainer, with a coffee filter inside it, over another medium-sized bowl.
  4. Now, place the pot in the ice water and stir to cool the oil quickly. Pour the oil into the prepared fine sieve to catch the coarse particles.
  5. Then, pour the oil into the second sieve, which is equipped with a coffee filter, to catch the remaining finer particles.
  6. Allow the oil to drip through for about 20 minutes or maybe less depending on how many remaining particles are in the coffee filter. Once all the oil has passed through the coffee filter, transfer the collected amount of oil into an oil bottle. Store in the refrigerator for up to 1 week.
  • Prep Time: 5 min
  • Passive Time: 20 min
  • Cook Time: 10 min

Vanilla Cupcakes with Pink Dragonfruit Frosting

Vanilla Cupcakes with Pink Dragonfruit Frosting

Vanilla Cupcakes with Pink Dragonfruit Frosting

Vanilla Cupcakes with Pink Dragonfruit Frosting

September 24, 2024 by Kimberly

These fluffy cupcakes melt in your mouth, with a pop of vibrant pink frosting that’s sweet and tropical. They’re perfect for adding a little joy to your day.

60 MINUTES

EASY

VEGETARIAN

INT.

276 PER CUPCAKE

SWEET

PICNIC

DESSERT

ALL YEAR

INTRODUCTION

ABOUT THE RECIPE

If you’re craving a dessert that’s light, fun, and full of flavor, these cupcakes are where it’s at. They have the perfect balance of soft, fluffy vanilla goodness, paired with a vibrant, fruity frosting that’ll bring some serious color to your table. This treat is ideal for anyone who loves a sweet surprise with a tropical twist. Whether it’s a casual afternoon snack or a party-ready dessert, these cupcakes are guaranteed to be a crowd-pleaser.

How to serve
These cupcakes are best enjoyed fresh and slightly chilled, which keeps the frosting from getting too soft. Pair them with a cold glass of milk or a refreshing iced tea for a delicious treat. They’re a great addition to a picnic, birthday party, or even just as an afternoon pick-me-up with your coffee. For a bit of extra flair, garnish with some fresh fruit slices or edible flowers for that wow factor.

How to store
Store any leftover cupcakes in an airtight container in the fridge for up to three days. If you want to keep them longer, freeze them without the frosting for up to two months. Just thaw and frost when ready to enjoy!

Hi, I'm Kimberly!

Hi, I'm Kimberly.

A passionate food lover who believes in the magic of homemade deliciousness that spreads love and warmth. Join me on this culinary adventure as I prepare wonderful dishes and let’s spread some happiness together!

Kimberly the Zett Signature

If you want to get to know me better, click here!


Vanilla Cupcakes with Pink Dragonfruit Frosting
„Let’s make a piece of happiness“
Print
clock clock iconcutlery cutlery iconflag flag iconfolder folder iconinstagram instagram iconpinterest pinterest iconfacebook facebook iconprint print iconsquares squares iconheart heart iconheart solid heart solid icon
Vanilla Cupcakes with Pink Dragonfruit Frosting

Vanilla Cupcakes with Pink Dragonfruit Frosting


  • Author: Kimberly
  • Total Time: 60 min
  • Yield: 18 cupcakes 1x

Description

Recommended Equipment

  • cupcake tin
  • cupcake liners
  • two mixing bowls
  • electric mixer
  • fine mesh strainer
  • piping bag

Ingredients

Units Scale

CUPCAKE BATTER

  • 2 eggs
  • 200 grams white sugar
  • 115 grams butter
  • 2 tsp vanilla extract
  • 235 grams all-purpose flour
  • 120 milliliters full-fat milk
  • 1.5 tsp baking powder
  • pinch of salt

PINK DRAGONFRUIT FROSTING

  • 150 grams cream cheese
  • 80 grams butter
  • 1 tsp vanilla extract
  • 300 grams powdered sugar
  • 50 grams flesh of a pink dragonfruit

Instructions

  1. Prepare the cupcake tin by lining it with cupcake liners. Set it aside. Preheat the oven to 175°C / 350°F.
  2. In a mixing bowl, use an electric mixer to combine the eggs and sugar until they come together. Then, add the vanilla extract and softened butter. Mix everything until it’s well combined.
  3. Sift the flour, salt, and baking powder into another bowl using a fine mesh strainer. Measure the milk. Now, in 4 additions, alternately add the milk and flour mixture to the butter-sugar-egg mixture, mixing after each addition. Don’t overmix, or the batter will become tough.
  4. Use a cookie scoop or a spoon to portion the batter into the liners. Fill each about 2/3 full so the cupcakes don’t rise over the edges while baking.
  5. Bake the cupcakes for 18-20 minutes. They’re done when you insert a toothpick into the center, and it comes out clean, without any batter sticking to it.
  6. Let the cupcakes cool on a wire rack.
  7. Meanwhile, prepare the frosting. Dice the pink dragon fruit and place it in a medium-sized bowl. Add the cream cheese, butter, vanilla extract, powdered sugar, and a pinch of salt to the bowl. Use an electric mixer to blend everything into a creamy mixture. If the frosting is too soft to hold its shape, place the bowl in the fridge for about 20 minutes.
  8. Fill a piping bag with the frosting and decorate the cupcakes. Optionally, garnish with a few pieces of dragon fruit.
  • Passive Time: 40 min
  • Cook Time: 20 min

Pineapple Coconut Oil

Pineapple Coconut Oil

Pineapple Coconut Oil

Pineapple Coconut Oil

September 8, 2024 by Kimberly

This pineapple-infused coconut oil is a tropical dream! It’s sweet, fresh, and perfect for cold dishes, bringing sunny, fruity vibes to every bite without overpowering your recipes.

80 MINUTES

ADVANCED

VEGAN

INT.

40 PER TSP

REFRESHING

MICHELIN

OIL

ALL YEAR

INTRODUCTION

ABOUT THE RECIPE

This fruity, pineapple-infused coconut oil will transport you to a sunny beach with every bite! It’s naturally sweet and tangy with a delicious coconut touch, perfect for adding a fun, fresh flavor to your dishes. The best part? It’s easy to make, and the vibrant yellow color from the pineapple infusion adds that visual pop. Trust me, once you’ve tried it, you’ll want to drizzle it on everything!

How to serve
Since this oil shines best when it’s not heated too high, it’s perfect for cold dishes. Drizzle it over fresh salads to give them a sweet, fruity twist. You can also mix it into smoothies or pour it over yogurt bowls for an instant tropical upgrade. If you’re feeling fancy, use it as a dipping oil with some fresh fruit on the side! Its fresh, summery taste will make even the simplest dish feel like a treat.

How to store
To keep this oil fresh and flavorful, store it in an airtight container in the fridge. Make sure to keep it away from direct sunlight. For the best flavor, try to use it within two weeks!

Hi, I'm Kimberly!

Hi, I'm Kimberly.

A passionate food lover who believes in the magic of homemade deliciousness that spreads love and warmth. Join me on this culinary adventure as I prepare wonderful dishes and let’s spread some happiness together!

Kimberly the Zett Signature

If you want to get to know me better, click here!


Pineapple Coconut Oil
„Let’s make a piece of happiness“
Print
clock clock iconcutlery cutlery iconflag flag iconfolder folder iconinstagram instagram iconpinterest pinterest iconfacebook facebook iconprint print iconsquares squares iconheart heart iconheart solid heart solid icon
Pineapple Coconut Oil

Pineapple Coconut Oil


  • Author: Kimberly
  • Total Time: 80 min
  • Yield: 1 cup / 250 ml 1x

Description

RECOMMENDED EQUIPMENT

  • blender
  • medium-sized saucepan
  • whisk
  • 2 medium-sized bowls
  • 2 fine sieves
  • coffee filter
  • oil bottle

Ingredients

Units Scale
  • 200 grams pineapple
  • 250 milliliters cold-pressed coconut oil

Instructions

  1. Cut off the pineapple skin and cut the flesh into large chunks. Put them into the blender. Since coconut oil solidifies below 23°C (73°F), you might need to warm it up briefly so it can be poured over the pineapple chunks in liquid form. Pour the oil into the blender and blend everything on the highest setting until it becomes pastel yellow and only small pieces of the pineapples are longer visible.
  2. Pour the mixture from the blender into a medium-sized pot and heat it over medium heat, constantly stirring, to a temperature of about 102°-103°C (215°-217°F). Then, let the mixture cook for the next 45 minutes. Stir only occasionally, making sure the temperature remains steady. This cooking time is essential for all the water to evaporate, allowing the perishable solids to settle at the bottom and the oil to float on top. You’ll know all the water has evaporated when the oil in the pot barely bubbles anymore – so if it’s still bubbling vigorously, keep it simmering.
  3. Once the oil mixture is no longer bubbling, remove the pot from the heat and let it cool a bit. Pour the oil into the first fine sieve to catch the coarse particles.
  4. Then, pour the oil into the second fine mesh sieve, which you before equipped with a coffee filter, to catch the remaining finer particles.
  5. Allow the oil to drip through for about 30 minutes or maybe less depending on how many remaining particles are in the coffee filter. Once all the oil has passed through the coffee filter, transfer the collected amount of oil into an oil bottle. Store in the refrigerator for up to 1-2 weeks.
  • Prep Time: 5 min
  • Passive Time: 30 min
  • Cook Time: 45 min

Lemon & Peach Oil

Lemon & Peach Oil

Lemon & Peach Oil

Lemon & Peach Oil

August 25, 2024 by Kimberly

Experience a hint of summer with this light, subtly fruity oil. It adds a delicate touch of peach and lemon to your dishes, making every bite feel refreshingly bright and unique.

65 MINUTES

ADVANCED

VEGAN

INT.

40 PER TSP

REFRESHING

MICHELIN

OIL

SUMMER

INTRODUCTION

ABOUT THE RECIPE

Looking to add a touch of something special to your cooking? This delicately infused oil offers just a whisper of peach and lemon, perfect for those who enjoy subtle, refreshing flavors. It’s the kind of ingredient that doesn’t overpower your dish but adds a light, sunny vibe to whatever you’re making. Whether you’re drizzling it over a fresh salad, using it in a marinade, or just dipping some crusty bread into it, this oil brings a gentle taste of summer to your kitchen.

How to serve
Drizzle it over fresh salads to give your greens a gentle, fruity twist, or use it as a finishing touch on grilled vegetables or fish for a bright, zesty flavor. Because the flavors are so subtle, this oil won’t overpower your dishes, making it an ideal addition to light, fresh recipes. It’s so delicious to pair it with these Apple Fritters with Lemon Vanilla Glaze. Just add 1 tbsp to the glaze and give it a good mix.

How to store
Store this flavored oil in a cool, dark place, tightly sealed to keep its delicate flavors intact. It should last for up to 1-2 weeks.

Hi, I'm Kimberly!

Hi, I'm Kimberly.

A passionate food lover who believes in the magic of homemade deliciousness that spreads love and warmth. Join me on this culinary adventure as I prepare wonderful dishes and let’s spread some happiness together!

Kimberly the Zett Signature

If you want to get to know me better, click here!


Lemon & Peach Oil
Lemon & Peach Oil
Lemon & Peach Oil
„Let’s make a piece of happiness“
Print
clock clock iconcutlery cutlery iconflag flag iconfolder folder iconinstagram instagram iconpinterest pinterest iconfacebook facebook iconprint print iconsquares squares iconheart heart iconheart solid heart solid icon
Lemon & Peach Oil

Lemon & Peach Oil


  • Author: Kimberly
  • Total Time: 65 min
  • Yield: 1 cup / 250 ml 1x

Description

RECOMMENDED EQUIPMENT

  • blender
  • medium-sized saucepan
  • whisk
  • a bowl which the medium saucepan fits into
  • 2 medium-sized bowls
  • 2 fine sieves
  • oil bottle
  • ice cubes
  • coffee filter

Ingredients

Units Scale
  • 2 peaches
  • zest of 1 lemon
  • 250 milliliters neutral tasting oil

Instructions

  1. Chop the peaches in coarse pieces. Zest the lemon and put everything into the blender. Blend on the highest setting until only tiny pieces of the ingredients are visible.
  2. Pour the mixture from the blender into a medium-sized pot and heat it over medium heat to a temperature of about 102°-103°C (215°-217°F), and maintain this temperature for the next 30 minutes. Stir occasionally, making sure the temperature remains steady and nothing gets burned.
  3. Prepare a bowl large enough to fit a medium-sized pot, and fill it with cold water and a handful of ice cubes. Also, hang a fine sieve strainer over one medium-sized bowl and another fine sieve strainer, with a coffee filter inside it, over another medium-sized bowl.
  4. Now, place the pot in the ice water and stir to cool the oil quickly. Once the oil is almost cold, remove the pot from the water and pour the oil into the prepared fine sieve to catch the coarse particles.
  5. Then, pour the oil into the second sieve, which is equipped with a coffee filter, to catch the remaining finer particles.
  6. Allow the oil to drip through for about 1 hour or maybe less depending on how many remaining particles are in the coffee filter. Once all the oil has passed through the coffee filter, transfer the collected amount of oil into an oil bottle. Store in the refrigerator for up to 1-2 weeks.
  • Prep Time: 5 min
  • Passive Time: 30 min
  • Cook Time: 30 min

Salmon Poke Bowl & Spicy Mayo Sauce

Salmon Poke Bowl & Spicy Mayo Sauce

Salmon Poke Bowl & Spicy Mayo Sauce

Salmon Poke Bowl & Spicy Mayo Sauce

August 21, 2024 by Kimberly

Dive into a fresh and vibrant bowl of goodness, packed with zesty spicy flavors, creamy textures, and a satisfying crunch. Perfect for a wholesome quick meal!

30 MINUTES

EASY

OMNIVORE

US AMERICAN

710 PER PORTION

REFRESHING

EVERYDAY

LUNCH

SPRING
SUMMER

INTRODUCTION

ABOUT THE RECIPE

This dish is like a hug in a bowl – a refreshing and vibrant mix of flavors that will take your taste buds on a little adventure. Perfect for when you’re craving something light yet satisfying, this bowl is loaded with fresh veggies like juicy mango, crisp red cabbage, and tender edamame, all sitting on a bed of fluffy rice. And the kicker? A drizzle of spicy mayo sauce that ties everything together with just the right amount of heat.

How to serve
To serve, grab a big, beautiful bowl and start with a generous layer of rice. Arrange the colorful veggies on top – think creamy avocado, bright mango, and that gorgeous purple cabbage. Lay your protein of choice (like tender salmon) over the top, and then drizzle on the spicy mayo sauce. Sprinkle with sesame seeds and a little wakame salad for that extra touch. Serve it chilled and watch your guests (or yourself) light up with every bite!

How to store
Got leftovers? Store each component separately in airtight containers to keep everything fresh. The rice and veggies will last about 2-3 days in the fridge. Just keep the sauce in a small jar and give it a good shake before using it again. It’s best not to store thawed raw salmon. If you can’t finish it, cook it and enjoy it the next day or later the same day.

Hi, I'm Kimberly!

Hi, I'm Kimberly.

A passionate food lover who believes in the magic of homemade deliciousness that spreads love and warmth. Join me on this culinary adventure as I prepare wonderful dishes and let’s spread some happiness together!

Kimberly the Zett Signature

If you want to get to know me better, click here!


Salmon Poke Bowl & Spicy Mayo Sauce
„Let’s make a piece of happiness“
Print
clock clock iconcutlery cutlery iconflag flag iconfolder folder iconinstagram instagram iconpinterest pinterest iconfacebook facebook iconprint print iconsquares squares iconheart heart iconheart solid heart solid icon
Salmon Poke Bowl & Spicy Mayo Sauce

Salmon Poke Bowl & Spicy Mayo Sauce


  • Author: Kimberly
  • Total Time: 30 min
  • Yield: 1 1x

Description

Recommended Equipment

  • sharp knife
  • cutting board
  • two small bowls
  • small pot
  • grater
  • paper towels

Ingredients

Units Scale
  • 3 tbsp edamame
  • 1 tbsp avocado
  • a quarter of a lime
  • 1/4 mini cucumber
  • 2 tbsp wakame salad
  • 80 grams farmed salmon, sushi-grade, frozen and then thawed
  • 2 tbsp red cabbage
  • 1 radish
  • 1/4 mango

RICE

  • 80 grams sushi rice or long grain white rice
  • 1 tbsp rice vinegar
  • 1 tsp white sugar
  • 1/4 tsp salt

SPICY MAYO SAUCE

  • 1 tbsp mayonnaise
  • 2 tbsp cold water
  • 1 tbsp sriracha (I used the one with coconut flavor)
  • 1/4 tsp ginger, grated
  • 1 garlic clove, grated
  • 1/2 tsp soy sauce
  • 1/8 tsp sesame oil
  • pinch of white pepper

TOPPINGS

  • white sesame seeds
  • black sesame seeds
  • nori sheets
  • cress

Instructions

  1. For the spicy mayo sauce, peel the ginger and garlic, and grate them into a bowl. Add the rest of the sauce ingredients and mix everything together until smooth. Set aside.
  2. Wash the rice until the water runs clear, then cook it in a rice cooker or small pot. Keep it warm. Place the edamame in a small bowl, cover with hot water, and let it sit for 5 minutes. Drain the water afterward.
  3. Wash and dry the cucumber, then slice it thinly. Remove the outer leaves of the red cabbage, cut it into quarters, and finely grate it. Wash the radishes and slice them thinly or use a mandoline. Peel the mango and cut it into pieces. Scoop the avocado out of its skin, drizzle it with lime juice, and cut it into cubes. Arrange the sliced fruits and veggies on a plate for later.
  4. Once the rice is done, mix in rice vinegar, salt, and sugar. Keep the rice warm.
  5. Rinse and pat dry the salmon, then cut it into cubes with a sharp knife. Set the wakame salad aside.
  6. In a deep bowl, start by layering the rice. Place the wakame salad in the center, then arrange the other components around it in a circle on top of the rice. Sprinkle the salmon with black and white sesame seeds and add a bit of cress. Place nori sheets on the side.
  7. Serve the sauce in a small bowl on the side, or drizzle it directly over the bowl.
  • Cook Time: 30 min