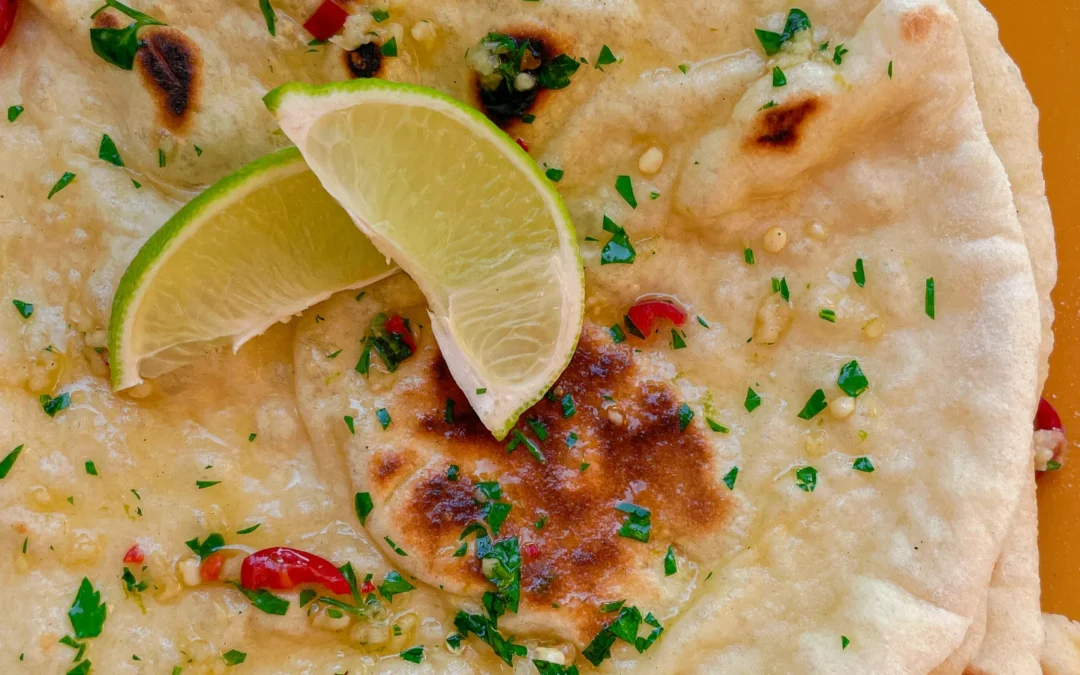
Gorgonzola Spinach Gnocchi with Salsiccia Walnut Topping

Gorgonzola Spinach Gnocchi with Salsiccia Walnut Topping

Gorgonzola Spinach Gnocchi with Salsiccia Walnut Topping

Gorgonzola Spinach Gnocchi with Salsiccia Walnut Topping

November 25, 2024 by Kimberly

Creamy, cheesy, and just the right touch of indulgence! This cozy dish feels like a warm hug, with bold Italian vibes and a satisfying crunch that’s absolutely unforgettable.

50 MINUTES

EASY

OMNIVORE

ITALIAN

854 PER PORTION

COMFORT FOOD

EVERYDAY

DINNER

AUTUMN
WINTER

INTRODUCTION

ABOUT THE RECIPE

This dish is the ultimate comfort meal you didn’t know you needed! Think soft pillows of gnocchi wrapped in a velvety, cheesy sauce, with just enough spinach to feel balanced. The topping? A game-changing mix of savory sausage and crunchy walnuts that takes it to the next level. It’s one of those meals that feels fancy but is super easy to whip up. Perfect for impressing guests or treating yourself to a cozy night in!

How to serve
Serve this dish straight from the pan, steaming and ready to impress. Sprinkle a touch of freshly grated Parmesan or a drizzle of olive oil on top for that extra flair. Pair it with a crisp arugula salad or some roasted veggies to balance the richness. Want to make it truly unforgettable? A glass of chilled white wine or sparkling water with a citrus twist will make the flavors pop.

How to store
Got leftovers? Lucky you! Store them in an airtight container in the fridge for up to 3 days. Reheat gently in a pan over low heat, adding a splash of milk or cream to revive that creamy magic. Avoid freezing – it’s best enjoyed fresh!

Hi, I'm Kimberly!

Hi, I'm Kimberly.

A passionate food lover who believes in the magic of homemade deliciousness that spreads love and warmth. Join me on this culinary adventure as I prepare wonderful dishes and let’s spread some happiness together!

Kimberly the Zett Signature

If you want to get to know me better, click here!


Gorgonzola Spinach Gnocchi with Salsiccia Walnut Topping
„Let’s make a piece of happiness“
Print
clock clock iconcutlery cutlery iconflag flag iconfolder folder iconinstagram instagram iconpinterest pinterest iconfacebook facebook iconprint print iconsquares squares iconheart heart iconheart solid heart solid icon
Gorgonzola Spinach Gnocchi with Salsiccia Walnut Topping

Gorgonzola Spinach Gnocchi with Salsiccia Walnut Topping


5 Stars 4 Stars 3 Stars 2 Stars 1 Star

No reviews

  • Author: Kimberly
  • Total Time: 50 min
  • Yield: 4 1x

Description

RECOMMENDED EQUIPMENT

  • large frying pan
  • medium frying pan
  • large pot
  • strainer
  • sharp knife
  • cutting board


Ingredients

Units Scale

SPINACH GORGONZOLA SAUCE

  • 200 grams gorgonzola
  • 200 grams heavy cream
  • 1 tbsp butter
  • 250 milliliter chicken stock
  • 50 milliliter dry white wine
  • 4 garlic cloves
  • 1 shallot
  • 50 grams baby spinach
  • fresh oregano
  • fresh thyme
  • nutmeg, salt & pepper to taste

SALSICCIA WALNUT TOPPING

  • 200 grams salsiccia with fennel
  • 50 milliliter dry white wine
  • 40 grams walnuts
  • 2 tsp honey
  • fresh oregano
  • fresh thyme
  • cayenne pepper, salt & pepper to taste

OTHER INGREDIENTS

  • 800 grams gnocchi
  • parmesan for topping

Instructions

PREPARATIONS

  • Chop the shallot and garlic cloves into small, fine pieces. Take the salsiccia sausage out of its casing—either tear it into chunky bits with your hands or crumble it up, whichever feels less chaotic. Slice the gorgonzola into chunks—don’t overthink it; it’ll melt anyway. Wash the baby spinach thoroughly and spin it dry. Set everything aside.

INSTRUCTIONS

  1. Melt some butter in a large pan over medium heat. Toss in the shallots and cook until they’re glossy and translucent. Add the garlic and stir it until your kitchen smells incredible.
  2. Deglaze with a splash of white wine. Let it simmer for 1-2 minutes to let the alcohol cook off. Pour in the chicken broth and bring it to a boil. Once it boils, lower the heat to a simmer and stir in the cream. Let this dreamy mix simmer gently for 10-15 minutes while you prepare the salsiccia.
  3. Toss the sausage bits into a cold pan. Slowly heat it up so the fat renders out—no extra oil needed! Cook until the pieces are golden and crispy on the outside. Deglaze with another splash of white wine, simmering until most of the liquid evaporates and you’re left with a creamy coating. Toss in the walnuts, a pinch of cayenne pepper, salt, and a drizzle of honey. Stir everything and let it caramelize for 1-2 minutes. Add fresh oregano and thyme, mix, and let those flavors pop.
  4. Keep your cream and broth mixture on low heat. Stir in the Gorgonzola until it’s completely melted into the sauce—smooth, rich, and irresistible. Grate in some fresh nutmeg, then stir in more oregano and thyme. Add the spinach and stir until it wilts down. Keep everything warm and cozy over low heat.
  5. Fill a large pot with water, bring it to a boil, and add the gnocchi. Cook for 3-5 minutes, or until they float to the surface. Drain the gnocchi and toss them directly into the Gorgonzola-spinach sauce. Stir until every pillowy bite is coated in the sauce.
  6. Plate the gnocchi in deep bowls. Spoon the crispy salsiccia-walnut mixture on top and finish with a shower of freshly grated Parmesan.

  • Prep Time: 10 min
  • Passive Time: 15 min
  • Cook Time: 25 min

Almond Milk

Almond Milk

Almond Milk

Almond Milk

November 23, 2024 by Kimberly

Creamy, nutty goodness that’s fresh and pure – this homemade almond milk brings all the cozy vibes! Smooth, simple, and a total game-changer for your morning coffee or smoothie. Pure plant-powered bliss.

OVERNIGHT
15 MINUTES

EASY

VEGAN

INT.

20 PER PORTION

CREAMY
NUTTY

EVERYDAY

BEVERAGES

ALL YEAR

INTRODUCTION

ABOUT THE RECIPE

There’s something incredibly satisfying about making your own almond milk. Not only is it super creamy and fresh, but it’s also free from additives, so you’re just getting pure, nutty goodness. Whether you’re dairy-free, vegan, or just a fan of plant-based alternatives, this homemade version brings a taste and texture you just can’t get from store-bought. It’s smooth, lightly nutty, and perfect for adding a cozy, wholesome touch to your morning coffee or favorite smoothie!

How to serve
This fresh, creamy almond milk is incredibly versatile. Pour it over your morning cereal, blend it into smoothies, or enjoy it with your coffee for a nutty, silky texture. You can even use it in baking or cooking as a dairy-free substitute. Try adding a pinch of cinnamon, vanilla, or a tiny drizzle of maple syrup if you want a little extra flavor boost. It’s a great way to elevate everyday recipes with a homemade touch!

How to store
Homemade almond milk keeps best in the fridge for up to 4 days. Just pour it into a clean, airtight container or glass bottle, give it a shake before serving, and keep it nice and cold for freshness.

Hi, I'm Kimberly!

Hi, I'm Kimberly.

A passionate food lover who believes in the magic of homemade deliciousness that spreads love and warmth. Join me on this culinary adventure as I prepare wonderful dishes and let’s spread some happiness together!

Kimberly the Zett Signature

If you want to get to know me better, click here!


Almond Milk
Almond Milk
Almond Milk

„Let’s make a piece of happiness“

Print
clock clock iconcutlery cutlery iconflag flag iconfolder folder iconinstagram instagram iconpinterest pinterest iconfacebook facebook iconprint print iconsquares squares iconheart heart iconheart solid heart solid icon
Almond Milk

Almond Milk


  • Author: Kimberly
  • Total Time: 8 hrs + 17 min
  • Yield: 1 liter / 4 cups 1x

Description

Recommended Equipment

  • medium-sized bowl
  • blender
  • fine mesh strainer
  • bottle

Ingredients

Units Scale
  • 200 grams raw almonds
  • 1000 milliliters cold, filtered water
  • 3 dates, pitted
  • 1 tsp vanilla extract
  • pinch of salt

Instructions

PREPARATIONS THE NIGHT BEFORE

  • Soak the almonds and dates in cold water overnight.

INSTRUCTIONS

  1. Drain the almonds and dates using a strainer, and discard the soaking water.
  2. Add the almonds and dates to a blender, then pour in 1 liter of cold water. Blend on the highest setting for about 1 minute, until the liquid turns white and frothy.
  3. Add flavoring to taste. I used a pinch of salt and 1 teaspoon of vanilla extract, but 1 teaspoon of cinnamon would be a fantastic choice for the holiday season.
  4. Set up a fine mesh strainer over a bowl and pour the blended mixture through it. Press the pulp firmly to squeeze out as much liquid as possible. If you want, you can filter the milk again by pouring it through a cheesecloth. You can also put the pulp into the cheesecloth and squeeze it further by hand.
  5. Transfer the strained milk into a bottle and enjoy! It will keep in the fridge for about 4–5 days. Be sure to shake it before using, as the solids naturally separate from the water over time—this is completely normal.
  • Prep Time: 2 min
  • Passive Time: 8 hrs
  • Cook Time: 15 min

Swedish Meatball Stew

Swedish Meatball Stew

Swedish Meatball Stew

Swedish Meatball Stew

November 11, 2024 by Kimberly

A hearty stew with tender meatballs, soft potatoes, and a hint of fresh herbs. It’s the perfect blend of warmth and flavor, topped with a dollop of lingonberries – pure comfort in a bowl.

80 MINUTES

EASY

OMNIVORE

SWEDISH

891 PER PORTION

COMFORT FOOD

EVERYDAY

DINNER

AUTUMN
WINTER

INTRODUCTION

ABOUT THE RECIPE

Imagine coming home to a cozy bowl of Swedish-inspired stew, where golden-brown meatballs meet tender potatoes in a creamy, herb-filled sauce. This dish combines everything we love about comfort food with a fresh, Nordic twist! With a touch of dill, parsley, and a spoonful of tangy lingonberries, it’s like a warm hug in every bite. Perfect for chilly evenings or family dinners, this stew is all about bold, cozy flavors that make you feel at home.

How to serve
To serve, ladle this creamy stew into bowls and top with a sprinkle of fresh parsley and dill for color and flavor. Adding a spoonful of lingonberries and creme fraiche gives a sweet, tangy pop that balances the savory richness of the stew. It’s amazing with crusty bread on the side for dipping or alongside a simple salad. Whether you’re serving it to family or friends, this stew is a guaranteed crowd-pleaser that’ll have everyone coming back for seconds!

How to store
Store the stew in an airtight container in the fridge for up to 3 days. When reheating, do it gently on the stove, adding a splash of broth or cream if it needs a little extra moisture. The flavors actually get even better after a day or two!

Hi, I'm Kimberly!

Hi, I'm Kimberly.

A passionate food lover who believes in the magic of homemade deliciousness that spreads love and warmth. Join me on this culinary adventure as I prepare wonderful dishes and let’s spread some happiness together!

Kimberly the Zett Signature

If you want to get to know me better, click here!


Swedish Meatball Stew
„Let’s make a piece of happiness“
Print
clock clock iconcutlery cutlery iconflag flag iconfolder folder iconinstagram instagram iconpinterest pinterest iconfacebook facebook iconprint print iconsquares squares iconheart heart iconheart solid heart solid icon
Swedish Meatball Stew

Swedish Meatball Stew


  • Author: Kimberly
  • Total Time: 80 min
  • Yield: 3-4 1x

Description

Recommended Equipment

  • sharp knife
  • cutting board
  • grater
  • medium bowl
  • large pan with lid
  • whisk
  • measuring cup

Ingredients

Units Scale

MEATBALLS

  • 250 grams minced beef
  • 250 grams minced pork
  • 1 big white onion
  • 2 garlic cloves
  • 20 grams bread crumbs
  • 1 egg
  • 5 grams fresh parsley
  • 5 grams fresh dill
  • 1/2 tsp Dijon mustard
  • nutmeg, salt & pepper to taste
  • 2 tsp clarified butter for frying

SAUCE

  • 20 grams butter
  • 20 grams flour
  • 500 milliliters beef stock
  • 100 milliliters heavy cream
  • 1 tsp Worcestershire sauce
  • 1/2 tsp Dijon mustard
  • nutmeg, salt & pepper to taste

OTHER INGREDIENTS

  • 150 grams frozen peas
  • 500 grams baby potatoes

TOPPINGS

  • 3 tbsp lingonberry jam
  • 3 tbsp creme fraiche

Instructions

  1. First, peel the onion and garlic cloves and set them aside. Finely chop the parsley and dill, placing them in a medium bowl. Add the ground meat, breadcrumbs, egg, Dijon mustard, nutmeg, salt, and pepper. Grate the onion and garlic finely and add them to the mixture as well. Mix everything thoroughly and form the mixture into small balls, about 40g each, roughly the size of a ping-pong ball.
  2. Heat a large pan over medium-high heat with a bit of clarified butter, and sear the meatballs on all sides until they are nicely browned. They don’t need to be fully cooked through yet, as they’ll finish cooking in the sauce. Be careful not to let them get too dark, as this can cause bitterness in the final dish.
  3. While the meatballs are cooking, wash the potatoes, dry them well, and cut them in halves or quarters, depending on their size. Set them aside.
  4. Once the meatballs are seared, remove them from the pan and set them aside on a plate. Return the pan to the stove and deglaze with white wine, scraping up any browned bits with a wooden spoon. Let it reduce for about 5 minutes. Strain the liquid through a sieve to remove any larger bits, then set this liquid aside.
  5. Now, place the pan over low heat, melt the butter, and whisk in the flour to create a roux, stirring constantly until you have a smooth, creamy paste. Let it cook for a few minutes, stirring continuously to remove any raw flour taste. Gradually add the beef broth in several stages, whisking each time until the sauce is smooth and comes to a light boil before adding the next portion. Finally, pour in the reserved liquid and the cream, stirring well. Season the sauce with Dijon mustard, Worcestershire sauce, salt, and pepper.
  6. Add the prepared potatoes to the sauce, cover, and let them simmer over medium heat for about 20 minutes, or until they are tender.
  7. While the potatoes are cooking, place the frozen peas in a small bowl, cover with hot water, and let them sit for about 5 minutes. Drain the peas and set them aside. Finely chop a bit more parsley and dill for garnish, and prepare the lingonberries and crème fraîche.
  8. Once the potatoes are soft, return the meatballs to the sauce, stir everything together, and let it simmer for an additional 10 minutes, or until the meatballs are fully cooked through and heated.
  9. To serve, divide the potatoes, meatballs, and sauce among deep plates. Top with peas, a dollop of crème fraîche, a spoonful of lingonberry jam, and fresh herbs. Enjoy!
  • Passive Time: 30 min
  • Cook Time: 50 min

Pasta al Pomodoro

Pasta al Pomodoro

Pasta al Pomodoro

Pasta al Pomodoro

November 5, 2024 by Kimberly

Imagine al dente pasta coated in a fresh, rich garlic basil tomato sauce – each bite bursting with Mediterranean sunshine, cozy comfort, and pure bliss. This dish tastes like home, every single time.

20 MINUTES

EASY

VEGAN

ITALIAN

589 PER PORTION

COMFORT FOOD

WEEKNIGHT

DINNER

ALL YEAR

INTRODUCTION

ABOUT THE RECIPE

Get ready to taste sunshine on a plate! This recipe brings you straight to an Italian summer with every bite – simple, cozy, and irresistibly delicious. This dish is all about fresh tomatoes simmered into a rich, velvety sauce that clings to each pasta strand, making it the ultimate comfort food. Perfect for weeknight dinners or when you crave a warm, feel-good meal, it’s easy to make but feels like pure indulgence.

How to serve
To make it unforgettable, serve this pasta with fresh basil and a dusting of Parmesan. A side of crusty garlic bread or a light salad with arugula and lemon vinaigrette balances the richness, adding that final touch. For a real treat, drizzle a bit of high-quality olive oil over the top just before serving. It’s simple but adds incredible depth and brings the dish to life, making it feel like a restaurant meal in the comfort of your home.

How to store
Store any leftovers in an airtight container in the fridge for up to 3 days. Reheat gently on the stovetop, adding a splash of water or olive oil to keep the sauce creamy. This way, you can enjoy it as good as fresh!

Hi, I'm Kimberly!

Hi, I'm Kimberly.

A passionate food lover who believes in the magic of homemade deliciousness that spreads love and warmth. Join me on this culinary adventure as I prepare wonderful dishes and let’s spread some happiness together!

Kimberly the Zett Signature

If you want to get to know me better, click here!


Pasta al Pomodoro
Pasta al Pomodoro
Pasta al Pomodoro
Pasta al Pomodoro
Pasta al Pomodoro
„Let’s make a piece of happiness“
Print
clock clock iconcutlery cutlery iconflag flag iconfolder folder iconinstagram instagram iconpinterest pinterest iconfacebook facebook iconprint print iconsquares squares iconheart heart iconheart solid heart solid icon
Pasta al Pomodoro

Pasta al Pomodoro


  • Author: Kimberly
  • Total Time: 20 min
  • Yield: 4 1x

Description

Recommended Equipment

  • large frying pan
  • sharp knife
  • cutting board
  • large pot

Ingredients

Units Scale
  • 4 tbsp olive oil
  • 4 garlic cloves
  • 1 fresh chili
  • 500 grams strained tomatoes
  • 10 grams fresh basil
  • 500 grams pasta of your choice (I used Rigatoni)
  • Parmesan
  • Salt & pepper to taste

Instructions

  1. Warm up 4 tbsp of olive oil over medium heat in a large frying pan. Meanwhile, peel the garlic cloves but leave them whole. Once the oil is warm, add the garlic cloves and let them roast until golden brown. It helps to tilt the pan so the oil pools in one spot, letting the garlic cloves fully submerge.
  2. When the garlic is golden brown, remove it from the pan and set it aside on a cutting board to cool slightly. Meanwhile, get a large pot of water ready for cooking your pasta, place it on the stove, and bring it to a rolling boil.
  3. Now mash the garlic into a paste with a bit of salt using the flat side of your knife on the cutting board – the salt helps break it down. Add this garlic paste back into the olive oil in the pan. Finely chop a fresh chili and add it to the pan as well. Warm everything over medium heat. Meanwhile, wash, dry, and thinly slice the basil leaves. Add the strained tomatoes and basil to the pan, stirring everything well, and let it simmer on low heat.
  4. Add the pasta and a bit of salt to the boiling water, cooking it until al dente. Season the tomato sauce with salt and pepper to taste.
  5. Transfer the pasta to the tomato sauce, add a bit of the pasta water, and stir until the noodles are fully coated in the sauce. Serve the pasta on deep plates, topped with freshly grated Parmesan and a sprinkle of pepper.
  • Cook Time: 20 min

Pink Grapefruit Cardamom Chutney

Pink Grapefruit Cardamom Chutney

Pink Grapefruit Cardamom Chutney

Pink Grapefruit Cardamom Chutney

October 30, 2024 by Kimberly

A chutney that brings out the best in so many dishes – sweet, tangy, and spiced with cardamom, this pink grapefruit version adds a unique twist to meals from brunch spreads to savory dinners!

80 MINUTES

EASY

VEGAN

INT.

77 PER PORTION

SWEET
SPICY

EVERYDAY

DIPS & SPREADS

ALL YEAR

INTRODUCTION

ABOUT THE RECIPE

Imagine a chutney that surprises you with every bite – a unique mix of pink grapefruit, cardamom, ginger & cinnamon balancing sweetness and spice in the freshest way. It’s a versatile addition that shines on breakfast toast, pairs perfectly with your favorite cheese board, and even makes savory dishes like grilled meats and veggies pop with vibrant flavor. With a quick prep and simple ingredients, it’s a recipe you’ll love making again and again for that extra zing.

How to serve
This chutney works wonders as a dipping sauce, spread, or finishing touch. Try it with cheeses like brie or goat cheese for a dreamy pairing that feels just a bit gourmet. It’s delicious alongside roasted chicken or even mixed into a salad dressing for a twist. If you’re in the mood for brunch vibes, layer it on toast with cream cheese or as a sandwich spread – honestly, it’s so versatile, you’ll find yourself using it with everything! For an extra flavor boost, try swapping regular oil with my Grapefruit Oil!

How to store
Keep this chutney fresh by storing it in an airtight container in the fridge for up to two weeks. The flavors deepen over time, so it only gets better with each passing day. Just give it a stir before serving to rediscover that zingy brightness!

Hi, I'm Kimberly!

Hi, I'm Kimberly.

A passionate food lover who believes in the magic of homemade deliciousness that spreads love and warmth. Join me on this culinary adventure as I prepare wonderful dishes and let’s spread some happiness together!

Kimberly the Zett Signature

If you want to get to know me better, click here!


Pink Grapefruit Cardamom Chutney
„Let’s make a piece of happiness“
Print
clock clock iconcutlery cutlery iconflag flag iconfolder folder iconinstagram instagram iconpinterest pinterest iconfacebook facebook iconprint print iconsquares squares iconheart heart iconheart solid heart solid icon
Pink Grapefruit Cardamom Chutney

Pink Grapefruit Cardamom Chutney


  • Author: Kimberly
  • Total Time: 80 min
  • Yield: 8 1x

Description

Recommended Equipment

  • sharp knife
  • cutting board
  • small pot
  • jar with a screw-top lid

Ingredients

Units Scale
  • 2 pink grapefruits
  • 12 tbsp oil
  • 1 red onion
  • 1 tsp ginger, grated
  • 1 tsp cardamon, ground
  • 1 cinnamon stick
  • 100 grams brown sugar
  • 50 milliliters apple cider vinegar
  • 1 fresh chili pepper
  • pinch of salt

Instructions

PREPARATIONS

  • Rinse a screw-top jar with boiling water and let it drain. Set aside until the chutney is ready to be poured in. The jar should be large enough to hold about 200g.

INSTRUCTIONS

  1. Peel the grapefruits and remove the flesh, making sure to get rid of all the bitter white skin. Cut the fruit segments into small pieces, separating as much of the transparent skin as possible. Set aside.
  2. Peel the onion and ginger. Dice the onion into small pieces and finely chop or grate the ginger. Sauté both with a cinnamon stick and 1 tsp ground cardamom in a pot with 1-2 tbsp of oil over medium heat until the onion softens and the spices become fragrant. Meanwhile, chop the fresh chili pepper into small pieces and add it to the pot.
  3. Next, add the brown sugar to the pot and bring it to a low boil until the sugar melts.
  4. Now, add the grapefruit pieces, apple cider vinegar, and salt to the pot, stirring well. Let everything simmer on low heat for about 20 minutes until it starts to thicken. Adjust seasoning to taste, remove the cinnamon stick, and transfer the chutney to the jar. Seal and allow it to cool completely.
  • Prep Time: 5 min
  • Passive Time: 60 min
  • Cook Time: 15 min

Easy Same Day Basic Focaccia

Easy Same Day Basic Focaccia

Quick & Easy - The Best Focaccia Recipe

Easy Same Day Basic Focaccia

October 26, 2024 by Kimberly

Golden-crisp on the outside, airy and soft inside, this fresh focaccia is the ultimate comfort! Perfect for dipping, snacking, or as a side – it’s irresistible, warm, and baked-to-perfection bliss.

3 HOURS
30 MINUTES

EASY

VEGETARIAN

ITALIAN

386 PER PORTION

FLUFFY

EVERYDAY

BREAD

ALL YEAR

INTRODUCTION

ABOUT THE RECIPE

Craving something warm, cozy, and seriously easy to bake? This focaccia is your answer! It’s got that perfect golden crust that you can’t resist breaking into and a soft, fluffy center that just melts in your mouth. Whether you’re new to baking or a seasoned bread lover, this focaccia has that fresh-baked, olive-oil-kissed goodness that makes it the ultimate comfort food. Plus, it’s ready in just 3.5 hours – no need to wait around for endless rises. Just mix, bake, and enjoy some bakery-style vibes at home!

How to serve
This focaccia is so versatile – it pairs perfectly with just about anything! Tear off pieces to dip in olive oil and balsamic vinegar for a classic Italian feel, or serve it alongside a warm soup or pasta for a cozy meal. It also makes a great base for an open-faced sandwich or as an appetizer with some herby olive oil and fresh tomatoes. However you serve it, the fluffy texture and crispy edges will make it an instant favorite for everyone around the table. For an in-depth guide with secret tips & tricks, check out my ‚How-To Guide‘ for the Best Focaccia Recipe!


How to store
To keep that bakery-fresh vibe, store your focaccia in an airtight container or plastic wrap at room temperature for up to 2 days. You can also freeze it – wrap it tightly, and it’ll last up to 2 months. Just warm it in the oven to bring back the freshness.

Hi, I'm Kimberly!

Hi, I'm Kimberly.

A passionate food lover who believes in the magic of homemade deliciousness that spreads love and warmth. Join me on this culinary adventure as I prepare wonderful dishes and let’s spread some happiness together!

Kimberly the Zett Signature

If you want to get to know me better, click here!


Quick & Easy - The Best Focaccia Recipe
Basic Focaccia
„Let’s make a piece of happiness“
Print
clock clock iconcutlery cutlery iconflag flag iconfolder folder iconinstagram instagram iconpinterest pinterest iconfacebook facebook iconprint print iconsquares squares iconheart heart iconheart solid heart solid icon
Quick & Easy - The Best Focaccia Recipe

Easy Same Day Basic Focaccia


  • Author: Kimberly
  • Total Time: 3 hrs + 30 min

Description

Recommended Equipment

  • large bowl
  • kitchen scale
  • thermometer (even a medicine one works)
  • measuring cup
  • wooden spoon
  • cling film, beeswax wrap, or a shower cap
  • baking dish or tray (mine is 20x26cm / 8×10 inch)
  • oven


Ingredients

Units Scale
  • 500 grams pizza flour (type 00 in Germany)
  • 400 grams luke-warm water
  • 1.5 tsp active dry-yeast
  • 1 tbsp olive oil
  • 1 tsp honey
  • 1.5 tsp salt
  • 50 milliliters olive oil for greasing and dipping

Instructions

  1. Combine the active-dry yeast with warm water (between 34-38°C / 93-100°F), olive oil, and a teaspoon of honey to get things started. Let it sit for about 10 minutes until it becomes bubbly and the oil floats on top with the activated yeast. Meanwhile, in a large bowl, mix your flour with the salt.
  2. Pour the activated yeast mixture into the flour. Using a wooden spoon, mix everything together until it forms a dough and no dry flour is left. It might look a bit shaggy at first, but that’s totally fine! Scrape down any dough stuck to the sides and cover the bowl with cling film, a beeswax towel, or a shower cap. Let it sit for 20 minutes to allow the flour to hydrate and the dough to start developing elasticity.
  3. After 20 minutes, uncover the dough and prepare a small bowl of warm water to dip your hands in for the stretch & fold process. This technique helps develop the gluten without kneading. To do it, gently pull one side of the dough up, stretch it, and fold it over the center. Rotate the bowl a quarter turn and repeat on all four sides. You’ll do this about three times, letting the dough rest in between. This method strengthens the dough and helps create that light, airy texture! Follow these steps:
    • First stretch & fold, then let the dough rest for 20 minutes covered
    • Second stretch & fold, then rest another 20 minutes covered
    • Third stretch & fold, then let it rest for 60 minutes covered
  4. After the final 60-minute rest, grab your oven dish and drizzle 2-3 tablespoons of olive oil to coat it generously. Carefully transfer the dough to the dish, lifting it gently with both hands. Place it back in the dish, folding any hanging dough underneath itself to give it structure and elasticity.
  5. Cover the dish and let the dough rest for another 60 minutes. During this time, the dough will rise and settle into the dish, preparing for its final transformation.
  6. Preheat the oven to 220°C / 430°F. After the dough’s last rest, uncover it and drizzle a little extra olive oil over the top. Use your fingers to gently press into the dough, forming dimples. This will encourage those signature bubbles to form during baking.
  7. Bake the focaccia for 20-25 minutes, or until it’s golden and crisp. Enjoy your freshly baked focaccia! Let the focaccia cool to room temperature. If you cut it while it’s still hot, it might tear apart. But honestly, it tastes sooo good when it’s warm. Just tear it up and dip it into your favorite dips!

  • Passive Time: 3 hrs + 20 min
  • Cook Time: 10 min