Cinnamon Swirl Pancakes with Cream Cheese Frosting

Cinnamon Swirl Pancakes with Cream Cheese Frosting

Cinnamon Swirl Pancakes with Cream Cheese Frosting

Cinnamon Swirl Pancakes with Cream Cheese Frosting

December 27, 2024 by Kimberly

These fluffy pancakes with a dreamy cinnamon swirl and creamy frosting hit differently – like your favorite café breakfast, but homemade. Sweet, cozy vibes with every bite, perfect for lazy mornings or brunch.

25 MINUTES

EASY

VEGETARIAN

INT.

450 PER PORTION

SWEET
COMFORT FOOD

EVERYDAY

BREAKFAST

AUTUMN
WINTER

INTRODUCTION

ABOUT THE RECIPE

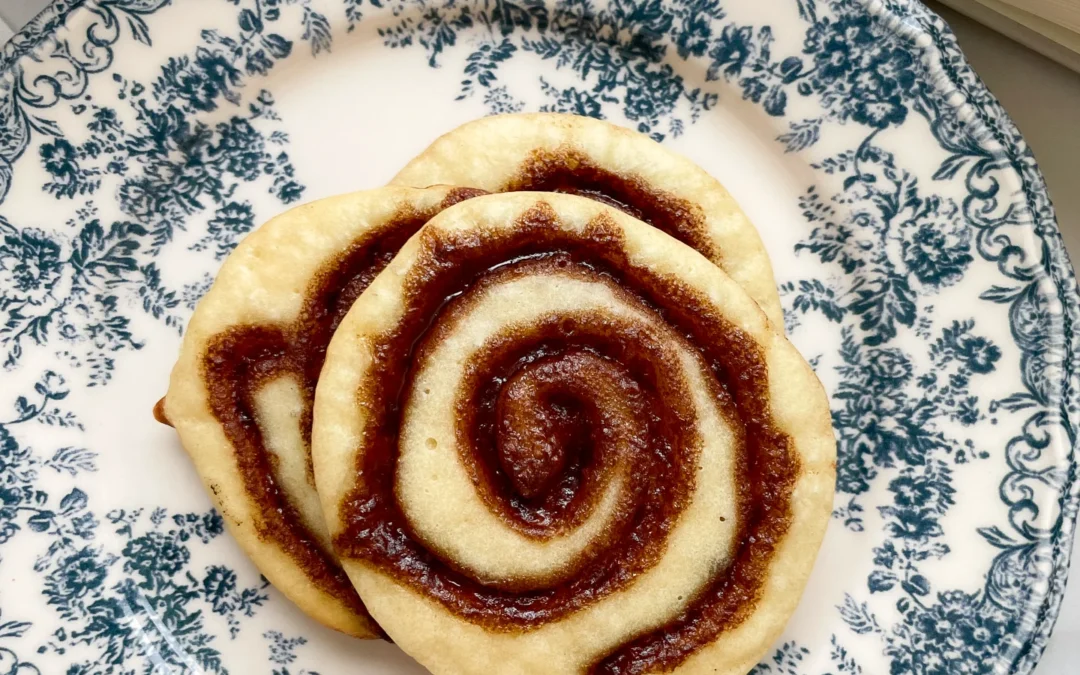
Imagine this: a stack of fluffy, golden pancakes, swirled with a rich, caramelized cinnamon filling and topped with a silky cream cheese frosting. It’s like the lovechild of your favorite cinnamon rolls and café-style pancakes. These pancakes bring a mix of indulgence and cozy comfort to your weekend mornings without the fuss. Perfect for brunch, date mornings, or when you want to impress yourself. So easy, yet so extra.

How to serve
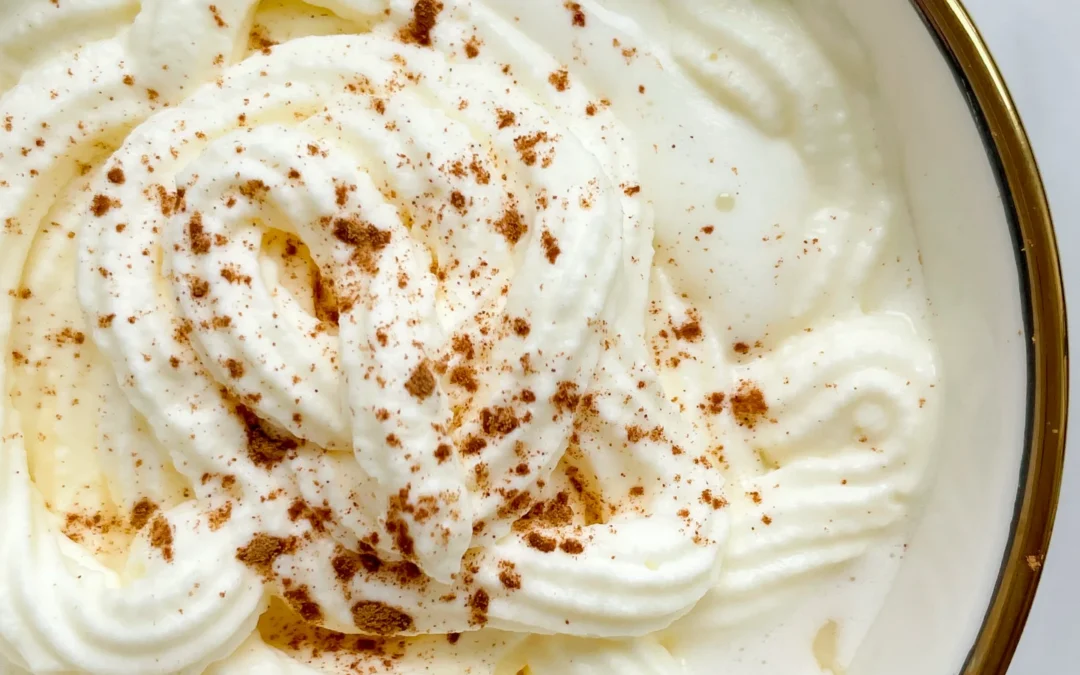
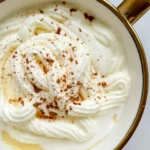
Serve these pancakes warm and stacked high. Drizzle a little extra cream cheese frosting on top for those irresistible slow-dripping vibes, and sprinkle with a dash of cinnamon. If you’re feeling fancy, a splash of maple syrup doesn’t hurt. Pair them with a steaming cup of coffee, chai latte, or even hot cocoa for the ultimate breakfast experience. These pancakes are brunch perfection, ready to elevate any slow morning.

How to store
Store leftover pancakes in an airtight container in the fridge for up to 2 days. Reheat gently in the microwave or a non-stick pan over low heat. Keep the frosting separate, in the fridge, and add it fresh when serving to maintain its creamy texture.

Hi, I'm Kimberly!

Hi, I'm Kimberly.

A passionate food lover who believes in the magic of homemade deliciousness that spreads love and warmth. Join me on this culinary adventure as I prepare wonderful dishes and let’s spread some happiness together!

Kimberly the Zett Signature

If you want to get to know me better, click here!


Cinnamon Swirl Pancakes with Cream Cheese Frosting
„Let’s make a piece of happiness“
Print
clock clock iconcutlery cutlery iconflag flag iconfolder folder iconinstagram instagram iconpinterest pinterest iconfacebook facebook iconprint print iconsquares squares iconheart heart iconheart solid heart solid icon
Cinnamon Swirl Pancakes with Cream Cheese Frosting

Cinnamon Swirl Pancakes with Cream Cheese Frosting


5 Stars 4 Stars 3 Stars 2 Stars 1 Star

No reviews

  • Author: Kimberly
  • Total Time: 25 min
  • Yield: 4-6 1x

Description

Recommended Equipment

  • mixing bowl
  • whisk
  • two small bowls
  • piping bag
  • large pan

Ingredients

Units Scale

PANCAKE BATTER

  • 1 egg
  • 55 grams neutral oil
  • 1 tbsp white sugar
  • pinch of salt
  • 250 milliliter full-fat milk
  • 2 tsp baking powder
  • 200 grams all-purpose flour
  • 12 tbsp butter for frying

CINNAMON SWIRL

  • 60 grams butter
  • 50 grams brown sugar
  • 1 tbsp cinnamon

CREAM CHEESE FROSTING

  • 100 grams cream cheese
  • 1.5 tbsp milk
  • 1 tbsp lemon juice
  • 20 grams powdered sugar

Instructions

  1. For the pancake batter, whisk the egg with sugar, canola oil, salt, and milk in a large bowl until well combined. Then add the flour and baking powder, and mix everything thoroughly with a whisk until you get a smooth batter. Set the batter aside briefly.
  2. For the cinnamon swirl, combine the room-temperature soft butter (don’t melt it in the microwave or on the stove, otherwise, the consistency will be too runny, and the swirl will lose its shape when cooked) with brown sugar and cinnamon in a small bowl. Put the mixture into a piping bag or a plastic bag and set it aside.
  3. For the frosting, mix powdered sugar, cream cheese, milk, and lemon juice in a bowl until smooth. Add a little more milk if you need a runnier consistency. Set this aside as well.
  4. Heat a large pan over medium heat and add a small piece of butter. Once the butter forms small bubbles, spoon 1-1.5 tablespoons of batter per pancake into the pan. Let them cook briefly until the pancakes start forming small bubbles around the edges.
  5. Now, cut a small hole in the piping bag with the butter-sugar-cinnamon mixture. Pipe the mixture onto the pancakes in a swirl pattern. Cover the pan with a lid and let the pancakes finish cooking on the lowest heat setting until fully cooked through. Important: Don’t flip the pancakes! Otherwise, the swirl will disappear.
  6. Carefully remove the finished pancakes from the pan, spread them with the cream cheese frosting, and enjoy!
  • Passive Time:
  • Cook Time: 25 min

Cheese Fondue Oil

Cheese Fondue Oil

Cheese Fondue Oil

Cheese Fondue Oil

December 23, 2024 by Kimberly

Velvety and savory, this infused oil captures the essence of garlic and cheese, delivering pure fondue vibes. Drizzle it, dip with it, or savor it – it’s a total flavor bomb.

40 MINUTES

ADVANCED

VEGETARIAN

INT.

40 PER TSP

UMAMI

MICHELIN

OIL

WINTER

INTRODUCTION

ABOUT THE RECIPE

This oil was a fun experiment that turned into a total win! Infused with Gruyere, Parmesan, and garlic, it packs a cheesy, savory punch that’s perfect for dipping or drizzling. While the salt didn’t quite come through, the rich flavors of garlic and cheese infused beautifully into the oil, creating a gourmet touch for any meal. Whether you’re hosting friends or elevating a simple dinner, this oil is a little bottle of magic.

How to serve
Drizzle this flavorful oil over fresh bread, roasted vegetables, or pasta to take your meal to the next level. Use it as a dip for crusty baguettes or even as a topping for grilled meats. It’s also a game-changer when swirled into soups for an extra burst of richness. For cheese lovers, this oil is the ultimate gourmet hack for effortless flavor in seconds. By the way it pairs perfectly with my Cottage Pie!

How to store
Store the oil in an airtight glass container in the fridge for up to one week. Keep it away from direct sunlight to preserve the flavor. If you notice any changes in smell or texture, it’s time to make a fresh batch!

Hi, I'm Kimberly!

Hi, I'm Kimberly.

A passionate food lover who believes in the magic of homemade deliciousness that spreads love and warmth. Join me on this culinary adventure as I prepare wonderful dishes and let’s spread some happiness together!

Kimberly the Zett Signature

If you want to get to know me better, click here!


Cheese Fondue Oil
Cheese Fondue Oil
Cheese Fondue Oil
„Let’s make a piece of happiness“
Print
clock clock iconcutlery cutlery iconflag flag iconfolder folder iconinstagram instagram iconpinterest pinterest iconfacebook facebook iconprint print iconsquares squares iconheart heart iconheart solid heart solid icon
Cheese Fondue Oil

Cheese Fondue Oil


  • Author: Kimberly
  • Total Time: 40 min
  • Yield: 1 cup / 250ml 1x

Description

RECOMMENDED EQUIPMENT

  • blender
  • medium-sized saucepan
  • whisk
  • a bowl which the medium saucepan fits into
  • 2 medium-sized bowls
  • 2 fine sieves
  • sealable container (oil bottle)
  • ice cubes
  • coffee filter

Ingredients

Units Scale
  • 50 grams parmesan
  • 30 grams gruyere
  • 4 garlic cloves
  • 1 tbsp sea salt
  • 250 milliliter oil

Instructions

  1. Cut the cheese into coarse pieces and peel the garlic cloves. Add everything to the blender along with the salt and oil.
  2. Pour the mixture from the blender into a medium-sized pot and heat it over medium heat to a temperature of about 101°-104°C (213°-219°F), and maintain this temperature for the next 15 minutes. Stir occasionally, making sure the temperature remains steady and nothing gets burned.
  3. Prepare a bowl large enough to fit a medium-sized pot, and fill it with cold water and a handful of ice cubes. Also, hang a fine sieve strainer over one medium-sized bowl and another fine sieve strainer, with a coffee filter inside it, over another medium-sized bowl.
  4. Now, place the pot in the ice water and stir to cool the oil quickly. Once the oil is almost cold, remove the pot from the water and pour the oil into the prepared fine sieve to catch the coarse particles.
  5. Then, pour the oil into the second sieve, which is equipped with a coffee filter, to catch the remaining finer particles.
  6. Allow the oil to drip through for about 20 minutes or maybe less depending on how many remaining particles are in the coffee filter. Once all the oil has passed through the coffee filter, transfer the collected amount of oil into a sealable container or directly into an oil bottle. Store in the refrigerator for up to one week.
  • Prep Time: 5 min
  • Passive Time: 20 min
  • Cook Time: 15 min

Cherry Almond Marzipan Oats

Cherry Almond Marzipan Oats

Cherry Almond Marzipan Oats

Cherry Almond Marzipan Oats

December 22, 2024 by Kimberly

Imagine creamy oats kissed with almond milk, layered with luscious cherry filling, and drizzled with silky marzipan sauce – finished with a candied cherry. It’s breakfast that tastes like dessert but feels indulgently cozy.

30 MINUTES

EASY

VEGETARIAN

INT.

399 PER PORTION

CREAMY

EVERYDAY

BREAKFAST

AUTUMN
WINTER

INTRODUCTION

ABOUT THE RECIPE

This dreamy breakfast combines the best of dessert and comfort food! Creamy almond milk oats meet a tangy-sweet cherry filling, topped with a velvety marzipan drizzle and crowned with a candied cherry. It’s perfect for chilly mornings, special occasions, or whenever you’re craving something extra indulgent. With layers of flavor and texture, this dish is not just a breakfast – it’s a hug in a bowl.

How to serve
Serve warm for the ultimate cozy vibes. To assemble, spoon the creamy almond oats into a bowl, add a layer of cherry filling, and drizzle generously with the marzipan sauce. Top it with a candied cherry for a stunning finish. Pair it with a hot cup of coffee or tea for a slow, luxurious morning or dress it up for a brunch centerpiece.

How to store
Store leftovers in an airtight container in the fridge for up to three days.

Hi, I'm Kimberly!

Hi, I'm Kimberly.

A passionate food lover who believes in the magic of homemade deliciousness that spreads love and warmth. Join me on this culinary adventure as I prepare wonderful dishes and let’s spread some happiness together!

Kimberly the Zett Signature

If you want to get to know me better, click here!


Cherry Almond Marzipan Oats
„Let’s make a piece of happiness“
Print
clock clock iconcutlery cutlery iconflag flag iconfolder folder iconinstagram instagram iconpinterest pinterest iconfacebook facebook iconprint print iconsquares squares iconheart heart iconheart solid heart solid icon
Cherry Almond Marzipan Oats

Cherry Almond Marzipan Oats


  • Author: Kimberly
  • Total Time: 30 min
  • Yield: 3 1x

Description

Recommended Equipment

  • small pot
  • whisk
  • bowl
  • cheese grater

Ingredients

Units Scale

OATS BASE

  • 100 grams rolled oats
  • 250 milliliter almond milk
  • 1 tsp vanilla extract
  • pinch of salt
  • 1 tsp date syrup

MARZIPAN SAUCE

  • 1 egg yolk
  • 100 milliliter full-fat cow milk
  • 50 milliliter heavy cream
  • 50 grams marzipan
  • 40 grams white sugar
  • 0.5 tsp vanilla extract

CHERRY FILLING

  • 150 grams cherries
  • 50 milliliter cherry juice
  • 1 tsp lemon juice
  • 1 tsp cornstarch
  • 1 tbsp powdered sugar

TOPPING

  • candied cherries

Instructions

  1. Place the marzipan in the freezer for about 20–30 minutes, then grate it coarsely using a cheese grater.
  2. Warm the milk and cream in a pot without bringing it to a boil, then remove from heat.
  3. Mix the egg yolks, sugar, and vanilla extract thoroughly in a bowl. Add the grated marzipan and stir well.
  4. Gradually add the egg yolk mixture to the warm milk-cream mixture, one teaspoon at a time, stirring constantly until combined. Return the pot to medium heat and stir until the sauce thickens. For a firmer consistency, mix 1 tsp of cornstarch with a bit of water, add it to the sauce, and briefly bring it to a boil. Remove from heat.
  5. In another pot, mix cherries, cherry juice, lemon juice, powdered sugar, and cornstarch. Heat over medium heat until the mixture thickens and the cherries soften. Remove from heat.
  6. In a separate pot, combine oats, almond milk, vanilla extract, salt, and your choice of sweetener (e.g., date syrup). Bring to a boil, stirring until the oats are soft.
  7. Layering: Spread a portion of the oatmeal in a small bowl, then add a layer of cherry sauce. Cover with the remaining oatmeal, smooth the surface, and pour the marzipan sauce over the top.
  8. Garnish with a candied cherry. Serve immediately or prepare as overnight oats.

Cherry Bakewell Oil

Cherry Bakewell Oil

Cherry Bakewell Oil

Cherry Bakewell Oil

December 22, 2024 by Kimberly

This Cherry Bakewell Oil was meant to be sweet, nutty, and elegant – but let’s just say it didn’t live up to the dream. Honest reviews and lessons learned inside!

40 MINUTES

ADVANCED

VEGAN

ENGLISH

40 PER TSP

MICHELIN

OIL

WINTER

INTRODUCTION

ABOUT THE RECIPE

Let’s get real: not every recipe turns out as dreamy as planned. This Cherry Bakewell Oil, infused with candied cherries and almonds, had all the right ideas but didn’t deliver on flavor. Instead of the sweet, nutty depth I envisioned, the result was underwhelming and lacked the vibrant punch I hoped for. But hey, it’s all part of the journey, and I’m here to share the lessons I learned from this kitchen experiment.

How to serve
Honestly, this oil didn’t bring the wow factor. The sweetness from the candied cherries didn’t infuse at all, and the almond flavor got lost in translation. If you do give it a try, maybe use it as a light drizzle over mild salads or simple desserts where subtlety is welcome. But don’t expect it to steal the show – it’s more of a whisper than a statement. But if you’re still craving cherry and almond, you should definitely try these Cherry Almond Marzipan Oats!


How to store
Keep the infused oil in an airtight container for up to a week at room temperature. Be sure to shake it before using, as the ingredients can settle at the bottom.

Hi, I'm Kimberly!

Hi, I'm Kimberly.

A passionate food lover who believes in the magic of homemade deliciousness that spreads love and warmth. Join me on this culinary adventure as I prepare wonderful dishes and let’s spread some happiness together!

Kimberly the Zett Signature

If you want to get to know me better, click here!


Cherry Bakewell Oil
Cherry Bakewell Oil
Cherry Bakewell Oil
„Let’s make a piece of happiness“
Print
clock clock iconcutlery cutlery iconflag flag iconfolder folder iconinstagram instagram iconpinterest pinterest iconfacebook facebook iconprint print iconsquares squares iconheart heart iconheart solid heart solid icon
Cherry Bakewell Oil

Cherry Bakewell Oil


  • Author: Kimberly
  • Total Time: 40 min
  • Yield: 1 cup / 250 ml 1x

Description

RECOMMENDED EQUIPMENT

  • blender
  • medium-sized saucepan
  • whisk
  • a bowl which the medium saucepan fits into
  • 2 medium-sized bowls
  • 2 fine mesh strainers
  • oil bottle
  • ice cubes
  • coffee filter

Ingredients

Units Scale
  • 50 grams raw almonds
  • 50 grams candied cherries
  • 250 milliliter rapeseed oil

Instructions

  1. Put the almonds and candied cherries into the blender. Pour in the oil. Blend on the highest setting until it no coarse pieces are longer visible.
  2. Pour the mixture from the blender into a medium-sized pot and heat it over medium heat, constantly stirring, to a temperature of about 102°-103°C (215°-217°F). Then, let the oil simmer with the lid partially on for the next 10 minutes. Stir only occasionally, making sure the temperature remains steady and nothing gets burned.
  3. At the end of the cooking process, prepare a bowl large enough to fit the medium-sized pot, filled with cold water and a handful of ice cubes. Also, hang a fine mesh sieve strainer over a medium-sized bowl.
  4. Now, place the pot in the ice water and stir to stop the cooking process. Once the oil is almost cold, remove the pot from the water and pour the oil into the first fine mesh sieve to catch the coarse particle.
  5. Then, pour the oil into the second fine mesh sieve, which you before equipped with a coffee filter, to catch the remaining finer particles.
  6. Allow the oil to drip through for about 30 minutes or maybe less depending on how many remaining particles are in the coffee filter. Once all the oil has passed through the coffee filter, transfer the collected amount of oil into an oil bottle. Store in the refrigerator for up to 1 week.
  • Passive Time: 30 min
  • Cook Time: 10 min

German Eggnog

German Eggnog

German Eggnog

German Eggnog

December 21, 2024 by Kimberly

Creamy, spiced, and a hint of orange, this festive drink feels like a warm blanket with a zesty twist. Perfect for cozy nights, it’s sweet nostalgia with a touch of magic.

10 MINUTES

EASY

VEGETARIAN

GERMAN

340 PER PORTION

SWEET

CHRISTMAS

BEVERAGES

WINTER

INTRODUCTION

ABOUT THE RECIPE

This creamy, spiced drink is your ultimate holiday treat, blending warm vanilla notes with a zesty orange kick. It’s the perfect balance of cozy and refreshing, bringing all the festive feels to your cup. Whether you’re cuddled up on the couch or hosting a holiday party, this drink will steal the show. Whipped cream and a sprinkle of cinnamon take it to the next level. Trust me, you’re about to sip your way to holiday bliss.

How to serve
Serve this festive drink warm for an extra cozy vibe or chilled for a refreshing twist. Top it with a generous dollop of whipped cream and a dash of cinnamon for that picture-perfect look. Pair it with a plate of Christmas cookies or a slice of fruitcake to complete the holiday mood. Pro tip: Add a splash of your favorite spirit if you want to elevate it for the grown-ups at your table.

How to store
Store the drink in an airtight container in the fridge for up to one day. Stir it well before reheating or serving cold. Keep the whipped cream and cinnamon topping separate and add them fresh just before serving.

Hi, I'm Kimberly!

Hi, I'm Kimberly.

A passionate food lover who believes in the magic of homemade deliciousness that spreads love and warmth. Join me on this culinary adventure as I prepare wonderful dishes and let’s spread some happiness together!

Kimberly the Zett Signature

If you want to get to know me better, click here!


German Eggnog
German Eggnog
„Let’s make a piece of happiness“
Print
clock clock iconcutlery cutlery iconflag flag iconfolder folder iconinstagram instagram iconpinterest pinterest iconfacebook facebook iconprint print iconsquares squares iconheart heart iconheart solid heart solid icon
German Eggnog

German Eggnog


  • Author: Kimberly
  • Total Time: 10 min
  • Yield: 2 1x

Description

Recommended Equipment

  • small saucepan
  • whisk
  • electric hand mixer
  • tall container
  • piping bag

Ingredients

Units Scale

EGGNOG

  • 250 milliliter full-fat cow milk
  • 150 milliliter advocaat
  • 100 milliliter orange juice
  • 14 grams vanilla sugar
  • 15 grams vanilla pudding instant powder
  • pinch of salt

WHIPPED CREAM

  • 200 milliliter heavy cream
  • pinch of cinnamon

Instructions

  1. In a small saucepan, whisk together milk, orange juice, eggnog, vanilla sugar, and vanilla pudding powder. Heat over medium heat until the mixture starts to thicken. Remove from heat and keep warm with a lid. Season with a pinch of salt.
  2. Whip the cream until stiff using an electric mixer and transfer it into a piping bag.
  3. Pour the eggnog mixture into a cup, top with whipped cream, and sprinkle with a bit of cinnamon for a finishing touch. Enjoy!
  4. The vanilla pudding powder can be replaced with milk powder and cornstarch for an even creamier taste.
  • Cook Time: 10 min

Vanilla Parfait with Chocolate Soil

Vanilla Parfait with Chocolate Soil

Vanilla Parfait with Chocolate Soil

Vanilla Parfait with Chocolate Soil

December 20, 2024 by Kimberly

This creamy vanilla parfait melts like a dream, paired with crunchy, bittersweet chocolate soil for a texture and flavor explosion. Dessert vibes: fancy enough to impress, cozy enough to devour solo.

4 HOURS
40 MINUTES

INTERMEDIATE

VEGETARIAN

FRENCH

245 PER PORTION

CREAMY
CRUNCHY

CHRISTMAS

DESSERT

ALL YEAR

INTRODUCTION

ABOUT THE RECIPE

If you’re looking for a dessert that feels both luxurious and approachable, this vanilla parfait with chocolate soil is it. The creamy, rich vanilla base perfectly contrasts the crunchy, bittersweet chocolate soil, creating a balance of flavors and textures. It’s the kind of dessert that wows at a dinner party but is easy enough to whip up for yourself when you need a little indulgence. Bonus: it’s no-bake and totally make-ahead friendly!

How to serve
Serve your parfait chilled in elegant bowls or plates for the ultimate dessert presentation. Spoon the creamy vanilla layer first and top with a generous sprinkle of chocolate soil for that perfect crunch. Want to elevate it even more? Add fresh berries, a drizzle of caramel or even a few drops of this Mint Oil.

How to store
Keep the parfait in an airtight container in the freezer for up to one week. Store the chocolate soil separately in a dry container to maintain its crunch. Assemble right before serving.

Hi, I'm Kimberly!

Hi, I'm Kimberly.

A passionate food lover who believes in the magic of homemade deliciousness that spreads love and warmth. Join me on this culinary adventure as I prepare wonderful dishes and let’s spread some happiness together!

Kimberly the Zett Signature

If you want to get to know me better, click here!


Vanilla Parfait with Chocolate Soil
„Let’s make a piece of happiness“
Print
clock clock iconcutlery cutlery iconflag flag iconfolder folder iconinstagram instagram iconpinterest pinterest iconfacebook facebook iconprint print iconsquares squares iconheart heart iconheart solid heart solid icon
Vanilla Parfait with Chocolate Soil

Vanilla Parfait with Chocolate Soil


  • Author: Kimberly
  • Total Time: 4 hrs + 40 min
  • Yield: 10-12 1x

Description

Recommended Equipment

  • two glass or metal mixing bowls
  • two small bowls
  • baking tray
  • small pot
  • whisk
  • silicone spatula
  • fine mesh strainer
  • molds for the parfait

Ingredients

Units Scale

PARFAIT

  • 4 egg yolks
  • 100 grams powdered sugar
  • 400 grams heavy cream
  • 1 vanilla pod

CHOCOLATE SOIL

  • 60 grams powdered sugar
  • 100 grams all-purpose flour
  • 15 grams unsweetened cocoa powder
  • 1/4 tsp salt
  • 50 grams butter
  • 1 tsp ground coffee

Instructions

  1. Whip the cream until stiff peaks form, then place it in the fridge to keep cold.
  2. Separate the eggs, placing the yolks in a glass or metal bowl. Scrape the vanilla pod and add the seeds to the yolks.
  3. Sift the powdered sugar through a fine mesh strainer into the yolks. Mix well with the vanilla seeds.
  4. Place the bowl over a pot of simmering water (double boiler setup), ensuring only the steam touches the bowl. Whisk the mixture until it reaches 80 °C (176 °F).
  5. Prepare an ice bath (a bowl with cold water and ice cubes). Once the yolk mixture reaches 80 °C, place the bowl in the ice bath and whisk until the mixture cools and becomes thick, sticky, and creamy.
  6. Gently fold the chilled whipped cream into the cooled yolk mixture using a silicone spatula until fully combined.
  7. Pour the parfait mixture into molds and freeze for about 4 hours.
  8. For the chocolate soil, preheat the oven to 160 °C (320 °F).
  9. Combine sugar, flour, cocoa powder, salt, and ground coffee in a bowl.
  10. Melt the butter and add it to the dry ingredients. Mix with your hands until a crumbly texture forms.
  11. Spread the mixture evenly on a small baking tray and bake for about 10 minutes.
  12. Remove the tray from the oven, let the mixture cool, then crumble it into pieces. Store in an airtight container.
  13. To serve, unmold the parfaits, arrange them on plates, and decorate with the chocolate soil around them.
  14. Optional: Garnish with mint oil, berry compote, marzipan sauce, or chocolate sauce.
  • Passive Time: 4 hours
  • Cook Time: 40 min