Homemade Kimchi

Homemade Kimchi

Homemade Kimchi

Homemade Kimchi

April 2, 2025 by Kimberly

Slightly chaotic, deeply flavorful, and kind of addictive. This spicy little side dish doesn’t ask for attention, it demands it. Make it once and suddenly you’re that person who ferments things.

45 MINUTES
+ 2 DAYS

EASY

VEGAN

KOREAN

1 JAR

UMAMI

WEEKNIGHT

CONDIMENTS

ALL YEAR

INTRODUCTION

ABOUT THE RECIPE

This is one of those recipes that feels a little chaotic while you’re making it. You’re chopping cabbage, blending weird things together, your kitchen smells slightly suspicious, and then magic. A few days later, you have the tangy, spicy, crunchy goodness that is homemade kimchi. It’s bold, a little wild, and honestly kind of addictive. If you’ve never made fermented food before, this is your sign. It’s easier than it looks and way more fun.

How to serve
Kimchi is one of the most iconic Korean staples for a reason. It’s a powerhouse of flavor and a probiotic dream that happens to be absolutely delicious with basically anything. My favorite way to eat this? Straight from the jar, if I’m being honest. But if we’re being civilized: layer it into rice bowls, stir into fried rice, top a savory pancake, or tuck it into sandwiches. Kimchi also loves melted cheese…trust me on this one. It’s the punchy, spicy friend that turns boring meals into actual moments. And once you start adding it to things, you won’t want to stop.

How to store
Store your kimchi in a clean, airtight container in the fridge once it’s done fermenting (after about 2–3 days). It’ll keep for weeks, actually, it gets more flavorful the longer it sits. Just make sure to use a clean fork every time, and you’re golden.

Hi, I'm Kimberly!

Hi, I'm Kimberly.

A passionate food lover who believes in the magic of homemade deliciousness that spreads love and warmth. Join me on this culinary adventure as I prepare wonderful dishes and let’s spread some happiness together!

Kimberly the Zett Signature

If you want to get to know me better, click here!


Homemade Kimchi
Homemade Kimchi
„Let’s make a piece of happiness“
Print
clock clock iconcutlery cutlery iconflag flag iconfolder folder iconinstagram instagram iconpinterest pinterest iconfacebook facebook iconprint print iconsquares squares iconheart heart iconheart solid heart solid icon
Homemade Kimchi

Homemade Kimchi


5 Stars 4 Stars 3 Stars 2 Stars 1 Star

No reviews

  • Author: Kimberly
  • Total Time: 2 days + 45 min

Description

RECOMMENDED EQUIPMENT

  • two large mixing bowls
  • a sharp knife
  • cutting board
  • blender
  • small saucepan
  • airtight container for storage

Ingredients

Units Scale

VEGGIES

  • 1 napa cabbage
  • 2 carrots
  • 6 green onions
  • 4 liter cold water
  • 100 grams sea salt

CHILI PASTE

  • 2 yellow onions
  • 1 apple or nashi pear
  • 1 garlic bulb
  • 1 thumb-sized piece of ginger
  • 2 tbsp fish sauce
  • 1 tbsp soy sauce
  • 1 tbsp mini shrimp
  • 4 tbsp water
  • 8 tbsp gochugaru (Korean chili flakes)

RICE FLOUR SLURRY

  • 3 tbsp rice flour
  • 200 milliliter water

Instructions

  1. Quarter the napa cabbage lengthwise, then chop it into bite-sized pieces. Place it in one of the large bowls and cover completely with cold water. Add a generous amount of sea salt and mix well with your hands or a spoon. To keep the cabbage submerged, weigh it down with a plate and something heavy. Let it soak for 30–45 minutes.
  2. While the cabbage is soaking, peel and julienne the carrots. Thinly slice the green part of the scallions. Set both aside, they’ll be folded into the paste later.
  3. Peel the apple, onion, garlic, and ginger. Toss everything into a blender with a splash of water. If you’re using mini shrimp, add those now. Pour in the fish sauce and soy sauce, then blend until smooth and pulpy.
  4. Transfer the paste to your second large bowl. Stir in the gochugaru (Korean chili flakes) until the mixture is a vibrant, rich red and has a spreadable texture.
  5. In a small saucepan, combine water and rice flour to make the slurry. Heat gently, stirring constantly, until it thickens into a sticky, glue-like consistency. Let it cool for a few minutes, then stir it into the chili paste mixture.
  6. Add the sliced carrots and scallions to the paste. Stir well until everything is evenly coated and combined.
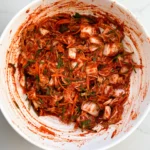
  7. Drain the soaked cabbage, rinse it under cold water, and gently squeeze out the excess liquid. Add it to the bowl with the red paste and (with gloves, highly recommended!) mix everything thoroughly until all the cabbage is coated.
  8. Spoon the kimchi mixture into a clean, airtight container. Press it down firmly to eliminate air pockets. Wipe the edges, cover with plastic wrap, and seal tightly. Leave it at room temperature for about two days to ferment.
  9. After two days, your kimchi will be lightly fermented and ready to taste. If you like it funkier and more sour, give it another day on the counter. After that, pop it in the fridge, it’ll keep for several weeks and just keeps getting better.
  • Passive Time: 2 days
  • Cook Time: 45 min

Chicken Katsudon with Napa Cabbage

Chicken Katsudon with Napa Cabbage

Chicken Katsudon with Napa Cabbage

Chicken Katsudon with Napa Cabbage

August 27, 2024 by Kimberly

Savor a golden bite of crispy chicken wrapped in rich, savory sauces, fluffy rice and tender napa cabbage – this dish is a warm hug for your taste buds, perfect for a cozy night in and better than take out.

80 MINUTES

EASY

OMNIVORE

JAPANESE

928 PER PORTION

COMFORT FOOD

EVERYDAY

DINNER

ALL YEAR

INTRODUCTION

ABOUT THE RECIPE

Get ready to dive into a bowl of pure comfort with this deliciously crispy chicken paired with rich, savory sauces and tender cabbage. This dish is like a cozy night in a bowl, combining the crunch of perfectly fried chicken with the deep, satisfying flavors of homemade, roasted sesame, tonkatsu and tsuyu sauces. Whether you’re new to Japanese cooking or a seasoned pro, this recipe will quickly become your go-to for a quick and comforting dinner idea that never disappoints.

How to serve
Serve this flavorful chicken dish over a bed of steaming hot rice. Add a generous portion of tender cabbage on the side for a bit of freshness that perfectly balances the crispy, savory chicken. For an extra crunch, sprinkle some toasted sesame seeds and scallions on top. This dish is ideal for a cozy dinner at home, but it’s also a fantastic option for impressing guests with something both comforting and deliciously unique. For that extra fancy touch massage the napa cabbage with 1-2 tbsp of this Chinese Holy Trinity Oil.

How to store
If you have leftovers (which is rare because it’s so good!), store the chicken, cabbage and rice separately in airtight containers in the fridge. The chicken will stay crispy for up to two days, and you can reheat it in the oven to keep that satisfying crunch. The sauces can be stored in the fridge for up to a week, ready to drizzle over fresh rice or veggies whenever you crave a quick, tasty meal.

Hi, I'm Kimberly!

Hi, I'm Kimberly.

A passionate food lover who believes in the magic of homemade deliciousness that spreads love and warmth. Join me on this culinary adventure as I prepare wonderful dishes and let’s spread some happiness together!

Kimberly the Zett Signature

If you want to get to know me better, click here!


Chicken Katsudon with Napa Cabbage
„Let’s make a piece of happiness“
Print
clock clock iconcutlery cutlery iconflag flag iconfolder folder iconinstagram instagram iconpinterest pinterest iconfacebook facebook iconprint print iconsquares squares iconheart heart iconheart solid heart solid icon
Chicken Katsudon with Napa Cabbage

Chicken Katsudon with Napa Cabbage


5 from 1 review

  • Author: Kimberly
  • Total Time: 80 min
  • Yield: 4 1x

Description

Recommended Equipment

  • small pan
  • mortar & pestle
  • medium-sized bowl
  • two squeeze bottles
  • small pot
  • sharp knife
  • cutting board
  • hand blender
  • fine mesh strainer
  • plastic wrap
  • meat tenderizer
  • three shallow bowls for breading
  • medium-sized pot
  • large pan
  • paper towels
  • salad spinner

Ingredients

Units Scale

SESAME SAUCE

  • 2 tbsp tahini
  • 1 tbsp rice vinegar
  • 1.5 tbsp soy sauce
  • 1 tbsp mirin
  • 1/8 tsp salt
  • 1 tbsp white sesame seeds
  • 2 tbsp mayonnaise
  • 1 tsp sesame oil
  • 1 tbsp water
  • 1 garlic clove

TONKATSU SAUCE

  • 1 tbsp tomato paste
  • 1 tsp honey
  • 1 tsp white sugar
  • 1 tbsp apple cider vinegar
  • 100 milliliter cold water
  • pinch of salt
  • 2 tbsp soy sauce
  • 2 tbsp Worcestershire sauce
  • 2 tbsp Hoisin sauce
  • 1 tbsp brown sugar
  • 4 dried plums
  • 1/4 of 1 apple
  • 1 tbsp mirin
  • 1 centimeter fresh ginger
  • 1 garlic cloves

CHICKEN SCHNITZEL

  • 400 grams chicken breast
  • 12 eggs
  • 4 tbsp all-purpose flour
  • 8 tbsp bread crumbs
  • 8 tbsp panko
  • clarified butter for frying

RICE & CABBAGE

TSUYU SAUCE

  • 6 tbsp soy sauce
  • 6 tbsp mirin
  • 1 tbsp white sugar
  • 1/2 tsp dashi powder
  • 6 tbsp water
  • 4 small yellow onions

TOPPING

  • green part of 2 scallions

Instructions

  1. Sesame Sauce: First, toast the white sesame seeds in a small pan until they turn golden brown, without adding any oil. Transfer the toasted sesame seeds to a mortar and grind them to a semi-coarse consistency. Then, place the sesame in a medium-sized bowl and mix it with tahini, rice vinegar, soy sauce, mirin, salt, mayonnaise, sesame oil, water, and a grated clove of garlic to create a creamy sauce. Pour the sauce into a squeeze bottle and refrigerate.
  2. Tonkatsu Sauce: In a small pot, mix together tomato paste, honey, sugar, apple cider vinegar, water, and salt, and gently heat the mixture. Meanwhile, cut the dried plums into small pieces and add them to the pot. Peel the apple, cut a quarter of it into small pieces, and add it to the pot along with the other ingredients. Peel the ginger and garlic clove, grate them into the pot, and stir well. Finally, add soy sauce, Worcestershire sauce, hoisin sauce, brown sugar, and mirin. Heat the mixture for a few minutes and bring it to a brief boil until the sugar dissolves and the apple softens. If your sauce it still too thick, add gradually more water until it reaches your desired consistency. Use a hand blender to puree the sauce until smooth, and if needed, strain it through a fine mesh strainer. Pour the sauce into a squeeze bottle and refrigerate.
  3. Chicken Schnitzel: If you bought whole chicken breasts, cut them horizontally using a butterfly cut so that you end up with two teardrop-shaped pieces. Place each piece between two layers of plastic wrap and gently and evenly flatten them with a meat tenderizer. Repeat this process with each piece of chicken and set them aside on a plate. Prepare the breading station using three shallow bowls. In the first bowl, place the flour; in the second bowl, beat the eggs; and in the third bowl, mix the breadcrumbs with panko. Dredge each chicken piece in flour, making sure it’s fully coated, then shake off the excess and dip it in the beaten egg, coating both sides. Finally, press the chicken into the breadcrumb-panko mixture, ensuring it’s well-covered on all sides. Set the breaded chicken pieces aside on a plate.
  4. Rice: Cook the rice according to the package instructions. If you don’t have the instructions, rinse the rice in a medium-sized pot until the water runs clear. Drain the water, then add fresh water in a 1.5:1 ratio to the rice (so, for this recipe, use 420g of water for 280g of rice after rinsing). Place the pot on the stove over high heat and cover with a lid. Once the water comes to a boil, reduce the heat to the lowest setting. Let the rice cook with the lid on for about 15 minutes. The rice is done when you see small, even holes forming between the grains. Leave the pot on the turned-off stove with the lid on.
  5. While the rice is cooking, heat a large pan for the schnitzel. Add clarified butter or another high-heat oil to the pan and fry the chicken on both sides over medium heat until golden brown. Place the fried schnitzel on paper towels to drain.
  6. While the chicken is frying, slice the onions for the Tsuyu sauce. Halve the onions and then cut them into thin strips.
  7. Napa Cabbage: While the chicken is frying, quarter the napa cabbage and slice two quarters into thin strips. Wash them under cold water and spin them dry. Set the cabbage aside. If you’d like to add a special touch, you can drizzle 1-2 tablespoons of my Chinese Holy Trinity Oil over the cabbage and massage it in.
  8. Tsuyu Sauce: Once the chicken is done frying, remove the remaining fat from the pan and place it back on the stove. Add soy sauce, mirin, sugar, dashi powder, and water to the pan and bring it to a quick boil. Then, add the onions and let it simmer for 5-7 minutes until the onions are soft but still slightly firm.
  9. Once the Tsuyu sauce is ready, you can start plating. Take four bowls. First, add the rice, then drizzle 1-2 tablespoons of Tsuyu sauce and some onions over the rice. Next, add a handful of napa cabbage on top, and drizzle the sesame sauce over it in a zigzag pattern. Slice the schnitzel into thin strips and place it on top of the cabbage. Finally, drizzle the remaining Tsuyu sauce and onions over the chicken, and finish with a zigzag of Tonkatsu sauce. Optional: garnish with fresh scallions.
  • Cook Time: 80 min