Whipped Feta & Rainbow Veggies

Whipped Feta & Rainbow Veggies

Whipped Feta & Rainbow Veggies

Whipped Feta & Rainbow Veggies

June 20, 2024 by Kimberly

Dive into this vibrant dish of whipped feta topped with colorful rainbow veggies. It’s fresh, it’s flavorful, and it’s sure to brighten your day!

15 MINUTES

EASY

VEGETARIAN

INT.

244 PER PORTION

CREAMYEVERDAY

DIPS & SPREADS

SUMMER

INTRODUCTION

ABOUT THE RECIPE

Who says healthy can’t be fun and delicious? This whipped feta with marinated rainbow veggies is a testament to just that. Bursting with colors and flavors, it’s the perfect pick-me-up any day!

How to serve
Serve this whipped feta as a delightful dip or spread over toasted bread. Pair it with the veggies for a mouth-watering appetizer or a light, satisfying lunch. It’s a versatile dish that plays well at your brunch table or as a snack during a busy workday.

How to store
Keep the whipped feta and marinated veggies in separate airtight containers in the fridge. They’ll stay fresh and tasty for up to five days, making them perfect for meal prep.

Hi, I'm Kimberly!

Hi, I'm Kimberly.

A passionate food lover who believes in the magic of homemade deliciousness that spreads love and warmth. Join me on this culinary adventure as I prepare wonderful dishes and let’s spread some happiness together!

Kimberly the Zett Signature

If you want to get to know me better, click here!


Whipped Feta & Rainbow Veggies
„Let’s make a piece of happiness“
Print
clock clock iconcutlery cutlery iconflag flag iconfolder folder iconinstagram instagram iconpinterest pinterest iconfacebook facebook iconprint print iconsquares squares iconheart heart iconheart solid heart solid icon
Whipped Feta & Rainbow Veggies

Whipped Feta & Rainbow Veggies


5 Stars 4 Stars 3 Stars 2 Stars 1 Star

No reviews

  • Author: Kimberly
  • Total Time: 15 minutes
  • Yield: 4 1x

Description

Recommended Equipment

  • sharp knife
  • cutting board
  • medium-sized bowl
  • food processor
  • measuring spoons
  • medium-sized plate

Ingredients

Units Scale

WHIPPED FETA

  • 200 grams feta cheese
  • 3 tbsp extra-virgin olive oil

RAINBOW VEGGIES

  • 1/4 cucumber
  • 46 cocktail tomatoes
  • 2 tbsp peas
  • 23 radishes
  • 1/2 carrot
  • 1 tbsp fresh dill
  • 1 tbsp fresh chives
  • 1 tbsp extra-virgin olive oil

Instructions

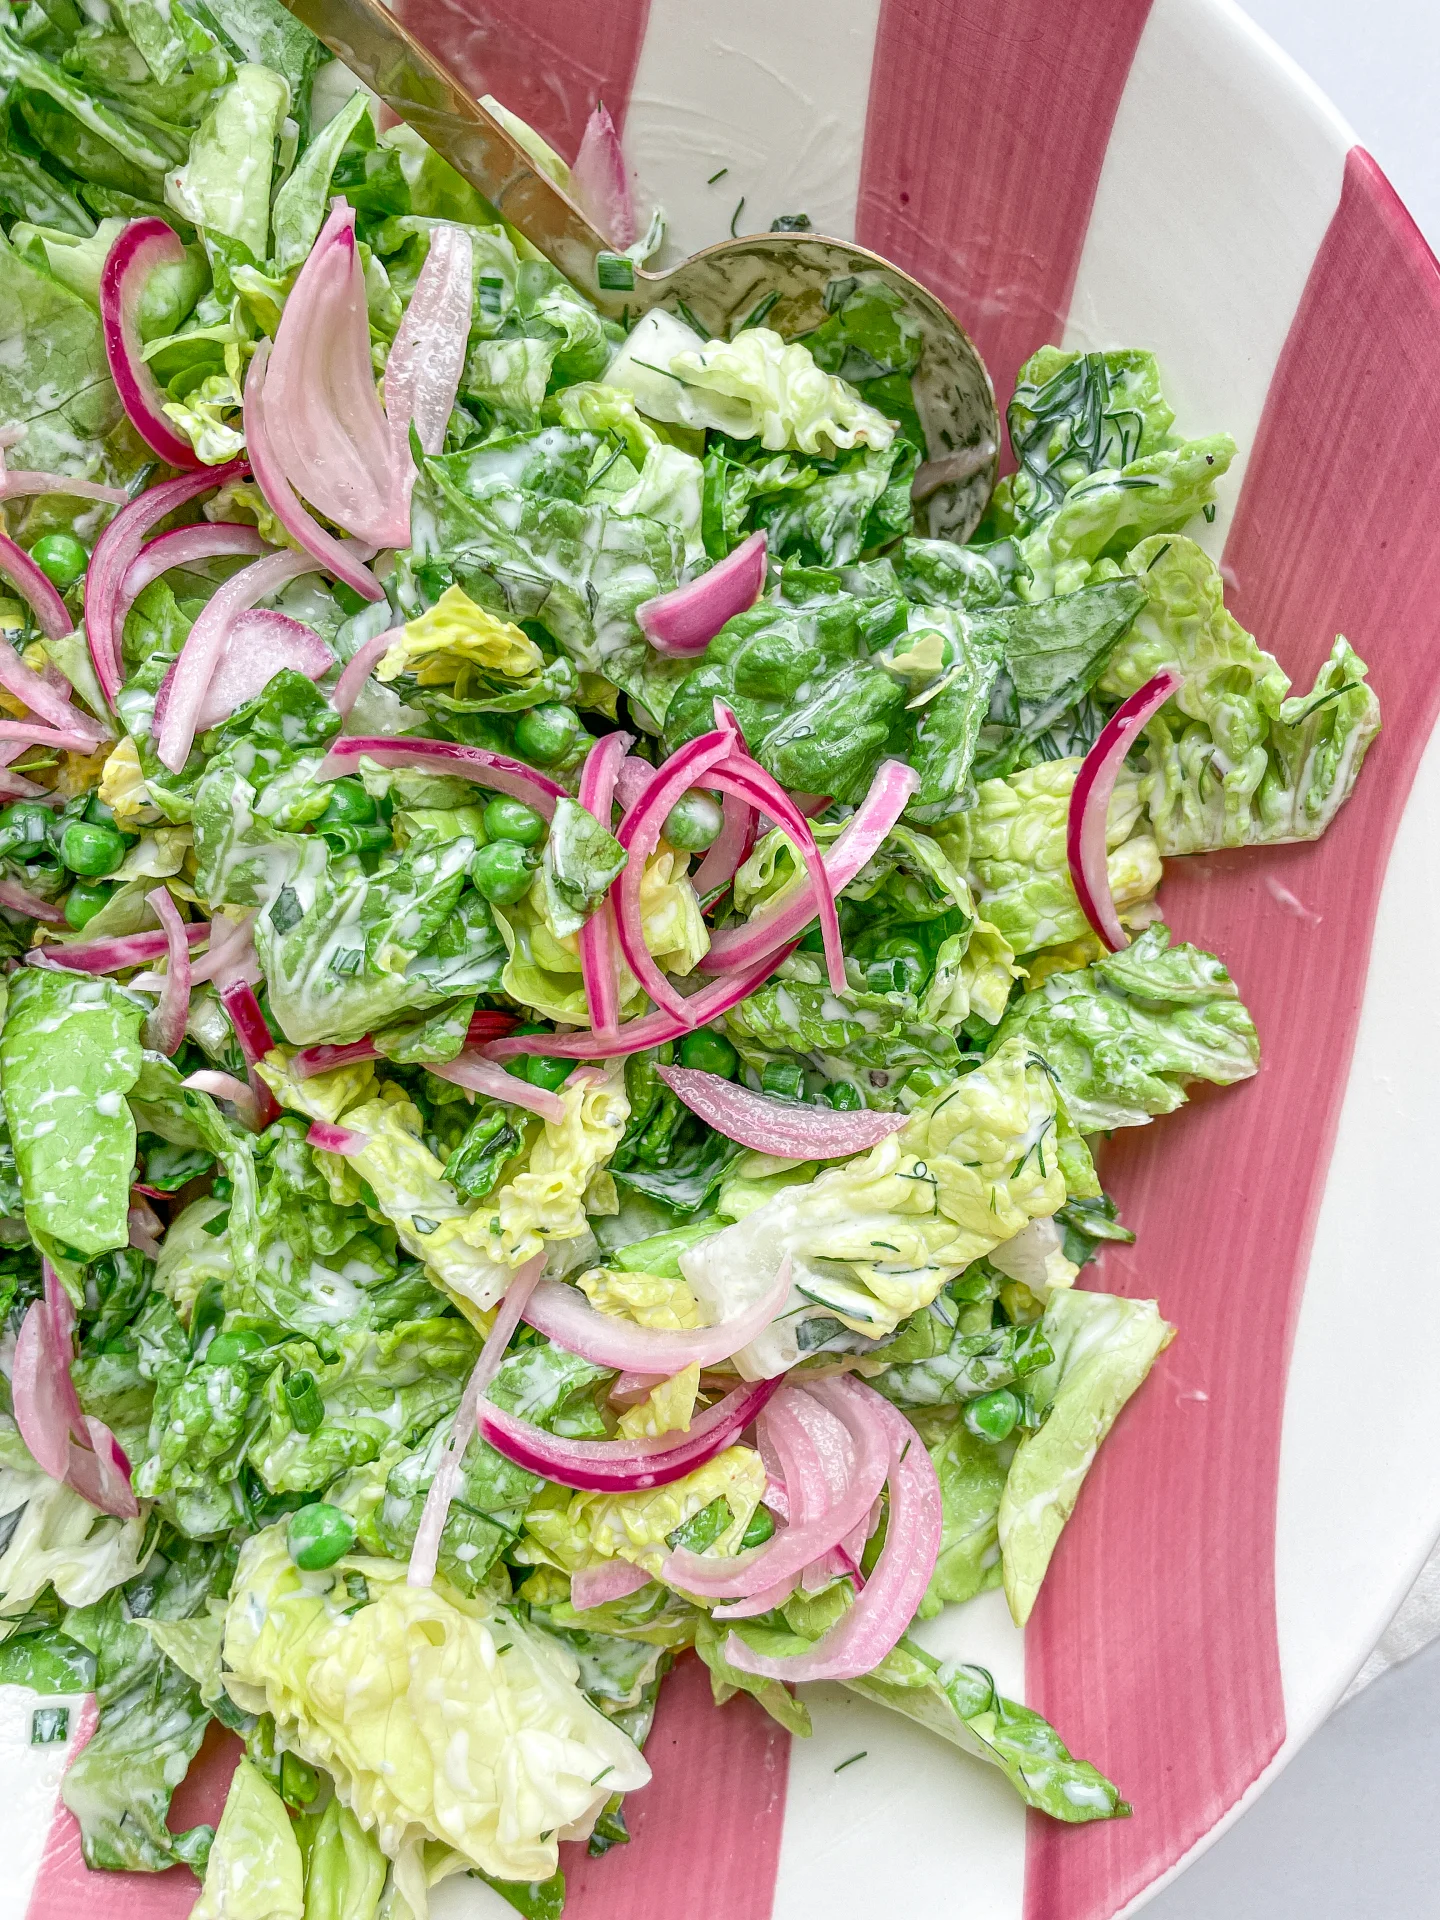
  • Thoroughly wash the cucumber, carrot, tomatoes, radishes, dill, and chives. Peel the cucumber and carrot and cut them into fine strips, halve the cherry tomatoes, slice the radishes thinly, finely chop the dill, and cut the chives into little rolls. Put everything into a medium-sized bowl and mix with 1 tablespoon of olive oil. If the feta cheese is very salty, I would not add any more salt to the vegetables.
  • Place the feta cheese in the food processor and turn it on. Gradually add 3 tablespoons of olive oil until the cheese is creamily blended.
  • Spread the feta on a flat plate and smooth it out. Distribute the vegetables over the cheese and serve. If you store the plate in the fridge, the cheese might harden a bit. I would recommend bringing it to room temperature before serving.

Notes

The calorie information may vary depending on the product used, country and region.

  • Cook Time: 15 min

Tomato Tarte Tatin

Tomato Tarte Tatin

Tomato Tarte Tatin

Tomato Tarte Tatin

June 15, 2024 by Kimberly

Flip your mealtime with a stunning Tomato Tarte Tatin! Sweet, savory, and beautifully caramelized, it’s a showstopper that turns any meal into a special occasion.

45 MINUTES

INTERMEDIATE

VEGETARIAN

FRENCH

586 PER PORTION

UMAMI

EVERDAY
DINNER PARTY

DINNER

SUMMER

INTRODUCTION

ABOUT THE RECIPE

Transform your table with the vibrant colors and lush flavors of a Tomato Tarte Tatin. This dish offers a delightful twist on the classic French dessert, turning tomatoes into the star of the show.

How to serve
Serve this exquisite tart fresh out of the oven to enjoy its optimal flavor and texture. It pairs beautifully with a simple arugula salad dressed with balsamic vinegar and olive oil or a side of creamy goat cheese. Perfect for impressing guests at dinner parties or enjoying a luxurious weekend meal.

How to store
Cool any leftovers to room temperature before storing them in an airtight container in the refrigerator. This dish is best enjoyed within a couple of days to maintain its crisp pastry and juicy topping.

Hi, I'm Kimberly!

Hi, I'm Kimberly.

A passionate food lover who believes in the magic of homemade deliciousness that spreads love and warmth. Join me on this culinary adventure as I prepare wonderful dishes and let’s spread some happiness together!

Kimberly the Zett Signature

If you want to get to know me better, click here!


Tomato Tarte Tatin
Tomato Tarte Tatin
Tomato Tarte Tatin
„Let’s make a piece of happiness“
Print
clock clock iconcutlery cutlery iconflag flag iconfolder folder iconinstagram instagram iconpinterest pinterest iconfacebook facebook iconprint print iconsquares squares iconheart heart iconheart solid heart solid icon
Tomato Tarte Tatin

Tomato Tarte Tatin


  • Author: Kimberly
  • Total Time: 45 min
  • Yield: 2 1x

Description

RECOMMENDED EQUIPMENT

  • sharp knife
  • cutting board
  • garlic press
  • oven-safe pan
  • large plate

Ingredients

Units Scale
  • 1 puff pastry dough
  • 4 big tomatoes
  • 2 garlic cloves
  • 1/2 tsp dried thyme
  • 3 tbsp olive oil
  • 1 tbsp honey
  • salt & pepper to taste
  • 1 tsp fresh thyme
  • 30 grams parmesan

Instructions

  1. Take the puff pastry out of the fridge. Set aside.
  2. Preheat the oven to 220°C (428°F).
  3. Wash the tomatoes and slice them finely from the bottom. Peel and finely chop or press the garlic and mix it into a small bowl with 1-2 tablespoons of olive oil. Set everything aside.
  4. Roll out the puff pastry and place the oven-safe pan on top. Trace a circle around the pan and cut out the puff pastry accordingly. Set the pastry circle aside. Don’t discard the remaining pastry. You can either make a second layer of pastry for the Tarte Tatin or cut it into squares, place a cube of feta in the middle, wrap it up, and bake until golden brown in the oven. Topped with a bit of honey, thyme, and salt, you quickly create a simple snack 🙂
  5. Heat the pan and briefly sauté honey, olive oil, dried thyme, and salt until bubbles form. Then distribute the tomato slices in the pan, brush them with the garlic oil, and let them caramelize for about 1-2 minutes. Remove from the heat, top with freshly ground pepper, and lay the puff pastry circle on top. Tuck the edges slightly inward and press firmly. Prick a few holes in the pastry with a fork.
  6. Bake the pan in the oven on the bottom rack uncovered for about 25 minutes.
  7. In the meantime, coarsely grate or slice the Parmesan and pluck the fresh thyme leaves from their stems. Set aside.
  8. Remove the pan from the oven and let it cool for a few minutes. Then place a plate larger than the pan over the pan and quickly invert to turn out the Tarte Tatin onto the plate.
  9. Top the Tarte Tatin with Parmesan, fresh thyme, and pepper, and serve immediately. Enjoy your piece of happiness!

Notes

The calorie information may vary depending on the product used, country and region.

  • Passive Time: 25 min
  • Cook Time: 20 min

Artichoke Chickpeas Salad

Artichoke Chickpeas Salad

Artichoke Chickpeas Salad

Artichoke Chickpeas Salad

June 8, 2024 by Kimberly

Fresh, zesty, and packed with flavor, this salad is a vibrant blend of artichokes and chickpeas, tossed in a light dressing—a refreshing twist to your meals!

15 MINUTES

EASY

VEGAN

INT.

325 PER SIDE PORTION

UMAMIEVERYDAY

SALAD

SUMMER

INTRODUCTION

ABOUT THE RECIPE

Revitalize your lunch routine with this bright and nutritious chickpea and artichoke salad. It’s a breeze to whip up, making it perfect for quick meal or a side salad for dinner.

How to serve
This salad shines when served chilled, making it an excellent choice for picnics. Elevate it by topping with fresh herbs or a sprinkle of feta cheese for those who enjoy a creamy contrast. It pairs wonderfully with crusty bread or as a hearty side to grilled meats.

How to store
To keep the salad fresh, store it in an airtight container in the fridge. It tastefully holds up for about three days, with the flavors melding beautifully over time, making it even more delicious!

Hi, I'm Kimberly!

Hi, I'm Kimberly.

A passionate food lover who believes in the magic of homemade deliciousness that spreads love and warmth. Join me on this culinary adventure as I prepare wonderful dishes and let’s spread some happiness together!

Kimberly the Zett Signature

If you want to get to know me better, click here!


Artichoke Chickpeas Salad
„Let’s make a piece of happiness“
Print
clock clock iconcutlery cutlery iconflag flag iconfolder folder iconinstagram instagram iconpinterest pinterest iconfacebook facebook iconprint print iconsquares squares iconheart heart iconheart solid heart solid icon
Artichoke Chickpeas Salad

Artichoke Chickpeas Salad


  • Author: Kimberly
  • Total Time: 15 minutes
  • Yield: 2 mains or 4 sides 1x

Description

RECOMMENDED EQUIPMENT

  • sharp knife
  • cutting board
  • salad bowl
  • small bowl
  • small whisk
  • garlic press

Ingredients

Units Scale

SALAD

  • 450 grams canned artichoke hearts
  • 150 grams canned roasted bell pepper
  • 250 grams canned chickpeas
  • 200 grams cocktail tomatoes
  • 1 red onion

DRESSING

  • 4 tbsp olive oil
  • 2 tbsp red wine vinegar
  • 2 tbsp maple syrup or honey
  • 1 garlic clove
  • salt & pepper to taste

TOPPING

  • fresh basil
  • fresh oregano

Instructions

  1. Drain the artichoke hearts and let them drip off a bit. Then place them in the salad bowl.
  2. Next, drain the chickpeas and rinse with water until no more bubbles form. Dry the chickpeas with a clean towel and pick out any loose skins. Add them to the salad bowl as well.
  3. Cut the grilled peppers into small pieces and add to the other ingredients in the bowl.
  4. Next, chop the tomatoes and peel and slice the onion into fine strips. Add both to the bowl.
  5. In a small bowl, mix the dressing. For this, peel the garlic and press or finely chop it into the bowl, then add olive oil, red wine vinegar, honey (or maple syrup), and dried oregano. Season with salt and pepper. Stir well and pour over the salad.
  6. Gently mix everything so that it’s evenly coated with the dressing. Finally, chop fresh basil and fresh oregano and sprinkle over the salad. Now enjoy your piece of happiness!

Notes

The calorie information may vary depending on the product used, country and region.

  • Cook Time: 15 min

Gnocchi Romaine Salad with Oven-Roasted Tomatoes & Parmesan

Gnocchi Romaine Salad with Oven-Roasted Tomatoes & Parmesan

Gnocchi Romaine Salad with Oven-Roasted Tomatoes & Parmesan

Gnocchi Romaine Salad with Oven-Roasted Tomatoes & Parmesan

May 15, 2024 by Kimberly

Savor the charm of this gnocchi romaine salad combined with roasted tomatoes and parmesan in a creamy garlic-yogurt dressing – perfect for a refreshing, hearty meal!

25 MINUTES

EASY

VEGETARIAN

ITALIAN

614 PER PORTION

COMFORT FOOD
TANGY

EVERYDAY

SALAD

SPRING
SUMMER

INTRODUCTION

ABOUT THE RECIPE

Elevate your dining experience with this gnocchi romaine salad, featuring oven-roasted tomatoes and a sprinkle of parmesan, all tossed in a zesty garlic-vinegar yogurt dressing. A delightful twist on classic ingredients!

How to serve
This salad shines whether served chilled or with tomatoes fresh out of the oven and gnocchi straight from the pan, making it a delightful choice for warm days. Pair it with red wine or a chilled rosé to complement the tangy yogurt dressing, along with a bit of baguette. Perfect for picnics or light lunches.

How to store
Keep the salad fresh by storing its components separately in sealed containers in the refrigerator. It’s best enjoyed within two days to ensure the flavors stay vibrant and the gnocchi retains its texture.

Hi, I'm Kimberly!

Hi, I'm Kimberly.

A passionate food lover who believes in the magic of homemade deliciousness that spreads love and warmth. Join me on this culinary adventure as I prepare wonderful dishes and let’s spread some happiness together!

Kimberly the Zett Signature

If you want to get to know me better, click here!


Gnocchi Romaine Salad with Oven-Roasted Tomatoes & Parmesan
„Let’s make a piece of happiness“
Print
clock clock iconcutlery cutlery iconflag flag iconfolder folder iconinstagram instagram iconpinterest pinterest iconfacebook facebook iconprint print iconsquares squares iconheart heart iconheart solid heart solid icon
Gnocchi Romaine Salad with Oven-Roasted Tomatoes & Parmesan

Gnocchi Romaine Salad with Oven-Roasted Tomatoes & Parmesan


  • Author: Kimberly
  • Total Time: 25 minutes
  • Yield: 2 1x
  • Diet: Vegetarian

Description

RECOMMENDED EQUIPMENT

  • sharp knife
  • cutting board
  • medium-sized frying pan
  • two salad bowls
  • small bowl

Ingredients

Units Scale

DRESSING & SALAD

  • 2 romaine lettuces
  • 1 garlic clove
  • 20 grams parmesan
  • 8 grams Worcestershire sauce
  • 1 tsp dijon mustard
  • 100 grams yogurt
  • 12 grams red wine vinegar

ROASTED TOMATOES

  • 250 grams cocktail tomatoes
  • 1 tbsp olive oil
  • 1 garlic clove

GNOCCHI

  • 400 grams soft gnocchi
  • 2 tbsp olive oil

TOPPINGS

  • chives
  • parmesan
  • black pepper

Instructions

PREPARATIONS

  • Wash tomatoes, lettuce, and chives.
  • Chop the chives into fine rolls and cut the lettuce into bite-sized pieces.
  • Peel the garlic cloves and finely chop or press them.
  • Grate the Parmesan finely.
  • Line a baking tray with parchment paper.
  • Preheat the oven to 200°C/392°F.

INSTRUCTIONS

  1. Place the tomatoes on the baking tray. Mix with 1 tablespoon of olive oil and a pressed garlic clove, and roast in the oven for about 15 minutes.
  2. Heat 2 tablespoons of olive oil in a medium frying pan and sauté the gnocchi until crispy.
  3. Meanwhile, divide the Romaine lettuce between two bowls. In a small bowl, thoroughly mix all the ingredients for the dressing. Evenly distribute the dressing over the lettuce in the two bowls, toss well to coat the lettuce with the dressing.
  4. Remove the tomatoes from the oven and distribute them and the gnocchi among the bowls. Toss briefly. Top everything with chives and Parmesan and serve immediately.

Notes

The calorie information may vary depending on the product used, country and region.

  • Prep Time: 10
  • Cook Time: 15
  • Category: SALAD
  • Cuisine: ITALIAN

Tomato Oil

Tomato Oil

Tomato Oil

Tomato Oil

April 2, 2024 by Kimberly

Discover the vibrant burst of flavor with homemade tomato oil! This easy-to-make oil adds a gourmet touch to any meal.

2 HOURS

ADVANCED

VEGAN

INT.

40 PER TSP

UMAMIMICHELIN

OIL

ALL YEAR

INTRODUCTION

ABOUT THE RECIPE

Dive into the world of gourmet flavors with my homemade tomato oil! Made from the freshest tomatoes, this oil is a game-changer for any kitchen. Its rich, tomato-infused taste transforms simple dishes into culinary masterpieces. Perfect for chefs of all levels, this easy recipe is your secret ingredient for that extra flavor kick.

How to serve:
Tomato oil is incredibly versatile, adding depth and aroma to any dish. Drizzle it over fresh salads for a summery vibe or blend it into your pasta for an instant flavor upgrade. It’s also perfect as a finishing oil on grilled vegetables, pizzas, and even soups. Elevate your bread dipping game by serving this rich oil alongside your favorite bread.

How to store:
For longevity, store your tomato oil in a clean, airtight container in the refrigerator. It keeps well for up to two weeks, ensuring you have this delightful flavor enhancer at hand whenever your dishes need a burst of tomato magic.

Hi, I'm Kimberly!

Hi, I'm Kimberly.

A passionate food lover who believes in the magic of homemade deliciousness that spreads love and warmth. Join me on this culinary adventure as I prepare wonderful dishes and let’s spread some happiness together!

Kimberly the Zett Signature

If you want to get to know me better, click here!


Tomato Oil
Tomato Oil
Tomato Oil
„Let’s make a piece of happiness“

INGREDIENTS

FOR 250ml (1 CUP)

TOMATO OIL

  • 400g fresh tomatoes (14 oz)
  • 250ml neutral cooking oil (1 cup)
Tomato Oil
}

ACTIVE: 2 min

PASSIVE: –

PREPARATIONS

Recommended Equipment
  • blender
  • medium-sized saucepan
  • whisk
  • a bowl into which the medium saucepan fits
  • 2 medium-sized bowls
  • fine sieve
  • sealable container
  • ice cubes
  • coffee filter
  • Wash the tomatoes and remove the greens.
}

ACTIVE: 60 min

PASSIVE: 60 min

COOKING

1. Put the tomatoes into the blender. Pour in the oil. Blend on the highest setting until it becomes a thick bright orange consistency and no pieces of tomatoes are longer visible.

2. Pour the mixture from the blender into a medium-sized pot and heat it over medium heat, constantly stirring, to a temperature of about 102°-103°C (215°-217°F). Then, let the oil simmer with the lid partially on for the next 30-40 minutes. Stir only occasionally, making sure the temperature remains steady. This long cooking time is essential for all the water to evaporate, allowing the perishable solids to settle at the bottom and the dark red oil to float on top. You’ll know all the water has evaporated when the oil in the pot barely bubbles anymore – so if it’s still bubbling vigorously, keep it simmering.

3. At the end of the cooking process, prepare a bowl large enough to fit the medium-sized pot, filled with cold water and a handful of ice cubes. Also, hang a fine sieve strainer over a medium-sized bowl.

4. Now, place the pot in the ice water and stir to stop the cooking process. Once the oil is no longer boiling and is almost cold, remove the pot from the water and pour the oil into the fine sieve to catch the coarse particles.

5. Then, rinse the strainer, dry it off well and hang it over the second medium-sized bowl. Press a coffee filter into the strainer and pour the captured oil into the coffee filter, so that the remaining perishable and coarser particles are caught.

6. Allow the oil to drip through for about 1 to 2 hours. Once all the oil has passed through the coffee filter, transfer the collected amount into a sealable container or directly into an oil bottle. Store in the refrigerator.

NOTE: The calorie information may vary depending on the product used, country and region.

Pico de Gallo

Pico de Gallo

Pico de Gallo

Pico de Gallo

February 12, 2024 by Kimberly

Discover the vibrant and fresh Pico de Gallo, a perfect blend of flavors to elevate any meal. Easy to make, it’s a delightful, colorful addition to your table!

10 MINUTES

EASY

VEGAN

MEXICAN

31 PER PORTION

REFRESHING

EVERYDAY

SALAD

SPRING / SUMMER

INTRODUCTION

ABOUT THE RECIPE

Dive into the world of Mexican cuisine with the simple yet exquisite Pico de Gallo. This refreshing salsa combines the bold flavors of tomato, onion, and cilantro, offering a burst of freshness with every bite. Perfect for health-conscious foodies, this easy-to-make dish serves as a versatile accompaniment to countless meals. Embrace the joy of homemade salsa and add a splash of color to your dining experience.

How to serve:
Pico de Gallo is incredibly versatile, making it a must-have for any gathering. Serve it alongside grilled meats or fish for a refreshing contrast, or scoop it up with crispy tortilla chips for the ultimate snack. It’s also the perfect topping for tacos, burritos, quesadillas and enchiladas, adding a fresh, crunchy element. For a lighter option, spoon it over avocado toast or mixed into a vibrant salad.

How to store:
To keep your Pico de Gallo fresh, store it in an airtight container in the refrigerator. It’s best enjoyed within 2-3 days, as the flavors meld beautifully over time, yet the ingredients retain their crispness.

Hi, I'm Kimberly!

Hi, I'm Kimberly.

A passionate food lover who believes in the magic of homemade deliciousness that spreads love and warmth. Join me on this culinary adventure as I prepare wonderful dishes and let’s spread some happiness together!

Kimberly the Zett Signature

If you want to get to know me better, click here!


Pico de Gallo
Pico de Gallo
Pico de Gallo

„Let’s make a piece of happiness“

INGREDIENTS

FOR 4 PORTIONS

PICO DE GALLO

  • 250g tomatoes (9 oz)
  • juice of 1 lime
  • 1 small onion
  • 3 garlic cloves
  • 1 jalapeno (fresh or pickled)
  • a few stems cilantro
  • salt & pepper to taste
Pico de Gallo
}

ACTIVE: 2 min

PASSIVE: –

PREPARATIONS

Recommended Equipment
  • sharp knife
  • cutting board
  • medium sized bowl
  • Wash the tomatoes thoroughly under running water.
  • If you are using fresh jalapenos, wash them thoroughly too.
    }

    ACTIVE: 8 min

    PASSIVE: –

    COOKING

    1. Halve the tomatoes and remove the seeds. Then quarter them and cut them into small cubes. Place the diced tomatoes in a medium-sized bowl.

    2. Peel the onion, cut it in half and then finely dice it. Add the diced onion to the tomatoes in the bowl.

    3. Pluck the coriander leaves from the stalks and chop them finely. Add the chopped coriander to the bowl.

    4. Peel the garlic cloves and chop them finely or press them directly into the bowl using a garlic press.

    5. Finely chop the jalapeno and add it to the other ingredients in the bowl.

    6. Halve the lime and squeeze the juice over the ingredients in the bowl. Mix all the ingredients together thoroughly and season to taste with salt and pepper.

    NOTE: The calorie information may vary depending on the product used, country and region.