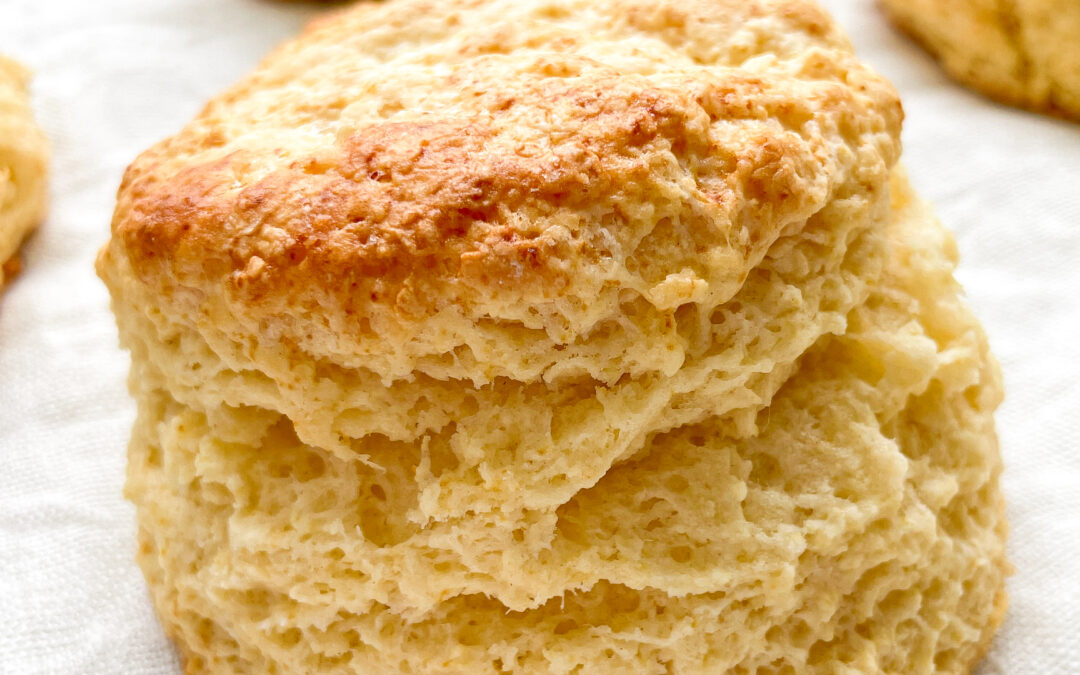
Classic Scones

Classic Scones

Classic Scones

Classic Scones

May 26, 2024 by Kimberly

Indulge in the simple pleasure of classic scones – tender, buttery delights perfect for any tea time or breakfast. Bake a batch today and experience homemade comfort!

This website uses affiliate links which may earn commission for purchases made at no additional cost to you.

TOTAL TIME

40 min

SERVES

10 scones

DIET

vegetarian

EVERY RECIPE DESERVES

A Little Love Letter

Dive into the delightful world of classic scones, a quintessential British treat beloved across the globe. These buttery, flaky delights are the perfect companion to your afternoon tea or a cozy morning breakfast. With just a few simple steps, you can bring the taste of authentic English tea time into your home, impressing guests and treating yourself to a timeless culinary tradition.

Serve these classic scones fresh and warm, straight from the oven. Split them open and slather with clotted cream and strawberry jam for a traditional experience. Alternatively, enjoy them plain with a hot cup of tea or coffee. These versatile treats can also be customized with add-ins like raisins or chocolate chips, making each batch uniquely delicious and perfectly suited to your taste preferences.

Store leftover scones in an airtight container at room temperature for up to two days. For longer storage, wrap them tightly and freeze for up to three months. Simply reheat to regain that freshly baked warmth and texture.

Hi, I'm Kimberly!

Hi, I'm Kimberly.

A hopeless romantic when it comes to food. Every recipe I share is a love letter to food itself. I’m so glad you’re here. Make yourself at home and stay a while.

Love,
Kimberly

Kimberly the Zett Signature

If you want to get to know me better,
click here!


Classic Scones
Classic Scones

LET’S MAKE A PIECE OF HAPPINESS

Print
clock clock iconcutlery cutlery iconflag flag iconfolder folder iconinstagram instagram iconpinterest pinterest iconfacebook facebook iconprint print iconsquares squares iconheart heart iconheart solid heart solid icon
Classic Scones

Classic Scones


5 Stars 4 Stars 3 Stars 2 Stars 1 Star

5 from 1 review

  • Author: Kimberly
  • Total Time: 40 min
  • Yield: 10

Description

GOOD TO HAVE ON HAND

  • box grater
  • medium-sized bowl
  • glass or small bowl
  • dough scraper / spatula
  • round cutter
  • pastry brush


Ingredients

Units Scale
  • 300 grams all-purpose flour
  • 35 grams white sugar
  • 4 tsp baking powder
  • 1/4 tsp salt
  • 90 grams butter
  • 1 egg
  • 160 milliliters milk
  • 2 tbsp milk for brushing

Instructions

PREPARATIONS

  • Place the butter in the freezer for 15 minutes.
  • Line a baking sheet with parchment paper.
  • Preheat the oven to 200°C/392°F.

INSTRUCTIONS

  1. In a medium-sized bowl, mix flour, sugar, baking powder, and salt. Grate the cold butter into the dry ingredients using a box grater.
  2. In a glass, whisk together the milk and egg and add to the other ingredients. Stir with a spoon until the mixture just comes together. Then, place the dough onto a clean work surface and fold it a few times with a dough scraper or a spatula, so that the dough comes together. It’s important not to use your hands for this, as the butter will soften too much, causing the dough to spread out during baking.
  3. Roll the dough into a rectangle about 30×20 cm and cut as many scones as possible using a round cutter. Fold the dough again and continue cutting out scones until all the dough is used. If you don’t have a cutter, you can also cut the dough into triangles. This amount of dough makes about 10 scones.
  4. Place the scones on the prepared baking sheet, spaced a little apart. Pour 2 tablespoons of milk into the glass and use the brush to spread it over the scones.
  5. Bake the scones in the oven for about 12 minutes. Then remove from the oven and enjoy immediately or let cool.

Notes

The calorie information may vary depending on the product used, country and region.

  • Prep Time: 2 min
  • Passive Time: 27 min
  • Cook Time: 10 min

CRAVING MORE?

Follow along here & don’t forget to subscribe to my substack!

Chocolate Chip Cookie Dough

Chocolate Chip Cookie Dough

Chocolate Chip Cookie Dough

Chocolate Chip Cookie Dough

May 18, 2024 by Kimberly

Obsessed with cookie dough? This easy, edible chocolate chip version is your new go-to treat! Safe to eat and super delicious – perfect for any sweet craving!

This website uses affiliate links which may earn commission for purchases made at no additional cost to you.

TOTAL TIME

5 min

SERVES

4 portions

DIET

vegetarian

EVERY RECIPE DESERVES

A Little Love Letter

This edible chocolate chip cookie dough is a game-changer! It’s safe to eat, incredibly easy to make, and ridiculously tasty. Whether you’re snacking straight from the bowl or adding it to your favorite desserts, this no-bake cookie dough will quickly become your new favorite treat. Ready to dive in? Let’s whip up this sweet, satisfying delight!

Enjoy it straight from the bowl with a spoon, or roll it into bite-sized balls for a fun, shareable treat. For an extra indulgent experience, pair it with ice cream or spread it on a warm brownie. You can even use it as a topping for your favorite desserts, like cupcakes or cheesecakes, to add a delightful cookie dough twist.

Store your edible chocolate chip cookie dough in an airtight container in the refrigerator for up to a week. For longer storage, freeze it for up to three months. Simply thaw in the fridge before enjoying your sweet, ready-to-eat treat.

Hi, I'm Kimberly!

Hi, I'm Kimberly.

A hopeless romantic when it comes to food. Every recipe I share is a love letter to food itself. I’m so glad you’re here. Make yourself at home and stay a while.

Love,
Kimberly

Kimberly the Zett Signature

If you want to get to know me better,
click here!


Chocolate Chip Cookie Dough

LET’S MAKE A PIECE OF HAPPINESS

Print
.tasty-recipe-responsive-iframe-container-7345ae1f { position: relative; overflow: hidden; padding-top: 56.3%; } .tasty-recipe-responsive-iframe-container-7345ae1f iframe { position: absolute; top: 0; left: 0; width: 100%; height: 100%; border: 0; } clock clock iconcutlery cutlery iconflag flag iconfolder folder iconinstagram instagram iconpinterest pinterest iconfacebook facebook iconprint print iconsquares squares iconheart heart iconheart solid heart solid icon
Chocolate Chip Cookie Dough

Chocolate Chip Cookie Dough


  • Author: Kimberly
  • Total Time: 5 minutes
  • Yield: 4
  • Diet: Vegetarian

Description

GOOD TO HAVE ON HAND

  • two small bowls
  • spoon
  • microwave or oven


Ingredients

Units Scale
  • 40 grams soft butter
  • 40 grams white sugar
  • 1/4 tsp vanilla extract
  • pinch of salt
  • 75 grams all-purpose flour
  • 2 tbsp milk
  • 35 grams semi-sweet chocolate

Instructions

  1. Microwave the flour in one of the bowls on high for 45 seconds. The flour should reach about 75°C/165°F to kill any bacteria and make it safe to eat raw. If you don’t have a microwave, you can bake the flour in the oven at 170°C/338°F for about 10 minutes.
  2. Meanwhile, mix the softened butter, sugar, vanilla extract, and salt until creamy. Add the milk and mix again.
  3. Now, add the flour and mix everything into a cookie dough.
  4. Fold in the chocolate chips and either snack on it right away or chill the bowl in the fridge for 10-15 minutes for a firmer texture.

Notes

The calorie information may vary depending on the product used, country and region.

  • Cook Time: 5 min
  • Category: DESSERT
  • Method: NO BAKE
  • Cuisine: US AMERICAN

CRAVING MORE?

Follow along here & don’t forget to subscribe to my substack!

Café de Paris Butter

Café de Paris Butter

Café de Paris Butter

Café de Paris Butter

May 1, 2024 by Kimberly

Unleash the flavors with Café de Paris Butter! A rich, herb-infused delight perfect for transforming steaks and vegetables into gourmet experiences.

This website uses affiliate links which may earn commission for purchases made at no additional cost to you.

TOTAL TIME

10 min

SERVES

4 portions

DIET

vegetarian

EVERY RECIPE DESERVES

A Little Love Letter

Experience the essence of French cuisine with Café de Paris Butter, a luxurious compound butter that enriches any dish it touches. This delightful blend is packed with herbs and spices, making it an ideal gourmet addition to your kitchen repertoire.

Café de Paris Butter is best served melted over hot steaks, grilled chicken, or roasted vegetables. Its rich flavor also complements baked potatoes and fresh bread. For an exquisite culinary twist, try spreading it on your favorite toasted baguette or incorporate it into pasta for a creamy, herbaceous sauce. Its gourmet flair will transform ordinary meals into memorable dining experiences.

Keep your Café de Paris Butter fresh by storing it wrapped in parchment paper in the refrigerator, where it will last up to one week. For longer preservation, freeze it, ensuring you always have a batch ready for use.

Hi, I'm Kimberly!

Hi, I'm Kimberly.

A hopeless romantic when it comes to food. Every recipe I share is a love letter to food itself. I’m so glad you’re here. Make yourself at home and stay a while.

Love,
Kimberly

Kimberly the Zett Signature

If you want to get to know me better,
click here!


Café de Paris Butter

LET’S MAKE A PIECE OF HAPPINESS

Print
.tasty-recipe-responsive-iframe-container-1752508d { position: relative; overflow: hidden; padding-top: 177.62%; } .tasty-recipe-responsive-iframe-container-1752508d iframe { position: absolute; top: 0; left: 0; width: 100%; height: 100%; border: 0; } clock clock iconcutlery cutlery iconflag flag iconfolder folder iconinstagram instagram iconpinterest pinterest iconfacebook facebook iconprint print iconsquares squares iconheart heart iconheart solid heart solid icon
Café de Paris Butter

Café de Paris Butter


  • Author: Kimberly
  • Total Time: 10 min
  • Yield: 4

Description

RECOMMENDED EQUIPMENT

  • small bowl
  • fork

Ingredients

Units Scale
  • 150 grams butter
  • 1 tbsp dried parsley
  • 1/2 tsp curry powder
  • 1/4 tsp dried dill
  • 1/4 tsp paprika powder
  • 1/4 tsp dried marjoram
  • 1/4 tsp salt
  • 1/4 tsp garlic powder
  • 1/8 tsp dried thyme
  • 1/8 tsp dried rosemary
  • 1/8 tsp ground black pepper

Instructions

  1. Let the butter come to room temperature. Mix butter and all herbs and spices together in a bowl. Mix everything well. Taste and adjust seasoning as needed. Roll the butter in parchment paper or place it in a bowl.
  • Cook Time: 10 min

CRAVING MORE?

Follow along here & don’t forget to subscribe to my substack!

Shortbread Bars With Cherry Jam

Shortbread Bars With Cherry Jam

Shortbread Bars with Cherry Jam

Shortbread Bars with Cherry Jam

December 18, 2023 by Kimberly

Delight in buttery shortbread bars, a symphony of crumbly texture, harmonized with luscious jam. Each bite unveils a perfect blend of sweetness and simplicity, a timeless treat for indulgence.

This website uses affiliate links which may earn commission for purchases made at no additional cost to you.

TOTAL TIME

40 min

SERVES

24 bars

DIET

vegetarian

EVERY RECIPE DESERVES

A Little Love Letter

Indulge in the sublime fusion of buttery shortbread and vibrant cherry jam with this irresistible Shortbread Bars With Cherry Jam. The crumbly, melt-in-your-mouth texture of the shortbread complements the sweet-tart burst of cherry jam, creating a symphony of flavors that’s both nostalgic and delectable.

To serve, cut into perfectly portioned bars and arrange them on a charming dessert platter. These bars make a delightful addition to afternoon tea or a sweet ending to any gathering.

For optimal freshness, store the Shortbread Bars in an airtight container at room temperature for up to three days. To extend their shelf life, refrigerate for a longer-lasting treat.

Hi, I'm Kimberly!

Hi, I'm Kimberly.

A hopeless romantic when it comes to food. Every recipe I share is a love letter to food itself. I’m so glad you’re here. Make yourself at home and stay a while.

Love,
Kimberly

Kimberly the Zett Signature

If you want to get to know me better,
click here!


Shortbread Bars with Cherry Jam

LET’S MAKE A PIECE OF HAPPINESS

Print
.tasty-recipe-responsive-iframe-container-13d4a151 { position: relative; overflow: hidden; padding-top: 177.62%; } .tasty-recipe-responsive-iframe-container-13d4a151 iframe { position: absolute; top: 0; left: 0; width: 100%; height: 100%; border: 0; } clock clock iconcutlery cutlery iconflag flag iconfolder folder iconinstagram instagram iconpinterest pinterest iconfacebook facebook iconprint print iconsquares squares iconheart heart iconheart solid heart solid icon
Shortbread Bars with Cherry Jam

Shortbread Bars With Cherry Jam


  • Author: Kimberly
  • Total Time: 40 min
  • Yield: 24 bars

Description

RECOMMENDED EQUIPMENT

  • Mixing bowl
  • Hand mixer (or stand mixer)
  • Cling film
  • Cheese grater
  • Baking tin 20×20 cm (8×8 inch)

Ingredients

Units Scale
  • 250 grams butter
  • 100 grams sugar
  • 350 grams sugar
  • 1/4 tsp salt
  • 150 grams cherry jam

Instructions

  1. Line a baking tin with baking paper.
  2. Place the soft (not liquid) butter, sugar and salt in a mixing bowl. Mix with a hand mixer or stand mixer for approx. 3 minutes until creamy. Add the flour and mix until the butter is coated in flour. Then knead with your hands until smooth.
  3. Wrap the dough in a layer of cling film and shape into a square. Place the dough in the freezer for approx. 1 hour.
  4. Preheat the oven to 180°C (350°F). Now grate half the dough into flakes using a cheese grater. Put the other half back in the freezer.
  5. Spread the flakes evenly in a baking dish. Use very little pressure to spread the flakes in the tin. DO NOT press them down. Now spread the cherry jam evenly over the flakes.
  6. Now take the second half of the dough out of the freezer and grate it into flakes using the cheese grater and spread it evenly over the jam. Again, only spread the flakes with very light fingers and do not press down.
  7. Bake for approx. 15 to 20 minutes at 180°C (350°F) or until the shortbread is light golden but not brown. It is best to take them out of the oven when they are lightly golden, as they will bake a little longer anyway. Leave the shortbreads to cool and cut into strips.
  • Passive Time: 20 min
  • Cook Time: 20 min

CRAVING MORE?

Follow along here & don’t forget to subscribe to my substack!