Five Spice Roasted Chicken & King Oyster Mushroom Soup

Five Spice Roasted Chicken & King Oyster Mushroom Soup

Five Spice Roasted Chicken & King Oyster Mushroom Soup

Five Spice Roasted Chicken & King Oyster Mushroom Soup

July 31, 2024 by Kimberly

Looking for a dish that brings comfort and delight in every spoonful? This Five Spice Chicken Soup offers just that! Experience a burst of flavors and cozy warmth with this delicious soup! It’s a hug in a bowl that’s perfect for any day.

This website uses affiliate links which may earn commission for purchases made at no additional cost to you.

TOTAL TIME

70 min

SERVES

2 portions

DIET

omnivore

EVERY RECIPE DESERVES

A Little Love Letter

This soup is a symphony of flavors, blending the warmth of roasted chicken thighs, the earthy taste of king oyster mushrooms, and the refreshing crunch of pak choi with the delicate texture of glass noodles. It’s the perfect way to enjoy a cozy, hearty meal that feels like a warm hug on a chilly day.

Serve this delightful Five Spice Chicken Soup hot, right after it’s cooked, to savor the full depth of its flavors. Garnish with fresh cilantro and a squeeze of lime for an extra burst of freshness. It’s perfect for a cozy dinner or a hearty lunch, sure to impress your family and friends.

Store any leftovers in an airtight container in the fridge for up to 2 days. Reheat gently on the stovetop or in the microwave.

Hi, I'm Kimberly!

Hi, I'm Kimberly.

A hopeless romantic when it comes to food. Every recipe I share is a love letter to food itself. I’m so glad you’re here. Make yourself at home and stay a while.

Love,
Kimberly

Kimberly the Zett Signature

If you want to get to know me better,
click here!


Five Spice Roasted Chicken & King Oyster Mushroom Soup

LET’S MAKE A PIECE OF HAPPINESS

Print
clock clock iconcutlery cutlery iconflag flag iconfolder folder iconinstagram instagram iconpinterest pinterest iconfacebook facebook iconprint print iconsquares squares iconheart heart iconheart solid heart solid icon
Five Spice Roasted Chicken & King Oyster Mushroom Soup

Five Spice Roasted Chicken & King Oyster Mushroom Soup


5 Stars 4 Stars 3 Stars 2 Stars 1 Star

No reviews

  • Author: Kimberly
  • Total Time: 70 min
  • Yield: 2-3

Description

Recommended Equipment

  • sharp knife
  • cutting board
  • medium bowl
  • medium pot
  • oven
  • sieve
  • small pot

Ingredients

Units Scale
BROTH
  • 1 liter vegetable stock (homemade or store-bought)
  • 1 yellow onion
  • thumb-width piece of ginger
  • 3 tbsp soy sauce
  • 1 tsp sesame oil
  • 2 tsp lemongrass oil (or any other oil you like)
  • 1 tsp rice vinegar
  • 2 garlic cloves
  • 1 tbsp fish sauce
  • 2 anise stars
  • 1 cinnamon stick
  • 2 cloves
  • 1 cardamom capsule
  • 1/2 tsp cilantro seeds
CHICKEN
  • 500 grams boneless, skin-on chicken thighs
  • 2 tbsp broth
  • 2 garlic cloves
  • 1.5 tsp Chinese Five Spice
  • 1 tsp rice vinegar
  • 1/2 tsp sesame oil
  • 3 tbsp lemongrass oil (or any other oil you like)
  • 1 tbsp honey
  • a piece of ginger
  • 1/2 tsp finely grated black pepper
  • juice from half a lemon
  • 1 tbsp dark soy sauce
KING OYSTER MUSHROOMS
  • 4 king oyster mushrooms
  • 1 tbsp lemongrass oil (or any other oil you like)
  • 1 tbsp soy sauce
TOPPINGS
  • 1 bok choi
  • 80 grams glass noodles
  • 2 tsp lemongrass oil (or any other oil you like)
  • fresh cilantro
  • lime
  • fresh chili
  • green part of spring onions

Instructions

PREPARATIONS

  • Here is the recipe for the lemongrass oil. You’ll need about 1/4 of the amount for this recipe.
  • Here is the recipe for the vegetable stock. You’ll need one liter of it for this soup but do not add salt.
  • Here is the recipe for the Chinese Five Spice. You’ll need about half of it for this recipe.

INSTRUCTIONS

  1. Rinse the chicken thighs and pat dry with paper towels. Set aside.
  2. For the marinade, peel the garlic cloves and ginger and grate them into a shallow dish. Add Five Spice Seasoning, pepper, honey, rice vinegar, sesame oil, lemongrass oil, lemon juice, and dark soy sauce. Mix well.
  3. Rub the chicken thighs with the marinade on all sides. Refrigerate for 30 minutes.
  4. Meanwhile, prepare the broth. Quarter the onion, peel and halve the garlic clove, and slice the ginger with the skin on. Set aside. In a medium pot, roast star anise, cinnamon stick, cardamom capsule, coriander seeds, and dried cloves on medium heat for 1-2 minutes until fragrant. Add a bit of sesame oil and lemongrass oil, then add the onion, garlic, and ginger. Fry for about 5 minutes. Add the vegetable broth and simmer with the lid on for 30 minutes.
  5. Meanwhile slice the king oyster mushrooms lengthwise into thick slices and place them on a baking sheet lined with parchment paper. Drizzle with lemongrass oil and soy sauce, then roast in the oven at 250°C / 480°F for 20 minutes.
  6. Strain the broth through a fine mesh strainer and toss the spices. Pour the broth back into the pot and keep it warm on low heat and add soy sauce, rice vinegar and fish sauce.
  7. Remove the mushrooms from the oven and set aside. Place the chicken in a small baking dish, skin side up, and add 2 tbsp of the broth to the remaining marinade. Spread the marinade on the chicken and roast in the oven at 200°C for 35 minutes.
  8. Prepare the toppings. Break off the bok choy leaves from the stem, wash, and halve lengthwise. Coarsely chop the cilantro, slice the fresh chili into rings, and cut the green part of the scallions into thin strips.
  9. Bring a small pot of water to a boil. Cook the glass noodles for 5 minutes until soft. Drain and set aside.
  10. Get the chicken out of the oven and let rest for about 5 minutes. Slice into bite-sized strips and set aside.
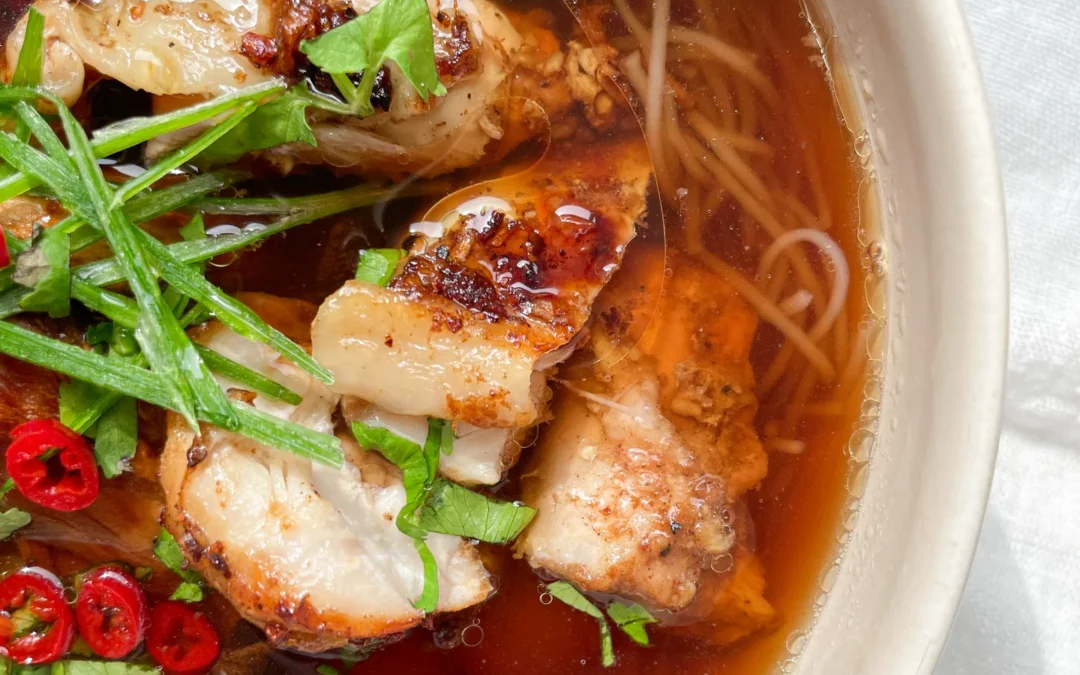
  11. To serve, place the glass noodles in deep bowls, pour the broth over them, add bok choy, and place the king oyster mushrooms on top. Finish with the chicken and garnish with cilantro, scallions, and fresh chili as desired.
  • Passive Time: 40 min
  • Cook Time: 30 min

CRAVING MORE?

Follow along here & don’t forget to subscribe to my substack!

Crispy Pork Gyoza, Miso Ginger Oil Glaze & Fried Seaweed

Crispy Pork Gyoza, Miso Ginger Oil Glaze & Fried Seaweed

Crispy Pork Gyoza, Miso Ginger Oil Glaze & Fried Seaweed

Crispy Pork Gyoza, Miso Ginger Oil Glaze & Fried Seaweed

July 29, 2024 by Kimberly

Dive into crispy pork gyoza with miso ginger oil glaze and fried seaweed – a flavor explosion that’s crunchy, savory, and totally irresistible. Perfect for any foodie adventure!

This website uses affiliate links which may earn commission for purchases made at no additional cost to you.

TOTAL TIME

40 min

SERVES

4 portions

DIET

vegan

EVERY RECIPE DESERVES

A Little Love Letter

Ready to elevate your appetizer game? Try these crispy pork gyoza drizzled with a mouth-watering miso ginger oil glaze, paired with crunchy fried seaweed. This dish is a fusion of amazing textures and flavors that will take your taste buds on an unforgettable journey. Perfect for impressing guests or enjoying a gourmet snack at home, these gyoza are a must-have for any cooking enthusiast.

Serve these crispy pork gyoza hot from the pan, generously drizzled with the miso ginger oil glaze for a savory kick. Pair them with the fried seaweed for an added crunch that perfectly complements the soft, flavorful gyoza. Garnish with sesame seeds and green onions for extra flavor and visual appeal. These gyoza make a fantastic appetizer, party snack, or light meal.

Store leftover gyoza in an airtight container in the fridge for up to three days. Reheat them in a hot pan to keep their crispiness. The miso ginger oil glaze can be stored separately in a sealed jar.

Hi, I'm Kimberly!

Hi, I'm Kimberly.

A hopeless romantic when it comes to food. Every recipe I share is a love letter to food itself. I’m so glad you’re here. Make yourself at home and stay a while.

Love,
Kimberly

Kimberly the Zett Signature

If you want to get to know me better,
click here!


Crispy Pork Gyoza, Miso Ginger Oil Glaze & Fried Seaweed

LET’S MAKE A PIECE OF HAPPINESS

Print
.tasty-recipe-responsive-iframe-container-877efee0 { position: relative; overflow: hidden; padding-top: 56.3%; } .tasty-recipe-responsive-iframe-container-877efee0 iframe { position: absolute; top: 0; left: 0; width: 100%; height: 100%; border: 0; } clock clock iconcutlery cutlery iconflag flag iconfolder folder iconinstagram instagram iconpinterest pinterest iconfacebook facebook iconprint print iconsquares squares iconheart heart iconheart solid heart solid icon
Crispy Pork Gyoza, Miso Ginger Oil Glaze & Fried Seaweed

Crispy Pork Gyoza, Miso Ginger Oil Glaze & Fried Seaweed


  • Author: Kimberly
  • Total Time: 40 min
  • Yield: 4

Description

Recommended Equipment

  • sharp knife
  • cutting board
  • medium bowl
  • large plate
  • three small bowls
  • measuring spoons
  • large pan with lid
  • scissors
  • small pan or pot

Ingredients

Units Scale
  • 20 Gyoza wrapper, homemade or store-bought
  • 1 tbsp high heat oil
  • 80 milliliters cold water
  • 400 grams seaweed salad (optional)
FILLING
  • 250 grams ground pork
  • 4 garlic cloves
  • 1 tsp sesame oil
  • 1 tsp ginger oil
  • 1 spring onion
  • 1.5 tbsp Hoisin sauce
  • 1 tsp soy sauce
  • 1/4 tsp Chinese Five Spice
  • 1 small egg
MISO GLAZE
  • 2 tbsp miso paste
  • 1 tbsp mirin
  • 1 tsp honey
  • 2 tsp soy sauce
  • 2 tsp ginger oil
  • 3 tbsp warm water
TOPPINGS
  • 1 Nori sheet
  • 1 tsp cornstarch
  • 2 tsp cold water
  • fresh cilantro
  • ginger oil

Instructions

PREPARATIONS

  • Here’s the recipe for Gyoza dough. You’ll need about 20 sheets, cut them into squares rather than rounds. Or, just get ready-made Gyoza wrappers from the Asian market.
  • Here’s the recipe for ginger oil. You’ll need about 2-3 tablespoons.
  • Here’s the recipe for Chinese Five Spice. You’ll need 1/4 teaspoon.

INSTRUCTIONS

  1. First, prepare the Gyoza filling. Peel and finely grate the garlic cloves into a medium bowl. Then, slice the spring onion into thin rings and add to the garlic. Next, add the ground pork, ginger oil, sesame oil, hoisin sauce, Chinese Five Spice, and the egg. Mix everything well.
  2. Take a large plate and sprinkle some flour on it. This will be the resting place for the filled Gyoza so they don’t stick to the plate. Also, prepare a small bowl with some cold water and have your Gyoza dough ready.
  3. Fill each Gyoza wrapper with 1 teaspoon of the pork filling. Dab a little water around the edge of the wrapper, fold it diagonally to seal, and press out all the air so the filling is well enclosed. Wet one side of the long edge, fold it over, and press firmly. Place on the floured plate. Repeat until all the filling is used up.
  4. Heat 1 tbsp of high-heat oil in a large pan over medium heat and add the Gyoza. Fry for a few minutes until the bottoms are crispy. Lower the heat and add about 100ml / 1/3 cup of cold water to the pan (be careful, it may splatter if the oil is too hot). Cover the pan with a lid and let the Gyoza steam.
  5. Meanwhile, fold the Nori sheet three times in the middle and cut it into thin strips with scissors. Mix the Nori strips with cornstarch in a small bowl. Add a bit of water and stir well. Heat about 1 cm of high-heat oil in a small pan or pot to around 180°C / 356°F. Fry the Nori strips for 2-3 minutes, then remove and drain on paper towels.
  6. The Gyoza should now be a bit translucent and the filling cooked through. Remove the lid and turn the heat back to medium to crisp up the Gyoza again.
  7. Meanwhile, make the Miso Glaze. In a small bowl, mix Mirin, honey, soy sauce, and ginger oil. Heat for a few seconds in the microwave (or in a small pan) until it simmers. Stir in the Miso paste well, add 3 tbsp warm water to thin it a bit and set aside.
  8. Finely chop the fresh coriander and set aside.
  9. Optionally, place seaweed salad in the center of the plate, arrange 5 Gyoza on top. Drizzle with Miso Glaze and top with fried Nori strips, chopped coriander, and toasted sesame seeds. Finish with a splash of ginger oil and serve immediately.
  • Cook Time: 40 min

CRAVING MORE?

Follow along here & don’t forget to subscribe to my substack!

White Chocolate Coconut Lime Cookies

White Chocolate Coconut Lime Cookies

White Chocolate Coconut Lime Cookies

White Chocolate Coconut Lime Cookies

July 27, 2024 by Kimberly

Indulge in a burst of tropical flavors with these scrumptious cookies, blending sweet white chocolate, refreshing lime, and a hint of coconut for the ultimate treat.

This website uses affiliate links which may earn commission for purchases made at no additional cost to you.

TOTAL TIME

2 hrs + 45 min

SERVES

9 cookies

DIET

vegetarian

EVERY RECIPE DESERVES

A Little Love Letter

Craving something sweet, tangy, and utterly irresistible? These white chocolate coconut lime cookies are the perfect tropical treat. With the zesty kick of lime, the creamy sweetness of white chocolate, and the nutty goodness of coconut, these cookies are sure to become a new favorite. They’re easy to make and perfect for any occasion, whether it’s a summer picnic or a cozy evening at home.

Serve these delightful cookies with a cold glass of milk or a cup of hot tea for a comforting snack. They also make a great addition to any dessert platter, paired with fresh fruit for a vibrant and refreshing twist. For a truly indulgent experience, try crumbling them over vanilla ice cream.

To keep your white chocolate coconut lime cookies fresh, store them in an airtight container at room temperature for up to a week. If you need to keep them longer, they freeze well too – just pop them into a freezer bag, and they’ll stay delicious for up to three months.

Hi, I'm Kimberly!

Hi, I'm Kimberly.

A hopeless romantic when it comes to food. Every recipe I share is a love letter to food itself. I’m so glad you’re here. Make yourself at home and stay a while.

Love,
Kimberly

Kimberly the Zett Signature

If you want to get to know me better,
click here!


White Chocolate Coconut Lime Cookies

LET’S MAKE A PIECE OF HAPPINESS

Print
.tasty-recipe-responsive-iframe-container-6bcd96b9 { position: relative; overflow: hidden; padding-top: 56.3%; } .tasty-recipe-responsive-iframe-container-6bcd96b9 iframe { position: absolute; top: 0; left: 0; width: 100%; height: 100%; border: 0; } clock clock iconcutlery cutlery iconflag flag iconfolder folder iconinstagram instagram iconpinterest pinterest iconfacebook facebook iconprint print iconsquares squares iconheart heart iconheart solid heart solid icon
White Chocolate Coconut Lime Cookies

White Chocolate Coconut Lime Cookies


  • Author: Kimberly
  • Total Time: 2 hrs 45 min
  • Yield: 9 big / 18 small

Description

Recommended Equipment

  • sharp knife
  • cutting board
  • two small bowls
  • small pot (or microwave)
  • two medium bowls
  • whisk
  • spatula
  • zester

Ingredients

Units Scale
DOUGH
  • 200 grams all-purpose flour
  • 35 grams cornstarch
  • 1 tsp baking powder
  • 1/2 tsp salt
  • 140 grams butter
  • 150 grams brown sugar
  • 50 grams white sugar
  • 1 egg
  • 1 egg yolk
  • 100 grams white chocolate
  • zest from 1 lime
  • 1 tsp vanilla extract
  • 50 grams shredded coconut flakes
GLAZE
  • 125 grams powdered sugar
  • 1 tbsp - 1.5 tbsp coconut milk
  • 1 tsp lime juice
   

Instructions

PREPARATIONS

  • Chop the chocolate into coarse pieces.
  • Melt the butter in a pot or microwave.
  • Zest the lime.

INSTRUCTIONS

  1. In a medium bowl, mix together flour, cornstarch, baking powder, and salt. Set aside.
  2. In another medium bowl, combine brown and white sugar. Add the melted butter and vanilla extract, whisking for a few minutes until creamy.
  3. Add a whole egg and an egg yolk, whisking until the mixture becomes thicker. Then, mix in the lime zest.
  4. Gradually add the dry ingredients from the other bowl, stirring a little before adding the chocolate. Mix just until combined and no flour is visible.
  5. Form the dough into 9 equal-sized balls and place them in a container that fits in the fridge. Chill the cookie dough balls for at least 2 hours or up to 48 hours if preparing ahead.
  6. Preheat the oven to 220°C / 425°F. Fill a small bowl with coconut flakes and roll the cookie dough balls in the flakes. Once the oven is hot, place the cookies on a baking sheet lined with parchment paper and bake for 8-10 minutes.
  7. Remove the baking sheet from the oven and let the cookies cool for 15 minutes.
  8. Meanwhile, prepare the glaze. In a small bowl, mix powdered sugar, coconut milk, and lime juice until you get a creamy, thick consistency. Drizzle the glaze over the cookies in a zigzag pattern, sprinkle with a bit more lime zest, and enjoy!
  • Prep Time: 20 min
  • Passive Time: 2 hrs 25 min

CRAVING MORE?

Follow along here & don’t forget to subscribe to my substack!

Spicy Rice Shrimp Bowl & Mango Avocado Salsa

Spicy Rice Shrimp Bowl & Mango Avocado Salsa

Spicy Rice Shrimp Bowl & Mango Avocado Salsa

Spicy Rice Shrimp Bowl & Mango Avocado Salsa

July 23, 2024 by Kimberly

Turn up the heat with this zesty rice shrimp bowl, packed with jalapeños and chili, and cooled by a fresh mango avocado salsa. It’s a fiery favorite with a tropical twist!

This website uses affiliate links which may earn commission for purchases made at no additional cost to you.

TOTAL TIME

40 min

SERVES

2 portions


DIET

vegan

EVERY RECIPE DESERVES

A Little Love Letter

Ignite your palate with this Spicy Rice Shrimp Bowl, complemented by a refreshing Mango Avocado Salsa! This dish is a thrilling blend of hot, spicy flavors and cool, sweet contrasts, perfect for those who love a bit of adventure in their meals.

Serve this fiery shrimp bowl fresh and hot, letting the cool mango avocado salsa contrast beautifully with the heat from the shrimp. It’s fantastic for a quick dinner or a vibrant, impressive dish at your next gathering. Add a dollop of cilantro-yogurt sauce for a creamy finish and add some sprouts for added crunch!

Best enjoyed fresh, but if you have leftovers, store them in separate airtight containers in the refrigerator. The rice and shrimp keep well for up to two days, while the salsa is best consumed within a day to maintain its freshness.

Hi, I'm Kimberly!

Hi, I'm Kimberly.

A hopeless romantic when it comes to food. Every recipe I share is a love letter to food itself. I’m so glad you’re here. Make yourself at home and stay a while.

Love,
Kimberly

Kimberly the Zett Signature

If you want to get to know me better,
click here!


Spicy Rice Shrimp Bowl & Mango Avocado Salsa

LET’S MAKE A PIECE OF HAPPINESS

Print
clock clock iconcutlery cutlery iconflag flag iconfolder folder iconinstagram instagram iconpinterest pinterest iconfacebook facebook iconprint print iconsquares squares iconheart heart iconheart solid heart solid icon
Spicy Rice Shrimp Bowl & Mango Avocado Salsa

Spicy Rice Shrimp Bowl & Mango Avocado Salsa


  • Author: Kimberly
  • Total Time: 40 min
  • Yield: 2-3

Description

Recommended Equipment

  • small bowl
  • measuring spoons
  • medium pot
  • tall container
  • immersion blender
  • sharp knife
  • cutting board
  • medium frying pan

Ingredients

Units Scale
  • 300 grams shrimps, raw peeled deveined
  • 2 small hands mung bean sprouts
  • 160 grams basmati rice
MARINADE
  • juice of half a lemon
  • 2 tbsp jalapeño oil
  • 1/2 fresh chili
  • 1 tsp cumin
  • 1 tsp salt
  • 1/2 tsp smoked paprika
  • 1/2 tsp garlic powder
  • 1/2 tsp cajun seasoning
  • 1/4 tsp onion powder
  • 1/4 tsp white pepper
  • 1/8 tsp cayenne pepper
CILANTRO YOGURT SAUCE
  • 3 tbsp yogurt
  • 1 tbsp jalapeño pulp from the production process of the jalapeño oil
  • juice of half a lemon
  • 1 garlic clove
  • 5 grams fresh cilantro
  • 5 grams fresh parsley
  • pinch of salt
  • pinch of pepper
MANGO AVOCADO SALAD
  • 1/2 ripe mango
  • 1/2 ripe avocado
  • 1 small red onion
  • juice of half a lemon
  • pinch of salt
TOPPINGS
  • fresh cilantro
  • lime slices
  • fresh chili

Instructions

PREPARATIONS
This dish is made with my Jalapeño Oil. If you want to replace it, you can use olive oil instead and for the pulp in the cilantro-yogurt sauce, use 1-2 fresh jalapeños + 1 tablespoon of olive oil.

INSTRUCTIONS

  1. In a small bowl, add cumin, salt, smoked paprika, garlic powder, onion powder, pepper, cayenne, and Cajun seasoning. Finely chop half of a fresh chili and add it to the spices. Finally, add 2 tablespoons of Jalapeño Oil and the juice of half a lime, and mix everything into a creamy paste. Wash the shrimp, pat dry, and place in a bowl. Add the creamy marinade and mix well to evenly coat all the shrimp. Set aside at room temperature.
  2. Wash and let your rice cook according to the package instructions.
  3. Meanwhile, in a tall container, blend yogurt, the pulp from making the Jalapeño Oil, 1-2 peeled garlic cloves, cilantro, parsley, salt, and pepper with an immersion blender until smooth. Set aside.
  4. Next, peel the mango, avocado, and red onion. Chop everything into small pieces and put in a medium bowl. Mix with the juice of half a lime and a little salt, and set aside.
  5. Wash and pat dry the mung bean sprouts and set aside.
  6. Heat 2 tablespoons of Jalapeño Oil in a frying pan and add the shrimp along with the remaining marinade. Briefly fry the shrimp on both sides and let the sauce reduce at the same time.
  7. In a deep bowl, distribute the rice, place mung bean sprouts on one side and the mango-avocado salad on the other. Add 1-2 tablespoons of the green cilantro-yogurt sauce to the sprouts, then lay the shrimp on top and drizzle with the sauce from the pan. You can also top it off with fresh lime juice, fresh cilantro, and fresh chili.
  • Cook Time: 40 min

CRAVING MORE?

Follow along here & don’t forget to subscribe to my substack!

Lime Curd Cheesecake

Lime Curd Cheesecake

Lime Curd Cheesecake

Lime Curd Cheesecake

July 22, 2024 by Kimberly

Experience pure bliss with every bite of this lime curd cheesecake. Its creamy texture and tangy lime burst create a dessert that’s simply irresistible and unforgettable.

This website uses affiliate links which may earn commission for purchases made at no additional cost to you.

TOTAL TIME

3 hrs + 40 min + overnight

SERVES

8 pieces

DIET

vegetarian

EVERY RECIPE DESERVES

A Little Love Letter

Discover the ultimate treat with this lime curd cheesecake. This creamy cheesecake sits atop a golden Oreo cookie crust, bringing together the perfect blend of tangy and sweet. It’s a showstopper dessert that’s incredibly easy to make and even easier to love. Whether you’re a cheesecake enthusiast or a lime lover, this dessert will quickly become your go-to for any occasion.

For a clean cut, use a sharp knife dipped in hot water and wiped dry. Garnish each slice with a thin lime slice or a dollop of whipped cream for that extra touch. It’s perfect for summer gatherings, dinner parties, or just a special treat to enjoy with your loved ones. Everyone will be asking for a second piece!

To keep your lime curd cheesecake fresh, store it in an airtight container in the refrigerator for up to 2 days. For longer storage, freeze individual slices wrapped in plastic wrap and foil for up to 2 months.

Hi, I'm Kimberly!

Hi, I'm Kimberly.

A hopeless romantic when it comes to food. Every recipe I share is a love letter to food itself. I’m so glad you’re here. Make yourself at home and stay a while.

Love,
Kimberly

Kimberly the Zett Signature

If you want to get to know me better,
click here!


Lime Curd Cheesecake

LET’S MAKE A PIECE OF HAPPINESS

Print
.tasty-recipe-responsive-iframe-container-06399260 { position: relative; overflow: hidden; padding-top: 56.3%; } .tasty-recipe-responsive-iframe-container-06399260 iframe { position: absolute; top: 0; left: 0; width: 100%; height: 100%; border: 0; } clock clock iconcutlery cutlery iconflag flag iconfolder folder iconinstagram instagram iconpinterest pinterest iconfacebook facebook iconprint print iconsquares squares iconheart heart iconheart solid heart solid icon
Lime Curd Cheesecake

Lime Curd Cheesecake


  • Author: Kimberly
  • Total Time: 3 hrs 40 min + overnight
  • Yield: 16

Description

GOOD TO HAVE ON HAND

  • oven
  • spring form pan 28 cm / 11″
  • deep baking tray that fits the spring form pan
  • food processor
  • microwave (or small saucepan)
  • large mixing bowl
  • whisk
  • aluminum foil
  • small saucepan
  • zest grater


Ingredients

Units Scale
CRUST
  • 200 grams golden Oreo cookies (without cream filling)
  • 100 grams butter
FILLING
  • 600 grams cream cheese
  • 130 grams white sugar
  • 160 grams creme fraiche
  • 1 tsp vanilla extract
  • 2 eggs
LIME CURD
  • 2 limes
  • 85 grams white sugar
  • 40 grams butter
  • 50 grams heavy cream
  • 1 tbsp cornstarch
  • cold water

Instructions

  1. Preheat your oven to 175°C / 350°F fan-assisted. Fill a deep baking tray or baking dish, large enough to fit your springform, with water. The water should come about halfway up the sides of the springform pan. Set aside.
  2. Carefully twist apart the Oreo cookies and remove the cream filling. Place the cookies in a food processor and pulse until crumbly. Melt the butter in the microwave or in a small saucepan and add it to the cookie crumbs. Mix for about 20 seconds until combined and crumbly. Press this mixture into the bottom of the springform and set aside.
  3. In a large mixing bowl, whisk the cream cheese until smooth. Add the sugar and beat until well combined. Mix in the crème fraîche and vanilla extract. Beat in one egg until just combined, then add the second egg and mix until just incorporated. Avoid overmixing to prevent adding too much air to the batter.
  4. Pour the cream cheese filling over the cookie crust in the springform and spread evenly. Place two sheets of aluminum foil on a flat surface and put the springform pan in the center. Fold the foil up around the edges of the pan to prevent water from getting in during the water bath. Place the pan in the water bath and bake on the middle rack of the oven for about 40 minutes. The cheesecake should be set at the edges and slightly wobbly in the center, with no cracks on top.
  5. While the cheesecake bakes, prepare the lime curd. Zest the limes and place the zest in a small saucepan. Juice the limes and add the juice, along with the sugar, to the pot. Bring to a simmer over medium heat, then gradually add the butter, stirring until melted. Finally, stir in the cream and bring to a boil. Remove from heat. In a small bowl, mix cornstarch and 1.5 tablespoons of water until smooth, then add to the lime mixture. Bring to a boil while stirring, set aside and then let it cool for a bit.
  6. After 40 minutes, turn off the oven and open the door completely. Leave the cheesecake in the cooling oven for 20 minutes to prevent cracking from temperature shock.
  7. The lime curd should be quite firm by now. Stir in about 4-5 tablespoons of cold water until creamy but not too runny. Add more water if needed. Set aside to cool completely.
  8. After 20 minutes, remove the cheesecake from the water bath, discard the foil, and run a sharp knife around the edge to loosen it from the springform. Leave the springform ring on and let the cheesecake cool to room temperature.
  9. Once the cheesecake has cooled, gently spread the lime curd on top. Refrigerate for at least 6 hours or overnight. I know it’s a long wait, but it’ll be worth it 😉 Enjoy your cheesecake!
  • Passive Time: 3 hours + overnight
  • Cook Time: 40 min

CRAVING MORE?

Follow along here & don’t forget to subscribe to my substack!

Mediterranean Pasta Salad

Mediterranean Pasta Salad

Mediterranean Pasta Salad

Mediterranean Pasta Salad

July 18, 2024 by Kimberly

Dive into summer with this zesty Mediterranean pasta salad! Packed with bold flavors, it’s a refreshing twist that’s perfect for any picnic or potluck.

This website uses affiliate links which may earn commission for purchases made at no additional cost to you.

TOTAL TIME

1 hr + 15 min

SERVES

8 portions

DIET

vegetarian

EVERY RECIPE DESERVES

A Little Love Letter

Whisk your taste buds away to the sunny Mediterranean with this vibrant pasta salad! It’s bursting with bold flavors and is the perfect quick and healthy dish for any occasion. Ideal for those looking for a delicious, fuss-free meal!

This pasta salad shines at room temperature, making it ideal for picnics and outdoor gatherings. Serve it as a hearty side with grilled meats or enjoy it as a light main course with crusty bread. It’s also great as a next-day lunch, so consider doubling the recipe!

Keep the pasta salad in a sealed container in the refrigerator. It beautifully holds its flavor and texture for up to three days, making it a fantastic choice for meal prep or leftovers.

Hi, I'm Kimberly!

Hi, I'm Kimberly.

A hopeless romantic when it comes to food. Every recipe I share is a love letter to food itself. I’m so glad you’re here. Make yourself at home and stay a while.

Love,
Kimberly

Kimberly the Zett Signature

If you want to get to know me better,
click here!


Mediterranean Pasta Salad

LET’S MAKE A PIECE OF HAPPINESS

Print
.tasty-recipe-responsive-iframe-container-0c0ae4ef { position: relative; overflow: hidden; padding-top: 56.3%; } .tasty-recipe-responsive-iframe-container-0c0ae4ef iframe { position: absolute; top: 0; left: 0; width: 100%; height: 100%; border: 0; } clock clock iconcutlery cutlery iconflag flag iconfolder folder iconinstagram instagram iconpinterest pinterest iconfacebook facebook iconprint print iconsquares squares iconheart heart iconheart solid heart solid icon
Mediterranean Pasta Salad

Mediterranean Pasta Salad


  • Author: Kimberly
  • Total Time: 1 hour + 15 min
  • Yield: 8

Description

GOOD TO HAVE ON HAND

  • large pot
  • large salad bowl
  • whisk
  • sharp knife
  • cutting board
  • small pan
  • colander


Ingredients

Units Scale
  • 500 grams penne pasta
  • 150 grams Kalamata olives
  • 180 gram dried tomatoes in oil
  • 60 grams capers
  • 2 tbsp pine nuts
  • 15 grams fresh parsley or basil
DRESSING
  • 4 tbsp olive oil (you can use the oil from the dried tomatoes)
  • 3 tbsp balsamic vinegar
  • 2 tsp Dijon mustard
  • 1 tbsp honey
  • 1/4 tsp oregano
  • 1/4 tsp thyme
  • 1/4 tsp rosemary
  • 1/4 tsp salt

Instructions

  1. Fill a large pot with water and bring it to a boil.
  2. Meanwhile, prepare the dressing in the salad bowl. Mix olive oil, balsamic vinegar, Dijon mustard, honey, oregano, thyme, rosemary, and salt with a whisk until smooth. Set the bowl aside.
  3. Add the pasta and 1 tablespoon of salt to the boiling water and cook according to the package instructions until al dente.
  4. While the pasta cooks, halve the olives and chop the tomatoes into small pieces. Pluck the parsley leaves from the stems and finely chop them. Drain and rinse the capers.
  5. Toast the pine nuts in a small pan without adding oil until golden brown.
  6. Drain the pasta and add it directly to the bowl with the dressing, mixing well.
  7. Add the tomatoes, olives, capers, pine nuts, and parsley and combine thoroughly. Season with salt and pepper to taste, then let it cool and marinate for about 1 hour or overnight.
  • Passive Time: 1 hour
  • Cook Time: 15 min

CRAVING MORE?

Follow along here & don’t forget to subscribe to my substack!