Turkish Beef Manti in Yogurt Sauce

Turkish Beef Manti in Yogurt Sauce

Turkish Beef Manti in Yogurt Sauce

Turkish Beef Manti in Yogurt Sauce

August 8, 2024 by Kimberly

Experience a taste of Turkey with this comforting, homemade dumpling dish. Tender beef manti drenched in creamy yogurt sauce with a spicy tomato and red pepper kick. Simply irresistible!

2 HOURS
15 MINUTES

INTERMEDIATE

OMNIVORE

TURKISH

655 PER PORTION

COMFORT FOOD

EVERYDAY

DINNER

ALL YEAR

INTRODUCTION

ABOUT THE RECIPE

Today, I’m bringing a slice of Turkey straight to your kitchen with a recipe that’s sure to warm your heart and tantalize your taste buds. Imagine soft, beef-filled dumplings, each bite bursting with rich flavors, sitting in a creamy yogurt sauce that’s perfectly balanced by a spicy tomato and red pepper kick. This dish is the epitome of comfort food and is sure to become a favorite in your home.

How to serve
When it comes to serving this delightful dish, presentation is key. Arrange cool, creamy yogurt sauce on a large platter, then place the tender beef dumplings on top. Finish off with the vibrant, spicy tomato and red pepper oil for a pop of color and flavor. Garnish with a sprinkle of sumac and dried mint. Pair it with a side of warm, crusty bread to soak up every bit of that delicious sauce.

How to store
If you have any leftovers (though I doubt you will!), store them in an airtight container in the refrigerator for up to three days. To reheat, simply warm them up in a microwave or on the stove, adding a splash of water to keep the dumplings moist and tender.

Hi, I'm Kimberly!

Hi, I'm Kimberly.

A passionate food lover who believes in the magic of homemade deliciousness that spreads love and warmth. Join me on this culinary adventure as I prepare wonderful dishes and let’s spread some happiness together!

Kimberly the Zett Signature

If you want to get to know me better, click here!


Turkish Beef Manti in Yogurt Sauce
„Let’s make a piece of happiness“
Print
clock clock iconcutlery cutlery iconflag flag iconfolder folder iconinstagram instagram iconpinterest pinterest iconfacebook facebook iconprint print iconsquares squares iconheart heart iconheart solid heart solid icon
Turkish Beef Manti in Yogurt Sauce

Turkish Beef Manti in Yogurt Sauce


5 Stars 4 Stars 3 Stars 2 Stars 1 Star

No reviews

  • Author: Kimberly
  • Total Time: 2 hrs + 15 min
  • Yield: 4 1x

Description

Recommended Equipment

  • shallow bowl
  • plastic wrap
  • two medium-sized bowls
  • grater
  • small pot
  • large plate
  • kitchen towel
  • rolling pin
  • sharp knife
  • medium-sized pot
  • slotted spoon

Ingredients

Units Scale

DOUGH

  • 240 grams all-purpose flour
  • 1 egg
  • 1/2 tsp salt
  • 80 milliliters water

FILLING

  • 250 grams minced beef
  • 1 small white onion
  • 2 tbsp red bell pepper oil
  • 1 tbsp minced fresh parsley
  • 1/2 tsp salt
  • 1/2 tsp ground pepper
  • 1/4 tsp cumin
  • 1/4 tsp chili flakes

YOGURT SAUCE

  • 600 grams
  • 6 garlic cloves
  • 1/8 tsp salt

TOMATO BELL PEPPER OIL SAUCE

  • 6 tbsp red bell pepper oil
  • 2 tbsp tomato paste
  • 2 tsp sumach
  • 2 tsp dried mint
  • pinch of salt

TOPPINGS

  • dried mint
  • sumach
  • parsely

Instructions

  1. First, you’ll prepare the Manti dough. Take a shallow bowl, add flour and sugar, and mix them together. Create a large well in the middle and crack the egg into it. Beat the egg with a fork and then add water. Mix everything with the fork until it forms a dough. Transfer the dough to a clean work surface and knead it into a smooth ball. If the dough is too sticky, add a bit more flour. Place the dough back in the bowl, cover it with plastic wrap, and let it rest for at least 1 hour.
  2. Next, take a medium-sized bowl and add the ground meat. Peel the onion and grate it directly into the bowl with the meat. Chop the parsley and add it to the meat as well. Season the meat with cumin, chili, salt, and pepper. Put the meat mixture in the fridge until you’re ready to use it.
  3. For the yogurt sauce, mix the yogurt with some salt. Peel the garlic cloves and grate them directly into the yogurt. Stir everything well and refrigerate until needed.
  4. To prepare the tomato-pepper sauce, mix the red pepper oil, tomato paste, sumac, mint, and a pinch of salt in a small pot. Place the pot on the stove but don’t heat it yet. We’ll get to this later.
  5. Take a large plate and sprinkle a thin layer of flour on it. Set it aside, you’ll need it soon to place your finished Manti. Also, prepare a clean kitchen towel to cover the Manti so they don’t dry out.
  6. Once the dough has rested, sprinkle a bit of flour on a clean work surface and place your dough ball on it. Sprinkle some flour on the dough ball as well. Roll out the dough into a rectangular shape measuring 36×50 cm / 14×20”. Cut the dough into squares measuring 6×6 cm / 2.3×2.3” using a pizza cutter or a sharp knife. You should get about 45-50 Manti squares from the dough.
  7. Place 1/2 to 1 teaspoon of filling on each square and fold them into Manti. To do this, bring the diagonal corners together and then fold the open corners towards the center, pressing the seams together. They should look like little envelopes.
  8. Take your 4 serving plates and evenly distribute the yogurt sauce on them. Set the plates aside.
  9. Fill a medium-sized pot about 3/4 full with water and bring it to a boil. Once the water is boiling, reduce the heat to medium and let it simmer. Add all the Manti to the water and cook for about 6-7 minutes.
  10. While the Manti are cooking, heat the pot with the tomato paste and red pepper oil over low heat. Stir well and keep it on low heat until the Manti are ready.
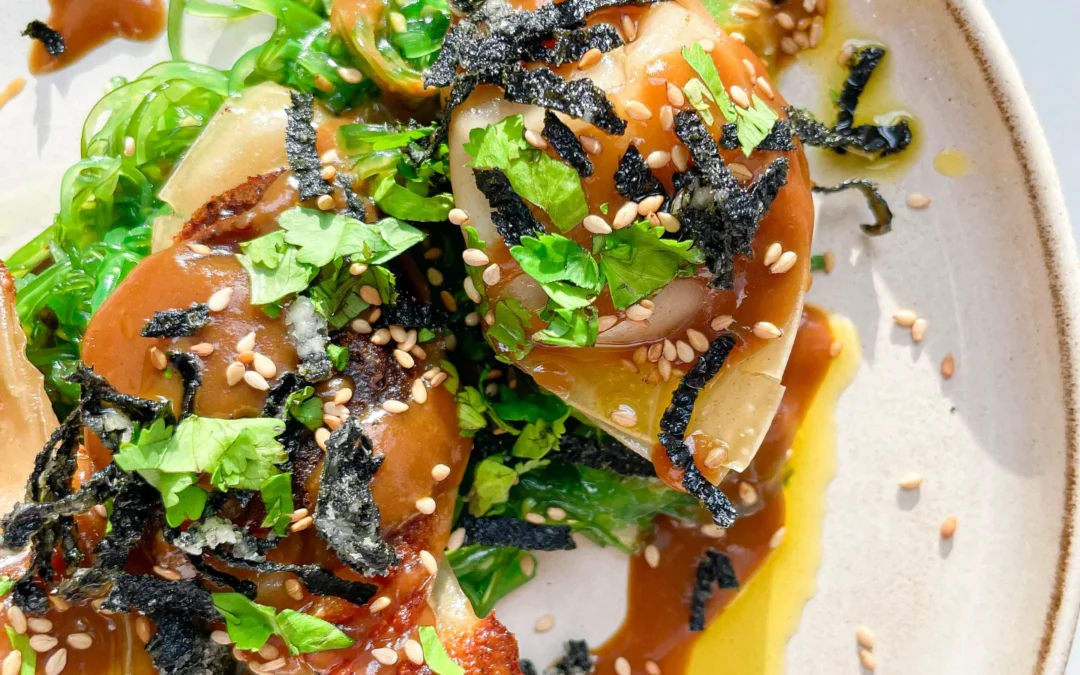
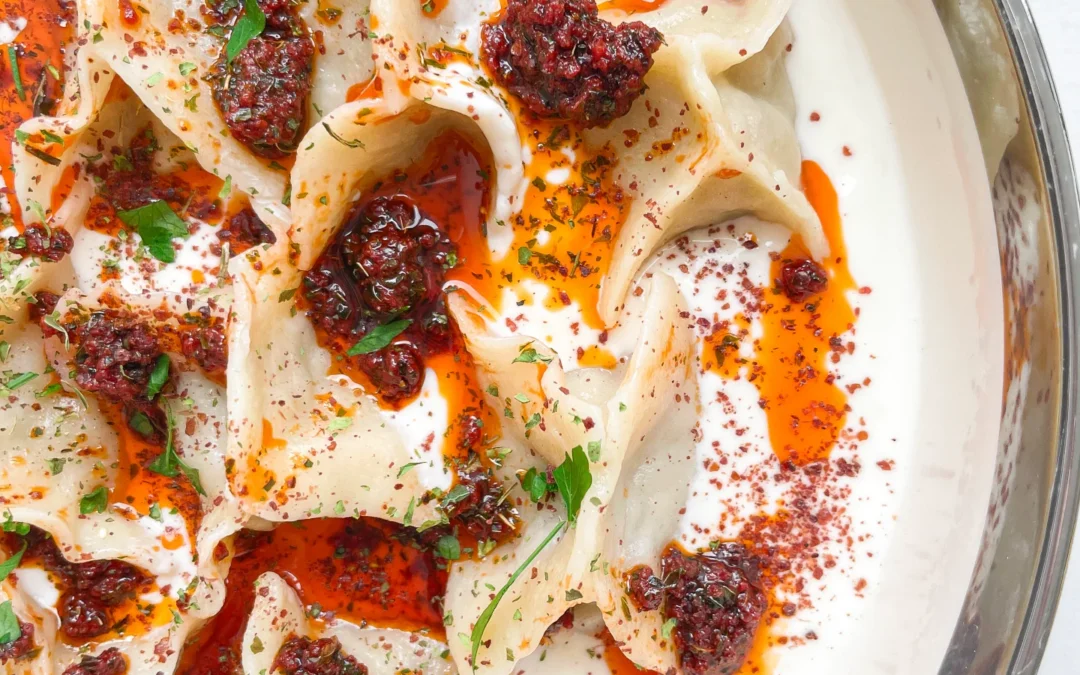
  11. Once the Manti are cooked, use a slotted spoon to remove them from the water and place them directly on the yogurt sauce on the plates. Pour the tomato-pepper oil sauce over the Manti and sprinkle with a bit of sumac and dried mint to finish.
  • Passive Time: 40 min
  • Cook Time: 1 hr + 35 min

Crispy Pork Gyoza, Miso Ginger Oil Glaze & Fried Seaweed

Crispy Pork Gyoza, Miso Ginger Oil Glaze & Fried Seaweed

Crispy Pork Gyoza, Miso Ginger Oil Glaze & Fried Seaweed

Crispy Pork Gyoza, Miso Ginger Oil Glaze & Fried Seaweed

July 29, 2024 by Kimberly

Dive into crispy pork gyoza with miso ginger oil glaze and fried seaweed – a flavor explosion that’s crunchy, savory, and totally irresistible. Perfect for any foodie adventure!

40 MINUTES

INTERMEDIATE

OMNIVORE

JAPANESE

334 PER PORTION

UMAMI

EVERYDAY

APPETIZER

ALL YEAR

INTRODUCTION

ABOUT THE RECIPE

Ready to elevate your appetizer game? Try these crispy pork gyoza drizzled with a mouth-watering miso ginger oil glaze, paired with crunchy fried seaweed. This dish is a fusion of amazing textures and flavors that will take your taste buds on an unforgettable journey. Perfect for impressing guests or enjoying a gourmet snack at home, these gyoza are a must-have for any cooking enthusiast.

How to serve
Serve these crispy pork gyoza hot from the pan, generously drizzled with the miso ginger oil glaze for a savory kick. Pair them with the fried seaweed for an added crunch that perfectly complements the soft, flavorful gyoza. Garnish with sesame seeds and green onions for extra flavor and visual appeal. These gyoza make a fantastic appetizer, party snack, or light meal.

How to store
Store leftover gyoza in an airtight container in the fridge for up to three days. Reheat them in a hot pan to keep their crispiness. The miso ginger oil glaze can be stored separately in a sealed jar.

Hi, I'm Kimberly!

Hi, I'm Kimberly.

A passionate food lover who believes in the magic of homemade deliciousness that spreads love and warmth. Join me on this culinary adventure as I prepare wonderful dishes and let’s spread some happiness together!

Kimberly the Zett Signature

If you want to get to know me better, click here!


Crispy Pork Gyoza, Miso Ginger Oil Glaze & Fried Seaweed
„Let’s make a piece of happiness“
Print
clock clock iconcutlery cutlery iconflag flag iconfolder folder iconinstagram instagram iconpinterest pinterest iconfacebook facebook iconprint print iconsquares squares iconheart heart iconheart solid heart solid icon
Crispy Pork Gyoza, Miso Ginger Oil Glaze & Fried Seaweed

Crispy Pork Gyoza, Miso Ginger Oil Glaze & Fried Seaweed


  • Author: Kimberly
  • Total Time: 40 min
  • Yield: 4 1x

Description

Recommended Equipment

  • sharp knife
  • cutting board
  • medium bowl
  • large plate
  • three small bowls
  • measuring spoons
  • large pan with lid
  • scissors
  • small pan or pot

Ingredients

Units Scale
  • 20 Gyoza wrapper, homemade or store-bought
  • 1 tbsp high heat oil
  • 80 milliliters cold water
  • 400 grams seaweed salad (optional)

FILLING

  • 250 grams ground pork
  • 4 garlic cloves
  • 1 tsp sesame oil
  • 1 tsp ginger oil
  • 1 spring onion
  • 1.5 tbsp Hoisin sauce
  • 1 tsp soy sauce
  • 1/4 tsp Chinese Five Spice
  • 1 small egg

MISO GLAZE

  • 2 tbsp miso paste
  • 1 tbsp mirin
  • 1 tsp honey
  • 2 tsp soy sauce
  • 2 tsp ginger oil
  • 3 tbsp warm water

TOPPINGS

  • 1 Nori sheet
  • 1 tsp cornstarch
  • 2 tsp cold water
  • fresh cilantro
  • ginger oil

Instructions

PREPARATIONS

  • Here’s the recipe for Gyoza dough. You’ll need about 20 sheets, cut them into squares rather than rounds. Or, just get ready-made Gyoza wrappers from the Asian market.
  • Here’s the recipe for ginger oil. You’ll need about 2-3 tablespoons.
  • Here’s the recipe for Chinese Five Spice. You’ll need 1/4 teaspoon.

INSTRUCTIONS

  1. First, prepare the Gyoza filling. Peel and finely grate the garlic cloves into a medium bowl. Then, slice the spring onion into thin rings and add to the garlic. Next, add the ground pork, ginger oil, sesame oil, hoisin sauce, Chinese Five Spice, and the egg. Mix everything well.
  2. Take a large plate and sprinkle some flour on it. This will be the resting place for the filled Gyoza so they don’t stick to the plate. Also, prepare a small bowl with some cold water and have your Gyoza dough ready.
  3. Fill each Gyoza wrapper with 1 teaspoon of the pork filling. Dab a little water around the edge of the wrapper, fold it diagonally to seal, and press out all the air so the filling is well enclosed. Wet one side of the long edge, fold it over, and press firmly. Place on the floured plate. Repeat until all the filling is used up.
  4. Heat 1 tbsp of high-heat oil in a large pan over medium heat and add the Gyoza. Fry for a few minutes until the bottoms are crispy. Lower the heat and add about 100ml / 1/3 cup of cold water to the pan (be careful, it may splatter if the oil is too hot). Cover the pan with a lid and let the Gyoza steam.
  5. Meanwhile, fold the Nori sheet three times in the middle and cut it into thin strips with scissors. Mix the Nori strips with cornstarch in a small bowl. Add a bit of water and stir well. Heat about 1 cm of high-heat oil in a small pan or pot to around 180°C / 356°F. Fry the Nori strips for 2-3 minutes, then remove and drain on paper towels.
  6. The Gyoza should now be a bit translucent and the filling cooked through. Remove the lid and turn the heat back to medium to crisp up the Gyoza again.
  7. Meanwhile, make the Miso Glaze. In a small bowl, mix Mirin, honey, soy sauce, and ginger oil. Heat for a few seconds in the microwave (or in a small pan) until it simmers. Stir in the Miso paste well, add 3 tbsp warm water to thin it a bit and set aside.
  8. Finely chop the fresh coriander and set aside.
  9. Optionally, place seaweed salad in the center of the plate, arrange 5 Gyoza on top. Drizzle with Miso Glaze and top with fried Nori strips, chopped coriander, and toasted sesame seeds. Finish with a splash of ginger oil and serve immediately.
  • Cook Time: 40 min

American Flag Pie

American Flag Pie

American Flag Pie

American Flag Pie

July 4, 2024 by Kimberly

Diving into the 4th of July with a sweet tribute to America! This patriotic cherry and blueberry pie captures the festive spirit in every delicious, colorful slice.

4 HOURS
45 MINUTES

INTERMEDIATE

VEGETARIAN

US AMERICAN

397 PER SLICE

FRUITY
SWEET

4TH JULY

DESSERT

ALL YEAR

INTRODUCTION

ABOUT THE RECIPE

Nothing screams 4th of July like an American Flag Pie! This vibrant cherry and blueberry pie isn’t just a treat for your taste buds—it’s a festive homage to the USA, perfect for any patriotic celebration.

How to serve
Best served chilled or at room temperature, this pie stands out at your holiday table. Top it off with a scoop of vanilla ice cream or a drizzle of fresh cream to complement the tangy berries. Gather around for fireworks and a slice of Americana!

How to store
Keep any leftover pie covered in the refrigerator. It stays fresh and tasty for up to three days, ensuring you can enjoy the flavors of the holiday a little longer.

Hi, I'm Kimberly!

Hi, I'm Kimberly.

A passionate food lover who believes in the magic of homemade deliciousness that spreads love and warmth. Join me on this culinary adventure as I prepare wonderful dishes and let’s spread some happiness together!

Kimberly the Zett Signature

If you want to get to know me better, click here!


American Flag Pie
American Flag Pie
American Flag Pie
American Flag Pie
American Flag Pie
American Flag Pie
„Let’s make a piece of happiness“
Print
clock clock iconcutlery cutlery iconflag flag iconfolder folder iconinstagram instagram iconpinterest pinterest iconfacebook facebook iconprint print iconsquares squares iconheart heart iconheart solid heart solid icon
American Flag Pie

American Flag Pie


  • Author: Kimberly
  • Total Time: 4 hrs + 45 min
  • Yield: 8-10 pieces 1x

Description

Recommended Equipment

  • 2 medium-sized bowls
  • plastic wrap
  • medium-sized pot
  • strainer + small bowl
  • whisk
  • oven
  • rolling pin
  • pie dish (28 cm / 11″)
  • sharp knife
  • star-shaped cutter
  • aluminum foil
  • pastry brush

Ingredients

Units Scale

PIE CRUST

  • 350 grams all-purpose flour
  • 50 grams white sugar
  • 130 grams unsalted butter, cold
  • 120 milliliters buttermilk, cold
  • pinch of salt

CHERRY FILLING

  • 700 grams morello cherries
  • 100 grams white sugar
  • 30 grams cornstarch
  • 1 tbsp butter
  • pinch of salt

BLUEBERRY FILLING

  • 250 grams blueberries
  • 50 grams white sugar
  • 1 tbsp cornstarch
  • 1 tbsp lemon juice

TOPPING

  • 1 tbsp full-fat milk
  • 1 tbsp brown sugar

Instructions

  1. Start by preparing the dough in a medium-sized bowl. Mix flour, sugar, and salt together. Then add cold butter, cut into small pieces, and crumble everything by hand until the butter is flaky. Add all the buttermilk and mix by hand until you have a somehow crumbly but firm dough. Wrap the dough in plastic wrap and chill it in the fridge for 30 minutes.
  2. Meanwhile, make the cherry filling in a medium-sized pot. Mix sugar, cornstarch, and salt together. Drain the cherries using a strainer, saving 1/2 cup of the juice, and add it to the pot. Cook over medium heat, letting it simmer until the mixture becomes creamy and the cloudiness disappears. Then add the cherries and a tablespoon of butter. Stir until the butter has melted. Set aside to cool.
  3. Next, prepare the blueberry filling. Wash the blueberries and place them in a medium-sized bowl. Add lemon juice, sugar, and cornstarch and mix well until all the blueberries are well coated.
  4. Preheat the oven to 215°C / 420°F and place the rack on the lowest shelf.
  5. Take the dough out of the fridge and shape it into a round ball. Place the dough on a heavily floured, clean work surface. Sprinkle more flour on the dough, then roll it out from the center using a rolling pin. The dough should be about 12 cm / 5″ larger in diameter than the pie dish. The dough itself should be 1cm / 1/3″ thick. Roll the dough around the rolling pin, then unroll it over the pie dish. Carefully fit the dough into the dish, then trim the excess edges. Tuck the edge inward to create a thicker top edge. From the remaining dough, cut out 4 long strips and 6 stars for the Stars & Stripes decoration. Set these aside.
  6. Take a piece of aluminum foil, fold it lengthwise, and then shape it into a right angle so it fits into the upper left quarter of the pie dish, acting as a divider between the fillings. Fill the 1/4 area with the blueberry mixture and the 3/4 area with the cherry filling. Remove and discard the foil.
  7. Distribute the cut-out stars over the blueberry filling and arrange the strips over the cherry filling. Trim the strips at the edges and fold them in. Brush the Stars & Stripes and the edges of the crust with a little milk and sprinkle with brown sugar.
  8. Bake the pie in the oven for 20 minutes. Then reduce the temperature to 175°C / 350°F and bake for another 25 minutes. Let the pie cool completely, which can take 3-4 hours as the filling sets upon cooling. Happy 4th of July!

Notes

The calorie information may vary depending on the product used, country and region.

  • Prep Time: 60 min
  • Passive Time: 3 hrs
  • Cook Time: 45 min

Katsu Sando

Katsu Sando

Katsu Sando

Katsu Sando

June 29, 2024 by Kimberly

Sink your teeth into the ultimate Katsu Sando – the most popular Japanese sandwich! Crispy chicken, tangy red cabbage, and creamy kewpie mayo nestled between soft bread – every bite is a flavor explosion!

40 MINUTES

EASY

OMNIVORE

JAPANESE

582 PER PORTION

CRISPY
UMAMI

EVERDAY

LUNCH

ALL YEAR

INTRODUCTION

ABOUT THE RECIPE

Brace yourself for the crunch and savor of the Katsu Sando, a Japanese-inspired sandwich that’s taking the culinary world by storm. Featuring crispy panko-crusted chicken, this sandwich packs a punch with every layer of flavor.

How to serve
Perfectly crispy and deliciously juicy, the Katsu Sando is best served immediately after assembly to maintain its textural contrast. Slice it in half to show off the beautiful layers of red cabbage slaw, green butter lettuce, creamy kewpie mayo and tonkatsu sauce.

How to store
While best enjoyed fresh, you can store the prepped ingredients separately in the fridge. The panko chicken can be kept for up to two days.

Hi, I'm Kimberly!

Hi, I'm Kimberly.

A passionate food lover who believes in the magic of homemade deliciousness that spreads love and warmth. Join me on this culinary adventure as I prepare wonderful dishes and let’s spread some happiness together!

Kimberly the Zett Signature

If you want to get to know me better, click here!


Katsu Sando
Katsu Sando
Katsu Sando
„Let’s make a piece of happiness“
Print
clock clock iconcutlery cutlery iconflag flag iconfolder folder iconinstagram instagram iconpinterest pinterest iconfacebook facebook iconprint print iconsquares squares iconheart heart iconheart solid heart solid icon
Katsu Sando

Katsu Sando


  • Author: Kimberly
  • Total Time: 40 minutes
  • Yield: 4 1x

Description

Recommended Equipment

  • sharp knife
  • cutting board
  • medium-sized bowl
  • plastic wrap
  • meat mallet
  • two plates
  • three shallow dishes for breading
  • large frying pan
  • measuring spoons

Ingredients

Units Scale
  • 8 slices white toast
  • 40 grams kewpie mayo
  • 40 grams tonkatsu sauce
  • 250 grams chicken breast
  • 1.5 tbsp all-purpose flour
  • 1 egg
  • 3 tbsp panko bread crumbs
  • 3 tbsp regular bread crumbs
  • 50 grams clarified butter
  • 150 grams red cabbage
  • 1 tsp rice vinegar
  • 1/2 tsp sesame oil
  • 1/4 tsp salt
  • 4 butter lettuce leaves

Instructions

  • Cut the red cabbage into eighths and finely shred or slice one eighth. Place it in a medium-sized bowl and marinate with rice vinegar, sesame oil, and salt. Set aside.
  • Detach 4 leaves from the head of lettuce and wash thoroughly. Pat dry and set aside.
  • Halve the chicken breast lengthwise, then cut each half again crosswise. Place each piece between two layers of plastic wrap and pound to about 0.5 cm / 0.2″ thickness using a meat mallet. Lay the flattened meat on a plate.
  • Set up a breading station with three shallow dishes or bowls. Fill the first dish with 1.5 heaped tablespoons of wheat flour, crack an egg into the second dish and whisk it. In the third dish, mix together 3 heaped tablespoons each of panko and breadcrumbs. Coat each piece of chicken first in flour, shaking off excess, then dip in the egg, and finally, press into the breadcrumb mixture, ensuring it’s well coated on all sides. Place the breaded pieces side by side on a plate.
  • Heat clarified butter in a large frying pan and fry the breaded chicken pieces on both sides until crispy, about 3 minutes per side or until cooked through. Let the meat drain on kitchen paper.
  • Place half of the slices of bread flat on a clean work surface, then place a lettuce leaf on each. Top each with a piece of cooked chicken, followed by a zigzag pattern of Kewpie mayo and Tonkatsu sauce. Add about 2 tablespoons of red cabbage salad on top of the sauces. Finally, top the sandwiches with another slice of bread. If desired, trim the edges all around and cut the sandwiches in half in the middle with a sharp knife.

Notes

The calorie information may vary depending on the product used, country and region.

  • Cook Time: 40 min

Tomato Tarte Tatin

Tomato Tarte Tatin

Tomato Tarte Tatin

Tomato Tarte Tatin

June 15, 2024 by Kimberly

Flip your mealtime with a stunning Tomato Tarte Tatin! Sweet, savory, and beautifully caramelized, it’s a showstopper that turns any meal into a special occasion.

45 MINUTES

INTERMEDIATE

VEGETARIAN

FRENCH

586 PER PORTION

UMAMI

EVERDAY
DINNER PARTY

DINNER

SUMMER

INTRODUCTION

ABOUT THE RECIPE

Transform your table with the vibrant colors and lush flavors of a Tomato Tarte Tatin. This dish offers a delightful twist on the classic French dessert, turning tomatoes into the star of the show.

How to serve
Serve this exquisite tart fresh out of the oven to enjoy its optimal flavor and texture. It pairs beautifully with a simple arugula salad dressed with balsamic vinegar and olive oil or a side of creamy goat cheese. Perfect for impressing guests at dinner parties or enjoying a luxurious weekend meal.

How to store
Cool any leftovers to room temperature before storing them in an airtight container in the refrigerator. This dish is best enjoyed within a couple of days to maintain its crisp pastry and juicy topping.

Hi, I'm Kimberly!

Hi, I'm Kimberly.

A passionate food lover who believes in the magic of homemade deliciousness that spreads love and warmth. Join me on this culinary adventure as I prepare wonderful dishes and let’s spread some happiness together!

Kimberly the Zett Signature

If you want to get to know me better, click here!


Tomato Tarte Tatin
Tomato Tarte Tatin
Tomato Tarte Tatin
„Let’s make a piece of happiness“
Print
clock clock iconcutlery cutlery iconflag flag iconfolder folder iconinstagram instagram iconpinterest pinterest iconfacebook facebook iconprint print iconsquares squares iconheart heart iconheart solid heart solid icon
Tomato Tarte Tatin

Tomato Tarte Tatin


  • Author: Kimberly
  • Total Time: 45 min
  • Yield: 2 1x

Description

RECOMMENDED EQUIPMENT

  • sharp knife
  • cutting board
  • garlic press
  • oven-safe pan
  • large plate

Ingredients

Units Scale
  • 1 puff pastry dough
  • 4 big tomatoes
  • 2 garlic cloves
  • 1/2 tsp dried thyme
  • 3 tbsp olive oil
  • 1 tbsp honey
  • salt & pepper to taste
  • 1 tsp fresh thyme
  • 30 grams parmesan

Instructions

  1. Take the puff pastry out of the fridge. Set aside.
  2. Preheat the oven to 220°C (428°F).
  3. Wash the tomatoes and slice them finely from the bottom. Peel and finely chop or press the garlic and mix it into a small bowl with 1-2 tablespoons of olive oil. Set everything aside.
  4. Roll out the puff pastry and place the oven-safe pan on top. Trace a circle around the pan and cut out the puff pastry accordingly. Set the pastry circle aside. Don’t discard the remaining pastry. You can either make a second layer of pastry for the Tarte Tatin or cut it into squares, place a cube of feta in the middle, wrap it up, and bake until golden brown in the oven. Topped with a bit of honey, thyme, and salt, you quickly create a simple snack 🙂
  5. Heat the pan and briefly sauté honey, olive oil, dried thyme, and salt until bubbles form. Then distribute the tomato slices in the pan, brush them with the garlic oil, and let them caramelize for about 1-2 minutes. Remove from the heat, top with freshly ground pepper, and lay the puff pastry circle on top. Tuck the edges slightly inward and press firmly. Prick a few holes in the pastry with a fork.
  6. Bake the pan in the oven on the bottom rack uncovered for about 25 minutes.
  7. In the meantime, coarsely grate or slice the Parmesan and pluck the fresh thyme leaves from their stems. Set aside.
  8. Remove the pan from the oven and let it cool for a few minutes. Then place a plate larger than the pan over the pan and quickly invert to turn out the Tarte Tatin onto the plate.
  9. Top the Tarte Tatin with Parmesan, fresh thyme, and pepper, and serve immediately. Enjoy your piece of happiness!

Notes

The calorie information may vary depending on the product used, country and region.

  • Passive Time: 25 min
  • Cook Time: 20 min

Sabich Sandwich

Sabich Sandwich

Sabich Sandwich

Sabich Sandwich

June 6, 2024 by Kimberly

Dive into the ultimate Sabich sandwich: crispy eggplant, fresh tomato cucumber salad, creamy tahini, spicy zhough, tangy mango sauce and crunchy chickpeas. Pure flavor explosion!

40 MINUTES

EASY

VEGAN

MIDDLE EAST

721 PER PORTION

SPICY

EVERYDAY

DINNER

ALL YEAR

INTRODUCTION

ABOUT THE RECIPE

Meet your new favorite sandwich: the Sabich. Inspired by Yottam Ottolenghi this Middle Eastern delight packs a punch with crispy eggplant, fresh tomato cucumber salad, creamy tahini, spicy zhoug, tangy mango sauce, and crunchy chickpeas. It’s a vegan feast that’s not only incredibly delicious but also super easy to make. Perfect for lunch or dinner, this Sabich sandwich is all about bold flavors and textures.

How to serve
Start with a warm bread, then layer on the crispy eggplant, followed by the tomato cucumber salad. Drizzle with tahini sauce and add a spoonful of zhoug for that spicy kick. Top it off with chickpeas and a splash of mango sauce. Wrap it up and enjoy! It’s best served fresh and warm, making it a perfect quick meal.

How to store
Store any leftover components separately in airtight containers. The crispy eggplant and salad can stay fresh in the fridge for up to two days. When ready to eat, reheat the eggplant in the oven and assemble your sandwich fresh for the best taste.

Hi, I'm Kimberly!

Hi, I'm Kimberly.

A passionate food lover who believes in the magic of homemade deliciousness that spreads love and warmth. Join me on this culinary adventure as I prepare wonderful dishes and let’s spread some happiness together!

Kimberly the Zett Signature

If you want to get to know me better, click here!


Sabich Sandwich
Sabich Sandwich
Sabich Sandwich
„Let’s make a piece of happiness“
Print
clock clock iconcutlery cutlery iconflag flag iconfolder folder iconinstagram instagram iconpinterest pinterest iconfacebook facebook iconprint print iconsquares squares iconheart heart iconheart solid heart solid icon
Sabich Sandwich

Sabich Sandwich


  • Author: Kimberly
  • Total Time: 40 minutes
  • Yield: 2 1x

Description

RECOMMENDED EQUIPMENT

  • small bowl
  • garlic press
  • sharp knife
  • cutting board
  • hand blender (or food processor)
  • mortar & pestle
  • medium bowl
  • 3 small bowls
  • sieve
  • large pan

Ingredients

Units Scale

TAHINI SAUCE

  • 2 tbsp tahini
  • 2 tbsp lemon juice
  • 1 tsp maple syrup
  • 1 garlic clove
  • salt & pepper to taste

MANGO SAUCE

  • 1 ripe mango
  • 1/8 tsp chili flakes

ZHOUG

  • 10 grams fresh cilantro
  • 5 grams fresh parsley
  • 1 jalapeno
  • 2 tbsp olive oil
  • 2 tbsp lime juice
  • 4 tbsp cold water
  • 1 garlic clove
  • 5 cardamom capsules
  • 3 cloves
  • 1/2 tsp cumin
  • pinch of pepper

TOMATE CUCUMBER SALAD

  • 100 grams tomatoes
  • 100 grams cucumber
  • 1 small red onion
  • 1 tbsp olive oil
  • 1 tbsp lemon juice
  • some parsley leaves

ROASTED CHICKPEAS

  • 130 grams drained chickpeas
  • 1/2 tbsp olive oil
  • 1/4 tsp cumin
  • 1/4 tsp smoked paprika
  • 1/8 tsp salz
  • 1/8 tsp curry
  • 1/8 tsp garlic powder
  • 1/8 tsp onion powder

EGGPLANT SLICES

  • 1 eggplant
  • 2 tbsp cornstarch
  • 2 tbsp ghee/clarified butter

OTHER INGREDIENTS

  • 2 pita breads

Instructions

  1. For the tahini sauce, mix tahini and water in a small bowl until smooth. Press in one peeled garlic clove, add maple syrup and lemon juice, and mix well. Season with salt and pepper and set aside.
  2. For the mango sauce, peel the mango and blend the soft flesh in a tall container with a hand blender until creamy, adding a bit of water if needed. Add chili flakes to taste and stir. Set aside.
  3. For the Zhoug, first grind the 3 cloves and the contents of 5 cardamom pods in a mortar. Put this powder in a tall container that fits the hand blender, and add the following: cilantro leaves, parsley leaves, 4 tablespoons of cold water, 2 tablespoons of olive oil, 2 tablespoons of lime juice, 1/2 teaspoon of cumin, 1 jalapeno without the stem, and 2 peeled garlic cloves. Blend everything into a pesto-like paste and set aside.
  4. For the tomato-cucumber salad, wash the tomatoes and cucumber well. Cut both into small, even pieces and put them in a medium bowl. Peel the red onion, cut it into thin strips, and add to the bowl. Finely chop a few parsley leaves and add them too. Finally, add 1 tablespoon of olive oil and 1 tablespoon of lemon juice and mix well. Set aside.
  5. For the roasted chickpeas, preheat the oven to 200°C / 392°F. Rinse the chickpeas thoroughly under running water and let them drain. In a medium bowl, mix together the spice blend: 1/2 tablespoon of olive oil, 1/4 teaspoon of cumin, 1/4 teaspoon of smoked paprika, 1/8 teaspoon of salt, 1/8 teaspoon of curry powder, 1/8 teaspoon of dried garlic, and 1/8 teaspoon of dried onion. Put the chickpeas in a clean kitchen towel and gently rub them dry, removing any loose skins. Mix the chickpeas with the spice paste in the bowl until they’re well coated. Spread the chickpeas on a baking sheet lined with parchment paper and roast in the oven for 20-25 minutes. Place the pita breads in the oven for the last 10 minutes.
  6. Finally, prepare the eggplant slices. Wash and dry the eggplant, then cut it into slices about 1 cm thick. Spread 2 tablespoons of cornstarch on a small plate and coat the eggplant slices on both sides, shaking off any excess. Fry the slices in a hot pan with 2 tablespoons of clarified butter until crispy on both sides, then let them drain on a paper towel.
  7. To assemble, spread tahini sauce on each piece of bread, add tomato-cucumber salad, then a few eggplant slices, and top with Zhoug and mango sauce. Finally, sprinkle the roasted chickpeas on top. Enjoy your delicious creation!

Notes

The calorie information may vary depending on the product used, country and region.

  • Cook Time: 40 min