Description
Recommended Equipment
- large baking dish
- sharp knife
- cutting board
- large pan
- peeler
- large pot
- immersion blender (or stand mixer)
Ingredients
Units Scale
OVEN VEGGIES
- 1 kilogram tomatoes (I used San Marzano)
- 1 red bell pepper
- 2 carrots
- 2 shallots
- 12 garlic cloves
- 3 tbsp olive oil
- salt
CARAMALIZED ONIONS FOR GRILLES CHEESE
- 8 small white onions
- 2 tsp butter
- 1 tbsp balsamic vinegar
- salt
SOUP BASE
- 1 tsp butter
- 4 small white onions
- 1/2 tsp chili flakes
- 2 tbsp tomato paste
- 80 milliliters red wine
SOUP
- 400 milliliters vegetable broth
- 200 milliliters heavy cream (save some for garnish)
- 10 grams fresh basil (save some for garnish)
- salt, pepper & cayenne pepper to taste
GRILLED CHEESE
- 8 slices bread of your choice (I used regular white flat breads)
- 200 grams cheese of your choice (I used an cheddar & medium-aged gouda)
- butter
Instructions
- Preheat your oven to 150°C / 300°F. Wash the tomatoes and bell peppers, then dry them well. Get a large baking dish ready. Quarter the tomatoes, remove the seeds from the bell peppers, and roughly chop them. Peel the carrots and cut them into large chunks too. Peel the shallots and garlic. Now, put everything in the baking dish, drizzle with a little olive oil and sprinkle some salt over the veggies. Toss them to coat evenly, then place the baking dish in the oven for 40 minutes. After 40 minutes, increase the temperature to 210°C / 410°F and roast for another 15 minutes.
- While the veggies are roasting, you can prepare the caramelized onions for the grilled cheese sandwiches. Peel the onions and slice them thinly. Add 1 teaspoon of butter to a large pan and let it melt. Add the onion slices, sprinkle a bit of salt on top, and cook on low heat, stirring regularly for about 10-15 minutes.
- Now, peel the onions for the soup base and cut them roughly. Set them aside. Pick the basil leaves from their stems, wash them, and dry them well. Set them aside too.
- After 10-15 minutes, the onions in the pan will have left some fond (browned bits) at the bottom. This is the time to add another teaspoon of butter and cook the onions for another 10-15 minutes. Once the onions are soft and golden brown, add a splash of balsamic vinegar and cook for another 1-2 minutes. Transfer the caramalized onions to a bowl and set the pan back on the stove to make the soup base.
- Add another teaspoon of butter to the pan and sauté the roughly chopped onions over medium heat. After a few minutes, add the chili flakes and stir well. After a few more minutes, stir in the tomato paste so that all the onions are coated evenly. Let it cook for a few minutes. Then, deglaze with the red wine and let it simmer until it reduces to a thick, creamy paste. Set the pan aside.
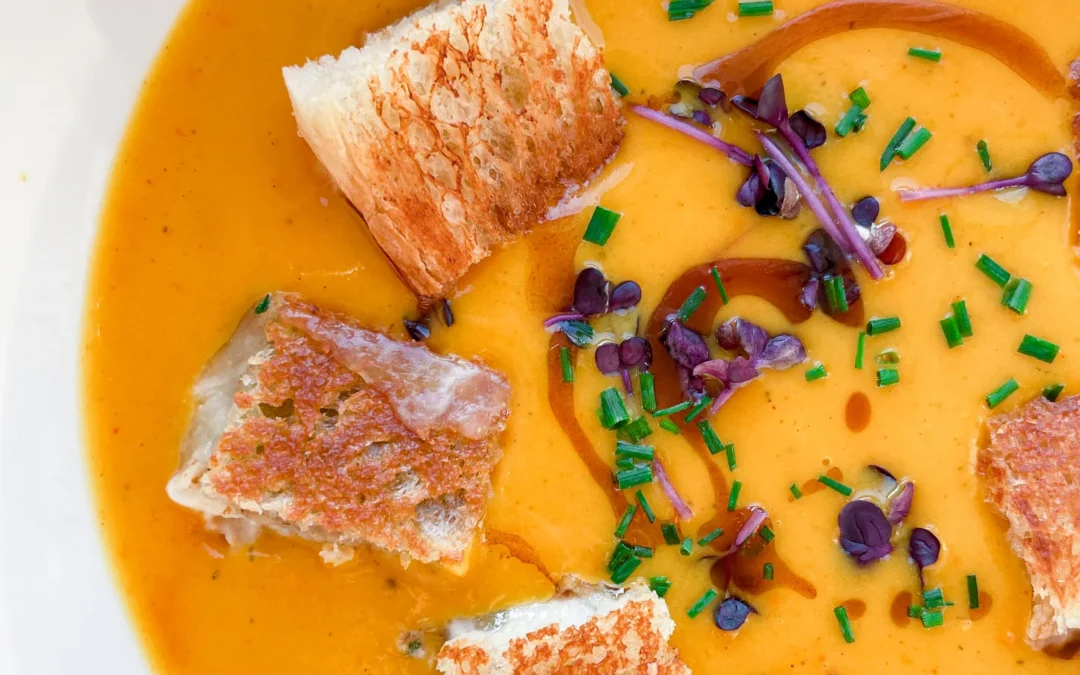
- Grab a large pot and transfer the roasted vegetables (along with any juices) into it once they’re done. Add the soup base from the pan, the vegetable broth, and the basil leaves. Use an immersion blender to blend everything until you reach the desired consistency. Finally, stir in the cream. Season the soup with salt, pepper, and cayenne to taste. Keep the soup on low heat and bring it to a simmer.
- Meanwhile, make the grilled cheese sandwiches. Heat a pan over low-medium heat. While the pan heats up, spread a thin layer of butter on the outside of each slice of bread. Grate the cheese. Place half of the buttered bread (butter side down) in the pan, then evenly distribute the cheese and caramelized onions on top. Cover the pan with a lid and wait for the cheese to start melting. Once it does, place the remaining slices of bread (butter side up) on top. Use a spatula to flip the sandwiches so they can brown on the other side.
- While the sandwiches are finishing, ladle the soup into bowls and optionally garnish with a drizzle of walnut oil, some cream, and fresh basil. Once the other side of the grilled cheese is crispy, take them out of the pan and cut them however you like – halves, triangles, strips, or small squares – depending on how you prefer them with your soup.
- Cook Time: 80 min