Apple Crumble

Apple Crumble

Apple Crumble

Apple Crumble

December 3, 2023 by Kimberly

Apple crumble, a quick and delicious dessert for everyone. Sliced apples coated in cinnamon, topped with a quick crumble, and baked to perfection. A speedy treat satisfying every sweet tooth!

This website uses affiliate links which may earn commission for purchases made at no additional cost to you.

TOTAL TIME

60 min

SERVES

4 portions

DIET

vegetarian

EVERY RECIPE DESERVES

A Little Love Letter

Once upon a kitchen, there was Apple Crumble…

Picture a cozy apple crumble, fresh and warm. Its golden-brown, cinnamon-kissed top teases your senses. The sweet smell of baked apples promises flavorful joy. Each bite reveals tender apples under a crumbly layer, with a buttery crunch. To make it even more special, imagine a silky vanilla sauce generously poured over, creating a rich, creamy magic. The sauce enhances the apple sweetness, creating a luxurious harmony. Each spoonful is like a warm hug of sweetness and nostalgia.

To serve your delightful apple crumble, scoop generous portions onto plates while it’s still warm. Pair it with a scoop of vanilla ice cream for an extra treat. The contrasting temperatures create a heavenly experience. If you prefer a simpler approach, a dollop of whipped cream or a drizzle of caramel sauce also works wonders. For a cozy touch, consider serving it with a hot cup of coffee or tea.

When it comes to storing apple crumble, keep it in an airtight container in the refrigerator. This helps preserve its freshness and flavor. Before refrigerating, let it cool to room temperature. To reheat, use the oven for a few minutes to regain its warmth and crispiness. Alternatively, you can microwave individual servings for a quick fix. Just remember, while it can be stored, apple crumble is at its best when enjoyed freshly baked.

Hi, I'm Kimberly!

Hi, I'm Kimberly.

A hopeless romantic when it comes to food. Every recipe I share is a love letter to food itself. I’m so glad you’re here. Make yourself at home and stay a while.

Love,
Kimberly

Kimberly the Zett Signature

If you want to get to know me better,
click here!


Apple Crumble
Apple Crumble

LET’S MAKE A PIECE OF HAPPINESS

Print
clock clock iconcutlery cutlery iconflag flag iconfolder folder iconinstagram instagram iconpinterest pinterest iconfacebook facebook iconprint print iconsquares squares iconheart heart iconheart solid heart solid icon
Apple Crumble

Apple Crumble


5 Stars 4 Stars 3 Stars 2 Stars 1 Star

No reviews

  • Author: Kimberly
  • Total Time: 60 min
  • Yield: 4 1x
  • Diet: Vegetarian

Description

GOOD TO HAVE ON HAND

  • 1 sharp knife
  • 1 medium bowl
  • 1 spoon
  • 1 baking dish 20 x 20 cm (8×8 inch)


Ingredients

Units Scale
FILLING
  • 3 apples (best use Granny Smith or Honeycrisp, but any other type will do)
  • 25 grams sugar
  • 1 tsp lemon juice
  • 1 tbsp corn starch
  • 1/4 tsp salt
  • 1/2 tsp cinnamon
  • 1 tsp vanilla extract
CRUMBLE
  • 100 grams all-purpose flour
  • 80 grams sugar
  • 1/2 tsp baking powder
  • 1/4 tsp salt
  • 1/4 tsp cinnamon
  • 85 grams butter

Instructions

PREPARATIONS

  • Preheat the oven to 190C° (375F°)
  • Peel 3 apples, remove the core, cut into bite-sized pieces and put the pieces in a bowl.
  • Melt 85g (4 tbsp) butter in a saucepan or in the microwave.

INSTRUCTIONS

  1. For the filling pour 1 tsp lemon juice over the chopped apples and mix. Then add sugar, cornstarch, salt, cinnamon and vanilla extract. Mix everything together.
  2. Place the apples in the baking dish and spread evenly.
  3. In the same bowl, mix the crumble. Add all-purpose flour, sugar, baking powder, salt, cinnamon and the melted butter. Mix everything together well to form a dough-like consistency. Place the bowl in the fridge for about 10 minutes.
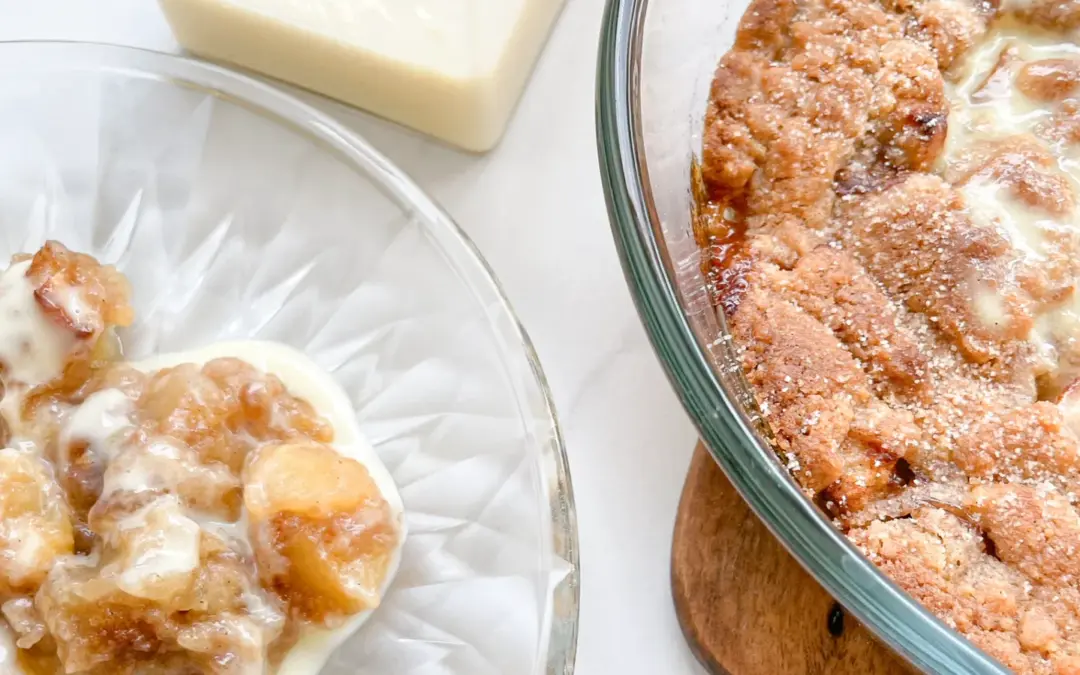
  4. Crumble the mixture over the apples and spread evenly.
  5. Place the baking dish in the oven and bake at 190C° (375F°) for 35 minutes.
  6. Now you can top it with your favorites: This tastes delicious with warm vanilla sauce or cold vanilla ice cream. You can also add almonds on top. Make the apple crumble the way you like it best.

Notes

The calorie information may vary depending on the product used, country and region.

  • Prep Time: 5 min
  • Passive Time: 45 min
  • Cook Time: 10 min
  • Category: Dessert
  • Method: Baking
  • Cuisine: ENGLISH

CRAVING MORE?

Follow along here & don’t forget to subscribe to my substack!

Garlic Oil

Garlic Oil

Garlic Oil

Garlic Oil

May 14, 2024 by Kimberly

Unleash the aromatic power of homemade Garlic Oil! Perfect for drizzling over dishes to add a burst of flavor. Simple, versatile, and absolutely irresistible.

This website uses affiliate links which may earn commission for purchases made at no additional cost to you.

TOTAL TIME

1 hour

SERVES

1 cup / 250 ml

DIET

vegan

EVERY RECIPE DESERVES

A Little Love Letter

Discover the magic of homemade Garlic Oil, an easy addition to your culinary arsenal that brings a robust flavor to any dish. It’s simple to make and wonderfully versatile.

Garlic Oil is a fantastic way to elevate your cooking. Drizzle it over pizza, stir into pasta, or use it as a flavorful dressing for salads. It adds a delicious garlic punch to bread, steaks, and even roasted vegetables, making it a must-have in your kitchen for an instant flavor upgrade.

Store your Garlic Oil in an oil bottle in the fridge. It keeps well for up to two to three weeks, ensuring you have this flavorful enhancer ready whenever needed.

Hi, I'm Kimberly!

Hi, I'm Kimberly.

A hopeless romantic when it comes to food. Every recipe I share is a love letter to food itself. I’m so glad you’re here. Make yourself at home and stay a while.

Love,
Kimberly

Kimberly the Zett Signature

If you want to get to know me better,
click here!


Garlic Oil
Garlic Oil
Garlic Oil
Garlic Oil

LET’S MAKE A PIECE OF HAPPINESS

Print
clock clock iconcutlery cutlery iconflag flag iconfolder folder iconinstagram instagram iconpinterest pinterest iconfacebook facebook iconprint print iconsquares squares iconheart heart iconheart solid heart solid icon
Garlic Oil

Garlic Oil


  • Author: Kimberly
  • Total Time: 2 hrs
  • Yield: 250 ml / 1 cup 1x

Description

RECOMMENDED EQUIPMENT

  • blender
  • medium-sized saucepan
  • whisk
  • a bowl which the medium saucepan fits into
  • 2 medium-sized bowls
  • 2 fine sieves
  • sealable container (oil bottle)
  • ice cubes
  • coffee filter

Ingredients

Units Scale
  • 3 garlic bulbs
  • 250 milliliters extra virgin olive oil

Instructions

  1. Peel all garlic cloves and put them into the blender. Pour in the oil. Blend on the highest setting until there are only tiny pieces of the garlic left.
  2. Pour the mixture from the blender into a medium-sized pot and heat it over medium heat to a temperature of about 108°-110°C (226°-230°F), and maintain this temperature for the next 15 minutes. Stir occasionally, making sure the temperature remains steady and nothing gets burned.
  3. Prepare a bowl large enough to fit a medium-sized pot, and fill it with cold water and a handful of ice cubes. Also, hang a fine sieve strainer over one medium-sized bowl and another fine sieve strainer, with a coffee filter inside it, over another medium-sized bowl.
  4. Now, place the pot in the ice water and stir to cool the oil quickly. Once the oil is almost cold, remove the pot from the water and let it sit for about 20 minutes so that the oil gets more infused.
  5. After the 20 minutes, pour the oil into the prepared fine sieve to catch the coarse particles.
  6. Then, pour the oil into the second sieve, which is equipped with a coffee filter, to catch the remaining finer particles.
  7. Allow the oil to drip through for about 1 hour or maybe more depending on how many remaining particles are in the coffee filter. Once all the oil has passed through the coffee filter, transfer the collected amount of oil into a sealable container or directly into an oil bottle. Store in the refrigerator for up to a few days.

Notes

The calorie information may vary depending on the product used, country and region.

  • Passive Time: 90 min
  • Cook Time: 25 min

CRAVING MORE?

Follow along here & don’t forget to subscribe to my substack!

White Chocolate Mousse

White Chocolate Mousse

White Chocolate Mousse

White Chocolate Mousse

May 8, 2024 by Kimberly

Indulge in a heavenly white chocolate mousse, the ultimate creamy delight! Luxurious, velvety, and decadently sweet – perfect for any dessert lover.

This website uses affiliate links which may earn commission for purchases made at no additional cost to you.

TOTAL TIME

2 hrs + 20 min

SERVES

4 portions

DIET

vegetarian

EVERY RECIPE DESERVES

A Little Love Letter

Experience the sheer decadence of this white chocolate mousse, a dessert that promises to elevate your dining experience. Its smooth, creamy texture and rich chocolate flavor make it a favorite among sweet tooth fans.

This white chocolate mousse is best served chilled, making it a refreshing end to any meal. Present it in elegant glasses topped with a sprinkle of chocolate flakes or fresh strawberries for a touch of sophistication. It’s ideal for dinner parties or a romantic evening, offering a light yet indulgent dessert option that’s sure to impress.

Store it in the refrigerator covered with plastic wrap. It will stay fresh for up to two days, ensuring you can enjoy its luxurious taste at its best.

Hi, I'm Kimberly!

Hi, I'm Kimberly.

A hopeless romantic when it comes to food. Every recipe I share is a love letter to food itself. I’m so glad you’re here. Make yourself at home and stay a while.

Love,
Kimberly

Kimberly the Zett Signature

If you want to get to know me better,
click here!


White Chocolate Mousse

LET’S MAKE A PIECE OF HAPPINESS

Print
clock clock iconcutlery cutlery iconflag flag iconfolder folder iconinstagram instagram iconpinterest pinterest iconfacebook facebook iconprint print iconsquares squares iconheart heart iconheart solid heart solid icon
White Chocolate Mousse

White Chocolate Mousse


  • Author: Kimberly
  • Total Time: 20 min + 2 hrs
  • Yield: 4 1x

Description

RECOMMENDED EQUIPMENT

  • 2 medium-sized bowls
  • whisk
  • electric mixer
  • small pot
  • small metal or glass bowl

Ingredients

Units Scale
  • 45 grams butter
  • 15g powdered sugar
  • 2 egg yolks
  • 100 grams white chocolate
  • 200 grams heavy whipping cream

Instructions

  1. Cream the butter and powdered sugar together in a medium-sized bowl with a whisk. Separate the eggs and add the yolks to the butter and sugar. Beat the mixture with an electric mixer until creamy and stiff, about 5 minutes. The egg whites won’t be used further, but to avoid waste, you could make a meringue with them.
  2. Melt the white chocolate in a double boiler, let it cool slightly, then stir it into the mixture.
  3. Whip the cold cream until it forms peaks and gently fold it into the mixture until everything is well combined.
  4. Divide the mixture into 4 dessert bowls and refrigerate for at least 2 hours.

Notes

The calorie information may vary depending on the product used, country and region.

  • Passive Time: 2 hrs
  • Cook Time: 20 min

CRAVING MORE?

Follow along here & don’t forget to subscribe to my substack!

Sun-Dried Tomato Oil

Sun-Dried Tomato Oil

Sun-Dried Tomatoes Oil

Sun-Dried Tomato Oil

May 7, 2024 by Kimberly

Unleash bold flavors with homemade sun-dried tomatoes oil, perfect for enhancing any dish! Vibrant, aromatic, and incredibly versatile—your kitchen’s new secret weapon!

This website uses affiliate links which may earn commission for purchases made at no additional cost to you.

TOTAL TIME

55 min


SERVES

1 cup / 250 ml

DIET

vegan

EVERY RECIPE DESERVES

A Little Love Letter

Elevate your culinary creations with sun-dried tomatoes oil, an exquisite infusion that brings a touch of Mediterranean flair to any dish. This special oil is a fantastic way to add depth and richness to your cooking.

Sun-dried tomatoes oil is exceptionally versatile. Drizzle it over salads for an instant flavor boost, mix into pasta for a luxurious touch, or brush it on grilled meats and vegetables. It also makes a fantastic dipping oil for bread at your next dinner party. Let this rich, flavorful oil transform your meals into gourmet creations!

Store your sun-dried tomatoes oil in an oil bottle in a cool, dark place. It can be kept for up to 2-3 weeks, ensuring you have this delicious condiment on hand to enhance your meals whenever needed.

Hi, I'm Kimberly!

Hi, I'm Kimberly.

A hopeless romantic when it comes to food. Every recipe I share is a love letter to food itself. I’m so glad you’re here. Make yourself at home and stay a while.

Love,
Kimberly

Kimberly the Zett Signature

If you want to get to know me better,
click here!


Sun-Dried Tomato Oil
Sun-Dried Tomatoes Oil

LET’S MAKE A PIECE OF HAPPINESS

Print
clock clock iconcutlery cutlery iconflag flag iconfolder folder iconinstagram instagram iconpinterest pinterest iconfacebook facebook iconprint print iconsquares squares iconheart heart iconheart solid heart solid icon
Sun-Dried Tomatoes Oil

Sun-Dried Tomatoes Oil


  • Author: Kimberly
  • Total Time: 55 min
  • Yield: 250 ml / 1 cup 1x

Description

RECOMMENDED EQUIPMENT

  • blender
  • medium-sized saucepan
  • whisk
  • a bowl which the medium saucepan fits into
  • 2 medium-sized bowls
  • 2 fine sieves
  • oil bottle
  • ice cubes
  • coffee filter

Ingredients

Units Scale
  • 85 grams sun-dried tomatoes
  • 250 milliliters extra virgin olive oil

Instructions

  1. Chop the tomatoes into coarse pieces, and put them into the blender. Pour in the oil. Blend on the highest setting until the mixture becomes dark orange/red and only tiny pieces of the dried tomatoes are visible.
  2. Pour the mixture from the blender into a medium-sized pot and heat it over medium heat to a temperature of about 102°-103°C (215°-217°F), and maintain this temperature for the next 10 minutes. Stir occasionally, making sure the temperature remains steady and nothing gets burned.
  3. Prepare a bowl large enough to fit a medium-sized pot, and fill it with cold water and a handful of ice cubes. Also, hang a fine sieve strainer over one medium-sized bowl and another fine sieve strainer, with a coffee filter inside it, over another medium-sized bowl.
  4. Now, place the pot in the ice water and stir to cool the oil quickly. Once the oil is almost cold, remove the pot from the water and let it sit for about 20 minutes so that the oil gets more infused.
  5. After the 20 minutes, pour the oil into the prepared fine sieve to catch the coarse particles.
  6. Then, pour the oil into the second sieve, which is equipped with a coffee filter, to catch the remaining finer particles.
  7. Allow the oil to drip through for about 1 hour or maybe more depending on how many remaining particles are in the coffee filter. Once all the oil has passed through the coffee filter, transfer the collected amount of oil into an oil bottle. Store in the refrigerator for up to 2-3 weeks.

Notes

The calorie information may vary depending on the product used, country and region.

  • Passive Time: 30 min
  • Cook Time: 25 min

CRAVING MORE?

Follow along here & don’t forget to subscribe to my substack!

Dried Chili Oil

Dried Chili Oil

Dried Chili Oil

Dried Chili Oil

April 30, 2024 by Kimberly

Discover the magic of homemade chili oil! Spicy, flavorful, and perfect for enhancing any dish with just the right kick of heat.

This website uses affiliate links which may earn commission for purchases made at no additional cost to you.

TOTAL TIME

55 min


SERVES

1 cup / 250 ml

DIET

vegan

EVERY RECIPE DESERVES

A Little Love Letter

Dive into the vibrant world of homemade chili oil! This easy-to-make condiment is a game-changer for any kitchen, adding a spicy flair that perfectly balances heat and flavor. It’s a must-try for spice lovers!

Drizzle this fiery chili oil over noodles, pizza, or dumplings to elevate your meals from ordinary to extraordinary. Its robust flavor also makes it a great partner for soups and stews, providing a warm, spicy undertone that delights the palate.

Keep your chili oil in an airtight container in a cool, dark place. It stays fresh for up to a month, ensuring you have a delicious kick of flavor ready anytime.

Hi, I'm Kimberly!

Hi, I'm Kimberly.

A hopeless romantic when it comes to food. Every recipe I share is a love letter to food itself. I’m so glad you’re here. Make yourself at home and stay a while.

Love,
Kimberly

Kimberly the Zett Signature

If you want to get to know me better,
click here!


Dried Chili Oil
Dried Chili Oil
Dried Chili Oil
Dried Chili Oil

LET’S MAKE A PIECE OF HAPPINESS

Print
clock clock iconcutlery cutlery iconflag flag iconfolder folder iconinstagram instagram iconpinterest pinterest iconfacebook facebook iconprint print iconsquares squares iconheart heart iconheart solid heart solid icon
Dried Chili Oil

Dried Chili Oil


  • Author: Kimberly
  • Total Time: 55 min
  • Yield: 250 ml / 1 cup 1x

Description

RECOMMENDED EQUIPMENT

  • blender
  • medium-sized saucepan
  • whisk
  • a bowl which the medium saucepan fits into
  • 2 medium-sized bowls
  • 2 fine sieves
  • sealable container (oil bottle)
  • ice cubes
  • coffee filter


Ingredients

Units Scale
  • 15 grams (0.5 oz) dried chili peppers
  • 250 milliliters neutral cooking oil

Instructions

  1. Prepare a bowl large enough to fit a medium-sized pot, and fill it with cold water and a handful of ice cubes. Also, hang a fine sieve strainer over one medium-sized bowl and another fine sieve strainer, with a coffee filter inside it, over another medium-sized bowl.
  2. Remove the stems from the chili pepper, chop the rest into coarse pieces, and put them into the blender. Pour in the oil. Blend on the highest setting until the mixture becomes bright orange/red and only tiny pieces of the chili peppers are visible.
  3. Pour the mixture from the blender into a medium-sized pot and heat it over medium heat to a temperature of about 102°-103°C (215°-217°F), and maintain this temperature for the next 10 minutes. Stir occasionally, making sure the temperature remains steady and nothing gets burned.
  4. Now, place the pot in the ice water and stir to cool the oil quickly. Once the oil is almost cold, remove the pot from the water and let it sit for about 30 minutes so that the oil gets more infused.
  5. After the 30 minutes, pour the oil into the prepared fine sieve to catch the coarse particles.
  6. Then, pour the oil into the second sieve, which is equipped with a coffee filter, to catch the remaining finer particles.
  7. Allow the oil to drip through for about 1 hour or maybe more depending on how many remaining particles are in the coffee filter. Once all the oil has passed through the coffee filter, transfer the collected amount of oil into a sealable container or directly into an oil bottle. Store in the refrigerator for up to one month.

Notes

The calorie information may vary depending on the product used, country and region.

  • Passive Time: 30 min
  • Cook Time: 25 min

CRAVING MORE?

Follow along here & don’t forget to subscribe to my substack!

Basil Oil

Basil Oil

Basil Oil

Basil Oil

April 16, 2024 by Kimberly

Experience the vibrant, fresh flavors of homemade basil oil! Perfect for drizzling over pasta or enhancing salads and many more dished with its aromatic touch.

This website uses affiliate links which may earn commission for purchases made at no additional cost to you.

TOTAL TIME

1 hr + 15 min

SERVES

250 ml / 1 cup

DIET

vegan

EVERY RECIPE DESERVES

A Little Love Letter

Discover the simplicity and elegance of homemade basil oil. This delightful infusion captures the essence of fresh basil, offering a quick way to add gourmet flair to your meals. Its vibrant color and fragrance enhance any dish effortlessly.

Drizzle basil oil over fresh pasta, salads, or toasted bread for an instant flavor boost. It’s also perfect as a finishing oil for pizzas and soups, adding a touch of sophistication. For a refreshing twist, mix it into your favorite vinaigrettes.

Keep your basil oil refrigerated in an airtight container. It stays fresh for up to a week, ensuring you can savor its herbal freshness in various dishes.

Hi, I'm Kimberly!

Hi, I'm Kimberly.

A hopeless romantic when it comes to food. Every recipe I share is a love letter to food itself. I’m so glad you’re here. Make yourself at home and stay a while.

Love,
Kimberly

Kimberly the Zett Signature

If you want to get to know me better,
click here!


Basil Oil
Basil Oil

LET’S MAKE A PIECE OF HAPPINESS

Print
clock clock iconcutlery cutlery iconflag flag iconfolder folder iconinstagram instagram iconpinterest pinterest iconfacebook facebook iconprint print iconsquares squares iconheart heart iconheart solid heart solid icon
Basil Oil

Basil Oil


  • Author: Kimberly
  • Total Time: 75 min
  • Yield: 1 cup / 250 ml 1x

Description

GOOD TO HAVE ON HAND

  • blender
  • medium-sized saucepan
  • whisk
  • a bowl into which the medium saucepan fits
  • 2 medium-sized bowls
  • fine sieve
  • sealable container
  • ice cubes
  • coffee filter


Ingredients

Units Scale
  • 75 grams fresh basil leaves
  • 250 milliliters neutral cooking oil

Instructions

  1. Separate the leaves from the stems and put the leaves into the blender. Pour in the oil. Blend on the highest setting until it becomes bright green and no pieces of basil are longer visible.
  2. Pour the mixture from the blender into a medium-sized pot and heat it over medium heat, constantly stirring, to a temperature of about 102°-103°C (215°-217°F). Then, let the oil simmer with the lid partially on for the next 10 minutes. Stir only occasionally, making sure the temperature remains steady. This cooking time is essential for all the water to evaporate, allowing the perishable solids to settle at the bottom and the dark green oil to float on top. You’ll know all the water has evaporated when the oil in the pot barely bubbles anymore – so if it’s still bubbling vigorously, keep it simmering.
  3. Meanwhile, prepare a bowl large enough to fit the medium-sized pot, filled with cold water and a handful of ice cubes. Also, hang a fine sieve strainer over a medium-sized bowl.
  4. Now, place the pot in the ice water and stir to stop the cooking process. Once the oil is no longer boiling and is almost cold, remove the pot from the water and pour the oil into the fine sieve to catch the coarse particles.
  5. Then, rinse the strainer and hang it over the second medium-sized bowl. Press a coffee filter into the strainer and pour the captured oil into the coffee filter, so that the remaining perishable and coarser particles are caught.
  6. Allow the oil to drip through for about 1 hour or maybe more depending on how many remaining particles are in there. Once all the oil has passed through the coffee filter, transfer the collected amount into a sealable container or directly into an oil bottle. Store in the refrigerator for up to one week.
  • Passive Time: 60 min
  • Cook Time: 15 min

CRAVING MORE?

Follow along here & don’t forget to subscribe to my substack!