Apple Crumble

Apple Crumble

Apple Crumble

Apple Crumble

December 3, 2023 by Kimberly

Apple crumble, a quick and delicious dessert for everyone. Sliced apples coated in cinnamon, topped with a quick crumble, and baked to perfection. A speedy treat satisfying every sweet tooth!

60 MINUTES

EASY

VEGETARIAN

ENGLISH

450 PER PORTION

COMFORT FOOD

CLASSIC

DESSERT

AUTUMN
WINTER

INTRODUCTION

ABOUT THE RECIPE

Once upon a kitchen, there was Apple Crumble…

Picture a cozy apple crumble, fresh and warm. Its golden-brown, cinnamon-kissed top teases your senses. The sweet smell of baked apples promises flavorful joy. Each bite reveals tender apples under a crumbly layer, with a buttery crunch. To make it even more special, imagine a silky vanilla sauce generously poured over, creating a rich, creamy magic. The sauce enhances the apple sweetness, creating a luxurious harmony. Each spoonful is like a warm hug of sweetness and nostalgia.

How to serve
To serve your delightful apple crumble, scoop generous portions onto plates while it’s still warm. Pair it with a scoop of vanilla ice cream for an extra treat. The contrasting temperatures create a heavenly experience. If you prefer a simpler approach, a dollop of whipped cream or a drizzle of caramel sauce also works wonders. For a cozy touch, consider serving it with a hot cup of coffee or tea.

How to store
When it comes to storing apple crumble, keep it in an airtight container in the refrigerator. This helps preserve its freshness and flavor. Before refrigerating, let it cool to room temperature. To reheat, use the oven for a few minutes to regain its warmth and crispiness. Alternatively, you can microwave individual servings for a quick fix. Just remember, while it can be stored, apple crumble is at its best when enjoyed freshly baked.

Hi, I'm Kimberly!

Hi, I'm Kimberly.

A passionate food lover who believes in the magic of homemade deliciousness that spreads love and warmth. Join me on this culinary adventure as I prepare wonderful dishes and let’s spread some happiness together!

Kimberly the Zett Signature

If you want to get to know me better, click here!


Apple Crumble
Apple Crumble
Apple Crumble

„Let’s make a piece of happiness“

Print
clock clock iconcutlery cutlery iconflag flag iconfolder folder iconinstagram instagram iconpinterest pinterest iconfacebook facebook iconprint print iconsquares squares iconheart heart iconheart solid heart solid icon
Apple Crumble

Apple Crumble


5 Stars 4 Stars 3 Stars 2 Stars 1 Star

No reviews

  • Author: Kimberly
  • Total Time: 60 min
  • Yield: 4 1x
  • Diet: Vegetarian

Description

RECOMMENDED EQUIPMENT
  • 1 sharp knife
  • 1 medium bowl
  • 1 spoon
  • 1 baking dish 20 x 20 cm (8×8 inch)

Ingredients

Units Scale

FILLING

  • 3 apples (best use Granny Smith or Honeycrisp, but any other type will do)
  • 25 grams sugar
  • 1 tsp lemon juice
  • 1 tbsp corn starch
  • 1/4 tsp salt
  • 1/2 tsp cinnamon
  • 1 tsp vanilla extract

CRUMBLE

  • 100 grams all-purpose flour
  • 80 grams sugar
  • 1/2 tsp baking powder
  • 1/4 tsp salt
  • 1/4 tsp cinnamon
  • 85 grams butter

Instructions

PREPARATIONS

  • Preheat the oven to 190C° (375F°)
  • Peel 3 apples, remove the core, cut into bite-sized pieces and put the pieces in a bowl.
  • Melt 85g (4 tbsp) butter in a saucepan or in the microwave.

INSTRUCTIONS

  1. For the filling pour 1 tsp lemon juice over the chopped apples and mix. Then add sugar, cornstarch, salt, cinnamon and vanilla extract. Mix everything together.
  2. Place the apples in the baking dish and spread evenly.
  3. In the same bowl, mix the crumble. Add all-purpose flour, sugar, baking powder, salt, cinnamon and the melted butter. Mix everything together well to form a dough-like consistency. Place the bowl in the fridge for about 10 minutes.
  4. Crumble the mixture over the apples and spread evenly.
  5. Place the baking dish in the oven and bake at 190C° (375F°) for 35 minutes.
  6. Now you can top it with your favorites: This tastes delicious with warm vanilla sauce or cold vanilla ice cream. You can also add almonds on top. Make the apple crumble the way you like it best.

Notes

The calorie information may vary depending on the product used, country and region.

  • Prep Time: 5 min
  • Passive Time: 45 min
  • Cook Time: 10 min
  • Category: DESSERT
  • Method: BAKING
  • Cuisine: ENGLISH

Shortbread Bars With Cherry Jam

Shortbread Bars With Cherry Jam

Shortbread Bars with Cherry Jam

Shortbread Bars with Cherry Jam

December 4, 2023 by Kimberly

Delight in buttery shortbread bars, a symphony of crumbly texture, harmonized with luscious jam. Each bite unveils a perfect blend of sweetness and simplicity, a timeless treat for indulgence.

40 MINUTES

EASY

VEGETARIAN

ENGLISH

158 PER BAR

BUTTERY

EVERYDAY / TEA TIME

DESSERT

ALL YEAR

INTRODUCTION

ABOUT THE RECIPE

Indulge in the sublime fusion of buttery shortbread and vibrant cherry jam with this irresistible Shortbread Bars With Cherry Jam. The crumbly, melt-in-your-mouth texture of the shortbread complements the sweet-tart burst of cherry jam, creating a symphony of flavors that’s both nostalgic and delectable.

How to serve:
To serve, cut into perfectly portioned bars and arrange them on a charming dessert platter. These bars make a delightful addition to afternoon tea or a sweet ending to any gathering.

How to store:
For optimal freshness, store the Shortbread Bars in an airtight container at room temperature for up to three days. To extend their shelf life, refrigerate for a longer-lasting treat.

Hi, I'm Kimberly!

Hi, I'm Kimberly.

A passionate food lover who believes in the magic of homemade deliciousness that spreads love and warmth. Join me on this culinary adventure as I prepare wonderful dishes and let’s spread some happiness together!

Kimberly the Zett Signature

If you want to get to know me better, click here!


Shortbread Bars with Cherry Jam

„Let’s make a piece of happiness“

INGREDIENTS

For 24 BARS

BARS

  • 250g butter (9 oz.)
  • 100g sugar (3.5 oz.)
  • 350g sugar (3 cups)
  • 1/4 tsp salt
  • 150g cherry jam (5 oz.)
Shortbread Bars with Cherry Jam
}

ACTIVE: 2 min

PASSIVE: 0 min

PREPARATIONS

Recommended Equipment
  • Mixing bowl
  • Hand mixer (or stand mixer)
  • Cling film
  • Cheese grater
  • Baking tin 20×20 cm (8×8 inch)
  • Line a baking tin with baking paper.
}

ACTIVE: 20 min

PASSIVE: 18 min

COOKING

1. Place the soft (not liquid) butter, sugar and salt in a mixing bowl. Mix with a hand mixer or stand mixer for approx. 3 minutes until creamy. Add the flour and mix until the butter is coated in flour. Then knead with your hands until smooth.

2. Wrap the dough in a layer of cling film and shape into a square. Place the dough in the freezer for approx. 1 hour.

3. Preheat the oven to 180°C (350°F). Now grate half the dough into flakes using a cheese grater. Put the other half back in the freezer.

4. Spread the flakes evenly in a baking dish. Use very little pressure to spread the flakes in the tin – DO NOT press them down. Now spread the cherry jam evenly over the flakes.

5. Now take the second half of the dough out of the freezer and grate it into flakes using the cheese grater and spread it evenly over the jam. Again, only spread the flakes with very light fingers and do not press down.

6. Bake for approx. 15 to 20 minutes at 180°C (350°F) or until the shortbread is light golden but not brown. It is best to take them out of the oven when they are lightly golden, as they will bake a little longer anyway. Leave the shortbreads to cool and cut into strips.

NOTE: The calorie information may vary depending on the product used, country and region.

Cumberland Sauce

Cumberland Sauce

Cranberry Cumberland Sauce

Cranberry Cumberland Sauce

November 21, 2023 by Kimberly

Tangy, fruity, and a little zesty – this sauce brings festive vibes to your table. Perfect for cozy dinners or holiday feasts, it’s like a warm hug for your taste buds.

30 MINUTES

EASY

VEGAN

ENGLISH

149 PER PORTION

ZESTY
TANGY

CHRISTMAS

SAUCE

WINTER

INTRODUCTION

ABOUT THE RECIPE

You know that feeling when a dish just makes the meal? This fruity, tangy, and slightly spiced sauce does exactly that. Whether you’re hosting a big holiday gathering, elevating a simple roast dinner, or looking for the perfect pairing for your appetizers, this recipe is your go-to for adding a pop of flavor and elegance to any plate. It’s absolutely divine with my Fingerfood Beef Wellington, bringing out those rich, savory notes, and pairs beautifully with my Cranberry Orange Glazed Pork Roast for a show-stopping main course. It’s classic, cozy, and totally irresistible, making every bite feel festive and full of love. Bonus? It’s ridiculously easy to whip up.

How to serve
Pair this zesty goodness with roasted meats like turkey, pork, or ham for a perfect balance of sweet and savory. It’s also a surprising win drizzled over creamy brie or slathered on a crusty sandwich. Looking for a quick appetizer? Serve it with crackers, a wedge of sharp cheese, and nuts for a crowd-pleasing snack board. It’s versatile enough to go beyond holiday feasts – any time you want a hit of bold, fruity flavor, this sauce has you covered.

How to store
Keep it fresh by storing it in an airtight container in the fridge for up to 3 days. You can also freeze it for up to three months – just thaw in the fridge overnight when needed.

Hi, I'm Kimberly!

Hi, I'm Kimberly.

A passionate food lover who believes in the magic of homemade deliciousness that spreads love and warmth. Join me on this culinary adventure as I prepare wonderful dishes and let’s spread some happiness together!

Kimberly the Zett Signature

If you want to get to know me better, click here!


Cumberland Sauce
Cumberland Sauce
Cumberland Sauce

„Let’s make a piece of happiness“

Print
clock clock iconcutlery cutlery iconflag flag iconfolder folder iconinstagram instagram iconpinterest pinterest iconfacebook facebook iconprint print iconsquares squares iconheart heart iconheart solid heart solid icon
Cranberry Cumberland Sauce

Cranberry Cumberland Sauce


  • Author: Kimberly
  • Total Time: 30 min
  • Yield: 6 1x

Description

RECOMMENDED EQUIPMENT
  • sharp knife
  • chopping board
  • peeler
  • grater
  • small pot
  • measuring cup
  • juicer (or by hand)

Ingredients

Units Scale
  • 1 lemon
  • 1 orange
  • 200 milliliter port wine
  • 1 shallot
  • 3/4 tsp fresh ginger, grated
  • 1 tsp dijon mustard
  • 100 grams fresh cranberries
  • 200 grams redcurrant jelly
  • salt & finely grated black pepper

Instructions

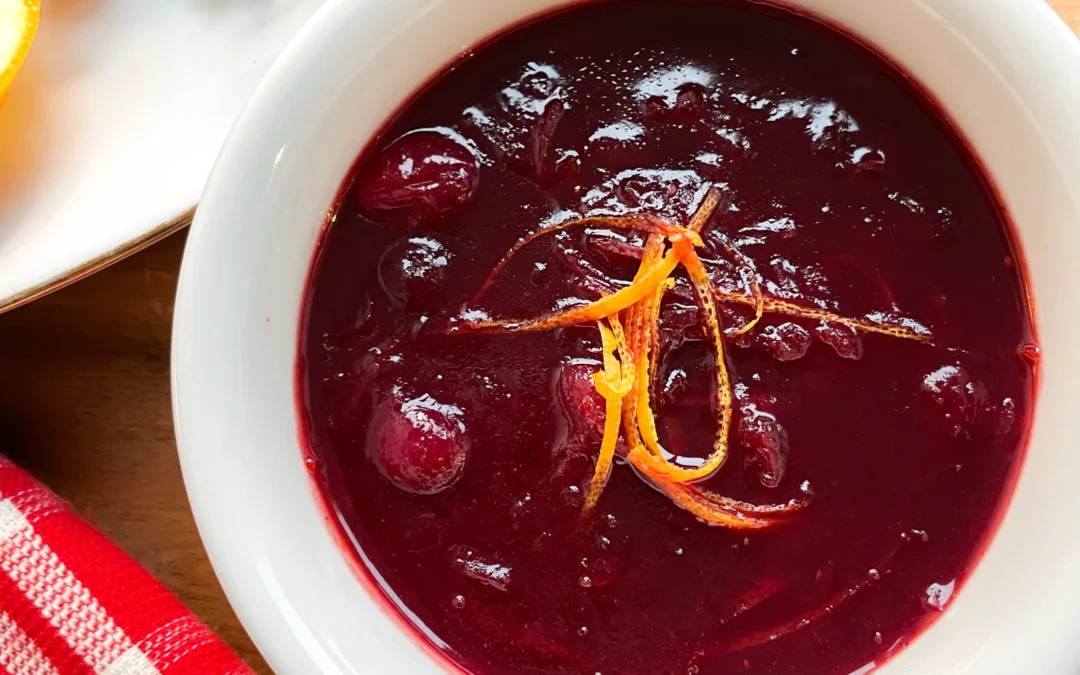
  1. Thoroughly wash and dry the lemon and orange. Peel 3–4 strips from each using a peeler, then slice the peels into fine julienne strips. Juice the orange, aiming for about 100 ml (3 fl. oz.) of juice.
  2. In a small saucepan, bring water to a boil and simmer the julienne strips for 5 minutes to soften and reduce their bitterness. Drain and set aside.
  3. Finely dice the shallot and grate the ginger directly into the saucepan. Add the port wine, orange juice, mustard, and cranberries. Bring everything to a boil over medium heat. Once boiling, lower the heat and simmer for about 15 minutes, until the cranberries soften and the liquid reduces.
  4. Next, stir in the redcurrant jelly and continue simmering for another 6–7 minutes, or until the sauce thickens. Season with salt and finely ground pepper to taste.
  5. Finally, fold the julienne strips into the sauce and let it cool. The sauce will thicken further as it cools and can be reheated anytime for serving.
  • Passive Time: 20 min
  • Cook Time: 10 min

Finger Food Beef Wellington

Finger Food Beef Wellington

Finger Food Beef Wellington

Finger Food Beef Wellington

November 21, 2023 by Kimberly

Enjoy the fancy version of Beef Wellington in bite-sized form. Enjoy tender beef wrapped in buttery batter and create a delicious and premium snack. Perfect for adding a touch of class to any gathering or occasion, a simple yet sophisticated treat that everyone will enjoy.

45 MINUTES

INTERMEDIATE

OMNIVORE

ENGLISH

93 PER PIECE

FANCY

DINNER PARTY
CHRISTMAS

APPETIZER

AUTUM/ WINTER

INTRODUCTION

ABOUT THE RECIPE

Take your event to the next level with these mini beef wellingtons, as a symphony of flavors unfolds with every bite, seamlessly blending mushrooms, Parma ham and a touch of Dijon mustard. This exquisite combination offers a sophisticated taste sensation in each delicious, finger-friendly parcel – perfect for adding a touch of gourmet flair to your party or event.

How to serve:

Present these delicious Beef Wellington finger foods at your Christmas party or on Christmas Eve, for example. These beef bites can be enjoyed on their own or with my spicy Cumberland sauce for an extra festive kick. With their delicious flavors, these canapés will enhance your Christmas party and are an irresistible and perfect addition to your festive table.

How to store:

To ensure optimum freshness, keep Beef Wellington wrapped in plastic wrap, beeswax cloths, aluminum foil or an airtight container in the refrigerator for up to two days. If you plan to store them for longer, freeze them in an airtight container, making sure to separate the layers with parchment paper. When you’re ready to enjoy the Wellingtons, reheat them in the oven to keep the batter crispy. Defrost frozen Wellingtons in the fridge before reheating to ensure they retain their delicious texture.

Hi, I'm Kimberly!

Hi, I'm Kimberly.

A passionate food lover who believes in the magic of homemade deliciousness that spreads love and warmth. Join me on this culinary adventure as I prepare wonderful dishes and let’s spread some happiness together!

Kimberly the Zett Signature

If you want to get to know me better, click here!


Finger Food Beef Wellington

„Let’s make a piece of happiness“

INGREDIENTS

FOR 16 PIECES

Mushroom Filling

  • 1 shallot 
  • 1 tbsp butter
  • 180g mushrooms (1.5 cups) 
  • 1 tsp dried thyme
  • 1 tbsp fresh parsley
  • 3 tbsp port wine (or any other red wine) 
  • salt
  • pepper

individual ingredients

  • 1 store-bought puff pastry
  • 200g beef fillet (7 oz.) 
  • 100g prosciutto di parma (3.5 oz.) 
  • 1 tbsp butter
  • 1 tsp dijon mustard
  • 1 egg
  • salt
  • pepper
Finger Food Beef Wellington
}

ACTIVE: 10 min

PASSIVE: 0 min

PREPARATIONS

Recommended Equipment
  • sharp knife
  • chopping board
  • food processor if necessary
  • small bowl
  • small pan
  • kitchen basting brush
  • Cut the mushrooms into very small pieces with a knife or chop briefly in a food processor.
  • Cut the shallot into very small pieces or chop briefly in a food processor.
  • Finely chop the parsley.
  • Cut the puff pastry into 16 equal pieces.
  • Cut or tear the Prosciutto di Parma into 16 equal pieces.
  • Crack an egg into a bowl and whisk it together.
}

ACTIVE: 25 min

PASSIVE: 10 min

COOKING

1. Fry the mushrooms in a pan without adding any fat so that the water can evaporate and the mushrooms do not become mushy and brown. Once the mushrooms are lightly browned, add a tablespoon of butter to the pan.

2. Secondly fry the finely chopped shallot in the pan with the mushrooms and melted butter until soft. When the onions are soft, deglaze everything with 3 tablespoons red wine and reduce for approx. 5-8 minutes. There should be no liquid left on the bottom, but everything should be absorbed into the mushrooms. Next, add the chopped fresh parsley, dried thyme and salt & pepper to taste to the pan. Set the mushroom mixture aside.

3. Now sear the fillet of beef very briefly on all sides in a pan with 1 tbsp butter. Remove the meat from the pan and cut into 16 equal pieces. Set aside.

4. First place the Prosciutto di Parma on the individual pieces of puff pastry so that the edges of the pastry are still visible around the ham. Next, place approx. 1/2 tsp of the mushroom mixture on each piece of ham. Then place a piece of beef fillet on top of the mushroom mixture. Brush the fillet of beef with a little mustard. Now roll up the pieces and seal the ends.

5. Preheat the oven to 200°C (390°F) and place the Beef Wellington finger food in the fridge until then.

6. When the oven is preheated take the Beef Wellington Finger Food pieces out of the fridge and place on a baking tray lined with baking paper. Make diagonal incisions in all the pieces and brush with the beaten egg.

7. Finally bake in the oven at 200°C (390°F) for about 10 minutes or until lightly browned on the outside. If the pieces of meat are very thin, it cannot be guaranteed that the meat will be cooked medium. But even if the meat is not medium, it will be very tender and fall apart in the mouth. My Cumberland sauce goes wonderfully with this.

NOTE: The calorie information may vary depending on the product used, country and region.