Shortbread Bars With Cherry Jam

Shortbread Bars With Cherry Jam

Shortbread Bars with Cherry Jam

Shortbread Bars with Cherry Jam

December 18, 2023 by Kimberly

Delight in buttery shortbread bars, a symphony of crumbly texture, harmonized with luscious jam. Each bite unveils a perfect blend of sweetness and simplicity, a timeless treat for indulgence.

This website uses affiliate links which may earn commission for purchases made at no additional cost to you.

TOTAL TIME

40 min

SERVES

24 bars

DIET

vegetarian

EVERY RECIPE DESERVES

A Little Love Letter

Indulge in the sublime fusion of buttery shortbread and vibrant cherry jam with this irresistible Shortbread Bars With Cherry Jam. The crumbly, melt-in-your-mouth texture of the shortbread complements the sweet-tart burst of cherry jam, creating a symphony of flavors that’s both nostalgic and delectable.

To serve, cut into perfectly portioned bars and arrange them on a charming dessert platter. These bars make a delightful addition to afternoon tea or a sweet ending to any gathering.

For optimal freshness, store the Shortbread Bars in an airtight container at room temperature for up to three days. To extend their shelf life, refrigerate for a longer-lasting treat.

Hi, I'm Kimberly!

Hi, I'm Kimberly.

A hopeless romantic when it comes to food. Every recipe I share is a love letter to food itself. I’m so glad you’re here. Make yourself at home and stay a while.

Love,
Kimberly

Kimberly the Zett Signature

If you want to get to know me better,
click here!


Shortbread Bars with Cherry Jam

LET’S MAKE A PIECE OF HAPPINESS

Print
clock clock iconcutlery cutlery iconflag flag iconfolder folder iconinstagram instagram iconpinterest pinterest iconfacebook facebook iconprint print iconsquares squares iconheart heart iconheart solid heart solid icon
Shortbread Bars with Cherry Jam

Shortbread Bars With Cherry Jam


5 Stars 4 Stars 3 Stars 2 Stars 1 Star

No reviews

  • Author: Kimberly
  • Total Time: 40 min
  • Yield: 24 bars

Description

RECOMMENDED EQUIPMENT

  • Mixing bowl
  • Hand mixer (or stand mixer)
  • Cling film
  • Cheese grater
  • Baking tin 20×20 cm (8×8 inch)

Ingredients

Units Scale
  • 250 grams butter
  • 100 grams sugar
  • 350 grams sugar
  • 1/4 tsp salt
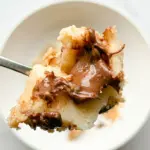
  • 150 grams cherry jam

Instructions

  1. Line a baking tin with baking paper.
  2. Place the soft (not liquid) butter, sugar and salt in a mixing bowl. Mix with a hand mixer or stand mixer for approx. 3 minutes until creamy. Add the flour and mix until the butter is coated in flour. Then knead with your hands until smooth.
  3. Wrap the dough in a layer of cling film and shape into a square. Place the dough in the freezer for approx. 1 hour.
  4. Preheat the oven to 180°C (350°F). Now grate half the dough into flakes using a cheese grater. Put the other half back in the freezer.
  5. Spread the flakes evenly in a baking dish. Use very little pressure to spread the flakes in the tin. DO NOT press them down. Now spread the cherry jam evenly over the flakes.
  6. Now take the second half of the dough out of the freezer and grate it into flakes using the cheese grater and spread it evenly over the jam. Again, only spread the flakes with very light fingers and do not press down.
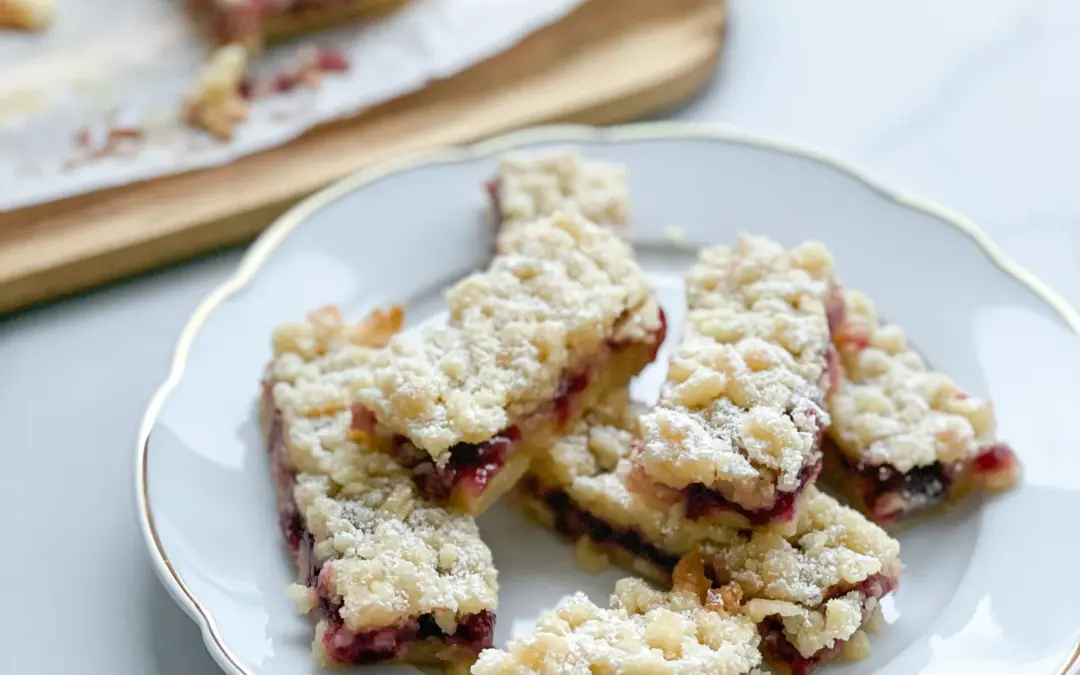
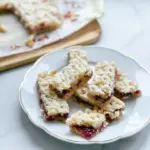
  7. Bake for approx. 15 to 20 minutes at 180°C (350°F) or until the shortbread is light golden but not brown. It is best to take them out of the oven when they are lightly golden, as they will bake a little longer anyway. Leave the shortbreads to cool and cut into strips.
  • Passive Time: 20 min
  • Cook Time: 20 min

CRAVING MORE?

Follow along here & don’t forget to subscribe to my substack!

Steamed Buns Filled With Melted Nougat

Steamed Buns Filled With Melted Nougat

Steamed Buns Filled With Melted Nougat

Steamed Buns Filled With Melted Nougat

December 16, 2023 by Kimberly

Picture this: fluffy steamed buns hugging a luscious center of melted nougat. A sweet symphony in every bite. Simply delicious and impossible to resist!

This website uses affiliate links which may earn commission for purchases made at no additional cost to you.

TOTAL TIME

2 hrs + 5 min

SERVES

4 buns

DIET

vegetarian

EVERY RECIPE DESERVES

A Little Love Letter

Indulge in a symphony of flavors with this delightful creation – Steamed Buns filled with Melted Nougat. This fusion of soft, pillowy buns and gooey nougat is a treat for the senses.

Steam the buns until warm, revealing a divine fusion of softness and gooey nougat. Elevate the indulgence by serving with warm vanilla sauce, roasted breadcrumbs, and hazelnuts. Each bite is a symphony of textures and flavors, creating a dessert sensation that will leave you craving more.

To keep the magic alive for later indulgence, store any leftovers in an airtight container in the refrigerator. The buns will stay fresh for up to three days. When ready to enjoy again, simply reheat them by steaming for a few minutes until they regain their warm, fluffy perfection.

Hi, I'm Kimberly!

Hi, I'm Kimberly.

A hopeless romantic when it comes to food. Every recipe I share is a love letter to food itself. I’m so glad you’re here. Make yourself at home and stay a while.

Love,
Kimberly

Kimberly the Zett Signature

If you want to get to know me better,
click here!


Steamed Buns Filled With Melted Nougat

LET’S MAKE A PIECE OF HAPPINESS

Print
.tasty-recipe-responsive-iframe-container-20fac647 { position: relative; overflow: hidden; padding-top: 177.62%; } .tasty-recipe-responsive-iframe-container-20fac647 iframe { position: absolute; top: 0; left: 0; width: 100%; height: 100%; border: 0; } clock clock iconcutlery cutlery iconflag flag iconfolder folder iconinstagram instagram iconpinterest pinterest iconfacebook facebook iconprint print iconsquares squares iconheart heart iconheart solid heart solid icon
Steamed Buns Filled With Melted Nougat

Steamed Buns Filled With Melted Nougat


  • Author: Kimberly
  • Total Time: 2 hrs

Description

RECOMMENDED EQUIPMENT

  • Kitchen paper (or a fine towel)
  • sharp knife
  • chopping board
  • hand mixer (or whisk)
  • cling film
  • medium-sized saucepan
  • small saucepan
  • small pan

Ingredients

Units Scale
BUNS
  • 200 grams quark
  • 100 grams all-purpose flour
  • 1 egg
  • 25 grams butter
  • pinch of salt
  • pinch of lemon zest
  • 120 grams nougat
TOPPINGS
  • 35 grams breadcrumbs
  • 35 grams ground hazelnuts
  • 1 tsp sugar
  • 1.5 tbsp butter
  • 200 milliliters vanilla sauce

Instructions

  1. Squeeze the quark between kitchen paper so that it loses any liquid. Cut the nougat into 4 equal pieces. If you are using whole hazelnuts, finely grind them. If you are using hazelnuts that have already been ground, you can skip this step.
  2. For the buns, beat butter with a pinch of salt (approx. 3 minutes) and then add the egg and mix. Now add flour and the quark. Knead everything into a smooth dough. Wrap the dough in cling film and place in the fridge for at least 90 minutes.
  3. After 90 minutes, bring a medium-sized pot of water to the boil. Meanwhile, transfer the dough from the fridge to a floured work surface and roll out. Divide into 4 equal pieces. Place a piece of nougat in the middle of each piece of dough, wrap evenly with dough and shape into a ball.
  4. As soon as the water boils, reduce the heat and place the nougat balls in the boiling water. Cook the nougat balls for around 10 minutes. Meanwhile, heat the vanilla sauce in a small pan.
  • Passive Time: 90 min
  • Cook Time: 30 min

CRAVING MORE?

Follow along here & don’t forget to subscribe to my substack!

Pasta alla Genovese Napoletana

Pasta alla Genovese Napoletana

Pasta alla Genovese Napoletana

Pasta alla Genovese Napoletana

December 14, 2023 by Kimberly

Indulge in Pasta alla Genovese – a symphony of caramelized onions, sweet tomatoes, and savory richness. A comforting, flavorful masterpiece that elevates your pasta experience to new heights.

This website uses affiliate links which may earn commission for purchases made at no additional cost to you.

TOTAL TIME

6 hrs + 35 min

SERVES

6 portions

DIET

omnivore

EVERY RECIPE DESERVES

A Little Love Letter

Pasta alla Genovese, a classic Italian delight, invites you on a culinary journey. This dish captures the essence of simplicity and bold flavors, combining caramelized onions, sweet tomatoes, and savory richness to create a truly unforgettable pasta experience.

Serve this culinary masterpiece on a warm plate. Garnish with freshly grated Parmesan cheese and a sprinkle of chopped fresh parsley for an added burst of freshness. Pair it with a glass of your favorite Italian red wine to elevate the dining experience. Whether shared with loved ones or enjoyed in solitary indulgence, Pasta alla Genovese promises a symphony of flavors that linger long after the last bite.

To preserve the exquisite flavors of Pasta alla Genovese, store any leftovers in an airtight container in the refrigerator for up to three days. For longer storage, consider freezing individual portions in freezer-safe containers.

Hi, I'm Kimberly!

Hi, I'm Kimberly.

A hopeless romantic when it comes to food. Every recipe I share is a love letter to food itself. I’m so glad you’re here. Make yourself at home and stay a while.

Love,
Kimberly

Kimberly the Zett Signature

If you want to get to know me better,
click here!


Pasta alla Genovese Napoletana

LET’S MAKE A PIECE OF HAPPINESS

Print
.tasty-recipe-responsive-iframe-container-4f63f610 { position: relative; overflow: hidden; padding-top: 177.62%; } .tasty-recipe-responsive-iframe-container-4f63f610 iframe { position: absolute; top: 0; left: 0; width: 100%; height: 100%; border: 0; } clock clock iconcutlery cutlery iconflag flag iconfolder folder iconinstagram instagram iconpinterest pinterest iconfacebook facebook iconprint print iconsquares squares iconheart heart iconheart solid heart solid icon
Pasta alla Genovese Napoletana

Pasta alla Genovese Napoletana


  • Author: Kimberly
  • Total Time: 6 hrs + 35 min
  • Yield: 6

Description

RECOMMENDED EQUIPMENT

  • sharp knife
  • chopping board
  • peeler
  • Dutch oven (or a large pot)
  • large pot for the pasta

Ingredients

Units Scale
  • 500 grams rigatoni
  • 100 grams parmesan
  • parsley for topping
SAUCE
  • 125 grams butter
  • 1,5 kilograms onions
  • 150 grams pancetta
  • 400 grams carrots
  • 1,5 kilograms beef shoulder
  • 250 milliliters white wine
  • 400 grams tinned tomatoes
  • 2 tbsp tomato paste
  • 1 tsp butter
  • 1 tsp salt
  • 1 tsp pepper
  • 3 bay leaves
 

Instructions

  1. Cut the pancetta into strips. The onions into thin half moons and the carrots into cubes.
  2. Warm the pancetta in a cold Dutch oven at medium temperature. Fry until crispy. Leave the fat in the Dutch Oven, remove the bacon and set aside.
  3. Add 1 tsp butter and approximately the amount of one sliced onion and all the carrot pieces to the pancetta fat and fry for 5 minutes over a medium heat.
  4. Move the vegetables to the edge of the pan and place the beef chuck in the middle. Sear on all sides and then deglaze with white wine. Bring the white wine to the boil.
  5. Then add a tin of chopped or peeled tomatoes, the pancetta, tomato paste and the bay leaves. Stir through once. Now add the rest of the onions. Season everything once with salt and pepper and leave to simmer on a low heat for 6 hours.
  6. After the 6 hours, the meat can be easily shredded with two forks if it is not already falling apart on its own.
  7. Bring water for the pasta to the boil in a large pan and cook the pasta al dente according to the instructions on the packet.
  8. Put the finished pasta on a plate, spread the meat sauce over it and serve with parmesan, plenty of parsley and fresh pepper.
  • Passive Time: 6 hrs
  • Cook Time: 35 min

CRAVING MORE?

Follow along here & don’t forget to subscribe to my substack!

Cranberry Cumberland Sauce

Cranberry Cumberland Sauce

Cranberry Cumberland Sauce

Cranberry Cumberland Sauce

December 5, 2023 by Kimberly

Tangy, fruity, and a little zesty – this sauce brings festive vibes to your table. Perfect for cozy dinners or holiday feasts, it’s like a warm hug for your taste buds.

This website uses affiliate links which may earn commission for purchases made at no additional cost to you.

TOTAL TIME

30 min

SERVES

6 portions

DIET

vegan

EVERY RECIPE DESERVES

A Little Love Letter

You know that feeling when a dish just makes the meal? This fruity, tangy, and slightly spiced sauce does exactly that. Whether you’re hosting a big holiday gathering, elevating a simple roast dinner, or looking for the perfect pairing for your appetizers, this recipe is your go-to for adding a pop of flavor and elegance to any plate. It’s absolutely divine with my Fingerfood Beef Wellington, bringing out those rich, savory notes, and pairs beautifully with my Cranberry Orange Glazed Pork Roast for a show-stopping main course. It’s classic, cozy, and totally irresistible, making every bite feel festive and full of love. Bonus? It’s ridiculously easy to whip up.

Pair this zesty goodness with roasted meats like turkey, pork, or ham for a perfect balance of sweet and savory. It’s also a surprising win drizzled over creamy brie or slathered on a crusty sandwich. Looking for a quick appetizer? Serve it with crackers, a wedge of sharp cheese, and nuts for a crowd-pleasing snack board. It’s versatile enough to go beyond holiday feasts – any time you want a hit of bold, fruity flavor, this sauce has you covered.

Keep it fresh by storing it in an airtight container in the fridge for up to 3 days. You can also freeze it for up to three months – just thaw in the fridge overnight when needed.

Hi, I'm Kimberly!

Hi, I'm Kimberly.

A hopeless romantic when it comes to food. Every recipe I share is a love letter to food itself. I’m so glad you’re here. Make yourself at home and stay a while.

Love,
Kimberly

Kimberly the Zett Signature

If you want to get to know me better,
click here!


Cranberry Cumberland Sauce

LET’S MAKE A PIECE OF HAPPINESS

Print
clock clock iconcutlery cutlery iconflag flag iconfolder folder iconinstagram instagram iconpinterest pinterest iconfacebook facebook iconprint print iconsquares squares iconheart heart iconheart solid heart solid icon
Cranberry Cumberland Sauce

Cranberry Cumberland Sauce


  • Author: Kimberly
  • Total Time: 30 min
  • Yield: 6

Description

RECOMMENDED EQUIPMENT
  • sharp knife
  • chopping board
  • peeler
  • grater
  • small pot
  • measuring cup
  • juicer (or by hand)

Ingredients

Units Scale
  • 1 lemon
  • 1 orange
  • 200 milliliter port wine
  • 1 shallot
  • 3/4 tsp fresh ginger, grated
  • 1 tsp dijon mustard
  • 100 grams fresh cranberries
  • 200 grams redcurrant jelly
  • salt & finely grated black pepper

Instructions

  1. Thoroughly wash and dry the lemon and orange. Peel 3–4 strips from each using a peeler, then slice the peels into fine julienne strips. Juice the orange, aiming for about 100 ml (3 fl. oz.) of juice.
  2. In a small saucepan, bring water to a boil and simmer the julienne strips for 5 minutes to soften and reduce their bitterness. Drain and set aside.
  3. Finely dice the shallot and grate the ginger directly into the saucepan. Add the port wine, orange juice, mustard, and cranberries. Bring everything to a boil over medium heat. Once boiling, lower the heat and simmer for about 15 minutes, until the cranberries soften and the liquid reduces.
  4. Next, stir in the redcurrant jelly and continue simmering for another 6–7 minutes, or until the sauce thickens. Season with salt and finely ground pepper to taste.
  5. Finally, fold the julienne strips into the sauce and let it cool. The sauce will thicken further as it cools and can be reheated anytime for serving.
  • Passive Time: 20 min
  • Cook Time: 10 min

CRAVING MORE?

Follow along here & don’t forget to subscribe to my substack!

Apple Cucumber Brie Turkey Sandwich

Apple Cucumber Brie Turkey Sandwich

Apple Cucumber Brie Turkey Sandwich

Apple Cucumber Brie Turkey Sandwich

December 4, 2023 by Kimberly

Experience a healthy morning with a delightful wholegrain sandwich. Fresh apples, crisp cucumbers, creamy Brie, and lean turkey combine for a flavorful delight.

This website uses affiliate links which may earn commission for purchases made at no additional cost to you.

TOTAL TIME

10 min

SERVES

1 sandwich

DIET

omnivore

EVERY RECIPE DESERVES

A Little Love Letter

Start your day right with a tasty Apple Cucumber Brie Turkey Sandwich on wholegrain bread. It’s got crunchy apples, fresh cucumbers, creamy Brie, and lean turkey for a delicious combo. This sandwich isn’t just good for you—it’s a yummy way to kick off your morning with lots of flavor.

Enjoy it in the morning or prep it ahead for on-the-go — quick, easy, and packed with nutrients. It provides a healthy start in the morning and serves as a convenient option when prepared as a meal prep. The combination of crisp apple, refreshing cucumber, creamy Brie, and lean turkey not only makes it delicious but also ensures you get essential nutrients. Easy to assemble and perfect for a flavorful energy boost.

Store this sandwich in an airtight container to keep it fresh. The layer of lettuce between the ingredients, especially the cucumber, acts as a barrier and prevents moisture from reaching the other ingredients. In this respect, this sandwich is very suitable for preparing the evening before or in the morning and taking with you on the go or simply enjoying at home.

Hi, I'm Kimberly!

Hi, I'm Kimberly.

A hopeless romantic when it comes to food. Every recipe I share is a love letter to food itself. I’m so glad you’re here. Make yourself at home and stay a while.

Love,
Kimberly

Kimberly the Zett Signature

If you want to get to know me better,
click here!


Apple Cucumber Brie Turkey Sandwich

LET’S MAKE A PIECE OF HAPPINESS

Print
.tasty-recipe-responsive-iframe-container-07ff274b { position: relative; overflow: hidden; padding-top: 177.62%; } .tasty-recipe-responsive-iframe-container-07ff274b iframe { position: absolute; top: 0; left: 0; width: 100%; height: 100%; border: 0; } clock clock iconcutlery cutlery iconflag flag iconfolder folder iconinstagram instagram iconpinterest pinterest iconfacebook facebook iconprint print iconsquares squares iconheart heart iconheart solid heart solid icon
Apple Cucumber Brie Turkey Sandwich

Apple Cucumber Brie Turkey Sandwich


  • Author: Kimberly
  • Total Time: 10 min
  • Yield: 1

Description

RECOMMENDED EQUIPMENT

  • sharp knife
  • normal knife
  • cutting board

Ingredients

Units Scale
  • 2 slices wholegrain bread
  • 30 grams turkey
  • 6 slices cucumber
  • 3 slices apple
  • some salad leaves
  • 3 slices camembert
  • 2 tsp cream cheese

Instructions

  1. Wash the cucumber and cut off six slices.
  2. Wash the apple and cut off three slices. Remove the core.
  3. Cut three slices off the Camembert.
  4. Wash the lettuce and cut off several leaves.
  5. Spread cream cheese on the two slices of bread.
  6. Now top one slice in the following order: Turkey, apple, camembert, lettuce & cucumber.
  7. Close the sandwich with the other slice. Cut in the middle with a sharp knife.
  • Cook Time: 10 min

CRAVING MORE?

Follow along here & don’t forget to subscribe to my substack!

Finger Food Beef Wellington

Finger Food Beef Wellington

Finger Food Beef Wellington

Finger Food Beef Wellington

December 1, 2023 by Kimberly

Enjoy the fancy version of Beef Wellington in bite-sized form. Enjoy tender beef wrapped in buttery batter and create a delicious and premium snack. Perfect for adding a touch of class to any gathering or occasion, a simple yet sophisticated treat that everyone will enjoy.

This website uses affiliate links which may earn commission for purchases made at no additional cost to you.

TOTAL TIME

45 min

SERVES

16 bites

DIET

omnivore

EVERY RECIPE DESERVES

A Little Love Letter

Take your event to the next level with these mini beef wellingtons, as a symphony of flavors unfolds with every bite, seamlessly blending mushrooms, Parma ham and a touch of Dijon mustard. This exquisite combination offers a sophisticated taste sensation in each delicious, finger-friendly parcel – perfect for adding a touch of gourmet flair to your party or event.

Present these delicious Beef Wellington finger foods at your Christmas party or on Christmas Eve, for example. These beef bites can be enjoyed on their own or with my spicy Cumberland sauce for an extra festive kick. With their delicious flavors, these canapés will enhance your Christmas party and are an irresistible and perfect addition to your festive table.

To ensure optimum freshness, keep Beef Wellington wrapped in plastic wrap, beeswax cloths, aluminum foil or an airtight container in the refrigerator for up to two days. If you plan to store them for longer, freeze them in an airtight container, making sure to separate the layers with parchment paper. When you’re ready to enjoy the Wellingtons, reheat them in the oven to keep the batter crispy. Defrost frozen Wellingtons in the fridge before reheating to ensure they retain their delicious texture.

Hi, I'm Kimberly!

Hi, I'm Kimberly.

A hopeless romantic when it comes to food. Every recipe I share is a love letter to food itself. I’m so glad you’re here. Make yourself at home and stay a while.

Love,
Kimberly

Kimberly the Zett Signature

If you want to get to know me better,
click here!


Finger Food Beef Wellington

LET’S MAKE A PIECE OF HAPPINESS

Print
.tasty-recipe-responsive-iframe-container-a86b6519 { position: relative; overflow: hidden; padding-top: 177.62%; } .tasty-recipe-responsive-iframe-container-a86b6519 iframe { position: absolute; top: 0; left: 0; width: 100%; height: 100%; border: 0; } clock clock iconcutlery cutlery iconflag flag iconfolder folder iconinstagram instagram iconpinterest pinterest iconfacebook facebook iconprint print iconsquares squares iconheart heart iconheart solid heart solid icon
Finger Food Beef Wellington

Finger Food Beef Wellington


  • Author: Kimberly
  • Total Time: 35 min
  • Yield: 16

Description

RECOMMENDED EQUIPMENT

  • sharp knife
  • chopping board
  • food processor if necessary
  • small bowl
  • small pan
  • kitchen basting brush

Ingredients

Units Scale
MUSHROOM FILLING
  • 1 shallot
  • 1 tbsp butter
  • 180 grams mushrooms
  • 1 tsp dried thyme
  • 1 tbsp fresh parsley
  • 3 tbsp port wine (or any other red wine)
  • salt
  • pepper
INDIVIDUAL INGREDIENTS
  • 1 store-bought puff pastry
  • 200 grams beef fillet
  • 100 grams prosciutto di parma
  • 1 tbsp butter
  • 1 tsp dijon mustard
  • 1 egg
  • salt
  • pepper

Instructions

  1. Cut the mushrooms and shallot into very small pieces or pulse briefly in a food processor. Finely chop the parsley. Cut the puff pastry into 16 equal squares and tear the Prosciutto di Parma into 16 pieces. Crack an egg into a bowl and whisk it.
  2. Start by heating a large pan over medium heat and add the chopped mushrooms without any fat. Let them cook until all the water has evaporated and they start to brown slightly. This step keeps them from turning mushy later. Once they’re lightly browned, add a tablespoon of butter and stir. Add the chopped shallot and fry together until the shallots are soft. Deglaze the pan with three tablespoons of red wine and let it reduce for about 5–8 minutes until no liquid remains on the bottom. Stir in the chopped parsley, dried thyme, and season with salt and pepper. Remove the pan from the heat and let the mixture cool slightly.
  3. While the mushroom mixture cools, heat another pan with one tablespoon of butter and quickly sear the beef fillet on all sides so that it’s browned on the outside but still raw inside. Take it out of the pan, let it rest briefly, and cut it into 16 equal pieces.
  4. Now assemble the parcels: place a piece of Prosciutto on each puff pastry square, leaving a small border around the edges. Spoon about half a teaspoon of the mushroom mixture onto each piece of ham, then place a piece of beef on top. Brush the beef with a little mustard, then roll up the pastry and seal the edges well.
  5. Place all the pieces on a baking tray lined with parchment paper and put them in the fridge while you preheat the oven to 200°C (390°F). When the oven is ready, take them out, make a few diagonal cuts on top of each piece, and brush with the beaten egg.
  6. Bake for about 10 minutes, or until the pastry is golden and crisp. If the beef pieces are very thin, they might not stay medium in the center but they’ll still be incredibly tender and melt in your mouth. Serve warm, ideally with Cumberland sauce.
  • Cook Time: 35 min

CRAVING MORE?

Follow along here & don’t forget to subscribe to my substack!