Apricot Cashew Honey Bliss Balls

Apricot Cashew Honey Bliss Balls

Apricot Cashew Honey Bliss Balls

Apricot Cashew Honey Bliss Balls

April 13, 2024 by Kimberly

Dive into the world of deliciousness with these Apricot Cashew Honey Bliss Balls! Perfectly sweet, nutty, and chewy, they’re the ultimate healthy snack for any time of day.

10 MINUTES

EASY

VEGETARIAN

INT.

67 kcal

NUTTY
CHEWY

EVERYDAY

SNACK

ALL YEAR

INTRODUCTION

ABOUT THE RECIPE

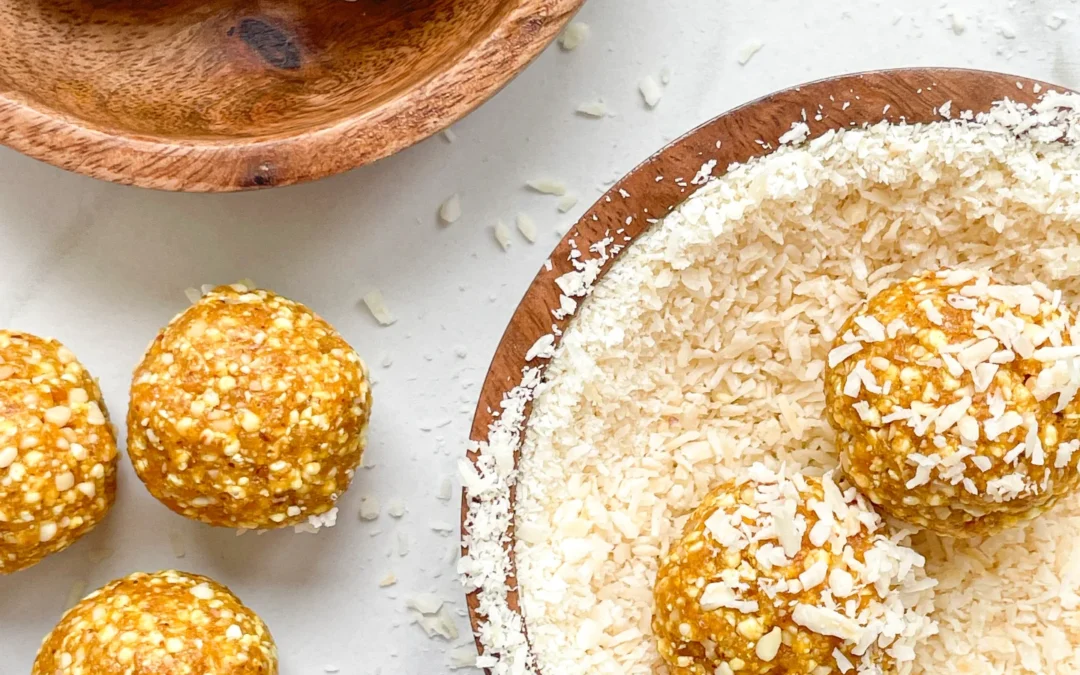
Welcome to your new favorite snack: Apricot Cashew Honey Bliss Balls! These no-bake energy balls are a blissful blend of sweet apricots, creamy cashews, and natural honey. Perfect for those seeking a quick, healthy dessert idea or a nutritious energy boost, these bliss balls are sure to delight with their chewy texture and nutty flavor.

How to serve:
Serve these delightful Apricot Cashew Honey Bliss Balls as a mid-morning snack, a post-workout energy boost, or a sweet after-dinner treat. Pair them with a cup of your favorite tea or a cold glass of almond milk for a refreshing snack. These bliss balls are also perfect for sharing at gatherings or gifting to friends and family who appreciate healthy, homemade treats.

How to store:
Store your Bliss Balls in an airtight container in the refrigerator for up to two weeks. For longer storage, freeze them on a baking sheet before transferring to a freezer-safe bag, keeping them fresh and delicious for up to three months.

Hi, I'm Kimberly!

Hi, I'm Kimberly.

A passionate food lover who believes in the magic of homemade deliciousness that spreads love and warmth. Join me on this culinary adventure as I prepare wonderful dishes and let’s spread some happiness together!

Kimberly the Zett Signature

If you want to get to know me better, click here!


Apricot Cashew Honey Bliss Balls
„Let’s make a piece of happiness“

INGREDIENTS

FOR 12 BALLS

BLISS BALLS

  • 60g salted cashew nuts (2.1 oz)
  • 40g hazelnuts (1.4 oz)
  • 80g dried apricots (2.8 oz)
  • 20g puffed quinoa (0.7 oz)
  • 2 tbsp honey
  • 20g coconut flakes (0.7 oz)
  • 1/4 tsp turmeric
Apricot Cashew Honey Bliss Balls
}

ACTIVE: –

PASSIVE: –

PREPARATIONS

Recommended Equipment
  • food processor
  • small bowl
}

ACTIVE: 10 min

PASSIVE: –

COOKING

1. Place the coconut flakes in a small bowl and set aside.

2. Put the following ingredients into the food processor and blend on high for 1 minute: 60g cashew nuts, 20g hazelnuts, 80g dried apricots, and 20g puffed quinoa.

3. Then add 1/4 tsp turmeric and 2 tbsp honey to the mixture in the food processor and blend again on high for another minute.

4. Divide the mixture into 12 equal portions and roll them into balls and then in the coconut flakes, press lightly, and enjoy 🙂

NOTE: The calorie information may vary depending on the product used, country and region.

Cilantro Lime Beef Quesadillas

Cilantro Lime Beef Quesadillas

Cilantro Lime Beef Quesadillas

Cilantro Lime Beef Quesadillas

April 10, 2024 by Kimberly

Indulge in the zesty flair of Cilantro Lime Beef Quesadillas! A mouthwatering fusion of juicy beef, tangy lime, and fresh cilantro, wrapped in a crispy tortilla.

30 MINUTES

EASY

OMNIVORE

MEXICAN

811 PER PORTION

COMFORT FOOD

EVERYDAY

DINNER

ALL YEAR

INTRODUCTION

ABOUT THE RECIPE

Dive into the delectable world of Cilantro Lime Beef Quesadillas, your next go-to recipe for a quick, flavorful meal that’s sure to delight your taste buds. Combining juicy beef, vibrant lime, and fresh cilantro, these quesadillas offer a tantalizing taste of Mexican cuisine right in your kitchen. Perfect for those busy weeknights or when you’re craving something deliciously different.

How to serve:
When it comes to serving, Cilantro Lime Beef Quesadillas shine brightest with a side of creamy guacamole, tangy salsa, and a dollop of sour cream. Whether you’re gathering around the table for a family dinner or entertaining friends, these quesadillas are a versatile dish that pairs wonderfully with a chilled margarita or a refreshing limeade. The fusion of flavors and textures makes every bite a delightful experience.

How to store:
To store, let your quesadillas cool down before wrapping them tightly in aluminum foil. They’ll keep nicely in the refrigerator for up to two days. Reheat in a skillet or oven to retain that irresistible crunch. Enjoy the ease of having a delicious meal just minutes away, any day of the week.

Hi, I'm Kimberly!

Hi, I'm Kimberly.

A passionate food lover who believes in the magic of homemade deliciousness that spreads love and warmth. Join me on this culinary adventure as I prepare wonderful dishes and let’s spread some happiness together!

Kimberly the Zett Signature

If you want to get to know me better, click here!


Cilantro Lime Beef Quesadillas
„Let’s make a piece of happiness“

INGREDIENTS

FOR 4 PORTIONS (6 QUESADILLAS)

FILLING

  • 400g lean minced beef (14 oz)
  • 1 tbsp olive oil
  • 1 tsp chili flakes
  • 1/2 tsp oregano
  • 1/2 cumin
  • 1/2 garlic powder
  • 1/2 onion powder
  • 1/2 tsp salt
  • 1/2 cayenne pepper
  • 1/2 ground black pepper
  • 1 tbsp tomato paste
  • 250ml beef stock (1 cup)
  • 125g shredded mozzarella (1 heaped cup)
  • 125g shredded cheddar (1 heaped cup)

TORTILLAS

  • 6 medium-sized tortillas
  • 3 tsp olive oil

TOPPINGS

  • 2 limes
  • cilantro
  • 200g creme fraiche (7 oz)
  • 200g salsa (7 oz)
Cilantro Lime Beef Quesadillas
}

ACTIVE: 5 min

PASSIVE: –

PREPARATIONS

Recommended Equipment
  • sharp knife
  • cutting board
  • large pan
  • Wash the cilantro, pluck the leaves from the stems, and roughly chop them.
  • Wash the limes and cut them into quarters.
  • Mix the grated mozzarella and grated cheddar in a bowl.
}

ACTIVE: 25 min

PASSIVE: –

COOKING

1. Heat a large pan over medium heat and add 1 tbsp olive oil. Put the ground beef into the pan and season it with 1 teaspoon of chili powder, and ½ teaspoon each of oregano, cumin, garlic powder, onion powder, cayenne pepper, salt, and pepper. Cook the meat until it forms a dark crust at the bottom of the pan. Then add 1 heaping tablespoon of tomato paste to the meat, mix everything together, and let it cook for 1-2 minutes. Pour beef broth into the pan to deglaze it, scrape off the crust from the bottom, and let everything simmer for about 10 minutes until the broth forms a creamy sauce around the meat.

2. Meanwhile, lay out 6 tortilla wraps side by side and spread half of the cheese on one half of each tortilla, leaving the other half free.

3. Spread the meat directly from the pan onto the cheese on each tortilla. Wipe the pan clean and place it back on the stove.

4. Now, spread the second half of the cheese on top of the meat and use a spoon to distribute the filling to the edge of half of each tortilla. Fold the empty half of the tortilla over the filled half. Press down firmly.

5. Cook two of the filled quesadillas side by side in the pan with 1 teaspoon of olive oil on both sides over medium heat until the tortilla becomes crispy golden brown and the cheese inside is melted. Remove from the pan and cut in half.

6. Place three pieces of the quesadillas on each plate, along with two lime wedges, and sprinkle with cilantro. Serve with your favorite salsa and sour cream for dipping.

NOTE: The calorie information may vary depending on the product used, country and region.

Honey Mustard Pretzel Bites

Honey Mustard Pretzel Bites

Honey Mustard Pretzel Bites

Honey Mustard Pretzel Bites

April 5, 2024 by Kimberly

Indulge in Honey Mustard Pretzel Bites – a sweet, tangy, and utterly addictive snack! Perfect for parties or snacking.

25 MINUTES

EASY

VEGETARIAN

US AMERICAN

151 PER PORTION

CRUNCHY

EVERYDAY

SNACK

ALL YEAR

INTRODUCTION

ABOUT THE RECIPE

Welcome to the irresistible world of Honey Mustard Pretzel Bites, your new favorite snack. These bite-sized delights are the perfect combination of crunchy pretzel goodness and the sweet tang of honey mustard. They’re so easy to make and even easier to devour!

How to serve:
Serve them in a big bowl for a casual gathering. They’re the perfect companion to your favorite craft beer or a crisp, refreshing soda. Whether it’s game day, movie night, or just a regular Tuesday, these pretzel bites will be the star of the show.

How to store:
Keep any leftovers (if there are any!) in an airtight container at room temperature. They’ll stay fresh and crunchy for up to a week, ready to satisfy those snack cravings anytime.

Hi, I'm Kimberly!

Hi, I'm Kimberly.

A passionate food lover who believes in the magic of homemade deliciousness that spreads love and warmth. Join me on this culinary adventure as I prepare wonderful dishes and let’s spread some happiness together!

Kimberly the Zett Signature

If you want to get to know me better, click here!


Honey Mustard Pretzel Bites
„Let’s make a piece of happiness“

INGREDIENTS

FOR 4 PORTIONS

BITES

  • 2 soft pretzels (9 oz)
  • 1 tbsp butter
  • 1 tbsp honey
  • 1 onion
  • 2 garlic cloves
  • 1.5 tbsp dijon mustard
  • 1 tbsp white wine vinegar
  • 1/2 tsp turmeric
  • 1 tsp salt
Honey Mustard Pretzel Bites
}

ACTIVE: 5 min

PASSIVE: –

PREPARATIONS

Recommended Equipment
  • sharp knife
  • cutting board
  • medium-sized pot
  • Cut the pretzels into small pieces and set them aside.
  • Peel the garlic cloves.
  • Just cut off the „top“ of the onion and then peel it, so it stays whole.
}

ACTIVE: 5 min

PASSIVE: 15 min

COOKING

1. Now grate the onion and garlic cloves directly into the pot using a grater.

2. Also add the following ingredients to the pot: 1 tablespoon of butter, 1 tablespoon of honey, 1 tablespoon of white wine vinegar, 1.5 tablespoons of Dijon mustard, 1 teaspoon of salt, and 1/2 teaspoon of turmeric.

3. Stir everything together and heat on medium until the butter has melted and a yellow mixture has formed. Then add the pretzel pieces to the pot and stir until all the pieces are coated with the sauce.

4. Place the pretzel pieces on a baking sheet lined with parchment paper and bake at 180°C (360°F) for about 15-18 minutes until crispy.

5. Remove the baking sheet from the oven, let the pretzel pieces cool down, and enjoy.

NOTE: The calorie information may vary depending on the product used, country and region.

Fresh Shrimp Tacos & Coleslaw

Fresh Shrimp Tacos & Coleslaw

Fresh Prawn Tacos & Slaw

Fresh Shrimp Tacos & Slaw

April 9, 2024 by Kimberly

Discover the joy of Fresh Shrimp Tacos & Slaw – a zesty, mouth-watering feast that’s perfect for any day. Easy, delicious, and absolutely unforgettable!

40 MINUTES

EASY

OMNIVORE

MEXICAN

147 PER TACO

REFRESHINGEVERYDAY

LUNCH 
DINNER

SPRING 
SUMMER

INTRODUCTION

ABOUT THE RECIPE

Dive into the delightful world of Fresh Shrimp Tacos & Slaw, your new go-to recipe for a quick, healthy, and utterly delicious meal. This dish combines the juicy, succulent flavors of fresh shrimps with the crisp, refreshing taste of homemade slaw, all wrapped up in a soft taco shell. It’s the perfect balance of textures and tastes, sure to tantalize your taste buds!

How to serve:
Serve these tacos fresh off the skillet for the best experience. Pair them with a side of lime wedges & extra slaw. Don’t forget a cold, refreshing drink to wash down the flavors. These shrimp tacos are not just food – they’re a vibrant, interactive dining experience that everyone can get excited about.

How to store:
Leftover shrimp fillings and slaw can be stored separately in airtight containers in the fridge. They’ll keep well for up to two days, making for an easy, delicious lunch or dinner option whenever you’re short on time.

Hi, I'm Kimberly!

Hi, I'm Kimberly.

A passionate food lover who believes in the magic of homemade deliciousness that spreads love and warmth. Join me on this culinary adventure as I prepare wonderful dishes and let’s spread some happiness together!

Kimberly the Zett Signature

If you want to get to know me better, click here!


Fresh Prawn Tacos & Slaw
„Let’s make a piece of happiness“

INGREDIENTS

FOR 12 TACOS

SLAW

  • 250g white cabbage (9 oz)
  • 250g red cabbage (9 oz)
  • 1 cup cilantro
  • 1 red onion
  • 200g low fat yogurt (7 oz)
  • salt & pepper to taste

SHRIMPS

  • 550g black tiger shrimps – 26/30 p. lb. frozen count (1.2 lb)
  • 2 tbsp olive oil for marinade
  • 2 tbsp olive oil for frying
  • 3 garlic cloves
  • 1 tsp cumin
  • 1 tsp smoked paprik
  • 1/2 tsp oregano
  • 1/2 tsp onion powder
  • 1/2 tsp garlic powder
  • 1/2 tsp salt
  • 1/4 tsp chili flakes

TOPPINGS & TACOS

  • 12 corn tortillas
  • 2 limes
  • 3 tbsp yogurt
  • 2 spring onions
  • cilantro
Fresh Prawn Tacos & Slaw
}

ACTIVE: 10 min

PASSIVE: –

PREPARATIONS

Recommended Equipment
  • sharp knife
  • cutting board
  • two medium-sized bowls
  • small pan
  • large pan
  • If you’re using frozen shrimp, let them thaw in a strainer with a drip tray in the fridge a day before you need them. Then wash them thoroughly and pat them dry before further use.
  • Rinse fresh shrimp with cold water and pat dry.
  • Cut the green part of the spring onions into fine strips lengthwise.
  • Quarter the limes.
}

ACTIVE: 25 min

PASSIVE: –

COOKING

1. Slice the red cabbage, white cabbage, and red onion into thin strips and put them in a medium-sized bowl. Pluck the coriander leaves from the stems, roughly chop them, and add to the bowl with the cabbage. Add yogurt, salt, and pepper as well, and stir everything well. Set aside.

2. Next, peel and finely chop or press the garlic cloves and mix them with olive oil, chili, cumin, salt, garlic powder, onion powder, smoked paprika, and oregano to create a paste. Coat the shrimp in the paste, ensuring they’re evenly covered. Let marinate for 15 minutes.

3. Meanwhile, in a small pan, lightly toast the corn tortillas on both sides without adding fat, so they’re warm but still bendable. Alternatively, you can warm them in the oven for a few minutes.

4. Heat 1-2 tablespoons of olive oil in a large pan and fry the shrimp on each side for about 1-2 minutes until they’re no longer transparent and have curled up.

5. Spread the tortillas on plates, top with the slaw, distribute 4 shrimps on each, and garnish with yogurt, coriander, spring onion, and lime juice.

NOTE: The calorie information may vary depending on the product used, country and region.

Lemon Blueberry Coffee Cake

Lemon Blueberry Coffee Cake

Lemon Blueberry Coffee Cake

Lemon Blueberry Coffee Cake

March 30, 2024 by Kimberly

Indulge in the cozy comfort of this Lemon Blueberry Coffee Cake, where every slice is a celebration of flavors, love, and homemade happiness.

80 MINUTES

EASY

VEGETARIAN

INT.

340 PER PORTION

SWEET

EASTER

CAKE

SPRING
SUMMER

INTRODUCTION

ABOUT THE RECIPE

Indulge in the perfect blend of tangy and sweet with this Lemon Blueberry Coffee Cake! This easy-to-make recipe brings you the moistness of coffee cake, bursting with fresh blueberries and a zesty lemon flavor. Ideal for breakfast, brunch, or a delightful afternoon treat, it’s a guaranteed crowd-pleaser.

How to serve:
Serve this Lemon Blueberry Coffee Cake freshly baked, with a dusting of powdered sugar or a drizzle of my lemon glaze for an extra touch of sweetness. It pairs wonderfully with your morning coffee or a cold glass of milk. Planning a brunch or a garden party? This cake makes an elegant addition to your menu, offering a refreshing burst of flavors that perfectly complement the summer vibe.

How to store:
Keep leftovers in an airtight container or wrapped up in cling film at room temperature for up to two days or refrigerate for longer freshness. Enjoy it chilled or briefly warmed up in the microwave for a just-baked experience any time!

Hi, I'm Kimberly!

Hi, I'm Kimberly.

A passionate food lover who believes in the magic of homemade deliciousness that spreads love and warmth. Join me on this culinary adventure as I prepare wonderful dishes and let’s spread some happiness together!

Kimberly the Zett Signature

If you want to get to know me better, click here!


Lemon Blueberry Coffee Cake
„Let’s make a piece of happiness“

INGREDIENTS

FOR 10 PORTIONS

CAKE BATTER

  • 240g all-purpose flour (1.5 cups)
  • 1 tsp backing powder
  • 1/2 tsp salt
  • 80g butter (1/3 cup)
  • 110g white sugar (1/2 cup)
  • 2 eggs
  • 1/2 tsp vanilla extract
  • 1 tbsp lemon zest
  • juice of half a lemon
  • 120g yoghurt (1/2 cup)
  • 180g blueberries (1 cup)
  • 1 tbsp all-purpose flour

CRUMBLE

  • 100g all-purpose flour (1/2 cup)
  • 50g white sugar (1/4 cup)
  • 50g soft butter (1/4 cup)

GLAZE

  • 60g powdered sugar (1/2 cup)
  • juice of half a lemon
  • 1/2 tsp vanilla extract
Lemon Blueberry Coffee Cake
}

ACTIVE: 10 min

PASSIVE: –

PREPARATIONS

Recommended Equipment
  • sharp knife
  • cutting board
  • baking dish – my measures 25×11 cm (10”x4”)
  • grater
  • two small bowls
  • two medium-sized bowls
  • large bowl
  • spatula
  • whisk
  • microwave (or small pot)
  • Preheat the oven to 175°C (350°F)
  • Line a rectangular baking dish with parchment paper.
  • Melt 80g (1/3 cup) butter in the microwave or in a small saucepan.
  • Toss the blueberries in a small bowl with 1 tablespoon of flour until all the blueberries are coated with flour.
  • For the crumble, mix together in a medium-sized bowl 50g (1/4 cup) white sugar, 50g (1/4 cup) softened butter, and 100g (1/2 cup) flour until small crumbs and larger clumps form. Set aside.
  • Zest the lemon and then halve the lemon.
}

ACTIVE: 10 min

PASSIVE: 60 min

COOKING

1. In a medium-sized bowl, mix together flour, baking powder, and salt and set it aside.

2. In a large bowl, whisk together melted butter, 2 eggs, sugar, vanilla extract, juice from half a lemon, and 1 tablespoon of lemon zest.

3. Add the flour mixture and yogurt to the butter-egg mixture and mix just until they start to come together. Now add the blueberries and stir only until no flour is visible.

4. Pour the batter into the baking pan, sprinkle the crumble over the top, and bake for 55 minutes. You can check if it’s done by inserting a clean knife or a skewer into the cake – if it comes out clean, the cake is ready. Let the cake cool on a wire rack.

5. Once the cake has cooled, in a small bowl, prepare the glaze. For this, mix 60g (0.5 cup) of powdered sugar, juice from the other half of the lemon, and 1/2 teaspoon of vanilla extract. The glaze should be creamy. You can thicken it by adding more powdered sugar or thin it by adding more lemon juice or milk. Spread the glaze over the cake and let it set for a few minutes.

NOTE: The calorie information may vary depending on the product used, country and region.

Roasted Parmesan Carrots

Roasted Parmesan Carrots

Roasted Parmesan Carrots

Roasted Parmesan Carrots

March 29, 2024 by Kimberly

Get ready for Roasted Parmesan Carrots: a game-changer in the kitchen! These cheesy, golden beauties will steal the show at any meal, guaranteed to delight.

40 MINUTES

EASY

VEGETARIAN

INT.

228 PER PORTION

COMFORT FOODEVERYDAY

LUNCH

SPRING
SUMMER

INTRODUCTION

ABOUT THE RECIPE

Dive into the world of flavors with this roasted Parmesan carrots! A simple yet sophisticated dish that combines the natural sweetness of carrots with the rich, savory taste of Parmesan cheese. It’s a side dish that promises to elevate any meal, from your weeknight dinners to special holiday feasts. Quick to prepare and packed with flavor, these carrots are a surefire way to impress your guests and family alike.

How to serve:
Serve these golden, cheese-crisped carrots straight from the oven to capture their best texture and warmth. They pair beautifully with grilled meats, roasted chicken, or as a vibrant addition to your vegetarian feast. For an extra touch, sprinkle fresh herbs like parsley or dill over the top before serving.

How to store:
Leftover roasted Parmesan carrots can be stored in an airtight container in the fridge for up to 3 days. Reheat in the oven or in a skillet over medium heat to revive their crispy exterior and warm center.

Hi, I'm Kimberly!

Hi, I'm Kimberly.

A passionate food lover who believes in the magic of homemade deliciousness that spreads love and warmth. Join me on this culinary adventure as I prepare wonderful dishes and let’s spread some happiness together!

Kimberly the Zett Signature

If you want to get to know me better, click here!


Roasted Parmesan Carrots
„Let’s make a piece of happiness“

INGREDIENTS

FOR 4 PORTIONS AS SIDE

CARROTS

  • 500g mixed carrots (1 lbs)
  • 1-2 tbsp olive oil
  • 1 tsp garlic powder
  • 40g parmesan (1/2 cup)
  • salt & pepper to taste
  • parsley

DIP

  • 150g creme fraiche (5 oz)
  • 2 garlic cloves
  • salt & pepper to taste
Roasted Parmesan Carrots
}

ACTIVE: 5 min

PASSIVE: –

PREPARATIONS

Recommended Equipment
  • peeler
  • sharp knife
  • cutting board
  • oven
  • small bowl
  • grater
  • Preheat the oven to 220°C (430°F)
  • Grate the Parmesan cheese into coarse shavings. Set aside.
  • Line a baking sheet with parchment paper.
}

ACTIVE: 10 min

PASSIVE: 25 min

COOKING

1. Peel the carrots and cut them into long sticks. Don’t throw the peels in the trash – instead put them in a plastic bag to your other veggie scraps in the freezer to cook vegetable stock from scratch. Place the sticks on the baking sheet, drizzle with olive oil, sprinkle with salt and pepper, and mix well.

2. Spread the carrot sticks in a single layer on the sheet, making sure they don’t overlap or stack on top of each other. Then, distribute the grated Parmesan over the carrots and put the sheet in the oven to roast for 25-30 minutes.

3. In the meantime, prepare the dip. Peel and finely chop the garlic or press it with a garlic press. In a small bowl, mix crème fraîche with salt, pepper, and the garlic. Next, chop the parsley and set it aside.

4. The carrots are done when the Parmesan has spread among them and become crispy. The carrots should have some brown spots but still be firm to the bite. Now, remove the carrots from the oven. Serve them on plates, garnished with parsley and the dip.

NOTE: The calorie information may vary depending on the product used, country and region.