Honey Mustard Pretzel Bites

Honey Mustard Pretzel Bites

Honey Mustard Pretzel Bites

Honey Mustard Pretzel Bites

April 5, 2024 by Kimberly

Indulge in Honey Mustard Pretzel Bites – a sweet, tangy, and utterly addictive snack! Perfect for parties or snacking.

This website uses affiliate links which may earn commission for purchases made at no additional cost to you.

TOTAL TIME

25 min

SERVES

4 portions

DIET

vegetarian

EVERY RECIPE DESERVES

A Little Love Letter

Welcome to the irresistible world of Honey Mustard Pretzel Bites, your new favorite snack. These bite-sized delights are the perfect combination of crunchy pretzel goodness and the sweet tang of honey mustard. They’re so easy to make and even easier to devour!

Serve them in a big bowl for a casual gathering. They’re the perfect companion to your favorite craft beer or a crisp, refreshing soda. Whether it’s game day, movie night, or just a regular Tuesday, these pretzel bites will be the star of the show.

Keep any leftovers (if there are any!) in an airtight container at room temperature. They’ll stay fresh and crunchy for up to a week, ready to satisfy those snack cravings anytime.

Hi, I'm Kimberly!

Hi, I'm Kimberly.

A hopeless romantic when it comes to food. Every recipe I share is a love letter to food itself. I’m so glad you’re here. Make yourself at home and stay a while.

Love,
Kimberly

Kimberly the Zett Signature

If you want to get to know me better,
click here!


Honey Mustard Pretzel Bites

LET’S MAKE A PIECE OF HAPPINESS

Print
clock clock iconcutlery cutlery iconflag flag iconfolder folder iconinstagram instagram iconpinterest pinterest iconfacebook facebook iconprint print iconsquares squares iconheart heart iconheart solid heart solid icon
Honey Mustard Pretzel Bites

Honey Mustard Pretzel Bites


5 Stars 4 Stars 3 Stars 2 Stars 1 Star

No reviews

  • Author: Kimberly
  • Total Time: 25 min
  • Yield: 4

Description

GOOD TO HAVE ON HAND

  • sharp knife
  • cutting board
  • medium-sized pot


Ingredients

  • 2 soft pretzels
  • 1 tbsp butter
  • 1 tbsp honey
  • 1 onion
  • 2 garlic cloves
  • 1.5 tbsp dijon mustard
  • 1 tbsp white wine vinegar
  • 1/2 tsp turmeric
  • 1 tsp salt

Instructions

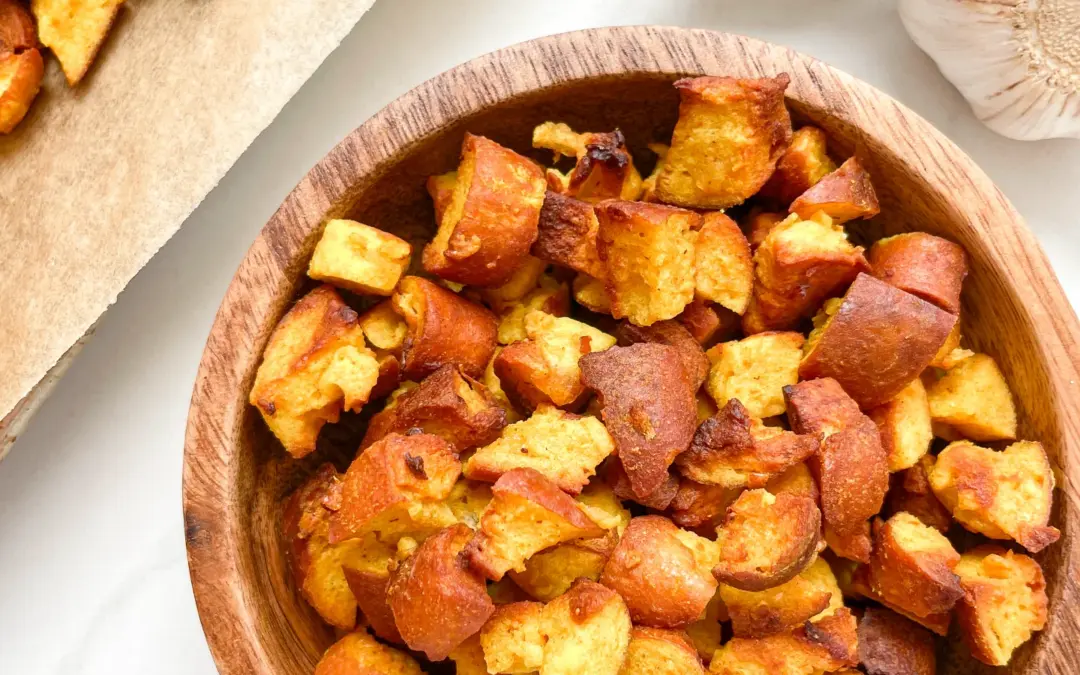
  1. Cut the pretzels into small pieces and set them aside.
  2. Peel the garlic cloves.
  3. Just cut off the „top“ of the onion and then peel it, so it stays whole.
  4. Now grate the onion and garlic cloves directly into the pot using a grater.
  5. Also add the following ingredients to the pot: 1 tablespoon of butter, 1 tablespoon of honey, 1 tablespoon of white wine vinegar, 1.5 tablespoons of Dijon mustard, 1 teaspoon of salt, and 1/2 teaspoon of turmeric.
  6. Stir everything together and heat on medium until the butter has melted and a yellow mixture has formed. Then add the pretzel pieces to the pot and stir until all the pieces are coated with the sauce.
  7. Place the pretzel pieces on a baking sheet lined with parchment paper and bake at 180°C (360°F) for about 15-18 minutes until crispy.
  8. Remove the baking sheet from the oven, let the pretzel pieces cool down, and enjoy.
  • Passive Time: 15 min
  • Cook Time: 10 min

CRAVING MORE?

Follow along here & don’t forget to subscribe to my substack!

Fresh Shrimp Tacos & Coleslaw

Fresh Shrimp Tacos & Coleslaw

Fresh Prawn Tacos & Slaw

Fresh Shrimp Tacos & Coleslaw

April 9, 2024 by Kimberly

Discover the joy of Fresh Shrimp Tacos & Slaw – a zesty, mouth-watering feast that’s perfect for any day. Easy, delicious, and absolutely unforgettable!

This website uses affiliate links which may earn commission for purchases made at no additional cost to you.

TOTAL TIME

40 min

SERVES

12 tacos

DIET

omnivore

EVERY RECIPE DESERVES

A Little Love Letter

Dive into the delightful world of Fresh Shrimp Tacos & Slaw, your new go-to recipe for a quick, healthy, and utterly delicious meal. This dish combines the juicy, succulent flavors of fresh shrimps with the crisp, refreshing taste of homemade slaw, all wrapped up in a soft taco shell. It’s the perfect balance of textures and tastes, sure to tantalize your taste buds!

Serve these tacos fresh off the skillet for the best experience. Pair them with a side of lime wedges & extra slaw. Don’t forget a cold, refreshing drink to wash down the flavors. These shrimp tacos are not just food – they’re a vibrant, interactive dining experience that everyone can get excited about.

Leftover shrimp fillings and slaw can be stored separately in airtight containers in the fridge. They’ll keep well for up to two days, making for an easy, delicious lunch or dinner option whenever you’re short on time.

Hi, I'm Kimberly!

Hi, I'm Kimberly.

A hopeless romantic when it comes to food. Every recipe I share is a love letter to food itself. I’m so glad you’re here. Make yourself at home and stay a while.

Love,
Kimberly

Kimberly the Zett Signature

If you want to get to know me better,
click here!


Fresh Prawn Tacos & Slaw

LET’S MAKE A PIECE OF HAPPINESS

Print
.tasty-recipe-responsive-iframe-container-782000ab { position: relative; overflow: hidden; padding-top: 177.62%; } .tasty-recipe-responsive-iframe-container-782000ab iframe { position: absolute; top: 0; left: 0; width: 100%; height: 100%; border: 0; } clock clock iconcutlery cutlery iconflag flag iconfolder folder iconinstagram instagram iconpinterest pinterest iconfacebook facebook iconprint print iconsquares squares iconheart heart iconheart solid heart solid icon
Fresh Prawn Tacos & Slaw

Fresh Shrimp Tacos & Coleslaw


  • Author: Kimberly
  • Total Time: 35 min
  • Yield: 12

Description

GOOD TO HAVE ON HAND

  • sharp knife
  • cutting board
  • two medium-sized bowls
  • small pan
  • large pan


Ingredients

Units Scale
SLAW
  • 250 grams white cabbage
  • 250 grams red cabbage
  • 1 cup cilantro
  • 1 red onion
  • 200 grams low fat yogurt
  • salt & pepper to taste
SHRIMPS
  • 550 grams black tiger shrimps (26/30 p. lb. frozen count)
  • 2 tbsp olive oil for marinade
  • 2 tbsp olive oil for frying
  • 3 garlic cloves
  • 1 tsp cumin
  • 1 tsp smoked paprik
  • 1/2 tsp oregano
  • 1/2 tsp onion powder
  • 1/2 tsp garlic powder
  • 1/2 tsp salt
  • 1/4 tsp chili flakes
TOPPINGS & TACOS
  • 12 corn tortillas
  • 2 limes
  • 3 tbsp yogurt
  • 2 spring onions
  • cilantro

Instructions

  1. If you’re using frozen shrimp, let them thaw in a strainer with a drip tray in the fridge a day before you need them. Then wash them thoroughly and pat them dry before further use.
  2. Rinse fresh shrimp with cold water and pat dry.
  3. Cut the green part of the spring onions into fine strips lengthwise.
  4. Quarter the limes.
  5. Slice the red cabbage, white cabbage, and red onion into thin strips and put them in a medium-sized bowl. Pluck the coriander leaves from the stems, roughly chop them, and add to the bowl with the cabbage. Add yogurt, salt, and pepper as well, and stir everything well. Set aside.
  6. Next, peel and finely chop or press the garlic cloves and mix them with olive oil, chili, cumin, salt, garlic powder, onion powder, smoked paprika, and oregano to create a paste. Coat the shrimp in the paste, ensuring they’re evenly covered. Let marinate for 15 minutes.
  7. Meanwhile, in a small pan, lightly toast the corn tortillas on both sides without adding fat, so they’re warm but still bendable. Alternatively, you can warm them in the oven for a few minutes.
  8. Heat 1-2 tablespoons of olive oil in a large pan and fry the shrimp on each side for about 1-2 minutes until they’re no longer transparent and have curled up.
  9. Spread the tortillas on plates, top with the slaw, distribute 4 shrimps on each, and garnish with yogurt, coriander, spring onion, and lime juice.
  • Cook Time: 35 min

CRAVING MORE?

Follow along here & don’t forget to subscribe to my substack!

Tomato Oil

Tomato Oil

Tomato Oil

Tomato Oil

April 2, 2024 by Kimberly

Discover the vibrant burst of flavor with homemade tomato oil! This easy-to-make oil adds a gourmet touch to any meal.

This website uses affiliate links which may earn commission for purchases made at no additional cost to you.

TOTAL TIME

2 hrs

SERVES

250 ml / 1 cup

DIET

vegan

EVERY RECIPE DESERVES

A Little Love Letter

Dive into the world of gourmet flavors with my homemade tomato oil! Made from the freshest tomatoes, this oil is a game-changer for any kitchen. Its rich, tomato-infused taste transforms simple dishes into culinary masterpieces. Perfect for chefs of all levels, this easy recipe is your secret ingredient for that extra flavor kick.

Tomato oil is incredibly versatile, adding depth and aroma to any dish. Drizzle it over fresh salads for a summery vibe or blend it into your pasta for an instant flavor upgrade. It’s also perfect as a finishing oil on grilled vegetables, pizzas, and even soups. Elevate your bread dipping game by serving this rich oil alongside your favorite bread.

For longevity, store your tomato oil in a clean, airtight container in the refrigerator. It keeps well for up to two weeks, ensuring you have this delightful flavor enhancer at hand whenever your dishes need a burst of tomato magic.

Hi, I'm Kimberly!

Hi, I'm Kimberly.

A hopeless romantic when it comes to food. Every recipe I share is a love letter to food itself. I’m so glad you’re here. Make yourself at home and stay a while.

Love,
Kimberly

Kimberly the Zett Signature

If you want to get to know me better,
click here!


Tomato Oil
Tomato Oil

LET’S MAKE A PIECE OF HAPPINESS

Print
.tasty-recipe-responsive-iframe-container-e016159a { position: relative; overflow: hidden; padding-top: 177.62%; } .tasty-recipe-responsive-iframe-container-e016159a iframe { position: absolute; top: 0; left: 0; width: 100%; height: 100%; border: 0; } clock clock iconcutlery cutlery iconflag flag iconfolder folder iconinstagram instagram iconpinterest pinterest iconfacebook facebook iconprint print iconsquares squares iconheart heart iconheart solid heart solid icon
Tomato Oil

Tomato Oil


  • Author: Kimberly
  • Total Time: 2 hrs
  • Yield: 1 cup / 250 ml

Description

GOOD TO HAVE ON HAND

  • blender
  • medium-sized saucepan
  • whisk
  • a bowl into which the medium saucepan fits
  • 2 medium-sized bowls
  • fine sieve
  • sealable container
  • ice cubes
  • coffee filter


Ingredients

Units Scale
  • 400 grams fresh tomatoes
  • 250 milliliters neutral cooking oil

Instructions

  1. Wash the tomatoes and remove the greens. Put the tomatoes into the blender. Pour in the oil. Blend on the highest setting until it becomes a thick bright orange consistency and no pieces of tomatoes are longer visible.
  2. Pour the mixture from the blender into a medium-sized pot and heat it over medium heat, constantly stirring, to a temperature of about 102°-103°C (215°-217°F). Then, let the oil simmer with the lid partially on for the next 30-40 minutes. Stir only occasionally, making sure the temperature remains steady. This long cooking time is essential for all the water to evaporate, allowing the perishable solids to settle at the bottom and the dark red oil to float on top. You’ll know all the water has evaporated when the oil in the pot barely bubbles anymore – so if it’s still bubbling vigorously, keep it simmering.
  3. At the end of the cooking process, prepare a bowl large enough to fit the medium-sized pot, filled with cold water and a handful of ice cubes. Also, hang a fine sieve strainer over a medium-sized bowl.
  4. Now, place the pot in the ice water and stir to stop the cooking process. Once the oil is no longer boiling and is almost cold, remove the pot from the water and pour the oil into the fine sieve to catch the coarse particles.
  5. Then, rinse the strainer, dry it off well and hang it over the second medium-sized bowl. Press a coffee filter into the strainer and pour the captured oil into the coffee filter, so that the remaining perishable and coarser particles are caught.
  6. Allow the oil to drip through for about 1 hour. Once all the oil has passed through the coffee filter, transfer the collected amount into a sealable container or directly into an oil bottle. Store in the refrigerator.
  • Passive Time: 60 min
  • Cook Time: 60 min

CRAVING MORE?

Follow along here & don’t forget to subscribe to my substack!

Lemon Blueberry Coffee Cake

Lemon Blueberry Coffee Cake

Lemon Blueberry Coffee Cake

Lemon Blueberry Coffee Cake

March 30, 2024 by Kimberly

Indulge in the cozy comfort of this Lemon Blueberry Coffee Cake, where every slice is a celebration of flavors, love, and homemade happiness.

This website uses affiliate links which may earn commission for purchases made at no additional cost to you.

TOTAL TIME

1 hr + 20 min

SERVES

10 pieces

DIET

vegetarian

EVERY RECIPE DESERVES

A Little Love Letter

Indulge in the perfect blend of tangy and sweet with this Lemon Blueberry Coffee Cake! This easy-to-make recipe brings you the moistness of coffee cake, bursting with fresh blueberries and a zesty lemon flavor. Ideal for breakfast, brunch, or a delightful afternoon treat, it’s a guaranteed crowd-pleaser.

Serve this Lemon Blueberry Coffee Cake freshly baked, with a dusting of powdered sugar or a drizzle of my lemon glaze for an extra touch of sweetness. It pairs wonderfully with your morning coffee or a cold glass of milk. Planning a brunch or a garden party? This cake makes an elegant addition to your menu, offering a refreshing burst of flavors that perfectly complement the summer vibe.

Keep leftovers in an airtight container or wrapped up in cling film at room temperature for up to two days or refrigerate for longer freshness. Enjoy it chilled or briefly warmed up in the microwave for a just-baked experience any time!

Hi, I'm Kimberly!

Hi, I'm Kimberly.

A hopeless romantic when it comes to food. Every recipe I share is a love letter to food itself. I’m so glad you’re here. Make yourself at home and stay a while.

Love,
Kimberly

Kimberly the Zett Signature

If you want to get to know me better,
click here!


Lemon Blueberry Coffee Cake

LET’S MAKE A PIECE OF HAPPINESS

Print
.tasty-recipe-responsive-iframe-container-31e343b6 { position: relative; overflow: hidden; padding-top: 177.62%; } .tasty-recipe-responsive-iframe-container-31e343b6 iframe { position: absolute; top: 0; left: 0; width: 100%; height: 100%; border: 0; } clock clock iconcutlery cutlery iconflag flag iconfolder folder iconinstagram instagram iconpinterest pinterest iconfacebook facebook iconprint print iconsquares squares iconheart heart iconheart solid heart solid icon
Lemon Blueberry Coffee Cake

Lemon Blueberry Coffee Cake


  • Author: Kimberly
  • Total Time: 80 min
  • Yield: 10

Description

GOOD TO HAVE ON HAND

  • sharp knife
  • cutting board
  • baking dish (mine measures 25×11 cm (10”x4”))
  • grater
  • two small bowls
  • two medium-sized bowls
  • large bowl
  • spatula
  • whisk
  • microwave (or small pot)


Ingredients

Units Scale
CAKE BATTER
  • 240 grams all-purpose flour
  • 1 tsp backing powder
  • 1/2 tsp salt
  • 80 grams butter
  • 110 grams white sugar
  • 2 eggs
  • 1/2 tsp vanilla extract
  • 1 tbsp lemon zest
  • juice of half a lemon
  • 120 grams yoghurt
  • 180 grams blueberries
  • 1 tbsp all-purpose flour
CRUMBLE
  • 100 grams all-purpose flour
  • 50 grams white sugar
  • 50 grams soft butter
GLAZE
  • 60 grams powdered sugar
  • juice of half a lemon
  • 1/2 tsp vanilla extract

Instructions

  1. Preheat the oven to 175°C (350°F)
  2. Line a rectangular baking dish with parchment paper.
  3. Melt 80g (1/3 cup) butter in the microwave or in a small saucepan.
  4. Toss the blueberries in a small bowl with 1 tablespoon of flour until all the blueberries are coated with flour.
  5. For the crumble, mix together in a medium-sized bowl 50g (1/4 cup) white sugar, 50g (1/4 cup)softened butter, and 100g (1/2 cup) flour until small crumbs and larger clumps form. Set aside.
  6. Zest the lemon and then halve the lemon.
  7. In a medium-sized bowl, mix together flour, baking powder, and salt and set it aside.
  8. In a large bowl, whisk together melted butter, 2 eggs, sugar, vanilla extract, juice from half a lemon, and 1 tablespoon of lemon zest.
  9. Add the flour mixture and yogurt to the butter-egg mixture and mix just until they start to come together. Now add the blueberries and stir only until no flour is visible.
  10. Pour the batter into the baking pan, sprinkle the crumble over the top, and bake for 55 minutes. You can check if it’s done by inserting a clean knife or a skewer into the cake – if it comes out clean, the cake is ready. Let the cake cool on a wire rack.
  11. Once the cake has cooled, in a small bowl, prepare the glaze. For this, mix 60g (0.5 cup) of powdered sugar, juice from the other half of the lemon, and 1/2 teaspoon of vanilla extract. The glaze should be creamy. You can thicken it by adding more powdered sugar or thin it by adding more lemon juice or milk. Spread the glaze over the cake and let it set for a few minutes.
  • Passive Time: 60 min
  • Cook Time: 20 min

CRAVING MORE?

Follow along here & don’t forget to subscribe to my substack!

Roasted Parmesan Carrots

Roasted Parmesan Carrots

Roasted Parmesan Carrots

Roasted Parmesan Carrots

March 29, 2024 by Kimberly

Get ready for Roasted Parmesan Carrots: a game-changer in the kitchen! These cheesy, golden beauties will steal the show at any meal, guaranteed to delight.

This website uses affiliate links which may earn commission for purchases made at no additional cost to you.

TOTAL TIME

40 min

SERVES

4 portions

DIET

vegetarian

EVERY RECIPE DESERVES

A Little Love Letter

Dive into the world of flavors with this roasted Parmesan carrots! A simple yet sophisticated dish that combines the natural sweetness of carrots with the rich, savory taste of Parmesan cheese. It’s a side dish that promises to elevate any meal, from your weeknight dinners to special holiday feasts. Quick to prepare and packed with flavor, these carrots are a surefire way to impress your guests and family alike.

Serve these golden, cheese-crisped carrots straight from the oven to capture their best texture and warmth. They pair beautifully with grilled meats, roasted chicken, or as a vibrant addition to your vegetarian feast. For an extra touch, sprinkle fresh herbs like parsley or dill over the top before serving.

Leftover roasted Parmesan carrots can be stored in an airtight container in the fridge for up to 3 days. Reheat in the oven or in a skillet over medium heat to revive their crispy exterior and warm center.

Hi, I'm Kimberly!

Hi, I'm Kimberly.

A hopeless romantic when it comes to food. Every recipe I share is a love letter to food itself. I’m so glad you’re here. Make yourself at home and stay a while.

Love,
Kimberly

Kimberly the Zett Signature

If you want to get to know me better,
click here!


Roasted Parmesan Carrots

LET’S MAKE A PIECE OF HAPPINESS

Print
.tasty-recipe-responsive-iframe-container-4e26c634 { position: relative; overflow: hidden; padding-top: 177.62%; } .tasty-recipe-responsive-iframe-container-4e26c634 iframe { position: absolute; top: 0; left: 0; width: 100%; height: 100%; border: 0; } clock clock iconcutlery cutlery iconflag flag iconfolder folder iconinstagram instagram iconpinterest pinterest iconfacebook facebook iconprint print iconsquares squares iconheart heart iconheart solid heart solid icon
Roasted Parmesan Carrots

Roasted Parmesan Carrots


  • Author: Kimberly
  • Total Time: 40 min
  • Yield: 4

Description

GOOD TO HAVE ON HAND

  • peeler
  • sharp knife
  • cutting board
  • oven
  • small bowl
  • grater


Ingredients

Units Scale
CARROTS
  • 500 grams mixed carrots
  • 1-2 tbsp olive oil
  • 1 tsp garlic powder
  • 40 grams parmesan
  • salt & pepper to taste
  • parsley
DIP
  • 150 grams creme fraiche
  • 2 garlic cloves
  • salt & pepper to taste

Instructions

  1. Preheat the oven to 220°C (430°F)
  2. Grate the Parmesan cheese into coarse shavings. Set aside.
  3. Line a baking sheet with parchment paper.
  4. Peel the carrots and cut them into long sticks. Don’t throw the peels in the trash – instead put them in a plastic bag to your other veggie scraps in the freezer to cook vegetable stock from scratch. Place the sticks on the baking sheet, drizzle with olive oil, sprinkle with salt and pepper, and mix well.
  5. Spread the carrot sticks in a single layer on the sheet, making sure they don’t overlap or stack on top of each other. Then, distribute the grated Parmesan over the carrots and put the sheet in the oven to roast for 25-30 minutes.
  6. In the meantime, prepare the dip. Peel and finely chop the garlic or press it with a garlic press. In a small bowl, mix crème fraîche with salt, pepper, and the garlic. Next, chop the parsley and set it aside.
  7. The carrots are done when the Parmesan has spread among them and become crispy. The carrots should have some brown spots but still be firm to the bite. Now, remove the carrots from the oven. Serve them on plates, garnished with parsley and the dip.
  • Passive Time: 25 min
  • Cook Time: 15 min

CRAVING MORE?

Follow along here & don’t forget to subscribe to my substack!

Bacon Onion Cheese Rolls & Poppy Seed Glaze

Bacon Onion Cheese Rolls & Poppy Seed Glaze

Bacon Onion Cheese Rolls & Poppy Seed Glaze

Bacon Onion Cheese Rolls & Poppy Seed Glaze

March 28, 2024 by Kimberly

Imagine soft, buttery rolls stuffed with crispy bacon, sweet caramelized onions, and gooey cheese, topped with a rich poppy seed glaze. It’s savory, satisfying, and pure comfort with every bite.

This website uses affiliate links which may earn commission for purchases made at no additional cost to you.

TOTAL TIME

2 hrs

SERVES

12 rolls

DIET

omnivore

EVERY RECIPE DESERVES

A Little Love Letter

Say hello to your new favorite snack! These savory rolls are the perfect combination of crispy bacon, caramelized onions, and melty cheese, all wrapped up in soft, buttery dough. Topped with a golden poppy seed glaze, they’re everything you didn’t know you needed for brunch, game day, or a cozy evening snack. Think warm, indulgent bites that feel like a little celebration in your kitchen. Simple to make and impossible to resist.

Serve these rolls fresh from the oven with a side of garlic herb butter or a tangy mustard dip for extra flavor. They’re perfect for brunch spreads, cozy dinner starters, or even as a party appetizer that everyone will rave about. Pair with a crisp salad or creamy soup for a balanced meal, or just enjoy them warm with your favorite drink for the ultimate comfort.

Keep any leftover rolls in an airtight container at room temperature for up to two days or refrigerate for up to four days. Reheat in the oven for 5-7 minutes at 180°C (350°F) to bring back their fresh, buttery goodness.

Hi, I'm Kimberly!

Hi, I'm Kimberly.

A hopeless romantic when it comes to food. Every recipe I share is a love letter to food itself. I’m so glad you’re here. Make yourself at home and stay a while.

Love,
Kimberly

Kimberly the Zett Signature

If you want to get to know me better,
click here!


Bacon Onion Cheese Rolls & Poppy Seed Glaze

LET’S MAKE A PIECE OF HAPPINESS

Print
clock clock iconcutlery cutlery iconflag flag iconfolder folder iconinstagram instagram iconpinterest pinterest iconfacebook facebook iconprint print iconsquares squares iconheart heart iconheart solid heart solid icon
Bacon Onion Cheese Rolls & Poppy Seed Glaze

Bacon Onion Cheese Rolls & Poppy Seed Glaze


  • Author: Kimberly
  • Total Time: 2 hrs
  • Yield: 12

Description

GOOD TO HAVE ON HAND

  • baking dish – my used measurements were 20x26cm (8×10 inch)
  • sharp knife
  • cutting board
  • medium-sized bowl
  • whisk
  • small bowl
  • pastry brush
  • spatula
  • large pan


Ingredients

Units Scale
DOUGH
  • 450 grams all-purpose flour
  • 180 milliliters full-fat cow milk
  • 2 tsp dry active yeast
  • 1 tbsp honey
  • 1 egg
  • 3 tbsp butter, room-temperature
  • 1/2 tsp salt
  • 1 tbsp olive oil for greasing the bowl
BACON
  • 250 grams bacon
  • 2 tsp dried thyme
  • 1 tbsp honey
  • 1/4 tsp cayenne pepper
  • 60 milliliter white wine (or any kind of stock)
CARAMALIZED ONIONS
  • 600 grams yellow onions
  • 1 tbsp butter
  • 1 tsp salt
  • 60 milliliter white wine (or any kind of stock)
POPPY SEED GLAZE
  • 2 tbsp butter, melted
  • 1 tsp Dijon mustard
  • 2 tsp brown sugar
  • 1 tsp poppy seeds
  • 1/2 tsp garlic powder
OTHER INGREDIENTS
  • 250 grams cheddar cheese
  • 1 tsp butter for greasing the baking dish

Instructions

  1. To make the dough, warm the milk slightly to 35–40°C (95–104°F) and mix it with the dry active yeast and honey in a small container. Let it sit for about 5 minutes until bubbles form, indicating the yeast is active. Meanwhile, in a medium-sized bowl, combine the egg, butter, and salt. Stir in the milk-yeast mixture until well incorporated. Gradually add the flour in four additions, mixing thoroughly after each one. Once the dough is firm enough, transfer it to a clean work surface and knead with the remaining flour until it becomes smooth, elastic, and soft. This should take about 10 minutes. Lightly oil a large bowl and place the dough ball inside. Coat the dough lightly with a bit more olive oil, then cover the bowl with cling film and a clean towel. Let it rest in a warm place for one hour.
  2. To make the caramelized onions, peel the onions, cut them into thin half-circles, and cook them in a large pan with a tablespoon of butter and a pinch of salt over low to medium heat. Stir occasionally, allowing them to caramelize slowly. This takes about 30 minutes, depending on the desired color. Finish by deglazing with a splash of white wine and letting it reduce briefly. Alternatively, you can use stock instead of wine. Remove the onions from the pan and set aside in a bowl.
  3. For the bacon, use the same pan you caramelized the onions in (no need for additional fat). Fry the bacon until crispy, then add fresh or dried thyme, a pinch of cayenne pepper, and a drizzle of honey. Let everything caramelize over medium heat before deglazing with a splash of white wine or stock. Allow the liquid to evaporate, then set the bacon aside.
  4. Grease a baking dish with butter and set aside. Preheat the oven to 190°C / 375°F. Grate the cheddar cheese and set it aside. Dust a clean work surface with flour and place the dough ball on it. It should have doubled in size by now. Sprinkle the dough lightly with more flour and roll it out into a rectangle about 30×40 cm (12×16 inches). Spread half of the grated cheddar cheese evenly over the dough, followed by the caramelized onions and bacon. Top with the remaining cheese. Roll the dough tightly from the bottom upward, then cut it into 12 equal pieces. Place the rolls in the greased baking dish, cut side up. Cover the dish with cling film and a towel, and let it rest for another 30 minutes in a warm place.
  5. Bake the rolls in the preheated oven for about 30 minutes, or until golden brown. While the rolls bake, prepare the poppy seed glaze. In a small bowl, mix together melted butter, garlic powder, poppy seeds, brown sugar, and Dijon mustard.
  6. After 30 minutes of baking, remove the rolls from the oven and brush them evenly with the glaze. Return them to the oven and bake for another 5 minutes, being careful not to let them get too dark. Let the rolls cool for 15 minutes before serving. Enjoy!

  • Passive Time: 90 min
  • Cook Time: 30 min

CRAVING MORE?

Follow along here & don’t forget to subscribe to my substack!