Chocolate Chip Cookie Dough

Chocolate Chip Cookie Dough

Chocolate Chip Cookie Dough

Chocolate Chip Cookie Dough

May 18, 2024 by Kimberly

Obsessed with cookie dough? This easy, edible chocolate chip version is your new go-to treat! Safe to eat and super delicious – perfect for any sweet craving!

This website uses affiliate links which may earn commission for purchases made at no additional cost to you.

TOTAL TIME

5 min

SERVES

4 portions

DIET

vegetarian

EVERY RECIPE DESERVES

A Little Love Letter

This edible chocolate chip cookie dough is a game-changer! It’s safe to eat, incredibly easy to make, and ridiculously tasty. Whether you’re snacking straight from the bowl or adding it to your favorite desserts, this no-bake cookie dough will quickly become your new favorite treat. Ready to dive in? Let’s whip up this sweet, satisfying delight!

Enjoy it straight from the bowl with a spoon, or roll it into bite-sized balls for a fun, shareable treat. For an extra indulgent experience, pair it with ice cream or spread it on a warm brownie. You can even use it as a topping for your favorite desserts, like cupcakes or cheesecakes, to add a delightful cookie dough twist.

Store your edible chocolate chip cookie dough in an airtight container in the refrigerator for up to a week. For longer storage, freeze it for up to three months. Simply thaw in the fridge before enjoying your sweet, ready-to-eat treat.

Hi, I'm Kimberly!

Hi, I'm Kimberly.

A hopeless romantic when it comes to food. Every recipe I share is a love letter to food itself. I’m so glad you’re here. Make yourself at home and stay a while.

Love,
Kimberly

Kimberly the Zett Signature

If you want to get to know me better,
click here!


Chocolate Chip Cookie Dough

LET’S MAKE A PIECE OF HAPPINESS

Print
clock clock iconcutlery cutlery iconflag flag iconfolder folder iconinstagram instagram iconpinterest pinterest iconfacebook facebook iconprint print iconsquares squares iconheart heart iconheart solid heart solid icon
Chocolate Chip Cookie Dough

Chocolate Chip Cookie Dough


5 Stars 4 Stars 3 Stars 2 Stars 1 Star

No reviews

  • Author: Kimberly
  • Total Time: 5 minutes
  • Yield: 4
  • Diet: Vegetarian

Description

GOOD TO HAVE ON HAND

  • two small bowls
  • spoon
  • microwave or oven


Ingredients

Units Scale
  • 40 grams soft butter
  • 40 grams white sugar
  • 1/4 tsp vanilla extract
  • pinch of salt
  • 75 grams all-purpose flour
  • 2 tbsp milk
  • 35 grams semi-sweet chocolate

Instructions

  1. Microwave the flour in one of the bowls on high for 45 seconds. The flour should reach about 75°C/165°F to kill any bacteria and make it safe to eat raw. If you don’t have a microwave, you can bake the flour in the oven at 170°C/338°F for about 10 minutes.
  2. Meanwhile, mix the softened butter, sugar, vanilla extract, and salt until creamy. Add the milk and mix again.
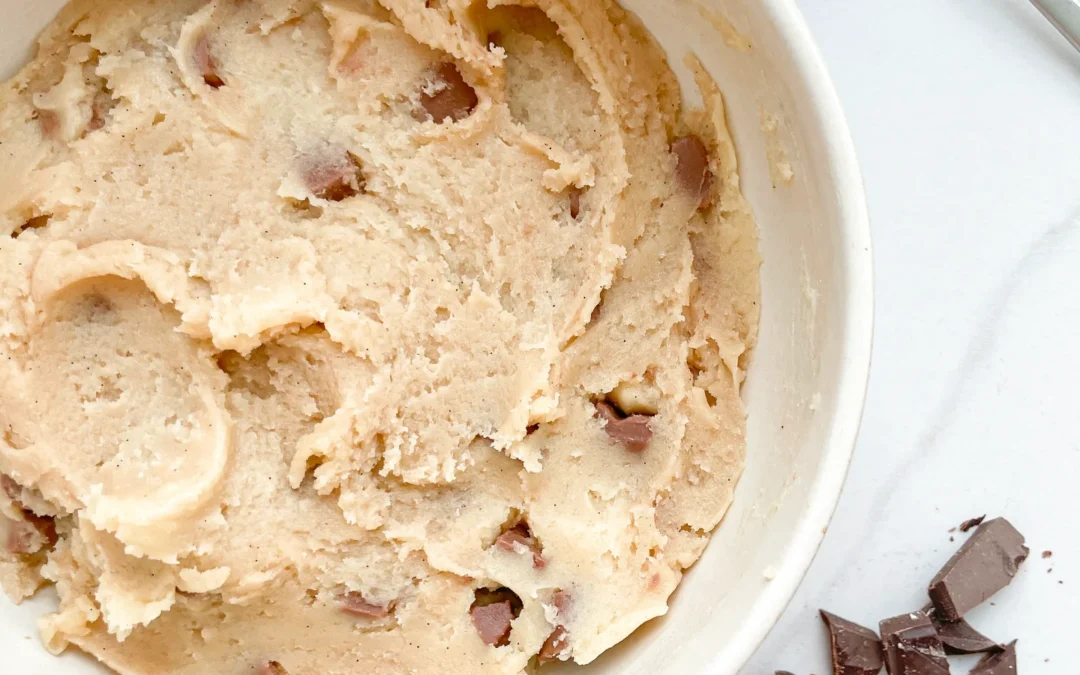
  3. Now, add the flour and mix everything into a cookie dough.
  4. Fold in the chocolate chips and either snack on it right away or chill the bowl in the fridge for 10-15 minutes for a firmer texture.

Notes

The calorie information may vary depending on the product used, country and region.

  • Cook Time: 5 min
  • Category: DESSERT
  • Method: NO BAKE
  • Cuisine: US AMERICAN

CRAVING MORE?

Follow along here & don’t forget to subscribe to my substack!

Apple Crumble

Apple Crumble

Apple Crumble

Apple Crumble

December 3, 2023 by Kimberly

Apple crumble, a quick and delicious dessert for everyone. Sliced apples coated in cinnamon, topped with a quick crumble, and baked to perfection. A speedy treat satisfying every sweet tooth!

This website uses affiliate links which may earn commission for purchases made at no additional cost to you.

TOTAL TIME

60 min

SERVES

4 portions

DIET

vegetarian

EVERY RECIPE DESERVES

A Little Love Letter

Once upon a kitchen, there was Apple Crumble…

Picture a cozy apple crumble, fresh and warm. Its golden-brown, cinnamon-kissed top teases your senses. The sweet smell of baked apples promises flavorful joy. Each bite reveals tender apples under a crumbly layer, with a buttery crunch. To make it even more special, imagine a silky vanilla sauce generously poured over, creating a rich, creamy magic. The sauce enhances the apple sweetness, creating a luxurious harmony. Each spoonful is like a warm hug of sweetness and nostalgia.

To serve your delightful apple crumble, scoop generous portions onto plates while it’s still warm. Pair it with a scoop of vanilla ice cream for an extra treat. The contrasting temperatures create a heavenly experience. If you prefer a simpler approach, a dollop of whipped cream or a drizzle of caramel sauce also works wonders. For a cozy touch, consider serving it with a hot cup of coffee or tea.

When it comes to storing apple crumble, keep it in an airtight container in the refrigerator. This helps preserve its freshness and flavor. Before refrigerating, let it cool to room temperature. To reheat, use the oven for a few minutes to regain its warmth and crispiness. Alternatively, you can microwave individual servings for a quick fix. Just remember, while it can be stored, apple crumble is at its best when enjoyed freshly baked.

Hi, I'm Kimberly!

Hi, I'm Kimberly.

A hopeless romantic when it comes to food. Every recipe I share is a love letter to food itself. I’m so glad you’re here. Make yourself at home and stay a while.

Love,
Kimberly

Kimberly the Zett Signature

If you want to get to know me better,
click here!


Apple Crumble
Apple Crumble

LET’S MAKE A PIECE OF HAPPINESS

Print
.tasty-recipe-responsive-iframe-container-dcbbf165 { position: relative; overflow: hidden; padding-top: 56.3%; } .tasty-recipe-responsive-iframe-container-dcbbf165 iframe { position: absolute; top: 0; left: 0; width: 100%; height: 100%; border: 0; } clock clock iconcutlery cutlery iconflag flag iconfolder folder iconinstagram instagram iconpinterest pinterest iconfacebook facebook iconprint print iconsquares squares iconheart heart iconheart solid heart solid icon
Apple Crumble

Apple Crumble


  • Author: Kimberly
  • Total Time: 60 min
  • Yield: 4
  • Diet: Vegetarian

Description

GOOD TO HAVE ON HAND

  • 1 sharp knife
  • 1 medium bowl
  • 1 spoon
  • 1 baking dish 20 x 20 cm (8×8 inch)


Ingredients

Units Scale
FILLING
  • 3 apples (best use Granny Smith or Honeycrisp, but any other type will do)
  • 25 grams sugar
  • 1 tsp lemon juice
  • 1 tbsp corn starch
  • 1/4 tsp salt
  • 1/2 tsp cinnamon
  • 1 tsp vanilla extract
CRUMBLE
  • 100 grams all-purpose flour
  • 80 grams sugar
  • 1/2 tsp baking powder
  • 1/4 tsp salt
  • 1/4 tsp cinnamon
  • 85 grams butter

Instructions

PREPARATIONS

  • Preheat the oven to 190C° (375F°)
  • Peel 3 apples, remove the core, cut into bite-sized pieces and put the pieces in a bowl.
  • Melt 85g (4 tbsp) butter in a saucepan or in the microwave.

INSTRUCTIONS

  1. For the filling pour 1 tsp lemon juice over the chopped apples and mix. Then add sugar, cornstarch, salt, cinnamon and vanilla extract. Mix everything together.
  2. Place the apples in the baking dish and spread evenly.
  3. In the same bowl, mix the crumble. Add all-purpose flour, sugar, baking powder, salt, cinnamon and the melted butter. Mix everything together well to form a dough-like consistency. Place the bowl in the fridge for about 10 minutes.
  4. Crumble the mixture over the apples and spread evenly.
  5. Place the baking dish in the oven and bake at 190C° (375F°) for 35 minutes.
  6. Now you can top it with your favorites: This tastes delicious with warm vanilla sauce or cold vanilla ice cream. You can also add almonds on top. Make the apple crumble the way you like it best.

Notes

The calorie information may vary depending on the product used, country and region.

  • Prep Time: 5 min
  • Passive Time: 45 min
  • Cook Time: 10 min
  • Category: DESSERT
  • Method: BAKING
  • Cuisine: ENGLISH

CRAVING MORE?

Follow along here & don’t forget to subscribe to my substack!

Apple Sauce

Apple Sauce

Apple Sauce

Apple Sauce

May 15, 2024 by Kimberly

Indulge in homemade apple sauce—sweet, comforting, and perfect for pairing with a variety of dishes. A simple treat that’s both nutritious and delicious!

This website uses affiliate links which may earn commission for purchases made at no additional cost to you.

TOTAL TIME

30 min

SERVES

10 portions

DIET

vegan

EVERY RECIPE DESERVES

A Little Love Letter

Discover the joys of making your own apple sauce at home with my easy recipe. This delightful condiment is not only tasty but also packs a nutritious punch, perfect for any season.

Enjoy apple sauce as a snack, a dessert topping, or a side with potato pancakes . It’s especially delicious when warmed and sprinkled with a dash of cinnamon or mixed into your morning yogurt.

Store your apple sauce in an airtight container in the refrigerator. It keeps well for up to two weeks, making it a handy addition to your daily meals.

Hi, I'm Kimberly!

Hi, I'm Kimberly.

A hopeless romantic when it comes to food. Every recipe I share is a love letter to food itself. I’m so glad you’re here. Make yourself at home and stay a while.

Love,
Kimberly

Kimberly the Zett Signature

If you want to get to know me better,
click here!


Apple Sauce
Apple Sauce

LET’S MAKE A PIECE OF HAPPINESS

Print
.tasty-recipe-responsive-iframe-container-25cdafa2 { position: relative; overflow: hidden; padding-top: 56.3%; } .tasty-recipe-responsive-iframe-container-25cdafa2 iframe { position: absolute; top: 0; left: 0; width: 100%; height: 100%; border: 0; } clock clock iconcutlery cutlery iconflag flag iconfolder folder iconinstagram instagram iconpinterest pinterest iconfacebook facebook iconprint print iconsquares squares iconheart heart iconheart solid heart solid icon
Apple Sauce

Apple Sauce


  • Author: Kimberly
  • Total Time: 30 min
  • Yield: 10

Description

GOOD TO HAVE ON HAND

  • peeler
  • sharp knife
  • cutting board
  • medium-sized pot
  • immersion blender
  • sealable jars


Ingredients

Units Scale
  • 1 kilograms red apples
  • 100 milliliters water
  • juice of half a lemon
  • 50 grams white sugar

Instructions

  1. Peel the apples and cut them into large chunks.
  2. In a medium-sized pot, combine the apple pieces with water, lemon juice, and sugar. Cover and simmer over medium heat for about 20 minutes.
  3. Remove the pot from the heat and puree the mixture until smooth using an immersion blender.
  4. Transfer the applesauce into sterilized jars with screw tops or serve immediately.

Notes

The calorie information may vary depending on the product used, country and region.

  • Passive Time: 20 min
  • Cook Time: 10 min

CRAVING MORE?

Follow along here & don’t forget to subscribe to my substack!

Gnocchi Romaine Salad with Oven-Roasted Tomatoes & Parmesan

Gnocchi Romaine Salad with Oven-Roasted Tomatoes & Parmesan

Gnocchi Romaine Salad with Oven-Roasted Tomatoes & Parmesan

Gnocchi Romaine Salad with Oven-Roasted Tomatoes & Parmesan

May 15, 2024 by Kimberly

Savor the charm of this gnocchi romaine salad combined with roasted tomatoes and parmesan in a creamy garlic-yogurt dressing – perfect for a refreshing, hearty meal!

This website uses affiliate links which may earn commission for purchases made at no additional cost to you.

TOTAL TIME

25 min

SERVES

2 bowls

DIET

vegetarian

EVERY RECIPE DESERVES

A Little Love Letter

Elevate your dining experience with this gnocchi romaine salad, featuring oven-roasted tomatoes and a sprinkle of parmesan, all tossed in a zesty garlic-vinegar yogurt dressing. A delightful twist on classic ingredients!

This salad shines whether served chilled or with tomatoes fresh out of the oven and gnocchi straight from the pan, making it a delightful choice for warm days. Pair it with red wine or a chilled rosé to complement the tangy yogurt dressing, along with a bit of baguette. Perfect for picnics or light lunches.

Keep the salad fresh by storing its components separately in sealed containers in the refrigerator. It’s best enjoyed within two days to ensure the flavors stay vibrant and the gnocchi retains its texture.

Hi, I'm Kimberly!

Hi, I'm Kimberly.

A hopeless romantic when it comes to food. Every recipe I share is a love letter to food itself. I’m so glad you’re here. Make yourself at home and stay a while.

Love,
Kimberly

Kimberly the Zett Signature

If you want to get to know me better,
click here!


Gnocchi Romaine Salad with Oven-Roasted Tomatoes & Parmesan

LET’S MAKE A PIECE OF HAPPINESS

Print
.tasty-recipe-responsive-iframe-container-6406821e { position: relative; overflow: hidden; padding-top: 56.3%; } .tasty-recipe-responsive-iframe-container-6406821e iframe { position: absolute; top: 0; left: 0; width: 100%; height: 100%; border: 0; } clock clock iconcutlery cutlery iconflag flag iconfolder folder iconinstagram instagram iconpinterest pinterest iconfacebook facebook iconprint print iconsquares squares iconheart heart iconheart solid heart solid icon
Gnocchi Romaine Salad with Oven-Roasted Tomatoes & Parmesan

Gnocchi Romaine Salad with Oven-Roasted Tomatoes & Parmesan


  • Author: Kimberly
  • Total Time: 25 minutes
  • Yield: 2
  • Diet: Vegetarian

Description

GOOD TO HAVE ON HAND

  • sharp knife
  • cutting board
  • medium-sized frying pan
  • two salad bowls
  • small bowl


Ingredients

Units Scale
DRESSING & SALAD
  • 2 romaine lettuces
  • 1 garlic clove
  • 20 grams parmesan
  • 8 grams Worcestershire sauce
  • 1 tsp dijon mustard
  • 100 grams yogurt
  • 12 grams red wine vinegar
ROASTED TOMATOES
  • 250 grams cocktail tomatoes
  • 1 tbsp olive oil
  • 1 garlic clove
GNOCCHI
  • 400 grams soft gnocchi
  • 2 tbsp olive oil
TOPPINGS
  • chives
  • parmesan
  • black pepper

Instructions

PREPARATIONS

  • Wash tomatoes, lettuce, and chives.
  • Chop the chives into fine rolls and cut the lettuce into bite-sized pieces.
  • Peel the garlic cloves and finely chop or press them.
  • Grate the Parmesan finely.
  • Line a baking tray with parchment paper.
  • Preheat the oven to 200°C/392°F.

INSTRUCTIONS

  1. Place the tomatoes on the baking tray. Mix with 1 tablespoon of olive oil and a pressed garlic clove, and roast in the oven for about 15 minutes.
  2. Heat 2 tablespoons of olive oil in a medium frying pan and sauté the gnocchi until crispy.
  3. Meanwhile, divide the Romaine lettuce between two bowls. In a small bowl, thoroughly mix all the ingredients for the dressing. Evenly distribute the dressing over the lettuce in the two bowls, toss well to coat the lettuce with the dressing.
  4. Remove the tomatoes from the oven and distribute them and the gnocchi among the bowls. Toss briefly. Top everything with chives and Parmesan and serve immediately.

Notes

The calorie information may vary depending on the product used, country and region.

  • Prep Time: 10
  • Cook Time: 15
  • Category: SALAD
  • Cuisine: ITALIAN

CRAVING MORE?

Follow along here & don’t forget to subscribe to my substack!

Peach Vanilla Jam

Peach Vanilla Jam

Peach Vanilla Jam

Peach Vanilla Jam

May 12, 2024 by Kimberly

Discover the joy of homemade Peach Vanilla Jam! A sweet, fragrant blend perfect for breakfast spreads and desserts. Simple, delicious, and wonderfully aromatic.

This website uses affiliate links which may earn commission for purchases made at no additional cost to you.

TOTAL TIME

2 hrs + 25 min

SERVES

1.5 kg / 3.3 lbs

DIET

vegetarian

EVERY RECIPE DESERVES

A Little Love Letter

Dive into the delightful world of homemade jam with my peach vanilla jam recipe! This easy-to-follow recipe combines ripe peaches and fragrant vanilla for a heavenly spread.

Spread it over warm toast, swirl it into your morning yogurt, or dollop it on pancakes. It’s the perfect addition to enhance any breakfast or snack time with a touch of homemade sweetness.

To keep your jam fresh, store it in airtight containers in the refrigerator. Properly sealed, it can last as long as store-bought jam once opened.

Hi, I'm Kimberly!

Hi, I'm Kimberly.

A hopeless romantic when it comes to food. Every recipe I share is a love letter to food itself. I’m so glad you’re here. Make yourself at home and stay a while.

Love,
Kimberly

Kimberly the Zett Signature

If you want to get to know me better,
click here!


Peach Vanilla Jam
Peach Vanilla Jam

LET’S MAKE A PIECE OF HAPPINESS

Print
.tasty-recipe-responsive-iframe-container-f069ea23 { position: relative; overflow: hidden; padding-top: 56.3%; } .tasty-recipe-responsive-iframe-container-f069ea23 iframe { position: absolute; top: 0; left: 0; width: 100%; height: 100%; border: 0; } clock clock iconcutlery cutlery iconflag flag iconfolder folder iconinstagram instagram iconpinterest pinterest iconfacebook facebook iconprint print iconsquares squares iconheart heart iconheart solid heart solid icon
Peach Vanilla Jam

Peach Vanilla Jam


  • Author: Kimberly
  • Total Time: 145 min
  • Yield: 1.5 kg / 3.3 lbs

Description

GOOD TO HAVE ON HAND

  • 4 screw-top jars
  • sharp knife
  • cutting board
  • medium-sized pot
  • immersion blender


Ingredients

Units Scale
  • 1 kilograms ripe peaches
  • 500 grams jam sugar 2:1
  • 1 vanilla pod

Instructions

  1. Rinse four screw-top jars with boiling hot water, dry them, and keep them open and ready to be filled.
  2. Wash and dry the peaches. Remove the pits and chop the peaches into rough pieces. Place all the pieces in a medium-sized pot.
  3. Slit a vanilla pod lengthwise and scrape out the seeds. Add the vanilla seeds, the pod, and the jam sugar to the peaches. Stir well and bring to a boil over medium heat.
  4. Let it boil for about 5 minutes. Stir occasionally. Remove the vanilla pod, then puree the mixture with an immersion blender until smooth and simmer for another 5 minutes and stir occasionally.
  5. Fill the jam hot into the washed jars and seal them. Let them cool completely. The jam can be stored unrefrigerated and unopened for several months, and once opened, it lasts in the fridge as long as store-bought jam.

Notes

The calorie information may vary depending on the product used, country and region.

  • Passive Time: 120 min
  • Cook Time: 25 min

CRAVING MORE?

Follow along here & don’t forget to subscribe to my substack!

White Chocolate Mousse

White Chocolate Mousse

White Chocolate Mousse

White Chocolate Mousse

May 8, 2024 by Kimberly

Indulge in a heavenly white chocolate mousse, the ultimate creamy delight! Luxurious, velvety, and decadently sweet – perfect for any dessert lover.

This website uses affiliate links which may earn commission for purchases made at no additional cost to you.

TOTAL TIME

2 hrs + 20 min

SERVES

4 portions

DIET

vegetarian

EVERY RECIPE DESERVES

A Little Love Letter

Experience the sheer decadence of this white chocolate mousse, a dessert that promises to elevate your dining experience. Its smooth, creamy texture and rich chocolate flavor make it a favorite among sweet tooth fans.

This white chocolate mousse is best served chilled, making it a refreshing end to any meal. Present it in elegant glasses topped with a sprinkle of chocolate flakes or fresh strawberries for a touch of sophistication. It’s ideal for dinner parties or a romantic evening, offering a light yet indulgent dessert option that’s sure to impress.

Store it in the refrigerator covered with plastic wrap. It will stay fresh for up to two days, ensuring you can enjoy its luxurious taste at its best.

Hi, I'm Kimberly!

Hi, I'm Kimberly.

A hopeless romantic when it comes to food. Every recipe I share is a love letter to food itself. I’m so glad you’re here. Make yourself at home and stay a while.

Love,
Kimberly

Kimberly the Zett Signature

If you want to get to know me better,
click here!


White Chocolate Mousse

LET’S MAKE A PIECE OF HAPPINESS

Print
.tasty-recipe-responsive-iframe-container-4ad0d9f5 { position: relative; overflow: hidden; padding-top: 56.3%; } .tasty-recipe-responsive-iframe-container-4ad0d9f5 iframe { position: absolute; top: 0; left: 0; width: 100%; height: 100%; border: 0; } clock clock iconcutlery cutlery iconflag flag iconfolder folder iconinstagram instagram iconpinterest pinterest iconfacebook facebook iconprint print iconsquares squares iconheart heart iconheart solid heart solid icon
White Chocolate Mousse

White Chocolate Mousse


  • Author: Kimberly
  • Total Time: 20 min + 2 hrs
  • Yield: 4

Description

RECOMMENDED EQUIPMENT

  • 2 medium-sized bowls
  • whisk
  • electric mixer
  • small pot
  • small metal or glass bowl

Ingredients

Units Scale
  • 45 grams butter
  • 15g powdered sugar
  • 2 egg yolks
  • 100 grams white chocolate
  • 200 grams heavy whipping cream

Instructions

  1. Cream the butter and powdered sugar together in a medium-sized bowl with a whisk. Separate the eggs and add the yolks to the butter and sugar. Beat the mixture with an electric mixer until creamy and stiff, about 5 minutes. The egg whites won’t be used further, but to avoid waste, you could make a meringue with them.
  2. Melt the white chocolate in a double boiler, let it cool slightly, then stir it into the mixture.
  3. Whip the cold cream until it forms peaks and gently fold it into the mixture until everything is well combined.
  4. Divide the mixture into 4 dessert bowls and refrigerate for at least 2 hours.

Notes

The calorie information may vary depending on the product used, country and region.

  • Passive Time: 2 hrs
  • Cook Time: 20 min

CRAVING MORE?

Follow along here & don’t forget to subscribe to my substack!