Light & Flavorful Blueberry Banana Cupcakes with Cream Cheese Frosting

Light & Flavorful Blueberry Banana Cupcakes with Cream Cheese Frosting

Light & Flavorful Blueberry Banana Cupcakes with Cream Cheese Frosting

Light & Flavorful Blueberry Banana Cupcakes with Cream Cheese Frosting

January 6, 2024 by Kimberly

Enjoy our Blueberry Banana Cupcakes, a refined sugar-free recipe, topped with creamy cheese frosting for a light, sweet delight blending natural fruitiness with rich smoothness.

This website uses affiliate links which may earn commission for purchases made at no additional cost to you.

TOTAL TIME

25 min

SERVES

12 cupcakes

DIET

vegetarian

EVERY RECIPE DESERVES

A Little Love Letter

These blueberry banana cupcakes are the kind of bake that instantly fills your kitchen with the scent of something cozy and inviting. They’re incredibly soft and light, made with ripe mashed bananas that add natural sweetness and moisture, and pockets of juicy blueberries that burst gently as they bake. Each bite feels fresh and bright, yet comforting in that nostalgic, homemade way.

What makes them truly special is how effortless they are: simple ingredients, a quick batter, and a result that tastes far more impressive than the time it takes to make them. They’re the kind of cupcakes you can whip up on a slow Sunday morning or bring to a last-minute gathering—and they’ll always feel like a thoughtful, homemade treat.

Once cooled, they’re topped with a silky, slightly tangy cream cheese frosting that pairs beautifully with the fruitiness of the cupcakes. It adds just the right amount of richness without overpowering the delicate flavors. Together, it’s a combination that feels both light and indulgent—perfect for brunch, spring and summer celebrations, or any moment that needs a little piece of happiness baked into it.

Hi, I'm Kimberly!

Hi, I'm Kimberly.

A hopeless romantic when it comes to food. Every recipe I share is a love letter to food itself. I’m so glad you’re here. Make yourself at home and stay a while.

Love,
Kimberly

Kimberly the Zett Signature

If you want to get to know me better,
click here!


Light & Flavorful Blueberry Banana Cupcakes with Cream Cheese Frosting

LET’S MAKE A PIECE OF HAPPINESS

Print
clock clock iconcutlery cutlery iconflag flag iconfolder folder iconinstagram instagram iconpinterest pinterest iconfacebook facebook iconprint print iconsquares squares iconheart heart iconheart solid heart solid icon
Light & Flavorful Blueberry Banana Cupcakes with Cream Cheese Frosting

Light & Flavorful Blueberry Banana Cupcakes with Cream Cheese Frosting


5 Stars 4 Stars 3 Stars 2 Stars 1 Star

No reviews

  • Author: Kimberly
  • Total Time: 25 min
  • Yield: 12 cupcakes

Description

GOOD TO HAVE ON HAND

  • cupcake tin
  • baking paper
  • large bowl
  • medium bowl
  • hand mixer


Ingredients

Units Scale
CUPCAKES
  • 3 ripe bananas
  • 50 milliliters coconut oil
  • 80 grams agave syrup
  • 1 egg
  • 1 tsp vanilla extract
  • 180 grams all-purpose flour
  • 1 tsp baking soda
  • 1 tsp baking powder
  • 1/2 tsp salt
  • 160 grams frozen blueberries
FROSTING
  • 230 grams cream cheese
  • 250 grams yogurt
  • 50 milliliters agave syrup
  • 1 tsp lemon juice
  • 1/2 tsp vanilla extract

Instructions

  1. Preheat the oven to 180°C (350°F) and line a 12-cup cupcake tin with baking paper and set aside.
  2. In a large bowl, mash the bananas with a fork to a mash. Mix in the coconut oil, agave syrup, egg and vanilla.
  3. Now add the flour, baking soda, baking powder and salt to the bowl and mix everything together until a creamy dough forms, do not overmix. Fold in the blueberries but set aside about 1 tablespoon of them for later.
  4. Fill the cupcake tins about 2/3 full. Now bake for 16 minutes. I bake them in two batches of 6 so that the cupcakes have more room to rise.
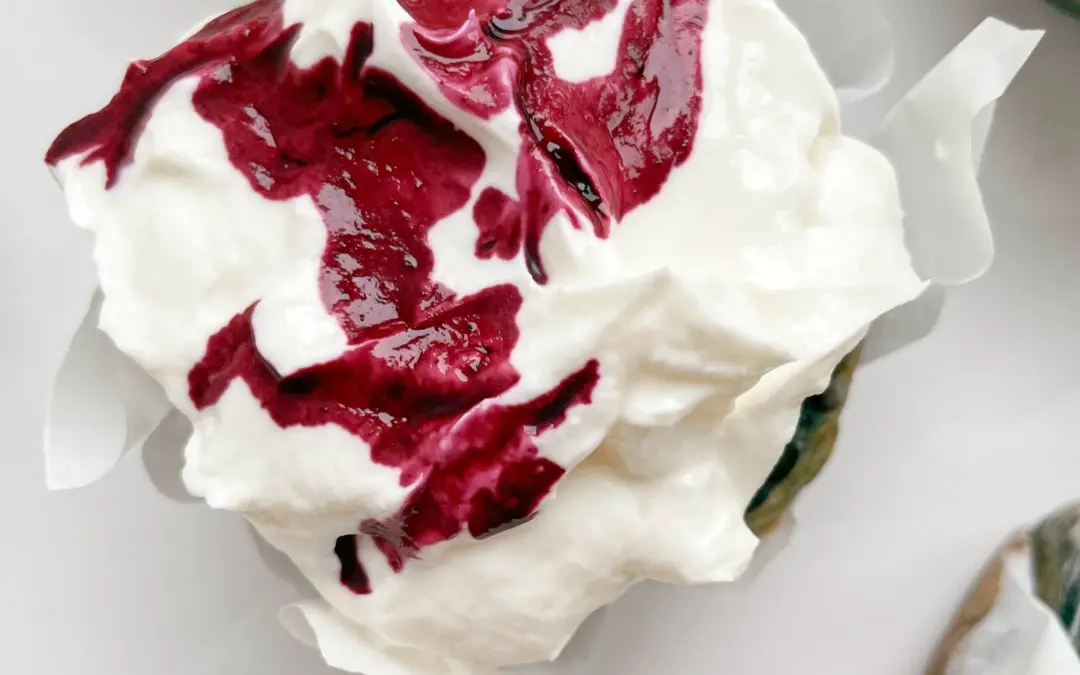
  5. Meanwhile, prepare the cream cheese frosting. Place the cream cheese, yoghurt, agave syrup, vanilla extract and lemon juice in a mixing bowl and beat with a hand mixer until stiff peaks form and a firm cream has formed,
  6. Take the cupcakes out of the oven and leave to cool on a wire rack. As soon as the cupcakes are at room temperature, the frosting can be spread on top. Warm the remaining blueberries in a small pot or in the microwave until they turn into a sauce. Let it cool and pour the sauce over the cupcakes just before serving.
  • Passive Time: 10 min
  • Cook Time: 15 min

CRAVING MORE?

Follow along here & don’t forget to subscribe to my substack!

Roasted Pumpkin with Garlic Yogurt Sauce and Pistachios

Roasted Pumpkin with Garlic Yogurt Sauce and Pistachios

Roasted Pumpkin with Garlic Yogurt Sauce & Pistachios

Roasted Pumpkin with Garlic Yogurt Sauce & Pistachios

January 3, 2024 by Kimberly

Indulge in this delectable Roasted Pumpkin, adorned with creamy Garlic Yogurt Sauce and crunchy Pistachios, offering a wholesome, flavorful, and aromatic delight with every savory, nutritious bite.

This website uses affiliate links which may earn commission for purchases made at no additional cost to you.

TOTAL TIME

30 min

SERVES

4 portions

DIET

vegetarian

EVERY RECIPE DESERVES

A Little Love Letter

Welcome to the delightful world of Roasted Pumpkin with Garlic Yogurt Sauce and Pistachios. This dish is a perfect amalgamation of sweet, earthy pumpkin, enriched with a tangy and creamy garlic yogurt sauce, and finished with a sprinkle of crunchy pistachios. It’s an ideal recipe for those seeking a nutritious yet indulgent addition to their meal, blending the warmth of winter flavors with a touch of elegance.

Serve this exquisite dish as a stunning side or a main course. It pairs beautifully with grilled meats or can stand alone for a satisfying vegetarian option. The creamy garlic yogurt sauce complements the soft, caramelized pumpkin, while the pistachios add a delightful crunch. Garnish with fresh parsley for a pop of color and flavor. It’s best enjoyed warm, making it a comforting choice for chilly evenings or festive gatherings.

Leftovers can be stored in an airtight container in the refrigerator for up to 3 days. Reheat in the oven or microwave until warm. It’s recommended to store the pumpkin and garlic yogurt sauce separately to maintain the best texture and flavor when enjoying it later.

Hi, I'm Kimberly!

Hi, I'm Kimberly.

A hopeless romantic when it comes to food. Every recipe I share is a love letter to food itself. I’m so glad you’re here. Make yourself at home and stay a while.

Love,
Kimberly

Kimberly the Zett Signature

If you want to get to know me better,
click here!


Roasted Pumpkin with Garlic Yogurt Sauce & Pistachios

LET’S MAKE A PIECE OF HAPPINESS

Print
.tasty-recipe-responsive-iframe-container-09d279b4 { position: relative; overflow: hidden; padding-top: 177.62%; } .tasty-recipe-responsive-iframe-container-09d279b4 iframe { position: absolute; top: 0; left: 0; width: 100%; height: 100%; border: 0; } clock clock iconcutlery cutlery iconflag flag iconfolder folder iconinstagram instagram iconpinterest pinterest iconfacebook facebook iconprint print iconsquares squares iconheart heart iconheart solid heart solid icon
Roasted Pumpkin with Garlic Yogurt Sauce & Pistachios

Roasted Pumpkin with Garlic Yogurt Sauce and Pistachios


  • Author: Kimberly
  • Total Time: 25 min
  • Yield: 4

Description

GOOD TO HAVE ON HAND

  • sharp knife
  • cutting board
  • medium bowl
  • small bowl


Ingredients

Units Scale
PUMPKIN
  • 750 grams pumpkin (I used Hokkaido)
  • 2 tbsp olive oil
  • 1/4 tsp salt
  • 1/4 tsp black pepper
  • 1/4 tsp onion powder
  • 1/4 tsp garlic powder
  • 1/4 tsp cilantro powder
  • 1/4 tsp smoked paprika powder
GARLIC YOGURT SAUCE
  • 250 grams yogurt
  • 1 garlic clove
  • 1/8 tsp salt
  • 1/8 tsp black pepper
TOPPINGS
  • pistachios
  • parsley
  • olive oil

Instructions

  1. Preheat the oven to 230°C (450°F).
  2. Remove the seeds from the pumpkin and cut into bite-sized pieces. You do not need to peel the Hokkaido.
  3. Place the pumpkin pieces in a medium-sized bowl. Now pour the olive oil and 1/4 tsp each of salt, pepper, dried coriander, smoked paprika, garlic and onion over the pumpkin pieces and mix so that the pieces are evenly coated with everything. Place the pumpkin pieces on a baking tray lined with baking paper.
  4. Place the baking tray in the preheated oven and roast for 20 minutes.
  5. While the pumpkin is in the oven, mix the yoghurt, fresh garlic, salt and pepper together in a small bowl and season to taste.
  6. Remove the shells from the pistachios and chop them into small pieces. Pluck the parsley from the stalks and chop finely too.
  7. Now remove the tray from the oven. Pour the yoghurt sauce over the pumpkin and then top with olive oil, parsley and pistachios.
  • Cook Time: 25 min

CRAVING MORE?

Follow along here & don’t forget to subscribe to my substack!

Mint Garlic Dip

Mint Garlic Dip

Mint Garlic Dip

Mint Garlic Dip

December 10, 2024 by Kimberly

Savor the goodness of a minty garlic dip with creamy yogurt. It’s a tasty twist that adds extra flavor to your snacks and meals. Dip in and enjoy!

This website uses affiliate links which may earn commission for purchases made at no additional cost to you.

TOTAL TIME

5 min

SERVES

2 portions

DIET

vegetarian

EVERY RECIPE DESERVES

A Little Love Letter

This dip is a creamy mix of yogurt, fresh mint, and zesty garlic. The refreshing mint adds a burst of flavor, while the garlic gives it a zing. Whether you’re snacking or serving at a party, this dip is sure to be a hit. Easy to make and even easier to enjoy—transform your meals with the delightful taste of mint garlic goodness!

Serve up the delightful Mint Garlic Dip to elevate your meals! Ideal for dipping veggies and chips, it also makes a tasty spread for sandwiches. You can also use the salad as a wonderful component for a whole meal, take a look at my Chicken Shawarma Plate. The cool and zesty blend of mint and garlic adds a burst of flavor to any dish.

Keep your yogurt mint garlic dip fresh by storing it in an airtight container in the refrigerator. This ensures its creamy texture and delicious flavor stay intact. For a longer shelf life, avoid leaving it at room temperature.

Hi, I'm Kimberly!

Hi, I'm Kimberly.

A hopeless romantic when it comes to food. Every recipe I share is a love letter to food itself. I’m so glad you’re here. Make yourself at home and stay a while.

Love,
Kimberly

Kimberly the Zett Signature

If you want to get to know me better,
click here!


Mint Garlic Dip
Mint Garlic Dip

LET’S MAKE A PIECE OF HAPPINESS

Print
.tasty-recipe-responsive-iframe-container-9c105aa6 { position: relative; overflow: hidden; padding-top: 177.62%; } .tasty-recipe-responsive-iframe-container-9c105aa6 iframe { position: absolute; top: 0; left: 0; width: 100%; height: 100%; border: 0; } clock clock iconcutlery cutlery iconflag flag iconfolder folder iconinstagram instagram iconpinterest pinterest iconfacebook facebook iconprint print iconsquares squares iconheart heart iconheart solid heart solid icon
Mint Garlic Dip

Mint Garlic Dip


  • Author: Kimberly
  • Total Time: 5 minutes
  • Yield: 2

Description

RECOMMENDED EQUIPMENT

  • sharp knife
  • small cutting board
  • small bowl

Ingredients

Units Scale
  • 200 grams yogurt
  • 12 leaves fresh mint
  • 1 garlic clove
  • 1/4 tsp salt
  • 1/8 tsp pepper

Instructions

  1. Remove the peel from the garlic clove.
  2. Stack the mint leaves on top of each other and roll them up. Then cut into fine rings and chop finely.
  3. Add yogurt to the bowl. Add the garlic clove with a press. Finally, add salt and finely ground pepper, as well as the finely chopped mint, and stir everything into a creamy dip.
  • Cook Time: 5 min

CRAVING MORE?

Follow along here & don’t forget to subscribe to my substack!

Apple Cucumber Brie Turkey Sandwich

Apple Cucumber Brie Turkey Sandwich

Apple Cucumber Brie Turkey Sandwich

Apple Cucumber Brie Turkey Sandwich

December 4, 2023 by Kimberly

Experience a healthy morning with a delightful wholegrain sandwich. Fresh apples, crisp cucumbers, creamy Brie, and lean turkey combine for a flavorful delight.

This website uses affiliate links which may earn commission for purchases made at no additional cost to you.

TOTAL TIME

10 min

SERVES

1 sandwich

DIET

omnivore

EVERY RECIPE DESERVES

A Little Love Letter

Start your day right with a tasty Apple Cucumber Brie Turkey Sandwich on wholegrain bread. It’s got crunchy apples, fresh cucumbers, creamy Brie, and lean turkey for a delicious combo. This sandwich isn’t just good for you—it’s a yummy way to kick off your morning with lots of flavor.

Enjoy it in the morning or prep it ahead for on-the-go — quick, easy, and packed with nutrients. It provides a healthy start in the morning and serves as a convenient option when prepared as a meal prep. The combination of crisp apple, refreshing cucumber, creamy Brie, and lean turkey not only makes it delicious but also ensures you get essential nutrients. Easy to assemble and perfect for a flavorful energy boost.

Store this sandwich in an airtight container to keep it fresh. The layer of lettuce between the ingredients, especially the cucumber, acts as a barrier and prevents moisture from reaching the other ingredients. In this respect, this sandwich is very suitable for preparing the evening before or in the morning and taking with you on the go or simply enjoying at home.

Hi, I'm Kimberly!

Hi, I'm Kimberly.

A hopeless romantic when it comes to food. Every recipe I share is a love letter to food itself. I’m so glad you’re here. Make yourself at home and stay a while.

Love,
Kimberly

Kimberly the Zett Signature

If you want to get to know me better,
click here!


Apple Cucumber Brie Turkey Sandwich

LET’S MAKE A PIECE OF HAPPINESS

Print
.tasty-recipe-responsive-iframe-container-07ff274b { position: relative; overflow: hidden; padding-top: 177.62%; } .tasty-recipe-responsive-iframe-container-07ff274b iframe { position: absolute; top: 0; left: 0; width: 100%; height: 100%; border: 0; } clock clock iconcutlery cutlery iconflag flag iconfolder folder iconinstagram instagram iconpinterest pinterest iconfacebook facebook iconprint print iconsquares squares iconheart heart iconheart solid heart solid icon
Apple Cucumber Brie Turkey Sandwich

Apple Cucumber Brie Turkey Sandwich


  • Author: Kimberly
  • Total Time: 10 min
  • Yield: 1

Description

RECOMMENDED EQUIPMENT

  • sharp knife
  • normal knife
  • cutting board

Ingredients

Units Scale
  • 2 slices wholegrain bread
  • 30 grams turkey
  • 6 slices cucumber
  • 3 slices apple
  • some salad leaves
  • 3 slices camembert
  • 2 tsp cream cheese

Instructions

  1. Wash the cucumber and cut off six slices.
  2. Wash the apple and cut off three slices. Remove the core.
  3. Cut three slices off the Camembert.
  4. Wash the lettuce and cut off several leaves.
  5. Spread cream cheese on the two slices of bread.
  6. Now top one slice in the following order: Turkey, apple, camembert, lettuce & cucumber.
  7. Close the sandwich with the other slice. Cut in the middle with a sharp knife.
  • Cook Time: 10 min

CRAVING MORE?

Follow along here & don’t forget to subscribe to my substack!

Parmesan Soup with Truffle Oil

Parmesan Soup with Truffle Oil

Parmesan Soup with Truffle Oil

Parmesan Soup with Truffle Oil

December 2, 2023 by Kimberly

This creamy, festive soup feels like Christmas in a bowl – silky Parmesan, a hint of truffle, and pure comfort. It’s the perfect starter to warm hearts this holiday season.

This website uses affiliate links which may earn commission for purchases made at no additional cost to you.

TOTAL TIME

30 min

SERVES

4 portions

DIET

vegetarian

EVERY RECIPE DESERVES

A Little Love Letter

The holidays are all about bringing people together, and what better way than with a soup that tastes like Christmas itself? Creamy Parmesan meets the luxurious touch of truffle, creating a dish that feels both festive and comforting. Whether it’s served as the starter for your Christmas dinner or enjoyed during a cozy evening by the fireplace, this soup is the perfect way to spread warmth and joy. It’s indulgent, simple to make, and guaranteed to be a holiday favorite.

Serve this festive soup as the opening act for your Christmas dinner or alongside a beautiful cheese board for a cozy holiday gathering. Pair it with fresh baguette slices or crispy garlic croutons to complement its creamy texture. For an elegant finish, drizzle a touch of truffle oil and add a sprinkle of fresh herbs like thyme or parsley. This dish pairs beautifully with a glass of white wine or sparkling apple cider for a complete holiday experience.

Store leftover soup in an airtight container in the fridge for up to three days. Reheat gently on the stovetop, adding a splash of milk or cream to keep it smooth and creamy. This festive treat is best enjoyed fresh, so savor it while the holiday magic lasts!

Hi, I'm Kimberly!

Hi, I'm Kimberly.

A hopeless romantic when it comes to food. Every recipe I share is a love letter to food itself. I’m so glad you’re here. Make yourself at home and stay a while.

Love,
Kimberly

Kimberly the Zett Signature

If you want to get to know me better,
click here!


Parmesan Soup with Truffle Oil

LET’S MAKE A PIECE OF HAPPINESS

Print
.tasty-recipe-responsive-iframe-container-8b200edd { position: relative; overflow: hidden; padding-top: 56.3%; } .tasty-recipe-responsive-iframe-container-8b200edd iframe { position: absolute; top: 0; left: 0; width: 100%; height: 100%; border: 0; } clock clock iconcutlery cutlery iconflag flag iconfolder folder iconinstagram instagram iconpinterest pinterest iconfacebook facebook iconprint print iconsquares squares iconheart heart iconheart solid heart solid icon
Parmesan Soup with Truffle Oil

Parmesan Soup with Truffle Oil


  • Author: Kimberly
  • Total Time: 30 min
  • Yield: 4 mains / 8 starters

Description

RECOMMENDED EQUIPMENT

  • sharp knife
  • cutting board
  • cheese grater
  • two medium pots
  • fine mesh strainer
  • hand blender

Ingredients

Units Scale
  • 2 shallots
  • 1-2 garlic cloves
  • 1 tbsp butter
  • 2 tbsp risotto rice
  • 200 grams parmesan (or grana padano)
  • 300 milliliter vegetable stock
  • 300 grams heavy cream
  • 70 milliliter dry white wine
  • salt & pepper to taste
  • truffle oil
  • fresh parsley

Instructions

PREPARATIONS

  • Slice the shallots into thin rings.
  • Peel the garlic and cut it into thin slices.
  • Finely grate the Parmesan.

INSTRUCTIONS

  1. Melt butter in a pot and sauté the risotto rice, shallots, and garlic for about 4 minutes, stirring occasionally, until they look glossy and smell amazing.
  2. Add broth and white wine to the pot, bring it to a boil, and let it reduce over medium heat for about 10 minutes until the liquid is halved.
  3. Pour in the cream, toss in the grated Parmesan, and stir gently over the lowest heat until the cheese is melted. Be careful not to overheat – it’s all about that smooth, creamy vibe.
  4. Once the risotto rice is soft, blend the soup with a hand blender until it’s silky smooth.
  5. Strain the soup through a fine mesh strainer into another pot. You’ll end up with a little clump of risotto and Parmesan left in the sieve that can be tossed and don’t forget to scrape off the bottom of the strainer for extra flavor! Season the soup with salt and pepper to taste.
  6. Serve with a few drops of truffle oil and a sprinkle of chopped parsley.
  • Prep Time: 5 min
  • Cook Time: 25 min

CRAVING MORE?

Follow along here & don’t forget to subscribe to my substack!

Bacon Pickles & Onion Dip

Bacon Pickles & Onion Dip

Bacon Pickles & Onion Dip

Bacon, Pickles & Onion Dip

December 8, 2023 by Kimberly

An irresistible dip featuring crispy bacon, sweet caramelized onions, and crunchy pickles. This perfect blend creates a savory delight for every palate, making it a crowd-pleaser at any gathering.

This website uses affiliate links which may earn commission for purchases made at no additional cost to you.

TOTAL TIME

25 min

SERVES

4 portions

DIET

omnivore

EVERY RECIPE DESERVES

A Little Love Letter

Imagine a delicious dip with crispy bacon, sweet caramelized onions, and tangy pickles. Mixed with yogurt, mayo, garlic, and a bit of dill, it’s a tasty combination. Perfect for dipping, every bite is like a simple fairy tale of flavor. You can create a lower-calorie and lower-fat version by replacing mayonnaise with yogurt entirely, opting for 0.1% fat yogurt, and substituting regular bacon with the low-fat one.

Make your gathering extra special with a tasty dip. Perfect for buffets or BBQs, serve it with bread, potato chips, or baguette slices. Every bite brings a mix of flavors, making it a hit for casual get-togethers or snack time.

For optimal storage of a yogurt-based dip, keep it in a sealed container in the refrigerator. This ensures its freshness and prevents the absorption of other fridge odors. Let the dip cool to room temperature before refrigerating. Avoid freezing, as this can alter the texture. When serving again, gently stir to restore the original consistency. Remember, yogurt-based dips are best enjoyed within a few days to savor their peak flavor and quality.

Hi, I'm Kimberly!

Hi, I'm Kimberly.

A hopeless romantic when it comes to food. Every recipe I share is a love letter to food itself. I’m so glad you’re here. Make yourself at home and stay a while.

Love,
Kimberly

Kimberly the Zett Signature

If you want to get to know me better,
click here!


Bacon, Pickles & Onion Dip

LET’S MAKE A PIECE OF HAPPINESS

Print
.tasty-recipe-responsive-iframe-container-a9f380ba { position: relative; overflow: hidden; padding-top: 177.62%; } .tasty-recipe-responsive-iframe-container-a9f380ba iframe { position: absolute; top: 0; left: 0; width: 100%; height: 100%; border: 0; } clock clock iconcutlery cutlery iconflag flag iconfolder folder iconinstagram instagram iconpinterest pinterest iconfacebook facebook iconprint print iconsquares squares iconheart heart iconheart solid heart solid icon
Bacon Pickles & Onion Dip

Bacon Pickles & Onion Dip


  • Author: Kimberly
  • Total Time: 15 min
  • Yield: 4

Description

RECOMMENDED EQUIPMENT

  • cutting board
  • sharp knife
  • small pan
  • medium bowl
  • spoon

Ingredients

Units Scale
  • 2 yellow onions
  • 4 pickles
  • 1 garlic clove
  • 150 grams greek yogurt
  • 3 tbsp mayonnaise
  • 125 grams bacon
  • 1 tsp dill (fresh or dried)
  • 1/8 tsp white pepper
  • 1/4 tsp salt

Instructions

  1. Place the bacon in a cold pan without adding any more fat and fry over a medium heat until crispy. If the bacon gets hot together with the pan and is not placed directly in a hot pan, the fat from the bacon will come out during frying.
  2. Meanwhile cut the onion and the pickles into very small pieces.
  3. Leave the excess fat from bacon in the pan and transfer the bacon to a medium bowl and set aside.
  4. In the same pan, fry the onion pieces in the bacon fat over a medium heat until golden brown until they start to caramelize slightly. Set the pan aside and allow the onion pieces to cool slightly.
  5. Add all the remaining ingredients to the bacon in the bowl and mix well. Season to taste with salt and pepper. The dip tastes best with a fresh baguette or potato chips.
  • Cook Time: 15 min

CRAVING MORE?

Follow along here & don’t forget to subscribe to my substack!