Garlic Herb Pull Apart Bread

Garlic Herb Pull Apart Bread

Garlic Herb Pull Apart Bread

Garlic Herb Pull Apart Bread

May 30, 2024 by Kimberly

Garlic Herb Pull Apart Bread is the perfect addition to any meal, bringing together the flavors of fresh garlic and herbs in a soft, pull-apart bread.

This website uses affiliate links which may earn commission for purchases made at no additional cost to you.

TOTAL TIME

2 hrs + 50 min

SERVES

10 portions

DIET

vegetarian

EVERY RECIPE DESERVES

A Little Love Letter

Garlic Herb Pull Apart Bread is the perfect addition to any meal, bringing together the flavors of fresh garlic and herbs in a soft, pull-apart bread. This bread is not only delicious but also incredibly fun to eat, making it a hit at parties and family gatherings.

Serve this mouthwatering Garlic Herb Pull Apart Bread as an appetizer at your next party or alongside a big salad. It’s also perfect for dipping into soups and stews, or simply enjoy it on its own. The combination of herbs and garlic makes every bite a delightful experience.

To store your leftover Garlic Herb Pull Apart Bread, wrap it tightly in aluminum foil and keep it at room temperature for up to 2 days. For longer storage, place it in an airtight container and refrigerate for up to 4 days. Reheat in the oven to bring back its fresh-baked taste and texture.

Hi, I'm Kimberly!

Hi, I'm Kimberly.

A hopeless romantic when it comes to food. Every recipe I share is a love letter to food itself. I’m so glad you’re here. Make yourself at home and stay a while.

Love,
Kimberly

Kimberly the Zett Signature

If you want to get to know me better,
click here!


Garlic Herb Pull Apart Bread

LET’S MAKE A PIECE OF HAPPINESS

Print
clock clock iconcutlery cutlery iconflag flag iconfolder folder iconinstagram instagram iconpinterest pinterest iconfacebook facebook iconprint print iconsquares squares iconheart heart iconheart solid heart solid icon
Garlic Herb Pull Apart Bread

Garlic Herb Pull Apart Bread


5 Stars 4 Stars 3 Stars 2 Stars 1 Star

5 from 1 review

  • Author: Kimberly
  • Total Time: 2 hours 50 min
  • Yield: 10

Description

GOOD TO HAVE ON HAND

  • baking pan (I used a 28x8cm / 11”x3” loaf pan)
  • large bowl
  • measuring cup
  • plastic wrap (or kitchen towel)
  • small bowl
  • sharp knife
  • cutting board
  • garlic press
  • rolling pin


Ingredients

Units Scale
DOUGH
  • 600 grams all-purpose flour
  • 42 grams fresh yeast
  • 2 tsp sugar
  • 2 tsp salt
  • 50 milliliters oil of your choice (I used cold-pressed rapeseed oil)
  • 350 milliliters lukewarm water
FILLING
  • 5 garlic cloves
  • 30 grams fresh herbs (I used thyme, oregano, basil, rosemary & parsley)
  • 125 grams soft butter
  • salt & pepper

Instructions

  1. For the dough, mix flour, sugar, and salt in a large bowl. In a measuring cup, measure out the lukewarm water, crumble in the fresh yeast, and stir until the yeast dissolves. Add the yeast water and olive oil to the flour-sugar-salt mixture and mix until a sticky dough forms. Cover the bowl with plastic wrap or a damp towel and set aside for 10 minutes.
  2. With a wet hand, grab one side of the dough, lift it up, and fold it into the middle. Repeat with the other three sides. Let the dough rest for another 10 minutes, then repeat the folding process and let the dough rise, covered, for 1 hour.
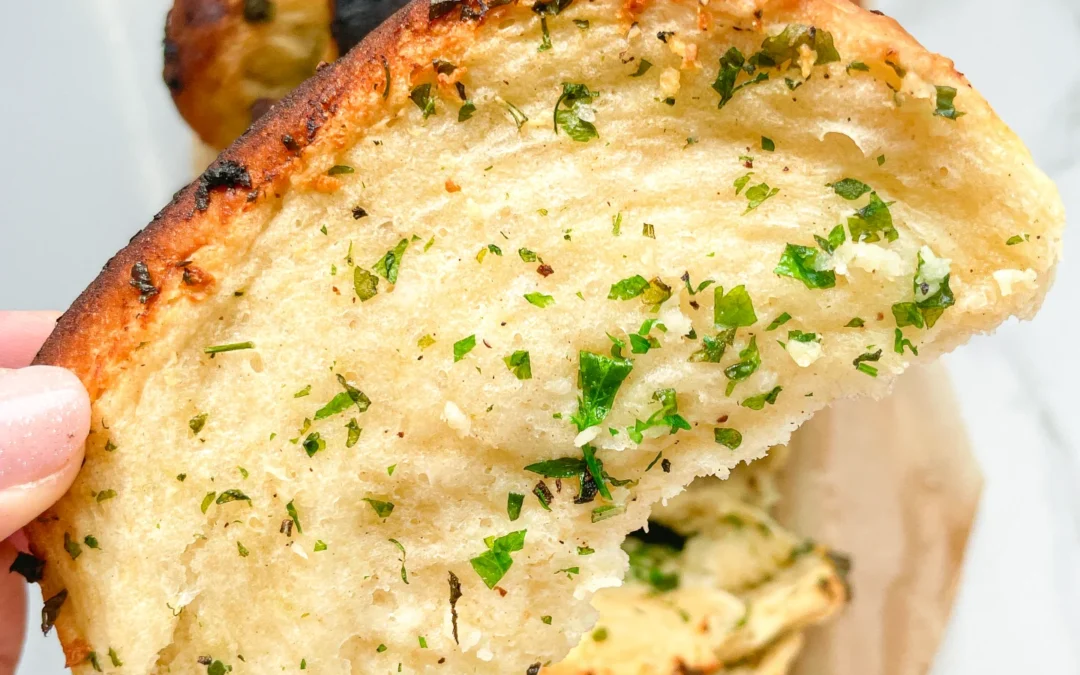
  3. Meanwhile, prepare the filling. Finely chop the herbs and peel the garlic cloves, then either finely chop them or use a garlic press. In a small bowl, mix the softened butter, herbs, garlic, salt, and pepper into a paste and set aside (do not refrigerate, the butter should remain spreadable). Prepare the baking pan by either greasing it with a bit of butter or lining it with parchment paper, and set aside.
  4. After the dough has risen for an hour, perform one final round of folding and let it rise, covered, for another hour.
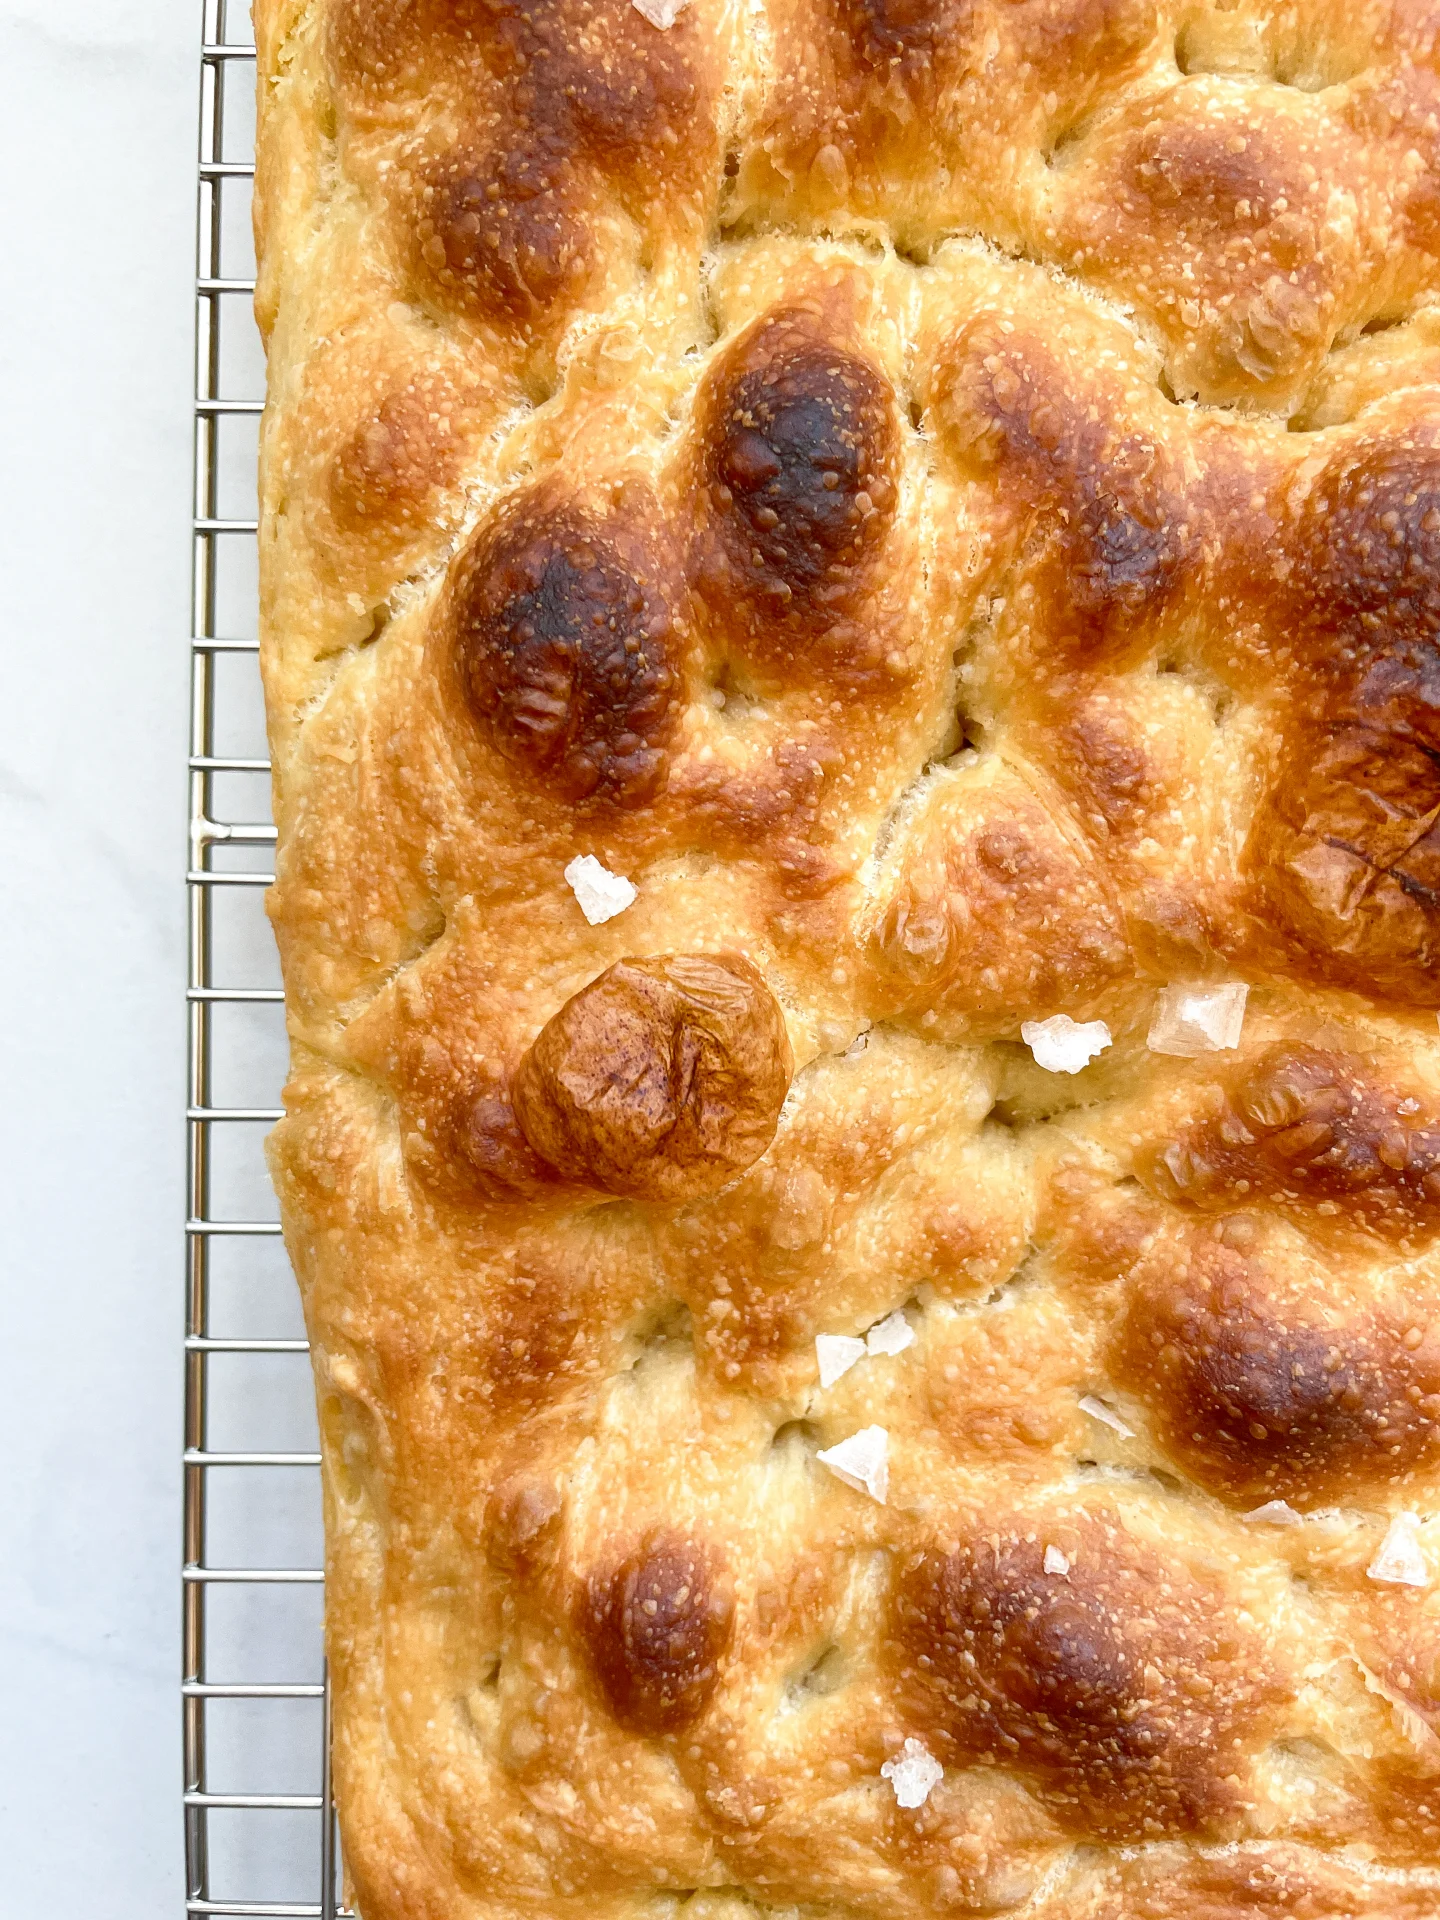
  5. Turn the dough out onto a clean, lightly floured surface and roll it out into a rectangle about 1/2” thick. Spread the butter-garlic-herb paste evenly over the dough. Cut the dough into strips about 8cm / 3” wide. Fold each strip like an accordion and place them upright in the baking pan with the buttered side facing up. Repeat with all the strips, pressing the dough snugly into the pan. Preheat the oven to 200°C / 392°F. Bake the dough for about 30 minutes. Serve warm or let cool. And now enjoy this piece of happiness 🙂

Notes

The calorie information may vary depending on the product used, country and region.

  • Passive Time: 2 hours 30 min
  • Cook Time: 20 min

CRAVING MORE?

Follow along here & don’t forget to subscribe to my substack!

Roasted Honey Garlic Zucchini with Feta & Dill

Roasted Honey Garlic Zucchini with Feta & Dill

Roasted Honey Garlic Zucchini with Feta & Dill

Roasted Honey Garlic Zucchini with Feta & Dill

May 27, 2024 by Kimberly

Discover the perfect summer side dish with roasted zucchini, garlic, honey, feta, and dill. It’s tender, crispy, and irresistibly flavorful. Your taste buds will thank you!

This website uses affiliate links which may earn commission for purchases made at no additional cost to you.

TOTAL TIME

15 min

SERVES

2 portions

DIET

vegetarian

EVERY RECIPE DESERVES

A Little Love Letter

Roasted Honey Garlic Zucchini with Feta & Dill is a summer favorite that’s sure to impress. This dish combines tender zucchini, sweet honey, and savory garlic, all topped with tangy feta and fresh dill. It’s easy to prepare and packed with flavor, making it a go-to for any meal.

Serve this Roasted Honey Garlic Zucchini as a delightful side dish at your next BBQ or family dinner. It pairs wonderfully with grilled meats or can be enjoyed on its own as a light, healthy meal. The combination of sweet, savory, and tangy flavors will leave everyone wanting more.

To store, place any leftover zucchini in an airtight container and refrigerate. It will stay fresh for up to 2 days. Reheat in the oven to maintain its crispy texture, or enjoy it cold for a quick and tasty snack.

Hi, I'm Kimberly!

Hi, I'm Kimberly.

A hopeless romantic when it comes to food. Every recipe I share is a love letter to food itself. I’m so glad you’re here. Make yourself at home and stay a while.

Love,
Kimberly

Kimberly the Zett Signature

If you want to get to know me better,
click here!


Roasted Honey Garlic Zucchini with Feta & Dill

LET’S MAKE A PIECE OF HAPPINESS

Print
.tasty-recipe-responsive-iframe-container-3407cba4 { position: relative; overflow: hidden; padding-top: 56.3%; } .tasty-recipe-responsive-iframe-container-3407cba4 iframe { position: absolute; top: 0; left: 0; width: 100%; height: 100%; border: 0; } clock clock iconcutlery cutlery iconflag flag iconfolder folder iconinstagram instagram iconpinterest pinterest iconfacebook facebook iconprint print iconsquares squares iconheart heart iconheart solid heart solid icon
Roasted Honey Garlic Zucchini with Feta & Dill

Roasted Honey Garlic Zucchini with Feta & Dill


5 from 1 review

  • Author: Kimberly
  • Total Time: 13 minutes
  • Yield: 2

Description

GOOD TO HAVE ON HAND

  • large pan
  • sharp knife
  • cutting board
  • garlic press


Ingredients

Units Scale
ZUCCHINIS
  • 2 zucchinis
  • 2 tbsp olive oil
  • 3 garlic cloves
  • 1/4 tsp to 1/2 tsp chili flakes (depending on your preferences)
TOPPINGS
  • 2 tsp honey
  • 100 grams feta cheese
  • 2 tbsp fresh dill
  • salt & pepper to taste

Instructions

PREPARATIONS

  • Peel the garlic cloves and finely chop them or use a garlic press.
  • Roughly chop the dill set aside.

INSTRUCTIONS

  1. Wash the zucchini and trim the ends. Then, halve the zucchini lengthwise and cut them into large chunks.
  2. Heat some olive oil in a pan over medium heat. Place the zucchini pieces cut side down in the pan and sauté for a few minutes until they are crispy and golden brown. Once they’re ready, add the garlic and chili flakes. Stir everything together and let it roast for 1-2 minutes.
  3. Transfer the zucchini to a bowl and drizzle with honey, then season with salt, pepper, dill, and sprinkle feta cheese on top. Serve immediately and enjoy this piece of happiness 🙂

Notes

The calorie information may vary depending on the product used, country and region.

  • Prep Time: 3 min
  • Cook Time: 10 min
  • Category: VEGETABLES

CRAVING MORE?

Follow along here & don’t forget to subscribe to my substack!

Basil Oil

Basil Oil

Basil Oil

Basil Oil

April 16, 2024 by Kimberly

Experience the vibrant, fresh flavors of homemade basil oil! Perfect for drizzling over pasta or enhancing salads and many more dished with its aromatic touch.

This website uses affiliate links which may earn commission for purchases made at no additional cost to you.

TOTAL TIME

1 hr + 15 min

SERVES

250 ml / 1 cup

DIET

vegan

EVERY RECIPE DESERVES

A Little Love Letter

Discover the simplicity and elegance of homemade basil oil. This delightful infusion captures the essence of fresh basil, offering a quick way to add gourmet flair to your meals. Its vibrant color and fragrance enhance any dish effortlessly.

Drizzle basil oil over fresh pasta, salads, or toasted bread for an instant flavor boost. It’s also perfect as a finishing oil for pizzas and soups, adding a touch of sophistication. For a refreshing twist, mix it into your favorite vinaigrettes.

Keep your basil oil refrigerated in an airtight container. It stays fresh for up to a week, ensuring you can savor its herbal freshness in various dishes.

Hi, I'm Kimberly!

Hi, I'm Kimberly.

A hopeless romantic when it comes to food. Every recipe I share is a love letter to food itself. I’m so glad you’re here. Make yourself at home and stay a while.

Love,
Kimberly

Kimberly the Zett Signature

If you want to get to know me better,
click here!


Basil Oil
Basil Oil

LET’S MAKE A PIECE OF HAPPINESS

Print
.tasty-recipe-responsive-iframe-container-e7954a37 { position: relative; overflow: hidden; padding-top: 177.62%; } .tasty-recipe-responsive-iframe-container-e7954a37 iframe { position: absolute; top: 0; left: 0; width: 100%; height: 100%; border: 0; } clock clock iconcutlery cutlery iconflag flag iconfolder folder iconinstagram instagram iconpinterest pinterest iconfacebook facebook iconprint print iconsquares squares iconheart heart iconheart solid heart solid icon
Basil Oil

Basil Oil


  • Author: Kimberly
  • Total Time: 75 min
  • Yield: 1 cup / 250 ml

Description

GOOD TO HAVE ON HAND

  • blender
  • medium-sized saucepan
  • whisk
  • a bowl into which the medium saucepan fits
  • 2 medium-sized bowls
  • fine sieve
  • sealable container
  • ice cubes
  • coffee filter


Ingredients

Units Scale
  • 75 grams fresh basil leaves
  • 250 milliliters neutral cooking oil

Instructions

  1. Separate the leaves from the stems and put the leaves into the blender. Pour in the oil. Blend on the highest setting until it becomes bright green and no pieces of basil are longer visible.
  2. Pour the mixture from the blender into a medium-sized pot and heat it over medium heat, constantly stirring, to a temperature of about 102°-103°C (215°-217°F). Then, let the oil simmer with the lid partially on for the next 10 minutes. Stir only occasionally, making sure the temperature remains steady. This cooking time is essential for all the water to evaporate, allowing the perishable solids to settle at the bottom and the dark green oil to float on top. You’ll know all the water has evaporated when the oil in the pot barely bubbles anymore – so if it’s still bubbling vigorously, keep it simmering.
  3. Meanwhile, prepare a bowl large enough to fit the medium-sized pot, filled with cold water and a handful of ice cubes. Also, hang a fine sieve strainer over a medium-sized bowl.
  4. Now, place the pot in the ice water and stir to stop the cooking process. Once the oil is no longer boiling and is almost cold, remove the pot from the water and pour the oil into the fine sieve to catch the coarse particles.
  5. Then, rinse the strainer and hang it over the second medium-sized bowl. Press a coffee filter into the strainer and pour the captured oil into the coffee filter, so that the remaining perishable and coarser particles are caught.
  6. Allow the oil to drip through for about 1 hour or maybe more depending on how many remaining particles are in there. Once all the oil has passed through the coffee filter, transfer the collected amount into a sealable container or directly into an oil bottle. Store in the refrigerator for up to one week.
  • Passive Time: 60 min
  • Cook Time: 15 min

CRAVING MORE?

Follow along here & don’t forget to subscribe to my substack!

Green Vegetable Lasagna

Green Vegetable Lasagna

Green Vegetable Lasagna

Green Vegetable Lasagna

March 19, 2024 by Kimberly

Savor the burst of freshness with Green Vegetable Lasagna! Packed with everything green, it’s a delicious twist on the classic comfort food.

This website uses affiliate links which may earn commission for purchases made at no additional cost to you.

TOTAL TIME

1 hr + 50 min

SERVES

6 portions

DIET

vegetarian

EVERY RECIPE DESERVES

A Little Love Letter

Dive into the vibrant layers of my green veggie lasagna, a wholesome twist on the traditional dish that’s as nourishing as it is delicious. This lasagna is a true celebration of green veggies, featuring broccoli, spinach, olives, basil, and leek, all coming together in perfect harmony for a meal that’s sure to impress.

Perfect for any occasion, from weeknight dinners to special gatherings, serve this lasagna hot, with a side of garlic bread or a crisp salad. Its rich, verdant flavors can be beautifully complemented by a light, zesty white wine, making every bite a delightful experience.

Keep leftovers fresh by storing them in an airtight container in the refrigerator, where they will remain perfect for up to three days. For longer storage, freeze individual portions for a quick and easy reheatable meal that retains all the flavors and textures of the freshly baked dish.

Hi, I'm Kimberly!

Hi, I'm Kimberly.

A hopeless romantic when it comes to food. Every recipe I share is a love letter to food itself. I’m so glad you’re here. Make yourself at home and stay a while.

Love,
Kimberly

Kimberly the Zett Signature

If you want to get to know me better,
click here!


Green Vegetable Lasagna

LET’S MAKE A PIECE OF HAPPINESS

Print
.tasty-recipe-responsive-iframe-container-fa1592aa { position: relative; overflow: hidden; padding-top: 177.62%; } .tasty-recipe-responsive-iframe-container-fa1592aa iframe { position: absolute; top: 0; left: 0; width: 100%; height: 100%; border: 0; } clock clock iconcutlery cutlery iconflag flag iconfolder folder iconinstagram instagram iconpinterest pinterest iconfacebook facebook iconprint print iconsquares squares iconheart heart iconheart solid heart solid icon
Green Vegetable Lasagna

Green Vegetable Lasagna


  • Author: Kimberly
  • Total Time: 1 hr + 45 min
  • Yield: 6

Description

GOOD TO HAVE ON HAND

  • sharp knife
  • cutting board
  • medium-sized pot
  • baking dish (my used measurements were 20x26cm (8×10 inch))
  • aluminum foil


Ingredients

Units Scale
  • 20 lasagna sheets
  • 100 grams parmesan, grated
  • 50 grams cheddar cheese, grated
  • 1 brokkoli
  • 200 grams baby spinach
  • 2 leeks
  • 180 grams green olives
  • 200 milliliters vegetable stock
  • 1 bunch basil
  • 2 shallots
  • 2 garlic cloves
  • 2 tbsp olive oil
  • juice of 1 lemon
  • salt & pepper to taste
BECHAMEL SAUCE
  • 70g butter
  • 70g flour
  • 1000 milliliters whole fat milk

Instructions

  1. Peel shallots, halve them, and slice thinly.
  2. Peel garlic cloves and either press or finely chop them.
  3. Halve the leek, wash, and cut into fine strips.
  4. Cut the broccoli florets, wash, and if necessary, chop into bite-sized pieces.
  5. Slice the olives.
  6. Cut the basil into fine strips.
  7. Grate the Parmesan and Cheddar cheese.
  8. Prepare the béchamel sauce. I used 70g (2.5 oz) butter, 70g (2.5 oz) flour, and 1 liter (4 cups)milk, since lasagna needs a more liquidy sauce to ensure the pasta sheets soften in the oven.
  9. Heat 2 tablespoons of olive oil in a medium-sized pot over medium heat. Cook the shallots until soft. Then add the leek and garlic. Mix well and cook until soft for a few minutes.
  10. Add broccoli, olives, and basil, then pour in the vegetable broth. Cover and let it cook for 5-10 minutes, so the broccoli becomes tender but still has a bit of a bite.
  11. Remove the lid and add the spinach and lemon juice. Stir everything once and let the spinach wilt slightly. Season with salt and pepper.
  12. Preheat the oven to 200°C (400°F).
  13. Now it’s time to layer the lasagna. Start with two large ladles of sauce at the bottom of your baking dish. Spread the sauce evenly. Then add a layer of pasta sheets. Next, spread a portion of the vegetables evenly. Follow with a layer of finely grated Parmesan. Continue in the following order: pasta sheets, béchamel, vegetables, Parmesan until all the vegetables (including the liquid in the pot) are used up. Finish with a final layer of pasta sheets and spread the remaining béchamel sauce over them completely. Finally, sprinkle 50g of grated Cheddar on top.
  14. Here’s the entire sequence more efficiently: Sauce, pasta sheets, vegetables, Parmesan, pasta sheets, sauce, vegetables, Parmesan, pasta sheets, sauce, vegetables, Parmesan, pasta sheets, sauce, Cheddar.
  15. Cover the dish with a layer of aluminum foil and bake in the oven for 25 minutes. After 25 minutes, remove the foil and bake for another 20 minutes, or until the cheese is crispy and golden brown. Let the lasagna rest for 10 minutes, then enjoy.
  • Passive Time: 45 min
  • Cook Time: 60 min

CRAVING MORE?

Follow along here & don’t forget to subscribe to my substack!

Pineapple Mint Juice

Pineapple Mint Juice

Pineapple Mint Juice

Pineapple Mint Juice

January 26, 2024 by Kimberly

Refresh your day with Pineapple Mint Juice, a tropical blend of sweet pineapple and cool mint – the perfect thirst-quencher for any time!

This website uses affiliate links which may earn commission for purchases made at no additional cost to you.

TOTAL TIME

10 min

SERVES

400 ml / 1.5 cups

DIET

vegan

EVERY RECIPE DESERVES

A Little Love Letter

Welcome to the refreshing world of Pineapple Mint Juice, a delightful tropical beverage that’s both energizing and soothing. This natural thirst quencher combines the sweet tang of pineapple with the cool, refreshing zing of mint, creating a perfect balance. Ideal for hot summer days or as a healthful pick-me-up, this homemade fruit juice is not only delicious but also packed with natural goodness, making it a favorite among health-conscious individuals and juice lovers alike.

Serving this Pineapple Mint Juice is all about capturing the essence of freshness. Serve it chilled or over ice for an instant cooling effect. The vibrant, sweet and minty flavor makes it a great companion for breakfast, a relaxing afternoon, or as a welcome drink for your guests. You can also add a splash of sparkling water for a fizzy twist or garnish with fresh mint leaves and pineapple slices for an extra touch of tropical elegance.

Keep it in an airtight bottle in the refrigerator, where it can stay fresh for up to 3-4 days. The flavors meld beautifully over time, ensuring that each sip is as delightful as the first. Remember, this natural beverage contains no preservatives, so enjoy it while it’s fresh and brimming with its unique mint-infused drink magic.

Hi, I'm Kimberly!

Hi, I'm Kimberly.

A hopeless romantic when it comes to food. Every recipe I share is a love letter to food itself. I’m so glad you’re here. Make yourself at home and stay a while.

Love,
Kimberly

Kimberly the Zett Signature

If you want to get to know me better,
click here!


Pineapple Mint Juice

LET’S MAKE A PIECE OF HAPPINESS

Print
.tasty-recipe-responsive-iframe-container-c7583989 { position: relative; overflow: hidden; padding-top: 177.62%; } .tasty-recipe-responsive-iframe-container-c7583989 iframe { position: absolute; top: 0; left: 0; width: 100%; height: 100%; border: 0; } clock clock iconcutlery cutlery iconflag flag iconfolder folder iconinstagram instagram iconpinterest pinterest iconfacebook facebook iconprint print iconsquares squares iconheart heart iconheart solid heart solid icon
Pineapple Mint Juice

Pineapple Mint Juice


  • Author: Kimberly
  • Total Time: 10 min
  • Yield: 1 DRINK (400ML OR 1.5 CUPS)

Description

GOOD TO HAVE ON HAND

  • sharp knife
  • chopping board
  • juicer (or blender & fine mesh strainer)


Ingredients

Units Scale
  • 1/2 pineapple
  • 4 apples
  • 15 grams mint

Instructions

PREPARATION WITH A JUICER

  1. Wash the apples and mint thoroughly. Cut the skin off the pineapple and cut the flesh into sticks. Place half of the pineapple in the juicer.
  2. Put the 4 apples into the juicer next.
  3. Add the fresh mint to the juicer last.
  4. Now pour all the juices obtained into a glass.


PREPARATION WITH A BLENDER & A FINE SIEVE

  1. Wash the apples and mint thoroughly. We need about half of the pineapple. Cut the skin off the pineapple and apples. Place the peeled pineapple and apples in the blender.
  2. Pluck the mint leaves and add to the blender.
  3. Puree everything for 30 seconds on the highest setting. Now pass the whole mixture through a fine sieve. If you like the pulp, you can of course skip this step.
  4. Pour the juice into a glass bottle.
  • Cook Time: 10 min

CRAVING MORE?

Follow along here & don’t forget to subscribe to my substack!

Mint Garlic Dip

Mint Garlic Dip

Mint Garlic Dip

Mint Garlic Dip

December 10, 2024 by Kimberly

Savor the goodness of a minty garlic dip with creamy yogurt. It’s a tasty twist that adds extra flavor to your snacks and meals. Dip in and enjoy!

This website uses affiliate links which may earn commission for purchases made at no additional cost to you.

TOTAL TIME

5 min

SERVES

2 portions

DIET

vegetarian

EVERY RECIPE DESERVES

A Little Love Letter

This dip is a creamy mix of yogurt, fresh mint, and zesty garlic. The refreshing mint adds a burst of flavor, while the garlic gives it a zing. Whether you’re snacking or serving at a party, this dip is sure to be a hit. Easy to make and even easier to enjoy—transform your meals with the delightful taste of mint garlic goodness!

Serve up the delightful Mint Garlic Dip to elevate your meals! Ideal for dipping veggies and chips, it also makes a tasty spread for sandwiches. You can also use the salad as a wonderful component for a whole meal, take a look at my Chicken Shawarma Plate. The cool and zesty blend of mint and garlic adds a burst of flavor to any dish.

Keep your yogurt mint garlic dip fresh by storing it in an airtight container in the refrigerator. This ensures its creamy texture and delicious flavor stay intact. For a longer shelf life, avoid leaving it at room temperature.

Hi, I'm Kimberly!

Hi, I'm Kimberly.

A hopeless romantic when it comes to food. Every recipe I share is a love letter to food itself. I’m so glad you’re here. Make yourself at home and stay a while.

Love,
Kimberly

Kimberly the Zett Signature

If you want to get to know me better,
click here!


Mint Garlic Dip
Mint Garlic Dip

LET’S MAKE A PIECE OF HAPPINESS

Print
.tasty-recipe-responsive-iframe-container-9c105aa6 { position: relative; overflow: hidden; padding-top: 177.62%; } .tasty-recipe-responsive-iframe-container-9c105aa6 iframe { position: absolute; top: 0; left: 0; width: 100%; height: 100%; border: 0; } clock clock iconcutlery cutlery iconflag flag iconfolder folder iconinstagram instagram iconpinterest pinterest iconfacebook facebook iconprint print iconsquares squares iconheart heart iconheart solid heart solid icon
Mint Garlic Dip

Mint Garlic Dip


  • Author: Kimberly
  • Total Time: 5 minutes
  • Yield: 2

Description

RECOMMENDED EQUIPMENT

  • sharp knife
  • small cutting board
  • small bowl

Ingredients

Units Scale
  • 200 grams yogurt
  • 12 leaves fresh mint
  • 1 garlic clove
  • 1/4 tsp salt
  • 1/8 tsp pepper

Instructions

  1. Remove the peel from the garlic clove.
  2. Stack the mint leaves on top of each other and roll them up. Then cut into fine rings and chop finely.
  3. Add yogurt to the bowl. Add the garlic clove with a press. Finally, add salt and finely ground pepper, as well as the finely chopped mint, and stir everything into a creamy dip.
  • Cook Time: 5 min

CRAVING MORE?

Follow along here & don’t forget to subscribe to my substack!