Gnocchi Romaine Salad with Oven-Roasted Tomatoes & Parmesan

Gnocchi Romaine Salad with Oven-Roasted Tomatoes & Parmesan

Gnocchi Romaine Salad with Oven-Roasted Tomatoes & Parmesan

Gnocchi Romaine Salad with Oven-Roasted Tomatoes & Parmesan

May 15, 2024 by Kimberly

Savor the charm of this gnocchi romaine salad combined with roasted tomatoes and parmesan in a creamy garlic-yogurt dressing – perfect for a refreshing, hearty meal!

25 MINUTES

EASY

VEGETARIAN

ITALIAN

614 PER PORTION

COMFORT FOOD
TANGY

EVERYDAY

SALAD

SPRING
SUMMER

INTRODUCTION

ABOUT THE RECIPE

Elevate your dining experience with this gnocchi romaine salad, featuring oven-roasted tomatoes and a sprinkle of parmesan, all tossed in a zesty garlic-vinegar yogurt dressing. A delightful twist on classic ingredients!

How to serve
This salad shines whether served chilled or with tomatoes fresh out of the oven and gnocchi straight from the pan, making it a delightful choice for warm days. Pair it with red wine or a chilled rosé to complement the tangy yogurt dressing, along with a bit of baguette. Perfect for picnics or light lunches.

How to store
Keep the salad fresh by storing its components separately in sealed containers in the refrigerator. It’s best enjoyed within two days to ensure the flavors stay vibrant and the gnocchi retains its texture.

Hi, I'm Kimberly!

Hi, I'm Kimberly.

A passionate food lover who believes in the magic of homemade deliciousness that spreads love and warmth. Join me on this culinary adventure as I prepare wonderful dishes and let’s spread some happiness together!

Kimberly the Zett Signature

If you want to get to know me better, click here!


Gnocchi Romaine Salad with Oven-Roasted Tomatoes & Parmesan
„Let’s make a piece of happiness“
Print
clock clock iconcutlery cutlery iconflag flag iconfolder folder iconinstagram instagram iconpinterest pinterest iconfacebook facebook iconprint print iconsquares squares iconheart heart iconheart solid heart solid icon
Gnocchi Romaine Salad with Oven-Roasted Tomatoes & Parmesan

Gnocchi Romaine Salad with Oven-Roasted Tomatoes & Parmesan


5 Stars 4 Stars 3 Stars 2 Stars 1 Star

No reviews

  • Author: Kimberly
  • Total Time: 25 minutes
  • Yield: 2 1x
  • Diet: Vegetarian

Description

RECOMMENDED EQUIPMENT

  • sharp knife
  • cutting board
  • medium-sized frying pan
  • two salad bowls
  • small bowl

Ingredients

Units Scale

DRESSING & SALAD

  • 2 romaine lettuces
  • 1 garlic clove
  • 20 grams parmesan
  • 8 grams Worcestershire sauce
  • 1 tsp dijon mustard
  • 100 grams yogurt
  • 12 grams red wine vinegar

ROASTED TOMATOES

  • 250 grams cocktail tomatoes
  • 1 tbsp olive oil
  • 1 garlic clove

GNOCCHI

  • 400 grams soft gnocchi
  • 2 tbsp olive oil

TOPPINGS

  • chives
  • parmesan
  • black pepper

Instructions

PREPARATIONS

  • Wash tomatoes, lettuce, and chives.
  • Chop the chives into fine rolls and cut the lettuce into bite-sized pieces.
  • Peel the garlic cloves and finely chop or press them.
  • Grate the Parmesan finely.
  • Line a baking tray with parchment paper.
  • Preheat the oven to 200°C/392°F.

INSTRUCTIONS

  1. Place the tomatoes on the baking tray. Mix with 1 tablespoon of olive oil and a pressed garlic clove, and roast in the oven for about 15 minutes.
  2. Heat 2 tablespoons of olive oil in a medium frying pan and sauté the gnocchi until crispy.
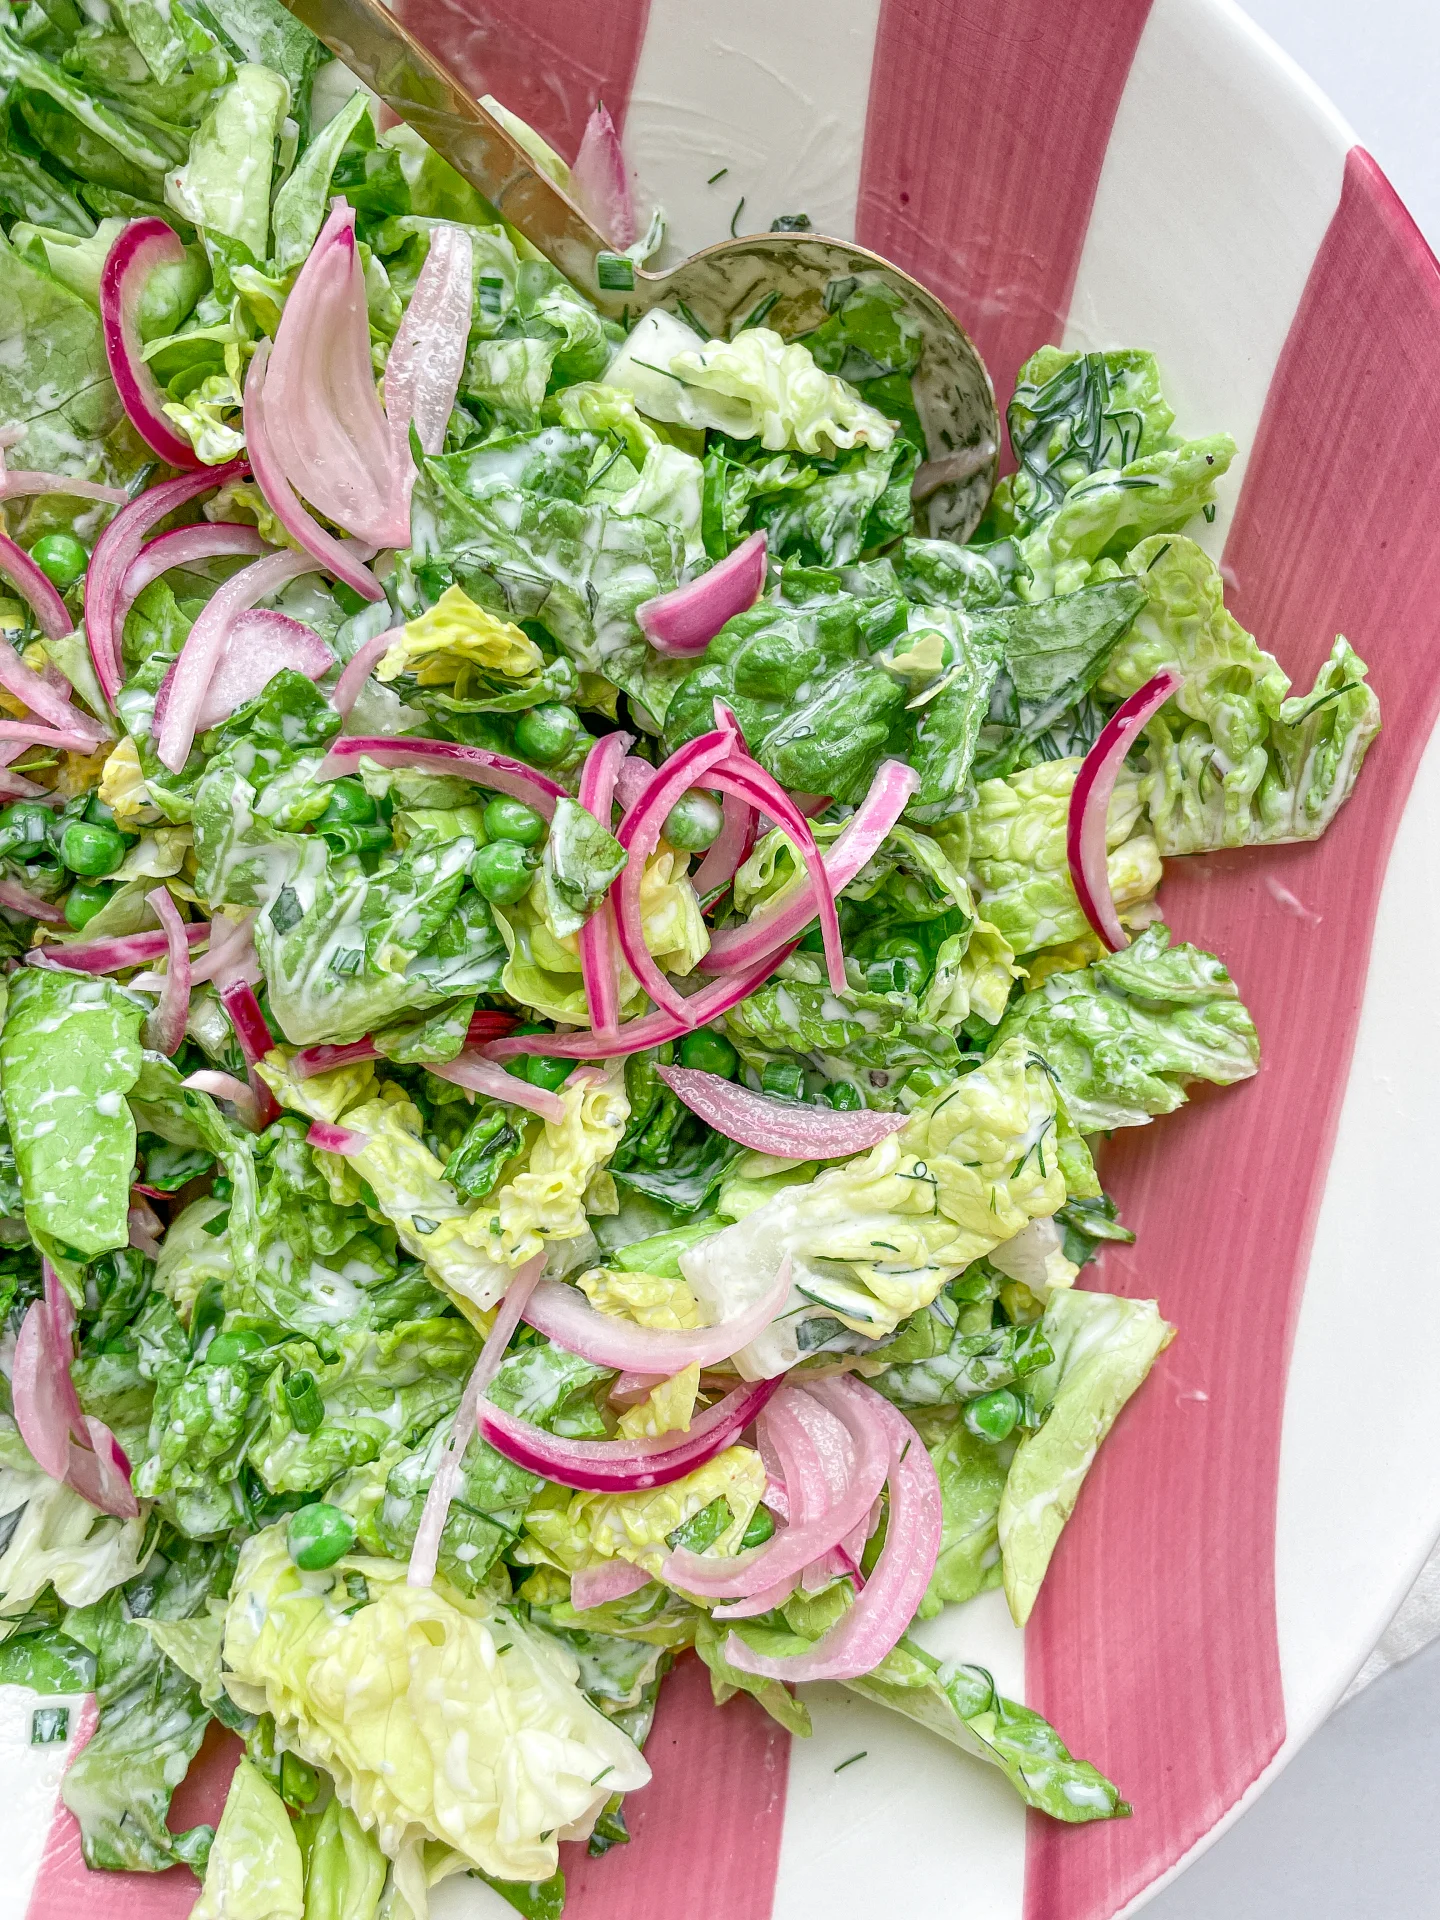
  3. Meanwhile, divide the Romaine lettuce between two bowls. In a small bowl, thoroughly mix all the ingredients for the dressing. Evenly distribute the dressing over the lettuce in the two bowls, toss well to coat the lettuce with the dressing.
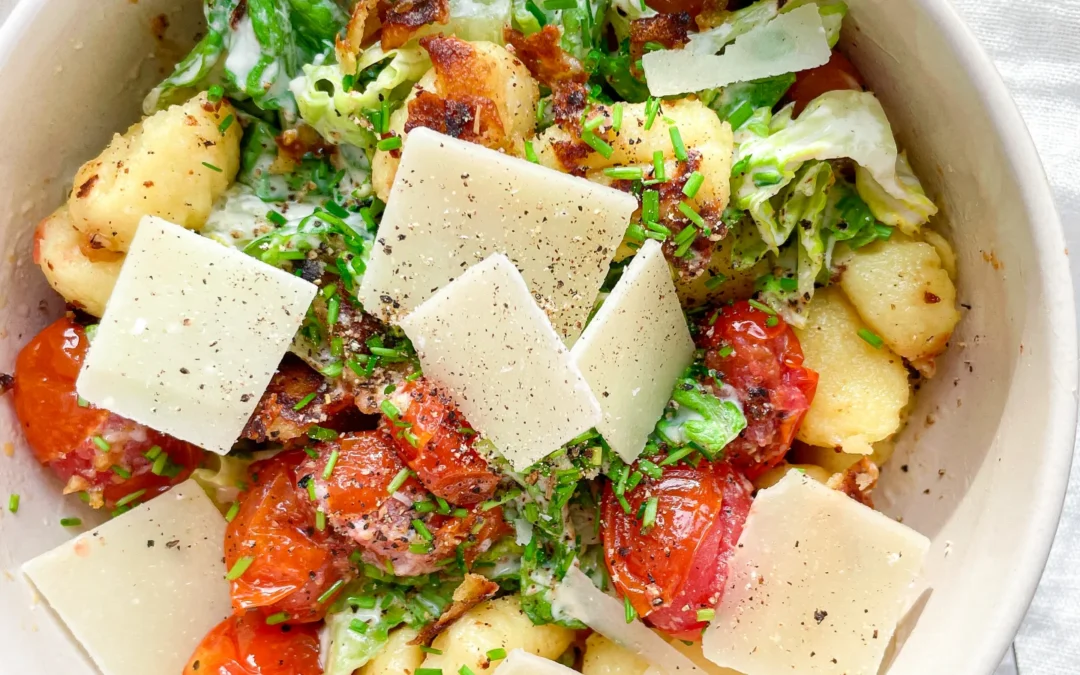
  4. Remove the tomatoes from the oven and distribute them and the gnocchi among the bowls. Toss briefly. Top everything with chives and Parmesan and serve immediately.

Notes

The calorie information may vary depending on the product used, country and region.

  • Prep Time: 10
  • Cook Time: 15
  • Category: SALAD
  • Cuisine: ITALIAN

Garlic Oil

Garlic Oil

Garlic Oil

Garlic Oil

May 14, 2024 by Kimberly

Unleash the aromatic power of homemade Garlic Oil! Perfect for drizzling over dishes to add a burst of flavor. Simple, versatile, and absolutely irresistible.

2 HOURS

ADVANCED

VEGAN

INT.

40 PER TSP

SPICY

MICHELIN

OIL

ALL YEAR

INTRODUCTION

ABOUT THE RECIPE

Discover the magic of homemade Garlic Oil, an easy addition to your culinary arsenal that brings a robust flavor to any dish. It’s simple to make and wonderfully versatile.

How to serve
Garlic Oil is a fantastic way to elevate your cooking. Drizzle it over pizza, stir into pasta, or use it as a flavorful dressing for salads. It adds a delicious garlic punch to bread, steaks, and even roasted vegetables, making it a must-have in your kitchen for an instant flavor upgrade.

How to store
Store your Garlic Oil in an oil bottle in the fridge. It keeps well for up to two to three weeks, ensuring you have this flavorful enhancer ready whenever needed.

Hi, I'm Kimberly!

Hi, I'm Kimberly.

A passionate food lover who believes in the magic of homemade deliciousness that spreads love and warmth. Join me on this culinary adventure as I prepare wonderful dishes and let’s spread some happiness together!

Kimberly the Zett Signature

If you want to get to know me better, click here!


Garlic Oil
Garlic Oil
Garlic Oil
„Let’s make a piece of happiness“
Print
clock clock iconcutlery cutlery iconflag flag iconfolder folder iconinstagram instagram iconpinterest pinterest iconfacebook facebook iconprint print iconsquares squares iconheart heart iconheart solid heart solid icon
Garlic Oil

Garlic Oil


  • Author: Kimberly
  • Total Time: 2 hrs
  • Yield: 250 ml / 1 cup 1x

Description

RECOMMENDED EQUIPMENT

  • blender
  • medium-sized saucepan
  • whisk
  • a bowl which the medium saucepan fits into
  • 2 medium-sized bowls
  • 2 fine sieves
  • sealable container (oil bottle)
  • ice cubes
  • coffee filter

Ingredients

Units Scale
  • 3 garlic bulbs
  • 250 milliliters extra virgin olive oil

Instructions

  1. Peel all garlic cloves and put them into the blender. Pour in the oil. Blend on the highest setting until there are only tiny pieces of the garlic left.
  2. Pour the mixture from the blender into a medium-sized pot and heat it over medium heat to a temperature of about 108°-110°C (226°-230°F), and maintain this temperature for the next 15 minutes. Stir occasionally, making sure the temperature remains steady and nothing gets burned.
  3. Prepare a bowl large enough to fit a medium-sized pot, and fill it with cold water and a handful of ice cubes. Also, hang a fine sieve strainer over one medium-sized bowl and another fine sieve strainer, with a coffee filter inside it, over another medium-sized bowl.
  4. Now, place the pot in the ice water and stir to cool the oil quickly. Once the oil is almost cold, remove the pot from the water and let it sit for about 20 minutes so that the oil gets more infused.
  5. After the 20 minutes, pour the oil into the prepared fine sieve to catch the coarse particles.
  6. Then, pour the oil into the second sieve, which is equipped with a coffee filter, to catch the remaining finer particles.
  7. Allow the oil to drip through for about 1 hour or maybe more depending on how many remaining particles are in the coffee filter. Once all the oil has passed through the coffee filter, transfer the collected amount of oil into a sealable container or directly into an oil bottle. Store in the refrigerator for up to a few days.

Notes

The calorie information may vary depending on the product used, country and region.

  • Passive Time: 90 min
  • Cook Time: 25 min

Vegan Dumplings in Sesame Miso Soup

Vegan Dumplings in Sesame Miso Soup

Vegan Dumplings in Sesame Miso Soup

Vegan Dumplings in Sesame Miso Soup

May 6, 2024 by Kimberly

Indulge in a comforting bowl full of flavor, perfect for cozy nights. Healthy, hearty, and absolutely delicious!

90 MINUTES

INTERMEDIATE

VEGAN

ASIAN

560 PER PORTION

COMFORT FOOD
UMAMI

EVERYDAY

DINNER

ALL YEAR

INTRODUCTION

ABOUT THE RECIPE

Savor the warmth and richness of these vegan Dumplings in Sesame Miso Soup, a delightful dish that combines hearty plant-based dumplings with a savory miso broth. This soup is not only nourishing but also packed with exquisite flavors that will satisfy both vegans and non-vegans alike. It’s a perfect choice for those seeking a comforting meal that’s both healthful and satisfying.

How to serve
Serve this aromatic Sesame Miso Soup hot, with its soft, tender dumplings soaking up the flavorful broth. Garnish with chopped green onions or cilantro, a sprinkle of sesame seeds, and a drizzle of crispy chili oil for an extra touch of luxury.

How to store
Store leftovers in an airtight container in the refrigerator for up to 2 days. Reheat gently to preserve the flavors and textures of the dumplings and broth. Freezing is not recommended as it may affect the soup’s quality.

Hi, I'm Kimberly!

Hi, I'm Kimberly.

A passionate food lover who believes in the magic of homemade deliciousness that spreads love and warmth. Join me on this culinary adventure as I prepare wonderful dishes and let’s spread some happiness together!

Kimberly the Zett Signature

If you want to get to know me better, click here!


Vegan Dumplings in Sesame Miso Soup
„Let’s make a piece of happiness“

INGREDIENTS

FOR 4 PORTIONS

DOUGH

FILLING

  • 200g mushrooms (7 oz)
  • 200g napa cabbage (7 oz)
  • 3 spring onions
  • 1 carrot
  • 1/2 tsp ginger
  • 3 garlic cloves, grated
  • 1 tbsp cilantro
  • 1 tbsp clarified butter
  • 1 tbsp soy sauce
  • 1/4 tsp sesame oil
  • 1/8 tsp ground white pepper

SESAME MISO SOUP

  • 800ml water (3.5 cups)
  • 6 tbsp tahini
  • 4 tbsp white miso paste
  • 2 tbsp crispy chili oil
  • 2 tbsp soy sauce
  • 2 tbsp rice vinegar
  • 2 tsp ginger, grated
  • 2 tsp sugar
  • 2 garlic cloves, grated

TOPPINGS

  • cilantro
  • crispy chili oil
  • sesame seeds
Vegan Dumplings in Sesame Miso Soup
}

ACTIVE: 30 min

PASSIVE: –

PREPARATIONS

Recommended Equipment
  • sharp knife
  • cutting board
  • vegetable peeler
  • salad spinner
  • large frying pan
  • two medium-sized pots
  • large plate
  • Prepare dumpling wrappers or defrost store-bought ones.
  • Peel and finely chop or grate the ginger. Set aside.
  • Peel and finely chop or press the garlic cloves. Set aside.
  • Clean the mushrooms and dice them into small pieces. Set aside.
  • Chop the napa cabbage into small pieces and wash it. Set aside.
  • Peel and finely dice the carrots. Set aside.
  • Pluck the cilantro leaves from the stems and finely chop them. Set aside.
  • Separate the green and white parts of the green onions and slice both into fine rings. Set aside.
}

ACTIVE: 40 min

PASSIVE: 20 min

COOKING

1. Heat a large pan over medium heat and add 1 tablespoons of clarified butter. Start by sautéing the white parts of the green onions, ginger, and garlic for a few minutes. Next, add the carrot pieces and sauté for a few more minutes. Then, add the mushroom pieces, mix well, and finally add the napa cabbage. Let the napa cabbage cook until soft, then stir everything together. Remove the pan from the heat and let it cool.

2. Once the mixture has cooled down, add 2 tablespoons of chopped cilantro, the green parts of the green onions, 1/4 teaspoon of ground white pepper, 2 tablespoons soy sauce, and 1/2 tablespoon sesame oil. Mix everything well.

3. Set up your vegetable filling, the dumpling wrappers, and a small bowl of cold water. Also, prepare a large plate dusted with a little flour where you can place your finished dumplings. Now, put on your favorite series or podcast and start filling your dumplings 🙂

4. Take a wrapper and place about 1-1.5 teaspoons of the vegetable mixture in the center. Dip a finger in the water and moisten the edge of the upper half of the wrapper. Fold the wrapper like a taco shell upwards and press the left tip of the wrapper with your left hand. Now, with the right hand’s index finger and thumb, hold the closed tip with your left thumb, place a small fold at the top edge against the backside of the wrapper and press it firmly. Continue this until the wrapper is completely closed and you have a finished dumpling in your hand. Place the finished dumpling on the floured plate. This folding technique might take a little practice. For a visual demonstration, just scroll down to my video at the end of the recipe 🙂 Continue this process until all the dumpling wrappers and filling are used up.

5. Fill a medium-sized pot with enough water to fill just over half the pot. Bring the water to a boil.

6. Meanwhile, you can prepare the Sesame Miso Soup in the other pot. Add the following ingredients to the pot: tahini, white miso paste, soy sauce, rice vinegar, sugar, crispy chili oil, water, and grated garlic and ginger. Bring everything to a simmer over medium heat. Keep the soup on a low flame on the stove.

7. Once the water in the other pot is boiling, turn it down slightly and add 6-8 dumplings depending on the size of your pot and let them cook for about 8 minutes. Since dumplings expand while cooking, do not overcrowd your pot. Once the dumplings become translucent and the filling is clearly visible, they are done. Place the dumplings in the bowls in which you want to serve them. Continue this for all dumplings until all are cooked.

8. Once all dumplings are ready, evenly distribute the soup from the other pot over the dumplings. Top each bowl with some cilantro, Crispy Chili Oil, and toasted sesame seeds.

NOTE: The calorie information may vary depending on the product used, country and region.

Dried Chili Oil

Dried Chili Oil

Dried Chili Oil

Dried Chili Oil

April 30, 2024 by Kimberly

Discover the magic of homemade chili oil! Spicy, flavorful, and perfect for enhancing any dish with just the right kick of heat.

2 HOURS

ADVANCED

VEGAN

INT.

40 PER TSP

SPICY

MICHELIN

OIL

ALL YEAR

INTRODUCTION

ABOUT THE RECIPE

Dive into the vibrant world of homemade chili oil! This easy-to-make condiment is a game-changer for any kitchen, adding a spicy flair that perfectly balances heat and flavor. It’s a must-try for spice lovers!

HOW TO SERVE
Drizzle this fiery chili oil over noodles, pizza, or dumplings to elevate your meals from ordinary to extraordinary. Its robust flavor also makes it a great partner for soups and stews, providing a warm, spicy undertone that delights the palate.

HOW TO STORE
Keep your chili oil in an airtight container in a cool, dark place. It stays fresh for up to a month, ensuring you have a delicious kick of flavor ready anytime.

Hi, I'm Kimberly!

Hi, I'm Kimberly.

A passionate food lover who believes in the magic of homemade deliciousness that spreads love and warmth. Join me on this culinary adventure as I prepare wonderful dishes and let’s spread some happiness together!

Kimberly the Zett Signature

If you want to get to know me better, click here!


Dried Chili Oil
Dried Chili Oil
Dried Chili Oil
„Let’s make a piece of happiness“
Print
clock clock iconcutlery cutlery iconflag flag iconfolder folder iconinstagram instagram iconpinterest pinterest iconfacebook facebook iconprint print iconsquares squares iconheart heart iconheart solid heart solid icon
Dried Chili Oil

Dried Chili Oil


  • Author: Kimberly
  • Total Time: 1 hour 55 minutes
  • Yield: 250 ml / 1 cup 1x

Description

RECOMMENDED EQUIPMENT

  • blender
  • medium-sized saucepan
  • whisk
  • a bowl which the medium saucepan fits into
  • 2 medium-sized bowls
  • 2 fine sieves
  • sealable container (oil bottle)
  • ice cubes
  • coffee filter


Ingredients

Units Scale
  • 15 grams (0.5 oz) dried chili peppers
  • 250 milliliters neutral cooking oil

Instructions

  1. Prepare a bowl large enough to fit a medium-sized pot, and fill it with cold water and a handful of ice cubes. Also, hang a fine sieve strainer over one medium-sized bowl and another fine sieve strainer, with a coffee filter inside it, over another medium-sized bowl.
  2. Remove the stems from the chili pepper, chop the rest into coarse pieces, and put them into the blender. Pour in the oil. Blend on the highest setting until the mixture becomes bright orange/red and only tiny pieces of the chili peppers are visible.
  3. Pour the mixture from the blender into a medium-sized pot and heat it over medium heat to a temperature of about 102°-103°C (215°-217°F), and maintain this temperature for the next 10 minutes. Stir occasionally, making sure the temperature remains steady and nothing gets burned.
  4. Now, place the pot in the ice water and stir to cool the oil quickly. Once the oil is almost cold, remove the pot from the water and let it sit for about 30 minutes so that the oil gets more infused.
  5. After the 30 minutes, pour the oil into the prepared fine sieve to catch the coarse particles.
  6. Then, pour the oil into the second sieve, which is equipped with a coffee filter, to catch the remaining finer particles.
  7. Allow the oil to drip through for about 1 hour or maybe more depending on how many remaining particles are in the coffee filter. Once all the oil has passed through the coffee filter, transfer the collected amount of oil into a sealable container or directly into an oil bottle. Store in the refrigerator for up to one month.

Notes

The calorie information may vary depending on the product used, country and region.

  • Passive Time: 90 min
  • Cook Time: 25 min

Asparagus Caramalized Leeks Flatbread with Parmesan & Ricotta

Asparagus Caramalized Leeks Flatbread with Parmesan & Ricotta

Asparagus Caramalized Leeks Pizza with Parmesan & Ricotta

Asparagus Caramalized Leeks Flatbread with Parmesan & Ricotta

April 12, 2024 by Kimberly

Crispy dough, creamy cheese, buttery leeks, and shaved asparagus. This one’s giving farmers market fantasy meets lazy dinner. It tastes like you definitely own linen napkins, even if you don’t.

2.5 HOURS

INTERMEDIATE

VEGETARIAN

INT.

4 FLATBREADS

CRISPY

DINNER PARTY

DINNER

SPRING

INTRODUCTION

ABOUT THE RECIPE

Ready to transform your pizza night? This Asparagus Caramelized Leeks Flatbread with Parmesan & Ricotta is a game-changer! It combines the earthy sweetness of caramelized leeks with the fresh, green crunch of asparagus, all beautifully balanced with the richness of Ricotta and Parmesan. Perfect for those who love adding a sophisticated twist to their homemade pizzas, this recipe is sure to impress your taste buds and guests alike.

How to serve:
This flatbread shines brightest when served fresh out of the oven. Slice it up for a cozy family dinner, or cut it into smaller pieces for a classy appetizer at your next gathering. Pair it with a crisp white wine or a light beer to complement its gourmet toppings. Don’t forget to garnish with some fresh micro greens or arugula for that extra pop of flavor and color!

How to store:
Leftovers can be stored in the refrigerator for up to three days. Reheat in a preheated oven at 190°C/375°F for about 10 minutes or until heated through.

Hi, I'm Kimberly!

Hi, I'm Kimberly.

A passionate food lover who believes in the magic of homemade deliciousness that spreads love and warmth. Join me on this culinary adventure as I prepare wonderful dishes and let’s spread some happiness together!

Kimberly the Zett Signature

If you want to get to know me better, click here!


Asparagus Caramalized Leeks Pizza with Parmesan & Ricotta
„Let’s make a piece of happiness“
Print
clock clock iconcutlery cutlery iconflag flag iconfolder folder iconinstagram instagram iconpinterest pinterest iconfacebook facebook iconprint print iconsquares squares iconheart heart iconheart solid heart solid icon
Asparagus Caramalized Leeks Pizza with Parmesan & Ricotta

Asparagus Caramalized Leeks Flatbread with Parmesan & Ricotta – Rezeptkarte


  • Author: Kimberly
  • Total Time: 165 min
  • Yield: 4 1x

Description

RECOMMENDED EQUIPMENT

  • sharp knife
  • cutting board
  • peeler
  • cheese grater
  • big bowl
  • oven-safe dish with a lid (or aluminum foil)
  • small pan
  • oven
  • cling film

Ingredients

Units Scale

PIZZA DOUGH

  • 600 grams pizza flour (or type 00)
  • 400 milliliters lukewarm water
  • 2 tsp salt
  • 7 grams active instant dry yeast

BAKED GARLIC

  • 1 garlic bulb
  • 1/4 tsp chili flakes
  • 1/4 tsp salt
  • 3 tbsp olive oil

CARAMALIZED LEEKS

  • 1 leek
  • 2 tsp butter
  • pinch of salt

BAKED TOPPINGS

  • 500 grams green asparagus
  • 80 grams parmesan
  • 2 tsp fresh thyme

OTHER TOPPINGS AFTER BAKING

  • ricotta cheese
  • cress
  • pine nuts
  • fresh lemon juice
  • olive oil
  • black pepper

Instructions

  1. In a large bowl, mix flour, salt, and yeast. Make a well in the center, pour in lukewarm water, and stir everything together with a wooden spoon until everything just came together and you get a sticky dough. Cover the bowl tightly with cling film and let the dough rest for 10 minutes.

  2. Now remove the cling film and do a round of stretch and folds: grab the dough from all four sides, lift each section, and fold it into the center. Wet your hand with lukewarm water each time to keep things from sticking. Cover the bowl again, rest for another 10 minutes, and repeat the stretch and fold. Cover once more and let the dough rise at room temp for 1 hour. Do one last round of stretch and folds after that hour, cover again, and let it rest for another hour.

  3. Meanwhile, slice off the top of the bulb to expose the cloves. Place in an oven-safe dish, drizzle with 3 tbsp olive oil, sprinkle with ¼ tsp chili flakes and ¼ tsp salt. Cover and bake at 250°C / 482°F for 45 minutes.

  4. Now wash the asparagus and snap off the woody ends. Use a peeler to shave thin ribbons from the stalks, leaving the heads intact. Set both aside. Wash the leek and slice it into thick rings, try to keep the rings whole. Set aside. Grate the Parmesan, finely chop the thyme, and halve the lemon.

  5. Next toast pine nuts in a dry pan over medium heat until golden. Transfer to a bowl and set aside. Wipe out the pan, add 2 tsp butter, and melt over low-medium heat. Gently place in the leek rings and cook for 10–15 minutes until the bottom is golden and the leeks are soft. Flip carefully and cook another 5 minutes. Set aside.

  6. Once the garlic is cool, squeeze the cloves out into the oil, mash it all together into a paste, and set aside. Preheat your oven to 230°C / 446°F (fan).

  7. Lightly flour a piece of parchment paper. Divide your dough into 4 pieces. Take one, place it on the parchment, dust the top with flour, and gently press it out with your fingers until it resists stretching (about 1.5 cm / ½″ thick). Drizzle olive oil over the dough. Top with grated Parmesan, a bit of garlic paste, asparagus shavings + heads, and a few caramelized leek rings. Sprinkle with thyme. Bake for 20 minutes until golden and crispy.

  8. Fresh out of the oven, finish with dollops of ricotta, toasted pine nuts, microgreens, cracked pepper, a squeeze of lemon, and (optional) a final drizzle of olive oil. Slice and serve!

  • Passive Time: 120 min
  • Cook Time: 45 min

Tomato Oil

Tomato Oil

Tomato Oil

Tomato Oil

April 2, 2024 by Kimberly

Discover the vibrant burst of flavor with homemade tomato oil! This easy-to-make oil adds a gourmet touch to any meal.

2 HOURS

ADVANCED

VEGAN

INT.

40 PER TSP

UMAMIMICHELIN

OIL

ALL YEAR

INTRODUCTION

ABOUT THE RECIPE

Dive into the world of gourmet flavors with my homemade tomato oil! Made from the freshest tomatoes, this oil is a game-changer for any kitchen. Its rich, tomato-infused taste transforms simple dishes into culinary masterpieces. Perfect for chefs of all levels, this easy recipe is your secret ingredient for that extra flavor kick.

How to serve:
Tomato oil is incredibly versatile, adding depth and aroma to any dish. Drizzle it over fresh salads for a summery vibe or blend it into your pasta for an instant flavor upgrade. It’s also perfect as a finishing oil on grilled vegetables, pizzas, and even soups. Elevate your bread dipping game by serving this rich oil alongside your favorite bread.

How to store:
For longevity, store your tomato oil in a clean, airtight container in the refrigerator. It keeps well for up to two weeks, ensuring you have this delightful flavor enhancer at hand whenever your dishes need a burst of tomato magic.

Hi, I'm Kimberly!

Hi, I'm Kimberly.

A passionate food lover who believes in the magic of homemade deliciousness that spreads love and warmth. Join me on this culinary adventure as I prepare wonderful dishes and let’s spread some happiness together!

Kimberly the Zett Signature

If you want to get to know me better, click here!


Tomato Oil
Tomato Oil
Tomato Oil
„Let’s make a piece of happiness“

INGREDIENTS

FOR 250ml (1 CUP)

TOMATO OIL

  • 400g fresh tomatoes (14 oz)
  • 250ml neutral cooking oil (1 cup)
Tomato Oil
}

ACTIVE: 2 min

PASSIVE: –

PREPARATIONS

Recommended Equipment
  • blender
  • medium-sized saucepan
  • whisk
  • a bowl into which the medium saucepan fits
  • 2 medium-sized bowls
  • fine sieve
  • sealable container
  • ice cubes
  • coffee filter
  • Wash the tomatoes and remove the greens.
}

ACTIVE: 60 min

PASSIVE: 60 min

COOKING

1. Put the tomatoes into the blender. Pour in the oil. Blend on the highest setting until it becomes a thick bright orange consistency and no pieces of tomatoes are longer visible.

2. Pour the mixture from the blender into a medium-sized pot and heat it over medium heat, constantly stirring, to a temperature of about 102°-103°C (215°-217°F). Then, let the oil simmer with the lid partially on for the next 30-40 minutes. Stir only occasionally, making sure the temperature remains steady. This long cooking time is essential for all the water to evaporate, allowing the perishable solids to settle at the bottom and the dark red oil to float on top. You’ll know all the water has evaporated when the oil in the pot barely bubbles anymore – so if it’s still bubbling vigorously, keep it simmering.

3. At the end of the cooking process, prepare a bowl large enough to fit the medium-sized pot, filled with cold water and a handful of ice cubes. Also, hang a fine sieve strainer over a medium-sized bowl.

4. Now, place the pot in the ice water and stir to stop the cooking process. Once the oil is no longer boiling and is almost cold, remove the pot from the water and pour the oil into the fine sieve to catch the coarse particles.

5. Then, rinse the strainer, dry it off well and hang it over the second medium-sized bowl. Press a coffee filter into the strainer and pour the captured oil into the coffee filter, so that the remaining perishable and coarser particles are caught.

6. Allow the oil to drip through for about 1 to 2 hours. Once all the oil has passed through the coffee filter, transfer the collected amount into a sealable container or directly into an oil bottle. Store in the refrigerator.

NOTE: The calorie information may vary depending on the product used, country and region.