Chocolate Chip Cookies

Chocolate Chip Cookies

Chocolate Chip Cookies

Chocolate Chip Cookies

March 13, 2024 by Kimberly

Look no further for the ultimate chocolate chip cookies. Dive into this rich, double chocolate chip cookie recipe, featuring a generous amount of dough and massive chocolate chunks!

This website uses affiliate links which may earn commission for purchases made at no additional cost to you.

TOTAL TIME

2 hrs + 50 min

SERVES

10 cookies

DIET

vegetarian

EVERY RECIPE DESERVES

A Little Love Letter

Get ready to fill your kitchen with the mouthwatering aroma of freshly baked Chocolate Chip Cookies! This recipe combines the perfect blend of sweet, gooey, and chocolaty in every bite. Ideal for any occasion, from family gatherings to a personal treat, these homemade cookies promise to be your new favorite. Let’s dive into the simple steps to create these delightful treats that everyone loves!

Serve these delicious Chocolate Chip Cookies fresh out of the oven for the ultimate gooey experience, or let them cool to achieve a delightful crunch. Pair with a glass of cold milk or your favorite coffee for a classic combo. They’re perfect for parties, as a sweet snack, or as a thoughtful homemade gift. Remember, warm cookies and cold milk are a match made in heaven for any cookie lover!

Store your Chocolate Chip Cookies in an airtight container to keep them fresh and chewy. They’ll last for up to a week at room temperature or can be frozen for longer enjoyment. Perfect for having a sweet treat on hand anytime!

Hi, I'm Kimberly!

Hi, I'm Kimberly.

A hopeless romantic when it comes to food. Every recipe I share is a love letter to food itself. I’m so glad you’re here. Make yourself at home and stay a while.

Love,
Kimberly

Kimberly the Zett Signature

If you want to get to know me better,
click here!


Chocolate Chip Cookies

LET’S MAKE A PIECE OF HAPPINESS

Print
clock clock iconcutlery cutlery iconflag flag iconfolder folder iconinstagram instagram iconpinterest pinterest iconfacebook facebook iconprint print iconsquares squares iconheart heart iconheart solid heart solid icon
Chocolate Chip Cookies

Chocolate Chip Cookies


5 Stars 4 Stars 3 Stars 2 Stars 1 Star

No reviews

  • Author: Kimberly
  • Total Time: 2 hrs + 20 min
  • Yield: 10

Description

GOOD TO HAVE ON HAND

  • sharp knife
  • cutting board
  • small bowl
  • small pot (or microwave)
  • two medium-sized bowls
  • whisk
  • spatula


Ingredients

Units Scale
  • 200 grams all-purpose flour
  • 35 grams cornstarch
  • 140 grams butter
  • 150 grams brown sugar
  • 50 grams white sugar
  • 100 grams semi-sweet chocolate
  • 100 grams white chocolate
  • 1 egg
  • 1 egg yolk
  • 1 tsp baking powder
  • 3/4 tsp salt

Instructions

  1. Chop the chocolate into big chunks.
  2. Melt the butter in a pot or in the microwave.
  3. In a medium-sized bowl, mix the flour, starch, and salt. Set aside.
  4. In another medium-sized bowl, mix the brown and white sugar. Add the melted butter with a whisk and beat the mixture until it becomes kind of creamy.
  5. Now add one whole egg and one egg yolk and beat until the mixture becomes thicker.
  6. Next, add the dry ingredients from the other bowl and stir a little, then add the chocolate and mix everything until no more flour is visible and stop stirring to avoid overmixing the dough.
  7. Form the dough into 9 equal-sized balls and place them in a container that fits in the fridge. Place the cookie balls in the refrigerator for at least 2 hours – if you want to prepare the dough in advance, you can leave it in the fridge for up to 48 hours.
  8. Preheat the oven to 220°C (425°F). Once the oven is hot, place the cookies on a baking sheet lined with parchment paper and bake for 8-10 minutes.
  9. Remove the tray with the cookies from the oven and let them cool for 15 minutes. I know it’s hard, but it’s worth the wait 😉
  • Passive Time: 2 hrs
  • Cook Time: 20 min

CRAVING MORE?

Follow along here & don’t forget to subscribe to my substack!

Basic Beef Broth

Basic Beef Broth

Basic Beef Broth

Basic Beef Broth

February 22, 2024 by Kimberly

Discover the rich, savory goodness of homemade Beef Broth, a nourishing and flavorful base for soups and stews.

This website uses affiliate links which may earn commission for purchases made at no additional cost to you.

TOTAL TIME

7 hrs

SERVES

2.5 liters / 5 fl. pt.

DIET

omnivore

EVERY RECIPE DESERVES

A Little Love Letter

Embrace the art of cooking with my homemade Beef Broth recipe. This nutritious and flavorful broth forms a versatile foundation for countless dishes. A perfect blend of simplicity and taste, this beef broth recipe guarantees a delightful culinary experience. It’s not just a recipe – it’s a journey to explore the depths of natural flavors, making it ideal for those who love to infuse health and taste in their cooking.

It’s perfect as a base for hearty soups and stews. Elevate your risottos, gravies, and sauces with its rich flavor. For a personalized touch, garnish with fresh herbs or a sprinkle of sea salt. Its versatility makes it a staple in any kitchen, promising a gourmet experience with every dish.

Cool it down and refrigerate for up to 4-5 days. For longer storage, freeze it in portions. Use ice cube trays for easy, recipe-ready portions, ensuring freshness and convenience whenever you need it.

Hi, I'm Kimberly!

Hi, I'm Kimberly.

A hopeless romantic when it comes to food. Every recipe I share is a love letter to food itself. I’m so glad you’re here. Make yourself at home and stay a while.

Love,
Kimberly

Kimberly the Zett Signature

If you want to get to know me better,
click here!


Basic Beef Broth
Basic Beef Broth

LET’S MAKE A PIECE OF HAPPINESS

Print
.tasty-recipe-responsive-iframe-container-2337b804 { position: relative; overflow: hidden; padding-top: 177.62%; } .tasty-recipe-responsive-iframe-container-2337b804 iframe { position: absolute; top: 0; left: 0; width: 100%; height: 100%; border: 0; } clock clock iconcutlery cutlery iconflag flag iconfolder folder iconinstagram instagram iconpinterest pinterest iconfacebook facebook iconprint print iconsquares squares iconheart heart iconheart solid heart solid icon
Basic Beef Broth

Basic Beef Broth


  • Author: Kimberly
  • Total Time: 6 hrs + 30 min
  • Yield: 2.5 LITERS (APPROX. 5 FL. PT.)

Description

GOOD TO HAVE ON HAND

  • sharp knife
  • cutting board
  • large pot with lid
  • large bowl (or a medium-sized pot)
  • fine sieve (or a kitchen towel)


Ingredients

Units Scale
VEGETABLES & BEEF
  • 2 kilograms beef bones
  • 1 tsp clarified butter
  • 400 grams carrots
  • 2 onions
  • 200 grams celery root
  • 100 grams leek
  • 2 garlic cloves
  • 1 lemon
HERBS & SPICES
  • 2 bay leaves
  • 1 stem thyme
  • 1 large bunch of parsley
  • 5 cloves
  • 1/2 tsp coriander seeds
  • 1 tsp black peppercorns
  • 22 grams salt (approx. 2 1/2 tsp)

Instructions

  1. Wash the beef bones well and roast in the oven at 250°C (480°F) for approx. 30 minutes.
  2. Wash the carrots, celery and leek and cut everything into large pieces.
  3. Wash the lemon and herbs too. Put the herbs aside.
  4. Halve the onions and lemon.
  5. Heat 1 tsp clarified butter in a large pot and fry onions, lemon, carrots, celery, leek and garlic cloves until they leave a residue.
  6. Remove the bones from the oven and place on top of the vegetables. Fill up with 2.5-3 liters of cold water.
  7. Now add 2 dried bay leaves, 5 allspice seeds, 5 cloves, 1 teaspoon of black peppercorns, 1/2 teaspoon of coriander seeds and 1 bunch of parsley.
  8. Put the lid on and bring to the boil over a high heat. As soon as it boils, turn the heat down to the lowest setting and leave the liquid to simmer in the pot with the lid on for 6 hours.
  9. After 6 hours, remove the pot from the heat and leave to cool briefly. Remove the beef bones and any other coarse pieces of vegetables, as well as the herbs and spices.
  10. Strain the liquid through a fine sieve into a medium-sized pan. Allow the broth to cool completely and then skim off any fat floating on top. I put my pot in the fridge overnight. If there is still too much fat floating on top, the broth can be strained again through kitchen towels or a fine kitchen towel. The fat residue will then stick to it. Season the broth with salt. I season with 6-8g (approx. 1 teaspoon) per liter, depending on taste.
  11. The broth can now be processed directly or filled into jars.
  • Passive Time: 6 hrs
  • Cook Time: 30 min

CRAVING MORE?

Follow along here & don’t forget to subscribe to my substack!

Bechamel Sauce

Bechamel Sauce

Béchamel Sauce

Béchamel Sauce

February 13, 2024 by Kimberly

Discover the magic of Béchamel Sauce! This creamy, smooth classic is a culinary staple, perfect for enhancing your favorite dishes.

This website uses affiliate links which may earn commission for purchases made at no additional cost to you.

TOTAL TIME

25 min

SERVES

6 portions

DIET

vegetarian

EVERY RECIPE DESERVES

A Little Love Letter

Embark on a culinary journey with the classic Béchamel Sauce, a cornerstone of French cuisine. This creamy, smooth sauce is not just a recipe – it’s a gateway to elevating your meals. Whether you’re dressing up a lasagna or making a rich, savory Croque Monsieur, Béchamel Sauce brings a touch of elegance and flavor to your dishes. It’s simple to whip up with just a few ingredients.

Pour it over vegetables for a comforting gratin, use it as a base for creamy pasta dishes, or layer it in lasagnas and moussakas for a moist, flavorful experience. It’s also perfect for creating a luxurious mac and cheese. The key is to let the sauce slightly thicken to coat your spoon, ensuring it blends seamlessly with your dish, enhancing every bite.

To keep your Béchamel Sauce fresh, cool it at room temperature before refrigerating in a tightly sealed container. It lasts up to 3 days.

Hi, I'm Kimberly!

Hi, I'm Kimberly.

A hopeless romantic when it comes to food. Every recipe I share is a love letter to food itself. I’m so glad you’re here. Make yourself at home and stay a while.

Love,
Kimberly

Kimberly the Zett Signature

If you want to get to know me better,
click here!


Béchamel Sauce
Infused Béchamel Sauce

LET’S MAKE A PIECE OF HAPPINESS

Print
clock clock iconcutlery cutlery iconflag flag iconfolder folder iconinstagram instagram iconpinterest pinterest iconfacebook facebook iconprint print iconsquares squares iconheart heart iconheart solid heart solid icon
Béchamel Sauce

Bechamel Sauce


  • Author: Kimberly
  • Total Time: 25 min
  • Yield: 6

Description

GOOD TO HAVE ON HAND

  • small pot
  • whisk
  • small wooden spoon


Ingredients

Units Scale
  • 500 milliliters full-fat cow milk
  • 50 grams unsalted butter
  • 50 grams all-purpose flour
  • 1/2 nutmeg
  • 1 garlic clove
  • 3/8 tsp salt
  • 1/4 tsp white pepper

Instructions

  1. Melt the butter in a pan over a medium heat. Add the garlic clove and fry briefly in the butter. Remove the garlic clove.
  2. Now add all the flour to the melted butter and stir quickly with a wooden spoon until smooth. The consistency should be like a paste. Remove the pot directly from the heat and stir in the first 100ml of milk with a whisk until smooth. Place the pan back on the stove and bring to a boil briefly, stirring constantly. Now remove the pot from the heat and pour in the next 100ml (3 fl oz) of milk. Stir well, place the pot back on the stove and bring to a boil, stirring constantly. Now do the same with the next 3 rounds of 100ml (3 fl oz). Remove from the heat, pour in, stir, return to the stove, bring to the boil, remove from the heat and so on…
  3. After about 20 minutes, the sauce should have a consistency similar to melted cheese. You should no longer be able to taste the flour. The sauce can now be removed from the heat and seasoned to taste. To do this, grate the nutmeg freshly and add 3/8 teaspoon of salt and 1/4 teaspoon of pepper.
  • Cook Time: 25 min

CRAVING MORE?

Follow along here & don’t forget to subscribe to my substack!

Classic Cucumber Salad

Classic Cucumber Salad

Classic Cucumber Salad

Classic Cucumber Salad

January 28, 2024 by Kimberly

Relish in the fresh, crisp taste of Classic Cucumber Salad, an effortlessly light and healthy dish, perfect for any meal or as a refreshing snack!

This website uses affiliate links which may earn commission for purchases made at no additional cost to you.

TOTAL TIME

30 min

SERVES

4 portions

DIET

vegan

EVERY RECIPE DESERVES

A Little Love Letter

Discover the timeless appeal of classic Cucumber Salad, a dish celebrated for its simplicity and freshness. This healthy salad, made with crisp cucumbers, is the epitome of a light side dish that complements any meal. Perfect for those seeking a nutritious vegetable salad that is both easy to prepare and delightfully satisfying.

Serving this classic Cucumber Salad is all about embracing its fresh and natural flavors. It’s an excellent addition to any table, be it for a casual lunch or a more formal dinner. This refreshing salad recipe pairs wonderfully with grilled meats, sandwiches, or as a standalone dish for a light meal. Its versatility also makes it a favorite in vegan salad ideas, appealing to various dietary preferences. For an enhanced experience, serve it chilled, allowing the flavors to meld together, creating a moreish, refreshing treat that’s sure to please any palate.

Keep it refrigerated in an airtight container to maintain its crispness and freshness. Ideally, it should be consumed within a day or two to enjoy its optimal taste and texture. This simple salad preparation ensures that you have a healthy, ready-to-eat option on hand.

Hi, I'm Kimberly!

Hi, I'm Kimberly.

A hopeless romantic when it comes to food. Every recipe I share is a love letter to food itself. I’m so glad you’re here. Make yourself at home and stay a while.

Love,
Kimberly

Kimberly the Zett Signature

If you want to get to know me better,
click here!


Classic Cucumber Salad

LET’S MAKE A PIECE OF HAPPINESS

Print
.tasty-recipe-responsive-iframe-container-10f26c4c { position: relative; overflow: hidden; padding-top: 177.62%; } .tasty-recipe-responsive-iframe-container-10f26c4c iframe { position: absolute; top: 0; left: 0; width: 100%; height: 100%; border: 0; } clock clock iconcutlery cutlery iconflag flag iconfolder folder iconinstagram instagram iconpinterest pinterest iconfacebook facebook iconprint print iconsquares squares iconheart heart iconheart solid heart solid icon
Classic Cucumber Salad

Classic Cucumber Salad


  • Author: Kimberly
  • Total Time: 30 min
  • Yield: 4

Description

GOOD TO HAVE ON HAND

  • Mandolin (or sharp knife)
  • sealable glass
  • salad bowl


Ingredients

SALAD
  • 1 cucumber
  • 1 small onion
  • chives
DRESSING
  • 1 garlic clove
  • 2 tbsp olive oil
  • 2 tbsp white wine vinegar
  • 1/2 tsp sugar
  • 1 tsp salt
  • chives

Instructions

  • Wash the cucumber thoroughly.
  • Slice the cucumber into very thin slices. Finely chop the onion.
  • For the dressing, pour the vinegar, oil, salt, sugar and crushed garlic into a sealable jar and shake well. Flavour the dressing and season with salt and ground pepper to taste.
  • Mix the cucumber slices and onion pieces with the dressing in a bowl and leave to stand in the fridge for 20 minutes.
  • Passive Time: 20 min
  • Cook Time: 10 min

CRAVING MORE?

Follow along here & don’t forget to subscribe to my substack!

Basic Chicken Broth

Basic Chicken Broth

Basic Chicken Broth

Basic Chicken Broth

January 11, 2024 by Kimberly

Discover the warm, comforting embrace of Chicken Broth. It’s simple, nourishing, and versatile, perfect for soups, stews, or just sipping. A timeless kitchen staple!

This website uses affiliate links which may earn commission for purchases made at no additional cost to you.

TOTAL TIME

2 hrs + 30 min

SERVES

3 liters / 3 quarts

DIET

omnivore

EVERY RECIPE DESERVES

A Little Love Letter

Embark on a culinary journey with the timeless classic, Chicken Broth. This simple yet profound staple is the heart of countless recipes, offering a warm, soothing base that’s both nourishing and flavorful. Ideal for both novice cooks and seasoned chefs, it’s a testament to the beauty of simplicity in cooking, transforming basic ingredients into a versatile foundation for a myriad of dishes.

Serve this comforting Basic Chicken Broth as a warming start to your meal, or use it as a versatile base for soups, stews, and sauces. Its delicate flavors complement a variety of ingredients, making it perfect for enhancing your favorite recipes. For a simple yet satisfying experience, enjoy it hot with a sprinkle of herbs, a dash of salt, and a slice of crusty bread for dipping.

To store, cool the broth and then transfer it into airtight containers or deli container. It can be refrigerated for up to 6 days or frozen for up to 6 months. The broth can also be preserved using canning methods for long-term storage. When ready to use, thaw or reheat as needed.

Hi, I'm Kimberly!

Hi, I'm Kimberly.

A hopeless romantic when it comes to food. Every recipe I share is a love letter to food itself. I’m so glad you’re here. Make yourself at home and stay a while.

Love,
Kimberly

Kimberly the Zett Signature

If you want to get to know me better,
click here!


Basic Chicken Broth
Basic Chicken Broth

LET’S MAKE A PIECE OF HAPPINESS

Print
clock clock iconcutlery cutlery iconflag flag iconfolder folder iconinstagram instagram iconpinterest pinterest iconfacebook facebook iconprint print iconsquares squares iconheart heart iconheart solid heart solid icon
Basic Chicken Broth

Basic Chicken Broth


  • Author: Kimberly
  • Total Time: 2-4 hrs
  • Yield: 3 liters / 3.17 quarts

Description

RECOMMENDED EQUIPMENT

  • sharp knife
  • cutting board
  • large pot with lid
  • large bowl
  • fine sieve

Ingredients

Units Scale
  • 3 liters water
  • 1.5 kilograms of any kind of chicken parts with bones and a bit of fat (e.g. stewing hen)
  • 800 grams mixed vegetables of your choice (e.g. carrots, onions, celery root, parsley, leeks)
  • 1 bundle of fresh herbs of your choice (e.g. thyme, parsley, cilantro, chives)
  • 2 bay leaves
  • 5 cloves
  • 1/4 tsp coriander seeds
  • 5 allspice
  • 1 tsp black peppercorns
  • 1 tsp avocado oil or clarified butter
  • 22 grams salt, optional

Instructions

  1. Wash your vegetables, leave their skins on, and chop everything into large pieces. Also, wash the herbs because we’ll use them whole, including their stems.
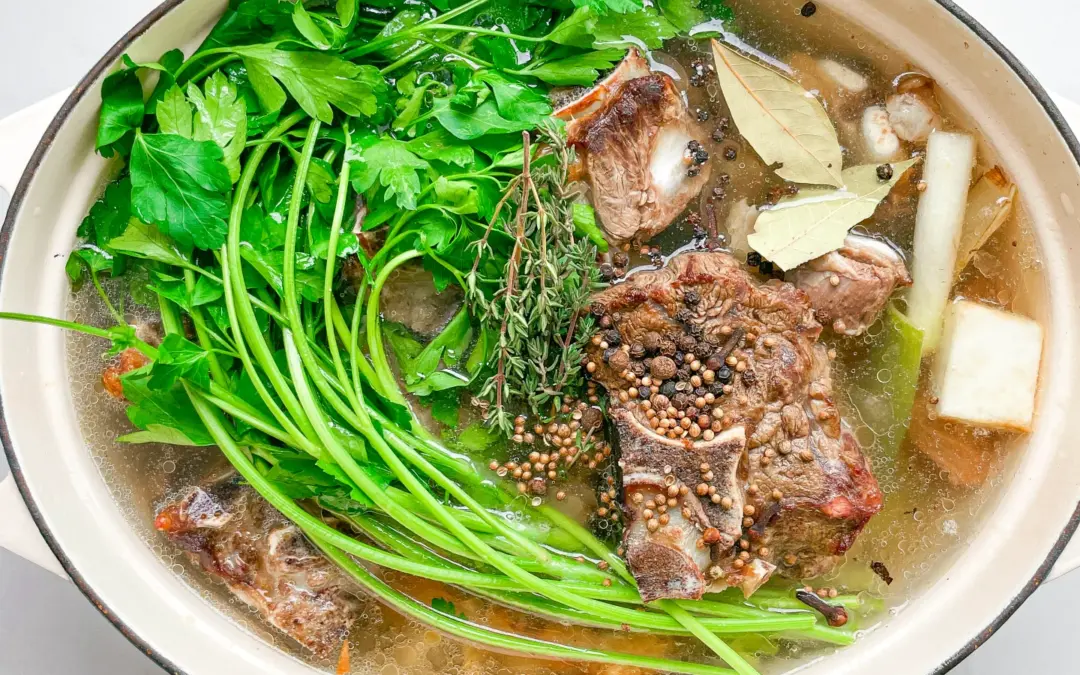
  2. Pat the chicken pieces dry with kitchen paper. Then heat a tablespoon of oil in a large pot and fry the vegetables until they get a little nice browning. Place the chicken on top of the vegetables and add 3 liters of cold water.
  3. Add 2 dried bay leaves, 5 allspice berries, 3 cloves, 1 teaspoon of black peppercorns, 1/2 teaspoon of coriander seeds, and the herbs to the pot.
  4. Cover the pot with a lid and bring it to a boil over high heat. Once it boils, reduce the heat to the lowest setting and let it simmer with the lid on for at least 2 hours. For the best results, I recommend letting it cook for 4 hours.
  5. After cooking, remove the pot from the heat and allow it to cool slightly. Take out the chicken, vegetables, herbs, and spices. If you’ve used chicken parts with meat on, don’t forget to save the meat for other recipes.
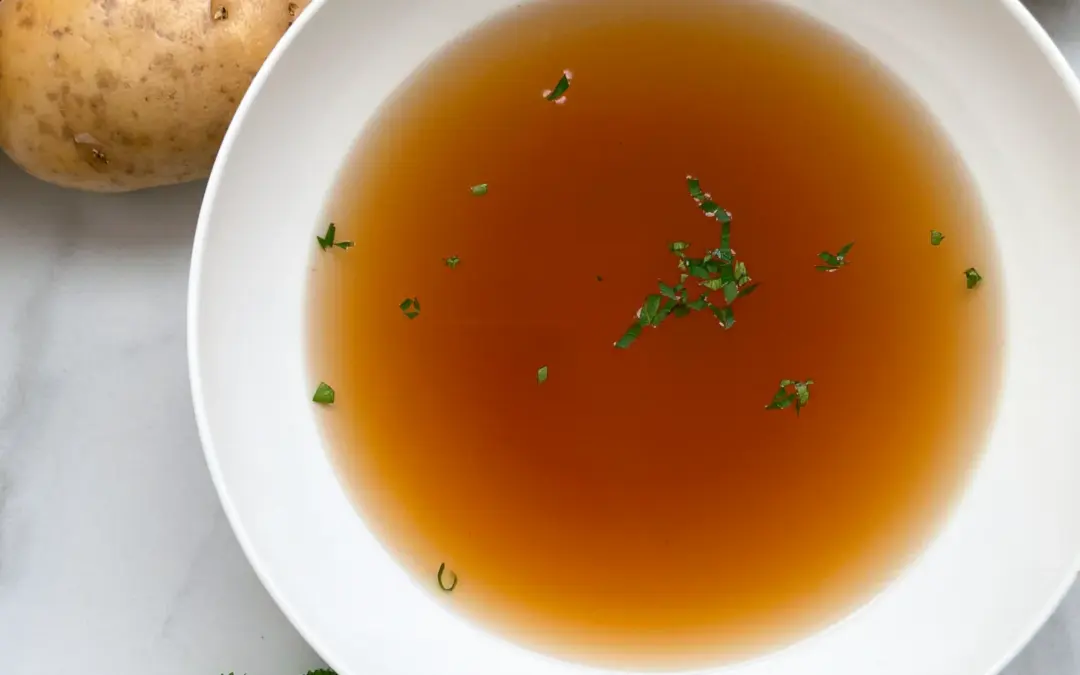
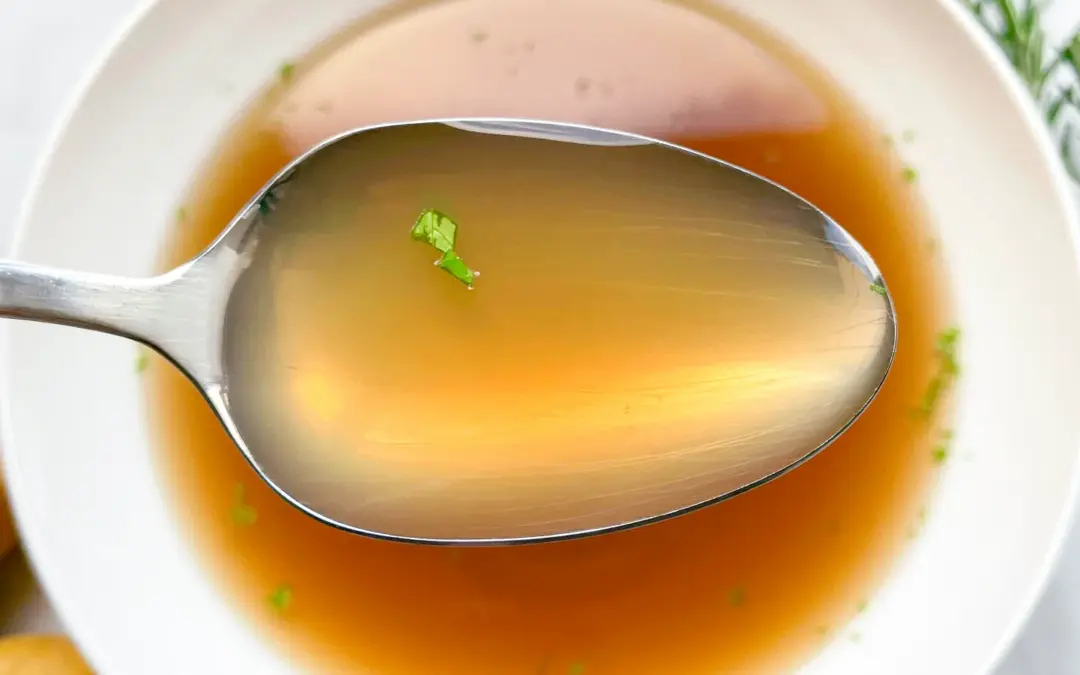
    Strain the liquid through a fine sieve into another pot. Season the broth with salt if desired. I usually add 6–8 g (approximately 1 teaspoon) of salt per liter (4 cups) of broth.
  6. Let the broth cool completely. Skim off any fat floating on top, or if your pot fits in the fridge, let it rest overnight. The fat will solidify on the surface, making it easy to remove.
  7. The broth is now ready to use. Alternatively, pour it into sealable jars or deli containers. You can store it in the fridge for up to 6 days or freeze it for up to 6 months.

Notes

If you cook on a regular basis, you’ve probably noticed how many vegetable scraps end up in the trash, e.g. onion skins, carrot peels, leek ends, herb stems, and more. Instead of tossing them, grab a large ziplock bag and store all your scraps in the freezer. Over time, you’ll collect a substantial amount of veggie and herb scraps, which are perfect for making your next broth at home. No need to defrost them, simply toss the frozen scraps directly into a pot, cover them with water and go for it. Use them alone for a flavorful vegetable stock or pair them with chicken or beef bones for a rich, meaty broth. It’s an easy, eco-friendly way to ensure you always have homemade stock for literally no cost!

  • Prep Time: 10 min
  • Passive Time: 2-4 hrs

CRAVING MORE?

Follow along here & don’t forget to subscribe to my substack!

Basic Vegetable Broth

Basic Vegetable Broth

Basic Vegetable Broth

Basic Vegetable Broth

January 5, 2024 by Kimberly

Vegetable broth is a delicious, nourishing base for soups and stews, made by simmering fresh veggies and aromatic herbs. It’s easy, versatile, and full of flavor!

This website uses affiliate links which may earn commission for purchases made at no additional cost to you.

TOTAL TIME

3 hrs + 30 min

SERVES

3 liters

DIET

vegan

EVERY RECIPE DESERVES

A Little Love Letter

Discover the magic of homemade vegetable broth! This simple, yet flavorful liquid gold is crafted by gently simmering a medley of fresh vegetables and aromatic herbs. Not only is it a healthier and most clean alternative to store-bought ones, but it also infuses your dishes with a depth of flavor that can only come from fresh, natural ingredients.

Vegetable broth is incredibly versatile. Use it as a rich base for soups and stews, adding layers of flavor to each spoonful. It’s perfect for deglazing pans, lending a savory note to sautéed dishes. Alternatively, enjoy it as a warm, comforting drink on its own, especially during chilly evenings. Mix in a dash of your favorite herbs or a squeeze of lemon for an extra zing!

Vegetable broth keeps well in the refrigerator for up to a week in a sealed container. For longer storage, the broth can be preserved in boiled jars. This way, you’ll always have handy, homemade broth ready for your next culinary adventure!

Hi, I'm Kimberly!

Hi, I'm Kimberly.

A hopeless romantic when it comes to food. Every recipe I share is a love letter to food itself. I’m so glad you’re here. Make yourself at home and stay a while.

Love,
Kimberly

Kimberly the Zett Signature

If you want to get to know me better,
click here!


Basic Vegetable Broth

LET’S MAKE A PIECE OF HAPPINESS

Print
.tasty-recipe-responsive-iframe-container-a7e52625 { position: relative; overflow: hidden; padding-top: 177.62%; } .tasty-recipe-responsive-iframe-container-a7e52625 iframe { position: absolute; top: 0; left: 0; width: 100%; height: 100%; border: 0; } clock clock iconcutlery cutlery iconflag flag iconfolder folder iconinstagram instagram iconpinterest pinterest iconfacebook facebook iconprint print iconsquares squares iconheart heart iconheart solid heart solid icon
Basic Vegetable Broth

Basic Vegetable Broth


  • Author: Kimberly
  • Total Time: 3 hrs + 30 min
  • Yield: 3 liters

Description

GOOD TO HAVE ON HAND

  • sharp knife
  • cutting board
  • large pot with lid
  • large bowl (or a medium-sized pot)
  • fine sieve (or a kitchen towel)


Ingredients

Units Scale
VEGETABLES
  • 400 grams carrots
  • 2 onions
  • 200 grams celery root
  • 100 grams leek
  • 2 garlic cloves
HERBS & SPICES
  • 1 bay leaf
  • 1 stem thyme
  • 1 large bunch of parsley
  • 5 cloves
  • 1/4 tsp coriander seeds
  • 1 tsp black peppercorns
  • 22 grams salt (approx. 2 1/2 tsp)
  • 1 tsp clarified butter

Instructions

  1. Wash the carrots, celery root, leek and parsley thoroughly and chop everything roughly.
  2. Halve the onions and leave the skin on.
  3. Heat 1 tsp clarified butter in a large pan and fry the onions, carrots, celery root, leek and garlic cloves until they are browned.
  4. Fill the pot up with 3 liters of cold water and add the bay leaf, 5 cloves, 1 teaspoon of black peppercorns and 1 bunch of parsley.
  5. Now put the lid on and bring to the boil once at a high temperature. As soon as it boils, turn the flame down to the lowest setting and leave the liquid to simmer in the pan with the lid on for 2 hours.
  6. After the 2 hours, remove the pot from the heat. Now remove the overcooked vegetables, herbs and spices from the broth.
  7. Strain the liquid through a fine sieve or kitchen towel into a medium-sized pot. Then season with salt. Add between 5g and 7g of salt per liter of broth, depending on taste. Allow the broth to cool completely.
  • Passive Time: 3 hrs
  • Cook Time: 30 min

CRAVING MORE?

Follow along here & don’t forget to subscribe to my substack!