Pasta alla Genovese Napoletana

Pasta alla Genovese Napoletana

Pasta alla Genovese Napoletana

Pasta alla Genovese Napoletana

December 14, 2023 by Kimberly

Indulge in Pasta alla Genovese – a symphony of caramelized onions, sweet tomatoes, and savory richness. A comforting, flavorful masterpiece that elevates your pasta experience to new heights.

This website uses affiliate links which may earn commission for purchases made at no additional cost to you.

TOTAL TIME

6 hrs + 35 min

SERVES

6 portions

DIET

omnivore

EVERY RECIPE DESERVES

A Little Love Letter

Pasta alla Genovese, a classic Italian delight, invites you on a culinary journey. This dish captures the essence of simplicity and bold flavors, combining caramelized onions, sweet tomatoes, and savory richness to create a truly unforgettable pasta experience.

Serve this culinary masterpiece on a warm plate. Garnish with freshly grated Parmesan cheese and a sprinkle of chopped fresh parsley for an added burst of freshness. Pair it with a glass of your favorite Italian red wine to elevate the dining experience. Whether shared with loved ones or enjoyed in solitary indulgence, Pasta alla Genovese promises a symphony of flavors that linger long after the last bite.

To preserve the exquisite flavors of Pasta alla Genovese, store any leftovers in an airtight container in the refrigerator for up to three days. For longer storage, consider freezing individual portions in freezer-safe containers.

Hi, I'm Kimberly!

Hi, I'm Kimberly.

A hopeless romantic when it comes to food. Every recipe I share is a love letter to food itself. I’m so glad you’re here. Make yourself at home and stay a while.

Love,
Kimberly

Kimberly the Zett Signature

If you want to get to know me better,
click here!


Pasta alla Genovese Napoletana

LET’S MAKE A PIECE OF HAPPINESS

Print
clock clock iconcutlery cutlery iconflag flag iconfolder folder iconinstagram instagram iconpinterest pinterest iconfacebook facebook iconprint print iconsquares squares iconheart heart iconheart solid heart solid icon
Pasta alla Genovese Napoletana

Pasta alla Genovese Napoletana


5 Stars 4 Stars 3 Stars 2 Stars 1 Star

No reviews

  • Author: Kimberly
  • Total Time: 6 hrs + 35 min
  • Yield: 6

Description

RECOMMENDED EQUIPMENT

  • sharp knife
  • chopping board
  • peeler
  • Dutch oven (or a large pot)
  • large pot for the pasta

Ingredients

Units Scale
  • 500 grams rigatoni
  • 100 grams parmesan
  • parsley for topping
SAUCE
  • 125 grams butter
  • 1,5 kilograms onions
  • 150 grams pancetta
  • 400 grams carrots
  • 1,5 kilograms beef shoulder
  • 250 milliliters white wine
  • 400 grams tinned tomatoes
  • 2 tbsp tomato paste
  • 1 tsp butter
  • 1 tsp salt
  • 1 tsp pepper
  • 3 bay leaves
 

Instructions

  1. Cut the pancetta into strips. The onions into thin half moons and the carrots into cubes.
  2. Warm the pancetta in a cold Dutch oven at medium temperature. Fry until crispy. Leave the fat in the Dutch Oven, remove the bacon and set aside.
  3. Add 1 tsp butter and approximately the amount of one sliced onion and all the carrot pieces to the pancetta fat and fry for 5 minutes over a medium heat.
  4. Move the vegetables to the edge of the pan and place the beef chuck in the middle. Sear on all sides and then deglaze with white wine. Bring the white wine to the boil.
  5. Then add a tin of chopped or peeled tomatoes, the pancetta, tomato paste and the bay leaves. Stir through once. Now add the rest of the onions. Season everything once with salt and pepper and leave to simmer on a low heat for 6 hours.
  6. After the 6 hours, the meat can be easily shredded with two forks if it is not already falling apart on its own.
  7. Bring water for the pasta to the boil in a large pan and cook the pasta al dente according to the instructions on the packet.
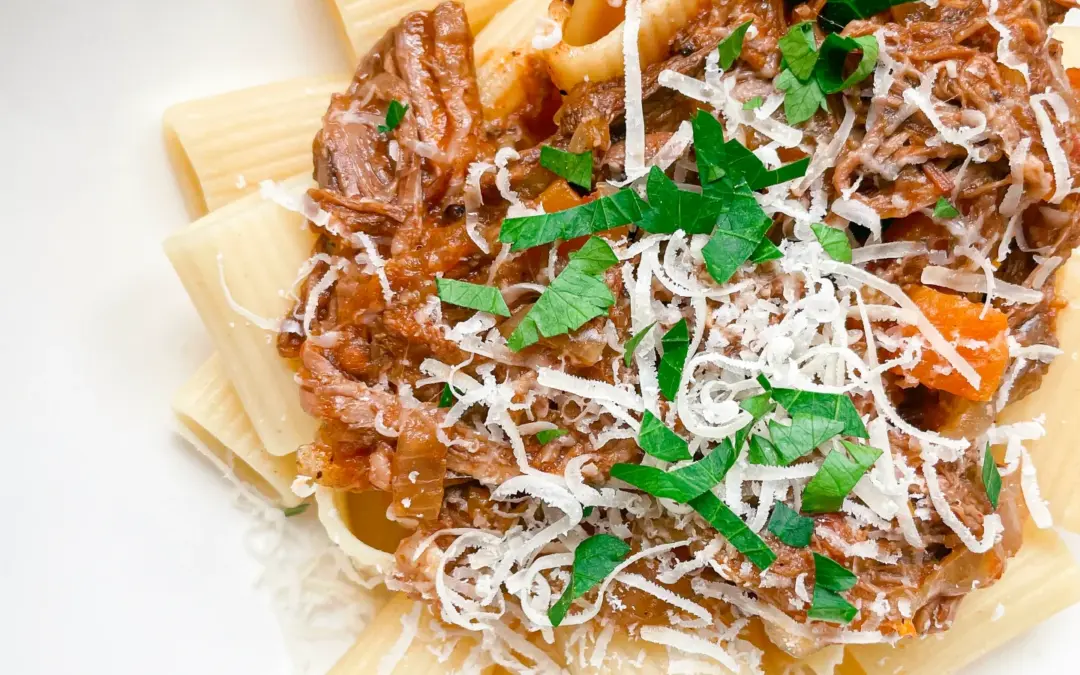
  8. Put the finished pasta on a plate, spread the meat sauce over it and serve with parmesan, plenty of parsley and fresh pepper.
  • Passive Time: 6 hrs
  • Cook Time: 35 min

CRAVING MORE?

Follow along here & don’t forget to subscribe to my substack!

Chicken Shawarma Plate

Chicken Shawarma Plate

Chicken Shawarma Plate

Chicken Shawarma Plate

December 12, 2023 by Kimberly

Experience a taste symphony with this Chicken Shawarma Plate – succulent spiced chicken, vibrant fresh veggies, and a zesty mint-garlic dip. A flavorful journey on every plate!

This website uses affiliate links which may earn commission for purchases made at no additional cost to you.

TOTAL TIME

60 min

SERVES

2 plates

DIET

omnivore

EVERY RECIPE DESERVES

A Little Love Letter

Savor the exotic flavors of my Chicken Shawarma Plate! Succulent, spice-infused chicken, paired with a medley of fresh tomatoes and cucumbers, all enhanced by a zesty mint-garlic dip. This culinary masterpiece promises a taste journey that’s as bold and exciting as it is delicious. Elevate your dining experience with this harmonious fusion of textures and spices, making every bite a celebration of Middle Eastern culinary delights.

Serve a delicious chicken shawarma plate by combining the seasoned chicken with the fresh tomato, cucumber and parsley salad and the spicy mint garlic dip. Feel free to add rice or chubz, a Lebanese bread, as well. This versatile dish offers a fusion of flavors and textures that can be enjoyed on any occasion. A simple but delicious culinary adventure awaits!

To store the Chicken Shawarma Plate, refrigerate any leftovers promptly. Keep the spiced chicken, tomato-cucumber salad, mint-garlic dip, and other components in separate airtight containers. This helps maintain their individual flavors and textures. When reheating, warm the chicken separately to preserve its tenderness. Consume within a day or two for the best taste and freshness.

Hi, I'm Kimberly!

Hi, I'm Kimberly.

A hopeless romantic when it comes to food. Every recipe I share is a love letter to food itself. I’m so glad you’re here. Make yourself at home and stay a while.

Love,
Kimberly

Kimberly the Zett Signature

If you want to get to know me better,
click here!


Chicken Shawarma Plate

LET’S MAKE A PIECE OF HAPPINESS

Print
.tasty-recipe-responsive-iframe-container-8e06529f { position: relative; overflow: hidden; padding-top: 177.62%; } .tasty-recipe-responsive-iframe-container-8e06529f iframe { position: absolute; top: 0; left: 0; width: 100%; height: 100%; border: 0; } clock clock iconcutlery cutlery iconflag flag iconfolder folder iconinstagram instagram iconpinterest pinterest iconfacebook facebook iconprint print iconsquares squares iconheart heart iconheart solid heart solid icon
Chicken Shawarma Plate

Chicken Shawarma Plate


  • Author: Kimberly
  • Total Time: 60 min
  • Yield: 2

Description

RECOMMENDED EQUIPMENT

  • sharp knife
  • cutting board
  • small bowl
  • medium bowl
  • frying pan

Ingredients

Units Scale
CHICKEN
  • 400 grams chicken breast or boneless, skinless chicken thighs
  • 1 tbsp olive oil
  • 1 tbsp lemon juice
  • 3 garlic cloves
  • 1 tsp cumin
  • 1 tsp smoked paprika
  • 1 tsp salt
  • 1/4 tsp turmeric
  • 1/4 tsp curry
  • 1/8 tsp cinnamon
  • 1/8 tsp pepper
SALAD
  • 200 grams tomatoes
  • 150 grams cucumber
  • 80 grams red onion
  • 1 tbsp parsley
  • 2 tbsp olive oil
  • 1 tbsp lemon juice
  • 1/8 tsp salt
  • 1/8 tsp pepper
DIP
  • 200 grams yogurt
  • 12 leaves fresh mint
  • 1 garlic clove
  • 1/4 tsp salt
  • 1/8 tsp pepper

Instructions

  1. Start by preparing the chicken marinade, since it needs resting time. Cut the chicken into small pieces if using breast, or leave boneless thighs whole. In a bowl, mix 1 tbsp olive oil with 1 tbsp lemon juice. Remove the skin from 3 garlic cloves, press them into the bowl, and add 1 tsp cumin, 1 tsp smoked paprika powder, ¼ tsp turmeric, ¼ tsp curry powder, ⅛ tsp cinnamon, 1 tsp salt, and ⅛ tsp black pepper. Stir well, then add the chicken and mix until every piece is coated. Cover the bowl and place it in the fridge for about 30 minutes.
  2. While the chicken marinates, move on to the salad and dip. Cut the tomatoes, cucumber, and onion into small pieces. Pluck the parsley leaves, chop them finely, and set everything aside. In a small bowl, whisk together 2 tbsp olive oil, 1 tbsp lemon juice, and a pinch of salt and pepper, but don’t combine the salad yet; that comes right before serving.
  3. Next, prepare the yogurt dip. Peel 1 garlic clove and chop or press it. Stack a few mint leaves, roll them up, slice into fine rings, and chop finely. In another small bowl, add the yogurt, garlic, mint, ¼ tsp salt, and ⅛ tsp black pepper. Stir until creamy, then refrigerate the dip while finishing the chicken.
  4. When the chicken has marinated long enough, heat a large frying pan over medium heat. There’s no need to add extra oil — the marinade already has enough. (Optional: Thread the chicken onto soaked wooden or metal skewers.) Place the chicken in the hot pan and let it cook without moving it, until it turns white around the edges and golden underneath. Then flip and cook for the same amount of time on the other side, until golden brown and cooked through.
  5. While the chicken cooks, quickly finish the salad. Add the chopped tomato, cucumber, onion, and parsley to the olive oil–lemon dressing and toss everything together. Once the chicken is ready, arrange it on plates, add the salad on the side, and either spoon the mint garlic yogurt dip over the top or serve it separately.
  • Passive Time: 30 min
  • Cook Time: 30 min

CRAVING MORE?

Follow along here & don’t forget to subscribe to my substack!

Warm Banana Blueberry Oats With Nutbutter

Warm Banana Blueberry Oats With Nutbutter

Warm Banana Blueberry Oats with Creamy Nutbutter

Warm Banana Blueberry Oats with Creamy Nutbutter

January 2, 2024 by Kimberly

Enjoy the comforting goodness of warm banana blueberry oatmeal topped with creamy nut butter. This delightful combination provides a wholesome and satisfying breakfast experience.

This website uses affiliate links which may earn commission for purchases made at no additional cost to you.

TOTAL TIME

20 min

SERVES

1 portion

DIET

vegan

EVERY RECIPE DESERVES

A Little Love Letter

I honestly used to think making almond milk at home was some sort of witchcraft, like you’d need a shiny high-speed blender, nut milk bags, and basically a degree in food science. And what can I say? You really don’t. Haha. All it actually takes is almonds, water, and a little bit of patience. That’s it. And at the end, you’re rewarded with this fresh, creamy, silky-smooth plant-based milk that feels so much more real than anything you’ll find in a carton at the store. No additives, no gums, no ingredients you can’t even pronounce.

The fun part? You can make it your own in about a million ways. Cinnamon almond milk for cozy fall vibes? Absolutely. Vanilla almond milk that tastes like dessert in a glass? Always yes. A drizzle of maple syrup for that subtle sweetness? Yessss, please. Once you try customizing it, you’ll realize how versatile it really is. I use homemade almond milk especially in smoothies. One of my favorites is this Banana Bliss Smoothie with Poppy Seeds, Marzipan & Almond Butter. It makes everything so creamy without feeling heavy. But it’s also amazing poured over granola or blended into iced coffee.

And yes, I’ll admit, I’m also in it for the aesthetic. I always pour my almond milk into a classic glass bottle before popping it into the fridge. There’s just something about opening the door and seeing that little bottle waiting there. But it’s practical as well: in a clean bottle with a lid, it keeps fresh for three to four days. Just give it a good shake before using, since it tends to separate naturally.

So yeah, homemade almond milk might sound fancy, but really it’s one of the simplest little kitchen habits you can build. And once you’ve tried it, I promise you’ll wonder why you ever thought it was complicated.

Hi, I'm Kimberly!

Hi, I'm Kimberly.

A hopeless romantic when it comes to food. Every recipe I share is a love letter to food itself. I’m so glad you’re here. Make yourself at home and stay a while.

Love,
Kimberly

Kimberly the Zett Signature

If you want to get to know me better,
click here!


Warm Banana Blueberry Oats with Creamy Nutbutter

LET’S MAKE A PIECE OF HAPPINESS

Print
.tasty-recipe-responsive-iframe-container-194fd428 { position: relative; overflow: hidden; padding-top: 177.62%; } .tasty-recipe-responsive-iframe-container-194fd428 iframe { position: absolute; top: 0; left: 0; width: 100%; height: 100%; border: 0; } clock clock iconcutlery cutlery iconflag flag iconfolder folder iconinstagram instagram iconpinterest pinterest iconfacebook facebook iconprint print iconsquares squares iconheart heart iconheart solid heart solid icon
Warm Banana Blueberry Oats with Creamy Nutbutter

Warm Banana Blueberry Oats With Nutbutter


  • Author: Kimberly
  • Total Time: 15 min
  • Yield: 1

Description

RECOMMENDED EQUIPMENT
  • sharp knife
  • cutting board
  • small pan
  • small pot
  • small bowl

Ingredients

Units Scale
OATS BASE
  • 100 milliliters milk of choice (I used soy milk)
  • 43 grams rolled oats
  • 1/4 tsp vanilla extract
  • pinch of salt
FRIED BANANA
  • 1 banana
  • 1 tsp coconut oil
  • 1 tsp maple syrup
  • 1/8 tsp cinnamon
TOPPINGS
  • 50 grams frozen blueberries (1/4 cup)
  • 1 tsp nutbutter of choice (I used peanut butter)

Instructions

  1. Cut the banana into finger-thick slices.
  2. Cook the rolled oats with milk, vanilla extract and a pinch of salt in a small saucepan to a creamy consistency for approx. 10 minutes. Transfer to a small bowl.
  3. In the same saucepan, cook the blueberries over a medium heat until soft and juices run clear.
  4. Meanwhile, add 1 tsp coconut oil to a small frying pan. Once hot, add the banana slices to the pan. Fry on both sides until the bananas are golden brown. Finally, add 1 tsp maple syrup and 1/8 tsp cinnamon and allow the bananas to caramelize.
  5. Put the 1 tsp nut butter for a few seconds in the microwave so that it softens.
  6. Pour the blueberries with their sauce over the oatmeal in the bowl. Spread the bananas on top and finish with the nut butter.
  • Cook Time: 15 min

CRAVING MORE?

Follow along here & don’t forget to subscribe to my substack!

Apple Cucumber Brie Turkey Sandwich

Apple Cucumber Brie Turkey Sandwich

Apple Cucumber Brie Turkey Sandwich

Apple Cucumber Brie Turkey Sandwich

December 4, 2023 by Kimberly

Experience a healthy morning with a delightful wholegrain sandwich. Fresh apples, crisp cucumbers, creamy Brie, and lean turkey combine for a flavorful delight.

This website uses affiliate links which may earn commission for purchases made at no additional cost to you.

TOTAL TIME

10 min

SERVES

1 sandwich

DIET

omnivore

EVERY RECIPE DESERVES

A Little Love Letter

Start your day right with a tasty Apple Cucumber Brie Turkey Sandwich on wholegrain bread. It’s got crunchy apples, fresh cucumbers, creamy Brie, and lean turkey for a delicious combo. This sandwich isn’t just good for you—it’s a yummy way to kick off your morning with lots of flavor.

Enjoy it in the morning or prep it ahead for on-the-go — quick, easy, and packed with nutrients. It provides a healthy start in the morning and serves as a convenient option when prepared as a meal prep. The combination of crisp apple, refreshing cucumber, creamy Brie, and lean turkey not only makes it delicious but also ensures you get essential nutrients. Easy to assemble and perfect for a flavorful energy boost.

Store this sandwich in an airtight container to keep it fresh. The layer of lettuce between the ingredients, especially the cucumber, acts as a barrier and prevents moisture from reaching the other ingredients. In this respect, this sandwich is very suitable for preparing the evening before or in the morning and taking with you on the go or simply enjoying at home.

Hi, I'm Kimberly!

Hi, I'm Kimberly.

A hopeless romantic when it comes to food. Every recipe I share is a love letter to food itself. I’m so glad you’re here. Make yourself at home and stay a while.

Love,
Kimberly

Kimberly the Zett Signature

If you want to get to know me better,
click here!


Apple Cucumber Brie Turkey Sandwich

LET’S MAKE A PIECE OF HAPPINESS

Print
.tasty-recipe-responsive-iframe-container-07ff274b { position: relative; overflow: hidden; padding-top: 177.62%; } .tasty-recipe-responsive-iframe-container-07ff274b iframe { position: absolute; top: 0; left: 0; width: 100%; height: 100%; border: 0; } clock clock iconcutlery cutlery iconflag flag iconfolder folder iconinstagram instagram iconpinterest pinterest iconfacebook facebook iconprint print iconsquares squares iconheart heart iconheart solid heart solid icon
Apple Cucumber Brie Turkey Sandwich

Apple Cucumber Brie Turkey Sandwich


  • Author: Kimberly
  • Total Time: 10 min
  • Yield: 1

Description

RECOMMENDED EQUIPMENT

  • sharp knife
  • normal knife
  • cutting board

Ingredients

Units Scale
  • 2 slices wholegrain bread
  • 30 grams turkey
  • 6 slices cucumber
  • 3 slices apple
  • some salad leaves
  • 3 slices camembert
  • 2 tsp cream cheese

Instructions

  1. Wash the cucumber and cut off six slices.
  2. Wash the apple and cut off three slices. Remove the core.
  3. Cut three slices off the Camembert.
  4. Wash the lettuce and cut off several leaves.
  5. Spread cream cheese on the two slices of bread.
  6. Now top one slice in the following order: Turkey, apple, camembert, lettuce & cucumber.
  7. Close the sandwich with the other slice. Cut in the middle with a sharp knife.
  • Cook Time: 10 min

CRAVING MORE?

Follow along here & don’t forget to subscribe to my substack!