Description
Recommended Equipment
- large, heavy pot with lid
- garlic press
- sharp knife
- cutting board
- grater
- ovenproof soup bowls
Ingredients
Units Scale
SOUP
- 800 grams onions, sliced
- 1 tbsp butter
- 2 tbsp avocado oil
- 1 tsp salt
- 3 garlic cloves
- 1.5 tbsp all-purpose flour
- 150 milliliter dry white wine
- 1 liter beef stock
- some sprigs fresh thyme
- 2 bay leaves
- salt & pepper to taste
- 12 slices of baguette
- 300 grams Gruyere cheese
- butter
- garlic powder
- fresh thyme
- freshly cracked pepper
Instructions
PREPARATIONS
- Peel the onions, halve them, and slice into thin half-rings.
- Peel the garlic cloves; they’ll be pressed into the onions later.
INSTRUCTIONS
- Melt butter and oil in a large pot over medium heat. Add the onions, sprinkle with a pinch of salt, and sauté for about 30 minutes, stirring occasionally. The goal? Dreamy, golden-brown caramelization. Yes, it takes patience, but trust me, it’s worth it.
- Press the garlic through a garlic press and sauté with the onions for 1 minute until fragrant. Sprinkle the flour like fairy dust over the onions and stir well.
- Pour in the white wine and let it cook down briefly. Add the beef broth, thyme sprigs, and bay leaves. Bring to a boil, then cover and simmer over low heat for 30 minutes. Season with salt and pepper to taste.
- While the soup simmers, preheat the oven to its highest broil setting. Slice the baguette, butter one side, and sprinkle with a bit of garlic powder. Grate the Gruyère.
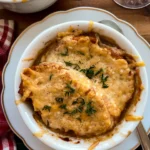
- Once the soup is done, ladle it into ovenproof bowls. Place the baguette slices on top and generously cover with Gruyère. Broil for 5–10 minutes until the cheese is golden and bubbling.
- Garnish with fresh thyme and a pinch of black pepper. Serve hot, grab a spoon, and get ready to impress yourself (and everyone else)!
- Prep Time: 15 min
- Passive Time: 15 min
- Cook Time: 45 min