Peanut Caramel Chocolate Protein Bars

Peanut Caramel Chocolate Protein Bars

Peanut Caramel Chocolate Protein Bars

Peanut Caramel Chocolate Protein Bars

February 17, 2024 by Kimberly

Energize your day with Protein-Rich Peanut Caramel Chocolate Bars! Perfect for fitness enthusiasts, these bars are a delicious, nutritious twist on your favorite Snickers bar.

This website uses affiliate links which may earn commission for purchases made at no additional cost to you.

TOTAL TIME

2 hrs + 30 min

SERVES

1 liter / 4 cups

DIET

vegetarian

EVERY RECIPE DESERVES

A Little Love Letter

These homemade protein-rich Peanut Caramel Chocolate Bars delights are your alternative to a regular peanut bar, packed with protein and full of flavor. They’re crafted for those who love to indulge without compromising their protein goals. Perfect as a post-workout snack or a midday energy booster, these bars are sure to satisfy your sweet tooth and your nutritional needs.

They’re an excellent snack after a workout, a sweet companion with your coffee break, or a healthy dessert option. Cut them into smaller pieces for a quick snack or enjoy a full bar for a more substantial energy boost. They’re not just a treat – they’re a satisfying choice to support your active lifestyle.

Store your bars in an airtight container to keep them fresh. Place them in the refrigerator for a firmer texture or at room temperature for a softer bite. Enjoy them within one week for optimal freshness.

Hi, I'm Kimberly!

Hi, I'm Kimberly.

A hopeless romantic when it comes to food. Every recipe I share is a love letter to food itself. I’m so glad you’re here. Make yourself at home and stay a while.

Love,
Kimberly

Kimberly the Zett Signature

If you want to get to know me better,
click here!


Peanut Caramel Chocolate Protein Bars

LET’S MAKE A PIECE OF HAPPINESS

Print
clock clock iconcutlery cutlery iconflag flag iconfolder folder iconinstagram instagram iconpinterest pinterest iconfacebook facebook iconprint print iconsquares squares iconheart heart iconheart solid heart solid icon
Peanut Caramel Chocolate Protein Bars

Peanut Caramel Chocolate Protein Bars


5 Stars 4 Stars 3 Stars 2 Stars 1 Star

No reviews

  • Author: Kimberly
  • Total Time: 2,5 hrs

Description

GOOD TO HAVE ON HAND

  • 2 medium sized bowls
  • medium-sized aluminum or glass bowl
  • rectangular flat container
  • baking paper
  • small pot


Ingredients

Units Scale
LAYER 1
  • 85 grams protein powder vanilla
  • 50 grams almond flour
  • 2 tbsp maple syrup
  • 60 milliliters soy milk
LAYER 2
  • 2 tbsp caramel spread
LAYER 3
  • 120 grams crunchy peanut butter
  • 2 tbsp coconut oil
  • 2 tbsp maple syrup
  • 1/8 salt
LAYER 4
  • 150 grams semi sweet chocolate
  • 1/2 tsp coconut oil

Instructions

  1. Line a rectangular flat container with baking paper.
  2. In a medium bowl, prepare the first layer by mixing the protein powder, almond flour, maple syrup and soy milk into a dense, malleable dough. My recommendation is to place the dough between two layers of baking paper, roll it out and then place it in the container. Because the dough is really sticky.
  3. Next, spread 2 tablespoons of caramel over the dough layer as a second layer. Then place the container in the freezer for about an hour.
  4. For the third layer, mix the crunchy peanut butter, coconut oil, maple syrup and a pinch of salt together in a medium bowl. After taking the container from the freezer, spread the mixture over the caramel layer evenly. Place the mold back in the freezer for 60 minutes.
  5. Fill a small pot with water, bring to the boil and then remove from the heat. Place a heatproof aluminum or glass bowl over the pot. Melt the chocolate in it together with half a teaspoon of coconut oil, stirring regularly.
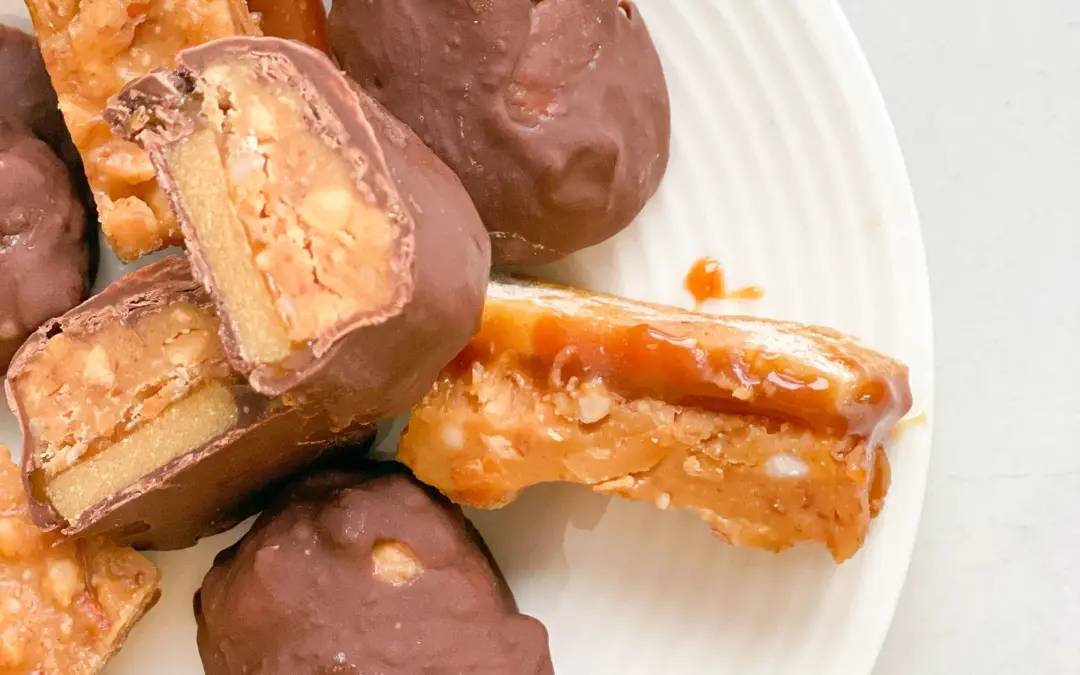
  6. Once the chocolate has melted completely, remove the frozen bar mixture from the freezer and cut into 15 bars. Pull each bar individually through the melted chocolate with two forks, drain and place on baking paper or a rack to harden. If the room temperature is too warm, leave the bars to set in the fridge.
  • Passive Time: 120 min
  • Cook Time: 30 min

CRAVING MORE?

Follow along here & don’t forget to subscribe to my substack!

Croque Monsieur

Croque Monsieur

Croque Monsieur

Croque Monsieur

February 13, 2024 by Kimberly

Dive into the cheesy goodness of Croque Monsieur! This classic French sandwich brings a crispy, creamy delight to your table, perfect for any meal. A must-try!

This website uses affiliate links which may earn commission for purchases made at no additional cost to you.

TOTAL TIME

50 min

SERVES

4 sandwiches

DIET

omnivore

EVERY RECIPE DESERVES

A Little Love Letter

Step into the world of French cuisine with the Croque Monsieur, a luxurious twist on the grilled cheese sandwich. Featuring ham and melted cheese nestled between slices of buttery bread, topped with a creamy Béchamel sauce and then grilled to perfection. This dish is not just food – it’s a culinary experience that transports you straight to the streets of Paris with every bite. Perfect for brunch or a comforting dinner!

Serve the Croque Monsieur fresh off the grill, with its cheese deliciously oozing and bread crisply toasted. Pair it with a light, tangy salad to cut through the richness, or enjoy it with a cup of hot soup for a heartier meal. Don’t forget a sprinkle of fresh herbs or a dash of Dijon mustard on the side for that authentic French flair.

To keep the Croque Monsieur’s delightful texture, store any leftovers in an airtight container in the fridge. Reheat in the oven or on the stove to revive its crispy exterior and melty interior, ensuring it tastes just as fabulous.

Hi, I'm Kimberly!

Hi, I'm Kimberly.

A hopeless romantic when it comes to food. Every recipe I share is a love letter to food itself. I’m so glad you’re here. Make yourself at home and stay a while.

Love,
Kimberly

Kimberly the Zett Signature

If you want to get to know me better,
click here!


Croque Monsieur
Croque Monsieur

LET’S MAKE A PIECE OF HAPPINESS

Print
.tasty-recipe-responsive-iframe-container-5fd71612 { position: relative; overflow: hidden; padding-top: 177.62%; } .tasty-recipe-responsive-iframe-container-5fd71612 iframe { position: absolute; top: 0; left: 0; width: 100%; height: 100%; border: 0; } clock clock iconcutlery cutlery iconflag flag iconfolder folder iconinstagram instagram iconpinterest pinterest iconfacebook facebook iconprint print iconsquares squares iconheart heart iconheart solid heart solid icon
Croque Monsieur

Croque Monsieur


  • Author: Kimberly
  • Total Time: 45 min
  • Yield: 4

Description

GOOD TO HAVE ON HAND

  • knife
  • cheese grater
  • large pan


Ingredients

Units Scale
  • 8 slices sourdough bread
  • 200 grams deli ham
  • 100 grams Gruyere cheese
  • 100 grams Emmental cheese
  • 2 tsp Dijon mustard
  • 4 tsp butter
  • 600 grams Béchamel sauce

Instructions

  1. Prepare the Béchamel sauce.
  2. Preheat the oven to 250°C (480°F)
  3. Grate the Gruyere and Emmental and mix together in a bowl.
  4. Spread 1/2 teaspoon of butter on one side of each slice of bread and fry in the pan on the buttered side until crispy. Remove the bread from the pan.
  5. The crispy side should now be on the bottom. Spread 1/4 teaspoon of Dijon mustard on the non-fried side of each slice of bread.
  6. Place deli ham on each slice of bread on top of the mustard.
  7. 1 tbsp of Béchamel sauce and 50g (2 oz) of grated cheese are placed on top of the deli ham.
  8. Now stack the slices as a double-decker that a total of 4 sandwiches are made from those 8 slices.
  9. Place the 4 sandwiches on a baking tray lined with baking paper and bake for 10-12 minutes until the cheese and sauce have melted and browned. Cut each croque monsieur in half with a sharp knife and divide between 4 plates. Serve with a fresh salad.
  • Passive Time: 15 min
  • Cook Time: 30 min

CRAVING MORE?

Follow along here & don’t forget to subscribe to my substack!

Pico de Gallo

Pico de Gallo

Pico de Gallo

Pico de Gallo

February 12, 2024 by Kimberly

Discover the vibrant and fresh Pico de Gallo, a perfect blend of flavors to elevate any meal. Easy to make, it’s a delightful, colorful addition to your table!

This website uses affiliate links which may earn commission for purchases made at no additional cost to you.

TOTAL TIME

10 min

SERVES

4 portions

DIET

vegan

EVERY RECIPE DESERVES

A Little Love Letter

Dive into the world of Mexican cuisine with the simple yet exquisite Pico de Gallo. This refreshing salsa combines the bold flavors of tomato, onion, and cilantro, offering a burst of freshness with every bite. Perfect for health-conscious foodies, this easy-to-make dish serves as a versatile accompaniment to countless meals. Embrace the joy of homemade salsa and add a splash of color to your dining experience.

Pico de Gallo is incredibly versatile, making it a must-have for any gathering. Serve it alongside grilled meats or fish for a refreshing contrast, or scoop it up with crispy tortilla chips for the ultimate snack. It’s also the perfect topping for tacos, burritos, quesadillas and enchiladas, adding a fresh, crunchy element. For a lighter option, spoon it over avocado toast or mixed into a vibrant salad.

To keep your Pico de Gallo fresh, store it in an airtight container in the refrigerator. It’s best enjoyed within 2-3 days, as the flavors meld beautifully over time, yet the ingredients retain their crispness.

Hi, I'm Kimberly!

Hi, I'm Kimberly.

A hopeless romantic when it comes to food. Every recipe I share is a love letter to food itself. I’m so glad you’re here. Make yourself at home and stay a while.

Love,
Kimberly

Kimberly the Zett Signature

If you want to get to know me better,
click here!


Pico de Gallo
Pico de Gallo

LET’S MAKE A PIECE OF HAPPINESS

Print
.tasty-recipe-responsive-iframe-container-36180689 { position: relative; overflow: hidden; padding-top: 177.62%; } .tasty-recipe-responsive-iframe-container-36180689 iframe { position: absolute; top: 0; left: 0; width: 100%; height: 100%; border: 0; } clock clock iconcutlery cutlery iconflag flag iconfolder folder iconinstagram instagram iconpinterest pinterest iconfacebook facebook iconprint print iconsquares squares iconheart heart iconheart solid heart solid icon
Pico de Gallo

Pico de Gallo


  • Author: Kimberly
  • Total Time: 10 min
  • Yield: 4

Description

GOOD TO HAVE ON HAND

  • sharp knife
  • cutting board
  • medium sized bowl


Ingredients

Units Scale
  • 250 grams tomatoes
  • juice of 1 lime
  • 1 small onion
  • 3 garlic cloves
  • 1 jalapeno (fresh or pickled)
  • a few stems cilantro
  • salt & pepper to taste

Instructions

  1. Wash the tomatoes thoroughly under running water.
  2. If you are using fresh jalapenos, wash them thoroughly too.
  3. Halve the tomatoes and remove the seeds. Then quarter them and cut them into small cubes. Place the diced tomatoes in a medium-sized bowl.
  4. Peel the onion, cut it in half and then finely dice it. Add the diced onion to the tomatoes in the bowl.
  5. Pluck the coriander leaves from the stalks and chop them finely. Add the chopped coriander to the bowl.
  6. Peel the garlic cloves and chop them finely or press them directly into the bowl using a garlic press.
  7. Finely chop the jalapeno and add it to the other ingredients in the bowl.
  8. Halve the lime and squeeze the juice over the ingredients in the bowl. Mix all the ingredients together thoroughly and season to taste with salt and pepper.
  • Cook Time: 10 min

CRAVING MORE?

Follow along here & don’t forget to subscribe to my substack!

Guacamole with Tomatoes & Red Onion

Guacamole with Tomatoes & Red Onion

Guacamole with Tomatoes & Red Onion

Guacamole with Tomatoes & Red Onion

February 10, 2024 by Kimberly

Indulge in the best Guacamole with Tomatoes & Red Onion! Simple, healthy, and bursting with flavor, it’s the perfect snack for every avocado lover. Quick and delicious!

This website uses affiliate links which may earn commission for purchases made at no additional cost to you.

TOTAL TIME

10 min

SERVES

4 portions

DIET

vegan

EVERY RECIPE DESERVES

A Little Love Letter

Dive into the creamy, tangy world of my easy Guacamole with tomatoes & red onion! Perfect for any occasion, this homemade guacamole recipe combines ripe avocados, juicy tomatoes, and sharp red onions to create a mouthwatering dip. Whether you’re hosting a party, looking for healthy snack ideas, or simply craving a fresh, vegan-friendly treat, this quick avocado recipe is the way to go.

Serve this vibrant guacamole with a side of crunchy tortilla chips, as a topping for tacos, alongside your favorite grilled dishes or fresh out of the oven enchiladas for an added burst of flavor. Its versatility makes it a hit for any gathering or a cozy night in.

Keep any leftover guacamole fresh by storing it in an airtight container in the fridge. Press plastic wrap or directly onto the surface to prevent browning, and enjoy within 2 days for the best taste and texture.

Hi, I'm Kimberly!

Hi, I'm Kimberly.

A hopeless romantic when it comes to food. Every recipe I share is a love letter to food itself. I’m so glad you’re here. Make yourself at home and stay a while.

Love,
Kimberly

Kimberly the Zett Signature

If you want to get to know me better,
click here!


Guacamole with Tomatoes & Red Onion

LET’S MAKE A PIECE OF HAPPINESS

Print
.tasty-recipe-responsive-iframe-container-04ace0b0 { position: relative; overflow: hidden; padding-top: 177.62%; } .tasty-recipe-responsive-iframe-container-04ace0b0 iframe { position: absolute; top: 0; left: 0; width: 100%; height: 100%; border: 0; } clock clock iconcutlery cutlery iconflag flag iconfolder folder iconinstagram instagram iconpinterest pinterest iconfacebook facebook iconprint print iconsquares squares iconheart heart iconheart solid heart solid icon
Guacamole with Tomatoes & Red Onion

Guacamole with Tomatoes & Red Onion


  • Author: Kimberly
  • Total Time: 10 min
  • Yield: 4

Description

GOOD TO HAVE ON HAND

  • sharp knife
  • cutting board
  • medium sized bowl


Ingredients

  • 2 avocados
  • 1/2 red onion
  • 4 cocktail tomatoes
  • juice of 1/2 lime
  • salt & pepper to taste

Instructions

  1. Slice the avocado lengthways, remove the pit and place the flesh in the bowl. Cut the lime in half and squeeze one half over the avocado. Mash the avocado with a fork until a cream is formed.
  2. Wash and halve the tomatoes. Remove the seeds. Halve the tomatoes again and cut into small pieces and add to the avocado in the bowl.
  3. Halve, peel and dice the onion and add to the bowl.
  4. Season everything with salt and pepper. If you like, you can squeeze in a clove of garlic at this point or stir in 100g of crème fraiche for even more creaminess.
  • Cook Time: 10 min

CRAVING MORE?

Follow along here & don’t forget to subscribe to my substack!

Warm Oven Baked Salad with Yogurt Thyme Honey Dressing

Warm Oven Baked Salad with Yogurt Thyme Honey Dressing

Warm Oven Baked Salad with Yogurt Thyme Honey Dressing

Warm Oven Baked Salad with Yogurt Thyme Honey Dressing

February 8, 2024 by Kimberly

Indulge in a scrumptious, warm salad fresh from the oven, enhanced by a sweet and savory honey-thyme yogurt dressing. A delightful, healthy treat!

This website uses affiliate links which may earn commission for purchases made at no additional cost to you.

TOTAL TIME

35 min

SERVES

2 portions

DIET

vegetarian

EVERY RECIPE DESERVES

A Little Love Letter

Indulge in the culinary delight of a warm salad recipe, perfect for any season. This oven-baked salad is not just a dish – it’s a journey of flavors, combining the comfort of warm ingredients with the freshness of a salad. Enhanced with a Yogurt Dressing, this recipe brings a wholesome and gourmet touch to your table. The Thyme Honey Dressing adds a unique twist, making it a standout in your Healthy Salad collection.

It’s best enjoyed fresh from the oven, with the warmth complementing the cool, creamy Yogurt Dressing. It’s a versatile dish that pairs wonderfully with a variety of mains, making it an excellent addition to your Easy Salad Recipes. Whether as a standalone meal for a light lunch or dinner or as a side for an extensive dinner, this salad is sure to impress. Its rich flavors and gourmet appeal make it a perfect choice for dinner parties or a nutritious family meal.

When it comes to storage, this Oven Baked Salad with its Flavorful Salads dressing is best enjoyed fresh. However, if you need to store it, keep vegetables and dressing separate from another in an airtight container in the refrigerator. The salad stays fresh for up to one day, but remember, the fresher, the better to maintain its unique texture and taste.

Hi, I'm Kimberly!

Hi, I'm Kimberly.

A hopeless romantic when it comes to food. Every recipe I share is a love letter to food itself. I’m so glad you’re here. Make yourself at home and stay a while.

Love,
Kimberly

Kimberly the Zett Signature

If you want to get to know me better,
click here!


Warm Oven Baked Salad with Yogurt Thyme Honey Dressing

LET’S MAKE A PIECE OF HAPPINESS

Print
.tasty-recipe-responsive-iframe-container-77021a9b { position: relative; overflow: hidden; padding-top: 177.62%; } .tasty-recipe-responsive-iframe-container-77021a9b iframe { position: absolute; top: 0; left: 0; width: 100%; height: 100%; border: 0; } clock clock iconcutlery cutlery iconflag flag iconfolder folder iconinstagram instagram iconpinterest pinterest iconfacebook facebook iconprint print iconsquares squares iconheart heart iconheart solid heart solid icon
Warm Oven Baked Salad with Yogurt Thyme Honey Dressing

Warm Oven Baked Salad with Yogurt Thyme Honey Dressing


  • Author: Kimberly
  • Total Time: 30 min
  • Yield: 2

Description

GOOD TO HAVE ON HAND

  • sharp knife
  • cutting board
  • small bowl
  • medium bowl


Ingredients

Units Scale
VEGETABLES
  • 1 red bell pepper
  • 1 yellow bell pepper
  • 1 red onion
  • 2 big tomatoes
  • 1 cup sugar snaps
  • 1 bay leaf
  • 1 tsp dried thyme
  • salt & pepper to taste
BREAD
  • 250 grams bread or baguette
  • 3 tbsp olive oil
  • 2 tbsp butter
  • 1 garlic clove
  • 1 tbsp chives
  • 1/8 tsp salt
  • 1/8 tsp pepper
DRESSING
  • 75 grams yogurt
  • 1 tbsp white wine vinegar
  • 1 tsp honey
  • 1 tbsp parsley
  • salt & pepper to taste

Instructions

  1. Preheat the oven to 200°C (400°F)
  2. Wash the bell peppers, tomatoes and sugarsnaps and cut into bite-sized pieces.
  3. Finely chop the parsley and chives.
  4. Peel the onion and cut into semicircles.
  5. Cut the bread into slices approx. 1 cm (1/2 inch) thick.
  6. Line a baking tray with baking paper and spread the chopped peppers, sugarsnaps, onions and tomatoes on it. Spread 1 tbsp olive oil, 1 tsp dried thyme and 1 bay leaf over the vegetables and mix everything well. Roast in the oven for approx. 15-20 minutes.
  7. In the meantime, to prepare the bread, mix the softened butter with the olive oil in a small bowl and add 1 tbsp of chopped chives. Add 1/8 teaspoon each of pepper and salt and the crushed garlic, stir well and spread evenly over the slices of bread. Place the slices on a rack with baking paper in the oven with the vegetables for the last 5 minutes and bake until golden brown.
  8. For the dressing, mix the yogurt, honey, white wine vinegar, parsley and a pinch each of salt and pepper in a medium bowl and set aside.
  9. Now take the vegetables and bread out the oven and leave to cool briefly. Remove the bay leaf. Place the vegetables in the bowl with the yogurt dressing and toss to combine. Divide the vegetables between two plates and serve with the garlic bread.
  • Cook Time: 30 min

CRAVING MORE?

Follow along here & don’t forget to subscribe to my substack!

Cajun Bang Bang Salmon Rice Bowl

Cajun Bang Bang Salmon Rice Bowl

Cajun Bang Bang Salmon Rice Bowl

Cajun Bang Bang Salmon Rice Bowl

February 7, 2024 by Kimberly

Discover the taste of Cajun-spiced Salmon Bites, paired with fluffy rice for a quick, savory meal. Perfect for an easy, delightful seafood experience!

This website uses affiliate links which may earn commission for purchases made at no additional cost to you.

TOTAL TIME

25 min

SERVES

2 portions

DIET

omnivore

EVERY RECIPE DESERVES

A Little Love Letter

Dive into the vibrant world of Cajun cuisine with my Cajun Salmon Recipe, a perfect blend of bold flavors and nutritious ingredients. These Spicy Salmon Bites offer a tantalizing experience, bringing the essence of Southern cooking right to your plate. Ideal for those who love Easy Seafood Meals, this dish combines the simplicity of cooking with an explosion of taste, making it a must-try for seafood enthusiasts.

The salmon bites, with their perfect Cajun seasoning, are best paired with fluffy, light rice, enhancing the rich flavors of the fish. This pairing makes for an irresistible combination and lands this dish among the top quick salmon dishes. Whether you’re hosting a dinner party or looking for a simple yet flavorful seafood recipe for your family, these Cajun Salmon Bites will not disappoint. Their versatility also makes them a great option for a healthy salmon idea, fitting into various meal plans.

Keep any leftovers in an airtight container in the refrigerator, ensuring they stay fresh. Make sure to store each ingredient in a separate container. They can be easily reheated for a quick meal, maintaining their delicious taste and texture.

Hi, I'm Kimberly!

Hi, I'm Kimberly.

A hopeless romantic when it comes to food. Every recipe I share is a love letter to food itself. I’m so glad you’re here. Make yourself at home and stay a while.

Love,
Kimberly

Kimberly the Zett Signature

If you want to get to know me better,
click here!


Cajun Bang Bang Salmon Rice Bowl

LET’S MAKE A PIECE OF HAPPINESS

Print
.tasty-recipe-responsive-iframe-container-a3451fbd { position: relative; overflow: hidden; padding-top: 177.62%; } .tasty-recipe-responsive-iframe-container-a3451fbd iframe { position: absolute; top: 0; left: 0; width: 100%; height: 100%; border: 0; } clock clock iconcutlery cutlery iconflag flag iconfolder folder iconinstagram instagram iconpinterest pinterest iconfacebook facebook iconprint print iconsquares squares iconheart heart iconheart solid heart solid icon
Cajun Bang Bang Salmon Rice Bowl

Cajun Bang Bang Salmon Rice Bowl


  • Author: Kimberly
  • Total Time: 25 min
  • Yield: 2

Description

GOOD TO HAVE ON HAND

  • sharp knife
  • cutting board
  • medium bowl
  • small bowl
  • rice cooker (or pot with lid)


Ingredients

Units Scale
SALMON
  • 300 grams salmon fillet
  • 1 tbsp cajun seasoning
  • 2 tbsp olive oil
SAUCE
  • 50 grams mayonnaise
  • 50 grams sweet &; sour sauce
  • 1 tbsp sriracha sauce
  • 1 tbsp lemon juice
  • 1 tsp crispy chili oil
  • 1 garlic clove
RICE
  • 300 grams jasmine rice
  • 400 milliliters water
TOPPING
  • spring onions

Instructions

  • Preheat the oven to 180°C (350°F)
  • Cut the spring onions into thin strips.
  • Cut the lemon in half.
  • Peel the garlic clove.
  • Pat the salmon dry and cut into large pieces.
  • Wash the rice until the water runs clear. Then cook the rice with 400ml (1 3/4 cups) of fresh water in the rice cooker. If you don’t have a rice cooker, you can cook the rice in a pot with a lid. To do so bring to a boil and then finish cooking on the lowest setting with the lid on.
  • In a medium-sized bowl, mix together the marinade for the salmon. Stir together the olive oil and Cajun seasoning and add the salmon bites. Stir everything well and then place the salmon pieces on a baking tray lined with baking paper.
  • Meanwhile, prepare the sauce. In a small bowl, mix together the mayonnaise, sweet and sour sauce, Sriracha, lemon juice, crispy chili oil and crushed garlic.
  • Remove the salmon from the oven after 5-7 minutes. Now divide the rice into two bowls, place the salmon bites on top and spread the sauce over them. Finally, top with spring onions.
  • Cook Time: 25 min

CRAVING MORE?

Follow along here & don’t forget to subscribe to my substack!