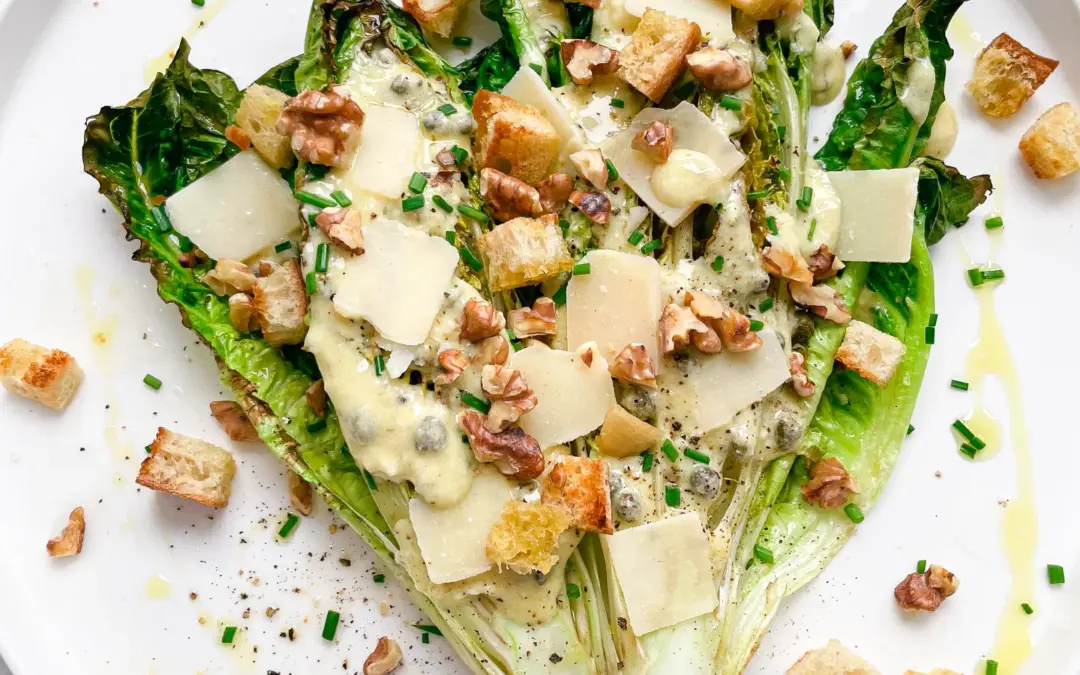
Curry Chicken Spread

Curry Chicken Spread

Curry Chicken Spread

Curry Chicken Spread

January 12, 2024 by Kimberly

Get ready for a taste adventure with my Curry Chicken Spread! Rich, spicy, and full of flavor, it’s perfect for sandwiches or as a savory snack dip!

30 MINUTES

EASY

OMNIVORE

INT.

147 PER PORTION

SPICY / CREAMY

EVERYDAY

DIPS & SPREADS

ALL YEAR

INTRODUCTION

ABOUT THE RECIPE

Embark on a culinary journey with our Curry Chicken Spread, a fusion of bold flavors and textures. This spread is a delightful blend of tender chicken, aromatic spices, and creamy elements, creating a versatile and irresistible addition to any meal. It’s an exotic twist on traditional spreads, perfect for those who crave something uniquely flavorful and satisfying.

How to serve:
Curry Chicken Spread is incredibly versatile. Spread it generously on crusty bread or crackers for a quick, savory snack. It’s also fantastic in sandwiches, adding a flavorful kick to your lunch. For a more elegant presentation, use it as a dip with a platter of fresh vegetables or pita chips at your next party. The rich curry flavors blend beautifully with the chicken, making it a hit at any dining occasion.

How to store:
To store the Curry Chicken Spread, place it in an airtight container and refrigerate. It will stay fresh for up to 3-4 days.

Hi, I'm Kimberly!

Hi, I'm Kimberly.

A passionate food lover who believes in the magic of homemade deliciousness that spreads love and warmth. Join me on this culinary adventure as I prepare wonderful dishes and let’s spread some happiness together!

Kimberly the Zett Signature

If you want to get to know me better, click here!


Curry Chicken Spread

„Let’s make a piece of happiness“

INGREDIENTS

FOR 6 PORTIONS

SPREAD

  • 450g chicken breast (1 lbs.)
  • 1 red onion
  • 4 dates
  • a few stems parsley
  • 150g yoghurt (5.5 oz.)
  • 3 tsp curry powder
  • 1 garlic clove
  • 1 tbsp lemon juice
  • 1 tsp Dijon mustard
  • salt & pepper to taste
Curry Chicken Spread
}

ACTIVE: 10 min

PASSIVE: 0 min

PREPARATIONS

Recommended Equipment
  • sharp knife
  • cutting board
  • medium sized bowl
  • Peel the onion and cut into small pieces.
  • Pluck the parsley leaves from the sprigs and chop finely.
  • Remove the skin from the garlic.
  • Cut the dates into small pieces.
    }

    ACTIVE: 5 min

    PASSIVE: 15 min

    COOKING

    1. Boil the chicken breasts in hot water for about 15 minutes and then shred them.

    2. In a medium bowl, mix the yogurt with the mustard, lemon juice, garlic, curry, salt and pepper and season to taste.

    3. Stir in the finely diced onions, dates and parsley.

    4. Finally, add the shredded chicken and mix everything well.

    NOTE: The calorie information may vary depending on the product used, country and region.

    Lemon Broth with Pasta, Broccoli & Peas

    Lemon Broth with Pasta, Broccoli & Peas

    Lemon Broth with Pasta Broccoli & Peas

    Lemon Broth with Pasta Broccoli & Peas

    January 10, 2024 by Kimberly

    Savor the tangy burst of Lemon Broth, mingled with tender Pasta, Broccoli, and Peas. Sprinkle Parmesan on top for a creamy finish. A delicious, nourishing delight!

    25 MINUTES

    EASY

    VEGETARIAN

    INT.

    595 PER PORTION

    COMFORT FOOD

    EVERYDAY

    LUNCH / DINNER

    ALL YEAR

    INTRODUCTION

    ABOUT THE RECIPE

    Embark on a culinary journey with this Lemon Broth with Pasta, Broccoli, and Peas, topped with Parmesan. This dish is a symphony of flavors, blending lemon juice with the wholesomeness of vegetables and pasta. Perfect for those seeking a meal that’s both nutritious and bursting with flavor, it’s an ideal comfort food for family dinners or a cozy night in.

    How to serve:
    Serve this vibrant dish hot, allowing the aromatic lemon broth to enhance the tender pasta, broccoli, and peas. The Parmesan cheese adds a creamy, indulgent touch, melting beautifully into the broth. For a perfect presentation, garnish with a sprinkle of lemon zest and fresh herbs. Pair it with a crisp white wine or a refreshing lemonade to complement the zesty flavors.

    How to store:
    I don’t recommend making too much of the dish and keeping it in the fridge as the noodles will swell in the soup and it will become too thick.

    Hi, I'm Kimberly!

    Hi, I'm Kimberly.

    A passionate food lover who believes in the magic of homemade deliciousness that spreads love and warmth. Join me on this culinary adventure as I prepare wonderful dishes and let’s spread some happiness together!

    Kimberly the Zett Signature

    If you want to get to know me better, click here!


    Lemon Broth with Pasta Broccoli & Peas
    Lemon Broth with Pasta Broccoli & Peas
    Lemon Broth with Pasta Broccoli & Peas

    „Let’s make a piece of happiness“

    INGREDIENTS

    FOR 2 PORTIONS

    • 200g Orecchiette pasta (2 cups)
    • 1 tbsp olive oil
    • 1 shallot
    • 2 garlic cloves
    • chili flakes
    • 700ml chicken broth (3 1/2 cups)
    • 200g broccoli (fresh or frozen) (7 oz.)
    • 200g frozen peas (7 oz.)
    • 2 tbsp parmigiano reggiano
    • juice of 1/2 to 1 lemon to taste
    • salt & pepper to taste
    Lemon Broth with Pasta Broccoli & Peas
    }

    ACTIVE: 5 min

    PASSIVE: 0 min

    PREPARATIONS

    Recommended Equipment
    • sharp knife
    • cutting board
    • medium sized pot
    • cheese grater
    • Peel the shallot and cut into small pieces.
    • Remove the skin from the garlic.
    • Finely grate the Parmesan.
      }

      ACTIVE: 5 min

      PASSIVE: 15 min

      COOKING

      1. Heat the olive oil in a medium saucepan and fry the shallot until translucent. Then add the garlic and chilli peppers and fry briefly until fragrant.

      2. Now add the dry pasta to the pan, stir briefly and then pour in the chicken broth. Allow to cook until the pasta is still firm to the bite.

      3. Then add the broccoli and peas and cook everything until the pasta is al dente and the vegetables are cooked soft, but not too soft, they should still have a little bite. The total cooking time is approx. 15 minutes.

      4. Remove the pan from the heat and season with lemon juice, salt and pepper. Now add the Parmesan. Serve the pasta and soup in two bowls and garnish with some extra Parmesan cheese and freshly ground pepper.

      NOTE: The calorie information may vary depending on the product used, country and region.

      Pomegranate Beetroot Juice

      Pomegranate Beetroot Juice

      Pomegranate Beetroot Juice

      Pomegranate Beetroot Juice

      January 7, 2024 by Kimberly

      Pomegranate Beetroot Juice is a healthy, tasty drink. It’s full of vitamins, lowers blood pressure, and boosts energy. Great for heart and digestive health.

      15 MINUTES

      EASY

      VEGAN

      INT.

      289 PER LITER
      (4 CUPS)

      REFRESHING

      EVERYDAY

      BEVERAGES

      ALL YEAR

      INTRODUCTION

      ABOUT THE RECIPE

      Indulge in the vibrant and nutritious blend of Pomegranate Beetroot Juice, a delightful concoction that promises both health and taste. This refreshing beverage merges the sweet, tangy essence of pomegranate with the earthy, rich flavors of beetroot, creating a perfect symphony for your taste buds. Not only is it a visual treat with its deep ruby color, but it’s also packed with essential nutrients that benefit your overall wellbeing.

      How to serve:
      Serve this Pomegranate Beetroot Juice chilled for a refreshing experience. It’s perfect as a morning energizer or a mid-day revitalizer. Enhance its appeal by garnishing with a slice of lemon or a sprig of mint. For a fun twist, add a splash of sparkling water to transform it into a fizzy delight. This juice pairs wonderfully with light breakfast items or as a standalone drink.

      How to store:
      For optimal freshness, store the juice in an airtight glas bottle in the refrigerator. It’s best consumed within 2-3 days. If you notice any separation, simply shake it well before serving. Freezing is not recommended as it can alter the flavor and texture of the juice.

      Hi, I'm Kimberly!

      Hi, I'm Kimberly.

      A passionate food lover who believes in the magic of homemade deliciousness that spreads love and warmth. Join me on this culinary adventure as I prepare wonderful dishes and let’s spread some happiness together!

      Kimberly the Zett Signature

      If you want to get to know me better, click here!


      Pomegranate Beetroot Juice
      Pomegranate Beetroot Juice
      Pomegranate Beetroot Juice

      „Let’s make a piece of happiness“

      INGREDIENTS

      FOR APPROX. 1 LITER (1 qt)

      FRUITS & VEGETABLES

      • 4 carrots
      • 2 apples
      • 2 beetroots
      • 3 oranges
      • 1 pomegranate
      Pomegranate Beetroot Juice
      }

      ACTIVE: 5 min

      PASSIVE: 0 min

      PREPARATIONS

      Recommended Equipment
      • juicer & citrus press (or food processor or blender)
      • sharp knife
      • chopping board
      • funnel
      • measuring cup
      • fine sieve
      • Wash the apples, carrots and beet thoroughly.
      • Halve the pomegranate and oranges.
        }

        ACTIVE: 10 min

        PASSIVE: 0 min

        COOKING

        PREPARATION WITH A JUICER & CITRUS PRESS

        1. Depending on the model, cut the apples, carrots and beetroot into large pieces and place in the juicer. Pass the juice through a fine sieve and pour into a glass bottle.
        2. Squeeze the pomegranate and oranges using a citrus juicer and also pass through a fine sieve. Then pour into the glass bottle with the other juices.

        PREPARATION WITH A FOOD PROCESSOR OR BLENDER

        1. Peel and roughly chop the apples, carrots and beet. Now put everything in the food processor or blender.
        2. Remove the orange flesh from the peel and add to the other fruits and vegetables. Scrape out the pomegranate and add the seeds to the food processor or blender.
        3. Blend everything at the highest setting for 30 seconds. Now pass the entire mixture through a fine sieve. If you like the pulp, you can of course skip this step.
        4. Pour the juice into a glass bottle.

        NOTE: The calorie information may vary depending on the product used, country and region.

        Light & Flavorful Blueberry Banana Cupcakes with Cream Cheese Frosting

        Light & Flavorful Blueberry Banana Cupcakes with Cream Cheese Frosting

        Light & Flavorful Blueberry Banana Cupcakes with Cream Cheese Frosting

        Light & Flavorful Blueberry Banana Cupcakes with Cream Cheese Frosting

        January 6, 2024 by Kimberly

        Enjoy our Blueberry Banana Cupcakes, a refined sugar-free recipe, topped with creamy cheese frosting for a light, sweet delight blending natural fruitiness with rich smoothness.

        25 MINUTES

        EASY

        VEGETARIAN

        US AMERICAN

        236 PER PORTION

        SWEET / CREAMY / FLUFFY

        EVERYDAY

        DESSERT / SNACK

        ALL YEAR

        INTRODUCTION

        ABOUT THE RECIPE

        Discover the joy of baking with our Light & Flavorful Blueberry Banana Cupcakes, a delightful twist on a classic treat. This unique recipe, free from refined sugar, combines the natural sweetness of bananas and blueberries with a luscious cream cheese frosting, creating a lighter but indulgently tasty delight. These cupcakes are perfect for those who enjoy the sweetness of life without the heaviness of traditional desserts.

        How to serve:
        Serve these charming cupcakes as a delightful dessert or a special treat with afternoon tea. The fusion of blueberries and banana offers a refreshing taste, while the cream cheese frosting adds a luxurious touch. For an extra flair, garnish with fresh blueberries or banana slices just before serving. They pair wonderfully with a cup of coffee or a glass of cold milk.

        How to store:
        Keep any leftover cupcakes in an airtight container in the refrigerator for up to 3 days. The cream cheese frosting requires refrigeration to maintain freshness and texture. For the best experience, let them reach room temperature before serving.

        Hi, I'm Kimberly!

        Hi, I'm Kimberly.

        A passionate food lover who believes in the magic of homemade deliciousness that spreads love and warmth. Join me on this culinary adventure as I prepare wonderful dishes and let’s spread some happiness together!

        Kimberly the Zett Signature

        If you want to get to know me better, click here!


        Light & Flavorful Blueberry Banana Cupcakes with Cream Cheese Frosting
        Light & Flavorful Blueberry Banana Cupcakes with Cream Cheese Frosting
        Light & Flavorful Blueberry Banana Cupcakes with Cream Cheese Frosting

        „Let’s make a piece of happiness“

        INGREDIENTS

        FOR 12 CUPCAKES

        CUPCAKES

        • 3 ripe bananas
        • 50ml coconut oil (1/4 cup)
        • 80g agave syrup (1/4 cup)
        • 1 egg
        • 1 tsp vanilla extract
        • 180g all-purpose flour (1.5 cups)
        • 1 tsp baking soda
        • 1 tsp baking powder
        • 1/2 tsp salt
        • 160g frozen blueberries (1 cup)

        FROSTING

        • 230g cream cheese (1 cup)
        • 250g yogurt (1 cup)
        • 50ml agave syrup (1/4 cup)
        • 1 tsp lemon juice
        • 1/2 tsp vanilla extract
        Light & Flavorful Blueberry Banana Cupcakes with Cream Cheese Frosting
        }

        ACTIVE: 5 min

        PASSIVE: 0 min

        PREPARATIONS

        Recommended Equipment
        • cupcake tin
        • baking paper
        • large bowl
        • medium bowl
        • hand mixer
        • Preheat the oven to 180°C (350°F)
        • Line a 12-cup cupcake tin with baking paper and set aside.
          }

          ACTIVE: 10 min

          PASSIVE: 10 min

          COOKING

          1. In a large bowl, mash the bananas with a fork to a mash. Mix in the coconut oil, agave syrup, egg and vanilla.

          2. Now add the flour, baking soda, baking powder and salt to the bowl and mix everything together until a creamy dough forms – do not overmix. Fold in the blueberries but set aside about 1 tablespoon of them for later.

          3. Fill the cupcake tins about 2/3 full. Now bake for 16 minutes. I bake them in two batches of 6 so that the cupcakes have more room to rise.

          4. Meanwhile, prepare the cream cheese frosting. Place the cream cheese, yoghurt, agave syrup, vanilla extract and lemon juice in a mixing bowl and beat with a hand mixer until stiff peaks form and a firm cream has formed,

          5. Take the cupcakes out of the oven and leave to cool on a wire rack.

          6. As soon as the cupcakes are at room temperature, the frosting can be spread on top. Warm the remaining blueberries in a small pot or in the microwave until they turn into a sauce. Let it cool and pour the sauce over the cupcakes just before serving.

          NOTE: The calorie information may vary depending on the product used, country and region.

          Banana Bliss Smoothie with Poppy Seeds Marzipan & Almond Butter

          Banana Bliss Smoothie with Poppy Seeds Marzipan & Almond Butter

          Banana Bliss Smoothie with Poppy Seeds Marzipan & Almond Butter

          Banana Bliss Smoothie with Poppy Seeds Marzipan & Almond Butter

          January 4, 2024 by Kimberly

          Savor this delightful smoothie, blending sweet bananas and almond butter with a hint of marzipan. It’s a creamy, refreshing treat that’s both nutritious and delicious!

          5 MINUTES

          EASY

          VEGAN

          INT.

          322 PER DRINK

          CREAMY

          EVERYDAY

          BEVERAGES

          AUTUMN / WINTER

          INTRODUCTION

          ABOUT THE RECIPE

          Indulge in the unique blend of flavors with our special smoothie, perfect for any time of the day. This recipe combines the creaminess of bananas and almond butter with subtle, sweet hints, creating a truly delightful beverage. Whether you need a morning pick-me-up or a refreshing afternoon treat, this smoothie offers a delicious way to energize and satisfy your taste buds.

          How to serve:
          Serve this smoothie chilled for the best experience. Pour it into a glass and garnish with a slice of lemon on the rim for an elegant touch. If you’re feeling creative, sprinkle a few extra poppy seeds on top for a beautiful presentation. It’s ideal for breakfast, a quick snack, or even as a light dessert.

          How to store:
          To keep this smoothie fresh, store it in an airtight glas jar for up to 2 days. Give it a good stir or a quick blend before serving, as the ingredients may separate over time.

          Hi, I'm Kimberly!

          Hi, I'm Kimberly.

          A passionate food lover who believes in the magic of homemade deliciousness that spreads love and warmth. Join me on this culinary adventure as I prepare wonderful dishes and let’s spread some happiness together!

          Kimberly the Zett Signature

          If you want to get to know me better, click here!


          Banana Bliss Smoothie with Poppy Seeds Marzipan & Almond Butter
          Banana Bliss Smoothie with Poppy Seeds Marzipan & Almond Butter
          Banana Bliss Smoothie with Poppy Seeds Marzipan & Almond Butter

          „Let’s make a piece of happiness“

          INGREDIENTS

          FOR 1 DRINK 350ml (12 fl. oz.)

          DRINK

          • 1 banana
          • 2 tsp almond butter (1.5 lbs.)
          • 1 tsp lemon juice
          • 1 tsp agave syrup
          • 1 tbsp marzipan
          • 1 tsp poppy seeds
          • 1/8 tsp cinnamon
          • 2ooml water (7 fl. oz.) 
          Banana Bliss Smoothie with Poppy Seeds Marzipan & Almond Butter
          }

          ACTIVE: 0 min

          PASSIVE: 0 min

          PREPARATIONS

          Recommended Equipment
          • blender
          • none
            }

            ACTIVE: 5 min

            PASSIVE: 0 min

            COOKING

            Peel the banana and put it into the blender in large chunks. Pluck the marzipan into small pieces and add to the blender. Then add the almond butter, lemon juice, agave syrup, poppy seeds, cinnamon and water. Puree everything on the highest setting for 1-2 minutes. Pour into a jar or bottle.

            NOTE: The calorie information may vary depending on the product used, country and region.

            Roasted Pumpkin with Garlic Yogurt Sauce and Pistachios

            Roasted Pumpkin with Garlic Yogurt Sauce and Pistachios

            Roasted Pumpkin with Garlic Yogurt Sauce & Pistachios

            Roasted Pumpkin with Garlic Yogurt Sauce & Pistachios

            January 3, 2024 by Kimberly

            Indulge in this delectable Roasted Pumpkin, adorned with creamy Garlic Yogurt Sauce and crunchy Pistachios, offering a wholesome, flavorful, and aromatic delight with every savory, nutritious bite.

            30 MINUTES

            EASY

            VEGETARIAN

            INT.

            375 PER PORTION

            MASHY

            EVERYDAY

            LUNCH

            AUTUMN / WINTER

            INTRODUCTION

            ABOUT THE RECIPE

            Welcome to the delightful world of Roasted Pumpkin with Garlic Yogurt Sauce and Pistachios. This dish is a perfect amalgamation of sweet, earthy pumpkin, enriched with a tangy and creamy garlic yogurt sauce, and finished with a sprinkle of crunchy pistachios. It’s an ideal recipe for those seeking a nutritious yet indulgent addition to their meal, blending the warmth of winter flavors with a touch of elegance.

            How to serve:
            Serve this exquisite dish as a stunning side or a main course. It pairs beautifully with grilled meats or can stand alone for a satisfying vegetarian option. The creamy garlic yogurt sauce complements the soft, caramelized pumpkin, while the pistachios add a delightful crunch. Garnish with fresh parsley for a pop of color and flavor. It’s best enjoyed warm, making it a comforting choice for chilly evenings or festive gatherings.

            How to store:
            Leftovers can be stored in an airtight container in the refrigerator for up to 3 days. Reheat in the oven or microwave until warm. It’s recommended to store the pumpkin and garlic yogurt sauce separately to maintain the best texture and flavor when enjoying it later.

            Hi, I'm Kimberly!

            Hi, I'm Kimberly.

            A passionate food lover who believes in the magic of homemade deliciousness that spreads love and warmth. Join me on this culinary adventure as I prepare wonderful dishes and let’s spread some happiness together!

            Kimberly the Zett Signature

            If you want to get to know me better, click here!


            Roasted Pumpkin with Garlic Yogurt Sauce & Pistachios
            Roasted Pumpkin with Garlic Yogurt Sauce & Pistachios
            Roasted Pumpkin with Garlic Yogurt Sauce & Pistachios

            „Let’s make a piece of happiness“

            INGREDIENTS

            FOR 4 PORTIONS AS SIDE DISH

            PUMPKIN

            • 750g pumpkin – I used Hokkaido (1.5 lbs.)
            • 2 tbsp olive oil
            • 1/4 tsp salt
            • 1/4 tsp black pepper
            • 1/4 tsp onion powder
            • 1/4 tsp garlic powder
            • 1/4 tsp cilantro powder
            • 1/4 tsp smoked paprika powder

            GARLIC YOGURT SAUCE

            • 250g yogurt (2 cups)
            • 1 garlic clove
            • 1/8 tsp salt
            • 1/8 tsp black pepper

            TOPPINGS

            • pistachios
            • parsley
            • olive oil
            Roasted Pumpkin with Garlic Yogurt Sauce & Pistachios
            }

            ACTIVE: 10 min

            PASSIVE: 0 min

            PREPARATIONS

            Recommended Equipment
            • sharp knife
            • cutting board
            • medium bowl
            • small bowl
            • Preheat the oven to 230°C (450°F)
            • Remove the seeds from the pumpkin and cut into bite-sized pieces. You do not need to peel the Hokkaido.
            • Remove the skin from the garlic.
              }

              ACTIVE: 15 min

              PASSIVE: 5 min

              COOKING

              1. Place the pumpkin pieces in a medium-sized bowl. Now pour the olive oil and 1/4 tsp each of salt, pepper, dried coriander, smoked paprika, garlic and onion over the pumpkin pieces and mix so that the pieces are evenly coated with everything. Place the pumpkin pieces on a baking tray lined with baking paper.

              2. Place the baking tray in the preheated oven and roast for 20 minutes.

              3. While the pumpkin is in the oven, mix the yoghurt, fresh garlic, salt and pepper together in a small bowl and season to taste.

              4. Remove the shells from the pistachios and chop them into small pieces. Pluck the parsley from the stalks and chop finely too.

              5. Now remove the tray from the oven. Pour the yoghurt sauce over the pumpkin and then top with olive oil, parsley and pistachios.

              NOTE: The calorie information may vary depending on the product used, country and region.