Creamy Salsiccia & Caramalized Onion Pasta

Creamy Salsiccia & Caramalized Onion Pasta

Creamy Sausage & Caramalized Onion Pasta with Salsiccia

Creamy Salsiccia & Caramalized Onion Pasta

December 6, 2023 by Kimberly

Get ready for a cozy, indulgent meal! This pasta brings together rich, creamy flavors with a hint of spice and deep caramelized sweetness, perfect for a relaxing night in.

40 MINUTES

EASY

OMNIVORE

ITALIAN

905 PER PORTION

COMFORT FOOD

EVERYDAY

DINNER

AUTUMN
WINTER

INTRODUCTION

ABOUT THE RECIPE

If you’re craving a comforting meal that’s both rich and full of flavor, this creamy pasta with sausage and caramelized onions will be your new favorite! Each bite is a perfect blend of deep, slow-cooked sweetness from the onions, paired with the bold, savory flavors of Italian sausage, all wrapped up in a smooth, creamy sauce. It’s an easy recipe that feels like a cozy hug on a plate, ideal for any night when you just want to treat yourself.

How to serve:
Serve this pasta piping hot, topped with freshly grated Parmesan and a sprinkle of parsley for extra color and flavor. Pair it with a light side salad or some crusty bread to soak up every bit of that creamy sauce. This dish shines with a glass of white wine, which complements the richness beautifully. It’s perfect for a weeknight dinner that feels like a restaurant treat or even a cozy date night at home.

How to store:
Store any leftovers in an airtight container in the fridge for up to three days. To reheat, add a splash of stock in a pan over low heat, stirring occasionally until warmed through. It’s almost as good as fresh!

Hi, I'm Kimberly!

Hi, I'm Kimberly.

A passionate food lover who believes in the magic of homemade deliciousness that spreads love and warmth. Join me on this culinary adventure as I prepare wonderful dishes and let’s spread some happiness together!

Kimberly the Zett Signature

If you want to get to know me better, click here!


Creamy Sausage & Caramalized Onion Pasta with Salsiccia

„Let’s make a piece of happiness“

Print
clock clock iconcutlery cutlery iconflag flag iconfolder folder iconinstagram instagram iconpinterest pinterest iconfacebook facebook iconprint print iconsquares squares iconheart heart iconheart solid heart solid icon
Creamy Sausage & Caramalized Onion Pasta with Salsiccia

Creamy Salsiccia & Caramalized Onion Pasta


5 Stars 4 Stars 3 Stars 2 Stars 1 Star

No reviews

  • Author: Kimberly
  • Total Time: 40 min
  • Yield: 2 1x

Description

RECOMMENDED EQUIPMENT

  • large pan
  • sharp knife
  • cutting board
  • large pot

Ingredients

Units Scale
  • 160 grams pasta of your choice (I used Tagliatelle)
  • 4 mid-sized white onions
  • 1 tsp butter
  • 1 tbsp olive oil
  • 150 grams fennel salsiccia
  • 2 garlic cloves
  • 1 tbsp tomato paste
  • 1 tsp dried oregano
  • 1 tsp smoked paprika powder
  • 1 tbsp balsamic vinegar
  • 1 tsp Dijon mustard
  • 50 milliliter dry white wine
  • 100 milliliter heavy cream
  • salt & pepper to taste
  • parmesan, for topping
  • fresh parsley, for topping

Instructions

PREPARATIONS

  • Peel the onions and cut them into thin half-rings. Set aside.
  • Remove the casing from the Salsiccia (or keep it on if it’s edible). Cut the sausage into small pieces and set aside.
  • Peel the garlic cloves. Set aside.

INSTRUCTIONS

  1. Place a large pan over medium heat and add butter. Toss in the onions and season with a pinch of salt. Lower the heat and let the onions cook down for about 15 minutes, until they’re soft and golden. Then, remove the onions from the pan.
  2. Put the pan back on the stove, add some olive oil, and heat it up. Add the Salsiccia, breaking it up with a wooden spoon so it resembles coarse ground meat. Turn the heat up to medium and cook until the pieces are golden brown.
  3. Mix in smoked paprika, tomato paste, and oregano, and let it cook briefly until it smells fragrant. Add the garlic to the pan – either finely grate it or press it through a garlic press. Put the onions back in the pan and mix everything well. Now, deglaze with white wine, scraping up the browned bits from the bottom. Add balsamic vinegar and mustard. Pour in the cream and let it simmer on low heat. Season generously with salt and pepper to taste.
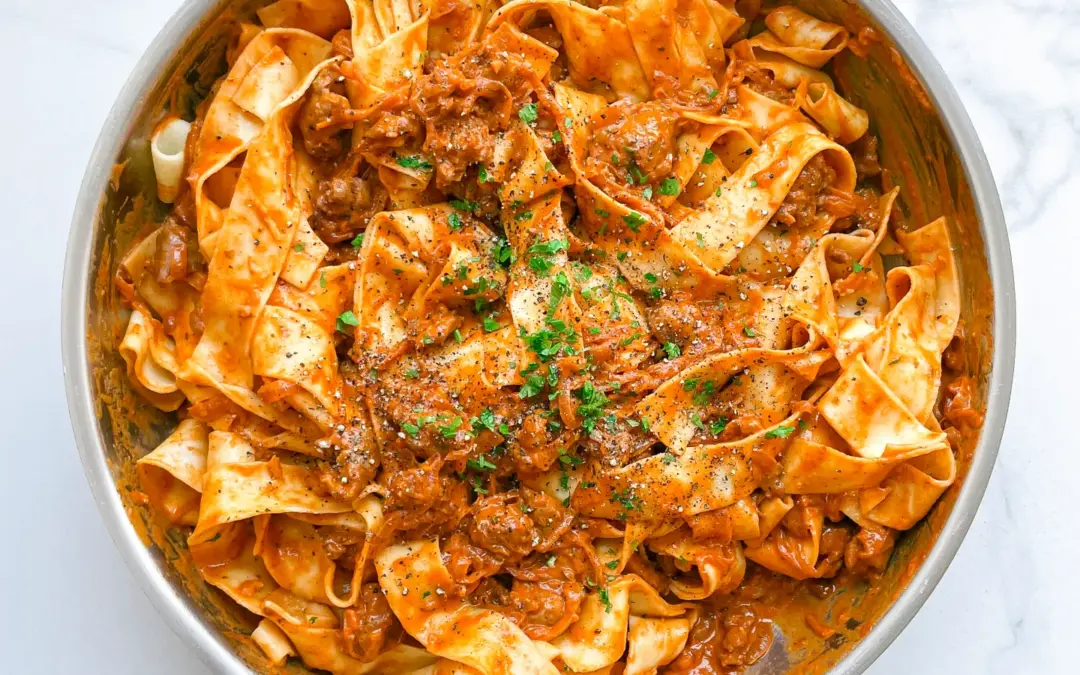
  4. Meanwhile, cook the pasta al dente according to package instructions. Save a bit of the pasta water when draining. Add the pasta and some of the pasta water to the pan, tossing it all together until the creamy sauce coats the pasta. Serve on plates, topped with freshly grated Parmesan and parsley.
  • Prep Time: 10 min
  • Passive Time: 15 min
  • Cook Time: 15 min

Shortbread Bars With Cherry Jam

Shortbread Bars With Cherry Jam

Shortbread Bars with Cherry Jam

Shortbread Bars with Cherry Jam

December 4, 2023 by Kimberly

Delight in buttery shortbread bars, a symphony of crumbly texture, harmonized with luscious jam. Each bite unveils a perfect blend of sweetness and simplicity, a timeless treat for indulgence.

40 MINUTES

EASY

VEGETARIAN

ENGLISH

158 PER BAR

BUTTERY

EVERYDAY / TEA TIME

DESSERT

ALL YEAR

INTRODUCTION

ABOUT THE RECIPE

Indulge in the sublime fusion of buttery shortbread and vibrant cherry jam with this irresistible Shortbread Bars With Cherry Jam. The crumbly, melt-in-your-mouth texture of the shortbread complements the sweet-tart burst of cherry jam, creating a symphony of flavors that’s both nostalgic and delectable.

How to serve:
To serve, cut into perfectly portioned bars and arrange them on a charming dessert platter. These bars make a delightful addition to afternoon tea or a sweet ending to any gathering.

How to store:
For optimal freshness, store the Shortbread Bars in an airtight container at room temperature for up to three days. To extend their shelf life, refrigerate for a longer-lasting treat.

Hi, I'm Kimberly!

Hi, I'm Kimberly.

A passionate food lover who believes in the magic of homemade deliciousness that spreads love and warmth. Join me on this culinary adventure as I prepare wonderful dishes and let’s spread some happiness together!

Kimberly the Zett Signature

If you want to get to know me better, click here!


Shortbread Bars with Cherry Jam

„Let’s make a piece of happiness“

INGREDIENTS

For 24 BARS

BARS

  • 250g butter (9 oz.)
  • 100g sugar (3.5 oz.)
  • 350g sugar (3 cups)
  • 1/4 tsp salt
  • 150g cherry jam (5 oz.)
Shortbread Bars with Cherry Jam
}

ACTIVE: 2 min

PASSIVE: 0 min

PREPARATIONS

Recommended Equipment
  • Mixing bowl
  • Hand mixer (or stand mixer)
  • Cling film
  • Cheese grater
  • Baking tin 20×20 cm (8×8 inch)
  • Line a baking tin with baking paper.
}

ACTIVE: 20 min

PASSIVE: 18 min

COOKING

1. Place the soft (not liquid) butter, sugar and salt in a mixing bowl. Mix with a hand mixer or stand mixer for approx. 3 minutes until creamy. Add the flour and mix until the butter is coated in flour. Then knead with your hands until smooth.

2. Wrap the dough in a layer of cling film and shape into a square. Place the dough in the freezer for approx. 1 hour.

3. Preheat the oven to 180°C (350°F). Now grate half the dough into flakes using a cheese grater. Put the other half back in the freezer.

4. Spread the flakes evenly in a baking dish. Use very little pressure to spread the flakes in the tin – DO NOT press them down. Now spread the cherry jam evenly over the flakes.

5. Now take the second half of the dough out of the freezer and grate it into flakes using the cheese grater and spread it evenly over the jam. Again, only spread the flakes with very light fingers and do not press down.

6. Bake for approx. 15 to 20 minutes at 180°C (350°F) or until the shortbread is light golden but not brown. It is best to take them out of the oven when they are lightly golden, as they will bake a little longer anyway. Leave the shortbreads to cool and cut into strips.

NOTE: The calorie information may vary depending on the product used, country and region.

Chicken Shawarma Marinade

Chicken Shawarma Marinade

Chicken Shawarma Marinade

Chicken Shawarma Marinade

November 28, 2023 by Kimberly

Transform your chicken shawarma with a zesty marinade featuring garlic, lemon, and a harmonious mix of Middle Eastern spices. Infuse bold flavor for a mouthwatering culinary adventure.

50 MINUTES

EASY

OMNIVORE

ARABIC

285 PER PORTION

SPICY

EVERYDAY

DINNER / MARINADE

ALL YEAR

INTRODUCTION

ABOUT THE RECIPE

Get ready to whip up the best chicken shawarma ever with this amazing marinade! Mix in some garlic, fresh lemon juice, olive oil, and a bunch of delightful Middle Eastern flavors. Whether you grill it or roast it, you’re in for some seriously joyous, tasty bites that will send your taste buds on a magical journey. Make your own piece of happiness with this fantastic chicken shawarma marinade – it’s an absolute blast!

How to serve:
Serve your delicious chicken shawarma meat by placing it on warm pita bread or flatbread. Top with crunchy vegetables such as a tomato cucumber salad. Drizzle with a spicy tahini or mint garlic dip for a special kick. You can also use the chicken as a wonderful component for a whole meal, take a look at my Chicken Shawarma Plate. A perfect feast so that every bite is a hearty delight!

How to store:
Maximize the flavor of your chicken shawarma by storing it in a jar or airtight container, letting the marinade work its magic for up to 5 days. The longer it sits, the more the flavors meld together, creating an even more delicious and satisfying dish when you’re ready to savor it. Store the roasted marinated chicken shawarma meat by placing it in an airtight container in the refrigerator and consume within 2 to 3 days to ensure optimum freshness.

Hi, I'm Kimberly!

Hi, I'm Kimberly.

A passionate food lover who believes in the magic of homemade deliciousness that spreads love and warmth. Join me on this culinary adventure as I prepare wonderful dishes and let’s spread some happiness together!

Kimberly the Zett Signature

If you want to get to know me better, click here!


Chicken Shawarma Marinade

„Let’s make a piece of happiness“

INGREDIENTS

FOR 2 PEOPLE

MARINADE

  • 1 tsbp olive oil
  • 1 tbsp lemon juice
  • 3 garlic cloves
  • 1 tsp cumin
  • 1 tsp smoked paprika
  • 1 tsp salt
  • 1/4 tsp turmeric
  • 1/4 tsp curry
  • 1/8 tsp cinnamon
  • 1/8 tsp pepper

CHICKEN

  • 400g (14 oz.) chicken breast or boneless, skinless chicken thighs
Chicken Shawarma Marinade
}

ACTIVE: 5 min

PASSIVE: 0 min

PREPARATIONS

Recommended Equipment
  • sharp knife
  • cutting board
  • medium sized bowl
  • frying pan
  • If you are using chicken breast, cut it into small pieces. If you are using boneless and skinless chicken thighs, you can also leave them whole.
  • Remove the skin from the 3 garlic cloves.
}

ACTIVE: 15 min

PASSIVE: 30 min

COOKING

1. Mix 1 tbsp olive oil and 1 tbsp lemon juice in a bowl.

2. Squeeze the garlic cloves into the bowl with the olive oil and lemon juice. Now add 1 tsp cumin, 1 tsp smoked paprika powder, 1/4 tsp turmeric, 1/4 tsp curry powder, 1/8 tsp cinnamon, 1 tsp salt and 1/8 tsp black pepper and mix well.

3. Add the chicken to the marinade and mix well so that all the chicken is coated with the marinade.

4. Now place the bowl in the fridge. If you want it to be super quick, leave it to marinate for at least 30 minutes. For a longer preparation time, you can leave it in the fridge for up to 4 hours.

5. After the marinating time, heat a large frying pan over a medium heat. The chicken can now be placed on wooden or metal skewers before frying, but this is not a must. Tip: If you want to use wooden skewers, place them in a bowl of water 1 hour before use so that they can soak up the water and won’t burn during frying.

6. Either place the chicken on skewers in the pan or fry them individually. To ensure the right juiciness in chicken meat so that it does not become dry, turn it only once during frying. When you place the raw chicken in the pan, let it cook on this side over a medium heat until it turns white around the edges, which is the sign that the bottom half is cooked through. Then you can turn it over. Then fry for the same amount of time on the other side. 

NOTE: The calorie information may vary depending on the product used, country and region.

Cumberland Sauce

Cumberland Sauce

Cranberry Cumberland Sauce

Cranberry Cumberland Sauce

November 21, 2023 by Kimberly

Tangy, fruity, and a little zesty – this sauce brings festive vibes to your table. Perfect for cozy dinners or holiday feasts, it’s like a warm hug for your taste buds.

30 MINUTES

EASY

VEGAN

ENGLISH

149 PER PORTION

ZESTY
TANGY

CHRISTMAS

SAUCE

WINTER

INTRODUCTION

ABOUT THE RECIPE

You know that feeling when a dish just makes the meal? This fruity, tangy, and slightly spiced sauce does exactly that. Whether you’re hosting a big holiday gathering, elevating a simple roast dinner, or looking for the perfect pairing for your appetizers, this recipe is your go-to for adding a pop of flavor and elegance to any plate. It’s absolutely divine with my Fingerfood Beef Wellington, bringing out those rich, savory notes, and pairs beautifully with my Cranberry Orange Glazed Pork Roast for a show-stopping main course. It’s classic, cozy, and totally irresistible, making every bite feel festive and full of love. Bonus? It’s ridiculously easy to whip up.

How to serve
Pair this zesty goodness with roasted meats like turkey, pork, or ham for a perfect balance of sweet and savory. It’s also a surprising win drizzled over creamy brie or slathered on a crusty sandwich. Looking for a quick appetizer? Serve it with crackers, a wedge of sharp cheese, and nuts for a crowd-pleasing snack board. It’s versatile enough to go beyond holiday feasts – any time you want a hit of bold, fruity flavor, this sauce has you covered.

How to store
Keep it fresh by storing it in an airtight container in the fridge for up to 3 days. You can also freeze it for up to three months – just thaw in the fridge overnight when needed.

Hi, I'm Kimberly!

Hi, I'm Kimberly.

A passionate food lover who believes in the magic of homemade deliciousness that spreads love and warmth. Join me on this culinary adventure as I prepare wonderful dishes and let’s spread some happiness together!

Kimberly the Zett Signature

If you want to get to know me better, click here!


Cumberland Sauce
Cumberland Sauce
Cumberland Sauce

„Let’s make a piece of happiness“

Print
clock clock iconcutlery cutlery iconflag flag iconfolder folder iconinstagram instagram iconpinterest pinterest iconfacebook facebook iconprint print iconsquares squares iconheart heart iconheart solid heart solid icon
Cranberry Cumberland Sauce

Cranberry Cumberland Sauce


  • Author: Kimberly
  • Total Time: 30 min
  • Yield: 6 1x

Description

RECOMMENDED EQUIPMENT
  • sharp knife
  • chopping board
  • peeler
  • grater
  • small pot
  • measuring cup
  • juicer (or by hand)

Ingredients

Units Scale
  • 1 lemon
  • 1 orange
  • 200 milliliter port wine
  • 1 shallot
  • 3/4 tsp fresh ginger, grated
  • 1 tsp dijon mustard
  • 100 grams fresh cranberries
  • 200 grams redcurrant jelly
  • salt & finely grated black pepper

Instructions

  1. Thoroughly wash and dry the lemon and orange. Peel 3–4 strips from each using a peeler, then slice the peels into fine julienne strips. Juice the orange, aiming for about 100 ml (3 fl. oz.) of juice.
  2. In a small saucepan, bring water to a boil and simmer the julienne strips for 5 minutes to soften and reduce their bitterness. Drain and set aside.
  3. Finely dice the shallot and grate the ginger directly into the saucepan. Add the port wine, orange juice, mustard, and cranberries. Bring everything to a boil over medium heat. Once boiling, lower the heat and simmer for about 15 minutes, until the cranberries soften and the liquid reduces.
  4. Next, stir in the redcurrant jelly and continue simmering for another 6–7 minutes, or until the sauce thickens. Season with salt and finely ground pepper to taste.
  5. Finally, fold the julienne strips into the sauce and let it cool. The sauce will thicken further as it cools and can be reheated anytime for serving.
  • Passive Time: 20 min
  • Cook Time: 10 min

Finger Food Beef Wellington

Finger Food Beef Wellington

Finger Food Beef Wellington

Finger Food Beef Wellington

November 21, 2023 by Kimberly

Enjoy the fancy version of Beef Wellington in bite-sized form. Enjoy tender beef wrapped in buttery batter and create a delicious and premium snack. Perfect for adding a touch of class to any gathering or occasion, a simple yet sophisticated treat that everyone will enjoy.

45 MINUTES

INTERMEDIATE

OMNIVORE

ENGLISH

93 PER PIECE

FANCY

DINNER PARTY
CHRISTMAS

APPETIZER

AUTUM/ WINTER

INTRODUCTION

ABOUT THE RECIPE

Take your event to the next level with these mini beef wellingtons, as a symphony of flavors unfolds with every bite, seamlessly blending mushrooms, Parma ham and a touch of Dijon mustard. This exquisite combination offers a sophisticated taste sensation in each delicious, finger-friendly parcel – perfect for adding a touch of gourmet flair to your party or event.

How to serve:

Present these delicious Beef Wellington finger foods at your Christmas party or on Christmas Eve, for example. These beef bites can be enjoyed on their own or with my spicy Cumberland sauce for an extra festive kick. With their delicious flavors, these canapés will enhance your Christmas party and are an irresistible and perfect addition to your festive table.

How to store:

To ensure optimum freshness, keep Beef Wellington wrapped in plastic wrap, beeswax cloths, aluminum foil or an airtight container in the refrigerator for up to two days. If you plan to store them for longer, freeze them in an airtight container, making sure to separate the layers with parchment paper. When you’re ready to enjoy the Wellingtons, reheat them in the oven to keep the batter crispy. Defrost frozen Wellingtons in the fridge before reheating to ensure they retain their delicious texture.

Hi, I'm Kimberly!

Hi, I'm Kimberly.

A passionate food lover who believes in the magic of homemade deliciousness that spreads love and warmth. Join me on this culinary adventure as I prepare wonderful dishes and let’s spread some happiness together!

Kimberly the Zett Signature

If you want to get to know me better, click here!


Finger Food Beef Wellington

„Let’s make a piece of happiness“

INGREDIENTS

FOR 16 PIECES

Mushroom Filling

  • 1 shallot 
  • 1 tbsp butter
  • 180g mushrooms (1.5 cups) 
  • 1 tsp dried thyme
  • 1 tbsp fresh parsley
  • 3 tbsp port wine (or any other red wine) 
  • salt
  • pepper

individual ingredients

  • 1 store-bought puff pastry
  • 200g beef fillet (7 oz.) 
  • 100g prosciutto di parma (3.5 oz.) 
  • 1 tbsp butter
  • 1 tsp dijon mustard
  • 1 egg
  • salt
  • pepper
Finger Food Beef Wellington
}

ACTIVE: 10 min

PASSIVE: 0 min

PREPARATIONS

Recommended Equipment
  • sharp knife
  • chopping board
  • food processor if necessary
  • small bowl
  • small pan
  • kitchen basting brush
  • Cut the mushrooms into very small pieces with a knife or chop briefly in a food processor.
  • Cut the shallot into very small pieces or chop briefly in a food processor.
  • Finely chop the parsley.
  • Cut the puff pastry into 16 equal pieces.
  • Cut or tear the Prosciutto di Parma into 16 equal pieces.
  • Crack an egg into a bowl and whisk it together.
}

ACTIVE: 25 min

PASSIVE: 10 min

COOKING

1. Fry the mushrooms in a pan without adding any fat so that the water can evaporate and the mushrooms do not become mushy and brown. Once the mushrooms are lightly browned, add a tablespoon of butter to the pan.

2. Secondly fry the finely chopped shallot in the pan with the mushrooms and melted butter until soft. When the onions are soft, deglaze everything with 3 tablespoons red wine and reduce for approx. 5-8 minutes. There should be no liquid left on the bottom, but everything should be absorbed into the mushrooms. Next, add the chopped fresh parsley, dried thyme and salt & pepper to taste to the pan. Set the mushroom mixture aside.

3. Now sear the fillet of beef very briefly on all sides in a pan with 1 tbsp butter. Remove the meat from the pan and cut into 16 equal pieces. Set aside.

4. First place the Prosciutto di Parma on the individual pieces of puff pastry so that the edges of the pastry are still visible around the ham. Next, place approx. 1/2 tsp of the mushroom mixture on each piece of ham. Then place a piece of beef fillet on top of the mushroom mixture. Brush the fillet of beef with a little mustard. Now roll up the pieces and seal the ends.

5. Preheat the oven to 200°C (390°F) and place the Beef Wellington finger food in the fridge until then.

6. When the oven is preheated take the Beef Wellington Finger Food pieces out of the fridge and place on a baking tray lined with baking paper. Make diagonal incisions in all the pieces and brush with the beaten egg.

7. Finally bake in the oven at 200°C (390°F) for about 10 minutes or until lightly browned on the outside. If the pieces of meat are very thin, it cannot be guaranteed that the meat will be cooked medium. But even if the meat is not medium, it will be very tender and fall apart in the mouth. My Cumberland sauce goes wonderfully with this.

NOTE: The calorie information may vary depending on the product used, country and region.