Cranberry Pistachio Biscotti

Cranberry Pistachio Biscotti

Cranberry Pistachio Biscotti

Cranberry Pistachio Biscotti

December 9, 2024 by Kimberly

These crispy, nutty biscotti are bursting with tart cranberries and crunchy pistachios, dipped in a silky layer of white chocolate. They’re festive, cozy, and perfect for coffee-dunking or gifting.

60 MINUTES

EASY

VEGETARIAN

ITALIAN

107 PER BISCOTTI

SWEET

EVERYDAY

SNACK

WINTER

INTRODUCTION

ABOUT THE RECIPE

These biscotti are everything you want in a cozy snack. Crunchy, nutty, and perfectly sweet, they combine tart cranberries, rich pistachios, and a touch of indulgence with a white chocolate coating. They’re ideal for holiday gifting, pairing with your coffee, or treating yourself to something a little special. The mix of textures and flavors makes them irresistible, and they look as beautiful as they taste.

How to serve
Serve these biscotti alongside a hot cup of coffee, tea, or even hot cocoa for the ultimate cozy vibe. They’re also fantastic as part of a dessert spread, paired with fresh fruit or a creamy mousse. And don’t forget – they make the perfect holiday gift, wrapped up in cute little bags or boxes.

How to store
Store the biscotti in an airtight container at room temperature for up to three weeks. If they’re coated in chocolate, keep them in a cool place to avoid melting. Perfect for make-ahead treats!

Hi, I'm Kimberly!

Hi, I'm Kimberly.

A passionate food lover who believes in the magic of homemade deliciousness that spreads love and warmth. Join me on this culinary adventure as I prepare wonderful dishes and let’s spread some happiness together!

Kimberly the Zett Signature

If you want to get to know me better, click here!


Cranberry Pistachio Biscotti
„Let’s make a piece of happiness“
Print
clock clock iconcutlery cutlery iconflag flag iconfolder folder iconinstagram instagram iconpinterest pinterest iconfacebook facebook iconprint print iconsquares squares iconheart heart iconheart solid heart solid icon
Cranberry Pistachio Biscotti

Cranberry Pistachio Biscotti


5 Stars 4 Stars 3 Stars 2 Stars 1 Star

No reviews

  • Author: Kimberly
  • Total Time: 60 min
  • Yield: 14-18 pieces 1x

Description

Recommended Equipment

  • 2 bowls
  • electric mixer
  • whisk
  • baking tray
  • parchment paper
  • sharp knife
  • spoon or spatula
  • food processor (optional, for chopping cranberries)

Ingredients

Units Scale
  • 125 grams all-purpose flour
  • 1/2 tsp baking powder
  • 1/4 tsp salt
  • 30 grams butter, room-temperature
  • 75 grams white sugar
  • 1 egg
  • 1 tsp vanilla extract
  • 50 grams pistachios
  • 50 grams fresh cranberries
  • 100 grams white chocolate

Instructions

  1. Roughly chop the cranberries and pistachios with a knife or a food processor, then set aside. Preheat the oven to 175°C/347°F.
  2. In one bowl, thoroughly mix the flour, baking powder, and salt.
  3. In another bowl, use an electric mixer to cream the soft butter and sugar until fluffy.
  4. Add the egg and vanilla extract to the butter-sugar mixture and mix well.
  5. Add the dry ingredients to the butter-egg mixture, along with the chopped pistachios and cranberries. Mix everything until you get a smooth dough. Only stir until no flour streaks remain.
  6. Place the dough onto a baking tray lined with parchment paper. Lightly dust your hands with flour and shape the dough into a flat, long rectangle (about 20-25 cm long and 6 cm wide).
  7. Bake the dough piece for about 30 minutes. Remove it from the oven and let it cool slightly.
  8. Use a bread knife or sharp knife to slice the baked dough into pieces (about 1.5–2 cm thick).
  9. Place the biscotti slices cut side down back onto the baking tray.
    • For a softer version: Bake each side for 5 minutes.
    • For a crunchier version: Bake each side for 10 minutes.
  10. Dip half of the biscotti in melted white chocolate and sprinkle with chopped pistachios. Let them cool on a wire rack until the chocolate hardens.
  • Passive Time: 40 min
  • Cook Time: 20 min

Gorgonzola Spinach Gnocchi with Salsiccia Walnut Topping

Gorgonzola Spinach Gnocchi with Salsiccia Walnut Topping

Gorgonzola Spinach Gnocchi with Salsiccia Walnut Topping

Gorgonzola Spinach Gnocchi with Salsiccia Walnut Topping

November 25, 2024 by Kimberly

Creamy, cheesy, and just the right touch of indulgence! This cozy dish feels like a warm hug, with bold Italian vibes and a satisfying crunch that’s absolutely unforgettable.

50 MINUTES

EASY

OMNIVORE

ITALIAN

854 PER PORTION

COMFORT FOOD

EVERYDAY

DINNER

AUTUMN
WINTER

INTRODUCTION

ABOUT THE RECIPE

This dish is the ultimate comfort meal you didn’t know you needed! Think soft pillows of gnocchi wrapped in a velvety, cheesy sauce, with just enough spinach to feel balanced. The topping? A game-changing mix of savory sausage and crunchy walnuts that takes it to the next level. It’s one of those meals that feels fancy but is super easy to whip up. Perfect for impressing guests or treating yourself to a cozy night in!

How to serve
Serve this dish straight from the pan, steaming and ready to impress. Sprinkle a touch of freshly grated Parmesan or a drizzle of olive oil on top for that extra flair. Pair it with a crisp arugula salad or some roasted veggies to balance the richness. Want to make it truly unforgettable? A glass of chilled white wine or sparkling water with a citrus twist will make the flavors pop.

How to store
Got leftovers? Lucky you! Store them in an airtight container in the fridge for up to 3 days. Reheat gently in a pan over low heat, adding a splash of milk or cream to revive that creamy magic. Avoid freezing – it’s best enjoyed fresh!

Hi, I'm Kimberly!

Hi, I'm Kimberly.

A passionate food lover who believes in the magic of homemade deliciousness that spreads love and warmth. Join me on this culinary adventure as I prepare wonderful dishes and let’s spread some happiness together!

Kimberly the Zett Signature

If you want to get to know me better, click here!


Gorgonzola Spinach Gnocchi with Salsiccia Walnut Topping
„Let’s make a piece of happiness“
Print
clock clock iconcutlery cutlery iconflag flag iconfolder folder iconinstagram instagram iconpinterest pinterest iconfacebook facebook iconprint print iconsquares squares iconheart heart iconheart solid heart solid icon
Gorgonzola Spinach Gnocchi with Salsiccia Walnut Topping

Gorgonzola Spinach Gnocchi with Salsiccia Walnut Topping


  • Author: Kimberly
  • Total Time: 50 min
  • Yield: 4 1x

Description

RECOMMENDED EQUIPMENT

  • large frying pan
  • medium frying pan
  • large pot
  • strainer
  • sharp knife
  • cutting board


Ingredients

Units Scale

SPINACH GORGONZOLA SAUCE

  • 200 grams gorgonzola
  • 200 grams heavy cream
  • 1 tbsp butter
  • 250 milliliter chicken stock
  • 50 milliliter dry white wine
  • 4 garlic cloves
  • 1 shallot
  • 50 grams baby spinach
  • fresh oregano
  • fresh thyme
  • nutmeg, salt & pepper to taste

SALSICCIA WALNUT TOPPING

  • 200 grams salsiccia with fennel
  • 50 milliliter dry white wine
  • 40 grams walnuts
  • 2 tsp honey
  • fresh oregano
  • fresh thyme
  • cayenne pepper, salt & pepper to taste

OTHER INGREDIENTS

  • 800 grams gnocchi
  • parmesan for topping

Instructions

PREPARATIONS

  • Chop the shallot and garlic cloves into small, fine pieces. Take the salsiccia sausage out of its casing—either tear it into chunky bits with your hands or crumble it up, whichever feels less chaotic. Slice the gorgonzola into chunks—don’t overthink it; it’ll melt anyway. Wash the baby spinach thoroughly and spin it dry. Set everything aside.

INSTRUCTIONS

  1. Melt some butter in a large pan over medium heat. Toss in the shallots and cook until they’re glossy and translucent. Add the garlic and stir it until your kitchen smells incredible.
  2. Deglaze with a splash of white wine. Let it simmer for 1-2 minutes to let the alcohol cook off. Pour in the chicken broth and bring it to a boil. Once it boils, lower the heat to a simmer and stir in the cream. Let this dreamy mix simmer gently for 10-15 minutes while you prepare the salsiccia.
  3. Toss the sausage bits into a cold pan. Slowly heat it up so the fat renders out—no extra oil needed! Cook until the pieces are golden and crispy on the outside. Deglaze with another splash of white wine, simmering until most of the liquid evaporates and you’re left with a creamy coating. Toss in the walnuts, a pinch of cayenne pepper, salt, and a drizzle of honey. Stir everything and let it caramelize for 1-2 minutes. Add fresh oregano and thyme, mix, and let those flavors pop.
  4. Keep your cream and broth mixture on low heat. Stir in the Gorgonzola until it’s completely melted into the sauce—smooth, rich, and irresistible. Grate in some fresh nutmeg, then stir in more oregano and thyme. Add the spinach and stir until it wilts down. Keep everything warm and cozy over low heat.
  5. Fill a large pot with water, bring it to a boil, and add the gnocchi. Cook for 3-5 minutes, or until they float to the surface. Drain the gnocchi and toss them directly into the Gorgonzola-spinach sauce. Stir until every pillowy bite is coated in the sauce.
  6. Plate the gnocchi in deep bowls. Spoon the crispy salsiccia-walnut mixture on top and finish with a shower of freshly grated Parmesan.

  • Prep Time: 10 min
  • Passive Time: 15 min
  • Cook Time: 25 min

Biscoff Cinnamon Banoffee Pie

Biscoff Cinnamon Banoffee Pie

Biscoff Cinnamon Banoffee Pie

Biscoff Cinnamon Banoffee Pie

November 19, 2024 by Kimberly

Dreamy layers of creamy dulce de leche, fresh banana slices, and cinnamon whipped cream, all on a buttery Biscoff cookie crust. This no-bake treat is pure, cozy dessert bliss in every bite!

40 MINUTES

EASY

VEGETARIAN

ENGLISH

311 PER SLICE

CREAMY

THANKSGIVING

DESSERT & SWEETS

AUTUMN
WINTER

INTRODUCTION

ABOUT THE RECIPE

This no-bake delight layers all the cozy flavors: a buttery Biscoff cookie crust, homemade dulce de leche, fresh banana slices, and a whipped cinnamon topping. It’s creamy, sweet, and has that dreamy, melt-in-your-mouth quality that’ll make you reach for seconds. No baking needed – just a quick assembly for a dessert that’s equally impressive and easy. It’s the perfect treat when you want a little something special without turning on the oven.

How to serve
Serve this pie chilled and straight from the fridge to get the best creamy texture and hold. For a little extra flair, sprinkle the top with crushed Biscoff cookies or some shavings of your favorite chocolate. Pair it with a warm coffee or your favorite cozy drink – the caramel-like dulce de leche and cinnamon cream make this pie the ultimate comfort dessert. It’s also a crowd-pleaser, so bring it along to your next gathering!

How to store
Store any leftovers in the fridge, covered, for up to 3 days. The whipped cream topping stays nicely set, and the crust holds well. This pie is best served cold, straight from the fridge, for that perfect creamy bite.

Hi, I'm Kimberly!

Hi, I'm Kimberly.

A passionate food lover who believes in the magic of homemade deliciousness that spreads love and warmth. Join me on this culinary adventure as I prepare wonderful dishes and let’s spread some happiness together!

Kimberly the Zett Signature

If you want to get to know me better, click here!


Biscoff Cinnamon Banoffee Pie

„Let’s make a piece of happiness“

Print
clock clock iconcutlery cutlery iconflag flag iconfolder folder iconinstagram instagram iconpinterest pinterest iconfacebook facebook iconprint print iconsquares squares iconheart heart iconheart solid heart solid icon
Biscoff Cinnamon Banoffee Pie

Biscoff Cinnamon Banoffee Pie


  • Author: Kimberly
  • Total Time: 3 hrs + 15 min
  • Yield: 8-16 1x

Description

Recommended Equipment

  • small pot with lid
  • food processor
  • pie dish
  • sharp knife
  • cutting board
  • electric mixer
  • tall container
  • vegetable peeler
  • can opener

Ingredients

Units Scale
  • 300 grams biscoff cookies
  • 140 grams butter, room temperature
  • 400 grams sweetened condensed milk
  • 2 bananas
  • 1 tbsp lemon juice
  • 250 grams heavy cream
  • 30 grams powdered sugar
  • 1 tsp vanilla
  • 1 tsp cinnamon

Instructions

PREPARATIONS

  • You can buy ready-made dulce de leche or order it online, but it’s also easy to make at home ahead of time. Just grab a 400g can of sweetened condensed milk, remove the label, and place the can in a pot. Fill with enough water to completely cover the can, then bring the water to a boil. Reduce the heat to low, cover the pot, and let it simmer for about 2 hours and 30 minutes. Be sure to keep the can covered with water the entire time – if the water evaporates, just add more. After the 2.5 hours, pour off the water and let the can cool completely before using the dulce de leche inside.

INSTRUCTIONS

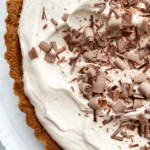
  1. Use a food processor to blend the Biscoff cookies and softened butter until they’re crumbly. Press the mixture evenly into a pie dish, covering the bottom and sides completely. Chill the crust in the fridge for 20 minutes.
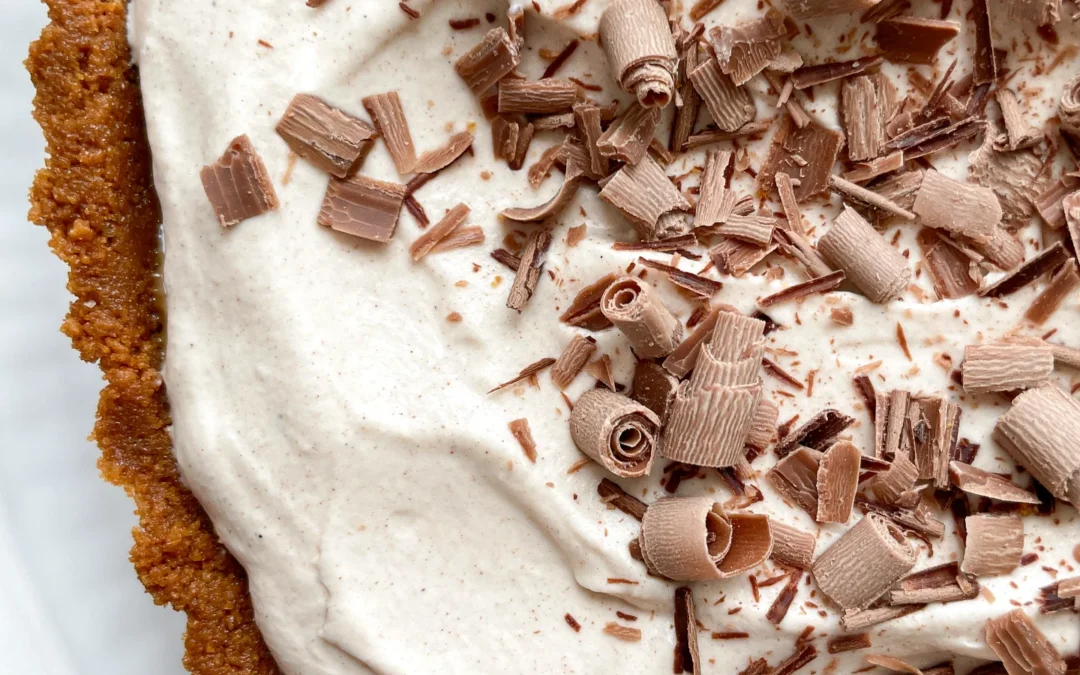
  2. Meanwhile, slice the bananas evenly and sprinkle with a little lemon juice to keep them from browning. Place the banana slices in the fridge until you’re ready to use them. Next, pour the cold cream into a tall container, add powdered sugar, vanilla extract, and cinnamon, and whip until stiff peaks form. Chill the whipped cream in the fridge until needed. Prepare the chocolate shavings by running a vegetable peeler along the narrow edge of a chocolate bar. Set the shavings aside.
  3. Open the can of dulce de leche and take the crust out of the fridge. Spread the entire can of dulce de leche evenly over the crust.
  4. Take the banana slices out of the fridge and arrange them over the dulce de leche so that the entire surface is covered.
  5. Now, take the whipped cream and spread it evenly over the bananas. Finally, sprinkle the chocolate shavings on top for decoration.
  6. Serve the pie immediately or keep it in the fridge until you’re ready to serve.
  • Passive Time: 2 hrs + 35 min
  • Cook Time: 40 min

Banana Oil

Banana Oil

Banana Oil

Banana Oil

November 19, 2024 by Kimberly

Ever tried to make banana-infused oil and ended up with, well…oil? Sometimes experiments don’t work out, but hey, it’s all about the fun and laughs in the kitchen, right?

40 MINUTES

ADVANCED

VEGAN

INT.

40 PER TSP

MICHELIN

OIL

ALL YEAR

INTRODUCTION

ABOUT THE RECIPE

Here’s a tale of an adventurous kitchen experiment – I set out to make banana-infused oil, dreaming of drizzling a sweet, tropical essence over everything. But guess what? This one didn’t go as planned! Despite all my efforts, the oil ended up just…oil. Yep, no banana flavor to be found. Sometimes, the kitchen surprises you, and it’s just as fun to share what didn’t work as what does!

How to serve
While banana-infused oil may not be gracing our tables today, this experience reminded me that cooking is all about experimentation and joy. You may not want to serve it (unless you like regular oil!), but if you’re feeling bold, give it a try and use it as a neutral base in a salad dressing. Or just laugh it off and move on to your next kitchen adventure!

How to store
If you decide to keep your flavorless banana oil, store it as you would any other oil in a cool, dark place. Just remember, the next time you open it, there’s no hint of banana waiting for you – just a fun memory of a cooking experiment!

Hi, I'm Kimberly!

Hi, I'm Kimberly.

A passionate food lover who believes in the magic of homemade deliciousness that spreads love and warmth. Join me on this culinary adventure as I prepare wonderful dishes and let’s spread some happiness together!

Kimberly the Zett Signature

If you want to get to know me better, click here!


Banana Oil
Banana Oil
Banana Oil
„Let’s make a piece of happiness“
Print
clock clock iconcutlery cutlery iconflag flag iconfolder folder iconinstagram instagram iconpinterest pinterest iconfacebook facebook iconprint print iconsquares squares iconheart heart iconheart solid heart solid icon
Banana Oil

Banana Oil


  • Author: Kimberly
  • Total Time: 40 min
  • Yield: 1 cup / 250 ml 1x

Description

RECOMMENDED EQUIPMENT

  • blender
  • medium-sized saucepan
  • whisk
  • a bowl which the medium saucepan fits into
  • 2 medium-sized bowls
  • 2 fine sieves
  • sealable container (oil bottle)
  • ice cubes
  • coffee filter

Ingredients

Units Scale
  • 1 banana
  • 250 milliliters cold-pressed rapeseed oil

Instructions

  1. Peel the banana and put it into the blender. Pour in the oil. Blend on the highest setting until there are only tiny pieces of the banana left.
  2. Pour the mixture from the blender into a medium-sized pot and heat it over medium heat to a temperature of about 101°-104°C (213°-219°F), and maintain this temperature for the next 20 minutes. Stir occasionally, making sure the temperature remains steady and nothing gets burned.
  3. Prepare a bowl large enough to fit a medium-sized pot, and fill it with cold water and a handful of ice cubes. Also, hang a fine sieve strainer over one medium-sized bowl and another fine sieve strainer, with a coffee filter inside it, over another medium-sized bowl.
  4. Now, place the pot in the ice water and stir to cool the oil quickly. Once the oil is almost cold, remove the pot from the water and pour the oil into the prepared fine sieve to catch the coarse particles.
  5. Then, pour the oil into the second sieve, which is equipped with a coffee filter, to catch the remaining finer particles.
  6. Allow the oil to drip through for about 20 minutes or maybe less depending on how many remaining particles are in the coffee filter. Once all the oil has passed through the coffee filter, transfer the collected amount of oil into a sealable container or directly into an oil bottle. Store in the refrigerator for up to one week.
  • Passive Time: 20 min
  • Cook Time: 20 min

Classic Risotto

Classic Risotto

Classic Risotto

Classic Risotto

November 9, 2023 by Kimberly

Creamy, dreamy, and cozy, this Parmesan and white wine risotto is pure comfort in a bowl. It’s that no-fuss, indulgent dish perfect for when you crave a warm, savory hug.

45 MINUTES

EASY

VEGETARIAN

ITALIAN

722 PER PORTION

CREAMY

CLASSICS

DINNER

ALL YEAR

INTRODUCTION

ABOUT THE RECIPE

Imagine a creamy, warm risotto made with Parmesan and white wine, bringing pure comfort to your plate. This easy recipe is approachable, yet delivers an indulgent result that feels like a special treat. With simple steps and bold flavors, it’s perfect for any night you want to relax with something delicious. Ideal as a base for endless variations, this risotto keeps things cozy and straightforward while packing in all the richness and creaminess you crave. If you’re not so confident with preparing a risotto yet, read on for a full guide and get the best tips for achieving THE Perfect Risotto.

How to serve
Serve your risotto steaming hot in a wide bowl to showcase that lovely creamy texture. Garnish with fresh herbs like parsley or basil and a generous shave of extra Parmesan for an extra touch of umami. You could also add a drizzle of truffle oil or crispy pancetta for a sophisticated twist. Pair with a light side salad or a crisp white wine to complement the dish’s creamy, savory flavors.

How to store
If there are leftovers, place the risotto in an airtight container and refrigerate for up to three days. To reheat, add a splash of broth or water, and warm on the stove, stirring to bring back the creamy consistency.

Hi, I'm Kimberly!

Hi, I'm Kimberly.

A passionate food lover who believes in the magic of homemade deliciousness that spreads love and warmth. Join me on this culinary adventure as I prepare wonderful dishes and let’s spread some happiness together!

Kimberly the Zett Signature

If you want to get to know me better, click here!


Classic Risotto
Classic Risotto

„Let’s make a piece of happiness“

Print
clock clock iconcutlery cutlery iconflag flag iconfolder folder iconinstagram instagram iconpinterest pinterest iconfacebook facebook iconprint print iconsquares squares iconheart heart iconheart solid heart solid icon
Classic Risotto

Classic Risotto


  • Author: Kimberly
  • Total Time: 45 min
  • Yield: 2 1x

Description

RECOMMENDED EQUIPMENT
  • sharp knife
  • cutting board
  • medium-sized pot
  • measuring cup
  • grater

Ingredients

Units Scale
  • 200 grams risotto rice
  • 400 milliliter vegetable broth
  • 200 milliliter dry white wine
  • 300 milliliter water
  • 100 grams parmesan
  • 1 shallot
  • 1 tbsp olive oil
  • 1 tsp butter
  • salt & pepper to taste
  • parsley for garnish

Instructions

PREPARATIONS

  • Finely grate the Parmesan.
  • Cut the shallot into small pieces.

INSTRUCTIONS

  1. Heat 1 tbsp of olive oil in a pot over medium heat. Sauté the shallot until translucent. Add the butter and risotto rice, stirring everything well, and sauté for 1-2 minutes.
  2. Deglaze with the first 100ml (1/2 cup) of white wine, letting it reduce over medium heat until no liquid remains in the pot.
  3. Next, add 100ml (1/2 cup) of stock and let it simmer, stirring occasionally, until the liquid has mostly evaporated. Continue adding stock 100ml (1/2 cup) at a time, letting it simmer and be absorbed by the rice before each addition, until the remaining 200ml (1 cup) of stock has been used.
  4. Afterward, add 150ml (1/2 cup) of water, allowing the rice to absorb it as it cooks. Follow with another 100ml (1/2 cup) of white wine, then add the final 150ml (1/2 cup) of water, stirring as it cooks. The whole process should take around 40 minutes.
  5. Remove the pot from the heat and stir in the Parmesan until it melts. Season with salt and white pepper to taste.
  6. Divide the risotto between plates and top with additional grated Parmesan, freshly ground pepper, and parsley.
  • Prep Time: 5 min
  • Cook Time: 40 min

Chestnut Soup & Chili Cinnamon Croutons

Chestnut Soup & Chili Cinnamon Croutons

Chestnut Soup & Chili Cinnamon Croutons

Chestnut Soup & Chili Cinnamon Croutons

November 7, 2024 by Kimberly

Cozy up with this creamy chestnut soup, bursting with earthy sweetness and a hint of spice. Perfect for chilly days, it’s like a warm hug in a bowl. Pure comfort.

35 MINUTES

EASY

VEGETARIAN

INT.

469 PER PORTION

COMFORT FOOD

CHRISTMAS

DINNER

AUTUMN
WINTER

INTRODUCTION

ABOUT THE RECIPE

When the chill of fall hits, there’s nothing like a rich, velvety chestnut soup to warm things up. This soup blends the earthy sweetness of roasted chestnuts with a creamy texture that feels luxurious but easy. And, just to give it that something extra, a sprinkle of chili-cinnamon croutons adds a spicy, toasty crunch that makes every spoonful a delight. It’s like wrapping up in your favorite blanket – just with a bit more flavor and spice!

How to serve
This soup is best served in a cozy bowl, topped generously with chili-cinnamon croutons that bring a mix of heat and warm spice to the creamy chestnut base. A little drizzle of olive oil or try adding a drizzle of this leeks oil as a topping or add a sprinkle of fresh herbs like thyme or parsley can also add a fresh contrast to the roasted, nutty flavors. Pair it with a simple salad or even a slice of rustic bread on the side for a full, comforting meal that feels like it’s made for sharing. 

How to store
Just store any cooled soup in an airtight container in the fridge for up to 3 days. For best results, keep the croutons separate so they stay crunchy. Reheat the soup gently on the stove and add the croutons just before serving!

Hi, I'm Kimberly!

Hi, I'm Kimberly.

A passionate food lover who believes in the magic of homemade deliciousness that spreads love and warmth. Join me on this culinary adventure as I prepare wonderful dishes and let’s spread some happiness together!

Kimberly the Zett Signature

If you want to get to know me better, click here!


Chestnut Soup & Chili Cinnamon Croutons
„Let’s make a piece of happiness“
Print
clock clock iconcutlery cutlery iconflag flag iconfolder folder iconinstagram instagram iconpinterest pinterest iconfacebook facebook iconprint print iconsquares squares iconheart heart iconheart solid heart solid icon
Chestnut Soup & Chili Cinnamon Croutons

Chestnut Soup & Chili Cinnamon Croutons


  • Author: Kimberly
  • Total Time: 35 min
  • Yield: 4 to 6 1x

Description

Recommended Equipment

  • sharp knife
  • cutting board
  • medium pot
  • immersion blender
  • pan

Ingredients

Units Scale

SOUP

  • 400 grams vacuum-packed chestnuts
  • 1 shallot
  • 1 tbsp olive oil
  • 600 milliliters beef stock
  • 200 milliliters heavy cream
  • fresh thyme
  • nutmeg, salt & pepper to taste

CROUTONS

  • 2 slices white toast bread
  • 1 tbsp butter
  • 1/2 tsp cinnamon
  • 1/2 tsp chili flakes
  • pinch of salt

Instructions

  1. Peel and dice the onion. Roughly chop the pre-cooked chestnuts and set both aside.
  2. Heat a medium pot over medium heat with a bit of olive oil, then sauté the onions until translucent. Next, add the chestnuts and let them cook for 3-4 minutes.
  3. Add the beef broth and cream to the pot, bring to a boil, then cover and let it simmer on low heat for about 20-30 minutes, until the chestnuts are soft.
  4. While the soup is cooking, heat a large pan over medium heat and melt the butter. Meanwhile, cut the toast into cubes. Add cinnamon, dried chili flakes and salt to the butter, stirring well. Add the toast cubes and toss so they’re evenly coated in the spiced butter. Cook for a few minutes until the cubes are crispy. Set aside.
  5. Add thyme to the soup and blend everything with an immersion blender until smooth. Season the soup with salt, pepper, nutmeg, and more thyme if needed.
  6. Ladle the soup into bowls, garnish with cream and leek oil, and top with the toasted croutons. Optionally, sprinkle with a bit more ground pepper and enjoy!
  • Passive Time: 15 min
  • Cook Time: 20 min