Maple Baked Pears with Yogurt & Pistachios

Maple Baked Pears with Yogurt & Pistachios

Maple Baked Pears with Yogurt & Pistachios

Maple Baked Pears with Yogurt & Pistachios

January 31, 2024 by Kimberly

Experience the cozy delight of baked pears enhanced with rich maple, creamy yogurt, and crunchy pistachios – a perfect, healthful dessert for any occasion!

This website uses affiliate links which may earn commission for purchases made at no additional cost to you.

TOTAL TIME

50 min

SERVES

2 portions

DIET

vegetarian

EVERY RECIPE DESERVES

A Little Love Letter

Savor the warmth and sweetness of this Maple Baked Pears, a dish that perfectly encapsulates the essence of comfort desserts. This healthy baked fruit recipe marries the natural succulence of pears with a rich maple glaze, topped with a dollop of creamy yogurt and a sprinkle of crunchy pistachios. Ideal for those seeking a nutritious pear dessert that doesn’t compromise on flavor, this easy fruit dessert is a testament to simple ingredients creating exquisite tastes.

Serving this warm pear treat is a delightful experience. Present these Maple Baked Pears fresh from the oven, accompanied by a generous scoop of creamy yogurt to balance the sweetness. The gourmet pistachio garnish not only adds a textural contrast but also a pop of color, making it an elegant dessert option for dinner parties or a comforting treat on a cozy night in. You can also drizzle a little extra maple syrup or honey for added decadence. This dish is sure to impress, offering a symphony of flavors and textures in every bite.

Keep the baked pears in an airtight container in the refrigerator, where they can last for up to one day. Gently reheat before serving to revive the warm, comforting essence of the dish. This makes this Maple Baked Pears with Yogurt & Pistachios a convenient, ready-to-indulge dessert, perfect for satisfying sweet cravings any day of the week.

Hi, I'm Kimberly!

Hi, I'm Kimberly.

A hopeless romantic when it comes to food. Every recipe I share is a love letter to food itself. I’m so glad you’re here. Make yourself at home and stay a while.

Love,
Kimberly

Kimberly the Zett Signature

If you want to get to know me better,
click here!


Maple Baked Pears with Yogurt & Pistachios

LET’S MAKE A PIECE OF HAPPINESS

Print
clock clock iconcutlery cutlery iconflag flag iconfolder folder iconinstagram instagram iconpinterest pinterest iconfacebook facebook iconprint print iconsquares squares iconheart heart iconheart solid heart solid icon
Maple Baked Pears with Yogurt & Pistachios

Maple Baked Pears with Yogurt & Pistachios


5 Stars 4 Stars 3 Stars 2 Stars 1 Star

No reviews

  • Author: Kimberly
  • Total Time: 50 min
  • Yield: 2

Description

GOOD TO HAVE ON HAND

  • sharp knife
  • chopping board
  • casserole dish


Ingredients

PEARS
  • 2 ripe pears
  • 2 tbsp maple syrup
  • 1 tsp butter
  • 1 tsp vanilla extract
  • 2 tbsp water
  • 1/4 tsp cinnamon
 
TOPPINGS
  • 1 tbsp pistachios
  • 2 tbsp yogurt

Instructions

  • Preheat the oven to 180°C (350°F)
  • Peel the pears, cut in half lengthwise and remove the seeds.
  • Crack the pistachios out of their shells and roughly chop.
  • Mix the water and maple syrup in the casserole dish. Turn the pear halves in the sauce.
  • Pour a little vanilla extract and cinnamon over the pears and place a small piece of butter on top of each one.
  • Roast the pears for 25 minutes, then turn each pear over and bake for a further 15 minutes.
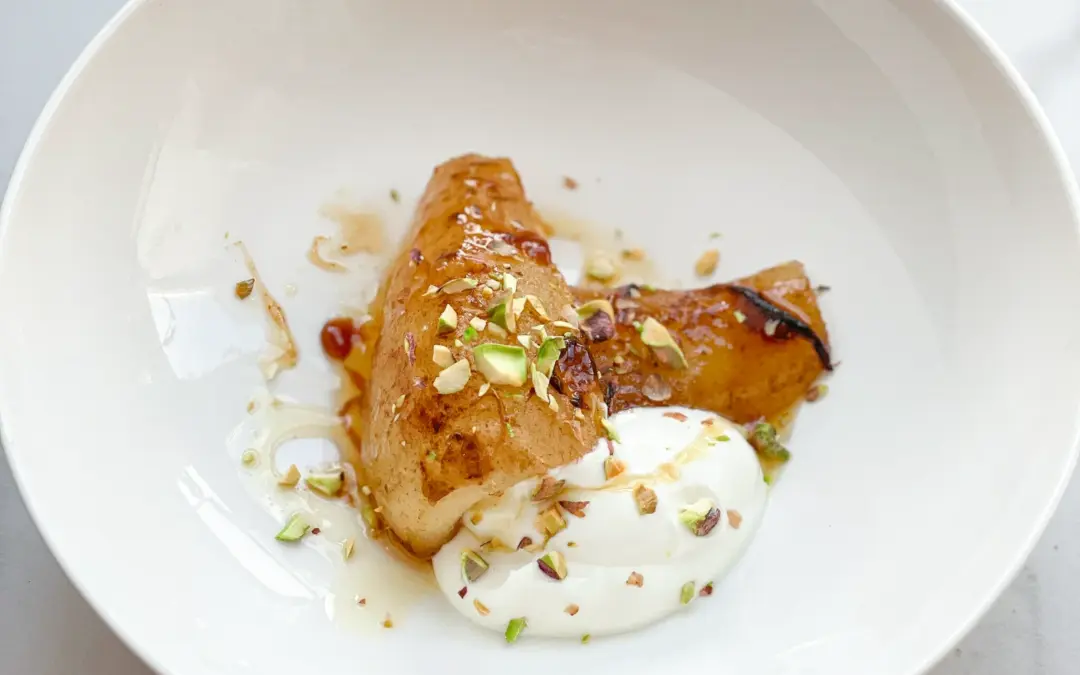
  • Remove the pears from the oven and arrange on plates. Scrape the sauce out of the baking dish and spread over the pears. Top with yoghurt, a little maple syrup and chopped pistachios.
  • Passive Time: 40 min
  • Cook Time: 10 min

CRAVING MORE?

Follow along here & don’t forget to subscribe to my substack!

Easy Red Cabbage Salad

Easy Red Cabbage Salad

Easy Red Cabbage Salad

Easy Red Cabbage Salad

January 30, 2024 by Kimberly

Enjoy the vibrant and healthy Easy Red Cabbage Salad, bursting with fresh flavors and a colorful crunch, perfect for a quick and nutritious meal!

This website uses affiliate links which may earn commission for purchases made at no additional cost to you.

TOTAL TIME

50 min

SERVES

8 portions

DIET

vegan

EVERY RECIPE DESERVES

A Little Love Letter

Dive into the world of vibrant colors and fresh flavors with this easy Red Cabbage Salad. This healthy cabbage recipe is not just a feast for the eyes but also a powerhouse of nutrition. Perfect for those seeking a quick salad idea that doesn’t skimp on taste or health benefits, this simple salad recipe brings together the crunchy goodness of red cabbage with a medley of fresh ingredients, making it an ideal choice for a nutritious veggie dish.

It’s perfect as a light meal option on its own or as a colorful side dish that complements any main course. The versatility of this crunchy vegetable salad allows it to pair beautifully with grilled meats, sandwiches, or as a refreshing addition to your buffet table. For an extra twist, you can add a sprinkle of seeds or nuts for added texture. Its vibrant presentation and refreshing taste make it a hit for family meals or a quick lunchtime fix.

Keep it in an airtight container in the refrigerator, and it will stay crisp and delicious for up to 3 days. The salad’s robust texture makes it ideal for meal prep, ensuring that you have a healthy, vegan cabbage salad ready to enjoy whenever you like. Its ease of storage and lasting freshness makes it a practical and appealing choice for busy lifestyles.

Hi, I'm Kimberly!

Hi, I'm Kimberly.

A hopeless romantic when it comes to food. Every recipe I share is a love letter to food itself. I’m so glad you’re here. Make yourself at home and stay a while.

Love,
Kimberly

Kimberly the Zett Signature

If you want to get to know me better,
click here!


Easy Red Cabbage Salad

LET’S MAKE A PIECE OF HAPPINESS

Print
.tasty-recipe-responsive-iframe-container-01ced9a1 { position: relative; overflow: hidden; padding-top: 177.62%; } .tasty-recipe-responsive-iframe-container-01ced9a1 iframe { position: absolute; top: 0; left: 0; width: 100%; height: 100%; border: 0; } clock clock iconcutlery cutlery iconflag flag iconfolder folder iconinstagram instagram iconpinterest pinterest iconfacebook facebook iconprint print iconsquares squares iconheart heart iconheart solid heart solid icon
Easy Red Cabbage Salad

Easy Red Cabbage Salad


  • Author: Kimberly
  • Total Time: 50 min
  • Yield: 8

Description

GOOD TO HAVE ON HAND

  • sharp knife
  • chopping board


Ingredients

Units Scale
  • 1 kilogram red cabbage
  • 2 tbsp olive oil
  • 4 tbsp pomegranate juice (or Grenadine)
  • juice of 1 lemon
  • 1/2 tsp salt

Instructions

  • Remove the top leaves from the red cabbage. Cut the red cabbage into quarters. Cut the two quarters of the red cabbage into thin strips on the short side. Place the strips in a large bowl.
  • Squeeze the lemon over the red cabbage and add the olive oil, pomegranate juice and salt. Mix everything well and leave to marinate in the fridge for approx. 40 minutes.
  • Passive Time: 40 min
  • Cook Time: 10 min

CRAVING MORE?

Follow along here & don’t forget to subscribe to my substack!

Chocolate Peanut Oat Bites

Chocolate Peanut Oat Bites

Chocolate Peanut Oat Bites

Chocolate Peanut Oat Bites

January 29, 2024 by Kimberly

Indulge in Chocolate Peanut Oat Bites – a heavenly blend of rich chocolate, nutty peanuts, and wholesome oats, perfect for a deliciously satisfying sweet snack!

This website uses affiliate links which may earn commission for purchases made at no additional cost to you.

TOTAL TIME

70 min

SERVES

12 pieces

DIET

vegan

EVERY RECIPE DESERVES

A Little Love Letter

Experience the joy of snacking with this Chocolate Peanut Oat Bites, a delightful fusion of flavors that satisfies your sweet tooth while providing nourishment. These no-bake snack ideas are a perfect blend of rich chocolate, creamy peanut butter, and hearty oats, creating a treat that’s not only delicious but also health-conscious. Ideal for those seeking a quick energy boost or a vegan chocolate bite, these homemade energy bites are a crowd-pleaser.

They make a fantastic snack for any time of the day, be it a mid-morning break, an afternoon pick-me-up, or a post-workout treat. Their bite-sized nature makes them a convenient option for on-the-go snacking or for packing in lunchboxes. You can also serve them as a dessert at casual get-togethers or as a healthy alternative to traditional sweets. Their versatility and universally appealing flavor make them suitable for various dietary preferences, including gluten-free and vegan options.

Keep them in an airtight container in the refrigerator, where they can last for up to a week. This ensures that they remain fresh and retain their delightful texture. Perfect for meal prep or when you need a sweet and nutritious snack on hand, these Chocolate Peanut Oat Bites are your go-to for a quick, healthy, and satisfying treat.

Hi, I'm Kimberly!

Hi, I'm Kimberly.

A hopeless romantic when it comes to food. Every recipe I share is a love letter to food itself. I’m so glad you’re here. Make yourself at home and stay a while.

Love,
Kimberly

Kimberly the Zett Signature

If you want to get to know me better,
click here!


Chocolate Peanut Oat Bites

LET’S MAKE A PIECE OF HAPPINESS

Print
.tasty-recipe-responsive-iframe-container-0d0b384f { position: relative; overflow: hidden; padding-top: 177.62%; } .tasty-recipe-responsive-iframe-container-0d0b384f iframe { position: absolute; top: 0; left: 0; width: 100%; height: 100%; border: 0; } clock clock iconcutlery cutlery iconflag flag iconfolder folder iconinstagram instagram iconpinterest pinterest iconfacebook facebook iconprint print iconsquares squares iconheart heart iconheart solid heart solid icon
Chocolate Peanut Oat Bites

Chocolate Peanut Oat Bites


  • Author: Kimberly
  • Total Time: 65 min
  • Yield: 12 pieces

Description

GOOD TO HAVE ON HAND

  • small pot
  • medium-sized bowl
  • rectangular container
  • baking paper


Ingredients

Units Scale
  • 1.5 tbsp peanut butter
  • 60 milliliters maple syrup
  • 1/2 banana
  • 2 tbsp coconut oil
  • 2 tbsp cocoa powder
  • 90 grams rolled oats
  • 1/8 tsp salt

Instructions

  • Melt the coconut oil in the microwave or in a small pan.
  • Line a rectangular container with baking paper.
  • In a medium-sized bowl, mash half the banana with a fork. Mix the peanut butter and maple syrup with the banana.
  • Now add the coconut oil, cocoa powder and salt to the bowl and mix well to form a homogeneous mixture.
  • Pour the mixture onto the baking paper in the rectangular tin and spread out evenly.
  • Leave to harden in the freezer for approx. 1 hour and then cut into 12 equal pieces. Store the pieces in the fridge.
  • Passive Time: 60 min
  • Cook Time: 5 min

CRAVING MORE?

Follow along here & don’t forget to subscribe to my substack!

Classic Cucumber Salad

Classic Cucumber Salad

Classic Cucumber Salad

Classic Cucumber Salad

January 28, 2024 by Kimberly

Relish in the fresh, crisp taste of Classic Cucumber Salad, an effortlessly light and healthy dish, perfect for any meal or as a refreshing snack!

This website uses affiliate links which may earn commission for purchases made at no additional cost to you.

TOTAL TIME

30 min

SERVES

4 portions

DIET

vegan

EVERY RECIPE DESERVES

A Little Love Letter

Discover the timeless appeal of classic Cucumber Salad, a dish celebrated for its simplicity and freshness. This healthy salad, made with crisp cucumbers, is the epitome of a light side dish that complements any meal. Perfect for those seeking a nutritious vegetable salad that is both easy to prepare and delightfully satisfying.

Serving this classic Cucumber Salad is all about embracing its fresh and natural flavors. It’s an excellent addition to any table, be it for a casual lunch or a more formal dinner. This refreshing salad recipe pairs wonderfully with grilled meats, sandwiches, or as a standalone dish for a light meal. Its versatility also makes it a favorite in vegan salad ideas, appealing to various dietary preferences. For an enhanced experience, serve it chilled, allowing the flavors to meld together, creating a moreish, refreshing treat that’s sure to please any palate.

Keep it refrigerated in an airtight container to maintain its crispness and freshness. Ideally, it should be consumed within a day or two to enjoy its optimal taste and texture. This simple salad preparation ensures that you have a healthy, ready-to-eat option on hand.

Hi, I'm Kimberly!

Hi, I'm Kimberly.

A hopeless romantic when it comes to food. Every recipe I share is a love letter to food itself. I’m so glad you’re here. Make yourself at home and stay a while.

Love,
Kimberly

Kimberly the Zett Signature

If you want to get to know me better,
click here!


Classic Cucumber Salad

LET’S MAKE A PIECE OF HAPPINESS

Print
.tasty-recipe-responsive-iframe-container-10f26c4c { position: relative; overflow: hidden; padding-top: 177.62%; } .tasty-recipe-responsive-iframe-container-10f26c4c iframe { position: absolute; top: 0; left: 0; width: 100%; height: 100%; border: 0; } clock clock iconcutlery cutlery iconflag flag iconfolder folder iconinstagram instagram iconpinterest pinterest iconfacebook facebook iconprint print iconsquares squares iconheart heart iconheart solid heart solid icon
Classic Cucumber Salad

Classic Cucumber Salad


  • Author: Kimberly
  • Total Time: 30 min
  • Yield: 4

Description

GOOD TO HAVE ON HAND

  • Mandolin (or sharp knife)
  • sealable glass
  • salad bowl


Ingredients

SALAD
  • 1 cucumber
  • 1 small onion
  • chives
DRESSING
  • 1 garlic clove
  • 2 tbsp olive oil
  • 2 tbsp white wine vinegar
  • 1/2 tsp sugar
  • 1 tsp salt
  • chives

Instructions

  • Wash the cucumber thoroughly.
  • Slice the cucumber into very thin slices. Finely chop the onion.
  • For the dressing, pour the vinegar, oil, salt, sugar and crushed garlic into a sealable jar and shake well. Flavour the dressing and season with salt and ground pepper to taste.
  • Mix the cucumber slices and onion pieces with the dressing in a bowl and leave to stand in the fridge for 20 minutes.
  • Passive Time: 20 min
  • Cook Time: 10 min

CRAVING MORE?

Follow along here & don’t forget to subscribe to my substack!

Apple Slices with Almond Coconut Dip

Apple Slices with Almond Coconut Dip

Apple Slices with Almond Coconut Dip

Apple Slices with Almond Coconut Dip

January 26, 2024 by Kimberly

Enjoy a healthy treat with crisp Apple Slices and rich Almond Coconut Dip – a simple, delicious snack perfect for satisfying your sweet cravings!

This website uses affiliate links which may earn commission for purchases made at no additional cost to you.

TOTAL TIME

5 min

SERVES

1 portion

DIET

vegan

EVERY RECIPE DESERVES

A Little Love Letter

Dive into the delightful pairing of Apple Slices with Almond Coconut Dip, a healthy snack recipe that’s as nutritious as it is delicious. This easy fruit snack combines the sweet and crunchy apple with a creamy, nutty coconut flavor, creating a perfect balance of taste and texture. Ideal for anyone looking for a quick, tasty treat, this vegan almond dip with fresh apple treat is sure to be a crowd-pleaser.

Arrange the apple slices on a plate, and place the almond coconut dip in a bowl for an inviting snack platter. This combination is perfect for after-school snacks, party appetizers, or as a refreshing dessert alternative. You can also get creative by adding a sprinkle of cinnamon or a drizzle of honey over the apples for extra flair. This gluten-free snacking option is not only appealing to the eye but also to the palate, satisfying both sweet cravings and the desire for something crunchy.

Keep it in an airtight container in the refrigerator, where it will stay fresh for up to a week. As for the apple slices, it’s best to cut them fresh to maintain their crispness and prevent browning. This way, you can always enjoy the creamy dip and fresh apple slices at their best, ready to serve up a quick and delicious treat anytime.

Hi, I'm Kimberly!

Hi, I'm Kimberly.

A hopeless romantic when it comes to food. Every recipe I share is a love letter to food itself. I’m so glad you’re here. Make yourself at home and stay a while.

Love,
Kimberly

Kimberly the Zett Signature

If you want to get to know me better,
click here!


Apple Slices with Almond Coconut Dip

LET’S MAKE A PIECE OF HAPPINESS

Print
.tasty-recipe-responsive-iframe-container-4c44221c { position: relative; overflow: hidden; padding-top: 177.62%; } .tasty-recipe-responsive-iframe-container-4c44221c iframe { position: absolute; top: 0; left: 0; width: 100%; height: 100%; border: 0; } clock clock iconcutlery cutlery iconflag flag iconfolder folder iconinstagram instagram iconpinterest pinterest iconfacebook facebook iconprint print iconsquares squares iconheart heart iconheart solid heart solid icon
Apple Slices with Almond Coconut Dip

Apple Slices with Almond Coconut Dip


  • Author: Kimberly
  • Total Time: 5 min
  • Yield: 1

Description

GOOD TO HAVE ON HAND

  • sharp knife
  • chopping board
  • small bowl


Ingredients

  • 1 apple
  • 1 tbsp almond butter
  • 2 tbsp coconut milk
  • pinch of salt

Instructions

  • Cut the apple into slices.
  • In a small bowl, mix the almond butter with the coconut milk and a pinch of salt.
  • Arrange the apple slices and the sweet dip on a plate and enjoy.
  • Cook Time: 5 min

CRAVING MORE?

Follow along here & don’t forget to subscribe to my substack!

Pineapple Mint Juice

Pineapple Mint Juice

Pineapple Mint Juice

Pineapple Mint Juice

January 26, 2024 by Kimberly

Refresh your day with Pineapple Mint Juice, a tropical blend of sweet pineapple and cool mint – the perfect thirst-quencher for any time!

This website uses affiliate links which may earn commission for purchases made at no additional cost to you.

TOTAL TIME

10 min

SERVES

400 ml / 1.5 cups

DIET

vegan

EVERY RECIPE DESERVES

A Little Love Letter

Welcome to the refreshing world of Pineapple Mint Juice, a delightful tropical beverage that’s both energizing and soothing. This natural thirst quencher combines the sweet tang of pineapple with the cool, refreshing zing of mint, creating a perfect balance. Ideal for hot summer days or as a healthful pick-me-up, this homemade fruit juice is not only delicious but also packed with natural goodness, making it a favorite among health-conscious individuals and juice lovers alike.

Serving this Pineapple Mint Juice is all about capturing the essence of freshness. Serve it chilled or over ice for an instant cooling effect. The vibrant, sweet and minty flavor makes it a great companion for breakfast, a relaxing afternoon, or as a welcome drink for your guests. You can also add a splash of sparkling water for a fizzy twist or garnish with fresh mint leaves and pineapple slices for an extra touch of tropical elegance.

Keep it in an airtight bottle in the refrigerator, where it can stay fresh for up to 3-4 days. The flavors meld beautifully over time, ensuring that each sip is as delightful as the first. Remember, this natural beverage contains no preservatives, so enjoy it while it’s fresh and brimming with its unique mint-infused drink magic.

Hi, I'm Kimberly!

Hi, I'm Kimberly.

A hopeless romantic when it comes to food. Every recipe I share is a love letter to food itself. I’m so glad you’re here. Make yourself at home and stay a while.

Love,
Kimberly

Kimberly the Zett Signature

If you want to get to know me better,
click here!


Pineapple Mint Juice

LET’S MAKE A PIECE OF HAPPINESS

Print
.tasty-recipe-responsive-iframe-container-c7583989 { position: relative; overflow: hidden; padding-top: 177.62%; } .tasty-recipe-responsive-iframe-container-c7583989 iframe { position: absolute; top: 0; left: 0; width: 100%; height: 100%; border: 0; } clock clock iconcutlery cutlery iconflag flag iconfolder folder iconinstagram instagram iconpinterest pinterest iconfacebook facebook iconprint print iconsquares squares iconheart heart iconheart solid heart solid icon
Pineapple Mint Juice

Pineapple Mint Juice


  • Author: Kimberly
  • Total Time: 10 min
  • Yield: 1 DRINK (400ML OR 1.5 CUPS)

Description

GOOD TO HAVE ON HAND

  • sharp knife
  • chopping board
  • juicer (or blender & fine mesh strainer)


Ingredients

Units Scale
  • 1/2 pineapple
  • 4 apples
  • 15 grams mint

Instructions

PREPARATION WITH A JUICER

  1. Wash the apples and mint thoroughly. Cut the skin off the pineapple and cut the flesh into sticks. Place half of the pineapple in the juicer.
  2. Put the 4 apples into the juicer next.
  3. Add the fresh mint to the juicer last.
  4. Now pour all the juices obtained into a glass.


PREPARATION WITH A BLENDER & A FINE SIEVE

  1. Wash the apples and mint thoroughly. We need about half of the pineapple. Cut the skin off the pineapple and apples. Place the peeled pineapple and apples in the blender.
  2. Pluck the mint leaves and add to the blender.
  3. Puree everything for 30 seconds on the highest setting. Now pass the whole mixture through a fine sieve. If you like the pulp, you can of course skip this step.
  4. Pour the juice into a glass bottle.
  • Cook Time: 10 min

CRAVING MORE?

Follow along here & don’t forget to subscribe to my substack!