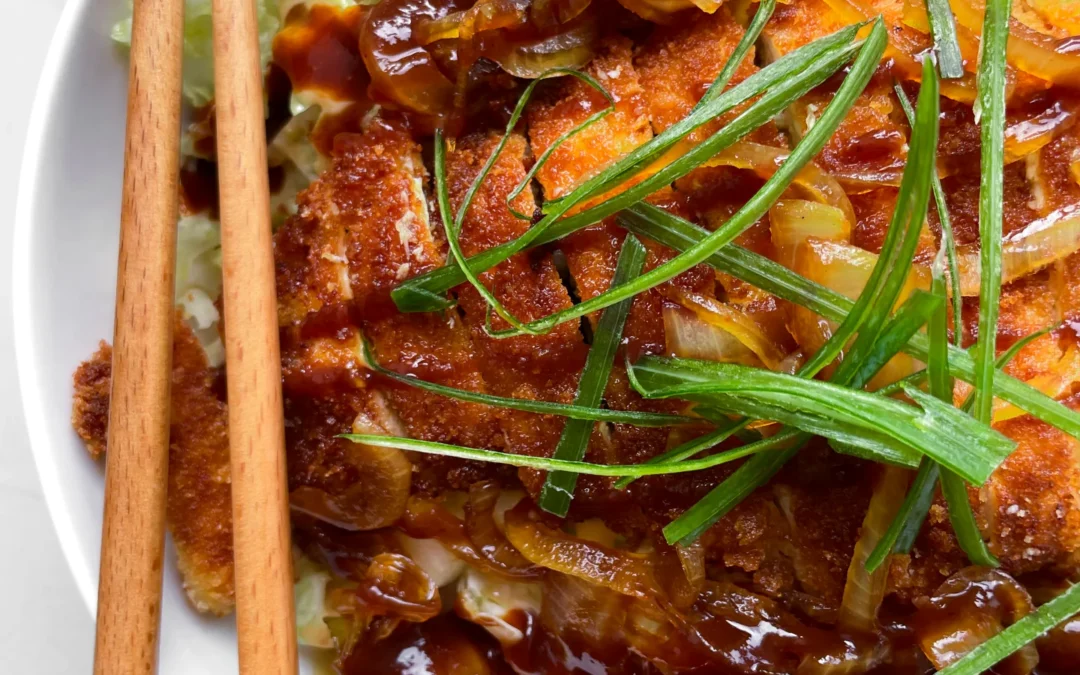
Katsu Sando

Katsu Sando

Katsu Sando

Katsu Sando

June 29, 2024 by Kimberly

Sink your teeth into the ultimate Katsu Sando – the most popular Japanese sandwich! Crispy chicken, tangy red cabbage, and creamy kewpie mayo nestled between soft bread – every bite is a flavor explosion!

40 MINUTES

EASY

OMNIVORE

JAPANESE

582 PER PORTION

CRISPY
UMAMI

EVERDAY

LUNCH

ALL YEAR

INTRODUCTION

ABOUT THE RECIPE

Brace yourself for the crunch and savor of the Katsu Sando, a Japanese-inspired sandwich that’s taking the culinary world by storm. Featuring crispy panko-crusted chicken, this sandwich packs a punch with every layer of flavor.

How to serve
Perfectly crispy and deliciously juicy, the Katsu Sando is best served immediately after assembly to maintain its textural contrast. Slice it in half to show off the beautiful layers of red cabbage slaw, green butter lettuce, creamy kewpie mayo and tonkatsu sauce.

How to store
While best enjoyed fresh, you can store the prepped ingredients separately in the fridge. The panko chicken can be kept for up to two days.

Hi, I'm Kimberly!

Hi, I'm Kimberly.

A passionate food lover who believes in the magic of homemade deliciousness that spreads love and warmth. Join me on this culinary adventure as I prepare wonderful dishes and let’s spread some happiness together!

Kimberly the Zett Signature

If you want to get to know me better, click here!


Katsu Sando
Katsu Sando
Katsu Sando
„Let’s make a piece of happiness“
Print
clock clock iconcutlery cutlery iconflag flag iconfolder folder iconinstagram instagram iconpinterest pinterest iconfacebook facebook iconprint print iconsquares squares iconheart heart iconheart solid heart solid icon
Katsu Sando

Katsu Sando


5 Stars 4 Stars 3 Stars 2 Stars 1 Star

No reviews

  • Author: Kimberly
  • Total Time: 40 minutes
  • Yield: 4 1x

Description

Recommended Equipment

  • sharp knife
  • cutting board
  • medium-sized bowl
  • plastic wrap
  • meat mallet
  • two plates
  • three shallow dishes for breading
  • large frying pan
  • measuring spoons

Ingredients

Units Scale
  • 8 slices white toast
  • 40 grams kewpie mayo
  • 40 grams tonkatsu sauce
  • 250 grams chicken breast
  • 1.5 tbsp all-purpose flour
  • 1 egg
  • 3 tbsp panko bread crumbs
  • 3 tbsp regular bread crumbs
  • 50 grams clarified butter
  • 150 grams red cabbage
  • 1 tsp rice vinegar
  • 1/2 tsp sesame oil
  • 1/4 tsp salt
  • 4 butter lettuce leaves

Instructions

  • Cut the red cabbage into eighths and finely shred or slice one eighth. Place it in a medium-sized bowl and marinate with rice vinegar, sesame oil, and salt. Set aside.
  • Detach 4 leaves from the head of lettuce and wash thoroughly. Pat dry and set aside.
  • Halve the chicken breast lengthwise, then cut each half again crosswise. Place each piece between two layers of plastic wrap and pound to about 0.5 cm / 0.2″ thickness using a meat mallet. Lay the flattened meat on a plate.
  • Set up a breading station with three shallow dishes or bowls. Fill the first dish with 1.5 heaped tablespoons of wheat flour, crack an egg into the second dish and whisk it. In the third dish, mix together 3 heaped tablespoons each of panko and breadcrumbs. Coat each piece of chicken first in flour, shaking off excess, then dip in the egg, and finally, press into the breadcrumb mixture, ensuring it’s well coated on all sides. Place the breaded pieces side by side on a plate.
  • Heat clarified butter in a large frying pan and fry the breaded chicken pieces on both sides until crispy, about 3 minutes per side or until cooked through. Let the meat drain on kitchen paper.
  • Place half of the slices of bread flat on a clean work surface, then place a lettuce leaf on each. Top each with a piece of cooked chicken, followed by a zigzag pattern of Kewpie mayo and Tonkatsu sauce. Add about 2 tablespoons of red cabbage salad on top of the sauces. Finally, top the sandwiches with another slice of bread. If desired, trim the edges all around and cut the sandwiches in half in the middle with a sharp knife.

Notes

The calorie information may vary depending on the product used, country and region.

  • Cook Time: 40 min

Vegan Dumplings in Sesame Miso Soup

Vegan Dumplings in Sesame Miso Soup

Vegan Dumplings in Sesame Miso Soup

Vegan Dumplings in Sesame Miso Soup

May 6, 2024 by Kimberly

Indulge in a comforting bowl full of flavor, perfect for cozy nights. Healthy, hearty, and absolutely delicious!

90 MINUTES

INTERMEDIATE

VEGAN

ASIAN

560 PER PORTION

COMFORT FOOD
UMAMI

EVERYDAY

DINNER

ALL YEAR

INTRODUCTION

ABOUT THE RECIPE

Savor the warmth and richness of these vegan Dumplings in Sesame Miso Soup, a delightful dish that combines hearty plant-based dumplings with a savory miso broth. This soup is not only nourishing but also packed with exquisite flavors that will satisfy both vegans and non-vegans alike. It’s a perfect choice for those seeking a comforting meal that’s both healthful and satisfying.

How to serve
Serve this aromatic Sesame Miso Soup hot, with its soft, tender dumplings soaking up the flavorful broth. Garnish with chopped green onions or cilantro, a sprinkle of sesame seeds, and a drizzle of crispy chili oil for an extra touch of luxury.

How to store
Store leftovers in an airtight container in the refrigerator for up to 2 days. Reheat gently to preserve the flavors and textures of the dumplings and broth. Freezing is not recommended as it may affect the soup’s quality.

Hi, I'm Kimberly!

Hi, I'm Kimberly.

A passionate food lover who believes in the magic of homemade deliciousness that spreads love and warmth. Join me on this culinary adventure as I prepare wonderful dishes and let’s spread some happiness together!

Kimberly the Zett Signature

If you want to get to know me better, click here!


Vegan Dumplings in Sesame Miso Soup
„Let’s make a piece of happiness“

INGREDIENTS

FOR 4 PORTIONS

DOUGH

FILLING

  • 200g mushrooms (7 oz)
  • 200g napa cabbage (7 oz)
  • 3 spring onions
  • 1 carrot
  • 1/2 tsp ginger
  • 3 garlic cloves, grated
  • 1 tbsp cilantro
  • 1 tbsp clarified butter
  • 1 tbsp soy sauce
  • 1/4 tsp sesame oil
  • 1/8 tsp ground white pepper

SESAME MISO SOUP

  • 800ml water (3.5 cups)
  • 6 tbsp tahini
  • 4 tbsp white miso paste
  • 2 tbsp crispy chili oil
  • 2 tbsp soy sauce
  • 2 tbsp rice vinegar
  • 2 tsp ginger, grated
  • 2 tsp sugar
  • 2 garlic cloves, grated

TOPPINGS

  • cilantro
  • crispy chili oil
  • sesame seeds
Vegan Dumplings in Sesame Miso Soup
}

ACTIVE: 30 min

PASSIVE: –

PREPARATIONS

Recommended Equipment
  • sharp knife
  • cutting board
  • vegetable peeler
  • salad spinner
  • large frying pan
  • two medium-sized pots
  • large plate
  • Prepare dumpling wrappers or defrost store-bought ones.
  • Peel and finely chop or grate the ginger. Set aside.
  • Peel and finely chop or press the garlic cloves. Set aside.
  • Clean the mushrooms and dice them into small pieces. Set aside.
  • Chop the napa cabbage into small pieces and wash it. Set aside.
  • Peel and finely dice the carrots. Set aside.
  • Pluck the cilantro leaves from the stems and finely chop them. Set aside.
  • Separate the green and white parts of the green onions and slice both into fine rings. Set aside.
}

ACTIVE: 40 min

PASSIVE: 20 min

COOKING

1. Heat a large pan over medium heat and add 1 tablespoons of clarified butter. Start by sautéing the white parts of the green onions, ginger, and garlic for a few minutes. Next, add the carrot pieces and sauté for a few more minutes. Then, add the mushroom pieces, mix well, and finally add the napa cabbage. Let the napa cabbage cook until soft, then stir everything together. Remove the pan from the heat and let it cool.

2. Once the mixture has cooled down, add 2 tablespoons of chopped cilantro, the green parts of the green onions, 1/4 teaspoon of ground white pepper, 2 tablespoons soy sauce, and 1/2 tablespoon sesame oil. Mix everything well.

3. Set up your vegetable filling, the dumpling wrappers, and a small bowl of cold water. Also, prepare a large plate dusted with a little flour where you can place your finished dumplings. Now, put on your favorite series or podcast and start filling your dumplings 🙂

4. Take a wrapper and place about 1-1.5 teaspoons of the vegetable mixture in the center. Dip a finger in the water and moisten the edge of the upper half of the wrapper. Fold the wrapper like a taco shell upwards and press the left tip of the wrapper with your left hand. Now, with the right hand’s index finger and thumb, hold the closed tip with your left thumb, place a small fold at the top edge against the backside of the wrapper and press it firmly. Continue this until the wrapper is completely closed and you have a finished dumpling in your hand. Place the finished dumpling on the floured plate. This folding technique might take a little practice. For a visual demonstration, just scroll down to my video at the end of the recipe 🙂 Continue this process until all the dumpling wrappers and filling are used up.

5. Fill a medium-sized pot with enough water to fill just over half the pot. Bring the water to a boil.

6. Meanwhile, you can prepare the Sesame Miso Soup in the other pot. Add the following ingredients to the pot: tahini, white miso paste, soy sauce, rice vinegar, sugar, crispy chili oil, water, and grated garlic and ginger. Bring everything to a simmer over medium heat. Keep the soup on a low flame on the stove.

7. Once the water in the other pot is boiling, turn it down slightly and add 6-8 dumplings depending on the size of your pot and let them cook for about 8 minutes. Since dumplings expand while cooking, do not overcrowd your pot. Once the dumplings become translucent and the filling is clearly visible, they are done. Place the dumplings in the bowls in which you want to serve them. Continue this for all dumplings until all are cooked.

8. Once all dumplings are ready, evenly distribute the soup from the other pot over the dumplings. Top each bowl with some cilantro, Crispy Chili Oil, and toasted sesame seeds.

NOTE: The calorie information may vary depending on the product used, country and region.

Sesame Chili Dumpling Dipping Sauce

Sesame Chili Dumpling Dipping Sauce

Sesame Chili Dumpling Dipping Sauce

Sesame Chili Dumpling Dipping Sauce

April 21, 2024 by Kimberly

Kick up your dumpling game with Sesame Chili Dumpling Dipping Sauce! Spicy, nutty, and bursting with flavor, it’s the perfect match for any dumpling.

5 MINUTES

EASY

VEGAN

ASIAN

65 PER PORTION

SPICY
UMAMI

EVERYDAY

DIPS & SPREADS

ALL YEAR

INTRODUCTION

ABOUT THE RECIPE

Elevate your dumplings with this Sesame Chili Dumpling Dipping Sauce, a bold blend that combines the nutty depth of toasted sesame with the fiery kick of chili. This sauce is not just a side but a star, turning any dumpling, whether homemade or store-bought, into a gourmet treat. It’s perfect for those who love a little heat and a lot of flavor in their meals.

How to serve:
Serve this Sesame Chili Dumpling Dipping Sauce alongside your favorite dumplings. Its vibrant flavor complements everything from classic pork dumplings to vegetable gyoza. It’s also fantastic as a dressing for Asian salads or as a spicy drizzle over grilled meats. Whether you’re hosting a dinner party or enjoying a quiet meal at home, this sauce will add a delicious, zesty twist to your dishes.

How to store:
Keep this sauce fresh by storing it in an airtight container in the refrigerator. It stays vibrant and tasty for up to three days, making it a convenient and flavorful addition to quick meals and snacks.

Hi, I'm Kimberly!

Hi, I'm Kimberly.

A passionate food lover who believes in the magic of homemade deliciousness that spreads love and warmth. Join me on this culinary adventure as I prepare wonderful dishes and let’s spread some happiness together!

Kimberly the Zett Signature

If you want to get to know me better, click here!


Sesame Chili Dumpling Dipping Sauce
„Let’s make a piece of happiness“

INGREDIENTS

FOR 2 PORTIONS

DIPPING SAUCE

  • 2 tbsp soy sauce
  • 1 tbsp hot water
  • 1 tsp crispy chili oil
  • 1 tsp sugar
  • 1/2 tsp sesame oil
  • 1/2 tsp rice vinegar
  • 1.5 tsp sesame seeds
  • 2 garlic cloves
Sesame Chili Dumpling Dipping Sauce
}

ACTIVE: –

PASSIVE: –

PREPARATIONS

Recommended Equipment
  • sharp knife
  • cutting board
  • small bowl
  • small frying pan
  • none
}

ACTIVE: 5 min

PASSIVE: –

COOKING

1. Dissolve the sugar in the bowl by stirring in hot water.

2. Then, in a small pan without adding any oil, toast the sesame seeds until they are golden brown and fragrant.

3. Meanwhile, add the following ingredients to the sugar in the bowl: 2 tablespoons soy sauce, 1 teaspoon crispy chili oil, 1/2 teaspoon sesame oil, and 1/2 teaspoon rice vinegar. Peel and finely chop or press two garlic cloves and add them to the sauce. Stir everything well.

4. Carefully pour the hot sesame seeds into the sauce. It will sizzle beautifully 🙂 Now stir everything together and serve.

NOTE: The calorie information may vary depending on the product used, country and region.

Easy Homemade Dumpling Wrapper

Easy Homemade Dumpling Wrapper

Easy Homemade Dumpling Wrapper

Easy Homemade Dumpling Wrapper

April 19, 2024 by Kimberly

Create your own dumpling wrappers at home! Simple, fun, and perfect for holding all your delicious fillings—get ready for a truly customized dining experience!

2 HOURS
20 MINUTES

INTERMEDIATE

VEGAN

ASIAN

24 PER WRAPPER

COMFORT FOOD

EVERYDAY

DOUGH

ALL YEAR

INTRODUCTION

ABOUT THE RECIPE

Dive into the delightful world of homemade dumpling wrappers, your first step to authentic, scrumptious dumplings. Crafting these wrappers at home is not only simple, but it also allows you to infuse a personal touch into every bite, making each dumpling truly your own.

How to serve:
Fill these pliable wrappers with anything from seasoned pork to mixed vegetables, seal, and then steam, boil, or fry. Serve them hot with a side of soy sauce, vinegar, or a spicy dipping sauce for a perfect snack or meal. They’re a fantastic addition to any gathering, allowing guests to discover the joys of fresh, homemade dumplings.

How to store:
Store your dumpling wrappers by layering them with parchment paper and keeping them in an airtight container. They’ll stay fresh in the refrigerator for up to one day or can be frozen for extended use.

Hi, I'm Kimberly!

Hi, I'm Kimberly.

A passionate food lover who believes in the magic of homemade deliciousness that spreads love and warmth. Join me on this culinary adventure as I prepare wonderful dishes and let’s spread some happiness together!

Kimberly the Zett Signature

If you want to get to know me better, click here!


Easy Homemade Dumpling Wrapper
„Let’s make a piece of happiness“

INGREDIENTS

FOR 58-64 WRAPPER

WRAPPER

  • 400g all-purpose flour (3 cups + 1 tbsp)
  • 1 tsp salt
  • 220ml very hot water (1 cup)
Easy Homemade Dumpling Wrapper
}

ACTIVE: 5 min

PASSIVE: –

PREPARATIONS

Recommended Equipment
  • medium-sized bowl
  • plastic wrap
  • two medium-sized Tupperware containers with lids
  • small rolling pin
  • parchment paper
  • two chopsticks
  • dough cutter (or the dull side of a knife)
  • round dough cutter, about 11 cm in diameter (4” to 4.5”)
  • Cut the parchment paper into 58-64 squares, each with sides measuring 12 cm (5″)
}

ACTIVE: 75 min

PASSIVE: 60 min

COOKING

1. In a bowl, mix the flour with 1 tsp of salt. Then pour the very warm (not boiling) water into the center and stir with two chopsticks until the dough no longer combines easily. You’ll have larger flakes of dough and still quite a bit of loose flour in the bowl.

2. Now, continue with your hands and knead the dough until all the flour is incorporated and the dough has a smooth texture. It should be as soft as an earlobe, which will take about 5-8 minutes.

3. Form the dough into a ball and place it back in the bowl. Stretch plastic wrap tightly over the bowl to prevent the dough from drying out. Let the dough rest for at least 30 minutes, though 60 minutes is better, as the longer it rests, the easier it will be to work with later.

4. Once the resting time is up, remove the plastic wrap and place the dough on a clean work surface. Quarter the dough and then halve each quarter, and then cut those halves into four equal pieces, resulting in a total of 32 small dough pieces. Each piece will eventually make about 2 dumpling wrappers, so you’ll end up with around 58-64 pieces in total.

5. To keep the dough soft and pliable throughout the rolling process and prevent it from drying out, place all the unrolled dough pieces into one of the Tupperware containers. Lay the lid loosely on top so you can easily grab a new piece to roll out. Now, take the first piece of dough from the container.

6. Dust a little flour on your work surface and on your piece of dough. Roll out the dough with a rolling pin until it’s big enough for the 11cm (4″ to 4.5″) dough cutter to fit over it with a little edge showing, and cut out the shape. Of course, pros can roll the dough directly into rounds without a cutter 😉 Then, take your second Tupperware container and place a square of parchment paper in it. Place the cut-out wrapper on the parchment and cover it with another piece of parchment. Replace the lid loosely. Any dough scraps from cutting should be placed back in the container with the other unrolled pieces.

7. Continue this process with each piece of dough until all the dough is used up. Knead the dough scraps back into a ball, divide it into 26-32 small pieces, and start the process over.

8. It’s worth noting that the number of wrappers can vary depending on how thin you roll the dough and the size of your cutter. Each rolled and cut wrapper weigh about 10g (1/3 oz).

9. You should process the rolled wrappers as soon as possible, as the dough becomes stickier the longer it is stored. To freeze, you can either place the whole Tupperware container with the wrappers into the freezer or portion them into Ziploc bags. Make sure to keep parchment paper between the wrapper. The wrappers should be at room temperature for easy filling. You can use the dough for frying, boiling, or steaming.

NOTE: The calorie information may vary depending on the product used, country and region.

Juicy Pan-Fried Pork Dumplings

Juicy Pan-Fried Pork Dumplings

Juicy Pan-Fried Pork Dumplings

Juicy Pan-Fried Pork Dumplings

March 12, 2024 by Kimberly

Dive into the world of flavors with these pan-fried pork Dumplings! Perfectly golden, irresistibly tasty, and just the right crunch to satisfy your cravings.

75 MINUTES

INTERMEDIATE

OMNIVORE

ASIAN

50 PER DUMPLING

COMFORT FOOD / UMAMI

EVERYDAY

DINNER / APPETIZER

ALL YEAR

INTRODUCTION

ABOUT THE RECIPE

Discover the joy of making juicy pan-fried pork Dumplings at home! A staple in Asian cuisine, these dumplings are a perfect blend of juicy filling and crispy skin. Easy to make and incredibly delicious, they’re sure to become a family favorite. Whether you’re a dumpling enthusiast or a first-timer, follow this simple guide to bring a taste of tradition into your kitchen.

How to serve:
Serve these golden delights with a side of dumpling dipping sauce. These juicy pan-fried pork Dumplings are best enjoyed hot, allowing the flavors to truly shine. They make a fantastic appetizer, a satisfying main, or a delightful side dish. Pair with a fresh cucumber salad or a steaming bowl of soup to complete a mouthwatering meal that’s sure to impress.

How to store:
Store leftover dumplings in an airtight container in the refrigerator for up to three days. Reheat in a pan to retain their crispiness or microwave if in a hurry. You can also freeze them immediately after filling, so you always have fresh dumplings on hand.

Hi, I'm Kimberly!

Hi, I'm Kimberly.

A passionate food lover who believes in the magic of homemade deliciousness that spreads love and warmth. Join me on this culinary adventure as I prepare wonderful dishes and let’s spread some happiness together!

Kimberly the Zett Signature

If you want to get to know me better, click here!


Juicy Pan-Fried Pork Dumplings
„Let’s make a piece of happiness“

INGREDIENTS

FOR 40 Dumplings

DUMPLINGS

  • 40 dumpling wrappers
  • 400g minced pork (14 oz)
  • 1 tbsp minced ginger
  • 4 garlic cloves
  • 3 spring onions
  • 1 egg
  • 1 tbsp soy sauce
  • 1 tbsp oyster sauce
  • 1 tsp sesame oil
  • 1/4 tsp salt
  • 1/4 tsp ground pepper

ADDITIONAL

  • all-purpose flour
  • neutral cooking oil
Juicy Pan-Fried Pork Dumplings
}

ACTIVE: 5 min

PASSIVE: –

PREPARATIONS

Recommended Equipment
  • sharp knife
  • cutting board
  • large bowl
  • small bowl
  • large pan with lid
  • Defrost the dumpling wrappers if necessary.
  • Peel the ginger, finely chop or grate and add to a large bowl.
  • Peel and finely chop or crush the garlic cloves and add to the ginger in the large bowl.
  • Separate the spring onions into whites and greens. Cut the white part into fine rings and add to the bowl with the ginger and garlic. Cut the green part into fine strips. Set aside.
}

ACTIVE: 40 min

PASSIVE: 30 min

COOKING

1. Also add the ground meat into the large bowl. Additionally, add: 1/4 tsp salt, 1/4 tsp ground pepper, one egg, 1 tbsp oyster sauce, 1 tbsp soy sauce, and 1 tsp sesame oil. Mix the entire mixture with two chopsticks and set aside.

2. As preparation for your dumplings, sprinkle a work surface or serving plate with a little flour, so you can place your filled dumplings there before frying them. Without flour, the dough would stick to the surface after a while.

3. Now, it’s time to fill the dumplings. For this, you will need the bowl with your filling, a small bowl with fresh, cold water, a teaspoon, and the dumpling wrappers.

4. For the filling and folding feel free to watch my video on this (located at the bottom of this page) as visuals always help 😉

Fill each dumpling wrapper with about 1 tsp of filling. Place the filling in the center of the wrapper. Dab a bit of the cold water on one half of the edges of the wrapper along the edge with a finger. Fold the wrapper in half so that the filling is enclosed by the edges. Press the edges tightly together. Once you have enclosed the filling in the dough, take the two rear corners, moisten one corner from one side and fold the corners onto each other from behind. Press tightly and place the dumpling on the floured work surface. Continue this process until for the remaining dumpling wrappers. For 40 dumplings, this can take about 15 to 30 minutes, depending on your speed.

5. If you want to freeze the dumplings, I recommend doing it now and not after the dumplings have been fried.

6. Once you have finished all the dumplings, heat a large pan over medium heat. Add 1 tbsp of oil to the pan and place as many dumplings as you can fit on the flat side in the pan. Let them fry for a few minutes until the bottom has become crispy. Then reduce the heat to low and pour a little water into the pan. Immediately cover the pan with the lid. Be careful that the oil in the pan is not too hot, otherwise there is a risk of burning. The dumplings will now be steamed with the water in the pan. Keep the lid closed until the dumpling skins have become translucent. This can take about 10-15 minutes. If they are not yet translucent and there is no more water in the pan, simply add some more. Now you can remove the lid and turn the heat back up to medium. Let them fry for about 5 more minutes without the lid, so that the bottom of the dumplings can become crispy again. Remove the dumplings from the pan and process the next batch in the same way.

7. When all the dumplings are done, serve them in a bowl with this dumpling dipping sauce and the green parts of the spring onion. You can also top them with roasted sesame seeds if you like.

NOTE: The calorie information may vary depending on the product used, country and region.