Vanilla Yogurt Bowl & Tropical Granola

Vanilla Yogurt Bowl & Tropical Granola

Vanilla Yogurt Bowl & Tropical Granola

Vanilla Yogurt Bowl & Tropical Granola

March 11, 2025 by Kimberly

Creamy vanilla yogurt meets tropical crunch. Sweet bananas, juicy kiwi, tart passion fruit, and golden granola loaded with chewy dried fruit. It’s fresh, indulgent, and kinda feels like eating breakfast on vacation.

25 MINUTES

EASY

VEGETARIAN

INT.

2 PORTIONS

SWEET

BRUNCH

BREAKFAST

ALL YEAR

INTRODUCTION

ABOUT THE RECIPE

This is the kind of breakfast that makes mornings feel a little fancier than they actually are. Creamy vanilla yogurt, perfectly chilled, topped with fresh banana, kiwi, and passion fruit for that sweet-tart balance, plus a generous spoonful of homemade granola that’s golden, crunchy, and packed with chewy dried fruit. It’s fresh, naturally sweet, and can easily be prepped ahead, ideal for busy mornings or lazy Sundays.

How to serve
This bowl is best served cold, straight from the fridge. For the perfect bite, get a little bit of everything on your spoon: creamy yogurt, juicy fruit, and crunchy granola. Want to level it up? Drizzle some almond butter on top or add a sprinkle of coconut flakes for an extra tropical twist. If you’re feeling fancy, serve it in a chilled bowl for that extra-refreshing vibe. Morning coffee on the side? Always a good idea.

How to store
The granola keeps for weeks in an airtight container, so make a big batch ahead of time. The yogurt and fruit are best assembled fresh, but you can pre-chop the fruit and store it in the fridge for a quick grab-and-go breakfast. Just add everything together when you’re ready to eat!

Hi, I'm Kimberly!

Hi, I'm Kimberly.

A passionate food lover who believes in the magic of homemade deliciousness that spreads love and warmth. Join me on this culinary adventure as I prepare wonderful dishes and let’s spread some happiness together!

Kimberly the Zett Signature

If you want to get to know me better, click here!


Vanilla Yogurt Bowl & Tropical Granola
„Let’s make a piece of happiness“
Print
clock clock iconcutlery cutlery iconflag flag iconfolder folder iconinstagram instagram iconpinterest pinterest iconfacebook facebook iconprint print iconsquares squares iconheart heart iconheart solid heart solid icon
Vanilla Yogurt Bowl & Tropical Granola

Vanilla Yogurt Bowl & Tropical Granola


5 Stars 4 Stars 3 Stars 2 Stars 1 Star

No reviews

  • Author: Kimberly
  • Total Time: 25 min
  • Yield: 2 1x

Description

RECOMMENDED EQUIPMENT

  • two small bowls
  • sharp knife
  • cutting board

Ingredients

Units Scale
  • 300 grams yogurt
  • 2 tsp agave syrup
  • 2 tsp vanilla extract
  • 1 passionfruit
  • 1 banana
  • 2 kiwis
  • 2 tsp almond butter
  • 4 tbsp tropical granola

Instructions

  1. First, prepare the tropical granola. You can find the full recipe here. While the granola is baking in the oven, get the other ingredients ready.
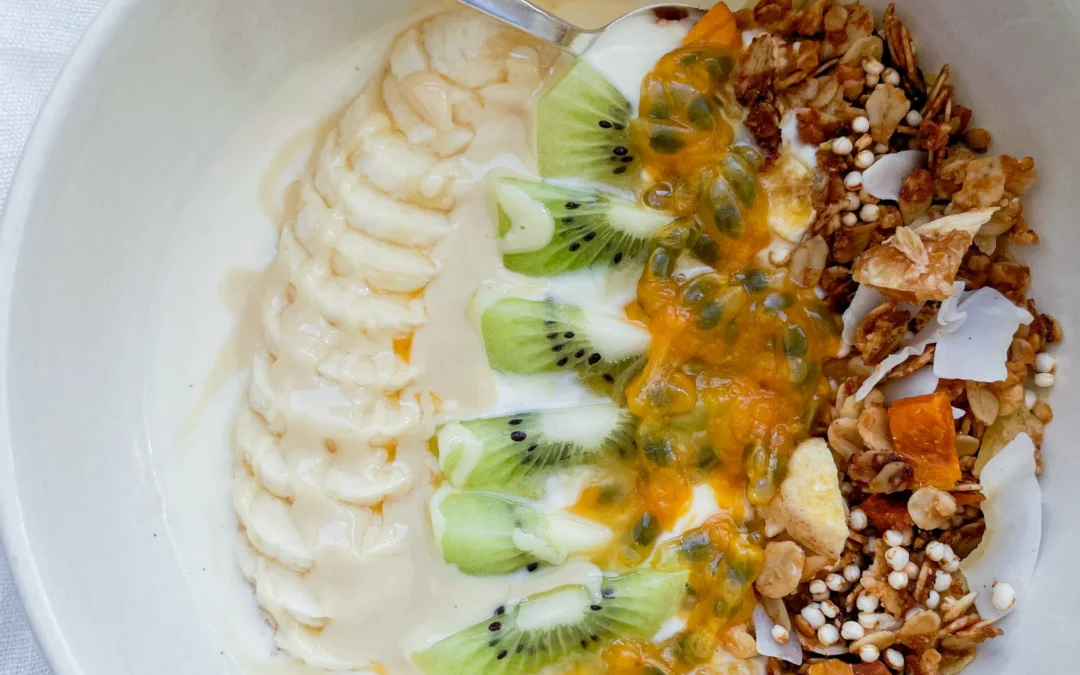
  2. In a bowl, mix the yogurt with agave syrup and vanilla extract until well combined.
  3. Slice the banana into thin rounds. Peel the kiwi and cut it into small pieces.
  4. Top the yogurt with the banana slices and kiwi pieces.
  5. Once the granola is done baking, follow the recipe to finish it. Then, add about 2 tablespoons per serving on top of the yogurt and fruit.
  6. Finally, top the bowl with fresh passion fruit and a drizzle of almond butter.
  • Prep Time: 10 min
  • Cook Time: 15 min

Brownie Batter Chocolate Hummus

Brownie Batter Chocolate Hummus

Brownie Batter Chocolate Hummus

Brownie Batter Chocolate Hummus

February 18, 2025 by Kimberly

This ultra-creamy, rich chocolate dip tastes like straight-up brownie batter but is secretly packed with good-for-you ingredients. Perfect for spreading, dipping, or just eating by the spoonful…no judgment here!!

10 MINUTES

EASY

VEGAN

INTERNATIONAL

4 PORTIONS

CREAMY
SWEET

EVERYDAY

SNACKS
DESSERT

ALL YEAR

INTRODUCTION

ABOUT THE RECIPE

If you’ve never tried sweet hummus before, this one’s about to change your life. Imagine the rich, fudgy taste of brownie batter but in a smooth, creamy dip that also happens to be good for you. No refined sugar, no weird additives, just simple ingredients blending into pure chocolatey magic. Whether you’re dipping fruit, spreading it on toast, or eating it straight from the jar (I see you), this is your new go-to for a guilt-free chocolate fix.

How to serve
Swipe it onto warm toast, pair it with strawberries, banana slices, or apple wedges, or go all in and dunk some pretzels for that sweet-salty combo. Feeling extra? Stir it into oatmeal, drizzle it over pancakes, or layer it in a yogurt parfait for a next-level treat.

How to store
Store your chocolate hummus in an airtight container in the fridge for up to 4 days, but let’s be real, it won’t last that long. If it thickens up, just stir in a splash of plant milk to bring back that creamy goodness. Freezing? Not recommended, it’s best fresh!

Hi, I'm Kimberly!

Hi, I'm Kimberly.

A passionate food lover who believes in the magic of homemade deliciousness that spreads love and warmth. Join me on this culinary adventure as I prepare wonderful dishes and let’s spread some happiness together!

Kimberly the Zett Signature

If you want to get to know me better, click here!


Brownie Batter Chocolate Hummus
„Let’s make a piece of happiness“
Print
clock clock iconcutlery cutlery iconflag flag iconfolder folder iconinstagram instagram iconpinterest pinterest iconfacebook facebook iconprint print iconsquares squares iconheart heart iconheart solid heart solid icon
Brownie Batter Chocolate Hummus

Brownie Batter Chocolate Hummus


  • Author: Kimberly
  • Total Time: 10 min
  • Yield: 4 1x

Description

RECOMMENDED EQUIPMENT

  • food processor
  • sieve

Ingredients

Units Scale
  • 265 grams canned chickpeas, drained
  • 2 tbsp tahini
  • 60 grams unsweetened cocoa powder
  • 4 tbsp date syrup
  • 1 tsp vanilla extract
  • 1/4 tsp salt
  • 2 tbsp coconut oil
  • 2 tbsp milk of choice
  • 1/2 cup ice cubes
  • fruits of your choice for dipping – strawberries, bananas, apples…

Instructions

  • Drain the chickpeas and rinse them under cold water. Add them to a food processor.
  • Next, add tahini, vanilla, unsweetened cocoa powder, coconut oil, salt, date syrup, and milk. Blend on high speed until it forms a thick paste. Then, gradually add ice cubes. Just enough to make it super fluffy and creamy.
  • Transfer to a bowl and enjoy with your favorite fruits or cracker!!

Cinnamon Swirl Pancakes with Cream Cheese Frosting

Cinnamon Swirl Pancakes with Cream Cheese Frosting

Cinnamon Swirl Pancakes with Cream Cheese Frosting

Cinnamon Swirl Pancakes with Cream Cheese Frosting

December 27, 2024 by Kimberly

These fluffy pancakes with a dreamy cinnamon swirl and creamy frosting hit differently – like your favorite café breakfast, but homemade. Sweet, cozy vibes with every bite, perfect for lazy mornings or brunch.

25 MINUTES

EASY

VEGETARIAN

INT.

450 PER PORTION

SWEET
COMFORT FOOD

EVERYDAY

BREAKFAST

AUTUMN
WINTER

INTRODUCTION

ABOUT THE RECIPE

Imagine this: a stack of fluffy, golden pancakes, swirled with a rich, caramelized cinnamon filling and topped with a silky cream cheese frosting. It’s like the lovechild of your favorite cinnamon rolls and café-style pancakes. These pancakes bring a mix of indulgence and cozy comfort to your weekend mornings without the fuss. Perfect for brunch, date mornings, or when you want to impress yourself. So easy, yet so extra.

How to serve
Serve these pancakes warm and stacked high. Drizzle a little extra cream cheese frosting on top for those irresistible slow-dripping vibes, and sprinkle with a dash of cinnamon. If you’re feeling fancy, a splash of maple syrup doesn’t hurt. Pair them with a steaming cup of coffee, chai latte, or even hot cocoa for the ultimate breakfast experience. These pancakes are brunch perfection, ready to elevate any slow morning.

How to store
Store leftover pancakes in an airtight container in the fridge for up to 2 days. Reheat gently in the microwave or a non-stick pan over low heat. Keep the frosting separate, in the fridge, and add it fresh when serving to maintain its creamy texture.

Hi, I'm Kimberly!

Hi, I'm Kimberly.

A passionate food lover who believes in the magic of homemade deliciousness that spreads love and warmth. Join me on this culinary adventure as I prepare wonderful dishes and let’s spread some happiness together!

Kimberly the Zett Signature

If you want to get to know me better, click here!


Cinnamon Swirl Pancakes with Cream Cheese Frosting
„Let’s make a piece of happiness“
Print
clock clock iconcutlery cutlery iconflag flag iconfolder folder iconinstagram instagram iconpinterest pinterest iconfacebook facebook iconprint print iconsquares squares iconheart heart iconheart solid heart solid icon
Cinnamon Swirl Pancakes with Cream Cheese Frosting

Cinnamon Swirl Pancakes with Cream Cheese Frosting


  • Author: Kimberly
  • Total Time: 25 min
  • Yield: 4-6 1x

Description

Recommended Equipment

  • mixing bowl
  • whisk
  • two small bowls
  • piping bag
  • large pan

Ingredients

Units Scale

PANCAKE BATTER

  • 1 egg
  • 55 grams neutral oil
  • 1 tbsp white sugar
  • pinch of salt
  • 250 milliliter full-fat milk
  • 2 tsp baking powder
  • 200 grams all-purpose flour
  • 12 tbsp butter for frying

CINNAMON SWIRL

  • 60 grams butter
  • 50 grams brown sugar
  • 1 tbsp cinnamon

CREAM CHEESE FROSTING

  • 100 grams cream cheese
  • 1.5 tbsp milk
  • 1 tbsp lemon juice
  • 20 grams powdered sugar

Instructions

  1. For the pancake batter, whisk the egg with sugar, canola oil, salt, and milk in a large bowl until well combined. Then add the flour and baking powder, and mix everything thoroughly with a whisk until you get a smooth batter. Set the batter aside briefly.
  2. For the cinnamon swirl, combine the room-temperature soft butter (don’t melt it in the microwave or on the stove, otherwise, the consistency will be too runny, and the swirl will lose its shape when cooked) with brown sugar and cinnamon in a small bowl. Put the mixture into a piping bag or a plastic bag and set it aside.
  3. For the frosting, mix powdered sugar, cream cheese, milk, and lemon juice in a bowl until smooth. Add a little more milk if you need a runnier consistency. Set this aside as well.
  4. Heat a large pan over medium heat and add a small piece of butter. Once the butter forms small bubbles, spoon 1-1.5 tablespoons of batter per pancake into the pan. Let them cook briefly until the pancakes start forming small bubbles around the edges.
  5. Now, cut a small hole in the piping bag with the butter-sugar-cinnamon mixture. Pipe the mixture onto the pancakes in a swirl pattern. Cover the pan with a lid and let the pancakes finish cooking on the lowest heat setting until fully cooked through. Important: Don’t flip the pancakes! Otherwise, the swirl will disappear.
  6. Carefully remove the finished pancakes from the pan, spread them with the cream cheese frosting, and enjoy!
  • Passive Time:
  • Cook Time: 25 min

Cheese Fondue Oil

Cheese Fondue Oil

Cheese Fondue Oil

Cheese Fondue Oil

December 23, 2024 by Kimberly

Velvety and savory, this infused oil captures the essence of garlic and cheese, delivering pure fondue vibes. Drizzle it, dip with it, or savor it – it’s a total flavor bomb.

40 MINUTES

ADVANCED

VEGETARIAN

INT.

40 PER TSP

UMAMI

MICHELIN

OIL

WINTER

INTRODUCTION

ABOUT THE RECIPE

This oil was a fun experiment that turned into a total win! Infused with Gruyere, Parmesan, and garlic, it packs a cheesy, savory punch that’s perfect for dipping or drizzling. While the salt didn’t quite come through, the rich flavors of garlic and cheese infused beautifully into the oil, creating a gourmet touch for any meal. Whether you’re hosting friends or elevating a simple dinner, this oil is a little bottle of magic.

How to serve
Drizzle this flavorful oil over fresh bread, roasted vegetables, or pasta to take your meal to the next level. Use it as a dip for crusty baguettes or even as a topping for grilled meats. It’s also a game-changer when swirled into soups for an extra burst of richness. For cheese lovers, this oil is the ultimate gourmet hack for effortless flavor in seconds. By the way it pairs perfectly with my Cottage Pie!

How to store
Store the oil in an airtight glass container in the fridge for up to one week. Keep it away from direct sunlight to preserve the flavor. If you notice any changes in smell or texture, it’s time to make a fresh batch!

Hi, I'm Kimberly!

Hi, I'm Kimberly.

A passionate food lover who believes in the magic of homemade deliciousness that spreads love and warmth. Join me on this culinary adventure as I prepare wonderful dishes and let’s spread some happiness together!

Kimberly the Zett Signature

If you want to get to know me better, click here!


Cheese Fondue Oil
Cheese Fondue Oil
Cheese Fondue Oil
„Let’s make a piece of happiness“
Print
clock clock iconcutlery cutlery iconflag flag iconfolder folder iconinstagram instagram iconpinterest pinterest iconfacebook facebook iconprint print iconsquares squares iconheart heart iconheart solid heart solid icon
Cheese Fondue Oil

Cheese Fondue Oil


  • Author: Kimberly
  • Total Time: 40 min
  • Yield: 1 cup / 250ml 1x

Description

RECOMMENDED EQUIPMENT

  • blender
  • medium-sized saucepan
  • whisk
  • a bowl which the medium saucepan fits into
  • 2 medium-sized bowls
  • 2 fine sieves
  • sealable container (oil bottle)
  • ice cubes
  • coffee filter

Ingredients

Units Scale
  • 50 grams parmesan
  • 30 grams gruyere
  • 4 garlic cloves
  • 1 tbsp sea salt
  • 250 milliliter oil

Instructions

  1. Cut the cheese into coarse pieces and peel the garlic cloves. Add everything to the blender along with the salt and oil.
  2. Pour the mixture from the blender into a medium-sized pot and heat it over medium heat to a temperature of about 101°-104°C (213°-219°F), and maintain this temperature for the next 15 minutes. Stir occasionally, making sure the temperature remains steady and nothing gets burned.
  3. Prepare a bowl large enough to fit a medium-sized pot, and fill it with cold water and a handful of ice cubes. Also, hang a fine sieve strainer over one medium-sized bowl and another fine sieve strainer, with a coffee filter inside it, over another medium-sized bowl.
  4. Now, place the pot in the ice water and stir to cool the oil quickly. Once the oil is almost cold, remove the pot from the water and pour the oil into the prepared fine sieve to catch the coarse particles.
  5. Then, pour the oil into the second sieve, which is equipped with a coffee filter, to catch the remaining finer particles.
  6. Allow the oil to drip through for about 20 minutes or maybe less depending on how many remaining particles are in the coffee filter. Once all the oil has passed through the coffee filter, transfer the collected amount of oil into a sealable container or directly into an oil bottle. Store in the refrigerator for up to one week.
  • Prep Time: 5 min
  • Passive Time: 20 min
  • Cook Time: 15 min

Cherry Almond Marzipan Oats

Cherry Almond Marzipan Oats

Cherry Almond Marzipan Oats

Cherry Almond Marzipan Oats

December 22, 2024 by Kimberly

Imagine creamy oats kissed with almond milk, layered with luscious cherry filling, and drizzled with silky marzipan sauce – finished with a candied cherry. It’s breakfast that tastes like dessert but feels indulgently cozy.

30 MINUTES

EASY

VEGETARIAN

INT.

399 PER PORTION

CREAMY

EVERYDAY

BREAKFAST

AUTUMN
WINTER

INTRODUCTION

ABOUT THE RECIPE

This dreamy breakfast combines the best of dessert and comfort food! Creamy almond milk oats meet a tangy-sweet cherry filling, topped with a velvety marzipan drizzle and crowned with a candied cherry. It’s perfect for chilly mornings, special occasions, or whenever you’re craving something extra indulgent. With layers of flavor and texture, this dish is not just a breakfast – it’s a hug in a bowl.

How to serve
Serve warm for the ultimate cozy vibes. To assemble, spoon the creamy almond oats into a bowl, add a layer of cherry filling, and drizzle generously with the marzipan sauce. Top it with a candied cherry for a stunning finish. Pair it with a hot cup of coffee or tea for a slow, luxurious morning or dress it up for a brunch centerpiece.

How to store
Store leftovers in an airtight container in the fridge for up to three days.

Hi, I'm Kimberly!

Hi, I'm Kimberly.

A passionate food lover who believes in the magic of homemade deliciousness that spreads love and warmth. Join me on this culinary adventure as I prepare wonderful dishes and let’s spread some happiness together!

Kimberly the Zett Signature

If you want to get to know me better, click here!


Cherry Almond Marzipan Oats
„Let’s make a piece of happiness“
Print
clock clock iconcutlery cutlery iconflag flag iconfolder folder iconinstagram instagram iconpinterest pinterest iconfacebook facebook iconprint print iconsquares squares iconheart heart iconheart solid heart solid icon
Cherry Almond Marzipan Oats

Cherry Almond Marzipan Oats


  • Author: Kimberly
  • Total Time: 30 min
  • Yield: 3 1x

Description

Recommended Equipment

  • small pot
  • whisk
  • bowl
  • cheese grater

Ingredients

Units Scale

OATS BASE

  • 100 grams rolled oats
  • 250 milliliter almond milk
  • 1 tsp vanilla extract
  • pinch of salt
  • 1 tsp date syrup

MARZIPAN SAUCE

  • 1 egg yolk
  • 100 milliliter full-fat cow milk
  • 50 milliliter heavy cream
  • 50 grams marzipan
  • 40 grams white sugar
  • 0.5 tsp vanilla extract

CHERRY FILLING

  • 150 grams cherries
  • 50 milliliter cherry juice
  • 1 tsp lemon juice
  • 1 tsp cornstarch
  • 1 tbsp powdered sugar

TOPPING

  • candied cherries

Instructions

  1. Place the marzipan in the freezer for about 20–30 minutes, then grate it coarsely using a cheese grater.
  2. Warm the milk and cream in a pot without bringing it to a boil, then remove from heat.
  3. Mix the egg yolks, sugar, and vanilla extract thoroughly in a bowl. Add the grated marzipan and stir well.
  4. Gradually add the egg yolk mixture to the warm milk-cream mixture, one teaspoon at a time, stirring constantly until combined. Return the pot to medium heat and stir until the sauce thickens. For a firmer consistency, mix 1 tsp of cornstarch with a bit of water, add it to the sauce, and briefly bring it to a boil. Remove from heat.
  5. In another pot, mix cherries, cherry juice, lemon juice, powdered sugar, and cornstarch. Heat over medium heat until the mixture thickens and the cherries soften. Remove from heat.
  6. In a separate pot, combine oats, almond milk, vanilla extract, salt, and your choice of sweetener (e.g., date syrup). Bring to a boil, stirring until the oats are soft.
  7. Layering: Spread a portion of the oatmeal in a small bowl, then add a layer of cherry sauce. Cover with the remaining oatmeal, smooth the surface, and pour the marzipan sauce over the top.
  8. Garnish with a candied cherry. Serve immediately or prepare as overnight oats.

Mulled Wine Oil

Mulled Wine Oil

Mulled Wine Oil

Mulled Wine Oil

December 17, 2024 by Kimberly

This spiced oil is like a hug in a drizzle. Think rich, warm, and aromatic vibes that make every dish feel festive and fancy. Perfect for cozy dinners and holiday magic.

45 MINUTES

ADVANCED

VEGAN

INT.

40 PER TSP

SPICY

MICHELIN

OIL

WINTER

INTRODUCTION

ABOUT THE RECIPE

This cozy spiced oil brings holiday magic to your plate. Infused with citrusy orange, cinnamon, cloves, star anise, and cardamom, it’s a flavorful hug in every drizzle. Perfect for elevating roasted veggies, hearty salads, or even as a bread dip, this oil is simple yet sophisticated. Whether you’re hosting or gifting, it’s a warm, festive twist that feels like Christmas in a bottle. Easy to make and impossible not to love!

How to serve
Drizzle this aromatic oil over roasted vegetables for a cozy finish, or mix it into salad dressings for a warm, festive twist. Pair it with fresh, crusty bread as a dip, or spoon it over warm risottos and soups to add a layer of spiced goodness. Feeling adventurous? Try it over roasted sweet potatoes or even desserts like baked pears for a gourmet touch. This oil fits wherever cozy, holiday vibes are needed. You absolutely have to try the oil with this Brussels Sprout Salad!

How to store
Store your infused oil in a sealed glass jar at room temperature for up to one week. Keep it in a cool, dark place to preserve its aromatic magic.

Hi, I'm Kimberly!

Hi, I'm Kimberly.

A passionate food lover who believes in the magic of homemade deliciousness that spreads love and warmth. Join me on this culinary adventure as I prepare wonderful dishes and let’s spread some happiness together!

Kimberly the Zett Signature

If you want to get to know me better, click here!


Mulled Wine Oil
Mulled Wine Oil
Mulled Wine Oil
„Let’s make a piece of happiness“
Print
clock clock iconcutlery cutlery iconflag flag iconfolder folder iconinstagram instagram iconpinterest pinterest iconfacebook facebook iconprint print iconsquares squares iconheart heart iconheart solid heart solid icon
Mulled Wine Oil

Mulled Wine Oil


  • Author: Kimberly
  • Total Time: 45 min

Description

RECOMMENDED EQUIPMENT

  • blender
  • medium-sized saucepan
  • whisk
  • a bowl which the medium saucepan fits into
  • 2 medium-sized bowls
  • 2 fine mesh strainers
  • oil bottle
  • ice cubes
  • coffee filter

Ingredients

Units Scale
  • 1 orange
  • 1/4 tsp cinnamon
  • 8 cloves
  • 1 star anise
  • 1/4 tsp ground cardamom
  • 250 milliliter rapeseed oil

Instructions

  1. Zest the orange and put it along with the cloves, cinnamon, cardamom and star anise into the blender. Pour in the oil. Blend on the highest setting until it no coarse pieces are longer visible.
  2. Pour the mixture from the blender into a medium-sized pot and heat it over medium heat, constantly stirring, to a temperature of about 102°-103°C (215°-217°F). Then, let the oil simmer with the lid partially on for the next 10 minutes. Stir only occasionally, making sure the temperature remains steady and nothing gets burned.
  3. At the end of the cooking process, prepare a bowl large enough to fit the medium-sized pot, filled with cold water and a handful of ice cubes. Also, hang a fine mesh sieve strainer over a medium-sized bowl.
  4. Now, place the pot in the ice water and stir to stop the cooking process. Once the oil is almost cold, remove the pot from the water and pour the oil into the first fine mesh sieve to catch the coarse particle.
  5. Then, pour the oil into the second fine mesh sieve, which you before equipped with a coffee filter, to catch the remaining finer particles.
  6. Allow the oil to drip through for about 30 minutes or maybe less depending on how many remaining particles are in the coffee filter. Once all the oil has passed through the coffee filter, transfer the collected amount of oil into an oil bottle. Store in the refrigerator for up to 1 week.
  • Prep Time: 5 min
  • Passive Time: 30 min
  • Cook Time: 10 min