Cranberry Pistachio Biscotti

Cranberry Pistachio Biscotti

Cranberry Pistachio Biscotti

Cranberry Pistachio Biscotti

December 9, 2024 by Kimberly

These crispy, nutty biscotti are bursting with tart cranberries and crunchy pistachios, dipped in a silky layer of white chocolate. They’re festive, cozy, and perfect for coffee-dunking or gifting.

60 MINUTES

EASY

VEGETARIAN

ITALIAN

107 PER BISCOTTI

SWEET

EVERYDAY

SNACK

WINTER

INTRODUCTION

ABOUT THE RECIPE

These biscotti are everything you want in a cozy snack. Crunchy, nutty, and perfectly sweet, they combine tart cranberries, rich pistachios, and a touch of indulgence with a white chocolate coating. They’re ideal for holiday gifting, pairing with your coffee, or treating yourself to something a little special. The mix of textures and flavors makes them irresistible, and they look as beautiful as they taste.

How to serve
Serve these biscotti alongside a hot cup of coffee, tea, or even hot cocoa for the ultimate cozy vibe. They’re also fantastic as part of a dessert spread, paired with fresh fruit or a creamy mousse. And don’t forget – they make the perfect holiday gift, wrapped up in cute little bags or boxes.

How to store
Store the biscotti in an airtight container at room temperature for up to three weeks. If they’re coated in chocolate, keep them in a cool place to avoid melting. Perfect for make-ahead treats!

Hi, I'm Kimberly!

Hi, I'm Kimberly.

A passionate food lover who believes in the magic of homemade deliciousness that spreads love and warmth. Join me on this culinary adventure as I prepare wonderful dishes and let’s spread some happiness together!

Kimberly the Zett Signature

If you want to get to know me better, click here!


Cranberry Pistachio Biscotti
„Let’s make a piece of happiness“
Print
clock clock iconcutlery cutlery iconflag flag iconfolder folder iconinstagram instagram iconpinterest pinterest iconfacebook facebook iconprint print iconsquares squares iconheart heart iconheart solid heart solid icon
Cranberry Pistachio Biscotti

Cranberry Pistachio Biscotti


5 Stars 4 Stars 3 Stars 2 Stars 1 Star

No reviews

  • Author: Kimberly
  • Total Time: 60 min
  • Yield: 14-18 pieces 1x

Description

Recommended Equipment

  • 2 bowls
  • electric mixer
  • whisk
  • baking tray
  • parchment paper
  • sharp knife
  • spoon or spatula
  • food processor (optional, for chopping cranberries)

Ingredients

Units Scale
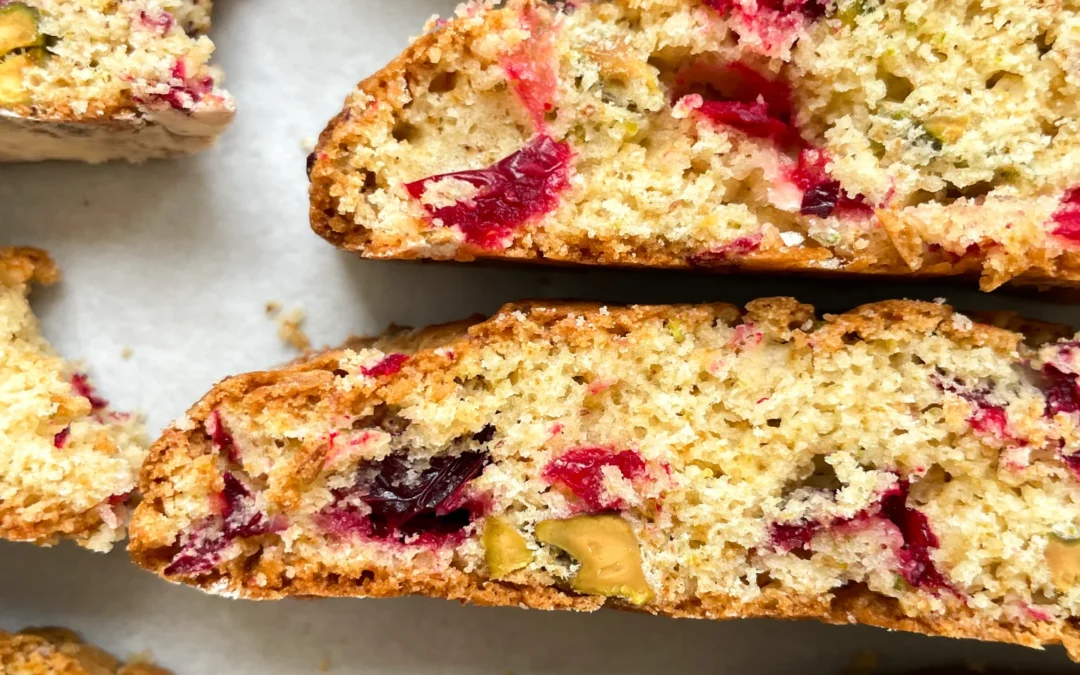
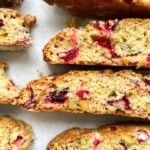
  • 125 grams all-purpose flour
  • 1/2 tsp baking powder
  • 1/4 tsp salt
  • 30 grams butter, room-temperature
  • 75 grams white sugar
  • 1 egg
  • 1 tsp vanilla extract
  • 50 grams pistachios
  • 50 grams fresh cranberries
  • 100 grams white chocolate

Instructions

  1. Roughly chop the cranberries and pistachios with a knife or a food processor, then set aside. Preheat the oven to 175°C/347°F.
  2. In one bowl, thoroughly mix the flour, baking powder, and salt.
  3. In another bowl, use an electric mixer to cream the soft butter and sugar until fluffy.
  4. Add the egg and vanilla extract to the butter-sugar mixture and mix well.
  5. Add the dry ingredients to the butter-egg mixture, along with the chopped pistachios and cranberries. Mix everything until you get a smooth dough. Only stir until no flour streaks remain.
  6. Place the dough onto a baking tray lined with parchment paper. Lightly dust your hands with flour and shape the dough into a flat, long rectangle (about 20-25 cm long and 6 cm wide).
  7. Bake the dough piece for about 30 minutes. Remove it from the oven and let it cool slightly.
  8. Use a bread knife or sharp knife to slice the baked dough into pieces (about 1.5–2 cm thick).
  9. Place the biscotti slices cut side down back onto the baking tray.
    • For a softer version: Bake each side for 5 minutes.
    • For a crunchier version: Bake each side for 10 minutes.
  10. Dip half of the biscotti in melted white chocolate and sprinkle with chopped pistachios. Let them cool on a wire rack until the chocolate hardens.
  • Passive Time: 40 min
  • Cook Time: 20 min

Gorgonzola Spinach Gnocchi with Salsiccia Walnut Topping

Gorgonzola Spinach Gnocchi with Salsiccia Walnut Topping

Gorgonzola Spinach Gnocchi with Salsiccia Walnut Topping

Gorgonzola Spinach Gnocchi with Salsiccia Walnut Topping

November 25, 2024 by Kimberly

Creamy, cheesy, and just the right touch of indulgence! This cozy dish feels like a warm hug, with bold Italian vibes and a satisfying crunch that’s absolutely unforgettable.

50 MINUTES

EASY

OMNIVORE

ITALIAN

854 PER PORTION

COMFORT FOOD

EVERYDAY

DINNER

AUTUMN
WINTER

INTRODUCTION

ABOUT THE RECIPE

This dish is the ultimate comfort meal you didn’t know you needed! Think soft pillows of gnocchi wrapped in a velvety, cheesy sauce, with just enough spinach to feel balanced. The topping? A game-changing mix of savory sausage and crunchy walnuts that takes it to the next level. It’s one of those meals that feels fancy but is super easy to whip up. Perfect for impressing guests or treating yourself to a cozy night in!

How to serve
Serve this dish straight from the pan, steaming and ready to impress. Sprinkle a touch of freshly grated Parmesan or a drizzle of olive oil on top for that extra flair. Pair it with a crisp arugula salad or some roasted veggies to balance the richness. Want to make it truly unforgettable? A glass of chilled white wine or sparkling water with a citrus twist will make the flavors pop.

How to store
Got leftovers? Lucky you! Store them in an airtight container in the fridge for up to 3 days. Reheat gently in a pan over low heat, adding a splash of milk or cream to revive that creamy magic. Avoid freezing – it’s best enjoyed fresh!

Hi, I'm Kimberly!

Hi, I'm Kimberly.

A passionate food lover who believes in the magic of homemade deliciousness that spreads love and warmth. Join me on this culinary adventure as I prepare wonderful dishes and let’s spread some happiness together!

Kimberly the Zett Signature

If you want to get to know me better, click here!


Gorgonzola Spinach Gnocchi with Salsiccia Walnut Topping
„Let’s make a piece of happiness“
Print
clock clock iconcutlery cutlery iconflag flag iconfolder folder iconinstagram instagram iconpinterest pinterest iconfacebook facebook iconprint print iconsquares squares iconheart heart iconheart solid heart solid icon
Gorgonzola Spinach Gnocchi with Salsiccia Walnut Topping

Gorgonzola Spinach Gnocchi with Salsiccia Walnut Topping


  • Author: Kimberly
  • Total Time: 50 min
  • Yield: 4 1x

Description

RECOMMENDED EQUIPMENT

  • large frying pan
  • medium frying pan
  • large pot
  • strainer
  • sharp knife
  • cutting board


Ingredients

Units Scale

SPINACH GORGONZOLA SAUCE

  • 200 grams gorgonzola
  • 200 grams heavy cream
  • 1 tbsp butter
  • 250 milliliter chicken stock
  • 50 milliliter dry white wine
  • 4 garlic cloves
  • 1 shallot
  • 50 grams baby spinach
  • fresh oregano
  • fresh thyme
  • nutmeg, salt & pepper to taste

SALSICCIA WALNUT TOPPING

  • 200 grams salsiccia with fennel
  • 50 milliliter dry white wine
  • 40 grams walnuts
  • 2 tsp honey
  • fresh oregano
  • fresh thyme
  • cayenne pepper, salt & pepper to taste

OTHER INGREDIENTS

  • 800 grams gnocchi
  • parmesan for topping

Instructions

PREPARATIONS

  • Chop the shallot and garlic cloves into small, fine pieces. Take the salsiccia sausage out of its casing—either tear it into chunky bits with your hands or crumble it up, whichever feels less chaotic. Slice the gorgonzola into chunks—don’t overthink it; it’ll melt anyway. Wash the baby spinach thoroughly and spin it dry. Set everything aside.

INSTRUCTIONS

  1. Melt some butter in a large pan over medium heat. Toss in the shallots and cook until they’re glossy and translucent. Add the garlic and stir it until your kitchen smells incredible.
  2. Deglaze with a splash of white wine. Let it simmer for 1-2 minutes to let the alcohol cook off. Pour in the chicken broth and bring it to a boil. Once it boils, lower the heat to a simmer and stir in the cream. Let this dreamy mix simmer gently for 10-15 minutes while you prepare the salsiccia.
  3. Toss the sausage bits into a cold pan. Slowly heat it up so the fat renders out—no extra oil needed! Cook until the pieces are golden and crispy on the outside. Deglaze with another splash of white wine, simmering until most of the liquid evaporates and you’re left with a creamy coating. Toss in the walnuts, a pinch of cayenne pepper, salt, and a drizzle of honey. Stir everything and let it caramelize for 1-2 minutes. Add fresh oregano and thyme, mix, and let those flavors pop.
  4. Keep your cream and broth mixture on low heat. Stir in the Gorgonzola until it’s completely melted into the sauce—smooth, rich, and irresistible. Grate in some fresh nutmeg, then stir in more oregano and thyme. Add the spinach and stir until it wilts down. Keep everything warm and cozy over low heat.
  5. Fill a large pot with water, bring it to a boil, and add the gnocchi. Cook for 3-5 minutes, or until they float to the surface. Drain the gnocchi and toss them directly into the Gorgonzola-spinach sauce. Stir until every pillowy bite is coated in the sauce.
  6. Plate the gnocchi in deep bowls. Spoon the crispy salsiccia-walnut mixture on top and finish with a shower of freshly grated Parmesan.

  • Prep Time: 10 min
  • Passive Time: 15 min
  • Cook Time: 25 min

Classic Risotto

Classic Risotto

Classic Risotto

Classic Risotto

November 9, 2023 by Kimberly

Creamy, dreamy, and cozy, this Parmesan and white wine risotto is pure comfort in a bowl. It’s that no-fuss, indulgent dish perfect for when you crave a warm, savory hug.

45 MINUTES

EASY

VEGETARIAN

ITALIAN

722 PER PORTION

CREAMY

CLASSICS

DINNER

ALL YEAR

INTRODUCTION

ABOUT THE RECIPE

Imagine a creamy, warm risotto made with Parmesan and white wine, bringing pure comfort to your plate. This easy recipe is approachable, yet delivers an indulgent result that feels like a special treat. With simple steps and bold flavors, it’s perfect for any night you want to relax with something delicious. Ideal as a base for endless variations, this risotto keeps things cozy and straightforward while packing in all the richness and creaminess you crave. If you’re not so confident with preparing a risotto yet, read on for a full guide and get the best tips for achieving THE Perfect Risotto.

How to serve
Serve your risotto steaming hot in a wide bowl to showcase that lovely creamy texture. Garnish with fresh herbs like parsley or basil and a generous shave of extra Parmesan for an extra touch of umami. You could also add a drizzle of truffle oil or crispy pancetta for a sophisticated twist. Pair with a light side salad or a crisp white wine to complement the dish’s creamy, savory flavors.

How to store
If there are leftovers, place the risotto in an airtight container and refrigerate for up to three days. To reheat, add a splash of broth or water, and warm on the stove, stirring to bring back the creamy consistency.

Hi, I'm Kimberly!

Hi, I'm Kimberly.

A passionate food lover who believes in the magic of homemade deliciousness that spreads love and warmth. Join me on this culinary adventure as I prepare wonderful dishes and let’s spread some happiness together!

Kimberly the Zett Signature

If you want to get to know me better, click here!


Classic Risotto
Classic Risotto

„Let’s make a piece of happiness“

Print
clock clock iconcutlery cutlery iconflag flag iconfolder folder iconinstagram instagram iconpinterest pinterest iconfacebook facebook iconprint print iconsquares squares iconheart heart iconheart solid heart solid icon
Classic Risotto

Classic Risotto


  • Author: Kimberly
  • Total Time: 45 min
  • Yield: 2 1x

Description

RECOMMENDED EQUIPMENT
  • sharp knife
  • cutting board
  • medium-sized pot
  • measuring cup
  • grater

Ingredients

Units Scale
  • 200 grams risotto rice
  • 400 milliliter vegetable broth
  • 200 milliliter dry white wine
  • 300 milliliter water
  • 100 grams parmesan
  • 1 shallot
  • 1 tbsp olive oil
  • 1 tsp butter
  • salt & pepper to taste
  • parsley for garnish

Instructions

PREPARATIONS

  • Finely grate the Parmesan.
  • Cut the shallot into small pieces.

INSTRUCTIONS

  1. Heat 1 tbsp of olive oil in a pot over medium heat. Sauté the shallot until translucent. Add the butter and risotto rice, stirring everything well, and sauté for 1-2 minutes.
  2. Deglaze with the first 100ml (1/2 cup) of white wine, letting it reduce over medium heat until no liquid remains in the pot.
  3. Next, add 100ml (1/2 cup) of stock and let it simmer, stirring occasionally, until the liquid has mostly evaporated. Continue adding stock 100ml (1/2 cup) at a time, letting it simmer and be absorbed by the rice before each addition, until the remaining 200ml (1 cup) of stock has been used.
  4. Afterward, add 150ml (1/2 cup) of water, allowing the rice to absorb it as it cooks. Follow with another 100ml (1/2 cup) of white wine, then add the final 150ml (1/2 cup) of water, stirring as it cooks. The whole process should take around 40 minutes.
  5. Remove the pot from the heat and stir in the Parmesan until it melts. Season with salt and white pepper to taste.
  6. Divide the risotto between plates and top with additional grated Parmesan, freshly ground pepper, and parsley.
  • Prep Time: 5 min
  • Cook Time: 40 min

Pasta al Pomodoro

Pasta al Pomodoro

Pasta al Pomodoro

Pasta al Pomodoro

November 5, 2024 by Kimberly

Imagine al dente pasta coated in a fresh, rich garlic basil tomato sauce – each bite bursting with Mediterranean sunshine, cozy comfort, and pure bliss. This dish tastes like home, every single time.

20 MINUTES

EASY

VEGAN

ITALIAN

589 PER PORTION

COMFORT FOOD

WEEKNIGHT

DINNER

ALL YEAR

INTRODUCTION

ABOUT THE RECIPE

Get ready to taste sunshine on a plate! This recipe brings you straight to an Italian summer with every bite – simple, cozy, and irresistibly delicious. This dish is all about fresh tomatoes simmered into a rich, velvety sauce that clings to each pasta strand, making it the ultimate comfort food. Perfect for weeknight dinners or when you crave a warm, feel-good meal, it’s easy to make but feels like pure indulgence.

How to serve
To make it unforgettable, serve this pasta with fresh basil and a dusting of Parmesan. A side of crusty garlic bread or a light salad with arugula and lemon vinaigrette balances the richness, adding that final touch. For a real treat, drizzle a bit of high-quality olive oil over the top just before serving. It’s simple but adds incredible depth and brings the dish to life, making it feel like a restaurant meal in the comfort of your home.

How to store
Store any leftovers in an airtight container in the fridge for up to 3 days. Reheat gently on the stovetop, adding a splash of water or olive oil to keep the sauce creamy. This way, you can enjoy it as good as fresh!

Hi, I'm Kimberly!

Hi, I'm Kimberly.

A passionate food lover who believes in the magic of homemade deliciousness that spreads love and warmth. Join me on this culinary adventure as I prepare wonderful dishes and let’s spread some happiness together!

Kimberly the Zett Signature

If you want to get to know me better, click here!


Pasta al Pomodoro
Pasta al Pomodoro
Pasta al Pomodoro
Pasta al Pomodoro
Pasta al Pomodoro
„Let’s make a piece of happiness“
Print
clock clock iconcutlery cutlery iconflag flag iconfolder folder iconinstagram instagram iconpinterest pinterest iconfacebook facebook iconprint print iconsquares squares iconheart heart iconheart solid heart solid icon
Pasta al Pomodoro

Pasta al Pomodoro


  • Author: Kimberly
  • Total Time: 20 min
  • Yield: 4 1x

Description

Recommended Equipment

  • large frying pan
  • sharp knife
  • cutting board
  • large pot

Ingredients

Units Scale
  • 4 tbsp olive oil
  • 4 garlic cloves
  • 1 fresh chili
  • 500 grams strained tomatoes
  • 10 grams fresh basil
  • 500 grams pasta of your choice (I used Rigatoni)
  • Parmesan
  • Salt & pepper to taste

Instructions

  1. Warm up 4 tbsp of olive oil over medium heat in a large frying pan. Meanwhile, peel the garlic cloves but leave them whole. Once the oil is warm, add the garlic cloves and let them roast until golden brown. It helps to tilt the pan so the oil pools in one spot, letting the garlic cloves fully submerge.
  2. When the garlic is golden brown, remove it from the pan and set it aside on a cutting board to cool slightly. Meanwhile, get a large pot of water ready for cooking your pasta, place it on the stove, and bring it to a rolling boil.
  3. Now mash the garlic into a paste with a bit of salt using the flat side of your knife on the cutting board – the salt helps break it down. Add this garlic paste back into the olive oil in the pan. Finely chop a fresh chili and add it to the pan as well. Warm everything over medium heat. Meanwhile, wash, dry, and thinly slice the basil leaves. Add the strained tomatoes and basil to the pan, stirring everything well, and let it simmer on low heat.
  4. Add the pasta and a bit of salt to the boiling water, cooking it until al dente. Season the tomato sauce with salt and pepper to taste.
  5. Transfer the pasta to the tomato sauce, add a bit of the pasta water, and stir until the noodles are fully coated in the sauce. Serve the pasta on deep plates, topped with freshly grated Parmesan and a sprinkle of pepper.
  • Cook Time: 20 min

Easy Same Day Basic Focaccia

Easy Same Day Basic Focaccia

Quick & Easy - The Best Focaccia Recipe

Easy Same Day Basic Focaccia

October 26, 2024 by Kimberly

Golden-crisp on the outside, airy and soft inside, this fresh focaccia is the ultimate comfort! Perfect for dipping, snacking, or as a side – it’s irresistible, warm, and baked-to-perfection bliss.

3 HOURS
30 MINUTES

EASY

VEGETARIAN

ITALIAN

386 PER PORTION

FLUFFY

EVERYDAY

BREAD

ALL YEAR

INTRODUCTION

ABOUT THE RECIPE

Craving something warm, cozy, and seriously easy to bake? This focaccia is your answer! It’s got that perfect golden crust that you can’t resist breaking into and a soft, fluffy center that just melts in your mouth. Whether you’re new to baking or a seasoned bread lover, this focaccia has that fresh-baked, olive-oil-kissed goodness that makes it the ultimate comfort food. Plus, it’s ready in just 3.5 hours – no need to wait around for endless rises. Just mix, bake, and enjoy some bakery-style vibes at home!

How to serve
This focaccia is so versatile – it pairs perfectly with just about anything! Tear off pieces to dip in olive oil and balsamic vinegar for a classic Italian feel, or serve it alongside a warm soup or pasta for a cozy meal. It also makes a great base for an open-faced sandwich or as an appetizer with some herby olive oil and fresh tomatoes. However you serve it, the fluffy texture and crispy edges will make it an instant favorite for everyone around the table. For an in-depth guide with secret tips & tricks, check out my ‚How-To Guide‘ for the Best Focaccia Recipe!


How to store
To keep that bakery-fresh vibe, store your focaccia in an airtight container or plastic wrap at room temperature for up to 2 days. You can also freeze it – wrap it tightly, and it’ll last up to 2 months. Just warm it in the oven to bring back the freshness.

Hi, I'm Kimberly!

Hi, I'm Kimberly.

A passionate food lover who believes in the magic of homemade deliciousness that spreads love and warmth. Join me on this culinary adventure as I prepare wonderful dishes and let’s spread some happiness together!

Kimberly the Zett Signature

If you want to get to know me better, click here!


Quick & Easy - The Best Focaccia Recipe
Basic Focaccia
„Let’s make a piece of happiness“
Print
clock clock iconcutlery cutlery iconflag flag iconfolder folder iconinstagram instagram iconpinterest pinterest iconfacebook facebook iconprint print iconsquares squares iconheart heart iconheart solid heart solid icon
Quick & Easy - The Best Focaccia Recipe

Easy Same Day Basic Focaccia


  • Author: Kimberly
  • Total Time: 3 hrs + 30 min

Description

Recommended Equipment

  • large bowl
  • kitchen scale
  • thermometer (even a medicine one works)
  • measuring cup
  • wooden spoon
  • cling film, beeswax wrap, or a shower cap
  • baking dish or tray (mine is 20x26cm / 8×10 inch)
  • oven


Ingredients

Units Scale
  • 500 grams pizza flour (type 00 in Germany)
  • 400 grams luke-warm water
  • 1.5 tsp active dry-yeast
  • 1 tbsp olive oil
  • 1 tsp honey
  • 1.5 tsp salt
  • 50 milliliters olive oil for greasing and dipping

Instructions

  1. Combine the active-dry yeast with warm water (between 34-38°C / 93-100°F), olive oil, and a teaspoon of honey to get things started. Let it sit for about 10 minutes until it becomes bubbly and the oil floats on top with the activated yeast. Meanwhile, in a large bowl, mix your flour with the salt.
  2. Pour the activated yeast mixture into the flour. Using a wooden spoon, mix everything together until it forms a dough and no dry flour is left. It might look a bit shaggy at first, but that’s totally fine! Scrape down any dough stuck to the sides and cover the bowl with cling film, a beeswax towel, or a shower cap. Let it sit for 20 minutes to allow the flour to hydrate and the dough to start developing elasticity.
  3. After 20 minutes, uncover the dough and prepare a small bowl of warm water to dip your hands in for the stretch & fold process. This technique helps develop the gluten without kneading. To do it, gently pull one side of the dough up, stretch it, and fold it over the center. Rotate the bowl a quarter turn and repeat on all four sides. You’ll do this about three times, letting the dough rest in between. This method strengthens the dough and helps create that light, airy texture! Follow these steps:
    • First stretch & fold, then let the dough rest for 20 minutes covered
    • Second stretch & fold, then rest another 20 minutes covered
    • Third stretch & fold, then let it rest for 60 minutes covered
  4. After the final 60-minute rest, grab your oven dish and drizzle 2-3 tablespoons of olive oil to coat it generously. Carefully transfer the dough to the dish, lifting it gently with both hands. Place it back in the dish, folding any hanging dough underneath itself to give it structure and elasticity.
  5. Cover the dish and let the dough rest for another 60 minutes. During this time, the dough will rise and settle into the dish, preparing for its final transformation.
  6. Preheat the oven to 220°C / 430°F. After the dough’s last rest, uncover it and drizzle a little extra olive oil over the top. Use your fingers to gently press into the dough, forming dimples. This will encourage those signature bubbles to form during baking.
  7. Bake the focaccia for 20-25 minutes, or until it’s golden and crisp. Enjoy your freshly baked focaccia! Let the focaccia cool to room temperature. If you cut it while it’s still hot, it might tear apart. But honestly, it tastes sooo good when it’s warm. Just tear it up and dip it into your favorite dips!

  • Passive Time: 3 hrs + 20 min
  • Cook Time: 10 min

Mediterranean Pasta Salad

Mediterranean Pasta Salad

Mediterranean Pasta Salad

Mediterranean Pasta Salad

July 18, 2024 by Kimberly

Dive into summer with this zesty Mediterranean pasta salad! Packed with bold flavors, it’s a refreshing twist that’s perfect for any picnic or potluck.

1 HOUR
15 MINUTES

EASY

VEGETARIAN

ITALIAN

349 PER PORTION

UMAMI

PICNIC

SALAD

SUMMER

INTRODUCTION

ABOUT THE RECIPE

Whisk your taste buds away to the sunny Mediterranean with this vibrant pasta salad! It’s bursting with bold flavors and is the perfect quick and healthy dish for any occasion. Ideal for those looking for a delicious, fuss-free meal!

How to serve
This pasta salad shines at room temperature, making it ideal for picnics and outdoor gatherings. Serve it as a hearty side with grilled meats or enjoy it as a light main course with crusty bread. It’s also great as a next-day lunch, so consider doubling the recipe!

How to store
Keep the pasta salad in a sealed container in the refrigerator. It beautifully holds its flavor and texture for up to three days, making it a fantastic choice for meal prep or leftovers.

Hi, I'm Kimberly!

Hi, I'm Kimberly.

A passionate food lover who believes in the magic of homemade deliciousness that spreads love and warmth. Join me on this culinary adventure as I prepare wonderful dishes and let’s spread some happiness together!

Kimberly the Zett Signature

If you want to get to know me better, click here!


Mediterranean Pasta Salad
„Let’s make a piece of happiness“
Print
clock clock iconcutlery cutlery iconflag flag iconfolder folder iconinstagram instagram iconpinterest pinterest iconfacebook facebook iconprint print iconsquares squares iconheart heart iconheart solid heart solid icon
Mediterranean Pasta Salad

Mediterranean Pasta Salad


  • Author: Kimberly
  • Total Time: 1 hour + 15 min
  • Yield: 8 1x

Description

Recommended Equipment

  • large pot
  • large salad bowl
  • whisk
  • sharp knife
  • cutting board
  • small pan
  • colander

Ingredients

Units Scale
  • 500 grams penne pasta
  • 150 grams Kalamata olives
  • 180 gram dried tomatoes in oil
  • 60 grams capers
  • 2 tbsp pine nuts
  • 15 grams fresh parsley or basil

DRESSING

  • 4 tbsp olive oil (you can use the oil from the dried tomatoes)
  • 3 tbsp balsamic vinegar
  • 2 tsp Dijon mustard
  • 1 tbsp honey
  • 1/4 tsp oregano
  • 1/4 tsp thyme
  • 1/4 tsp rosemary
  • 1/4 tsp salt

Instructions

  1. Fill a large pot with water and bring it to a boil.
  2. Meanwhile, prepare the dressing in the salad bowl. Mix olive oil, balsamic vinegar, Dijon mustard, honey, oregano, thyme, rosemary, and salt with a whisk until smooth. Set the bowl aside.
  3. Add the pasta and 1 tablespoon of salt to the boiling water and cook according to the package instructions until al dente.
  4. While the pasta cooks, halve the olives and chop the tomatoes into small pieces. Pluck the parsley leaves from the stems and finely chop them. Drain and rinse the capers.
  5. Toast the pine nuts in a small pan without adding oil until golden brown.
  6. Drain the pasta and add it directly to the bowl with the dressing, mixing well.
  7. Add the tomatoes, olives, capers, pine nuts, and parsley and combine thoroughly. Season with salt and pepper to taste, then let it cool and marinate for about 1 hour or overnight.
  • Passive Time: 1 hour
  • Cook Time: 15 min