Carrot Cake & Cream Cheese Frosting

Carrot Cake & Cream Cheese Frosting

Carrot Cake & Cream Cheese Frosting

Carrot Cake & Cream Cheese Frosting

March 26, 2024 by Kimberly

Indulge in the joy of Easter with this divine Carrot Cake & Cream Cheese Frosting, a perfect blend of spices, sweetness, and celebration in every bite!

110 MINUTES

INTERMEDIATE

VEGETARIAN

INT.

240 PER PORTION

CREAMY
SWEET

EASTER

CAKE

SPRING
SUMMER

INTRODUCTION

ABOUT THE RECIPE

Dive into the world of baking with this mouth-watering Carrot Cake Recipe, perfectly paired with Cream Cheese Frosting. Whether you’re a seasoned baker or a newbie, this Easy Carrot Cake will guide you to creating the most delectable dessert. It combines a moist, spice-infused cake layer with rich, creamy frosting for a taste that’s truly unforgettable. Get ready to impress at any gathering with this ultimate carrot cake delight.

How to serve:
Slice it up for a heartwarming dessert, afternoon tea treat, or a celebratory centerpiece. Its Cream Cheese Icing melts in your mouth, pairing beautifully with the cake’s textures and flavors. Elevate your presentation by garnishing with chopped nuts or these little cute carrots made of colored cream cheese frosting. For an extra touch of elegance, serve chilled on a decorative plate, letting each bite transport you to dessert heaven.

How to store:
Store it in an airtight container in the fridge. Enjoy your delicious creation for up to a week, ensuring each slice is as moist and flavorful as the first.

Hi, I'm Kimberly!

Hi, I'm Kimberly.

A passionate food lover who believes in the magic of homemade deliciousness that spreads love and warmth. Join me on this culinary adventure as I prepare wonderful dishes and let’s spread some happiness together!

Kimberly the Zett Signature

If you want to get to know me better, click here!


Carrot Cake & Cream Cheese Frosting
„Let’s make a piece of happiness“

INGREDIENTS

FOR 1 CAKE WITH 16 SLICES

CAKE BATTER

  • 150g all-purpose flour (1 cup + 2 tbsp)
  • 1/2 tsp orange zest
  • 1 tsp baking powder
  • 1 tsp baking soda
  • 2 eggs
  • 100g white sugar (1/2 cup)
  • 100g brown sugar (1/2 cup)
  • 80g rapeseed oil (1/2 cup)
  • 1 tsp vanilla extract
  • 200g carrots (1.5 cups)
  • 1/8-1/4 tsp nutmeg
  • 1/2 tsp cloves
  • 1/8 tsp salt
  • 1.5 tsp cinnamon

FROSTING

  • 200g cream cheese (7 oz)
  • 3 tbsp butter
  • 200g powdered sugar (7 oz)
  • pinch of salt
  • 1 tsp vanilla extract
  • green & orange food color
Carrot Cake & Cream Cheese Frosting
}

ACTIVE: 10 min

PASSIVE: –

PREPARATIONS

Recommended Equipment
  • mortar and pestle
  • cake pan with a diameter of 24cm (9 inches)
  • peeler
  • grater
  • sieve
  • medium-sized bowl
  • large bowl
  • hand mixer
  • spatula
  • two small bowls
  • piping bag (or two small Ziplock bags)
  • Preheat the oven to 176°C (350°F)
  • Use a mortar and pestle to grind the cloves.
  • Grease the cake pan with 1 teaspoon of butter.
  • Peel the carrots and grate one half of the carrots coarsley and the other half into thin shreds.
}

ACTIVE: 20 min

PASSIVE: 80 min

COOKING

1. Sift flour, cinnamon, cloves, and baking soda through a sieve into a medium-sized bowl. Grate 1/4 teaspoon of fresh nutmeg into it. Set aside.

2. In a large bowl, mix sugar, oil, and vanilla extract. Then add the eggs and beat everything together briefly.

3. Next, gradually add the flour mixture and stir well. Finally, fold in the carrots.

4. Pour the batter evenly into the cake pan and bake for 20 minutes or until a toothpick inserted into the center comes out clean.

5. Let the cake cool in the pan on a rack for about 60 minutes, then invert it onto a cake stand or plate.

6. Meanwhile, prepare the frosting. Using a hand mixer, beat cream cheese and butter until fluffy and firm. Gradually add powdered sugar and vanilla extract, continuing to beat until it reaches a firm consistency. Take 1-2 tablespoons of the frosting and put them into two small separate bowls.

7. Once the cake is cool, spread the frosting over the cake and smooth it out.

8. Now color the remaining frosting in the two small bowls with green and orange food coloring to the desired intensity. Fill each colored frosting into a small plastic bag and cut a tiny opening in the corner of each bag. Then, with very light pressure, draw the carrot design on the white frosting. Keep the cake in the fridge until serving.

NOTE: The calorie information may vary depending on the product used, country and region.

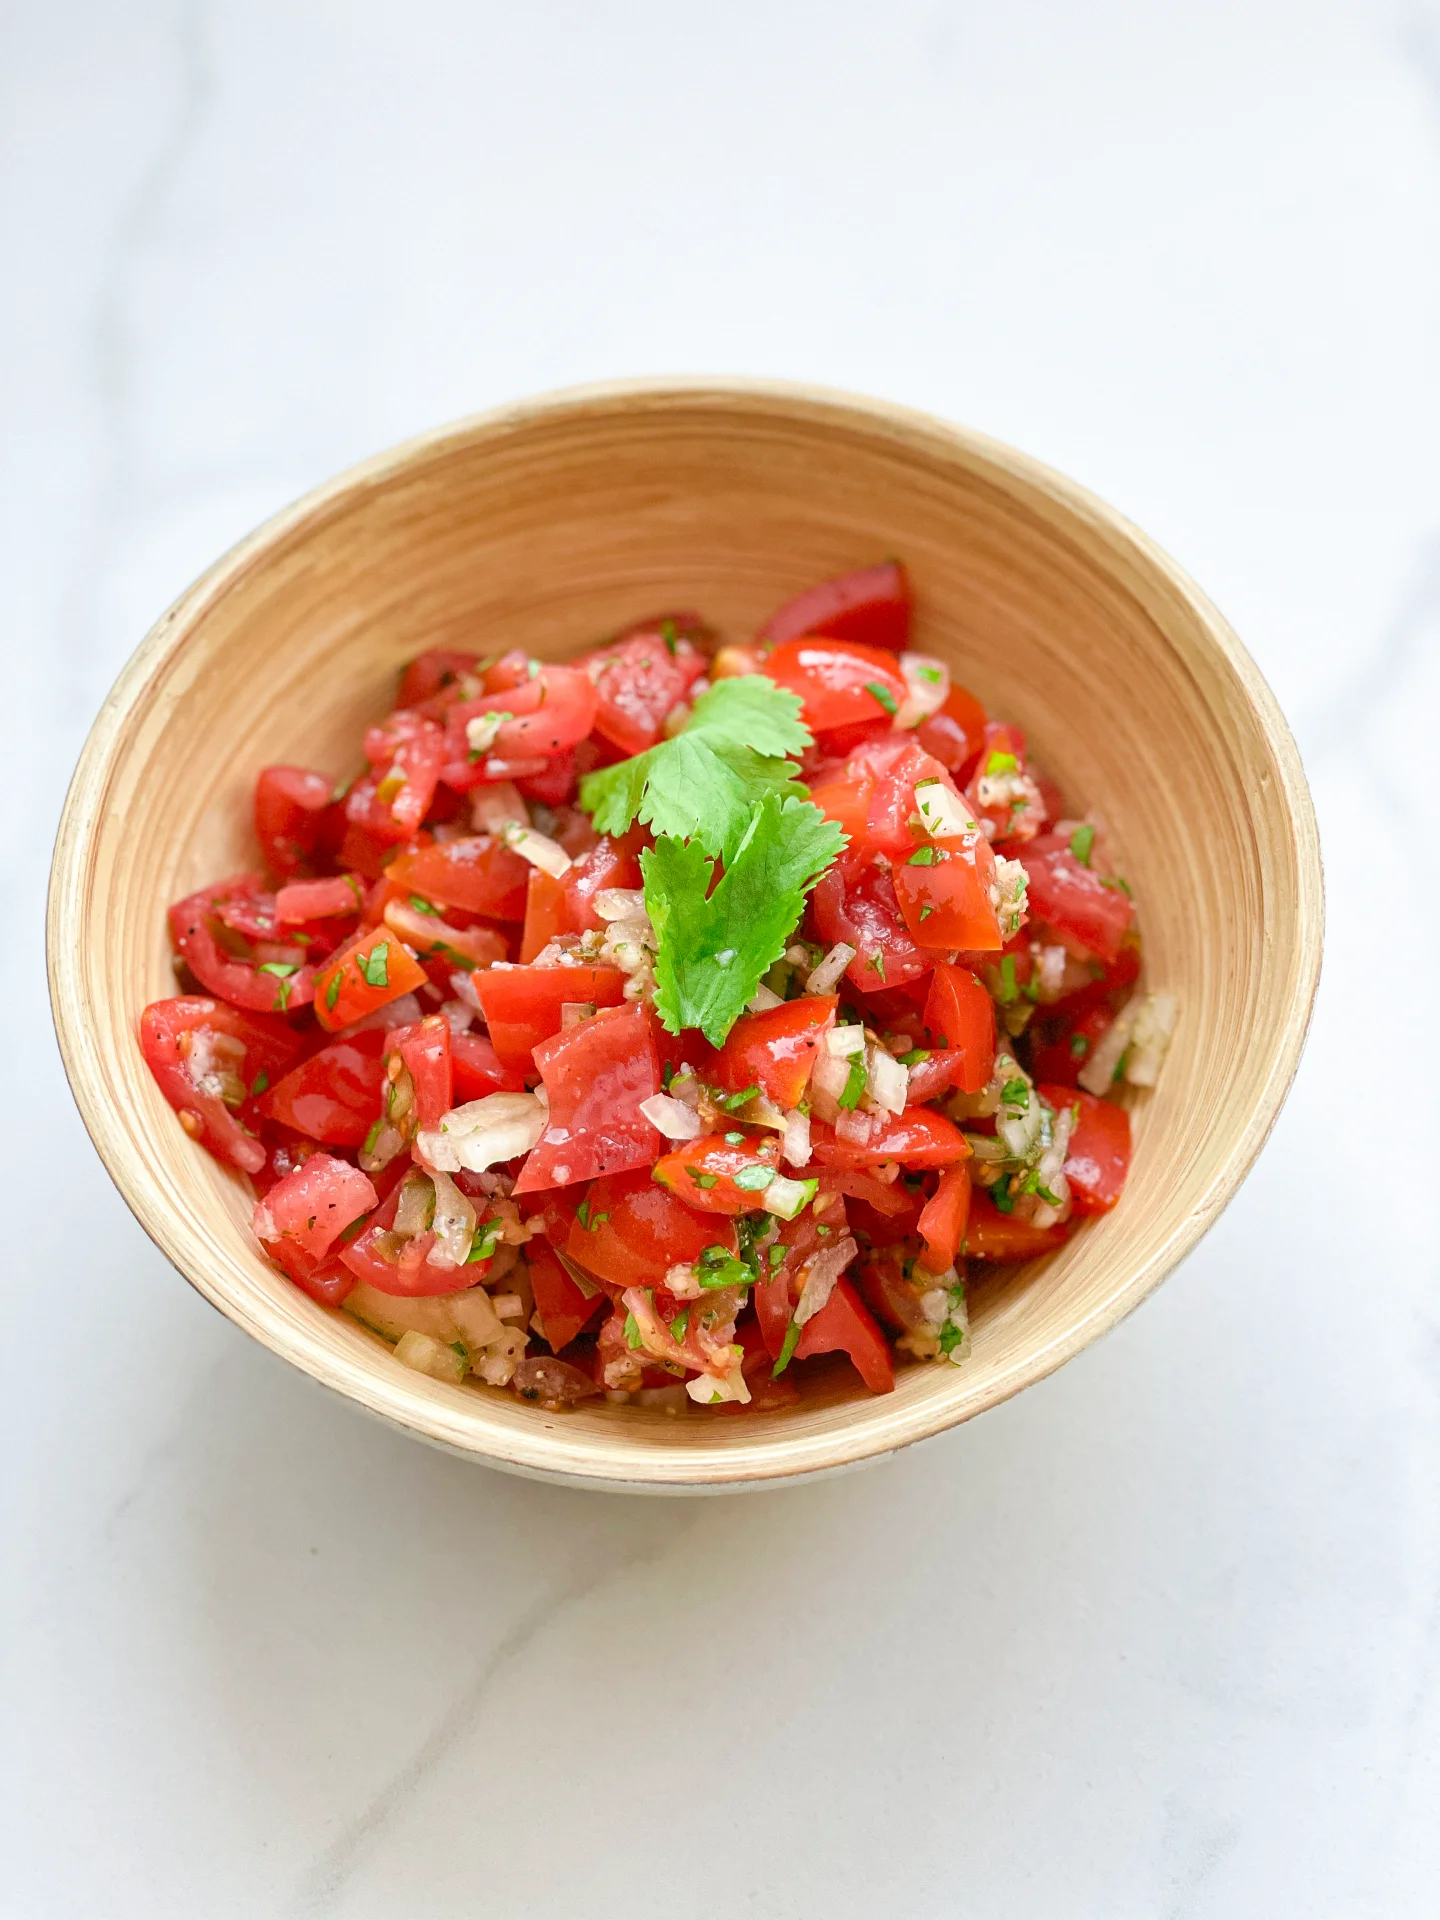
Pico de Gallo

Pico de Gallo

Pico de Gallo

Pico de Gallo

February 12, 2024 by Kimberly

Discover the vibrant and fresh Pico de Gallo, a perfect blend of flavors to elevate any meal. Easy to make, it’s a delightful, colorful addition to your table!

10 MINUTES

EASY

VEGAN

MEXICAN

31 PER PORTION

REFRESHING

EVERYDAY

SALAD

SPRING / SUMMER

INTRODUCTION

ABOUT THE RECIPE

Dive into the world of Mexican cuisine with the simple yet exquisite Pico de Gallo. This refreshing salsa combines the bold flavors of tomato, onion, and cilantro, offering a burst of freshness with every bite. Perfect for health-conscious foodies, this easy-to-make dish serves as a versatile accompaniment to countless meals. Embrace the joy of homemade salsa and add a splash of color to your dining experience.

How to serve:
Pico de Gallo is incredibly versatile, making it a must-have for any gathering. Serve it alongside grilled meats or fish for a refreshing contrast, or scoop it up with crispy tortilla chips for the ultimate snack. It’s also the perfect topping for tacos, burritos, quesadillas and enchiladas, adding a fresh, crunchy element. For a lighter option, spoon it over avocado toast or mixed into a vibrant salad.

How to store:
To keep your Pico de Gallo fresh, store it in an airtight container in the refrigerator. It’s best enjoyed within 2-3 days, as the flavors meld beautifully over time, yet the ingredients retain their crispness.

Hi, I'm Kimberly!

Hi, I'm Kimberly.

A passionate food lover who believes in the magic of homemade deliciousness that spreads love and warmth. Join me on this culinary adventure as I prepare wonderful dishes and let’s spread some happiness together!

Kimberly the Zett Signature

If you want to get to know me better, click here!


Pico de Gallo
Pico de Gallo
Pico de Gallo

„Let’s make a piece of happiness“

INGREDIENTS

FOR 4 PORTIONS

PICO DE GALLO

  • 250g tomatoes (9 oz)
  • juice of 1 lime
  • 1 small onion
  • 3 garlic cloves
  • 1 jalapeno (fresh or pickled)
  • a few stems cilantro
  • salt & pepper to taste
Pico de Gallo
}

ACTIVE: 2 min

PASSIVE: –

PREPARATIONS

Recommended Equipment
  • sharp knife
  • cutting board
  • medium sized bowl
  • Wash the tomatoes thoroughly under running water.
  • If you are using fresh jalapenos, wash them thoroughly too.
    }

    ACTIVE: 8 min

    PASSIVE: –

    COOKING

    1. Halve the tomatoes and remove the seeds. Then quarter them and cut them into small cubes. Place the diced tomatoes in a medium-sized bowl.

    2. Peel the onion, cut it in half and then finely dice it. Add the diced onion to the tomatoes in the bowl.

    3. Pluck the coriander leaves from the stalks and chop them finely. Add the chopped coriander to the bowl.

    4. Peel the garlic cloves and chop them finely or press them directly into the bowl using a garlic press.

    5. Finely chop the jalapeno and add it to the other ingredients in the bowl.

    6. Halve the lime and squeeze the juice over the ingredients in the bowl. Mix all the ingredients together thoroughly and season to taste with salt and pepper.

    NOTE: The calorie information may vary depending on the product used, country and region.

    Guacamole with Tomatoes & Red Onion

    Guacamole with Tomatoes & Red Onion

    Guacamole with Tomatoes & Red Onion

    Guacamole with Tomatoes & Red Onion

    February 10, 2024 by Kimberly

    Indulge in the best Guacamole with Tomatoes & Red Onion! Simple, healthy, and bursting with flavor, it’s the perfect snack for every avocado lover. Quick and delicious!

    10 MINUTES

    EASY

    VEGAN

    MEXICAN

    170 PER PORTION

    CREAMY

    EVERYDAY

    DIPS & SPREADS

    SPRING / SUMMER

    INTRODUCTION

    ABOUT THE RECIPE

    Dive into the creamy, tangy world of my easy Guacamole with tomatoes & red onion! Perfect for any occasion, this homemade guacamole recipe combines ripe avocados, juicy tomatoes, and sharp red onions to create a mouthwatering dip. Whether you’re hosting a party, looking for healthy snack ideas, or simply craving a fresh, vegan-friendly treat, this quick avocado recipe is the way to go.

    How to serve:
    Serve this vibrant guacamole with a side of crunchy tortilla chips, as a topping for tacos, alongside your favorite grilled dishes or fresh out of the oven enchiladas for an added burst of flavor. Its versatility makes it a hit for any gathering or a cozy night in.

    How to store:
    Keep any leftover guacamole fresh by storing it in an airtight container in the fridge. Press plastic wrap or directly onto the surface to prevent browning, and enjoy within 2 days for the best taste and texture.

    Hi, I'm Kimberly!

    Hi, I'm Kimberly.

    A passionate food lover who believes in the magic of homemade deliciousness that spreads love and warmth. Join me on this culinary adventure as I prepare wonderful dishes and let’s spread some happiness together!

    Kimberly the Zett Signature

    If you want to get to know me better, click here!


    Guacamole with Tomatoes & Red Onion
    Guacamole with Tomatoes & Red Onion
    Guacamole with Tomatoes & Red Onion

    „Let’s make a piece of happiness“

    INGREDIENTS

    FOR 4 PORTIONS

    VEGETABLES

    • 2 avocados
    • 1/2 red onion
    • 4 cocktail tomatoes
    • juice of 1/2 lime
    • salt & pepper to taste


    Guacamole with Tomatoes & Red Onion
    }

    ACTIVE: –

    PASSIVE: –

    PREPARATIONS

    Recommended Equipment
    • sharp knife
    • cutting board
    • medium sized bowl
    • none
      }

      ACTIVE: 10 min

      PASSIVE: –

      COOKING

      1. Slice the avocado lengthways, remove the pit and place the flesh in the bowl. Cut the lime in half and squeeze one half over the avocado. Mash the avocado with a fork until a cream is formed.

      2. Wash and halve the tomatoes. Remove the seeds. Halve the tomatoes again and cut into small pieces and add to the avocado in the bowl.

      3. Halve, peel and dice the onion and add to the bowl.

      4. Season everything with salt and pepper. If you like, you can squeeze in a clove of garlic at this point or stir in 100g of crème fraiche for even more creaminess.

      NOTE: The calorie information may vary depending on the product used, country and region.

      Pineapple Mint Juice

      Pineapple Mint Juice

      Pineapple Mint Juice

      Pineapple Mint Juice

      January 26, 2024 by Kimberly

      Refresh your day with Pineapple Mint Juice, a tropical blend of sweet pineapple and cool mint – the perfect thirst-quencher for any time!

      10 MINUTES

      EASY

      VEGAN

      INT.

      192 PER DRINK

      REFRESHING

      EVERYDAY

      BEVERAGES

      SPRING / SUMMER

      INTRODUCTION

      ABOUT THE RECIPE

      Welcome to the refreshing world of Pineapple Mint Juice, a delightful tropical beverage that’s both energizing and soothing. This natural thirst quencher combines the sweet tang of pineapple with the cool, refreshing zing of mint, creating a perfect balance. Ideal for hot summer days or as a healthful pick-me-up, this homemade fruit juice is not only delicious but also packed with natural goodness, making it a favorite among health-conscious individuals and juice lovers alike.

      How to serve:
      Serving this Pineapple Mint Juice is all about capturing the essence of freshness. Serve it chilled or over ice for an instant cooling effect. The vibrant, sweet and minty flavor makes it a great companion for breakfast, a relaxing afternoon, or as a welcome drink for your guests. You can also add a splash of sparkling water for a fizzy twist or garnish with fresh mint leaves and pineapple slices for an extra touch of tropical elegance.

      How to store:
      Keep it in an airtight bottle in the refrigerator, where it can stay fresh for up to 3-4 days. The flavors meld beautifully over time, ensuring that each sip is as delightful as the first. Remember, this natural beverage contains no preservatives, so enjoy it while it’s fresh and brimming with its unique mint-infused drink magic.

      Hi, I'm Kimberly!

      Hi, I'm Kimberly.

      A passionate food lover who believes in the magic of homemade deliciousness that spreads love and warmth. Join me on this culinary adventure as I prepare wonderful dishes and let’s spread some happiness together!

      Kimberly the Zett Signature

      If you want to get to know me better, click here!


      Pineapple Mint Juice
      Pineapple Mint Juice
      Pineapple Mint Juice

      „Let’s make a piece of happiness“

      INGREDIENTS

      FOR 1 DRINK (400ml or 1.5 cups)

      JUICE

      • ½ pineapple
      • 4 apples
      • 15g mint (1/2 oz)
      Pineapple Mint Juice
      }

      ACTIVE: 3 min

      PASSIVE: –

      PREPARATIONS

      Recommended Equipment
      • sharp knife
      • chopping board
      • juicer (or blender & fine sieve)
      • Wash the apples and mint thoroughly.
        }

        ACTIVE: 5 min

        PASSIVE: –

        COOKING

        PREPARATION WITH A JUICER

        1. Cut the skin off the pineapple and cut the flesh into sticks. Place half of the pineapple in the juicer. This corresponds to approx. 400g (14 oz) of pineapple without the peel.
        2. Put the 4 apples into the juicer next.
        3. Add the fresh mint to the juicer last.
        4. Now pour all the juices obtained into a glass.

        PREPARATION WITH A BLENDER & A FINE SIEVE

        1. We need about half of the pineapple. This corresponds to approx. 400 g (14 oz) pineapple without the peel. Cut the skin off the pineapple and apples. Place the peeled pineapple and apples in the blender.
        2. Pluck the mint leaves and add to the blender.
        3. Puree everything for 30 seconds on the highest setting. Now pass the whole mixture through a fine sieve. If you like the pulp, you can of course skip this step.
        4. Pour the juice into a glass bottle.

        NOTE: The calorie information may vary depending on the product used, country and region.

        Pineapple Mint Salad

        Pineapple Mint Salad

        Pineapple Mint Salad

        Pineapple Mint Salad

        January 22, 2024 by Kimberly

        Enjoy a refreshing Pineapple & Mint Salad, perfect for a healthy, tasty treat. Bursting with sweet pineapple and zesty mint – it’s a delightful, energizing snack!

        5 MINUTES

        EASY

        VEGAN

        INT.

        151 PER PORTION

        FRESH / FRUITY

        EVERYDAY

        SNACK / DESSERT

        SPRING / SUMMER

        INTRODUCTION

        ABOUT THE RECIPE

        Indulge in the exquisite blend of sweet and zesty with this Pineapple & Mint Salad, a delectable treat that’s both energizing and nutritious. This easy recipe brings together the freshness of mint and the natural sweetness of pineapple, creating a perfect balance of flavors.

        How to serve:
        Serving this Pineapple Mint Salad is a breeze and adds a refreshing touch to any occasion. For an elevated experience, serve it chilled on a summer day or as a vibrant dessert at your next gathering. Its combination of energizing fruit snack goodness and the zesty mint refreshment makes it a crowd-pleaser. Pair it with a light yogurt for a wholesome, healthy pineapple treat.

        How to store:
        Keep it in an airtight container in the refrigerator to maintain its refreshing mint quality. It stays fresh and flavorful for up to three days, ensuring you can enjoy the nutritious pineapple mint goodness at your convenience. Perfect for a quick and easy pineapple mint flavor boost anytime!

        Hi, I'm Kimberly!

        Hi, I'm Kimberly.

        A passionate food lover who believes in the magic of homemade deliciousness that spreads love and warmth. Join me on this culinary adventure as I prepare wonderful dishes and let’s spread some happiness together!

        Kimberly the Zett Signature

        If you want to get to know me better, click here!


        Pineapple Mint Salad
        Pineapple Mint Salad
        Pineapple Mint Salad

        „Let’s make a piece of happiness“

        INGREDIENTS

        FOR 2 PORTIONS

        SALAD

        • 1 pineapple
        • a few stalks of mint
        Pineapple Mint Salad
        }

        ACTIVE: –

        PASSIVE: –

        PREPARATIONS

        Recommended Equipment
        • sharp knife
        • cutting board
        • medium sized bowl
        • none
          }

          ACTIVE: 5 min

          PASSIVE: –

          COOKING

          1. Remove the skin from the pineapple and cut the flesh into small pieces.

          2. Pluck the mint leaves from the stalks and chop finely.

          3. Mix the pineapple pieces and chopped mint in a medium-sized bowl and then divide between two bowls.

          NOTE: The calorie information may vary depending on the product used, country and region.

          Cod with Caper Lemon Butter Baked Asparagus & Vine Tomatoes

          Cod with Caper Lemon Butter Baked Asparagus & Vine Tomatoes

          Cod with Caper Lemon Butter Baked Asparagus & Vine Tomatoes

          Cod with Caper Lemon Butter Baked Asparagus & Vine Tomatoes

          January 17, 2024 by Kimberly

          Savor the zesty blend of Cod with Caper Lemon Butter, complemented by tender baked asparagus and juicy vine tomatoes. A delicious, wholesome dinner for any day!

          25 MINUTES

          INTERMEDIATE

          OMNIVORE

          INT.

          466 PER PORTION

          UMAMI

          EVERYDAY

          DINNER

          SPRING / SUMMER

          INTRODUCTION

          ABOUT THE RECIPE

          Delight your taste buds with this exquisite Cod with Caper Lemon Butter, Baked Asparagus & Vine Tomatoes recipe. This dish is a perfect blend of flavors, combining the mild, flaky texture of cod with the zesty tang of caper lemon butter. Complemented by the earthy taste of baked asparagus and the sweetness of vine tomatoes, it’s a healthy seafood dish that’s both nutritious and indulgent. Ideal for a quick, yet elegant family dinner, this recipe brings gourmet home cooking to your table with simple, seasonal ingredients.

          How to serve:
          To serve this delightful meal, plate the perfectly cooked cod as the centerpiece. Drizzle it generously with the aromatic caper lemon butter sauce, ensuring each bite is infused with its rich flavor. Accompany the fish with a side of tender, oven-roasted asparagus and ripe, juicy baked vine tomatoes, enhancing the dish’s freshness and color. This combination not only offers a harmonious blend of tastes but also presents a visually appealing dish, perfect for any occasion. For a complete dining experience, pair this meal with a light, crisp white wine or a lemon-infused water.

          How to store:
          Keep the cod and vegetables in separate airtight containers in the refrigerator. They will maintain their quality for up to one day. Reheat gently to preserve the texture of the fish and the crispness of the vegetables. Enjoy the convenience of a delicious, homemade meal, ready to be savored again.

          Hi, I'm Kimberly!

          Hi, I'm Kimberly.

          A passionate food lover who believes in the magic of homemade deliciousness that spreads love and warmth. Join me on this culinary adventure as I prepare wonderful dishes and let’s spread some happiness together!

          Kimberly the Zett Signature

          If you want to get to know me better, click here!


          Cod with Caper Lemon Butter Baked Asparagus & Vine Tomatoes
          Cod with Caper Lemon Butter Baked Asparagus & Vine Tomatoes
          Cod with Caper Lemon Butter Baked Asparagus & Vine Tomatoes

          „Let’s make a piece of happiness“

          INGREDIENTS

          FOR 2 PORTIONS

          COD

          • 300g cod filet (11 oz)
          • 2 tbsp all-purpose flou
          • 2 tbsp olive oil
          • 1 tbsp butter

          SAUCE

          • 1 tbsp capers
          • 1 tsp butter
          • juice of half a lemon

            VEGETABLES

            • 250g vine tomatoes
            • 250g green asparagus (fresh or frozen)
            • 2 tbsp olive oil
            • salt
            • pepper

              TOPPINGS

              • parsley
              • the other half of the lemon
                Cod with Caper Lemon Butter Baked Asparagus & Vine Tomatoes
                }

                ACTIVE: 3 min

                PASSIVE: –

                PREPARATIONS

                Recommended Equipment
                • sharp knife
                • cutting board
                • frying pan
                • Preheat the oven to 200°C (400°F)
                • Pluck the parsley leaves from the stalks and chop finely.
                  }

                  ACTIVE: 20 min

                  PASSIVE: –

                  COOKING

                  1. Place the frozen asparagus and tomatoes on a baking tray lined with baking paper, drizzle with olive oil and season with salt and pepper. Roast the asparagus and tomatoes in the oven on the middle shelf for approx. 15 minutes until golden brown.

                  2. Pat the cod dry and then roll in flour. Set aside.

                  3. Heat 2 tbsp olive oil and 1 tbsp butter in a frying pan over a medium heat. Add the cod and fry on one side for approx. 5 minutes. Carefully flip the fish and fry for a further 1-3 minutes (depending on the thickness of the fish). At this point, the fat in the pan can be poured over the fish with a spoon so that the side that is facing up does not dry out.

                  4. Remove the pan from the heat and arrange the fish on plates – warm the plates in advance if you like. Put the pan back on the heat.

                  5. Now pour the juice of half a lemon over the remaining oil and butter in the pan. Stir briefly and allow to warm. Now add the capers, toss well and deglaze whats on the bottom of the pan. Remove the pan from the heat and stir in 1 teaspoon of butter. The sauce can now be poured over the fish.

                  6. Remove the vegetables from the oven and place on the plates next to the fish. Garnish with parsley and lemon slices.

                  NOTE: The calorie information may vary depending on the product used, country and region.