Mochi Matcha Brownies

Mochi Matcha Brownies

Mochi Matcha Brownies

Mochi Matcha Brownies

July 13, 2024 by Kimberly

Whip up these irresistibly gooey mochi matcha brownies topped with creamy white chocolate! Simple, decadent, and perfect for any sweet tooth.

This website uses affiliate links which may earn commission for purchases made at no additional cost to you.

TOTAL TIME

3 hrs + 20 min

SERVES

9 pieces

DIET

vegan

EVERY RECIPE DESERVES

A Little Love Letter

Dive into the world of baking with these mochi matcha brownies! These delights blend the chewy texture of mochi with the rich taste of matcha, topped with luscious white chocolate.

Serve these brownies chilled to fully enjoy their gooey texture. They pair beautifully with a cup of coffee or matcha latte, making them perfect for dessert or a special afternoon treat. Cut into small squares for an elegant presentation.

Keep leftover brownies in an airtight container at room temperature to maintain their moisture. They stay fresh and delicious for up to three days.

Hi, I'm Kimberly!

Hi, I'm Kimberly.

A hopeless romantic when it comes to food. Every recipe I share is a love letter to food itself. I’m so glad you’re here. Make yourself at home and stay a while.

Love,
Kimberly

Kimberly the Zett Signature

If you want to get to know me better,
click here!


Mochi Matcha Brownies

LET’S MAKE A PIECE OF HAPPINESS

Print
clock clock iconcutlery cutlery iconflag flag iconfolder folder iconinstagram instagram iconpinterest pinterest iconfacebook facebook iconprint print iconsquares squares iconheart heart iconheart solid heart solid icon
Mochi Matcha Brownies

Mochi Matcha Brownies


5 Stars 4 Stars 3 Stars 2 Stars 1 Star

No reviews

  • Author: Kimberly
  • Total Time: 3 hrs + 20 min
  • Yield: 9

Description

GOOD TO HAVE ON HAND

  • oven
  • baking pan dish (20x20cm / 8×8″)
  • 2 medium-sized bowls
  • whisk
  • small pot
  • small metal (or glass) bowl
  • sharp knife


Ingredients

Units Scale
BATTER
  • 230 grams rice flour
  • 100 grams white sugar
  • 1/4 tsp backing powder
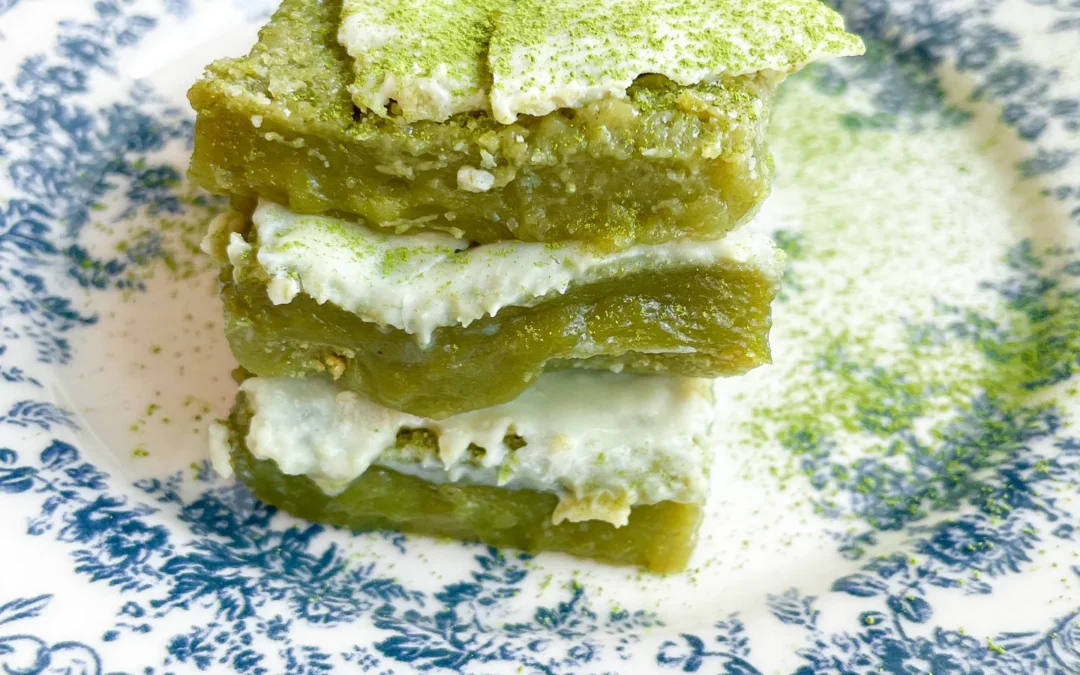
  • 1 tsp matcha powder
  • 120 milliliters oat milk (or any other milk you prefer)
  • 90 milliliters coconut milk
  • 1/4 tsp vanilla extract
  • 1 tsp butter, for greasing
TOPPING
  • 100 grams white chocolate
  • 1 tsp coconut oil

Instructions

  1. Preheat your oven to 135°C / 275°F.
  2. Grease your baking pan with a teaspoon of butter and set it aside.
  3. In a medium bowl, whisk together all the dry ingredients: rice flour, sugar, matcha powder, and baking powder.
  4. In another medium bowl, combine the wet ingredients: oat milk, coconut milk, and vanilla extract. Whisk these together well.
  5. Slowly add the wet ingredients to the dry, mixing until you have a smooth, creamy batter.
  6. Pour the batter into the greased pan, smoothing it out to an even layer, and bake for about 70 minutes.
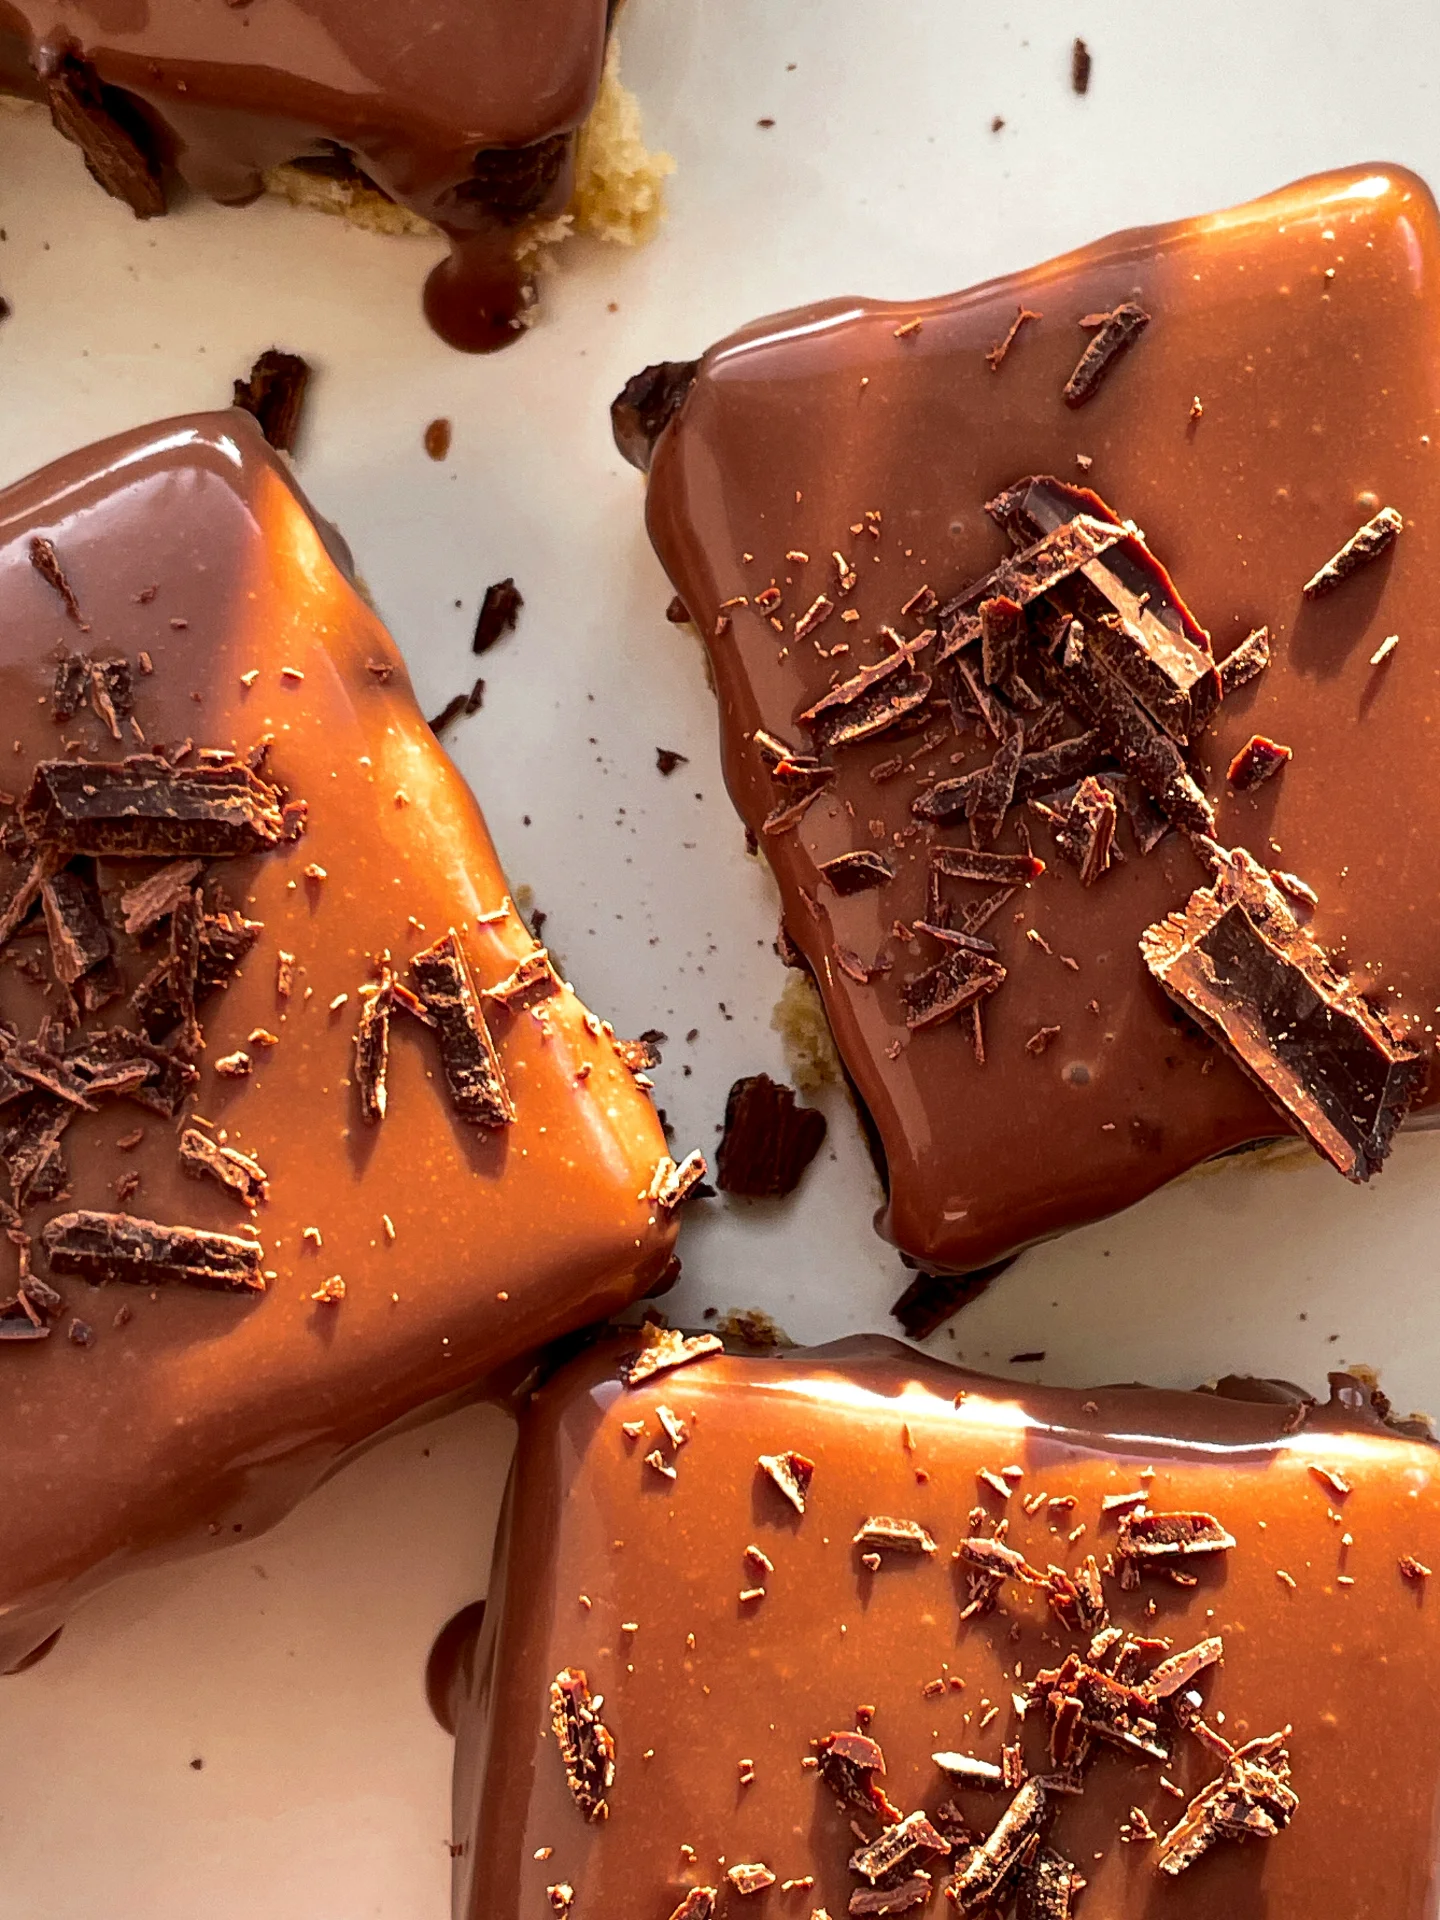
  7. Once done, take the brownie out of the oven and let it cool completely. As it cools, it will sink slightly and the surface will dry out, but it will become deliciously gooey.
  8. For the topping, fill a small pot with water and bring it to a simmer, then take it off the heat. Break the white chocolate into small pieces and place them in a small metal bowl. Set this bowl over the simmering water pot to melt the chocolate, stirring until smooth. Add a teaspoon of coconut oil, mix well, then pour the melted chocolate over the cooled brownie. Let this cool down again.
  9. I got a bit impatient and cut into the brownies too soon while the chocolate was still soft – it was a bit messy, but I wasn’t mad about it! Once everything is fully set, cut the brownie into 9 even squares and enjoy.
  • Passive Time: 3 hrs
  • Cook Time: 20 min

CRAVING MORE?

Follow along here & don’t forget to subscribe to my substack!

Blue Spirulina Breakfast Bowl

Blue Spirulina Breakfast Bowl

Blue Spirulina Breakfast Bowl

Blue Spirulina Breakfast Bowl

July 11, 2024 by Kimberly

Kick off your day with a stunning Blue Spirulina Breakfast Bowl! This refreshing blend energizes with lush tropical flavors, a pop of brilliant blue and natural health benefits.

This website uses affiliate links which may earn commission for purchases made at no additional cost to you.

TOTAL TIME

10 min

SERVES

1 bowl

DIET

vegan

EVERY RECIPE DESERVES

A Little Love Letter

Embrace a burst of color and nutrition each morning with the Blue Spirulina Breakfast Bowl! This delightful dish combines the natural vibrancy of blue spirulina with the creamy sweetness of almond milk and tropical fruits, making your breakfast not only healthful but also irresistibly tasty. Start your day with this energizing bowl that’s sure to brighten your morning and fuel your adventures.

Serve your Blue Spirulina Breakfast Bowl chilled, garnished with fresh fruits and a swirl of almond butter for an extra touch of luxury. It’s the perfect way to energize your morning or refuel post-workout with a dish that’s both delicious and nutrient-rich.

Keep any remaining mixture in a sealed container in the freezer for up to two days. Let it thaw and refresh with new toppings before serving again to maintain the perfect blend of flavors and textures.

Hi, I'm Kimberly!

Hi, I'm Kimberly.

A hopeless romantic when it comes to food. Every recipe I share is a love letter to food itself. I’m so glad you’re here. Make yourself at home and stay a while.

Love,
Kimberly

Kimberly the Zett Signature

If you want to get to know me better,
click here!


Blue Spirulina Breakfast Bowl

LET’S MAKE A PIECE OF HAPPINESS

Print
.tasty-recipe-responsive-iframe-container-8d54c30b { position: relative; overflow: hidden; padding-top: 56.3%; } .tasty-recipe-responsive-iframe-container-8d54c30b iframe { position: absolute; top: 0; left: 0; width: 100%; height: 100%; border: 0; } clock clock iconcutlery cutlery iconflag flag iconfolder folder iconinstagram instagram iconpinterest pinterest iconfacebook facebook iconprint print iconsquares squares iconheart heart iconheart solid heart solid icon
Blue Spirulina Breakfast Bowl

Blue Spirulina Breakfast Bowl


  • Author: Kimberly
  • Total Time: 10 min
  • Yield: 1 bowl

Description

GOOD TO HAVE ON HAND

  • sharp knife
  • cutting board
  • freezer
  • high-power blender
  • cereal bowl


Ingredients

Units Scale
BASE
  • 2 bananas, frozen
  • 170 grams pineapple, frozen
  • 125 milliliters to 250 milliliters almond milk (or your favorite type of milk)
  • 1 tsp blue spirulina powder
TOPPINGS
  • 1/4 banana
  • 1/2 kiwi
  • 3 green grapes
  • 1 tsp coconut flakes
  • 1 tsp puffed quinoa

Instructions

PREPARATIONS

  • Chop the banana and pineapple into pieces and freeze them overnight.

INSTRUCTIONS

  1. Put the pineapple, banana, almond milk, and spirulina powder into the blender and blend until it becomes creamy.
  2. Meanwhile, slice 1/4 of a fresh banana and 3 grapes, and chop half a kiwi into small pieces.
  3. Pour the blue cream into a bowl and top it with the banana and grape slices, kiwi pieces, 1 teaspoon of almond butter, 1 teaspoon of puffed quinoa, and 1 teaspoon of coconut flakes. Enjoy it right away 🙂
  • Prep Time: over night
  • Cook Time: 10 min

CRAVING MORE?

Follow along here & don’t forget to subscribe to my substack!

Lavender Oil

Lavender Oil

Lavender Oil

Lavender Oil

July 9, 2024 by Kimberly

Dive into the delicate, floral notes of lavender oil! This unique ingredient adds a touch of elegance to your dishes, making every meal a sophisticated experience.

This website uses affiliate links which may earn commission for purchases made at no additional cost to you.

TOTAL TIME

55 min

SERVES

1 cup / 250 ml

DIET

vegan

EVERY RECIPE DESERVES

A Little Love Letter

Welcome to the aromatic world of lavender oil! Infusing your meals with the essence of lavender transforms simple dishes into gourmet experiences that captivate your senses.

Serve your lavender-infused dishes as a refined finish to any meal you like. Whether drizzled over a fresh salad or blended into a creamy dessert sauce, lavender oil elevates your culinary creations. Pair it with light proteins like chicken or fish, or let it enhance the flavor of seasonal vegetables.

Keep your lavender oil in a cool, dark place to maintain its potent flavor and aroma for about a week. A well-sealed bottle ensures that the delicate essence of lavender remains pristine for your next culinary adventure.

Hi, I'm Kimberly!

Hi, I'm Kimberly.

A hopeless romantic when it comes to food. Every recipe I share is a love letter to food itself. I’m so glad you’re here. Make yourself at home and stay a while.

Love,
Kimberly

Kimberly the Zett Signature

If you want to get to know me better,
click here!


Lavender Oil
Lavender Oil
Lavender Oil
Lavender Oil

LET’S MAKE A PIECE OF HAPPINESS

Print
.tasty-recipe-responsive-iframe-container-407eeb88 { position: relative; overflow: hidden; padding-top: 56.3%; } .tasty-recipe-responsive-iframe-container-407eeb88 iframe { position: absolute; top: 0; left: 0; width: 100%; height: 100%; border: 0; } clock clock iconcutlery cutlery iconflag flag iconfolder folder iconinstagram instagram iconpinterest pinterest iconfacebook facebook iconprint print iconsquares squares iconheart heart iconheart solid heart solid icon
Lavender Oil

Lavender Oil


  • Author: Kimberly
  • Total Time: 55 min
  • Yield: 250 ml / 1 cup

Description

RECOMMENDED EQUIPMENT

  • blender
  • medium-sized saucepan
  • whisk
  • a bowl which the medium saucepan fits into
  • 2 medium-sized bowls
  • 2 fine sieves
  • sealable container (oil bottle)
  • ice cubes
  • coffee filter

Ingredients

Units Scale
  • 9 lavender blossoms
  • 250 milliliters unrefined cold-pressed sunflower oil

Instructions

  1. Cut the lavender blossoms of the stems and put the blossoms into the blender. Pour in the oil. Blend on the highest setting until there are only tiny pieces of the lavender left.
  2. Pour the mixture from the blender into a medium-sized pot and heat it over medium heat to a temperature of about 100°-101°C (212°-213°F), and maintain this temperature for the next 10 minutes. Stir occasionally, making sure the temperature remains steady and nothing gets burned.
  3. Prepare a bowl large enough to fit a medium-sized pot, and fill it with cold water and a handful of ice cubes. Also, hang a fine sieve strainer over one medium-sized bowl and another fine sieve strainer, with a coffee filter inside it, over another medium-sized bowl.
  4. Now, place the pot in the ice water and stir to cool the oil quickly. Once the oil is almost cold, remove the pot from the water and pour the oil into the prepared fine sieve to catch the coarse particles.
  5. Then, pour the oil into the second sieve, which is equipped with a coffee filter, to catch the remaining finer particles.
  6. Allow the oil to drip through for about 40 minutes or maybe less depending on how many remaining particles are in the coffee filter. Once all the oil has passed through the coffee filter, transfer the collected amount of oil into a sealable container or directly into an oil bottle. Store in the refrigerator for up to one week.

Notes

Use the oil to enrich these homemade scones. Simply make a frosting from 125g (1 cup) powdered sugar, 2-3 tablespoons of lemon juice and 1 teaspoon of the lavender oil and coat your scones with it. Enjoy these pieces of happiness 🙂

  • Prep Time: 5 min
  • Passive Time: 40 min
  • Cook Time: 10 min

CRAVING MORE?

Follow along here & don’t forget to subscribe to my substack!

Crispy Rice Paper with Mango Avocado Cashew Salad

Crispy Rice Paper with Mango Avocado Cashew Salad

Crispy Rice Paper with Mango Avocado Cashew Salad

Crispy Rice Paper with Mango Avocado Cashew Salad

July 4, 2024 by Kimberly

Crunch into crispy rice paper paired with a vibrant salad of mango, avocado, and cashews. A dish that’s as fun to eat as it is colorful!

This website uses affiliate links which may earn commission for purchases made at no additional cost to you.

TOTAL TIME

25 min

SERVES

16 cups

DIET

vegan

EVERY RECIPE DESERVES

A Little Love Letter

Experience a crunch like no other with this unique dish that combines crispy fried rice paper with a lush mango avocado cashew salad. It’s a textural delight that’s bursting with freshness and flavor.

Serve this crispy delight as a stunning appetizer or a light, refreshing meal. The crackle of the rice paper perfectly complements the soft, rich textures of avocado and mango, with cashews adding a satisfying crunch. It’s a dish best enjoyed immediately to secure the crispy rice paper and the cool, fresh salad. Alternatively for making it ahead, you can serve the salad and the deep-fried rice paper individually.

The crispy rice paper should be enjoyed right after frying to maintain its texture. However, the mango avocado cashew salad can be refrigerated in an airtight container and is best eaten within a day to keep the flavors vibrant and fresh.

Hi, I'm Kimberly!

Hi, I'm Kimberly.

A hopeless romantic when it comes to food. Every recipe I share is a love letter to food itself. I’m so glad you’re here. Make yourself at home and stay a while.

Love,
Kimberly

Kimberly the Zett Signature

If you want to get to know me better,
click here!


Crispy Rice Paper with Mango Avocado Cashew Salad

LET’S MAKE A PIECE OF HAPPINESS

Print
.tasty-recipe-responsive-iframe-container-fb71a836 { position: relative; overflow: hidden; padding-top: 56.3%; } .tasty-recipe-responsive-iframe-container-fb71a836 iframe { position: absolute; top: 0; left: 0; width: 100%; height: 100%; border: 0; } clock clock iconcutlery cutlery iconflag flag iconfolder folder iconinstagram instagram iconpinterest pinterest iconfacebook facebook iconprint print iconsquares squares iconheart heart iconheart solid heart solid icon
Crispy Rice Paper with Mango Avocado Cashew Salad

Crispy Rice Paper with Mango Avocado Cashew Salad


  • Author: Kimberly
  • Total Time: 25 minutes
  • Yield: about 16 small cups

Description

GOOD TO HAVE ON HAND
  • sharp knife
  • cutting board
  • small frying pan or pot
  • scissors
  • paper towels
  • salad bowl
  • small bowl


Ingredients

Units Scale
CUPS
  • 4 small rice paper
  • 200 milliliters deep-frying fat
DRESSING
  • 1 tbsp avocado oil
  • 2 tbsp lime juice
  • 1 garlic clove, grated
  • 1/4 tsp ginger, grated
  • 1/2 tsp sesame oil
  • 1 tbsp soy sauce
SALAD
  • 300 grams red cabbage
  • 1 ripe mango
  • 1 ripe avocado
  • 40 grams cashew nuts
TOPPINGS
  • cress or sprouts
  • white sesame
  • spring onion

Instructions

  1. Heat about 1 cm of frying oil to 180°C / 356°F in a small frying pan. Carefully cut the rice paper into quarters using scissors, and fry each quarter in the hot oil for 5 seconds until it puffs up and turns fluffy white. Remove from the pan and let it drain on paper towels. Note: The paper is only pliable for a short time after being removed from the oil.
  2. For the salad, finely shred the red cabbage and place it in a salad bowl. Peel the mango and avocado and cut the flesh into bite-sized pieces, adding them to the salad bowl as well. Finally, add the cashews.
  3. For the dressing, mix avocado oil, lime juice, grated garlic and ginger, sesame oil, and soy sauce in a small bowl and pour it over the salad. Mix everything well.
  4. Slice the green part of the spring onion into fine strips and set aside.
  5. If serving immediately, lay out the fried rice papers, fill each with 1-2 tablespoons of salad, and top each with white sesame seeds, cress, and the sliced spring onions. If not serving immediately, I recommend preparing both components separately.

Notes

The calorie information may vary depending on the product used, country and region.

  • Cook Time: 25 min

CRAVING MORE?

Follow along here & don’t forget to subscribe to my substack!

Green Herb Salad with Peas & Pickled Onions

Green Herb Salad with Peas & Pickled Onions

Green Herb Salad with Peas & Pickled Onions

Green Herb Salad with Peas & Pickled Onions

July 1, 2024 by Kimberly

Freshen up your meal with a vibrant green herb salad! Crunchy, zesty, and bursting with flavor, it’s a refreshing twist that’ll make your tastebuds dance.

This website uses affiliate links which may earn commission for purchases made at no additional cost to you.

TOTAL TIME

20 min

SERVES

4 portions

DIET

vegetarian

EVERY RECIPE DESERVES

A Little Love Letter

Elevate your salad game with this green herb salad, a lush blend of romaine and butter lettuce mixed with sweet peas and tangy pickled onions, all dressed in a light, herb-infused yogurt dressing. It’s a garden-fresh delight that captures the essence of spring in every bite.

This salad shines brightest when served fresh. Toss the crisp lettuces with the peas and pickled onions just before serving and sprinkle generously with dill, chives, and tarragon for that extra burst of freshness. It’s perfect alongside a grilled fish or as a standalone dish that’s both fulfilling and light.

Best enjoyed immediately, however, if you have leftovers, keep them separate in an airtight container in the fridge. The salad stays fresh for about two days, but it’s ideal to add the dressing just before serving to maintain crispness.

Hi, I'm Kimberly!

Hi, I'm Kimberly.

A hopeless romantic when it comes to food. Every recipe I share is a love letter to food itself. I’m so glad you’re here. Make yourself at home and stay a while.

Love,
Kimberly

Kimberly the Zett Signature

If you want to get to know me better,
click here!


Green Herb Salad with Peas & Pickled Onions

LET’S MAKE A PIECE OF HAPPINESS

Print
.tasty-recipe-responsive-iframe-container-1ddd40b1 { position: relative; overflow: hidden; padding-top: 56.3%; } .tasty-recipe-responsive-iframe-container-1ddd40b1 iframe { position: absolute; top: 0; left: 0; width: 100%; height: 100%; border: 0; } clock clock iconcutlery cutlery iconflag flag iconfolder folder iconinstagram instagram iconpinterest pinterest iconfacebook facebook iconprint print iconsquares squares iconheart heart iconheart solid heart solid icon
Green Herb Salad with Peas & Pickled Onions

Green Herb Salad with Peas & Pickled Onions


  • Author: Kimberly
  • Total Time: 20 minutes
  • Yield: 4

Description

GOOD TO HAVE ON HAND

  • sharp knife
  • cutting board
  • large salad bowl
  • medium-sized bowl
  • small bowl
  • measuring spoons


Ingredients

Units Scale
SALAD
  • 1 butter lettuce
  • 1 romaine lettuce
  • 100 grams frozen peas
  • 1 red onion
  • 1.5 tbsp fresh dill
  • 1.5 tbsp fresh chives
  • 1.5 tbsp fresh tarragon
DRESSING
  • 150 grams yogurt
  • 2 tbsp lemon juice
  • 2 garlic cloves
  • 1/2 tsp dijon mustard
  • salt & pepper to taste

Instructions

  1. Cut romaine and butter lettuce into bite-sized pieces, wash thoroughly, and spin dry. Place in a large salad bowl.
  2. Also wash chives, dill, and tarragon, dry, and finely chop. Add to the salad in the bowl.
  3. Fill a small bowl with frozen peas and pour hot water over them to cover and then set aside.
  4. In the meantime, in a separate bowl, prepare the dressing. Mix yogurt, lemon juice, peeled and pressed garlic cloves, and Dijon mustard together. Season with salt and pepper to taste.
  5. Drain the peas in a sieve and rinse with cold water. Let them drain and then add them to the salad bowl. Peel the red onion and slice it into very fine strips.
  6. Pour the dressing over the salad and top with the sliced red onions. Enjoy the salad immediately.

Notes

The calorie information may vary depending on the product used, country and region.

  • Cook Time: 20 min

CRAVING MORE?

Follow along here & don’t forget to subscribe to my substack!

Radish Cucumber Butter

Radish Cucumber Butter

Radish Cucumber Butter

Radish Cucumber Butter

June 24, 2024 by Kimberly

Whip up magic in your kitchen with this fresh, zesty butter blend! Perfect for giving a crunchy, creamy twist to any snack or sandwich.

This website uses affiliate links which may earn commission for purchases made at no additional cost to you.

TOTAL TIME

10 min

SERVES

4 portions

DIET

vegetarian

EVERY RECIPE DESERVES

A Little Love Letter

Radish cucumber butter combines the crisp freshness of radishes and cucumbers with creamy butter to create a spread that’s both light and invigorating. It’s a delightful way to add a burst of spring flavor to any dish.

This versatile butter is perfect slathered on warm bread, used as a savory topping for steamed vegetables, or as a refreshing twist in sandwiches. Its light, creamy texture and vibrant flavor profile make it an excellent complement to both casual and sophisticated culinary creations.

Keep the butter refrigerated in an airtight container. It maintains its best quality for up to 3 days, ensuring you can enjoy its fresh taste over several days.

Hi, I'm Kimberly!

Hi, I'm Kimberly.

A hopeless romantic when it comes to food. Every recipe I share is a love letter to food itself. I’m so glad you’re here. Make yourself at home and stay a while.

Love,
Kimberly

Kimberly the Zett Signature

If you want to get to know me better,
click here!


Radish Cucumber Butter

LET’S MAKE A PIECE OF HAPPINESS

Print
.tasty-recipe-responsive-iframe-container-4c2bffe2 { position: relative; overflow: hidden; padding-top: 56.3%; } .tasty-recipe-responsive-iframe-container-4c2bffe2 iframe { position: absolute; top: 0; left: 0; width: 100%; height: 100%; border: 0; } clock clock iconcutlery cutlery iconflag flag iconfolder folder iconinstagram instagram iconpinterest pinterest iconfacebook facebook iconprint print iconsquares squares iconheart heart iconheart solid heart solid icon
Radish Cucumber Butter

Radish Cucumber Butter


  • Author: Kimberly
  • Total Time: 10 minutes
  • Yield: 4

Description

GOOD TO HAVE ON HAND

  • sharp knife
  • cutting board
  • deep plate
  • paper towels
  • grater


Ingredients

Units Scale
  • 4 radishes
  • 1/4 cucumber
  • 125 grams butter
  • chives
  • salt to taste

Instructions

  1. Thoroughly wash the radishes, cucumber, and chives. Set up a deep plate and finely grate the radishes into it. Squeeze out the excess moisture from the grated radishes using paper towels. Repeat the process with the cucumber.
  2. Finely slice the chives and set them aside.
  3. Dry the plate, then add the softened butter to it. Incorporate the grated radishes and cucumber, mixing well. Season with salt and sprinkle the sliced chives on top.

Notes

The calorie information may vary depending on the product used, country and region.

  • Cook Time: 10 min

CRAVING MORE?

Follow along here & don’t forget to subscribe to my substack!