Natural Easter Egg Dye

Natural Easter Egg Dye

Natural Easter Egg Dye

Natural Easter Egg Dye

March 27, 2024 by Kimberly

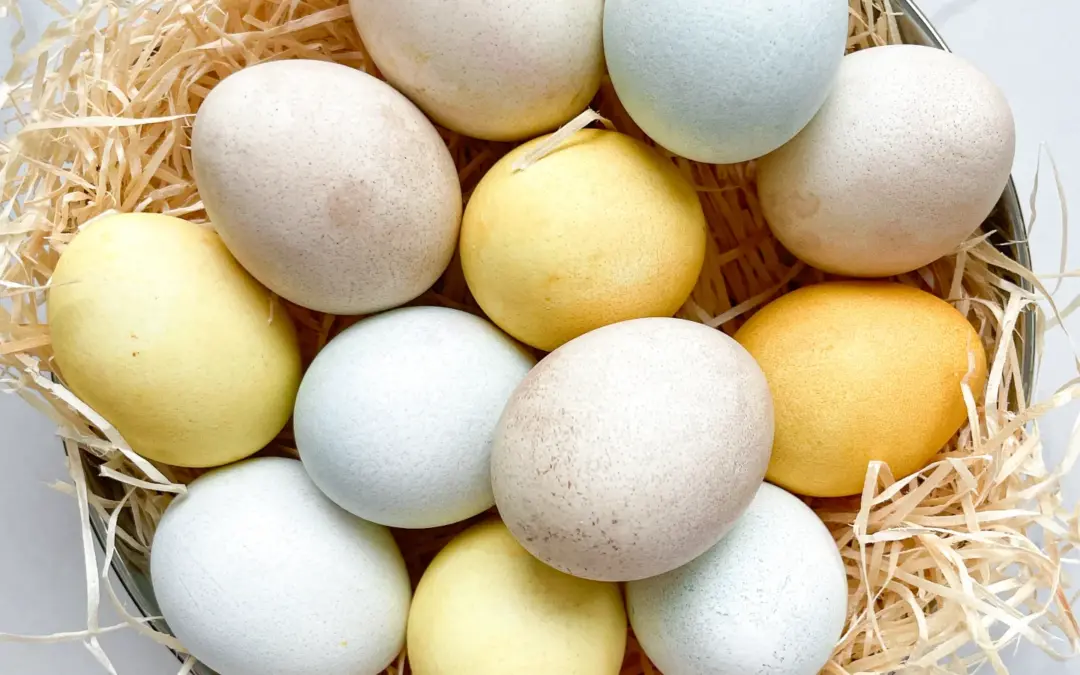
Embrace a colorful Easter tradition with natural dyes! Create stunning red, blue, and yellow eggs using just beetroot, red cabbage, and turmeric. A fun, family-friendly adventure awaits!

4 HRS

EASY

VEGETARIAN

INT.

85 PER EGG

EASTER

EGGS

SPRING

INTRODUCTION

ABOUT THE RECIPE

Embrace the magic of Easter with this natural Easter egg dye recipe! Using just red cabbage, beetroot, and turmeric, you can create a spectrum of vibrant, non-toxic colors. It’s a fun, eco-friendly activity that brings the beauty of nature into your Easter celebrations. Perfect for families looking to add a personal touch to their Easter eggs without the chemicals.

How to serve:
Display your naturally dyed Easter eggs as the centerpiece of your Easter table, nestled in a nest of fresh grass or delicately arranged in a rustic basket. They make for a stunning display that sparks conversations about the beauty of using natural ingredients. Incorporate them into your Easter egg hunt for a delightful surprise, or use them as personalized place settings, adding a touch of charm and warmth to your holiday gatherings.

How to store:
To keep your naturally dyed Easter eggs fresh, store them on your countertop or dining table for up to 5 days or in the refrigerator for up to 2 weeks

Hi, I'm Kimberly!

Hi, I'm Kimberly.

A passionate food lover who believes in the magic of homemade deliciousness that spreads love and warmth. Join me on this culinary adventure as I prepare wonderful dishes and let’s spread some happiness together!

Kimberly the Zett Signature

If you want to get to know me better, click here!


Natural Easter Egg Dye
„Let’s make a piece of happiness“

INGREDIENTS

FOR 24 EGGS

BROWN EGGS

  • 300g beetroot
  • 1 liter water (4 cups)

BLUE EGGS

  • 300g red cabagge
  • 1 liter water (4 cups)

YELLOW EGGS

  • 1.5 tsp turmeric
  • 1 liter water (4 cups)

OTHER INGREDIENTS

  • 24 eggs
  • 1 tbsp vinegar
  • 1 tbsp olive oil (optional)
Natural Easter Egg Dye
}

ACTIVE: 1 min

PASSIVE: –

PREPARATIONS

Recommended Equipment
  • sharp knife
  • cutting board
  • four medium-sized pots
  • three medium-sized bowls
  • sieve
  • kitchen paper
  • small bowl
  • disposable gloves to prevent the vegetables from staining your fingers
  • to prevent the eggs from cracking, you should take them out of the fridge early enough so that they reach room temperature and are not cold when placed into the boiling water.
}

ACTIVE: 20 min

PASSIVE: 3.5 hours

COOKING

1. Put the gloves on. Peel the beets and chop them into coarse pieces. Place the pieces in one of the pots. Set aside.

2. Chop the red cabbage into coarse pieces and place them in another pot. Set aside.

3. Add 1.5 teaspoons of turmeric powder to another pot.

4. Fill all three pots with 1 liter of water each and place them on the stove.

5. Bring the water to a simmer and prepare a broth in each pot. Let the beets simmer for 15 minutes, and the red cabbage and turmeric for 20 minutes. Then, remove the pots from the stove and strain the liquid from each pot into the medium-sized bowls. Let the liquid cool.

6. Meanwhile, hard boil the eggs. Fill a pot with water enough to cover all the eggs. Bring the water to a boil, add the eggs, and cook for 8 minutes. Shock the eggs with cold water and set aside. Once the eggs are no longer hot, rub them with vinegar to help them better absorb the color later. For this, put 1 tablespoon of vinegar into a small bowl, dip kitchen paper into the vinegar, and then rub the eggs all around. Set aside.

7. Once the eggs and the broths have cooled, you can now place the eggs in the broth. I left them in for 2 hours because I like the pastel tone best. For a more intense color, the eggs can be left in the broth longer.

8. When you are happy with the color, remove the eggs from the broth and dry them with kitchen paper. The eggs are now ready. If you prefer them to be shiny rather than matte, you can now rub them with a little cooking oil.

NOTE: The calorie information may vary depending on the product used, country and region.

Lemon Blue Cheese Dip

Lemon Blue Cheese Dip

Blue Cheese Dip

Lemon Blue Cheese Dip

March 23, 2024 by Kimberly

Indulge in the creamy, tangy bliss of Blue Cheese Dip! Perfect for game nights or elegant appetizers, this dip transforms any snack into a gourmet delight.

10 MINUTES

EASY

VEGETARIAN

US AMERICAN

224 PER PORTION

CREAMY / ZESTY

EVERYDAY

DIPS & SPREADS

ALL YEAR

INTRODUCTION

ABOUT THE RECIPE

Dive into the irresistible creaminess of Blue Cheese Dip, a must-have for any gathering or quiet night in. This dip combines the rich, tangy flavors of blue cheese with a smooth, spreadable texture that’s simply unmatched. Whether you’re hosting a party or just treating yourself, this dip is a game-changer.

How to serve:
Blue Cheese Dip is versatile, perfect alongside crispy veggies, as a bold wing accompaniment, or as a unique burger topping. Its robust flavor elevates simple crackers to gourmet status and transforms potato chips into a delicacy. Experiment with it as a spread for a zesty twist on sandwiches.

How to store:
Keep your Blue Cheese Dip fresh and flavorful by storing it in an airtight container in the fridge. It stays perfect for up to 3 days, making it a great make-ahead option for effortless entertaining or snacking.

Hi, I'm Kimberly!

Hi, I'm Kimberly.

A passionate food lover who believes in the magic of homemade deliciousness that spreads love and warmth. Join me on this culinary adventure as I prepare wonderful dishes and let’s spread some happiness together!

Kimberly the Zett Signature

If you want to get to know me better, click here!


Blue Cheese Dip
Blue Cheese Dip
Blue Cheese Dip
„Let’s make a piece of happiness“

INGREDIENTS

FOR 4 PORTIONS

DIP

  • 100g blue cheese – I used Roquefort (3.5 oz)
  • 35g mayonnaise (1/4 cup)
  • 100g creme fraiche (1/2 cup)
  • 1-2 tbsp buttermilk
  • 1 tbsp lemon juice
  • dill, salt & pepper to taste
Blue Cheese Dip
}

ACTIVE: –

PASSIVE: –

PREPARATIONS

Recommended Equipment
  • medium-sized bowl
  • none
}

ACTIVE: 10 min

PASSIVE: –

COOKING

1. In a medium-sized bowl, mix crème fraîche, mayonnaise, and buttermilk. Now add the blue cheese in small chunks and mix thoroughly until there are no big lumps of cheese visible.

2. Then season the mixture with lemon juice, salt, pepper, and fresh dill to taste.

3. For an especially intense flavor, the dip can be prepared in advance and should be stored in the fridge before serving.

NOTE: The calorie information may vary depending on the product used, country and region.

Cured Egg Yolk

Cured Egg Yolk

Cured Egg Yolk

CURED EGG YOLK

March 22, 2024 by Kimberly

Discover the unique, umami-rich world of cured egg yolks! Elevate your dishes with this simple, gourmet addition. A culinary secret for a luxurious, savory flavor boost!

80 MIN + 5 DAYS

EASY

VEGETARIAN

INT.

50 PER EGG YOLK

UMAMI

MICHELIN

TOPPING

ALL YEAR

INTRODUCTION

ABOUT THE RECIPE

Embark on a culinary adventure with cured egg yolks, an artisanal delight that transforms ordinary meals into gourmet experiences. This luxurious ingredient, known for its rich umami flavor and silky texture, is surprisingly simple to make at home. Perfect for food enthusiasts looking to add a touch of elegance and depth to their dishes, cured egg yolks will become your new secret weapon in the kitchen.

How to serve:
Grate cured egg yolks over pasta, salads, pizza or soups to add a burst of savory flavor and a touch of sophistication. Use them to enhance the taste of roasted vegetables or to elevate your morning avocado toast. Their rich, salty taste complements a wide range of dishes, making them a versatile addition to your culinary repertoire.

How to store:
Keep your cured egg yolks in an airtight container in the refrigerator. They can last for up to a month, retaining their flavor and texture. Ensure they are fully dried and cured before storage to maintain their quality.

Hi, I'm Kimberly!

Hi, I'm Kimberly.

A passionate food lover who believes in the magic of homemade deliciousness that spreads love and warmth. Join me on this culinary adventure as I prepare wonderful dishes and let’s spread some happiness together!

Kimberly the Zett Signature

If you want to get to know me better, click here!


Cured Egg Yolk
Cured Egg Yolk
Cured Egg Yolk
„Let’s make a piece of happiness“

INGREDIENTS

FOR 6 EGG YOLKS

EGGS

  • 6 fresh eggs
  • 500g to 1kg fine-grained salt (1-2 lbs. depending on the size of your container)
Cured Egg Yolk
}

ACTIVE: 5 min

PASSIVE: –

PREPARATIONS

Recommended Equipment
  • shallow deep dish
  • oven
  • Distribute the half of your fine-grained salt evenly in the shallow deep container and form six wells for the egg yolks. You should not be able to see the bottom. The wells should be completely formed out of salt, ensuring that the egg yolks are completely surrounded by salt.
}

ACTIVE: 15 min

PASSIVE: 60 min + 5 days

COOKING

1. Separate one egg at a time. Carefully let the yolks slide into the wells in the salt. Do not discard the egg whites – they can be used for making meringue or egg white omelet, for example.

2. Once you have placed all the egg yolks into the wells, cover them with the other half of fine-grained salt and put them in the refrigerator for 5 days.

3. After 5 days, take your container with the egg yolks out of the refrigerator and carefully remove the yolks from the salt. The yolk will now be very sticky and feel a bit like firmer hair gel. Rinse off the remaining salt from each yolk under cold water. Place the egg yolks on a baking rack lined with parchment paper and dry them in the oven at approximately 80°C (175°F) for one hour. Occasionally open the oven door for a few seconds to let all the moisture escape.

4. Once the egg yolks are fully dried, remove them from the oven and let them cool completely.

5. The egg yolks are now firm and ready to use. The cured egg yolks can be stored in a sealable glass jar in the refrigerator for 3-4 weeks. And I like to grate a bit of them over every savory dish 🙂

NOTE: The calorie information may vary depending on the product used, country and region.

Green Vegetable Lasagna

Green Vegetable Lasagna

Green Vegetable Lasagna

Green Vegetable Lasagna

March 19, 2024 by Kimberly

Savor the burst of freshness with Green Vegetable Lasagna! Packed with everything green, it’s a delicious twist on the classic comfort food.

110 MINUTES

EASY

VEGETARIAN

INT.

691 PER PORTION

COMFORT FOODEVERYDAY

DINNER

ALL YEAR

INTRODUCTION

ABOUT THE RECIPE

Dive into the vibrant layers of my green veggie lasagna, a wholesome twist on the traditional dish that’s as nourishing as it is delicious. This lasagna is a true celebration of green veggies, featuring broccoli, spinach, olives, basil, and leek, all coming together in perfect harmony for a meal that’s sure to impress.

How to serve:
Perfect for any occasion, from weeknight dinners to special gatherings, serve this lasagna hot, with a side of garlic bread or a crisp salad. Its rich, verdant flavors can be beautifully complemented by a light, zesty white wine, making every bite a delightful experience.

How to store:
Keep leftovers fresh by storing them in an airtight container in the refrigerator, where they will remain perfect for up to three days. For longer storage, freeze individual portions for a quick and easy reheatable meal that retains all the flavors and textures of the freshly baked dish.

Hi, I'm Kimberly!

Hi, I'm Kimberly.

A passionate food lover who believes in the magic of homemade deliciousness that spreads love and warmth. Join me on this culinary adventure as I prepare wonderful dishes and let’s spread some happiness together!

Kimberly the Zett Signature

If you want to get to know me better, click here!


Green Vegetable Lasagna
„Let’s make a piece of happiness“

INGREDIENTS

FOR 6 PORTIONS

LASAGNA

  • 1 liter Béchamel sauce
    (but use 70g butter (2.5 oz), 70g flour (2.5 oz) & 1 liter (4 cups) milk)
  • 20 lasagna sheets
  • 100g parmesan, grated (1 cup)
  • 50g cheddar cheese, grated (1/2 cup)

VEGETABLES

  • 1 brokkoli (230g / 8 oz)
  • 200g baby spinach (7 oz)
  • 2 leeks (250g / 8 oz)
  • 180g green olives (6 oz)
  • 200ml vegetable stock (1 cup)
  • 1 bunch basil
  • 2 shallots
  • 2 garlic cloves
  • 2 tbsp olive oil
  • juice of 1 lemon
  • salt & pepper to taste
Green Vegetable Lasagna
}

ACTIVE: 45 min.

PASSIVE: –

PREPARATIONS

Recommended Equipment
  • sharp knife
  • cutting board
  • medium-sized pot
  • baking dish (my used measurements were 20x26cm (8×10 inch))
  • aluminum foil
  • Peel shallots, halve them, and slice thinly.
  • Peel garlic cloves and either press or finely chop them.
  • Halve the leek, wash, and cut into fine strips.
  • Cut the broccoli florets, wash, and if necessary, chop into bite-sized pieces.
  • Slice the olives.
  • Cut the basil into fine strips.
  • Grate the Parmesan and Cheddar cheese.
  • Prepare the béchamel sauce. I used 70g (2.5 oz) butter, 70g (2.5 oz) flour, and 1 liter (4 cups) milk, since lasagna needs a more liquidy sauce to ensure the pasta sheets soften in the oven.
}

ACTIVE: 20 min

PASSIVE: 45 min

COOKING

1. Heat 2 tablespoons of olive oil in a medium-sized pot over medium heat. Cook the shallots until soft. Then add the leek and garlic. Mix well and cook until soft for a few minutes.

2. Add broccoli, olives, and basil, then pour in the vegetable broth. Cover and let it cook for 5-10 minutes, so the broccoli becomes tender but still has a bit of a bite.

3. Remove the lid and add the spinach and lemon juice. Stir everything once and let the spinach wilt slightly. Season with salt and pepper.

4. Preheat the oven to 200°C (400°F).

5. Now it’s time to layer the lasagna. Start with two large ladles of sauce at the bottom of your baking dish. Spread the sauce evenly. Then add a layer of pasta sheets. Next, spread a portion of the vegetables evenly. Follow with a layer of finely grated Parmesan. Continue in the following order: pasta sheets, béchamel, vegetables, Parmesan until all the vegetables (including the liquid in the pot) are used up. Finish with a final layer of pasta sheets and spread the remaining béchamel sauce over them completely. Finally, sprinkle 50g of grated Cheddar on top.

Here’s the entire sequence more efficiently: Sauce, pasta sheets, vegetables, Parmesan, pasta sheets, sauce, vegetables, Parmesan, pasta sheets, sauce, vegetables, Parmesan, pasta sheets, sauce, Cheddar.

6. Cover the dish with a layer of aluminum foil and bake in the oven for 25 minutes. After 25 minutes, remove the foil and bake for another 20 minutes, or until the cheese is crispy and golden brown.

7. Let the lasagna rest for 10 minutes, then enjoy.

NOTE: The calorie information may vary depending on the product used, country and region.

Potato Soup with Bacon & Sausage

Potato Soup with Bacon & Sausage

Potato Soup with Bacon & Sausage

Potato Soup with Bacon & Sausage

March 16, 2024 by Kimberly

Indulge in the ultimate comfort food: Potato Soup with Bacon & Sausage! This hearty, flavorful dish is perfect for cozy nights and brings everyone to the table.

55 MINUTES

EASY

OMNIVORE

GERMAN

560 PER PORTION

COMFORT FOOD

EVERYDAY

DINNER

AUTUMN / WINTER

INTRODUCTION

ABOUT THE RECIPE

Get ready to cozy up with this delicious Potato Soup with Bacon & Sausage! Perfect for chilly evenings, this hearty soup brings the ultimate comfort food to your table. Easy to make and bursting with flavor, it’s sure to become a family favorite. Dive into a bowl of warmth and enjoy the rich, savory taste of home-cooked goodness.

How to serve:
Serve this mouthwatering soup hot, topped with shredded cheese, a dollop of sour cream, and extra bacon bits for an added crunch. It pairs wonderfully with a slice of crusty bread or a warm dinner roll to soak up all the flavorful broth. Perfect for a satisfying family dinner or a comforting weekend meal, this Potato Soup with Bacon & Sausage will fill your home with joy and your belly with warmth.

How to store:
Leftovers? No problem! Store this savory soup in an airtight container in the refrigerator for up to three days. Reheat gently on the stove or in the microwave, stirring occasionally, until hot throughout.

Hi, I'm Kimberly!

Hi, I'm Kimberly.

A passionate food lover who believes in the magic of homemade deliciousness that spreads love and warmth. Join me on this culinary adventure as I prepare wonderful dishes and let’s spread some happiness together!

Kimberly the Zett Signature

If you want to get to know me better, click here!


Potato Soup with Bacon & Sausage
„Let’s make a piece of happiness“

INGREDIENTS

FOR 3 PORTIONS

SOUP

  • 1kg potatoes (2 lbs)
  • 125g bacon (4.5 oz)
  • 300g german wiener sausage (10.5 oz)
  • 4 carrots
  • 1 leek
  • 1 big onion
  • 4 garlic cloves
  • 1.2 l vegetable broth (2.5 pt)
  • 100ml heavy cream (3.5 fl oz)
  • 1 tbsp butter
  • 1/2 tsp marjoram
  • 1 bay leaf
  • pinch of freshly grated nutmeg
  • salt & pepper to taste
  • parsley for topping
Potato Soup with Bacon & Sausage
}

ACTIVE: 15 min

PASSIVE: –

PREPARATIONS

Recommended Equipment
  • sharp knife
  • cutting board
  • big pot with lid
  • Peel the potatoes and carrots and chop them into bite-sized pieces. Set aside.
  • Wash the leek and cut it into thin strips.
  • Peel the onion and garlic cloves and dice them. Set aside.
  • Finely chop the parsley.
  • Slice the sausages. Set aside.
  • Dice the bacon.
}

ACTIVE: 10 min

PASSIVE: 30 min

COOKING

1. Put the bacon in the cold pot and heat it over medium heat. This way, the bacon fat renders out nicely. Then remove the bacon and set it aside for later and leave the fat in the pot. 

2. Now add the onions, garlic and leeks to the pot and sauté for 2-3 minutes, then add the potato and carrot pieces. Sauté everything for about 5 minutes.

3. Then add the vegetable broth and simmer with the lid on for 15 minutes. Now, add marjoram, bay leaf and nutmeg, season with salt and pepper, and simmer for another 15 minutes with the lid on.

4. Now add the bacon, sausage slices, and cream to the soup and simmer for another 5 minutes without the lid, until the sausages are heated through. Finally, season with salt and pepper.

5. Serve the soup in deep plates and garnish with a bit of freshly chopped parsley and optional baguette.

NOTE: The calorie information may vary depending on the product used, country and region.

Chocolate Chip Cookies

Chocolate Chip Cookies

Chocolate Chip Cookies

Chocolate Chip Cookies

March 13, 2024 by Kimberly

Look no further for the ultimate chocolate chip cookies. Dive into this rich, double chocolate chip cookie recipe, featuring a generous amount of dough and massive chocolate chunks!

2 HRS &
50 MINUTES

EASY

VEGETARIAN

US AMERICAN

434 PER COOKIE

CRUNCHY / GOOEY / SWEET

EVERYDAY

DESSERT / SNACK

ALL YEAR

INTRODUCTION

ABOUT THE RECIPE

Get ready to fill your kitchen with the mouthwatering aroma of freshly baked Chocolate Chip Cookies! This recipe combines the perfect blend of sweet, gooey, and chocolaty in every bite. Ideal for any occasion, from family gatherings to a personal treat, these homemade cookies promise to be your new favorite. Let’s dive into the simple steps to create these delightful treats that everyone loves!

How to serve:
Serve these delicious Chocolate Chip Cookies fresh out of the oven for the ultimate gooey experience, or let them cool to achieve a delightful crunch. Pair with a glass of cold milk or your favorite coffee for a classic combo. They’re perfect for parties, as a sweet snack, or as a thoughtful homemade gift. Remember, warm cookies and cold milk are a match made in heaven for any cookie lover!

How to store:
Store your Chocolate Chip Cookies in an airtight container to keep them fresh and chewy. They’ll last for up to a week at room temperature or can be frozen for longer enjoyment. Perfect for having a sweet treat on hand anytime!

Hi, I'm Kimberly!

Hi, I'm Kimberly.

A passionate food lover who believes in the magic of homemade deliciousness that spreads love and warmth. Join me on this culinary adventure as I prepare wonderful dishes and let’s spread some happiness together!

Kimberly the Zett Signature

If you want to get to know me better, click here!


Chocolate Chip Cookies
„Let’s make a piece of happiness“

INGREDIENTS

FOR 9 COOKIES

COOKIES

  • 200g all-purpose flour (1.5 cups)
  • 35g cornstarch (1/4 cup)
  • 140g butter (2/3 cup)
  • 150g brown sugar (2/3 cup)
  • 50g white sugar (1/4 cup)
  • 100g semi-sweet chocolate (1/2 cup)
  • 100g white chocolate (1/2 cup)
  • 1 egg
  • 1 egg yolk
  • 1 tsp baking powder
  • 3/4 tsp salt
Chocolate Chip Cookies
}

ACTIVE: 5 min

PASSIVE: –

PREPARATIONS

Recommended Equipment
  • sharp knife
  • cutting board
  • small bowl
  • small pot (or microwave)
  • two medium-sized bowls
  • whisk
  • spatula
  • Chop the chocolate into big chunks.
  • Melt the butter in a pot or in the microwave.
}

ACTIVE: 20 min

PASSIVE: 2 hrs + 25 min

COOKING

1. In a medium-sized bowl, mix the flour, starch, and salt. Set aside.

2. In another medium-sized bowl, mix the brown and white sugar. Add the melted butter with a whisk and beat the mixture until it becomes kind of creamy.

3. Now add one whole egg and one egg yolk and beat until the mixture becomes thicker.

4. Next, add the dry ingredients from the other bowl and stir a little, then add the chocolate and mix everything until no more flour is visible and stop stirring to avoid overmixing the dough.

5. Form the dough into 9 equal-sized balls and place them in a container that fits in the fridge. Place the cookie balls in the refrigerator for at least 2 hours – if you want to prepare the dough in advance, you can leave it in the fridge for up to 48 hours.

6. Preheat the oven to 220°C (425°F). Once the oven is hot, place the cookies on a baking sheet lined with parchment paper and bake for 8-10 minutes.

7. Remove the tray with the cookies from the oven and let them cool for 15 minutes. I know it’s hard, but it’s worth the wait 😉

NOTE: The calorie information may vary depending on the product used, country and region.