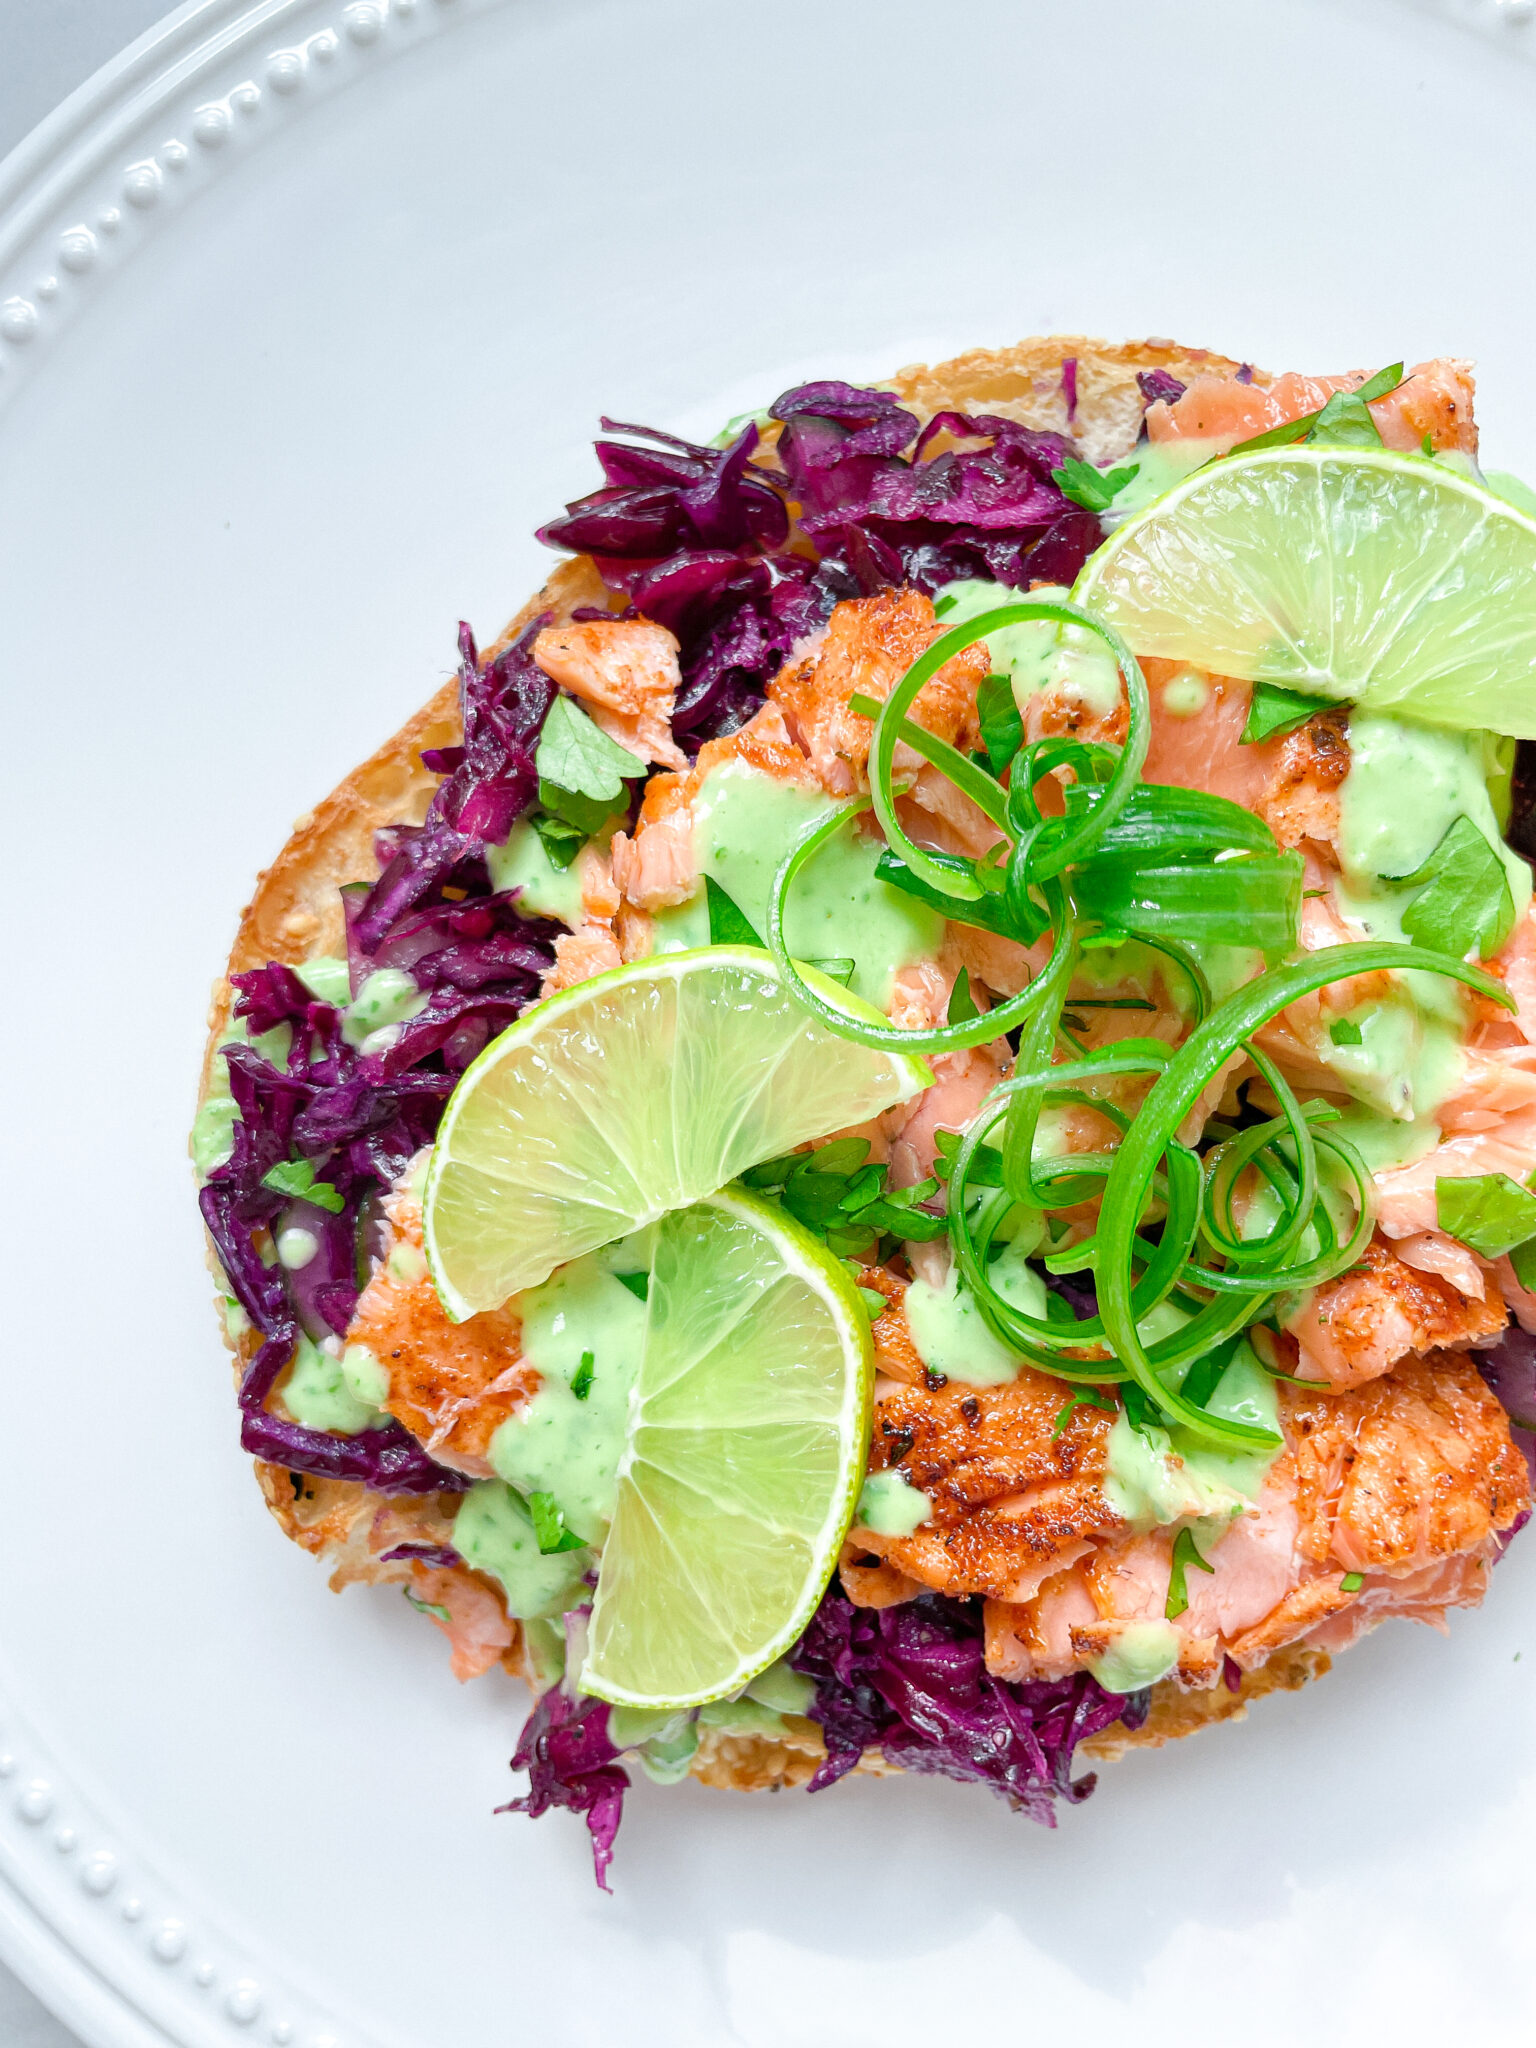
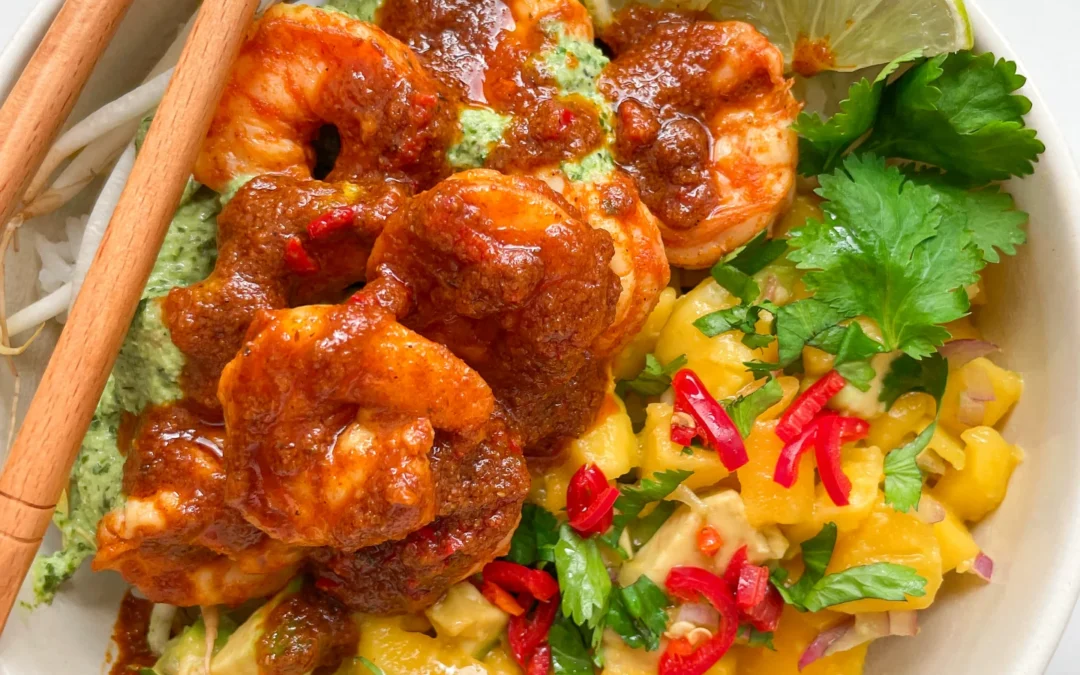
Spicy Rice Shrimp Bowl & Mango Avocado Salsa

Spicy Rice Shrimp Bowl & Mango Avocado Salsa

Spicy Rice Shrimp Bowl & Mango Avocado Salsa

Spicy Rice Shrimp Bowl & Mango Avocado Salsa

July 23, 2024 by Kimberly

Turn up the heat with this zesty rice shrimp bowl, packed with jalapeños and chili, and cooled by a fresh mango avocado salsa. It’s a fiery favorite with a tropical twist!

40 MINUTES

EASY

OMNIVORE

ASIAN

676 PER PORTION

SPICY
REFRESHING

EVERYDAY

LUNCH
DINNER

SUMMER

INTRODUCTION

ABOUT THE RECIPE

Ignite your palate with this Spicy Rice Shrimp Bowl, complemented by a refreshing Mango Avocado Salsa! This dish is a thrilling blend of hot, spicy flavors and cool, sweet contrasts, perfect for those who love a bit of adventure in their meals.

How to serve
Serve this fiery shrimp bowl fresh and hot, letting the cool mango avocado salsa contrast beautifully with the heat from the shrimp. It’s fantastic for a quick dinner or a vibrant, impressive dish at your next gathering. Add a dollop of cilantro-yogurt sauce for a creamy finish and add some sprouts for added crunch!

How to store
Best enjoyed fresh, but if you have leftovers, store them in separate airtight containers in the refrigerator. The rice and shrimp keep well for up to two days, while the salsa is best consumed within a day to maintain its freshness.

Hi, I'm Kimberly!

Hi, I'm Kimberly.

A passionate food lover who believes in the magic of homemade deliciousness that spreads love and warmth. Join me on this culinary adventure as I prepare wonderful dishes and let’s spread some happiness together!

Kimberly the Zett Signature

If you want to get to know me better, click here!


Spicy Rice Shrimp Bowl & Mango Avocado Salsa
„Let’s make a piece of happiness“
Print
clock clock iconcutlery cutlery iconflag flag iconfolder folder iconinstagram instagram iconpinterest pinterest iconfacebook facebook iconprint print iconsquares squares iconheart heart iconheart solid heart solid icon
Spicy Rice Shrimp Bowl & Mango Avocado Salsa

Spicy Rice Shrimp Bowl & Mango Avocado Salsa


5 Stars 4 Stars 3 Stars 2 Stars 1 Star

No reviews

  • Author: Kimberly
  • Total Time: 40 min
  • Yield: 2-3 1x

Description

Recommended Equipment

  • small bowl
  • measuring spoons
  • medium pot
  • tall container
  • immersion blender
  • sharp knife
  • cutting board
  • medium frying pan

Ingredients

Units Scale
  • 300 grams shrimps, raw peeled deveined
  • 2 small hands mung bean sprouts
  • 160 grams basmati rice

MARINADE

  • juice of half a lemon
  • 2 tbsp jalapeño oil
  • 1/2 fresh chili
  • 1 tsp cumin
  • 1 tsp salt
  • 1/2 tsp smoked paprika
  • 1/2 tsp garlic powder
  • 1/2 tsp cajun seasoning
  • 1/4 tsp onion powder
  • 1/4 tsp white pepper
  • 1/8 tsp cayenne pepper

CILANTRO YOGURT SAUCE

  • 3 tbsp yogurt
  • 1 tbsp jalapeño pulp from the production process of the jalapeño oil
  • juice of half a lemon
  • 1 garlic clove
  • 5 grams fresh cilantro
  • 5 grams fresh parsley
  • pinch of salt
  • pinch of pepper

MANGO AVOCADO SALAD

  • 1/2 ripe mango
  • 1/2 ripe avocado
  • 1 small red onion
  • juice of half a lemon
  • pinch of salt

TOPPINGS

  • fresh cilantro
  • lime slices
  • fresh chili

Instructions

PREPARATIONS
This dish is made with my Jalapeño Oil. If you want to replace it, you can use olive oil instead and for the pulp in the cilantro-yogurt sauce, use 1-2 fresh jalapeños + 1 tablespoon of olive oil.

INSTRUCTIONS

  1. In a small bowl, add cumin, salt, smoked paprika, garlic powder, onion powder, pepper, cayenne, and Cajun seasoning. Finely chop half of a fresh chili and add it to the spices. Finally, add 2 tablespoons of Jalapeño Oil and the juice of half a lime, and mix everything into a creamy paste. Wash the shrimp, pat dry, and place in a bowl. Add the creamy marinade and mix well to evenly coat all the shrimp. Set aside at room temperature.
  2. Wash and let your rice cook according to the package instructions.
  3. Meanwhile, in a tall container, blend yogurt, the pulp from making the Jalapeño Oil, 1-2 peeled garlic cloves, cilantro, parsley, salt, and pepper with an immersion blender until smooth. Set aside.
  4. Next, peel the mango, avocado, and red onion. Chop everything into small pieces and put in a medium bowl. Mix with the juice of half a lime and a little salt, and set aside.
  5. Wash and pat dry the mung bean sprouts and set aside.
  6. Heat 2 tablespoons of Jalapeño Oil in a frying pan and add the shrimp along with the remaining marinade. Briefly fry the shrimp on both sides and let the sauce reduce at the same time.
  7. In a deep bowl, distribute the rice, place mung bean sprouts on one side and the mango-avocado salad on the other. Add 1-2 tablespoons of the green cilantro-yogurt sauce to the sprouts, then lay the shrimp on top and drizzle with the sauce from the pan. You can also top it off with fresh lime juice, fresh cilantro, and fresh chili.
  • Cook Time: 40 min

Cannelloni

Cannelloni

Cannelloni

Cannelloni

June 27, 2024 by Kimberly

Imagine biting into perfectly baked Cannelloni, stuffed with rich, savory beef filling, all wrapped in a golden, crispy bechamel parmesan top. It’s comfort food heaven in every bite!

2 HOURS
55 MINUTES

INTERMEDIATE

OMNIVORE

ITALIAN

872 PER PORTION

COMFORT FOOD

CLASSICS

DINNER

ALL YEAR

INTRODUCTION

ABOUT THE RECIPE

Cannelloni, the classic Italian comfort dish, is a true crowd-pleaser with its hearty fillings and rich, creamy sauce. Perfect for gatherings, it promises to be the star of your dining table.

How to serve
Serve your Cannelloni fresh out of the oven, topped with parmesan for that irresistible cheese pull. Accompany it with a simple green salad and a glass of delicious red wine for an authentic Italian dining experience. Whether it’s a cozy family dinner or a more festive occasion, cannelloni adapts to both, pleasing everyone who takes a bite.

How to store
Leftover Cannelloni can be refrigerated in an airtight container for up to three days, making it a fantastic make-ahead dish. Simply reheat in the oven until thoroughly warm and enjoy!

Hi, I'm Kimberly!

Hi, I'm Kimberly.

A passionate food lover who believes in the magic of homemade deliciousness that spreads love and warmth. Join me on this culinary adventure as I prepare wonderful dishes and let’s spread some happiness together!

Kimberly the Zett Signature

If you want to get to know me better, click here!


Cannelloni
Cannelloni
Cannelloni
„Let’s make a piece of happiness“
Print
clock clock iconcutlery cutlery iconflag flag iconfolder folder iconinstagram instagram iconpinterest pinterest iconfacebook facebook iconprint print iconsquares squares iconheart heart iconheart solid heart solid icon
Cannelloni

Cannelloni


  • Author: Kimberly
  • Total Time: 2 hrs 55 min
  • Yield: 6 1x

Description

Recommended Equipment

  • sharp knife
  • cutting board
  • vegetable peeler
  • large pot
  • baking dish
  • medium-sized pot
  • whisk
  • medium-sized bowl
  • piping bag

Ingredients

Units Scale
  • 24 cannelloni roles
  • 40 grams parmesan
  • 125 grams mozzarella
  • fresh basil

BEEF SAUCE

  • 500 grams minced beef
  • 500 grams minced pork
  • 700 milliliters beef stock
  • 1 tbsp butter
  • 1 tbsp clarified butter
  • 1 white onion
  • 1/2 celery stick
  • 1 carrot
  • 4 garlic cloves
  • 100 milliliters dry white wine
  • 800 grams canned tomatoes
  • 2 tbsp tomato paste
  • 1/2 tsp oregano
  • 1/4 tsp cinnamon
  • 1/4 tsp chili flakes
  • 1 tsp salt
  • 1/4 tsp black pepper

BECHAMEL SAUCE

  • 500 milliliters full-fat cow milk
  • 50 grams butter
  • 50 grams all-purpose flour
  • 1/8 tsp white pepper
  • 3/8 tsp salt
  • freshly grated nutmeg to taste

Instructions

  1. Peel the carrots, onion, and garlic, and chop them along with the celery into very small pieces. Set aside.
  2. Melt the clarified butter in a large pot and thoroughly brown the minced meat until a nice crust forms on the bottom. Then remove the meat from the pot and set it aside in a bowl.
  3. Now add the carrots, onion, garlic, and celery to the pot with 1 tbsp butter and sauté for about 5 minutes until soft. Deglaze with white wine and scrape up the crusty from the bottom. Return the ground meat to the pot along with tomato paste and a pinch of salt. Sauté for 1-2 minutes.
  4. Add beef broth and canned tomatoes and simmer over medium heat for about 1 hour without a lid. The consistency should be creamy-thick, neither too liquid nor too solid, just firm enough so that it doesn’t run out of the cannelloni when filling them. Now add oregano, salt, pepper, chili, and cinnamon, and season well. Set the filling aside to cool slightly.
  5. Meanwhile, prepare the béchamel sauce. The recipe can be found here: Béchamel Sauce. Once prepared, set it aside. Preheat the oven to 200°C / 392°F.
  6. Set up your cannelloni filling station. You’ll need the meat filling in the pot, a piping bag, a baking dish, and a spoon. Place about 4 tablespoons of the meat filling at the bottom of the baking dish. Fill your piping bag with a few tablespoons of the filling and pipe it into the cannelloni. I recommend not overfilling the piping bag to maintain control. Fill all the cannelloni one by one and arrange them in a single layer over the sauce in your baking dish. Spread the remaining sauce over the cannelloni.
  7. Next, pour the béchamel over the cannelloni, ensuring all gaps are filled with sauce. Top with grated mozzarella and Parmesan.
  8. Cover the baking dish with aluminum foil and bake for 30 minutes. After 30 minutes, remove the foil, increase the oven temperature to 220°C / 428°F, and bake for an additional 15 minutes until the cheese is crispy. Optionally, you can slice fresh basil into fine strips and sprinkle over the cannelloni.

Notes

The calorie information may vary depending on the product used, country and region.

  • Passive Time: 1 hour 45 min
  • Cook Time: 60 min

Salmon Flatbread with Slaw & Cilantro Yogurt Sauce

Salmon Flatbread with Slaw & Cilantro Yogurt Sauce

Salmon Flatbread with Slaw & Cilantro Yogurt Sauce

Salmon Flatbread with Slaw & Cilantro Yogurt Sauce

June 17, 2024 by Kimberly

Whip up this salmon flatbread for a delightful twist on dinner! Topped with crunchy slaw and a zesty cilantro yogurt sauce, it’s a fresh, flavorful favorite.

30 MINUTES

EASY

OMNIVORE

INT.

699 PER PORTION

COMFORT FOOD

EVERDAY

LUNCH
DINNER

SUMMER

INTRODUCTION

ABOUT THE RECIPE

Step up your meal game with this savory salmon flatbread, a perfect blend of nutritious and delicious. It’s simple enough for a weeknight yet impressive enough for guests. The combination of tender salmon, crispy slaw, and creamy cilantro yogurt sauce on a soft flatbread base makes every bite a delightful experience, ensuring this dish will become a new staple in your culinary repertoire.

How to serve
Serve this salmon flatbread freshly made to enjoy its full range of flavors. It’s perfect as a light, standalone dinner or can be paired with a side salad for a more filling meal. The zesty cilantro yogurt sauce brings a cool contrast to the warm, crispy salmon, making it a hit for any season. For an added twist, pair it with a chilled glass of white wine or sparkling water.

How to store
Best enjoyed fresh, if you must store it, keep the flatbread, salmon, and slaw separately in the fridge. The cilantro yogurt sauce can be refrigerated in an airtight container for up to three days.

Hi, I'm Kimberly!

Hi, I'm Kimberly.

A passionate food lover who believes in the magic of homemade deliciousness that spreads love and warmth. Join me on this culinary adventure as I prepare wonderful dishes and let’s spread some happiness together!

Kimberly the Zett Signature

If you want to get to know me better, click here!


Salmon Flatbread with Slaw & Cilantro Yogurt Sauce
„Let’s make a piece of happiness“
Print
clock clock iconcutlery cutlery iconflag flag iconfolder folder iconinstagram instagram iconpinterest pinterest iconfacebook facebook iconprint print iconsquares squares iconheart heart iconheart solid heart solid icon
Salmon Flatbread with Slaw & Cilantro Yogurt Sauce

Salmon Flatbread with Slaw & Cilantro Yogurt Sauce


  • Author: Kimberly
  • Total Time: 30 min
  • Yield: 4 1x

Description

Recommended Equipment

  • small bowl
  • grater
  • medium-sized bowl
  • sharp knife
  • cutting board
  • tall container
  • immersion blender (or food processor)
  • large skillet
  • oven (or toaster)

Ingredients

Units Scale
  • 500 grams salmon filet
  • 4 flatbreads

MARINADE

  • 1 tbsp olive oil
  • 1/4 tsp smoked paprika
  • 1/4 tsp salt
  • 1/4 tsp garlic powder
  • 1/4 tsp oregano
  • 1/8 tsp grounded pepper
  • 1/8 tsp chili flakes

SLAW

  • 200 grams red cabbage
  • 1/2 cucumber
  • 1 tbsp lemon juice
  • 1 tbsp olive oil
  • salt & pepper to taste

CILANTRO YOGURT SAUCE

  • 20 grams cilantro
  • 2 tbsp lime juice
  • 2 tbsp olive oil
  • 100 grams yogurt
  • 2 tbsp cold water
  • 1/2 avocado
  • 2 garlic cloves
  • salt & pepper to taste

Instructions

  1. In a small bowl, mix 1 tablespoon of olive oil with 1/4 teaspoon each of smoked paprika, salt, garlic powder, dried oregano, and 1/8 teaspoon each of ground pepper and chili powder into a paste. Spread this paste over the salmon fillet and rub it in well. Refrigerate the salmon until further use.
  2. For the coleslaw, finely shred the red cabbage and place it in a medium-sized bowl. Quarter the cucumber, slice it, and add to the cabbage. Add olive oil, lime juice, salt, and pepper to the bowl, mix well, and set aside.
  3. For the cilantro yogurt sauce, in a tall container, blend cilantro (leave some leaves for garnish), lime juice, olive oil, 2 tablespoons of water, yogurt, avocado, and peeled garlic cloves into a cream using an immersion blender. Add salt and pepper to taste. Set aside.
  4. In a large skillet, sear the salmon on both sides for 2-4 minutes, depending on thickness, until slightly translucent inside. Remove the salmon from the skillet and place it on a plate to rest for a bit.
  5. Meanwhile, warm the flatbreads in the oven or on the toaster for a few minutes.
  6. Spread 1-2 tablespoons of sauce on the warm bread, add the coleslaw, then place a salmon fillet on top and slightly shred it. Garnish with some sauce, fresh cilantro leaves, green onions, and lime slices.

Notes

The calorie information may vary depending on the product used, country and region.

  • Cook Time: 30 min

Lemon Yogurt Chicken Thighs

Lemon Yogurt Chicken Thighs

Lemon Yogurt Chicken Thighs

Lemon Yogurt Chicken Thighs

June 13, 2024 by Kimberly

Get ready to savor Lemon Yogurt Chicken Thighs: tangy, tender, and irresistibly juicy! Perfect for spicing up weeknights or wowing guests at your next dinner.

1 HOUR
55 MINUTES

EASY

OMNIVORE

INT.

398 PER PORTION

COMFORT FOOD

EVERDAY
DINNER PARTY

DINNER

SUMMER

INTRODUCTION

ABOUT THE RECIPE

Bring a zesty flair to your dinner table with these lemon yogurt marinated chicken thighs. They’re unbelievably tender and infused with the perfect balance of tangy and creamy flavors.

How to serve
These chicken thighs are best served hot with sides of grilled vegetables and a cool cucumber salad to complement the tangy marinade. They’re perfect for a cozy family dinner. Add a squeeze of fresh lemon juice right before serving to enhance their citrusy punch.

How to store
Keep leftover chicken in an airtight container in the refrigerator. They’ll stay delicious for up to two days, making them a fantastic option for next-day lunches or quick protein additions to salads or wraps.

Hi, I'm Kimberly!

Hi, I'm Kimberly.

A passionate food lover who believes in the magic of homemade deliciousness that spreads love and warmth. Join me on this culinary adventure as I prepare wonderful dishes and let’s spread some happiness together!

Kimberly the Zett Signature

If you want to get to know me better, click here!


Lemon Yogurt Chicken Thighs
„Let’s make a piece of happiness“
Print
clock clock iconcutlery cutlery iconflag flag iconfolder folder iconinstagram instagram iconpinterest pinterest iconfacebook facebook iconprint print iconsquares squares iconheart heart iconheart solid heart solid icon
Lemon Yogurt Chicken Thighs

Lemon Yogurt Chicken Thighs


  • Author: Kimberly
  • Total Time: 1 hr 55 min
  • Yield: 4 1x

Description

RECOMMENDED EQUIPMENT

  • medium-sized bowl
  • oven-safe pan

Ingredients

Units Scale
  • 4 boneless chicken thighs
  • 1/4 cup greek yogurt
  • juice of 1 lemon
  • 1/2 tbsp dried oregano
  • 1/4 tsp salt
  • 1/4 tsp pepper
  • 1/81/4 tsp chili flakes
  • 2 tbsp olive oil
  • 1 tsp fresh thyme
  • 2 tsp butter

Instructions

PREPARATIONS

  • In a medium-sized bowl, mix the following ingredients into a marinade: yogurt, lemon juice, peeled and pressed garlic cloves, chili flakes, oregano, salt, and pepper.
  • Place the chicken thighs in the bowl and rub them thoroughly with the marinade. Let the thighs marinate in the refrigerator for at least 1 hour up to overnight.

INSTRUCTIONS

  1. Preheat the oven to 200°C / 392°F.
  2. Remove the chicken thighs from the refrigerator and place them skin-side up in an ovenproof pan. Slice a lemon and arrange the slices between the chicken thighs in the pan. Place about 1/2 teaspoon of butter on each thigh and drizzle 1-2 tablespoons of olive oil over everything.
  3. Bake the pan with the thighs in the oven for about 45 minutes uncovered. Depending on the size of the thighs, it might take a bit longer. Turn on the broiler 5-10 minutes before the end of cooking to get the chicken really crispy. A delicious sauce will naturally form in the pan while baking.
  4. Serve the hot thighs and the sauce immediately. They go best with salad, potatoes, or rice. Enjoy your piece of bliss!

Notes

The calorie information may vary depending on the product used, country and region.

  • Prep Time: 5 min
  • Passive Time: 1 hr 45 min
  • Cook Time: 5 min

Sabich Sandwich

Sabich Sandwich

Sabich Sandwich

Sabich Sandwich

June 6, 2024 by Kimberly

Dive into the ultimate Sabich sandwich: crispy eggplant, fresh tomato cucumber salad, creamy tahini, spicy zhough, tangy mango sauce and crunchy chickpeas. Pure flavor explosion!

40 MINUTES

EASY

VEGAN

MIDDLE EAST

721 PER PORTION

SPICY

EVERYDAY

DINNER

ALL YEAR

INTRODUCTION

ABOUT THE RECIPE

Meet your new favorite sandwich: the Sabich. Inspired by Yottam Ottolenghi this Middle Eastern delight packs a punch with crispy eggplant, fresh tomato cucumber salad, creamy tahini, spicy zhoug, tangy mango sauce, and crunchy chickpeas. It’s a vegan feast that’s not only incredibly delicious but also super easy to make. Perfect for lunch or dinner, this Sabich sandwich is all about bold flavors and textures.

How to serve
Start with a warm bread, then layer on the crispy eggplant, followed by the tomato cucumber salad. Drizzle with tahini sauce and add a spoonful of zhoug for that spicy kick. Top it off with chickpeas and a splash of mango sauce. Wrap it up and enjoy! It’s best served fresh and warm, making it a perfect quick meal.

How to store
Store any leftover components separately in airtight containers. The crispy eggplant and salad can stay fresh in the fridge for up to two days. When ready to eat, reheat the eggplant in the oven and assemble your sandwich fresh for the best taste.

Hi, I'm Kimberly!

Hi, I'm Kimberly.

A passionate food lover who believes in the magic of homemade deliciousness that spreads love and warmth. Join me on this culinary adventure as I prepare wonderful dishes and let’s spread some happiness together!

Kimberly the Zett Signature

If you want to get to know me better, click here!


Sabich Sandwich
Sabich Sandwich
Sabich Sandwich
„Let’s make a piece of happiness“
Print
clock clock iconcutlery cutlery iconflag flag iconfolder folder iconinstagram instagram iconpinterest pinterest iconfacebook facebook iconprint print iconsquares squares iconheart heart iconheart solid heart solid icon
Sabich Sandwich

Sabich Sandwich


  • Author: Kimberly
  • Total Time: 40 minutes
  • Yield: 2 1x

Description

RECOMMENDED EQUIPMENT

  • small bowl
  • garlic press
  • sharp knife
  • cutting board
  • hand blender (or food processor)
  • mortar & pestle
  • medium bowl
  • 3 small bowls
  • sieve
  • large pan

Ingredients

Units Scale

TAHINI SAUCE

  • 2 tbsp tahini
  • 2 tbsp lemon juice
  • 1 tsp maple syrup
  • 1 garlic clove
  • salt & pepper to taste

MANGO SAUCE

  • 1 ripe mango
  • 1/8 tsp chili flakes

ZHOUG

  • 10 grams fresh cilantro
  • 5 grams fresh parsley
  • 1 jalapeno
  • 2 tbsp olive oil
  • 2 tbsp lime juice
  • 4 tbsp cold water
  • 1 garlic clove
  • 5 cardamom capsules
  • 3 cloves
  • 1/2 tsp cumin
  • pinch of pepper

TOMATE CUCUMBER SALAD

  • 100 grams tomatoes
  • 100 grams cucumber
  • 1 small red onion
  • 1 tbsp olive oil
  • 1 tbsp lemon juice
  • some parsley leaves

ROASTED CHICKPEAS

  • 130 grams drained chickpeas
  • 1/2 tbsp olive oil
  • 1/4 tsp cumin
  • 1/4 tsp smoked paprika
  • 1/8 tsp salz
  • 1/8 tsp curry
  • 1/8 tsp garlic powder
  • 1/8 tsp onion powder

EGGPLANT SLICES

  • 1 eggplant
  • 2 tbsp cornstarch
  • 2 tbsp ghee/clarified butter

OTHER INGREDIENTS

  • 2 pita breads

Instructions

  1. For the tahini sauce, mix tahini and water in a small bowl until smooth. Press in one peeled garlic clove, add maple syrup and lemon juice, and mix well. Season with salt and pepper and set aside.
  2. For the mango sauce, peel the mango and blend the soft flesh in a tall container with a hand blender until creamy, adding a bit of water if needed. Add chili flakes to taste and stir. Set aside.
  3. For the Zhoug, first grind the 3 cloves and the contents of 5 cardamom pods in a mortar. Put this powder in a tall container that fits the hand blender, and add the following: cilantro leaves, parsley leaves, 4 tablespoons of cold water, 2 tablespoons of olive oil, 2 tablespoons of lime juice, 1/2 teaspoon of cumin, 1 jalapeno without the stem, and 2 peeled garlic cloves. Blend everything into a pesto-like paste and set aside.
  4. For the tomato-cucumber salad, wash the tomatoes and cucumber well. Cut both into small, even pieces and put them in a medium bowl. Peel the red onion, cut it into thin strips, and add to the bowl. Finely chop a few parsley leaves and add them too. Finally, add 1 tablespoon of olive oil and 1 tablespoon of lemon juice and mix well. Set aside.
  5. For the roasted chickpeas, preheat the oven to 200°C / 392°F. Rinse the chickpeas thoroughly under running water and let them drain. In a medium bowl, mix together the spice blend: 1/2 tablespoon of olive oil, 1/4 teaspoon of cumin, 1/4 teaspoon of smoked paprika, 1/8 teaspoon of salt, 1/8 teaspoon of curry powder, 1/8 teaspoon of dried garlic, and 1/8 teaspoon of dried onion. Put the chickpeas in a clean kitchen towel and gently rub them dry, removing any loose skins. Mix the chickpeas with the spice paste in the bowl until they’re well coated. Spread the chickpeas on a baking sheet lined with parchment paper and roast in the oven for 20-25 minutes. Place the pita breads in the oven for the last 10 minutes.
  6. Finally, prepare the eggplant slices. Wash and dry the eggplant, then cut it into slices about 1 cm thick. Spread 2 tablespoons of cornstarch on a small plate and coat the eggplant slices on both sides, shaking off any excess. Fry the slices in a hot pan with 2 tablespoons of clarified butter until crispy on both sides, then let them drain on a paper towel.
  7. To assemble, spread tahini sauce on each piece of bread, add tomato-cucumber salad, then a few eggplant slices, and top with Zhoug and mango sauce. Finally, sprinkle the roasted chickpeas on top. Enjoy your delicious creation!

Notes

The calorie information may vary depending on the product used, country and region.

  • Cook Time: 40 min

Vegan Dumplings in Sesame Miso Soup

Vegan Dumplings in Sesame Miso Soup

Vegan Dumplings in Sesame Miso Soup

Vegan Dumplings in Sesame Miso Soup

May 6, 2024 by Kimberly

Indulge in a comforting bowl full of flavor, perfect for cozy nights. Healthy, hearty, and absolutely delicious!

90 MINUTES

INTERMEDIATE

VEGAN

ASIAN

560 PER PORTION

COMFORT FOOD
UMAMI

EVERYDAY

DINNER

ALL YEAR

INTRODUCTION

ABOUT THE RECIPE

Savor the warmth and richness of these vegan Dumplings in Sesame Miso Soup, a delightful dish that combines hearty plant-based dumplings with a savory miso broth. This soup is not only nourishing but also packed with exquisite flavors that will satisfy both vegans and non-vegans alike. It’s a perfect choice for those seeking a comforting meal that’s both healthful and satisfying.

How to serve
Serve this aromatic Sesame Miso Soup hot, with its soft, tender dumplings soaking up the flavorful broth. Garnish with chopped green onions or cilantro, a sprinkle of sesame seeds, and a drizzle of crispy chili oil for an extra touch of luxury.

How to store
Store leftovers in an airtight container in the refrigerator for up to 2 days. Reheat gently to preserve the flavors and textures of the dumplings and broth. Freezing is not recommended as it may affect the soup’s quality.

Hi, I'm Kimberly!

Hi, I'm Kimberly.

A passionate food lover who believes in the magic of homemade deliciousness that spreads love and warmth. Join me on this culinary adventure as I prepare wonderful dishes and let’s spread some happiness together!

Kimberly the Zett Signature

If you want to get to know me better, click here!


Vegan Dumplings in Sesame Miso Soup
„Let’s make a piece of happiness“

INGREDIENTS

FOR 4 PORTIONS

DOUGH

FILLING

  • 200g mushrooms (7 oz)
  • 200g napa cabbage (7 oz)
  • 3 spring onions
  • 1 carrot
  • 1/2 tsp ginger
  • 3 garlic cloves, grated
  • 1 tbsp cilantro
  • 1 tbsp clarified butter
  • 1 tbsp soy sauce
  • 1/4 tsp sesame oil
  • 1/8 tsp ground white pepper

SESAME MISO SOUP

  • 800ml water (3.5 cups)
  • 6 tbsp tahini
  • 4 tbsp white miso paste
  • 2 tbsp crispy chili oil
  • 2 tbsp soy sauce
  • 2 tbsp rice vinegar
  • 2 tsp ginger, grated
  • 2 tsp sugar
  • 2 garlic cloves, grated

TOPPINGS

  • cilantro
  • crispy chili oil
  • sesame seeds
Vegan Dumplings in Sesame Miso Soup
}

ACTIVE: 30 min

PASSIVE: –

PREPARATIONS

Recommended Equipment
  • sharp knife
  • cutting board
  • vegetable peeler
  • salad spinner
  • large frying pan
  • two medium-sized pots
  • large plate
  • Prepare dumpling wrappers or defrost store-bought ones.
  • Peel and finely chop or grate the ginger. Set aside.
  • Peel and finely chop or press the garlic cloves. Set aside.
  • Clean the mushrooms and dice them into small pieces. Set aside.
  • Chop the napa cabbage into small pieces and wash it. Set aside.
  • Peel and finely dice the carrots. Set aside.
  • Pluck the cilantro leaves from the stems and finely chop them. Set aside.
  • Separate the green and white parts of the green onions and slice both into fine rings. Set aside.
}

ACTIVE: 40 min

PASSIVE: 20 min

COOKING

1. Heat a large pan over medium heat and add 1 tablespoons of clarified butter. Start by sautéing the white parts of the green onions, ginger, and garlic for a few minutes. Next, add the carrot pieces and sauté for a few more minutes. Then, add the mushroom pieces, mix well, and finally add the napa cabbage. Let the napa cabbage cook until soft, then stir everything together. Remove the pan from the heat and let it cool.

2. Once the mixture has cooled down, add 2 tablespoons of chopped cilantro, the green parts of the green onions, 1/4 teaspoon of ground white pepper, 2 tablespoons soy sauce, and 1/2 tablespoon sesame oil. Mix everything well.

3. Set up your vegetable filling, the dumpling wrappers, and a small bowl of cold water. Also, prepare a large plate dusted with a little flour where you can place your finished dumplings. Now, put on your favorite series or podcast and start filling your dumplings 🙂

4. Take a wrapper and place about 1-1.5 teaspoons of the vegetable mixture in the center. Dip a finger in the water and moisten the edge of the upper half of the wrapper. Fold the wrapper like a taco shell upwards and press the left tip of the wrapper with your left hand. Now, with the right hand’s index finger and thumb, hold the closed tip with your left thumb, place a small fold at the top edge against the backside of the wrapper and press it firmly. Continue this until the wrapper is completely closed and you have a finished dumpling in your hand. Place the finished dumpling on the floured plate. This folding technique might take a little practice. For a visual demonstration, just scroll down to my video at the end of the recipe 🙂 Continue this process until all the dumpling wrappers and filling are used up.

5. Fill a medium-sized pot with enough water to fill just over half the pot. Bring the water to a boil.

6. Meanwhile, you can prepare the Sesame Miso Soup in the other pot. Add the following ingredients to the pot: tahini, white miso paste, soy sauce, rice vinegar, sugar, crispy chili oil, water, and grated garlic and ginger. Bring everything to a simmer over medium heat. Keep the soup on a low flame on the stove.

7. Once the water in the other pot is boiling, turn it down slightly and add 6-8 dumplings depending on the size of your pot and let them cook for about 8 minutes. Since dumplings expand while cooking, do not overcrowd your pot. Once the dumplings become translucent and the filling is clearly visible, they are done. Place the dumplings in the bowls in which you want to serve them. Continue this for all dumplings until all are cooked.

8. Once all dumplings are ready, evenly distribute the soup from the other pot over the dumplings. Top each bowl with some cilantro, Crispy Chili Oil, and toasted sesame seeds.

NOTE: The calorie information may vary depending on the product used, country and region.