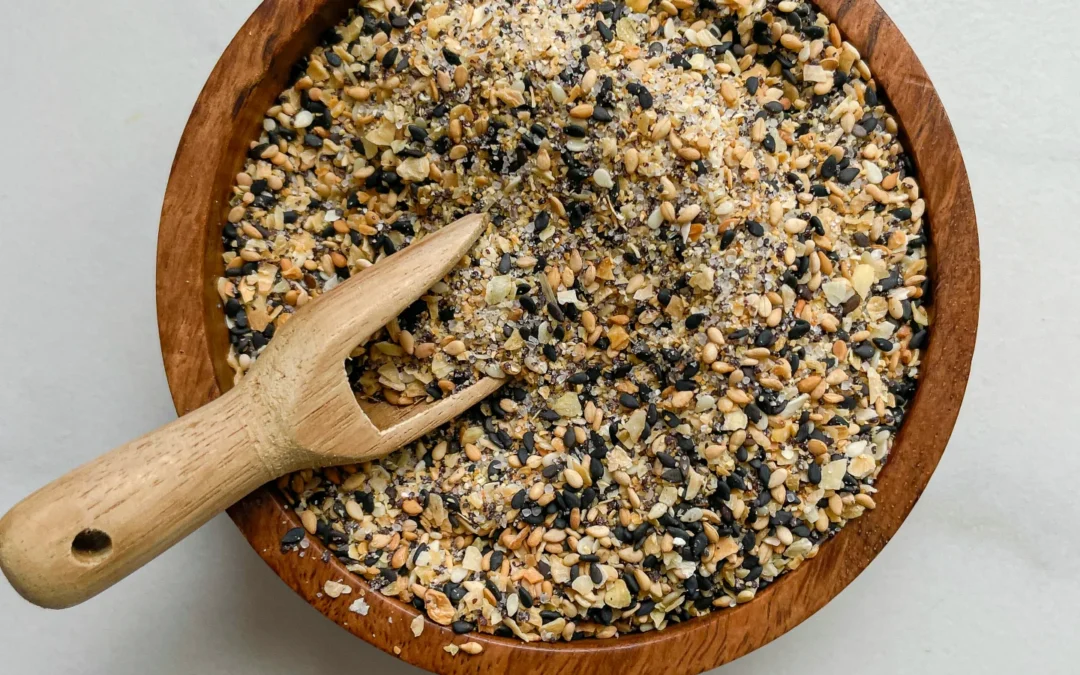
Honeycomb Apricot Marshmallow Fluff Cookies

Honeycomb Apricot Marshmallow Fluff Cookies

Honeycomb Apricot Marshmallow Fluff Cookies

Honeycomb Apricot Marshmallow Fluff Cookies

December 19, 2024 by Kimberly

Soft, gooey cookie layers meet tangy apricot sauce, marshmallowy swirls, and honeycomb crunch. Every bite is an explosion of textures and flavors – sweet, sticky, and irresistibly cozy vibes in cookie form.

2 HOURS
25 MINUTES

ADVANCED

VEGETARIAN

US AMERICAN

308 PER COOKIE

SWEET

EVERYDAY

DESSERT

ALL YEAR

INTRODUCTION

ABOUT THE RECIPE

Imagine sinking your teeth into layers of soft cookie dough, creamy marshmallow fluff, tangy apricot sauce, and crunchy honeycomb pieces. It’s not just a dessert – it’s a flavor-packed adventure! These cookies are a mash-up of textures and tastes that scream fun and indulgence. Whether it’s for a cozy night in or to impress your friends, they’re bound to disappear fast.

How to serve
These cookies are best enjoyed slightly chilled for that perfect contrast of gooey and crunchy. Pair them with a cup of tea or coffee for a casual treat, or bring them out as the star of a dessert platter. Hosting a party? Stack them up on a pretty plate and watch them vanish in minutes.

How to store
Keep leftovers in an airtight container for up to 3 days. For extra freshness, separate layers with parchment paper to avoid sticking.

Hi, I'm Kimberly!

Hi, I'm Kimberly.

A passionate food lover who believes in the magic of homemade deliciousness that spreads love and warmth. Join me on this culinary adventure as I prepare wonderful dishes and let’s spread some happiness together!

Kimberly the Zett Signature

If you want to get to know me better, click here!


Honeycomb Apricot Marshmallow Fluff Cookies
„Let’s make a piece of happiness“
Print
clock clock iconcutlery cutlery iconflag flag iconfolder folder iconinstagram instagram iconpinterest pinterest iconfacebook facebook iconprint print iconsquares squares iconheart heart iconheart solid heart solid icon
Honeycomb Apricot Marshmallow Fluff Cookies

Honeycomb Apricot Marshmallow Fluff Cookies


5 Stars 4 Stars 3 Stars 2 Stars 1 Star

No reviews

  • Author: Kimberly
  • Total Time: 85 min
  • Yield: 12 cookies 1x

Description

Recommended Equipment

  • 2 small pots
  • 1 medium pot
  • baking dish (approx. 20×20 cm)
  • parchment paper
  • spatula
  • whisk
  • thermometer
  • electric mixer
  • sharp knife
  • cutting board
  • mixing bowl
  • cookie scoop

Ingredients

Units Scale

HONEYCOMB

  • 100 grams white sugar
  • 20 grams honey
  • 20 milliliter water
  • 1 tsp baking soda

MARSHMALLOW FLUFF

  • 60 grams white sugar
  • 60 grams water
  • 80 grams corn syrup
  • 1 egg white

APRICOT SAUCE

  • 100 grams dried apricots
  • 80 milliliter apricot juice
  • 10 grams powdered sugar
  • 1/2 tsp vanilla extract
  • 1 tsp lemon juice
  • 2 tsp cornstarch

COOKIE DOUGH

  • 120 grams butter, room temperature
  • 100 grams white sugar
  • 50 grams brown sugar
  • 1 egg
  • 1 tsp vanilla extract
  • 220 grams all-purpose flour
  • 1/2 tsp baking soda
  • 1/2 tsp salt

Instructions

  1. Honeycomb: First, line a heatproof baking dish with parchment paper. Combine sugar, honey, and water in a medium pot. Heat over medium until it boils, monitoring the temperature with a thermometer until it reaches 149°C (300°F). Remove from heat and quickly stir in the baking soda just until combined. Be careful—it will foam up a lot! Immediately pour the mixture into the prepared dish without stirring or spreading it, as this would break the air bubbles. Scrape any remaining mixture from the pot and add it on top. Let it cool completely (about 1–2 hours).
  2. Marshmallow Fluff: Heat water, sugar, and corn syrup in a small pot to 115°C (240°F). Meanwhile, beat egg whites in a clean bowl until stiff peaks form. Slowly pour the hot sugar syrup in a thin, steady stream into the egg whites, mixing continuously with an electric hand mixer. After adding all the syrup, beat on high for another 5 minutes until light and fluffy. Set aside.
  3. Apricot Sauce: Chop the dried apricots and combine them with apricot juice, powdered sugar, vanilla extract, and lemon juice in a small pot. Simmer for about 10 minutes until softened. Dissolve the cornstarch in a bit of cold water, stir it in, and bring everything to a boil until thickened. Set aside to cool.
  4. Cookie Dough: Cream butter with the white and brown sugar. Add the egg and vanilla extract, mixing well. Stir in the flour, baking soda, and salt until just combined—don’t overmix!
  5. In a deep dish, layer the components: a part of cookie dough, a tablespoon of marshmallow fluff, and a tablespoon of apricot sauce. Repeat until all ingredients are used. Tip: Store leftover fluff in a jar in the fridge for up to two weeks.
  6. Use a cookie scoop (or tablespoon) to form 12 evenly sized balls from the layered dough. Place them on the prepared baking tray. Chill the cookies in the fridge for 1 hour – don’t skip this step! Chilling ensures the cookies hold their shape and don’t spread too much when baked.
  7. Preheat the oven to 150°C (300°F) and bake the cookies for 13–15 minutes. While baking, carefully cut the honeycomb into small pieces. Remove the warm cookies from the oven, adjust their shape if necessary, and gently press the honeycomb pieces onto the tops. Let the cookies rest for about 10 minutes before enjoying.
  • Passive Time: 85 min
  • Cook Time: 60 min

Pecan Caramel Pie Cobbler

Pecan Caramel Pie Cobbler

Pecan Caramel Pie Cobbler

Pecan Caramel Pie Cobbler

November 27, 2024 by Kimberly

This warm, gooey cobbler is the ultimate comfort dessert – melty caramel candies, crunchy pecans, and buttery dough baked into golden perfection. A cozy, sweet treat for every dessert lover out there!

75 MINUTES

EASY

VEGETARIAN

US AMERICAN

505 PER PORTION

COMFORT FOOD

CHRISTMAS

DESSERT

AUTUMN
WINTER

INTRODUCTION

ABOUT THE RECIPE

There’s something magical about desserts that feel like a warm hug, and this cobbler delivers just that. Melty caramel candies and crunchy pecans create a gooey filling, while the buttery dough bakes into a golden, rustic crust. It’s the perfect dessert for chilly evenings or holiday gatherings, combining the cozy flavors of caramel and pecans into one irresistible dish. Trust me, once you try this cobbler, it’ll quickly become a go-to comfort dessert for every season.

How to serve
This cobbler is best served warm, straight out of the oven, with a scoop of vanilla ice cream or a dollop of whipped cream on top. The cold creaminess of the topping perfectly balances the gooey caramel and crunchy pecans. Sprinkle a few extra pecans over the top for added texture. It’s perfect for family gatherings, dinner parties, or just a cozy night in.

How to store
Store any leftovers in an airtight container at room temperature for up to one day, or in the fridge for up to four days. Reheat individual portions in the microwave for 20-30 seconds to bring back the gooey, warm goodness.

Hi, I'm Kimberly!

Hi, I'm Kimberly.

A passionate food lover who believes in the magic of homemade deliciousness that spreads love and warmth. Join me on this culinary adventure as I prepare wonderful dishes and let’s spread some happiness together!

Kimberly the Zett Signature

If you want to get to know me better, click here!


Pecan Caramel Pie Cobbler
„Let’s make a piece of happiness“
Print
clock clock iconcutlery cutlery iconflag flag iconfolder folder iconinstagram instagram iconpinterest pinterest iconfacebook facebook iconprint print iconsquares squares iconheart heart iconheart solid heart solid icon
Pecan Caramel Pie Cobbler

Pecan Caramel Pie Cobbler


  • Author: Kimberly
  • Total Time: 75 min
  • Yield: 8 1x

Description

RECOMMENDED EQUIPMENT

  • baking dish (approx. 20×30 cm or similar)
  • mixing bowl
  • whisk or hand mixer
  • kettle (for boiling water)


Ingredients

Units Scale
  • 120 grams butter
  • 125 grams all-purpose flour
  • 125 grams white sugar
  • 3 tsp baking powder
  • 1/4 tsp salt
  • 170 milliliter full-fat cow milk
  • 1 tsp vanilla extract
  • 100 grams pecans
  • 50 grams brown sugar
  • 125 grams caramel candies
  • 250 milliliter boiling water
  • vanilla ice cream

Instructions

  1. Preheat the oven to 175°C / 350°F. Grab a baking dish, drop in the butter, and pop it into the oven for a few minutes and let it melt.
  2. In a bowl, combine flour, sugar, baking powder, and a pinch of salt. Stir in milk and a splash of vanilla extract until it’s all smooth, creamy, and totally lump-free.
  3. Carefully pull the now-buttery baking dish out of the oven. Pour the batter right over that melted butter. Trust the process – it looks weird now, but it’s all part of trust the process. Sprinkle pecans on top and follow up with a layer of brown sugar. Finally, add the caramel candies. Whole or crushed? Dealer’s choice.
  4. Next, get that kettle boiling and slowly pour the hot water over everything in the dish. Yes, everything. No stirring allowed! Just trust me on this one.
  5. Bake uncovered for 30–35 minutes or until the top is golden brown and smells like a caramel dream.
  6. Take it out and let it cool for about 30 minutes. Patience is key – the caramel sauce underneath thickens and gets all creamy during this time.
  7. Scoop it into bowls, drizzle with that caramel sauce hiding underneath, and top with a big ol’ scoop of vanilla ice cream.

  • Passive Time: 60 min
  • Cook Time: 15 min

Cinnamon Rolls

Cinnamon Rolls

Cinnamon Rolls

Cinnamon Rolls

October 2, 2024 by Kimberly

Get ready for the fluffiest, most melt-in-your-mouth rolls ever! Soft, buttery layers soaked in cream before baking—it’s like biting into a cloud of sweet cinnamon heaven with every bite.

100 MINUTES

INTERMEDIATE

VEGETARIAN

US AMERICAN

429 PER ROLL

SWEET
FLUFFY
CREAMY

BRUNCH

DESSERT

AUTUMN
WINTER

INTRODUCTION

ABOUT THE RECIPE

Imagine starting your day with soft, pillowy rolls that are bursting with cinnamon sweetness. The secret? A little heavy cream poured between the rolls before baking. It creates the dreamiest, most moist cinnamon rolls you’ll ever try. These rolls are more than just a treat – they’re a cozy, comforting hug wrapped in cinnamon-sugar goodness. Whether you’re baking them for a holiday morning or just because, they bring that extra something special to the table.

How to serve
These rolls are perfect fresh out of the oven, still warm and gooey. Drizzle them with a sweet vanilla glaze or a classic cream cheese frosting for that extra indulgent touch. Pair them with your morning coffee, or serve them up as a weekend brunch star alongside fresh fruit or a light mimosa. Trust me, they’re a hit at any gathering, or even for a solo cozy morning in!

How to store
To keep these rolls soft and fluffy, store them in an airtight container at room temperature for up to two days. Want to enjoy them later? Pop them in the fridge and reheat in the oven to bring back that fresh-baked magic.

Hi, I'm Kimberly!

Hi, I'm Kimberly.

A passionate food lover who believes in the magic of homemade deliciousness that spreads love and warmth. Join me on this culinary adventure as I prepare wonderful dishes and let’s spread some happiness together!

Kimberly the Zett Signature

If you want to get to know me better, click here!


Cinnamon Rolls
Cinnamon Rolls
Cinnamon Rolls
„Let’s make a piece of happiness“
Print
clock clock iconcutlery cutlery iconflag flag iconfolder folder iconinstagram instagram iconpinterest pinterest iconfacebook facebook iconprint print iconsquares squares iconheart heart iconheart solid heart solid icon
Cinnamon Rolls

Cinnamon Rolls


  • Author: Kimberly
  • Total Time: 100 min
  • Yield: 12 rolls 1x

Description

Recommended Equipment

  • small bowl
  • small whisk
  • large bowl
  • plastic wrap
  • two medium bowls
  • rolling pin
  • sharp knife
  • baking dish
  • oven

Ingredients

Units Scale

DOUGH

  • 500 grams bread flour (in Germany that’s Type 550)
  • 170 grams yogurt
  • 1/2 tsp salt
  • 1 egg
  • 130 milliliters full-fat milk
  • 1 tbsp white sugar
  • 21 grams fresh yeast

FILLING

  • 115 grams butter, room temperature
  • 150 grams brown sugar
  • 2 tbsp cinnamon
  • 1/4 tsp salt
  • 100 milliliters heavy cream
  • 50 milliliters cinnamon oil (optional)

FROSTING

  • 120 grams cream cheese
  • 120 grams powdered sugar
  • 50 grams butter, room temperature
  • 1 tsp vanilla extract
  • 1 tsp lemon juice

Instructions

  1. First, we activate the fresh yeast. Heat the milk to a temperature between 32°C and 38°C (90°F to 100°F). Add the white sugar and stir well. Crumble the fresh yeast into the warm milk and whisk it until fully dissolved. Let the mixture sit for 5 minutes. You should see small bubbles forming on the surface by then.
  2. Meanwhile, in a large bowl, add the flour, salt, yogurt, and egg. Pour in the yeast mixture and stir everything together with a wooden spoon. Transfer the dough to a clean work surface and knead by hand for about 10-15 minutes. The goal is to get a smooth and elastic dough. Using an electric mixer will cut the time in half. The dough is ready when you can stretch a piece thin enough to let light through without tearing. Place the dough back in the bowl and cover it with plastic wrap to keep it from drying out. Let it rise in a warm, draft-free spot for about an hour until it doubles in size.
  3. In the meantime, prepare the filling. Mix together softened butter, brown sugar, cinnamon, and a pinch of salt into a creamy mixture. Set it aside at room temperature.
  4. Next, prepare the frosting. Mix together cream cheese, powdered sugar, softened butter, vanilla extract, and lemon juice until smooth and creamy. Store in the fridge until ready to use.
  5. After the dough has risen for an hour, it should have doubled in size and is ready to work with. Prepare a large baking dish. Transfer the dough to a lightly floured, clean surface and roll it out to a 50×30 cm (about 20×12 inch) rectangle. Spread the butter-sugar-cinnamon mixture evenly over the dough. Then, cut the dough lengthwise into 12 equal strips. Roll each strip into a spiral and place them in the baking dish, forming 3 rows of 4 rolls. Let the rolls rise again for another 30 minutes.
  6. About 10 minutes before the rising time is up, preheat the oven to 190°C (375°F). Once the rolls have risen, pour the heavy cream and optional cinnamon oil in between the rolls. Bake for 20-25 minutes until the tops are golden brown. Be careful not to overbake them, as they may become dry.
  7. Remove the rolls from the oven and let them cool for about 10 minutes. Take the frosting out of the fridge and spread it evenly over the warm rolls. Enjoy!
  • Passive Time: 60 min
  • Cook Time: 40 min

Apple Fritters with Lemon Vanilla Glaze

Apple Fritters with Lemon Vanilla Glaze

Apple Fritters with Lemon Vanilla Glaze

Apple Fritters with Lemon Vanilla Glaze

August 25, 2024 by Kimberly

Imagine biting into warm, fluffy fritters bursting with juicy apples, drizzled with a sweet, tangy glaze. It’s like a cozy hug on a chilly morning – a little piece of homemade heaven!

30 MINUTES

EASY

VEGETARIAN

US AMERICAN

150 PER FRITTER

FLUFFY

EVERYDAY

DESSERT

ALL YEAR

INTRODUCTION

ABOUT THE RECIPE

Ever feel like treating yourself to something that’s a mix of comfort and a touch of fancy? These fluffy apple fritters are just that! They’re packed with juicy apple chunks, fried to golden perfection, and then topped with a mouthwatering lemon vanilla glaze. It’s the kind of snack that feels like a warm hug, perfect for cozy mornings or as a delightful dessert to share with friends. Trust me, once you try these, they’ll become your go-to treat!

How to serve
They’re best enjoyed fresh and warm, right out of the frying pan, with the glaze still slightly gooey and dripping down the sides. Pair them with a hot cup of coffee or tea for a perfect morning pick-me-up. If you’re feeling extra indulgent, a scoop of vanilla ice cream on the side turns these fritters into an irresistible dessert.

How to store
If you have leftovers (which I doubt!), store these fritters in an airtight container at room temperature for up to two days. For the best experience, reheat them in the oven at a low temperature.

Hi, I'm Kimberly!

Hi, I'm Kimberly.

A passionate food lover who believes in the magic of homemade deliciousness that spreads love and warmth. Join me on this culinary adventure as I prepare wonderful dishes and let’s spread some happiness together!

Kimberly the Zett Signature

If you want to get to know me better, click here!


Apple Fritters with Lemon Vanilla Glaze
„Let’s make a piece of happiness“
Print
clock clock iconcutlery cutlery iconflag flag iconfolder folder iconinstagram instagram iconpinterest pinterest iconfacebook facebook iconprint print iconsquares squares iconheart heart iconheart solid heart solid icon
Apple Fritters with Lemon Vanilla Glaze

Apple Fritters with Lemon Vanilla Glaze


  • Author: Kimberly
  • Total Time: 30 min
  • Yield: 12 fritters 1x

Description

Recommended Equipment

  • small pot
  • cooling rack
  • two bowls
  • whisk
  • sharp knife
  • cutting board
  • small bowl

Ingredients

Units Scale

BATTER

  • 100 grams all-purpose flour
  • 50 grams brown sugar
  • 1 tsp baking powder
  • 1/4 tsp salt
  • 1/3 cup milk
  • 1 egg
  • 1 tbsp butter, melted
  • 1/2 tsp vanilla extract
  • 2 apples
  • fat for frying

GLAZE

  • 65 grams powdered sugar
  • 1 tbsp milk
  • 1 tbsp lemon juice
  • 1/2 tsp vanilla extract

Instructions

  1. Heat frying fat in a small pot to around 175°C / 350°F. Prepare a cooling rack with some paper towels underneath to catch any excess oil when the fritters are done.
  2. Meanwhile, in a mixing bowl, combine the flour, brown sugar, baking powder, and salt. Set aside.
  3. In another mixing bowl, crack the egg and whisk it together with milk, vanilla extract, and melted butter. Set aside.
  4. Peel, core, and dice the apples into small pieces. Set aside.
  5. Pour the wet ingredients into the dry ingredients and stir until a thick batter forms. Then, add the apple pieces and mix everything together again.
  6. Drop spoonfuls of the batter into the hot oil, frying each side for about 2-3 minutes, depending on thickness. I used about 1 heaping tablespoon of batter per fritter. Place the fritters on the cooling rack to drain any excess oil.
  7. While the fritters are frying, mix powdered sugar, lemon juice, and vanilla extract in a small bowl to create a thick glaze. Drizzle the glaze over the fritters. I think they taste best when warm, so feel free to enjoy them right away 🙂
  • Cook Time: 30 min

Salmon Poke Bowl & Spicy Mayo Sauce

Salmon Poke Bowl & Spicy Mayo Sauce

Salmon Poke Bowl & Spicy Mayo Sauce

Salmon Poke Bowl & Spicy Mayo Sauce

August 21, 2024 by Kimberly

Dive into a fresh and vibrant bowl of goodness, packed with zesty spicy flavors, creamy textures, and a satisfying crunch. Perfect for a wholesome quick meal!

30 MINUTES

EASY

OMNIVORE

US AMERICAN

710 PER PORTION

REFRESHING

EVERYDAY

LUNCH

SPRING
SUMMER

INTRODUCTION

ABOUT THE RECIPE

This dish is like a hug in a bowl – a refreshing and vibrant mix of flavors that will take your taste buds on a little adventure. Perfect for when you’re craving something light yet satisfying, this bowl is loaded with fresh veggies like juicy mango, crisp red cabbage, and tender edamame, all sitting on a bed of fluffy rice. And the kicker? A drizzle of spicy mayo sauce that ties everything together with just the right amount of heat.

How to serve
To serve, grab a big, beautiful bowl and start with a generous layer of rice. Arrange the colorful veggies on top – think creamy avocado, bright mango, and that gorgeous purple cabbage. Lay your protein of choice (like tender salmon) over the top, and then drizzle on the spicy mayo sauce. Sprinkle with sesame seeds and a little wakame salad for that extra touch. Serve it chilled and watch your guests (or yourself) light up with every bite!

How to store
Got leftovers? Store each component separately in airtight containers to keep everything fresh. The rice and veggies will last about 2-3 days in the fridge. Just keep the sauce in a small jar and give it a good shake before using it again. It’s best not to store thawed raw salmon. If you can’t finish it, cook it and enjoy it the next day or later the same day.

Hi, I'm Kimberly!

Hi, I'm Kimberly.

A passionate food lover who believes in the magic of homemade deliciousness that spreads love and warmth. Join me on this culinary adventure as I prepare wonderful dishes and let’s spread some happiness together!

Kimberly the Zett Signature

If you want to get to know me better, click here!


Salmon Poke Bowl & Spicy Mayo Sauce
„Let’s make a piece of happiness“
Print
clock clock iconcutlery cutlery iconflag flag iconfolder folder iconinstagram instagram iconpinterest pinterest iconfacebook facebook iconprint print iconsquares squares iconheart heart iconheart solid heart solid icon
Salmon Poke Bowl & Spicy Mayo Sauce

Salmon Poke Bowl & Spicy Mayo Sauce


  • Author: Kimberly
  • Total Time: 30 min
  • Yield: 1 1x

Description

Recommended Equipment

  • sharp knife
  • cutting board
  • two small bowls
  • small pot
  • grater
  • paper towels

Ingredients

Units Scale
  • 3 tbsp edamame
  • 1 tbsp avocado
  • a quarter of a lime
  • 1/4 mini cucumber
  • 2 tbsp wakame salad
  • 80 grams farmed salmon, sushi-grade, frozen and then thawed
  • 2 tbsp red cabbage
  • 1 radish
  • 1/4 mango

RICE

  • 80 grams sushi rice or long grain white rice
  • 1 tbsp rice vinegar
  • 1 tsp white sugar
  • 1/4 tsp salt

SPICY MAYO SAUCE

  • 1 tbsp mayonnaise
  • 2 tbsp cold water
  • 1 tbsp sriracha (I used the one with coconut flavor)
  • 1/4 tsp ginger, grated
  • 1 garlic clove, grated
  • 1/2 tsp soy sauce
  • 1/8 tsp sesame oil
  • pinch of white pepper

TOPPINGS

  • white sesame seeds
  • black sesame seeds
  • nori sheets
  • cress

Instructions

  1. For the spicy mayo sauce, peel the ginger and garlic, and grate them into a bowl. Add the rest of the sauce ingredients and mix everything together until smooth. Set aside.
  2. Wash the rice until the water runs clear, then cook it in a rice cooker or small pot. Keep it warm. Place the edamame in a small bowl, cover with hot water, and let it sit for 5 minutes. Drain the water afterward.
  3. Wash and dry the cucumber, then slice it thinly. Remove the outer leaves of the red cabbage, cut it into quarters, and finely grate it. Wash the radishes and slice them thinly or use a mandoline. Peel the mango and cut it into pieces. Scoop the avocado out of its skin, drizzle it with lime juice, and cut it into cubes. Arrange the sliced fruits and veggies on a plate for later.
  4. Once the rice is done, mix in rice vinegar, salt, and sugar. Keep the rice warm.
  5. Rinse and pat dry the salmon, then cut it into cubes with a sharp knife. Set the wakame salad aside.
  6. In a deep bowl, start by layering the rice. Place the wakame salad in the center, then arrange the other components around it in a circle on top of the rice. Sprinkle the salmon with black and white sesame seeds and add a bit of cress. Place nori sheets on the side.
  7. Serve the sauce in a small bowl on the side, or drizzle it directly over the bowl.
  • Cook Time: 30 min

Cajun Seasoning

Cajun Seasoning

Cajun Seasoning

Cajun Seasoning

August 17, 2024 by Kimberly

Spice up your meals with this vibrant blend! Perfect for adding a kick to your favorite dishes, it brings a burst of flavor that makes every bite irresistible.

10 MINUTES

EASY

VEGAN

US AMERICAN

SPICY

EVERYDAY

SPICE BLEND

ALL YEAR

INTRODUCTION

ABOUT THE RECIPE

If you’re looking to add some serious flavor to your meals, this spicy seasoning blend is your new best friend. With its bold and zesty mix of spices, it’s perfect for turning any dish into a flavor explosion. Whether you’re a seasoned chef or just starting out in the kitchen, this versatile spice blend is super easy to make and will quickly become a staple in your pantry.

How to serve
This vibrant spice mix is incredibly versatile and can be used in so many ways. Sprinkle it over grilled chicken, fish, or veggies for an instant flavor boost. Mix it into soups, stews, or even pasta for a zesty kick. You can also use it as a rub for your favorite meats before cooking. The possibilities are endless, and it’s guaranteed to make your dishes stand out!

How to store
To keep your spice blend fresh and flavorful, store it in an airtight container in a cool, dry place. It’ll stay potent for up to six months, so you can always have this flavor powerhouse ready to go whenever you need it.

Hi, I'm Kimberly!

Hi, I'm Kimberly.

A passionate food lover who believes in the magic of homemade deliciousness that spreads love and warmth. Join me on this culinary adventure as I prepare wonderful dishes and let’s spread some happiness together!

Kimberly the Zett Signature

If you want to get to know me better, click here!


Cajun Seasoning
Cajun Seasoning
„Let’s make a piece of happiness“
Print
clock clock iconcutlery cutlery iconflag flag iconfolder folder iconinstagram instagram iconpinterest pinterest iconfacebook facebook iconprint print iconsquares squares iconheart heart iconheart solid heart solid icon

Cajun Seasoning


  • Author: Kimberly
  • Total Time: 10 min
  • Yield: 10 tbsp 1x

Description

Recommended Equipment

  • mortar & pestle or food processor
  • airtight container

Ingredients

Scale
  • 4 tbsp salt
  • 1 tbsp cilantro seeds
  • 1 tbsp celery salt
  • 1 tbsp smoked paprika
  • 1.5 tsp mustard seeds
  • 1 tsp chili flakes
  • 1 tsp onion powder
  • 1 tsp cumin
  • 1/2 tsp garlic powder
  • 1/2 tsp oregano
  • 1/2 tsp thyme
  • 1/4 tsp marjoram
  • 1/4 tsp black pepper

Instructions

  • Put all the spices in a mortar and grind them finely with the pestle. Alternatively, you can use a small high-performance food processor. Transfer the spice mix to an airtight jar.
  • Cook Time: 10 min