Truffle Mushroom Mascarpone Pasta

Truffle Mushroom Mascarpone Pasta

Truffle Mushroom Mascarpone Pasta

Truffle Mushroom Mascarpone Pasta

February 2, 2024 by Kimberly

Experience the luxurious taste of Truffle Mushroom Mascarpone Pasta, a creamy delight that’s simple to prepare and perfect for an unforgettable gourmet experience.

This website uses affiliate links which may earn commission for purchases made at no additional cost to you.

TOTAL TIME

55 min

SERVES

4 portions

DIET

vegetarian

EVERY RECIPE DESERVES

A Little Love Letter

Dive into the world of gourmet cooking with my Truffle Mushroom Mascarpone Pasta, a dish that promises a luxurious taste experience. Perfect for those who adore the rich, earthy flavors of truffles and the creamy texture of mascarpone, this easy Truffle Pasta is a delightful twist on traditional Italian cuisine. Its decadent mushroom blend is sure to impress, offering a quick yet elegant meal option for any occasion. 

You can use broth or stock for this dish. Just note that if you use stock, you will need to season the whole dish more strongly. As always, homemade broth or stock will make the dish taste a thousand times better than store-bought. Chopped truffle pieces in oil and truffle oil are a much cheaper and very tasty alternative to fresh truffles. You can order the products online or in a supermarket.

To elevate your dining experience, serve it hot, garnished with freshly grated Parmesan and a sprinkle of herbs. Pair it with a light, crisp white wine to complement the richness of the truffles and mascarpone. It’s a Luxury Pasta Dish that’s perfect for intimate dinners or as a sophisticated centerpiece for your gatherings.

If you have leftovers, let the pasta cool down and then store it in an airtight container. It can be refrigerated for up to 2 days. When ready to enjoy again, gently reheat it on the stove or in the microwave, adding a splash of stock or a dollop of mascarpone to retain its creamy texture. This Truffle Pasta delight remains a tantalizing treat, even as leftovers!

Hi, I'm Kimberly!

Hi, I'm Kimberly.

A hopeless romantic when it comes to food. Every recipe I share is a love letter to food itself. I’m so glad you’re here. Make yourself at home and stay a while.

Love,
Kimberly

Kimberly the Zett Signature

If you want to get to know me better,
click here!


Truffle Mushroom Mascarpone Pasta

LET’S MAKE A PIECE OF HAPPINESS

Print
clock clock iconcutlery cutlery iconflag flag iconfolder folder iconinstagram instagram iconpinterest pinterest iconfacebook facebook iconprint print iconsquares squares iconheart heart iconheart solid heart solid icon
Truffle Mushroom Mascarpone Pasta

Truffle Mushroom Mascarpone Pasta


5 Stars 4 Stars 3 Stars 2 Stars 1 Star

No reviews

  • Author: Kimberly
  • Total Time: 40 min
  • Yield: 4

Description

GOOD TO HAVE ON HAND

  • sharp knife
  • cutting board
  • large pan
  • large pot


Ingredients

Units Scale
  • 500 grams spaghettoni
  • 500 milliliters vegetable or chicken broth
  • 100 milliliters white wine
  • 100 grams mascarpone
  • 200 grams mushrooms
  • 70 grams parmesan
  • 2 tsp minced truffle in oil
  • 2 tbsp butter
  • 1 shallot
  • 2 garlic cloves
  • 1-2 stems thyme
  • truffle oil, for topping

Instructions

  1. Cut the shallot into very small pieces.
  2. Cut the mushrooms into very small pieces.
  3. Finely grate the parmesan.
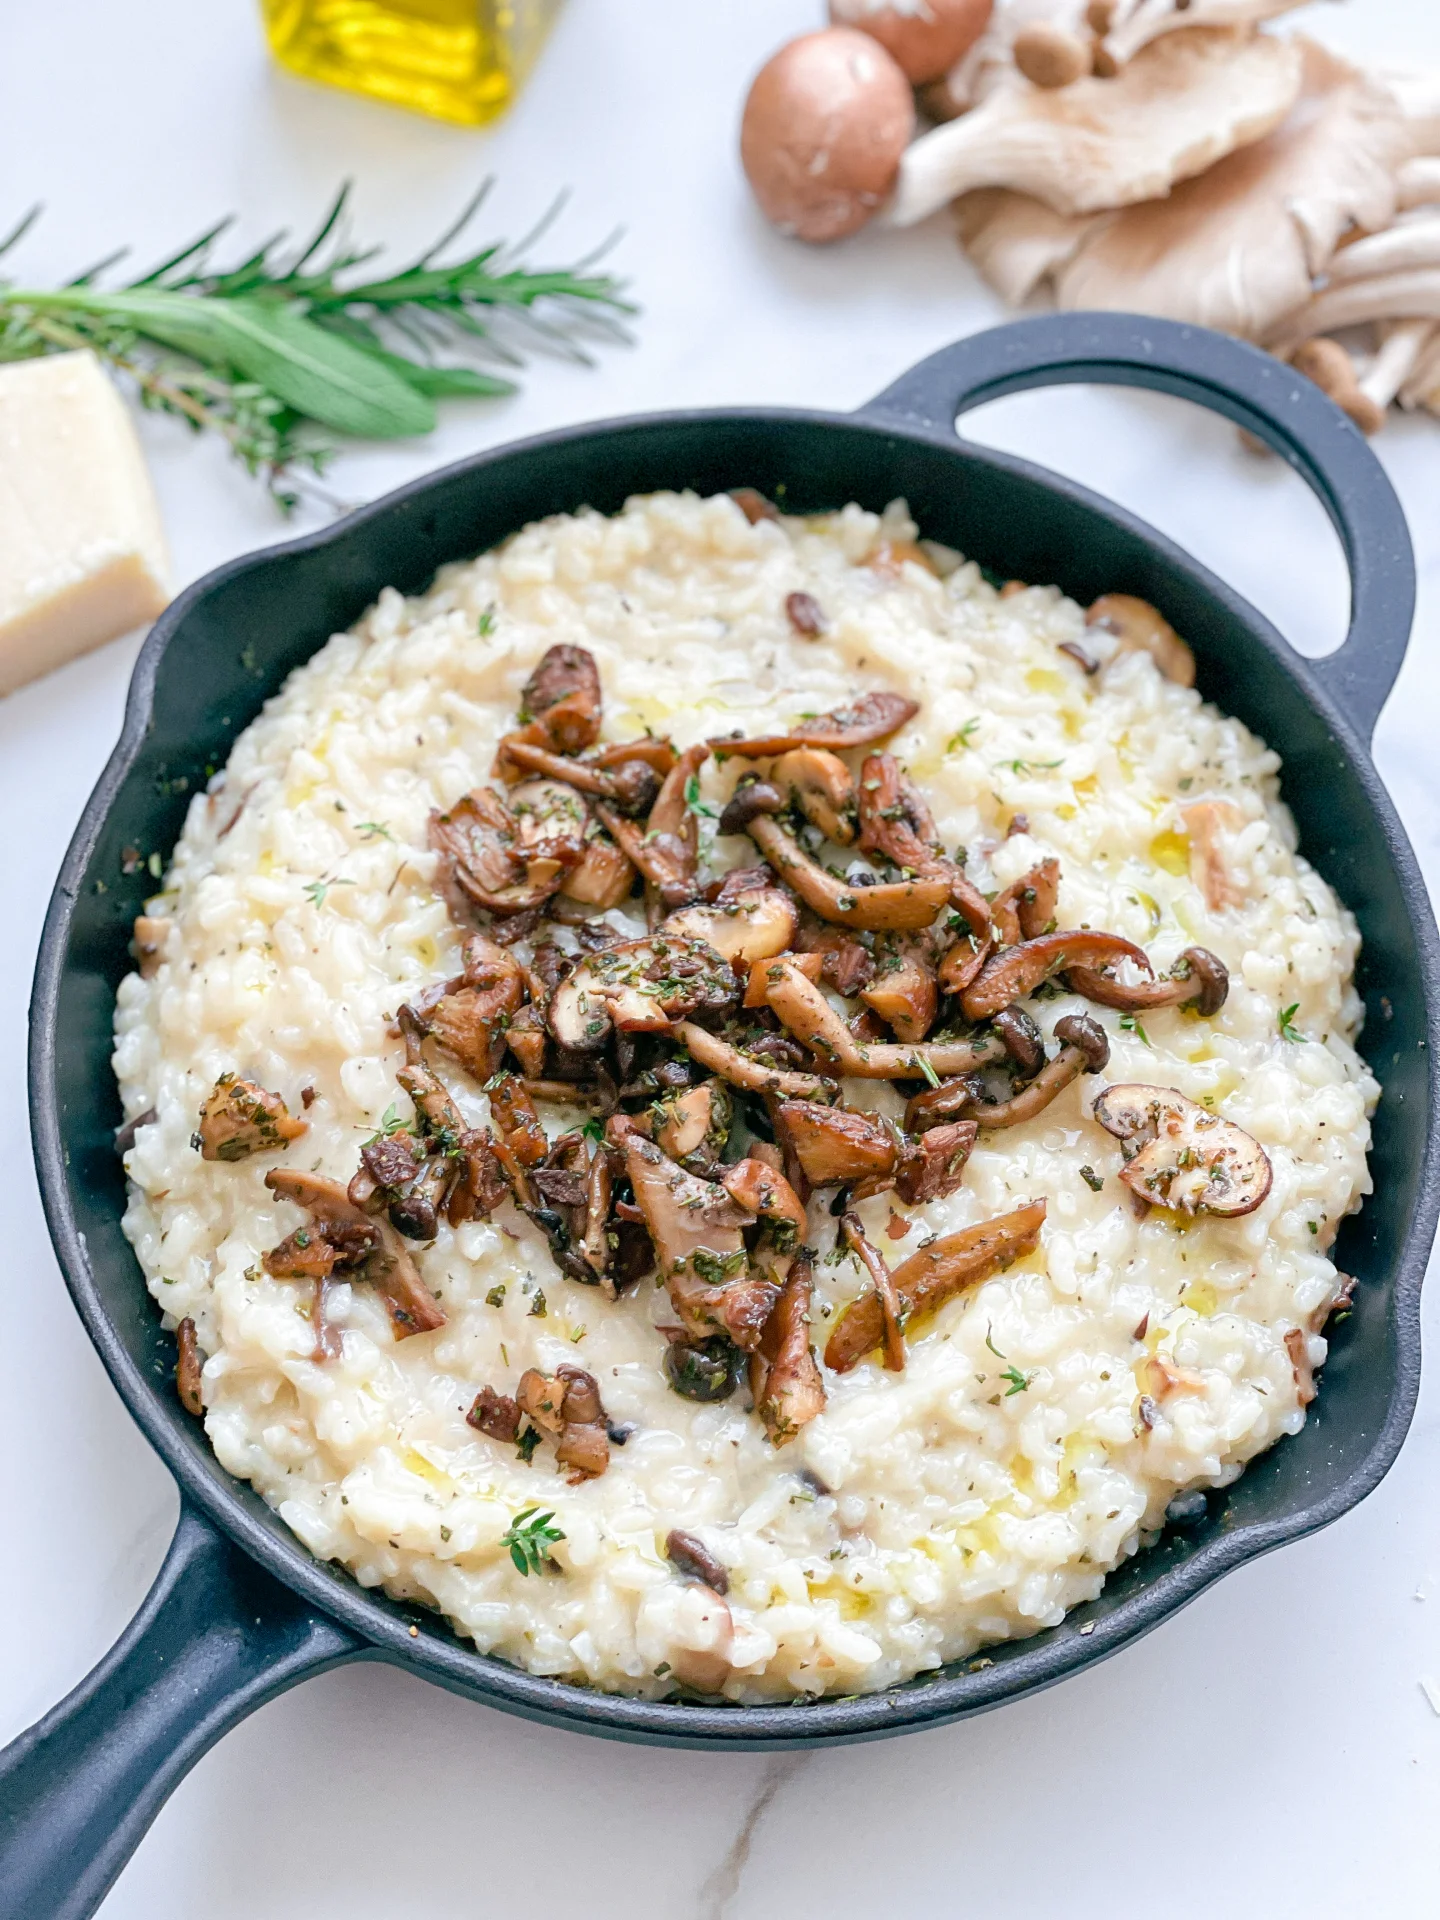
  4. Heat the butter with the truffle oil in a large pan. Sauté the finely chopped shallots over a medium heat for approx. 3 minutes until translucent.
  5. Now add the chopped mushrooms. Allow to brown for a few minutes so that the mushrooms turn golden brown. Add the peeled garlic cloves as whole and one to two stalks of fresh thyme and sauté for 1-2 minutes. Then deglaze with white wine and let it boil for about five minutes on a medium heat, then stir.
  6. Now add the hot chicken stock and cook over a medium heat until only 1/3 is left. This will take about 15 minutes.
  7. In the meantime, cook the pasta in a pan in boiling salted water until al dente.
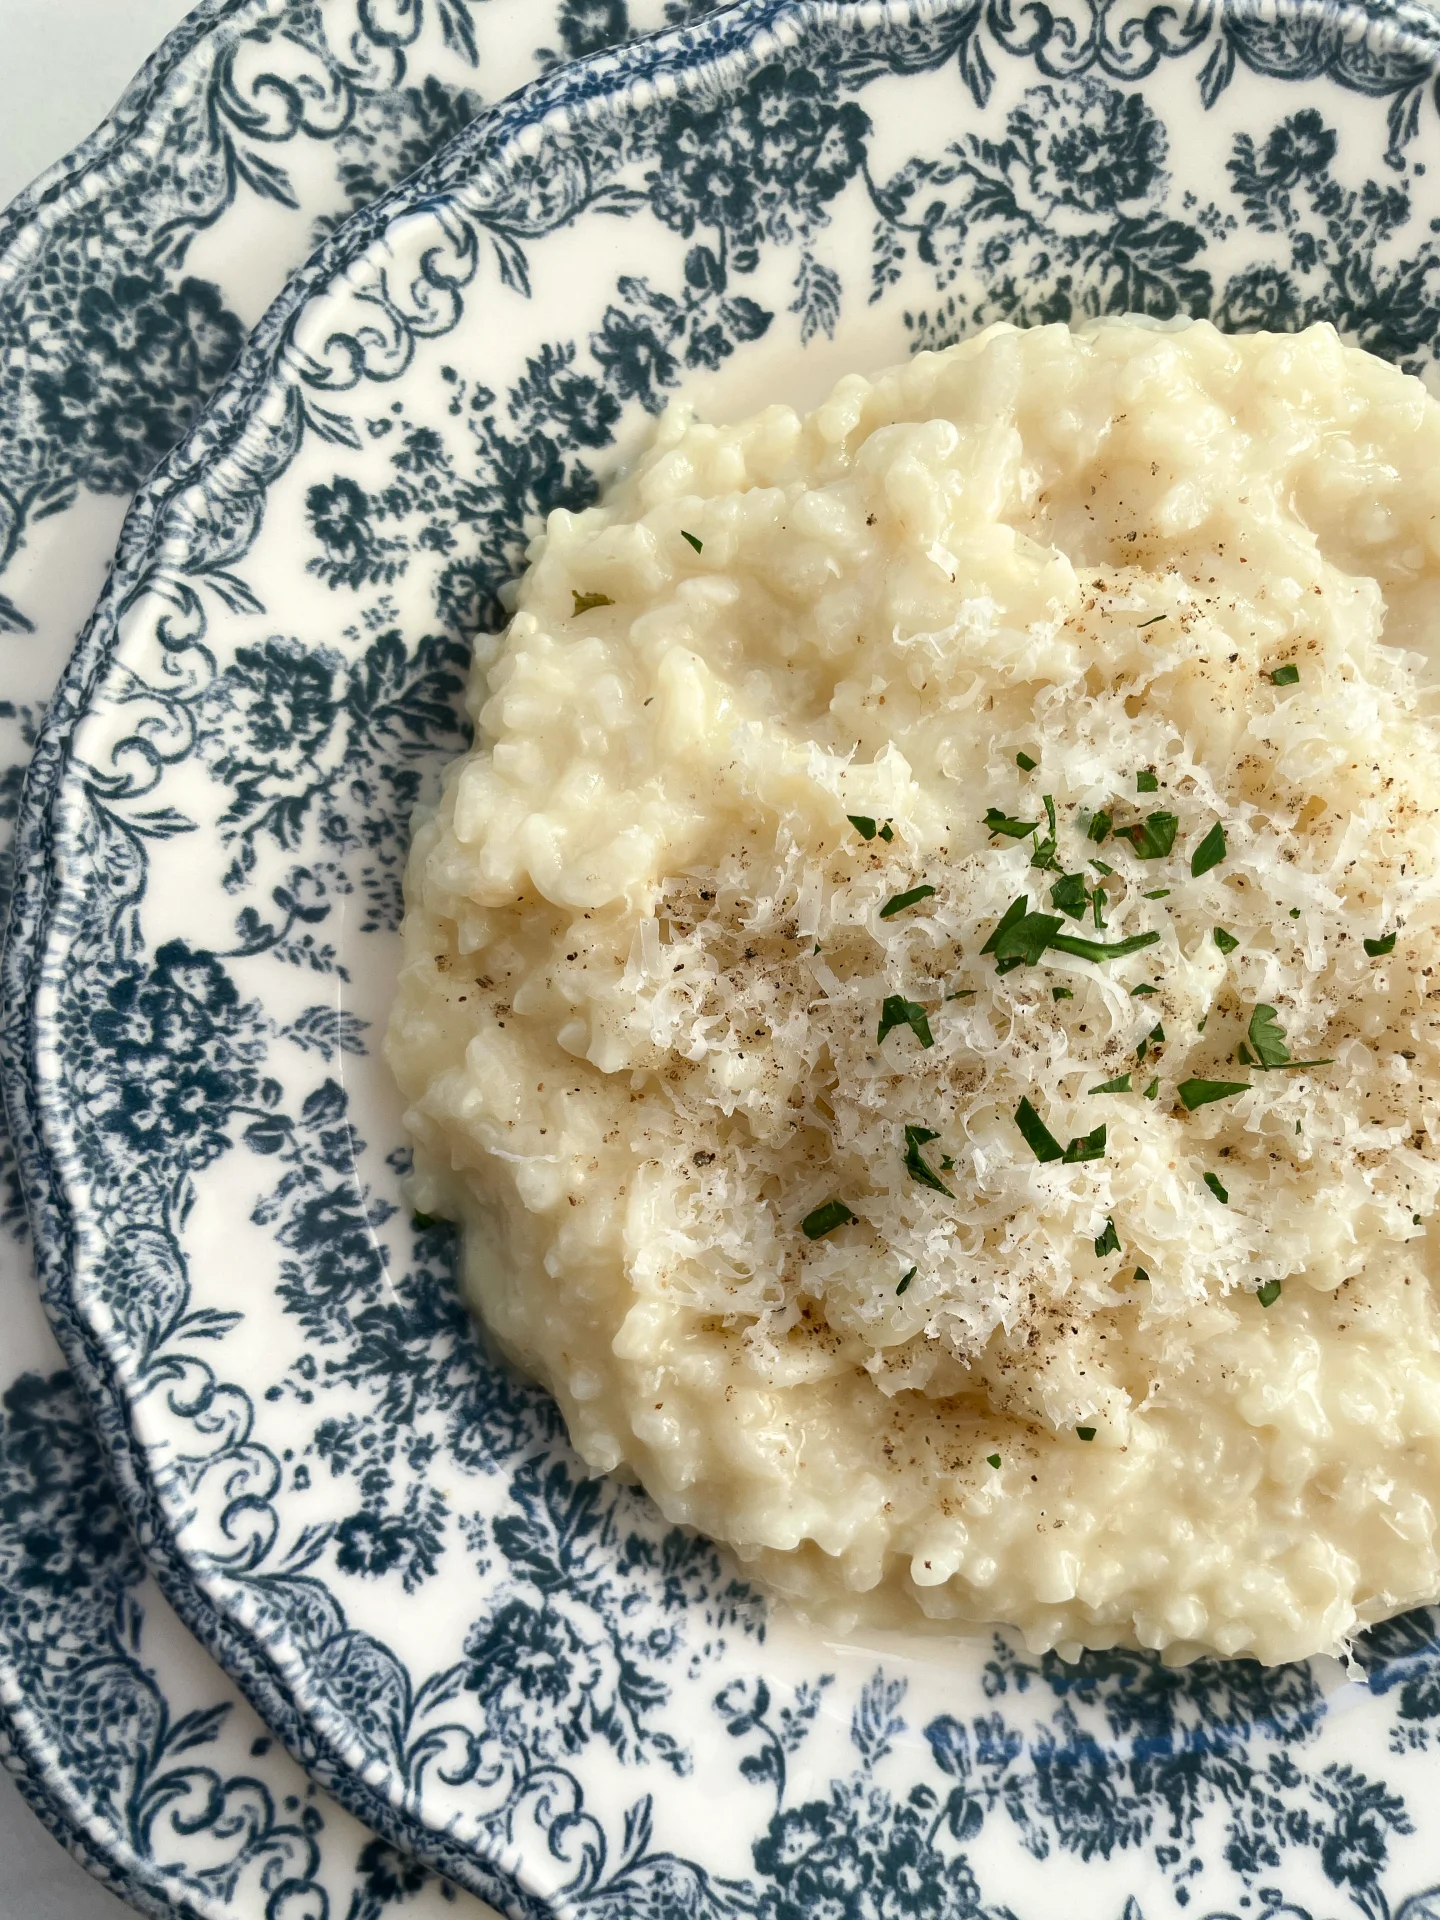
  8. Now add the mascarpone to the sauce, stir and heat gently. Remove the garlic clove and thyme from the pan. Now add the chopped truffle. Stir well and remove the pan from the heat. Add 1 tbsp of butter to the sauce. Truffle butter is best for this, but normal butter will also work. Season to taste with salt and pepper.
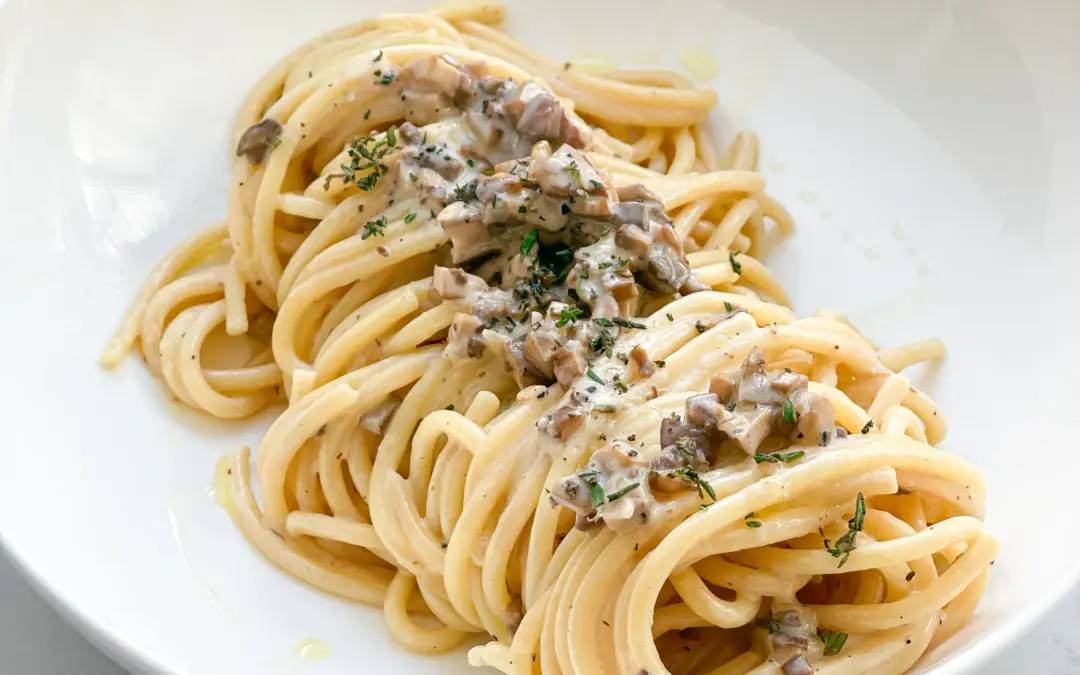
  9. Add the pasta to the sauce in the pan. Stir well. Now add the grated Parmesan and approx. 150 ml of the pasta cooking water to the pan and stir everything until creamy using tongs. This may take a few minutes. Now serve on deep plates. Top with truffle oil and a few mushrooms.
  • Cook Time: 40 min

CRAVING MORE?

Follow along here & don’t forget to subscribe to my substack!

Apple Slices with Almond Coconut Dip

Apple Slices with Almond Coconut Dip

Apple Slices with Almond Coconut Dip

Apple Slices with Almond Coconut Dip

January 26, 2024 by Kimberly

Enjoy a healthy treat with crisp Apple Slices and rich Almond Coconut Dip – a simple, delicious snack perfect for satisfying your sweet cravings!

This website uses affiliate links which may earn commission for purchases made at no additional cost to you.

TOTAL TIME

5 min

SERVES

1 portion

DIET

vegan

EVERY RECIPE DESERVES

A Little Love Letter

Dive into the delightful pairing of Apple Slices with Almond Coconut Dip, a healthy snack recipe that’s as nutritious as it is delicious. This easy fruit snack combines the sweet and crunchy apple with a creamy, nutty coconut flavor, creating a perfect balance of taste and texture. Ideal for anyone looking for a quick, tasty treat, this vegan almond dip with fresh apple treat is sure to be a crowd-pleaser.

Arrange the apple slices on a plate, and place the almond coconut dip in a bowl for an inviting snack platter. This combination is perfect for after-school snacks, party appetizers, or as a refreshing dessert alternative. You can also get creative by adding a sprinkle of cinnamon or a drizzle of honey over the apples for extra flair. This gluten-free snacking option is not only appealing to the eye but also to the palate, satisfying both sweet cravings and the desire for something crunchy.

Keep it in an airtight container in the refrigerator, where it will stay fresh for up to a week. As for the apple slices, it’s best to cut them fresh to maintain their crispness and prevent browning. This way, you can always enjoy the creamy dip and fresh apple slices at their best, ready to serve up a quick and delicious treat anytime.

Hi, I'm Kimberly!

Hi, I'm Kimberly.

A hopeless romantic when it comes to food. Every recipe I share is a love letter to food itself. I’m so glad you’re here. Make yourself at home and stay a while.

Love,
Kimberly

Kimberly the Zett Signature

If you want to get to know me better,
click here!


Apple Slices with Almond Coconut Dip

LET’S MAKE A PIECE OF HAPPINESS

Print
.tasty-recipe-responsive-iframe-container-4c44221c { position: relative; overflow: hidden; padding-top: 177.62%; } .tasty-recipe-responsive-iframe-container-4c44221c iframe { position: absolute; top: 0; left: 0; width: 100%; height: 100%; border: 0; } clock clock iconcutlery cutlery iconflag flag iconfolder folder iconinstagram instagram iconpinterest pinterest iconfacebook facebook iconprint print iconsquares squares iconheart heart iconheart solid heart solid icon
Apple Slices with Almond Coconut Dip

Apple Slices with Almond Coconut Dip


  • Author: Kimberly
  • Total Time: 5 min
  • Yield: 1

Description

GOOD TO HAVE ON HAND

  • sharp knife
  • chopping board
  • small bowl


Ingredients

  • 1 apple
  • 1 tbsp almond butter
  • 2 tbsp coconut milk
  • pinch of salt

Instructions

  • Cut the apple into slices.
  • In a small bowl, mix the almond butter with the coconut milk and a pinch of salt.
  • Arrange the apple slices and the sweet dip on a plate and enjoy.
  • Cook Time: 5 min

CRAVING MORE?

Follow along here & don’t forget to subscribe to my substack!

Basic Hummus

Basic Hummus

Basic Hummus

Basic Hummus

January 20, 2024 by Kimberly

Discover delicious Basic Hummus, a healthy, creamy snack! Perfect for dipping, it’s packed with flavor and nutrients. A must-try for all food lovers!

This website uses affiliate links which may earn commission for purchases made at no additional cost to you.

TOTAL TIME

10 min

SERVES

4 portions

DIET

vegan

EVERY RECIPE DESERVES

A Little Love Letter

Indulge in the delightful flavors of homemade Hummus. This creamy, protein-rich spread is not just delicious, but also a healthy snack option. Made from simple, wholesome ingredients, this easy Hummus recipe is perfect for health enthusiasts and food lovers alike. Whether you’re a fan of vegan options or looking for gluten-free snacks, this nutritious dip fits all palates.

Hummus is incredibly versatile, making it a perfect addition to any meal. Spread it on warm pita bread for a classic experience, or use it as a dip with crunchy vegetables for a healthy treat. It’s an excellent companion and can be customized to your liking. Add a sprinkle of olive oil and a dash of paprika to enhance its flavors, making it an irresistible centerpiece for your gatherings.

To keep your homemade Hummus fresh and flavorful, store it in an airtight container in the refrigerator. It stays good for up to a week, ensuring you have a protein-rich Hummus snack ready at all times.

Hi, I'm Kimberly!

Hi, I'm Kimberly.

A hopeless romantic when it comes to food. Every recipe I share is a love letter to food itself. I’m so glad you’re here. Make yourself at home and stay a while.

Love,
Kimberly

Kimberly the Zett Signature

If you want to get to know me better,
click here!


Basic Hummus
Basic Hummus

LET’S MAKE A PIECE OF HAPPINESS

Print
.tasty-recipe-responsive-iframe-container-01ef2920 { position: relative; overflow: hidden; padding-top: 177.62%; } .tasty-recipe-responsive-iframe-container-01ef2920 iframe { position: absolute; top: 0; left: 0; width: 100%; height: 100%; border: 0; } clock clock iconcutlery cutlery iconflag flag iconfolder folder iconinstagram instagram iconpinterest pinterest iconfacebook facebook iconprint print iconsquares squares iconheart heart iconheart solid heart solid icon
Basic Hummus

Basic Hummus


  • Author: Kimberly
  • Total Time: 10 min
  • Yield: 4

Description

GOOD TO HAVE ON HAND

  • sharp knife
  • cutting board
  • sieve
  • food processor


Ingredients

Units Scale
HUMMUS BASE
  • 265 grams cooked chickpeas, drained
  • 2 tbsp oilve oil
  • juice of half a lemon
  • 60 grams tahini
  • 1 garlic clove
  • 1/4 tsp salt
  • 1/4 tsp cumin
  • 4-5 ice cubes
TOPPINGS
  • chickpeas
  • parsley
  • paprika powder
  • za’atar
  • olive oil

Instructions

  1. Pour the chickpeas from the tin into a sieve and rinse them with cold water until no more bubbles form from the aquafaba. You can also collect the aquafaba and use it for other vegan dishes.
  2. Peel the garlic clove and cut the lemon in half.
  3. Pour the chickpeas into the food processor. You can keep a few chickpeas for decoration. Add the garlic clove, tahini, salt, olive oil and cumin. Now blend everything well at medium speed until you have a crumbly but creamy mixture.
  4. Next, add the ice cubes in batches while the machine is running. Blend for about 1-3 minutes (depending on the model) on highest until a creamy, smooth and airy mixture is formed. Season to taste with salt, lemon juice and garlic if necessary. If the hummus is too thick, you can add a little cold water and blend again.
  5. Now pour the hummus into a deep plate and garnish with olive oil, chickpeas, herbs and paprika powder as desired.
  • Cook Time: 10 min

CRAVING MORE?

Follow along here & don’t forget to subscribe to my substack!

Roasted Eggplant with Tahini Yogurt Sauce

Roasted Eggplant with Tahini Yogurt Sauce

Roasted Eggplant with Tahini Yogurt Sauce

Roasted Eggplant with Tahini Yogurt Sauce

January 18, 2024 by Kimberly

Indulge in Roasted Eggplant with Tahini Yogurt Sauce, a tantalizing, easy-to-prepare dish that promises a burst of exquisite flavors in every bite!

This website uses affiliate links which may earn commission for purchases made at no additional cost to you.

TOTAL TIME

25 min

SERVES

2 portions

DIET

vegetarian

EVERY RECIPE DESERVES

A Little Love Letter

Embark on a culinary journey with this Roasted Eggplant with Tahini Yogurt Sauce, a dish that masterfully combines simplicity with exotic flavors. Perfect for those who adore vegetarian recipes, this easy-to-prepare entrée is a gourmet treat. Made with succulent roasted eggplant and draped in a homemade tahini yogurt sauce, it’s a delicious addition to any meal or a highlight on its own.

Serving this dish is a breeze and it’s incredibly versatile. Present it as a stunning centerpiece for a family-friendly vegetarian meal or as a side dish that complements a variety of mains. The creamy tahini yogurt sauce adds a savory richness, making it an instant hit. To elevate the experience, garnish with fresh herbs or a sprinkle of toasted sesame seeds. Pair with crusty bread or a light salad for a complete, flavorful eggplant dinner idea.

Refrigerate any leftovers in an airtight container, ensuring it stays fresh and delicious. Enjoy it within the next 2 days. The flavors often deepen, making the reheated dish even more delicious.

Hi, I'm Kimberly!

Hi, I'm Kimberly.

A hopeless romantic when it comes to food. Every recipe I share is a love letter to food itself. I’m so glad you’re here. Make yourself at home and stay a while.

Love,
Kimberly

Kimberly the Zett Signature

If you want to get to know me better,
click here!


Roasted Eggplant with Tahini Yogurt Sauce

LET’S MAKE A PIECE OF HAPPINESS

Print
.tasty-recipe-responsive-iframe-container-27afa93a { position: relative; overflow: hidden; padding-top: 177.62%; } .tasty-recipe-responsive-iframe-container-27afa93a iframe { position: absolute; top: 0; left: 0; width: 100%; height: 100%; border: 0; } clock clock iconcutlery cutlery iconflag flag iconfolder folder iconinstagram instagram iconpinterest pinterest iconfacebook facebook iconprint print iconsquares squares iconheart heart iconheart solid heart solid icon
Roasted Eggplant with Tahini Yogurt Sauce

Roasted Eggplant with Tahini Yogurt Sauce


  • Author: Kimberly
  • Total Time: 25 min
  • Yield: 2

Description

GOOD TO HAVE ON HAND

  • sharp knife
  • cutting board
  • small bowl
  • medium bowl
  • mortar


Ingredients

EGGPLANT
  • 1 eggplant
  • 4 tbsp olive oil
  • 1/4 tsp salt
  • 1/8 tsp ground pepper
  • 1/8 tsp dried coriander powder
  • 1/8 tsp cinnamon
  • 1/8 tsp oregano
  • 1/8 tsp garlic powder
  • 1/8 tsp chili flakes
  • 2 cardamom capsules
TAHINI YOGURT SAUCE
  • 2 tbsp tahini
  • 4 tbsp cold water
  • 2 tbsp yogurt
  • 1 tbsp olive oil
  • 1 tbsp lemon juice
  • 1 garlic clove
  • 1/8 tsp salt
TOPPINGS
  • dates
  • chives
  • mint
  • lemon juice
  • olive oil

Instructions

  1. Preheat the oven to 230°C (450°F).
  2. Wash the eggplant and cut into 1 cm (1/2 inch) thick slices. Cut the chives into fine rolls and roughly chop the mint.
  3. Cut the dates into small pieces and crush the contents of the cardamom pods with a mortar.
  4. Mix spices together in a small bowl: 1/4 tsp salt and 1/8 tsp each of the ground pepper, coriander, cinnamon, oregano, garlic, chilli and the contents of two cardamom pods. Stir everything together and set aside.
  5. Place the eggplant slices on a baking tray lined with baking paper, spread 4 tablespoons of olive oil and the spice mixture over them. Rub all the slices with your hands and spread the oil and spices evenly. Now place the tray in the oven and bake the eggplant for 20 minutes.
  6. In the meantime, mix the tahini-yoghurt sauce in a medium-sized bowl. Mix 2 tbsp tahini with 4 tbsp water until smooth. Then add 2 tbsp yogurt, 1 tbsp lemon juice, 1 tbsp olive oil, 1 clove of garlic and 1/8 tsp salt and mix well.
  7. Remove the eggplant slices from the oven and arrange them on a large plate. Pour over the tahini-yoghurt sauce and serve with freshly ground pepper, the date pieces, chives, mint and a few sprinkles of olive oil and lemon juice.
  • Cook Time: 25 min

CRAVING MORE?

Follow along here & don’t forget to subscribe to my substack!

Apple Leek Dip with Veggies & Bread

Apple Leek Dip with Veggies & Bread

Apple Leek Dip with Veggies & Bread

Apple Leek Dip with Veggies & Bread

January 16, 2024 by Kimberly

Apple Leek Dip is amazing! It’s fresh, creamy, and perfectly paired with crunchy veggies and warm, toasty bread. A delightful treat for everyone!

This website uses affiliate links which may earn commission for purchases made at no additional cost to you.

TOTAL TIME

10 min

SERVES

2 portions

DIET

vegetarian

EVERY RECIPE DESERVES

A Little Love Letter

Embark on a culinary adventure with this Apple Leek Dip, a perfect blend for your healthy snack ideas. This easy appetizer recipe combines the unique flavors of apple and leek, offering a fresh, creamy experience. Ideal for anyone seeking quick dip recipes that are both delicious and nutritious, this dish elevates your homemade bread pairings and serves as a standout amongst vegetarian party snacks.

Serve this delightful Apple Leek Dip with a colorful array of fresh vegetables, like carrots and cucumbers, enhancing your healthy snack spread. Complement it with warm, crusty bread or toasted baguette slices for a satisfying crunch. This easy appetizer recipe is not just a treat to your taste buds but also a visual feast, making it a top choice for quick, yet impressive, vegetarian party snacks.

To keep this creamy leek appetizer fresh, store the leftover dip in an airtight container in the refrigerator. It remains delectable for 3-4 days, making it a convenient choice among quick dip recipes. Stir well before serving again to retain its smooth texture and rich flavor profile.

Hi, I'm Kimberly!

Hi, I'm Kimberly.

A hopeless romantic when it comes to food. Every recipe I share is a love letter to food itself. I’m so glad you’re here. Make yourself at home and stay a while.

Love,
Kimberly

Kimberly the Zett Signature

If you want to get to know me better,
click here!


Apple Leek Dip with Veggies & Bread

LET’S MAKE A PIECE OF HAPPINESS

Print
.tasty-recipe-responsive-iframe-container-50e0b532 { position: relative; overflow: hidden; padding-top: 177.62%; } .tasty-recipe-responsive-iframe-container-50e0b532 iframe { position: absolute; top: 0; left: 0; width: 100%; height: 100%; border: 0; } clock clock iconcutlery cutlery iconflag flag iconfolder folder iconinstagram instagram iconpinterest pinterest iconfacebook facebook iconprint print iconsquares squares iconheart heart iconheart solid heart solid icon
Apple Leek Dip with Veggies & Bread

Apple Leek Dip with Veggies & Bread


  • Author: Kimberly
  • Total Time: 10 min
  • Yield: 2

Description

GOOD TO HAVE ON HAND

  • sharp knife
  • cutting board
  • medium sized bowl


Ingredients

Units Scale
DIP
  • 200 grams cream cheese
  • 1 garlic clove
  • 50 grams leek mixed white and green parts
  • 1/2 green apple
  • 1/8 tsp salt
  • 1/8 tsp white pepper
VEGGIES & BREAD
  • bread of choice
  • tomatoes
  • carrots
  • cucumber
  • paprika

Instructions

  1. Peel half the apple, remove the core and cut into small pieces.
    Cut the ends off the leek, wash the piece to be used and then cut into fine strips.
    Peel the garlic.
  2. Pour the cream cheese into a bowl. Season with salt, pepper and freshly pressed garlic. Stir everything together and season to taste.
  3. Now add the apple pieces and leek strips and mix everything well.
  • Cook Time: 10 min

CRAVING MORE?

Follow along here & don’t forget to subscribe to my substack!

Spicy Red Cabbage Soup

Spicy Red Cabbage Soup

Spicy Red Cabbage Soup & Garlic Croûtons

Spicy Red Cabbage Soup & Garlic Croûtons

January 15, 2024 by Kimberly

Dive into a bowl of Spicy Red Cabbage Soup, where bold spices meet the deep, rich hues of red cabbage, creating a colorful and flavorful feast for your senses!

This website uses affiliate links which may earn commission for purchases made at no additional cost to you.

TOTAL TIME

50 min

SERVES

4 bowls

DIET

omnivore

EVERY RECIPE DESERVES

A Little Love Letter

Unleash a burst of color and flavor in your kitchen with Spicy Red Cabbage Soup, accompanied by crispy Garlic Croutons. This vibrant soup combines the hearty warmth of red cabbage with a tantalizing spice blend, creating a dish that’s not only visually stunning but also a delight to the taste buds. Ideal for those who love a bit of heat, it’s a perfect way to brighten up chilly days.

Serve this Spicy Red Cabbage Soup piping hot, allowing its vivid colors and aromatic spices to come alive. Top each bowl with homemade Garlic Croutons, adding a delightful crunch and garlicky contrast to the soup’s texture. Garnish with fresh herbs or a dollop of sour cream to balance the spiciness. This soup pairs wonderfully with a light salad or a slice of rustic bread, creating a satisfying and wholesome meal.

To store, let the soup cool to room temperature before transferring it into airtight containers. It can be refrigerated for up to 2 days, making it a great make-ahead dish.

Hi, I'm Kimberly!

Hi, I'm Kimberly.

A hopeless romantic when it comes to food. Every recipe I share is a love letter to food itself. I’m so glad you’re here. Make yourself at home and stay a while.

Love,
Kimberly

Kimberly the Zett Signature

If you want to get to know me better,
click here!


Spicy Red Cabbage Soup & Garlic Croûtons

LET’S MAKE A PIECE OF HAPPINESS

Print
.tasty-recipe-responsive-iframe-container-b151e3db { position: relative; overflow: hidden; padding-top: 177.62%; } .tasty-recipe-responsive-iframe-container-b151e3db iframe { position: absolute; top: 0; left: 0; width: 100%; height: 100%; border: 0; } clock clock iconcutlery cutlery iconflag flag iconfolder folder iconinstagram instagram iconpinterest pinterest iconfacebook facebook iconprint print iconsquares squares iconheart heart iconheart solid heart solid icon
Spicy Red Cabbage Soup & Garlic Croûtons

Spicy Red Cabbage Soup


  • Author: Kimberly
  • Total Time: 50 min
  • Yield: 4

Description

GOOD TO HAVE ON HAND

  • sharp knife
  • cutting board
  • large pot
  • hand blender (or blender)


Ingredients

Units Scale

SOUP

  • 800 grams red cabbage
  • 2 red onions
  • 2 potatoes
  • 1 apple
  • 3 tbsp balsamic vinegar
  • 900 milliliters chicken broth
  • 1 bay leaf
  • 2 tbsp creme fraiche (or sour cream)
  • 2 garlic cloves
  • a small piece of ginger
  • 1/8 tsp of chili flakes
  • 2 tbsp lemon juice
  • 1 tbsp butter
  • 1 tbsp Worcestershire sauce
  • 1/8 tsp cinnamon
  • salt & pepper to taste

CROÛTONS

  • 100 grams baguette
  • 2 tbsp olive oil
  • 1/4 tsp garlic powder
  • 1/4 tsp salt

TOPPINGS

  • 1 tbsp creme fraiche
  • 1 tbsp chili or olive oil
  • parsley
  • freshly cracked pepper

Instructions

  1. Peel and roughly chop onions, potatoes and the apple into large pieces.
  2. Peel the ginger and cut into small pieces.
  3. Cut or slice the red cabbage into fine strips.
  4. Remove the skin from the garlic and cut in half.
  5. Heat the butter in the pan and fry the onions until translucent. Now add the garlic and ginger to the onions in the pot and fry until fragrant.
  6. Now add the potato and apple pieces and the red cabbage. Stir everything and sauté for about 5 minutes. Now deglaze with the balsamic vinegar, stir briefly and then pour in the chicken broth. Bring to boil and then simmer on low heat with the lid closed for 20-30 minutes until the red cabbage has softened.
  7. In the meantime, prepare the croutons. To do this, cut the baguette into cubes and place on a baking tray lined with baking paper. Sprinkle with olive oil, salt and garlic powder and mix well so that the bread cubes are covered on all sides. Roast at 180°C (350° F) for approx. 5-8 minutes until golden brown. The time may vary depending on your oven. Remove the croutons from the oven and leave to cool.
  8. Once the red cabbage is soft, remove the pot from the heat and puree with a hand blender to the desired consistency.
  9. Now add creme fraiche, lemon juice, Worcestershire sauce, cinnamon, pepper and chilli to taste.
  10. Pour the soup into deep plates and top with creme fraiche, chilli oil, parsley and croutons.
  • Passive Time: 15 min
  • Cook Time: 35 min

CRAVING MORE?

Follow along here & don’t forget to subscribe to my substack!