Easy Ciabatta Buns

Easy Ciabatta Buns

Easy Ciabatta Buns

Easy Ciabatta Buns

December 27, 2023 by Kimberly

Soft and airy, easy ciabatta buns are perfect for sandwiches. Their golden crust and light texture make them a delightful choice for any meal or snack.

This website uses affiliate links which may earn commission for purchases made at no additional cost to you.

TOTAL TIME

4 hrs

SERVES

8 buns

DIET

vegan

EVERY RECIPE DESERVES

A Little Love Letter

Savor the simplicity of our easy ciabatta buns—a homemade delight with a golden crust and a soft, airy interior. Perfect for sandwiches or alongside a hearty meal, these buns require minimal effort for maximum flavor.

Serve these ciabatta buns fresh out of the oven for the ultimate experience. Ideal for crafting gourmet sandwiches or simply slathering with butter, their versatile nature complements any culinary creation. Embrace the warm, fluffy texture and revel in the homemade goodness.

To keep your ciabatta buns at their best, store them in a paper bag or bread box at room temperature. Avoid airtight containers to maintain the crisp crust. For longer freshness, freeze individually wrapped buns. Reheat in the oven for a few minutes to recapture that just-baked perfection.

Hi, I'm Kimberly!

Hi, I'm Kimberly.

A hopeless romantic when it comes to food. Every recipe I share is a love letter to food itself. I’m so glad you’re here. Make yourself at home and stay a while.

Love,
Kimberly

Kimberly the Zett Signature

If you want to get to know me better,
click here!


Easy Ciabatta Buns
Easy Ciabatta Buns
Easy Ciabatta Buns
Easy Ciabatta Buns

LET’S MAKE A PIECE OF HAPPINESS

Print
clock clock iconcutlery cutlery iconflag flag iconfolder folder iconinstagram instagram iconpinterest pinterest iconfacebook facebook iconprint print iconsquares squares iconheart heart iconheart solid heart solid icon
Easy Ciabatta Buns

Easy Ciabatta Buns


5 Stars 4 Stars 3 Stars 2 Stars 1 Star

No reviews

  • Author: Kimberly
  • Total Time: 4 hrs + 5 min
  • Yield: 8

Description

RECOMMENDED EQUIPMENT

  • large bowl
  • whisk
  • spatula
  • dough scraper (or blunt knife)
  • casserole dish (or ovenproof dish)

Ingredients

Units Scale
  • 350 milliliters lukewarm water
  • 1 tsp sugar
  • 1 tbsp oil
  • 7 grams instant yeast
  • 500 grams flour type 00 (pizza flour)
  • 1 tsp salt

Instructions

  1. Place the ingredients in a large bowl in the following order: warm water, 1 tsp sugar, 1 tbsp olive oil, dry yeast. Mix everything well with a whisk.
  2. Now add flour and 1 tsp salt. Mix everything well with a spatula so that the flour is incorporated and the edges can be scraped off. Now cover the bowl with a towel for 20 minutes and leave to rest.
  3. Wet your hands with a little water and grab the dough from four sides one after the other, pull it up and fold it in the middle so that the dough becomes rounder and has tension. Cover the bowl with a towel again and leave to rest for another 20 minutes.
  4. Repeat step 3 and cover the bowl with a towel again, but this time leave the dough to rest for approx. 2 hours.
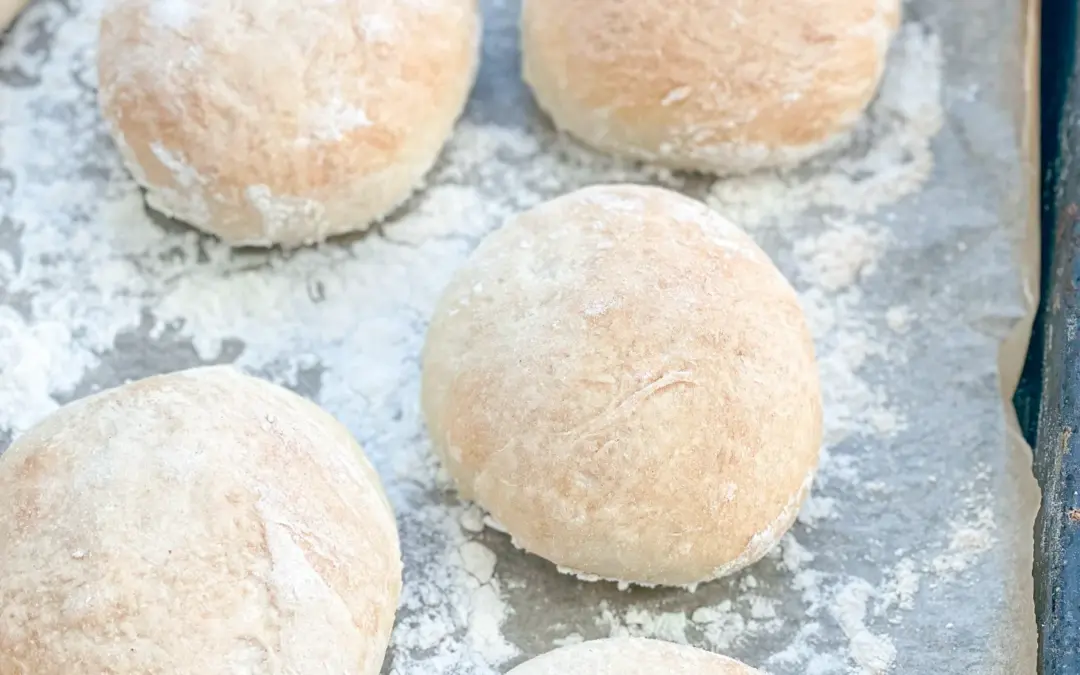
  5. Sprinkle a little flour on a work surface and place the dough on top and also sprinkle with a little flour. Spread the dough out a little and divide into 8 equal portions. Pull the dough pieces in a semicircle on the worktop so that there is tension on the surface.
  6. Place baking paper on a baking tray and sprinkle with a little flour. Place the dough pieces on top, cover again with a towel and leave to rise for another hour.
  7. Now heat the oven to 230°C (446°F). Place a baking dish or ovenproof dish with water on the bottom of the oven. Instead of the bowl of water, you can also simply pour water into the oven with a spray bottle as soon as the tray is in the oven and then quickly close the door.
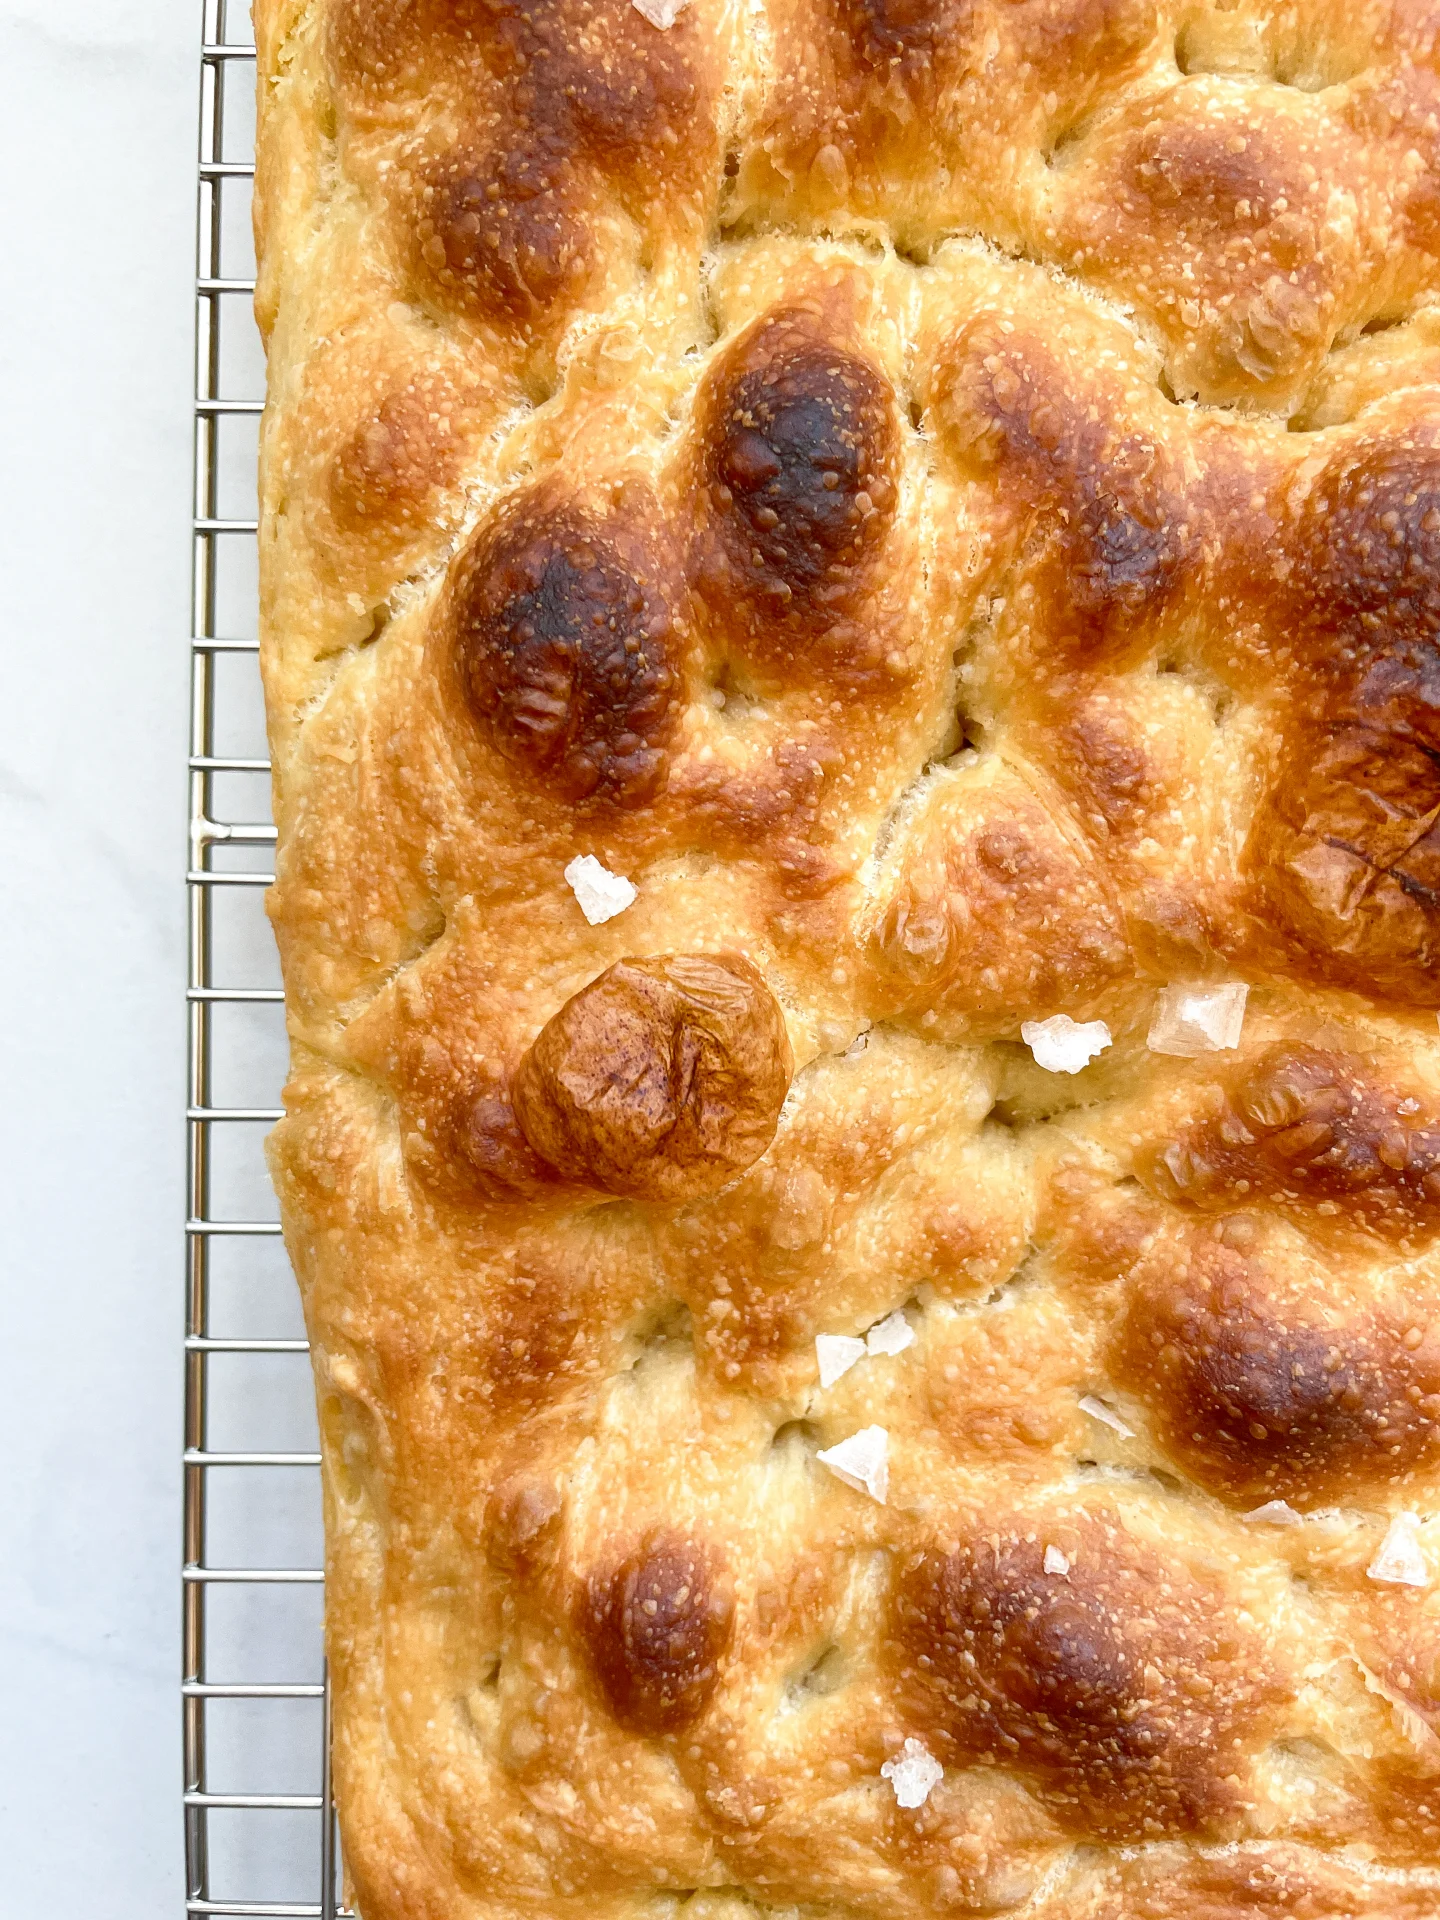
  8. Once the oven has heated up, place the baking tray with the rolls in the oven and bake for 10 minutes. Then remove the baking dish with water from the oven and bake for a further 10-15 minutes until the buns are golden brown.
  • Passive Time: 4 hrs
  • Cook Time: 5 min

CRAVING MORE?

Follow along here & don’t forget to subscribe to my substack!

Sandwich with Ham Tomato Fried Egg & Pickle Salsa (Strammer Max)

Sandwich with Ham Tomato Fried Egg & Pickle Salsa (Strammer Max)

Sandwich with Ham Tomato Fried Egg and Pickle Salsa (Strammer Max)

Sandwich with Ham Tomato Fried Egg and Pickle Salsa (Strammer Max)

December 24, 2023 by Kimberly

A variation on „Strammer Max“: ham and eggs on bread with a little twist. Simple, tasty and a delicious breakfast.

This website uses affiliate links which may earn commission for purchases made at no additional cost to you.

TOTAL TIME

15 min

SERVES

2 portions

DIET

omnivore

EVERY RECIPE DESERVES

A Little Love Letter

The „Stramme Max“ is originally a German dish traditionally served as a slice of sourdough bread with ham and fried eggs. There are countless variations and modifications, as it is super simple and makes a delicious breakfast. Here you will find my version as a slightly crisper one with fresh tomatoes and my pickle & red onion salsa as well as a freshly baked ciabatta bun. Let’s enjoy this bun of happiness.

To serve Strammer Max, start by toasting a slice of your favorite bread. Fry eggs to your desired doneness. Place the ham and eggs on the toasted bread. Add a touch of freshness with sliced tomatoes and a zesty pickle and red onion salsa. Serve it open-faced for a picturesque presentation.

While Strammer Max is best enjoyed fresh, you can prepare components in advance. Store ham and eggs separately in airtight containers in the refrigerator. Assemble just before serving to maintain the ideal texture. If you have leftover Strammer Max, refrigerate it, but be aware that the bread may lose its crispiness upon reheating.

Hi, I'm Kimberly!

Hi, I'm Kimberly.

A hopeless romantic when it comes to food. Every recipe I share is a love letter to food itself. I’m so glad you’re here. Make yourself at home and stay a while.

Love,
Kimberly

Kimberly the Zett Signature

If you want to get to know me better,
click here!


Sandwich with Ham Tomato Fried Egg and Pickle Salsa (Strammer Max)

LET’S MAKE A PIECE OF HAPPINESS

Print
.tasty-recipe-responsive-iframe-container-b6529bee { position: relative; overflow: hidden; padding-top: 177.62%; } .tasty-recipe-responsive-iframe-container-b6529bee iframe { position: absolute; top: 0; left: 0; width: 100%; height: 100%; border: 0; } clock clock iconcutlery cutlery iconflag flag iconfolder folder iconinstagram instagram iconpinterest pinterest iconfacebook facebook iconprint print iconsquares squares iconheart heart iconheart solid heart solid icon
Sandwich with Ham Tomato Fried Egg and Pickle Salsa (Strammer Max)

Sandwich with Ham Tomato Fried Egg & Pickle Salsa (Strammer Max)


  • Author: Kimberly
  • Total Time: 15 min
  • Yield: 2

Description

GOOD TO HAVE ON HAND

  • sharp knife
  • cutting board
  • small pan


Ingredients

Units Scale
  • 1 ciabatta bun
  • 1 tbsp butter
  • 4 tbsp pickles & red onion salsa
  • 50 grams deli ham
  • 2 tsp sweet mustard
  • 2 eggs
  • 1 tomato
  • chives
  • salt
  • pepper

Instructions

  1. Prepare the pickles & red onion salsa.
  2. Cut the ciabatta bun lengthwise down the middle.
  3. Cut the tomato into thin slices.
  4. Cut the chives into rolls.
  5. Melt 1 teaspoon of butter in a pan, crack in 2 eggs and fry over a medium heat until the egg whites are fully cooked but the yolks are still runny.
  6. Meanwhile, spread the rest of the butter and sweet mustard on the bun halves. Now place the ham and tomato slices on top of it.
  7. Place the fried egg on top, season with salt and pepper and top with the pickles and red onion salsa and some fresh chives.
  • Cook Time: 15 min

CRAVING MORE?

Follow along here & don’t forget to subscribe to my substack!

Smashed Chinese Cucumber Salad

Smashed Chinese Cucumber Salad

Smashed Chinese Cucumber Salad

Smashed Chinese Cucumber Salad

December 22, 2023 by Kimberly

Crisp cucumbers mingle with a savory symphony of soy sauce, sesame oil, and garlic, creating a refreshing Chinese Cucumber Salad that’s a burst of flavors in every delightful bite.

This website uses affiliate links which may earn commission for purchases made at no additional cost to you.

TOTAL TIME

10 min

SERVES

2 portions

DIET

vegan

EVERY RECIPE DESERVES

A Little Love Letter

Embark on a culinary adventure with this Chinese cucumber salad – a harmonious fusion of simplicity and robust flavor. The marriage of crisp cucumbers and an array of spices yields a salad that is not only easy to prepare but also satisfyingly filling.

Prepare this salad as a delightful side dish for gatherings or alongside your preferred main meals to elevate your dining experience. Its refreshing flavor and satisfying crunch make it a versatile accompaniment or a light, tasty standalone meal. Enhance it further by topping it with fresh coriander and roasted peanuts.

To preserve its freshness, store the salad in an airtight container in the refrigerator. Consume within 24 hours for optimal flavor and texture.

Hi, I'm Kimberly!

Hi, I'm Kimberly.

A hopeless romantic when it comes to food. Every recipe I share is a love letter to food itself. I’m so glad you’re here. Make yourself at home and stay a while.

Love,
Kimberly

Kimberly the Zett Signature

If you want to get to know me better,
click here!


Smashed Chinese Cucumber Salad

LET’S MAKE A PIECE OF HAPPINESS

Print
.tasty-recipe-responsive-iframe-container-5526eb7f { position: relative; overflow: hidden; padding-top: 177.62%; } .tasty-recipe-responsive-iframe-container-5526eb7f iframe { position: absolute; top: 0; left: 0; width: 100%; height: 100%; border: 0; } clock clock iconcutlery cutlery iconflag flag iconfolder folder iconinstagram instagram iconpinterest pinterest iconfacebook facebook iconprint print iconsquares squares iconheart heart iconheart solid heart solid icon
Smashed Chinese Cucumber Salad

Smashed Chinese Cucumber Salad


  • Author: Kimberly
  • Total Time: 10 min
  • Yield: 2

Description

GOOD TO HAVE ON HAND

  • sharp knife
  • cutting board
  • meat mallet (or rolling pin)
  • small frying pan
  • medium sized bowl


Ingredients

SALAD
  • 1 cucumber
  • 1 spring onion
  • 1 small red onion
  • 1/2 tsp roasted sesame seeds
DRESSING
  • 1 tsp sesame oil
  • 2 tbsp soy sauce
  • 1/2 tsp rice vinegar
  • 1/4 tsp sugar (or honey)
  • 1/2 tsp crispy chili oil
  • 1 garlic clove

Instructions

  1. Beat the cucumber lightly all over with a meat mallet or rolling pin. Then cut the cucumber into large pieces and place in a medium-sized bowl.
  2. Cut the red onion into thin strips and finely slice the spring onion and add everything to the bowl.
  3. Remove the skin from the garlic and press it into the bowl.
  4. Toast the sesame seeds in a small pan and add to the bowl.
  5. Now add the sesame oil, soy sauce, rice vinegar, sugar and chilli oil to the bowl and then mix with the other ingredients to make a salad. Optionally, add fresh coriander and chopped peanuts.
  • Cook Time: 10 min

CRAVING MORE?

Follow along here & don’t forget to subscribe to my substack!

Boeuf Bourguignon with Mashed Potatoes & Pearl Onions

Boeuf Bourguignon with Mashed Potatoes & Pearl Onions

Boeuf Bourguignon with Mashed Potatoes & Pearl Onions

Boeuf Bourguignon with Mashed Potatoes & Pearl Onions

December 22, 2023 by Kimberly

A classic French dish, features tender beef slow-cooked in red wine, complemented by flavorful veggies. Served alongside velvety mashed potatoes and caramelized pearl onions for a truly indulgent dining experience.

This website uses affiliate links which may earn commission for purchases made at no additional cost to you.

TOTAL TIME

3 hrs + 30 min

SERVES

6 portions

DIET

omnivore

EVERY RECIPE DESERVES

A Little Love Letter

You know those meals that taste like love in a bowl? This one’s it. Rich, slow-cooked beef in a bold red wine sauce paired with creamy mashed potatoes and sweet, soft pearl onions – it’s the ultimate cozy dinner for when you’re feeling fancy but also need that comforting omg-this-is-so-good moment. Whether it’s for a holiday dinner or just a random Tuesday when you’re feeling yourself, this dish is about to be your new fave.

Serve this beauty hot, right out of the pot. Pour that glossy, rich sauce over the creamiest mashed potatoes for a plate that’s basically edible therapy. Add a sprinkle of fresh parsley for a pop of color, and don’t forget a slice of crusty bread to scoop up all the saucy goodness. Pair it with a bold glass of red wine because it’s a whole vibe. Perfect for cozy nights or impressing dinner guests.

Store leftovers in an airtight container in the fridge for up to 3 days. Reheat gently on the stovetop, adding a splash of broth or wine to keep it saucy and delish. Pro tip: it tastes even better the next day because flavors get all cozy overnight.

Hi, I'm Kimberly!

Hi, I'm Kimberly.

A hopeless romantic when it comes to food. Every recipe I share is a love letter to food itself. I’m so glad you’re here. Make yourself at home and stay a while.

Love,
Kimberly

Kimberly the Zett Signature

If you want to get to know me better,
click here!


Boeuf Bourguignon with Mashed Potatoes & Pearl Onions
LET’S MAKE A PIECE OF HAPPINESS
Print
.tasty-recipe-responsive-iframe-container-1efa3bd5 { position: relative; overflow: hidden; padding-top: 56.3%; } .tasty-recipe-responsive-iframe-container-1efa3bd5 iframe { position: absolute; top: 0; left: 0; width: 100%; height: 100%; border: 0; } clock clock iconcutlery cutlery iconflag flag iconfolder folder iconinstagram instagram iconpinterest pinterest iconfacebook facebook iconprint print iconsquares squares iconheart heart iconheart solid heart solid icon
Boeuf Bourguignon with Mashed Potatoes & Pearl Onions

Boeuf Bourguignon with Mashed Potatoes & Pearl Onions


  • Author: Kimberly
  • Total Time: 3 hrs (1 hr passive)
  • Yield: 6

Description

RECOMMENDED EQUIPMENT

  • dutch oven
  • sharp knife
  • cutting board
  • large pot
  • small pan with a lid
  • large pan
  • potato masher

Ingredients

Units Scale
BOEUF BOURGUIGNON
  • 1.5 kilograms beef brisket or beef shoulder
  • 3 white onions
  • 3 carrots
  • 2 tbsp tomato paste
  • 750 milliliter red wine
  • 2 bay leaves
  • 400 milliliter beef stock
  • 150 grams pancetta
  • 250 grams mushrooms
  • 1 tsp clarified butter
  • 1 tbsp all-purpose flour
  • 3 garlic cloves
  • 2 fresh thyme sprigs
  • 25 grams dark chocolate
  • 50 milliliter espresso
  • salt & pepper to taste
MASHED POTATOES
  • 2 kilograms potatoes
  • 500 milliliter full-fat milk
  • 150 grams butter
  • 150 grams creme fraiche
  • salt, pepper & nutmeg to taste
PEARL ONIONS
  • 400 grams pearl onions
  • 1 tsp clarified butter
  • 1 bay leaf
  • 1 fresh thyme sprig
  • 10 grams fresh parsley
  • 150 milliliter white wine
  • salt & pepper
BEURRE MANIÉ
  • 2 tbsp butter, room temperature
  • 2 tbsp all-purpose flour

Instructions

  1. Peel the carrots and cut them into bite-sized pieces. Peel the onions and chop them into small pieces. Pat the beef dry, remove any silver skin if necessary, and cut it into roughly 4×4 cm pieces. Beef brisket or shoulder (also known as “falsches Filet” in Germany) works best. Cut the pancetta into strips. Peel the garlic cloves. They’ll be pressed into the pot later. Open the bottle of wine. Pick a Pinot Noir, Merlot, or Cabernet Sauvignon all work great. A bold, fruity red wine is ideal.
  2. Place the pancetta in a cold Dutch oven. Slowly heat it over medium heat and fry until crispy, allowing the fat to render out. Remove the pancetta and set it aside, leaving the bacon fat in the Dutch oven. If the bacon fat isn’t enough, add 1 tbsp of clarified butter and let it melt. Sear the beef in batches on both sides over high heat to create a nice crust. Remove the beef from the pot. Add the carrots, onions, and tomato paste to the Dutch oven. Press the garlic through a garlic press into the pot and stir everything well. Sauté for about 5 minutes, then sprinkle 1 tbsp of flour over the vegetables and mix well.
  3. Pour in about 1/4 of the red wine, stir, and let it reduce over medium heat without a lid until almost no liquid remains (about 5 minutes). The wine and flour should form a creamy texture with the veggies. Return the seared beef to the pot, pour in the remaining wine and the beef stock, and stir well. Place thyme sprigs and bay leaves on top, cover, and bring to a boil. Then reduce to low heat and simmer with the lid on for 2.5-3 hours.
  4. Meanwhile, peel the pearl onions carefully without cutting through them. Set them aside in a bowl. Next brush the mushrooms clean with a pastry brush or peel them directly, then quarter them. Set them aside as well. Next to prepare the mashed potatoes peel and quarter them. Fill a large pot with water, add the potatoes and 1 tsp salt and boil until soft. Drain the water and keep the potatoes covered. Heat a small pan over medium heat, melt 1 tsp of clarified butter, and sauté the pearl onions for about 5 minutes, stirring frequently, until they turn golden brown. Deglaze with white wine, add thyme, parsley, and a bay leaf on top, cover, and simmer for about 25 minutes until the wine has mostly evaporated and the onions are soft. Remove the herbs before serving and keep the onions warm on the stove. Season with salt & pepper.
  5. To thicken the Boeuf Bourguignon sauce, prepare a beurre manié. Mix 2 tbsp of softened butter with 2 tbsp of flour into a creamy paste. Add it gradually to the stew about 30 minutes before the end of the cooking time to thicken the sauce. Stir the beurre manié into the Dutch oven in portions and bring everything to a quick boil.
  6. After about 1.5 hours of simmering, sauté the quartered mushrooms in a large pan with 1 tsp of clarified butter until golden brown. While they’re cooking, prepare an espresso. Add the mushrooms, pancetta, dark chocolate, and espresso to the Dutch oven. Stir well and let it simmer for at least another 30 minutes.
  7. For the mashed potatoes, warm milk and butter in a small pot until the butter has melted. Add the mixture to the potatoes, grate in some nutmeg, and mash everything into a chunky texture. For a smoother mash, pass the potatoes through a sieve or food mill. Season with salt and pepper, then stir in crème fraîche. To serve, spoon the mashed potatoes onto plates, top with Boeuf Bourguignon, and add some pearl onions. Garnish with fresh chives.
  • Passive Time:
CRAVING MORE?
Follow along here & don’t forget to subscribe to my substack!

Shortbread Bars With Cherry Jam

Shortbread Bars With Cherry Jam

Shortbread Bars with Cherry Jam

Shortbread Bars with Cherry Jam

December 18, 2023 by Kimberly

Delight in buttery shortbread bars, a symphony of crumbly texture, harmonized with luscious jam. Each bite unveils a perfect blend of sweetness and simplicity, a timeless treat for indulgence.

This website uses affiliate links which may earn commission for purchases made at no additional cost to you.

TOTAL TIME

40 min

SERVES

24 bars

DIET

vegetarian

EVERY RECIPE DESERVES

A Little Love Letter

Indulge in the sublime fusion of buttery shortbread and vibrant cherry jam with this irresistible Shortbread Bars With Cherry Jam. The crumbly, melt-in-your-mouth texture of the shortbread complements the sweet-tart burst of cherry jam, creating a symphony of flavors that’s both nostalgic and delectable.

To serve, cut into perfectly portioned bars and arrange them on a charming dessert platter. These bars make a delightful addition to afternoon tea or a sweet ending to any gathering.

For optimal freshness, store the Shortbread Bars in an airtight container at room temperature for up to three days. To extend their shelf life, refrigerate for a longer-lasting treat.

Hi, I'm Kimberly!

Hi, I'm Kimberly.

A hopeless romantic when it comes to food. Every recipe I share is a love letter to food itself. I’m so glad you’re here. Make yourself at home and stay a while.

Love,
Kimberly

Kimberly the Zett Signature

If you want to get to know me better,
click here!


Shortbread Bars with Cherry Jam

LET’S MAKE A PIECE OF HAPPINESS

Print
.tasty-recipe-responsive-iframe-container-13d4a151 { position: relative; overflow: hidden; padding-top: 177.62%; } .tasty-recipe-responsive-iframe-container-13d4a151 iframe { position: absolute; top: 0; left: 0; width: 100%; height: 100%; border: 0; } clock clock iconcutlery cutlery iconflag flag iconfolder folder iconinstagram instagram iconpinterest pinterest iconfacebook facebook iconprint print iconsquares squares iconheart heart iconheart solid heart solid icon
Shortbread Bars with Cherry Jam

Shortbread Bars With Cherry Jam


  • Author: Kimberly
  • Total Time: 40 min
  • Yield: 24 bars

Description

RECOMMENDED EQUIPMENT

  • Mixing bowl
  • Hand mixer (or stand mixer)
  • Cling film
  • Cheese grater
  • Baking tin 20×20 cm (8×8 inch)

Ingredients

Units Scale
  • 250 grams butter
  • 100 grams sugar
  • 350 grams sugar
  • 1/4 tsp salt
  • 150 grams cherry jam

Instructions

  1. Line a baking tin with baking paper.
  2. Place the soft (not liquid) butter, sugar and salt in a mixing bowl. Mix with a hand mixer or stand mixer for approx. 3 minutes until creamy. Add the flour and mix until the butter is coated in flour. Then knead with your hands until smooth.
  3. Wrap the dough in a layer of cling film and shape into a square. Place the dough in the freezer for approx. 1 hour.
  4. Preheat the oven to 180°C (350°F). Now grate half the dough into flakes using a cheese grater. Put the other half back in the freezer.
  5. Spread the flakes evenly in a baking dish. Use very little pressure to spread the flakes in the tin. DO NOT press them down. Now spread the cherry jam evenly over the flakes.
  6. Now take the second half of the dough out of the freezer and grate it into flakes using the cheese grater and spread it evenly over the jam. Again, only spread the flakes with very light fingers and do not press down.
  7. Bake for approx. 15 to 20 minutes at 180°C (350°F) or until the shortbread is light golden but not brown. It is best to take them out of the oven when they are lightly golden, as they will bake a little longer anyway. Leave the shortbreads to cool and cut into strips.
  • Passive Time: 20 min
  • Cook Time: 20 min

CRAVING MORE?

Follow along here & don’t forget to subscribe to my substack!

Steamed Buns Filled With Melted Nougat

Steamed Buns Filled With Melted Nougat

Steamed Buns Filled With Melted Nougat

Steamed Buns Filled With Melted Nougat

December 16, 2023 by Kimberly

Picture this: fluffy steamed buns hugging a luscious center of melted nougat. A sweet symphony in every bite. Simply delicious and impossible to resist!

This website uses affiliate links which may earn commission for purchases made at no additional cost to you.

TOTAL TIME

2 hrs + 5 min

SERVES

4 buns

DIET

vegetarian

EVERY RECIPE DESERVES

A Little Love Letter

Indulge in a symphony of flavors with this delightful creation – Steamed Buns filled with Melted Nougat. This fusion of soft, pillowy buns and gooey nougat is a treat for the senses.

Steam the buns until warm, revealing a divine fusion of softness and gooey nougat. Elevate the indulgence by serving with warm vanilla sauce, roasted breadcrumbs, and hazelnuts. Each bite is a symphony of textures and flavors, creating a dessert sensation that will leave you craving more.

To keep the magic alive for later indulgence, store any leftovers in an airtight container in the refrigerator. The buns will stay fresh for up to three days. When ready to enjoy again, simply reheat them by steaming for a few minutes until they regain their warm, fluffy perfection.

Hi, I'm Kimberly!

Hi, I'm Kimberly.

A hopeless romantic when it comes to food. Every recipe I share is a love letter to food itself. I’m so glad you’re here. Make yourself at home and stay a while.

Love,
Kimberly

Kimberly the Zett Signature

If you want to get to know me better,
click here!


Steamed Buns Filled With Melted Nougat

LET’S MAKE A PIECE OF HAPPINESS

Print
.tasty-recipe-responsive-iframe-container-20fac647 { position: relative; overflow: hidden; padding-top: 177.62%; } .tasty-recipe-responsive-iframe-container-20fac647 iframe { position: absolute; top: 0; left: 0; width: 100%; height: 100%; border: 0; } clock clock iconcutlery cutlery iconflag flag iconfolder folder iconinstagram instagram iconpinterest pinterest iconfacebook facebook iconprint print iconsquares squares iconheart heart iconheart solid heart solid icon
Steamed Buns Filled With Melted Nougat

Steamed Buns Filled With Melted Nougat


  • Author: Kimberly
  • Total Time: 2 hrs

Description

RECOMMENDED EQUIPMENT

  • Kitchen paper (or a fine towel)
  • sharp knife
  • chopping board
  • hand mixer (or whisk)
  • cling film
  • medium-sized saucepan
  • small saucepan
  • small pan

Ingredients

Units Scale
BUNS
  • 200 grams quark
  • 100 grams all-purpose flour
  • 1 egg
  • 25 grams butter
  • pinch of salt
  • pinch of lemon zest
  • 120 grams nougat
TOPPINGS
  • 35 grams breadcrumbs
  • 35 grams ground hazelnuts
  • 1 tsp sugar
  • 1.5 tbsp butter
  • 200 milliliters vanilla sauce

Instructions

  1. Squeeze the quark between kitchen paper so that it loses any liquid. Cut the nougat into 4 equal pieces. If you are using whole hazelnuts, finely grind them. If you are using hazelnuts that have already been ground, you can skip this step.
  2. For the buns, beat butter with a pinch of salt (approx. 3 minutes) and then add the egg and mix. Now add flour and the quark. Knead everything into a smooth dough. Wrap the dough in cling film and place in the fridge for at least 90 minutes.
  3. After 90 minutes, bring a medium-sized pot of water to the boil. Meanwhile, transfer the dough from the fridge to a floured work surface and roll out. Divide into 4 equal pieces. Place a piece of nougat in the middle of each piece of dough, wrap evenly with dough and shape into a ball.
  4. As soon as the water boils, reduce the heat and place the nougat balls in the boiling water. Cook the nougat balls for around 10 minutes. Meanwhile, heat the vanilla sauce in a small pan.
  • Passive Time: 90 min
  • Cook Time: 30 min

CRAVING MORE?

Follow along here & don’t forget to subscribe to my substack!