Peach Vanilla Jam

Peach Vanilla Jam

Peach Vanilla Jam

Peach Vanilla Jam

May 12, 2024 by Kimberly

Discover the joy of homemade Peach Vanilla Jam! A sweet, fragrant blend perfect for breakfast spreads and desserts. Simple, delicious, and wonderfully aromatic.

2 HOURS
25 MINUTES

EASY

VEGETARIAN

INT.

16 PER TSP

SWEET
FRUITY

EVERYDAY

DIPS & SPREADS

SPRING
SUMMER

INTRODUCTION

ABOUT THE RECIPE

Dive into the delightful world of homemade jam with my peach vanilla jam recipe! This easy-to-follow recipe combines ripe peaches and fragrant vanilla for a heavenly spread.

How to serve
Spread it over warm toast, swirl it into your morning yogurt, or dollop it on pancakes. It’s the perfect addition to enhance any breakfast or snack time with a touch of homemade sweetness.

How to store
To keep your jam fresh, store it in airtight containers in the refrigerator. Properly sealed, it can last as long as store-bought jam once opened.

Hi, I'm Kimberly!

Hi, I'm Kimberly.

A passionate food lover who believes in the magic of homemade deliciousness that spreads love and warmth. Join me on this culinary adventure as I prepare wonderful dishes and let’s spread some happiness together!

Kimberly the Zett Signature

If you want to get to know me better, click here!


Peach Vanilla Jam
Peach Vanilla Jam
Peach Vanilla Jam
„Let’s make a piece of happiness“
Print
clock clock iconcutlery cutlery iconflag flag iconfolder folder iconinstagram instagram iconpinterest pinterest iconfacebook facebook iconprint print iconsquares squares iconheart heart iconheart solid heart solid icon
Peach Vanilla Jam

Peach Vanilla Jam


5 Stars 4 Stars 3 Stars 2 Stars 1 Star

No reviews

  • Author: Kimberly
  • Total Time: 145 min
  • Yield: 1.5 kg / 3.3 lbs 1x

Description

RECOMMENDED EQUIPMENT

  • 4 screw-top jars
  • sharp knife
  • cutting board
  • medium-sized pot
  • immersion blender

Ingredients

Units Scale
  • 1 kilograms ripe peaches
  • 500 grams jam sugar 2:1
  • 1 vanilla pod

Instructions

  1. Rinse four screw-top jars with boiling hot water, dry them, and keep them open and ready to be filled.
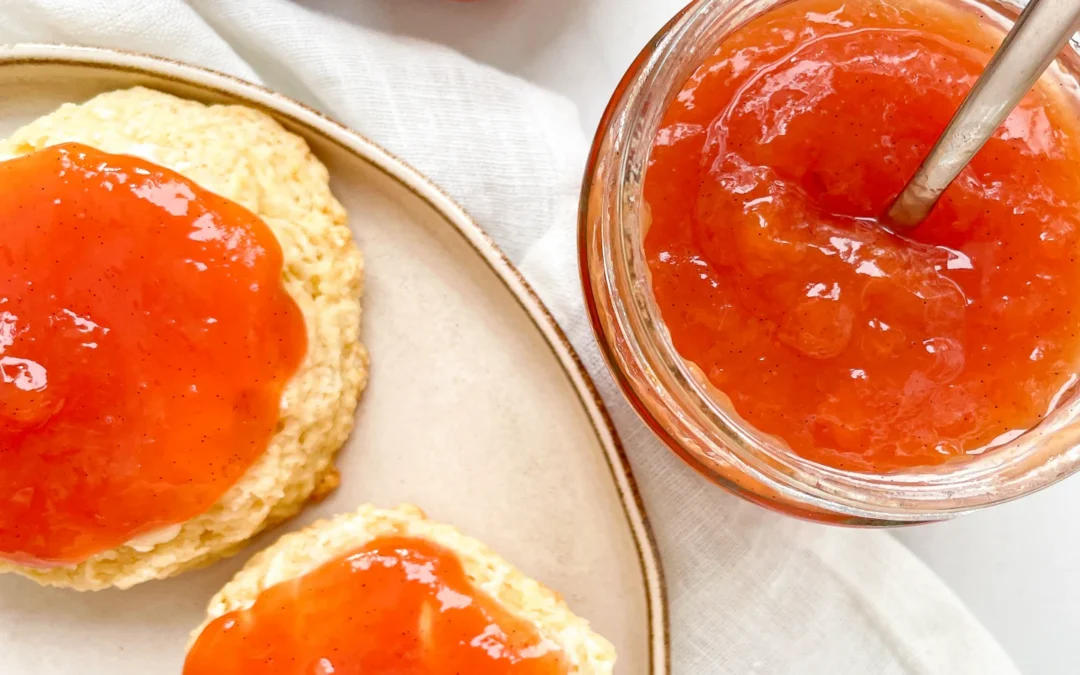
  2. Wash and dry the peaches. Remove the pits and chop the peaches into rough pieces. Place all the pieces in a medium-sized pot.
  3. Slit a vanilla pod lengthwise and scrape out the seeds. Add the vanilla seeds, the pod, and the jam sugar to the peaches. Stir well and bring to a boil over medium heat.
  4. Let it boil for about 5 minutes. Stir occasionally. Remove the vanilla pod, then puree the mixture with an immersion blender until smooth and simmer for another 5 minutes and stir occasionally.
  5. Fill the jam hot into the washed jars and seal them. Let them cool completely. The jam can be stored unrefrigerated and unopened for several months, and once opened, it lasts in the fridge as long as store-bought jam.

Notes

The calorie information may vary depending on the product used, country and region.

  • Passive Time: 120 min
  • Cook Time: 25 min

White Chocolate Mousse

White Chocolate Mousse

White Chocolate Mousse

White Chocolate Mousse

May 8, 2024 by Kimberly

Indulge in a heavenly white chocolate mousse, the ultimate creamy delight! Luxurious, velvety, and decadently sweet – perfect for any dessert lover.

2 HOURS
20 MINUTES

INTERMEDIATE

VEGETARIAN

FRENCH

415 PER PORTION

SWEET
CREAMY

DINNER PARTY

DESSERT

ALL YEAR

INTRODUCTION

ABOUT THE RECIPE

Experience the sheer decadence of this white chocolate mousse, a dessert that promises to elevate your dining experience. Its smooth, creamy texture and rich chocolate flavor make it a favorite among sweet tooth fans.

How to serve
This white chocolate mousse is best served chilled, making it a refreshing end to any meal. Present it in elegant glasses topped with a sprinkle of chocolate flakes or fresh strawberries for a touch of sophistication. It’s ideal for dinner parties or a romantic evening, offering a light yet indulgent dessert option that’s sure to impress.

How to store
Store it in the refrigerator covered with plastic wrap. It will stay fresh for up to two days, ensuring you can enjoy its luxurious taste at its best.

Hi, I'm Kimberly!

Hi, I'm Kimberly.

A passionate food lover who believes in the magic of homemade deliciousness that spreads love and warmth. Join me on this culinary adventure as I prepare wonderful dishes and let’s spread some happiness together!

Kimberly the Zett Signature

If you want to get to know me better, click here!


White Chocolate Mousse
„Let’s make a piece of happiness“
Print
clock clock iconcutlery cutlery iconflag flag iconfolder folder iconinstagram instagram iconpinterest pinterest iconfacebook facebook iconprint print iconsquares squares iconheart heart iconheart solid heart solid icon
White Chocolate Mousse

White Chocolate Mousse


  • Author: Kimberly
  • Total Time: 20 min + 2 hrs
  • Yield: 4 1x

Description

RECOMMENDED EQUIPMENT

  • 2 medium-sized bowls
  • whisk
  • electric mixer
  • small pot
  • small metal or glass bowl

Ingredients

Units Scale
  • 45 grams butter
  • 15g powdered sugar
  • 2 egg yolks
  • 100 grams white chocolate
  • 200 grams heavy whipping cream

Instructions

  1. Cream the butter and powdered sugar together in a medium-sized bowl with a whisk. Separate the eggs and add the yolks to the butter and sugar. Beat the mixture with an electric mixer until creamy and stiff, about 5 minutes. The egg whites won’t be used further, but to avoid waste, you could make a meringue with them.
  2. Melt the white chocolate in a double boiler, let it cool slightly, then stir it into the mixture.
  3. Whip the cold cream until it forms peaks and gently fold it into the mixture until everything is well combined.
  4. Divide the mixture into 4 dessert bowls and refrigerate for at least 2 hours.

Notes

The calorie information may vary depending on the product used, country and region.

  • Passive Time: 2 hrs
  • Cook Time: 20 min

Café de Paris Butter

Café de Paris Butter

Café de Paris Butter

Café de Paris Butter

May 1, 2024 by Kimberly

Unleash the flavors with Café de Paris Butter! A rich, herb-infused delight perfect for transforming steaks and vegetables into gourmet experiences.

10 MINUTES

EASY

VEGETARIAN

INT.

180 PER PORTION

HERBACOUS
BUTTERY

EVERYDAY

DIPS & SPREADS

ALL YEAR

INTRODUCTION

ABOUT THE RECIPE

Experience the essence of French cuisine with Café de Paris Butter, a luxurious compound butter that enriches any dish it touches. This delightful blend is packed with herbs and spices, making it an ideal gourmet addition to your kitchen repertoire.

How to serve:
Café de Paris Butter is best served melted over hot steaks, grilled chicken, or roasted vegetables. Its rich flavor also complements baked potatoes and fresh bread. For an exquisite culinary twist, try spreading it on your favorite toasted baguette or incorporate it into pasta for a creamy, herbaceous sauce. Its gourmet flair will transform ordinary meals into memorable dining experiences.

How to store:
Keep your Café de Paris Butter fresh by storing it wrapped in parchment paper in the refrigerator, where it will last up to one week. For longer preservation, freeze it, ensuring you always have a batch ready for use.

Hi, I'm Kimberly!

Hi, I'm Kimberly.

A passionate food lover who believes in the magic of homemade deliciousness that spreads love and warmth. Join me on this culinary adventure as I prepare wonderful dishes and let’s spread some happiness together!

Kimberly the Zett Signature

If you want to get to know me better, click here!


Café de Paris Butter
„Let’s make a piece of happiness“

INGREDIENTS

FOR 8 PORTIONS

BASE

  • 150g butter (1 stick butter + 1 tbsp)
  • 100g creme fraiche (1/2 cup)
  • 1/2 tsp dijon mustard
  • 1 tsp white wine vinegar
  • 1 shallot
  • 1 garlic clove

HERBS & SPICES

  • 1 tbsp dried parsley
  • 1/2 tsp curry powder
  • 1/4 tsp dried dill
  • 1/4 tsp paprika powder
  • 1/4 tsp dried marjoram
  • 1/4 tsp salt
  • 1/8 tsp dried thyme
  • 1/8 tsp dried rosmary
  • 1/8 tsp ground black pepper
Café de Paris Butter
}

ACTIVE: 2 min

PASSIVE: –

PREPARATIONS

Recommended Equipment
  • sharp knife
  • cutting board
  • small bowl
  • fork
  • Let the butter come to room temperature.
  • Peel the shallot and finely dice it.
  • Peel the garlic clove.
}

ACTIVE: 5 min

PASSIVE: –

COOKING

1. Mix butter, crème fraîche, white wine vinegar, and Dijon mustard together in a bowl.

2. Add the finely diced shallot. Also, finely chop or press the garlic clove and add it to the mixture.

3. Finally, add rosemary, parsley, dill, curry, paprika, marjoram, thyme, salt, and pepper to the bowl and mix everything well. Taste and adjust seasoning as needed.

4. Roll the butter in parchment paper or place it in a bowl.

NOTE: The calorie information may vary depending on the product used, country and region.

Strawberry Cupcakes with Cream Cheese Frosting & Cheesecake Filling

Strawberry Cupcakes with Cream Cheese Frosting & Cheesecake Filling

Strawberry Cupcakes with Cream Cheese Frosting & Cheesecake Filling

Strawberry Cupcakes with Cream Cheese Frosting & Cheesecake Filling

April 24, 2024 by Kimberly

Savor the irresistible charm of these Strawberry Cupcakes, brimming with lush cheesecake filling and crowned with velvety cream cheese frosting—ideal for satisfying any dessert craving!

100 MINUTES

INTERMEDIATE

VEGETARIAN

INT.

471 PER CUPCAKE

SWEET
CREAMY
FLUFFY

EVERYDAY

DESSERT
CUPCAKE

SPRING
SUMMER

INTRODUCTION

ABOUT THE RECIPE

Dive into the delightful world of Strawberry Cupcakes with Cream Cheese Frosting and Cheesecake Filling! These heavenly cupcakes are a fusion of fruity, creamy, and utterly decadent flavors, making them the ultimate dessert for any occasion.

HOW TO SERVE
Serve these Strawberry Cupcakes chilled or at room temperature to let the flavors shine. They pair beautifully with a cup of coffee or a glass of cold milk. Perfect for celebrations or as a special treat, their gorgeous appearance and exquisite taste will impress any guest!

HOW TO STORE
Keep the cupcakes in an airtight container in the refrigerator. They stay fresh and delicious for up to 3 days.

Hi, I'm Kimberly!

Hi, I'm Kimberly.

A passionate food lover who believes in the magic of homemade deliciousness that spreads love and warmth. Join me on this culinary adventure as I prepare wonderful dishes and let’s spread some happiness together!

Kimberly the Zett Signature

If you want to get to know me better, click here!


Strawberry Cupcakes with Cream Cheese Frosting & Cheesecake Filling
„Let’s make a piece of happiness“
Print
clock clock iconcutlery cutlery iconflag flag iconfolder folder iconinstagram instagram iconpinterest pinterest iconfacebook facebook iconprint print iconsquares squares iconheart heart iconheart solid heart solid icon
Strawberry Cupcakes with Cream Cheese Frosting & Cheesecake Filling

Strawberry Cupcakes with Cream Cheese Frosting & Cheesecake Filling


5 from 1 review

  • Author: Kimberly
  • Total Time: 100 min
  • Yield: 12 cupcakes 1x

Description

RECOMMENDED EQUIPMENT

  • sharp knife
  • cutting board
  • cupcake tin
  • parchment paper
  • two small bowls
  • three medium bowls
  • whisk
  • cookie scoop (or spoon)
  • spatula
  • fine mesh sieve
  • mortar and pestle
  • electric mixer

Ingredients

Units Scale

BATTER

  • 500 grams all-purpose flour
  • 2 tsp backing powder
  • 1/4 tsp baking soda
  • 100 grams white sugar
  • 100 grams unsalted butter
  • 2 eggs
  • 150 grams yogurt
  • 1 tsp vanilla extract
  • 200 grams strawberries
  • pinch of salt

FILLING

  • 150 grams cream cheese
  • 20 grams powdered sugar
  • zest of half a lemon
  • 1/2 tsp vanilla extract

FROSTING

  • 75 grams butter
  • 75 grams cream cheese
  • 175 grams powdered sugar
  • 20 grams freeze-dried strawberries

CRUMBLES

  • 100 grams all-purpose flour
  • 75 grams butter
  • 25 grams white sugar
  • pinch of salt

Instructions

PREPARATIONS

  1. Thoroughly wash the strawberries, dry them, and cut into small pieces. Set aside.
  2. Cut parchment paper into small squares and press two layers into every other cup of the cupcake tin. Alternatively, you can skip the parchment paper and use cupcake liners instead. Set the prepared tin aside.

COOKING

  1. For the crumbles: In a small bowl, knead together room temperature butter, flour, sugar, and a pinch of salt until combined, then break into large chunks. Store in the refrigerator until needed.
  2. For the filling: In a small bowl, mix together cream cheese, powdered sugar, zest from half a lemon, and 1/2 teaspoon vanilla extract until creamy. Store in the refrigerator until needed. Preheat the oven to 180°C (350°F).
  3. For the batter: In one of the medium bowls, mix together the dry ingredients – flour, 2 teaspoons baking powder, 1/4 teaspoon baking soda, sugar, and a pinch of salt. Set aside.
  4. In another medium bowl, combine the wet ingredients – melted butter, eggs, yogurt, milk, and 1 teaspoon vanilla extract using a whisk until smooth.
  5. Add the flour mixture to the wet ingredients and use a spatula to blend into a batter. Mix just until no flour streaks remain, then fold in the chopped strawberries.
  6. Grab the crumbles and cream cheese mix from the fridge.
  7. Place a scoop of batter into every second cup of the cupcake tin. Press a scoop in the center and add 1 teaspoon of the cream cheese filling. Cover with another scoop of batter. Distribute crumbles over 6 of the 12 cupcakes, pressing down firmly. Leave the other 6 plain for the strawberry frosting later.
  8. Bake the cupcakes for 20-25 minutes. Remove the tin from the oven and let cool briefly before removing them to a wire rack to cool completely. Prepare the next batch of cupcakes similarly, but without the crumbles. Let all cupcakes cool completely.
  9. Meanwhile, make the frosting: In a medium bowl, beat room temperature butter with an electric mixer until pale yellow and fluffy. Add cream cheese and mix again. Then, add sifted powdered sugar and mix for 1-2 minutes until creamy.
  10. Crush freeze-dried strawberries into a fine powder using a mortar and pestle (or a powerful food processor). Mix this strawberry powder into the frosting until evenly pink.
  11. Once the cupcakes are completely cool, evenly spread and smooth the frosting over the 6 plain cupcakes. And now enjoy your pieces of happiness!

Notes

The calorie information may vary depending on the product used, country and region.

  • Prep Time: 10 min
  • Passive Time: 60 min
  • Cook Time: 30 min

Vanilla Lemon Cream Cheese Rolls

Vanilla Lemon Cream Cheese Rolls

Vanilla Lemon Cream Cheese Rolls

Vanilla Lemon Cream Cheese Rolls

April 17, 2024 by Kimberly

Savor the blissful bite of Vanilla Lemon Cream Cheese Rolls! A heavenly blend of zesty lemon and sweet vanilla wrapped in a soft, fluffy pastry.

3.5 HOURS

INTERMEDIATE

VEGETARIAN

INT.

455 PER ROLL

FLUFFY
SWEET

EVERYDAY

DESSERT
CAKE

SPRING
SUMMER

INTRODUCTION

ABOUT THE RECIPE

Wake up to the sweet aroma of Vanilla Lemon Cream Cheese Rolls! These gourmet pastries blend the tangy zest of lemon with the rich sweetness of vanilla and cream cheese, all nestled in a tender, fluffy roll. Perfect for indulging your sweet tooth or impressing guests at brunch, these rolls are a delightful twist on classic flavors, creating a memorable experience with every bite.

How to serve:
They’re perfect alongside your morning coffee or as an afternoon treat. For an extra special touch, garnish with lemon zest or thin lemon slices. These rolls are sure to be a hit at any brunch, breakfast, or tea time, offering a beautiful balance of flavors and textures.

How to store:
Keep leftover Vanilla Lemon Cream Cheese Rolls in an airtight container in the refrigerator for up to 4 days.

Hi, I'm Kimberly!

Hi, I'm Kimberly.

A passionate food lover who believes in the magic of homemade deliciousness that spreads love and warmth. Join me on this culinary adventure as I prepare wonderful dishes and let’s spread some happiness together!

Kimberly the Zett Signature

If you want to get to know me better, click here!


Vanilla Lemon Cream Cheese Rolls
„Let’s make a piece of happiness“

INGREDIENTS

FOR 12 ROLLS

DOUGH

  • 550g all-purpose flour (the germans can use type 550) (4.5 cups)
  • 250ml whole-fat milk (1 cup)
  • 50g white sugar (1/4 cup)
  • 75g butter (1/3 cup)
  • 1 egg
  • 20g fresh yeast (0.7 oz)
  • pinch of salt

FILLING

  • 300g cream cheese (1 + 1/3 cup)
  • 60g powdered sugar (1/2 cup)
  • 100g lemon curd (1 cup)
  • 1 tbsp cornstarch 
  • 1/2 tsp vanilla extract

GLAZE

  • 150g powdered sugar (1.5 cups)
  • 50g butter (1/4 cup)
  • 150g cream cheese (2/3 cup)
  • zest of one lemon
  • juice of half a lemon
  • 1/2 tsp vanilla extract
  • funfetti sprinkles
Vanilla Lemon Cream Cheese Rolls
}

ACTIVE: –

PASSIVE: –

PREPARATIONS

Recommended Equipment
  • medium-sized bowl
  • small pot (or microwave)
  • rolling pin
  • baking dish – my used measurements were 20x26cm (8×10 inch)
  • whisk
  • sewing thread
  • none
}

ACTIVE: 25 min

PASSIVE: 3 hrs

COOKING

1. First, in a medium-sized bowl, stir together the filling. Mix 300g of cream cheese, 60g of powdered sugar, 1 tsp of vanilla extract, and 1 tbsp of cornstarch and put it in the fridge.

2. Next, prepare the dough. In a small pot, warm 250ml of full-fat milk to no more than 38°C (100°F) so the yeast isn’t killed. Take 1 tbsp from the 50g (1/4 cup) of sugar intended for the dough and add it to the warm milk along with the yeast. Stir everything well with a whisk until the yeast is completely dissolved in the milk. Set aside.

3. In a large bowl, add flour, the remaining sugar, the soft butter, an egg, and a pinch of salt. Mix everything using your hands. Now pour in the yeast-milk mixture and knead everything into a soft, pliable dough for a good 10 minutes. Cover the bowl with a damp towel or cling film and let it rise for 2 hours at 20°-23°C (68°-73°F). The dough should double in volume.

4. After the two hours sprinkle some flour on a clean work surface and place the dough on it. Dust a bit more flour on the dough and roll it out until it’s rectangular and about 1 cm (1/2″) thick throughout.

5. Take the cream cheese filling out of the fridge and spread it evenly over the dough. Now also spread the lemon curd over the cream, working it in a bit – depending on the consistency of the curd.

6. Start rolling up the dough from the longer side. Keep it nice and loose, not too tight, or the filling might ooze out.

7. Cut a long piece of sewing thread and slide it under the middle of the roll. Gently lift both ends of the thread, cross them over the top, and pull downwards, cutting the dough cleanly without squishing it. Proceed with the entire roll, making a total of 12 buns.

8. Place the individual rolls in a baking dish, cover again with the damp towel, and let them rise for another 15 minutes.

9. Meanwhile, preheat the oven to 180°C (356°F).

10. After the final 15 minutes of rising, bake the buns in the oven for 30 minutes. They should turn a golden color.

11. Let the buns cool completely. In the meantime, whisk together the glaze made of 150g (1.5 cups) powdered sugar, 150g (2/3 cups) cream cheese, 50g (1/4 cup) soft butter, 1 tsp vanilla extract, the zest of one lemon, and the juice of half a lemon.

12. Once the buns are cool, spread the glaze all over them and, if you like, sprinkle some funfetti on top – but that’s optional 😉

NOTE: The calorie information may vary depending on the product used, country and region.

Apricot Cashew Honey Bliss Balls

Apricot Cashew Honey Bliss Balls

Apricot Cashew Honey Bliss Balls

Apricot Cashew Honey Bliss Balls

April 13, 2024 by Kimberly

Dive into the world of deliciousness with these Apricot Cashew Honey Bliss Balls! Perfectly sweet, nutty, and chewy, they’re the ultimate healthy snack for any time of day.

10 MINUTES

EASY

VEGETARIAN

INT.

67 kcal

NUTTY
CHEWY

EVERYDAY

SNACK

ALL YEAR

INTRODUCTION

ABOUT THE RECIPE

Welcome to your new favorite snack: Apricot Cashew Honey Bliss Balls! These no-bake energy balls are a blissful blend of sweet apricots, creamy cashews, and natural honey. Perfect for those seeking a quick, healthy dessert idea or a nutritious energy boost, these bliss balls are sure to delight with their chewy texture and nutty flavor.

How to serve:
Serve these delightful Apricot Cashew Honey Bliss Balls as a mid-morning snack, a post-workout energy boost, or a sweet after-dinner treat. Pair them with a cup of your favorite tea or a cold glass of almond milk for a refreshing snack. These bliss balls are also perfect for sharing at gatherings or gifting to friends and family who appreciate healthy, homemade treats.

How to store:
Store your Bliss Balls in an airtight container in the refrigerator for up to two weeks. For longer storage, freeze them on a baking sheet before transferring to a freezer-safe bag, keeping them fresh and delicious for up to three months.

Hi, I'm Kimberly!

Hi, I'm Kimberly.

A passionate food lover who believes in the magic of homemade deliciousness that spreads love and warmth. Join me on this culinary adventure as I prepare wonderful dishes and let’s spread some happiness together!

Kimberly the Zett Signature

If you want to get to know me better, click here!


Apricot Cashew Honey Bliss Balls
„Let’s make a piece of happiness“

INGREDIENTS

FOR 12 BALLS

BLISS BALLS

  • 60g salted cashew nuts (2.1 oz)
  • 40g hazelnuts (1.4 oz)
  • 80g dried apricots (2.8 oz)
  • 20g puffed quinoa (0.7 oz)
  • 2 tbsp honey
  • 20g coconut flakes (0.7 oz)
  • 1/4 tsp turmeric
Apricot Cashew Honey Bliss Balls
}

ACTIVE: –

PASSIVE: –

PREPARATIONS

Recommended Equipment
  • food processor
  • small bowl
}

ACTIVE: 10 min

PASSIVE: –

COOKING

1. Place the coconut flakes in a small bowl and set aside.

2. Put the following ingredients into the food processor and blend on high for 1 minute: 60g cashew nuts, 20g hazelnuts, 80g dried apricots, and 20g puffed quinoa.

3. Then add 1/4 tsp turmeric and 2 tbsp honey to the mixture in the food processor and blend again on high for another minute.

4. Divide the mixture into 12 equal portions and roll them into balls and then in the coconut flakes, press lightly, and enjoy 🙂

NOTE: The calorie information may vary depending on the product used, country and region.