Apple Pie Rolls with Vanilla & Caramel Sauce & Milk Crumble

Apple Pie Rolls with Vanilla & Caramel Sauce & Milk Crumble

Apple Pie Rolls with Vanilla & Caramel Sauce & Milk Crumble

Apple Pie Rolls with Vanilla & Caramel Sauce & Milk Crumble

December 14, 2024 by Kimberly

Golden rolls packed with spiced apples, drizzled with caramel, and topped with crunchy milk crumble – this dessert is a little masterpiece that’ll make your kitchen smell like pure magic.

75 MINUTES

INTERMEDIATE

VEGETARIAN

INT.

340 PER PORTION

COMFORT FOOD

DINNER PARTY

DESSERT

WINTER

INTRODUCTION

ABOUT THE RECIPE

These crispy golden rolls, filled with spiced apples and topped with caramel & vanilla sauce and milk crumble, are everything you love about desserts. They’re the perfect blend of sweet, buttery, and crunchy, delivering big seasonal vibes in every bite. Whether you’re making them for a dinner party or just for yourself, this dessert promises to steal the show and leave everyone asking for seconds.

How to serve
Lay the rolls on a warm puddle of vanilla sauce, drizzle generously with caramel, and finish with a sprinkle of milk crumble for that perfect texture. Serve them while they’re still warm to keep the filo dough crisp and the apple filling gooey.

How to store
Store leftover rolls in an airtight container in the fridge for up to 3 days. Reheat them in the oven at 180°C (350°F) for about 10 minutes to bring back their crisp texture.

Hi, I'm Kimberly!

Hi, I'm Kimberly.

A passionate food lover who believes in the magic of homemade deliciousness that spreads love and warmth. Join me on this culinary adventure as I prepare wonderful dishes and let’s spread some happiness together!

Kimberly the Zett Signature

If you want to get to know me better, click here!


Apple Pie Rolls with Vanilla & Caramel Sauce & Milk Crumble
„Let’s make a piece of happiness“
Print
clock clock iconcutlery cutlery iconflag flag iconfolder folder iconinstagram instagram iconpinterest pinterest iconfacebook facebook iconprint print iconsquares squares iconheart heart iconheart solid heart solid icon
Apple Pie Rolls with Vanilla & Caramel Sauce & Milk Crumble

Apple Pie Rolls with Vanilla & Caramel Sauce & Milk Crumble


5 Stars 4 Stars 3 Stars 2 Stars 1 Star

No reviews

  • Author: Kimberly
  • Total Time: 75 min
  • Yield: 4-6 1x

Description

Recommended Equipment

  • sharp knife
  • cutting board
  • two small pots
  • two small bowls
  • oven

Ingredients

Units Scale

APPLE PIE ROLLS

  • 8 filo pastry sheets
  • 1 apple
  • 150 milliliter apple juice
  • 2 tsp cornstarch
  • 15 grams white sugar
  • 1 tsp vanilla extract
  • 1 tsp lemon juice
  • 1/2 tsp cinnamon
  • 1/8 tsp nutmeg
  • pinch of salt

CARAMEL CINNAMON SAUCE

  • 75g white sugar
  • 2 tbsp water
  • 20 grams butter
  • 75 grams heavy cream
  • 1/2 tsp cinnamon
  • 1/4 tsp vanilla extract
  • pinch of salt

VANILLA SAUCE

  • 150 grams heavy cream
  • 150 milliliter full-fat milk
  • 3 egg yolks
  • 1 vanilla bean
  • 50 grams brown sugar
  • pinch of salt

MILK CRUMBLE

  • 30 grams full-fat milk powder
  • 50 grams all-purpose flour
  • 30 grams powdered sugar
  • 1/8 tsp salt
  • 25 grams butter
  • 45 grams white chocolate

Instructions

  1. For the apple filling, dice the apples and add them to a pot with apple juice, sugar, cinnamon, nutmeg, salt, vanilla extract, and lemon juice. Simmer over medium heat for about 10 minutes until the apples are soft. Mix cornstarch with 2 tbsp of cold water, then stir it into the apple mixture. Bring to a quick boil until it thickens, then remove from heat and let cool.
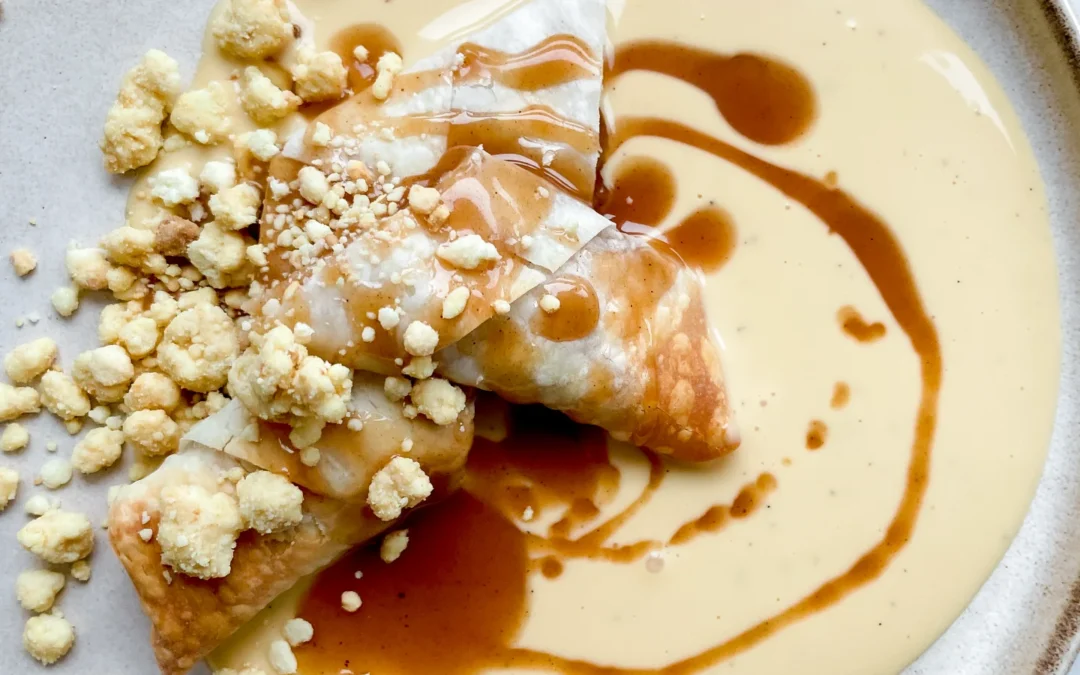
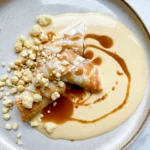
  2. For the caramel-cinnamon sauce, heat sugar and water in a pot until it reaches 170°C (340°F) and turns a light golden caramel (about 10–15 minutes). Remove from heat and carefully stir in butter and cream – it may clump, but just keep stirring. Add a pinch of salt, vanilla extract, and cinnamon, mix well, and let it cool.
  3. For the milk crumble, combine milk powder, flour, powdered sugar, and salt in a bowl. Add melted butter and mix with your hands until crumbly. Spread the mixture onto a baking sheet and bake at 140°C (285°F) for about 10 minutes. While it bakes, melt the white chocolate. Once the crumble is baked, transfer it to a bowl, drizzle the melted chocolate over it, and stir until it forms larger clusters. Set aside.
  4. Next, prepare the vanilla sauce. You can find the recipe here.
  5. For the filo rolls, place a heaping tablespoon of the apple filling on each sheet of filo dough. Fold in the sides, roll them up, and seal the ends with a bit of water. Arrange the rolls on a baking sheet lined with parchment paper, brush them with melted butter, and bake at 180°C (355°F) for about 15 minutes until golden brown.
  6. To serve, pour the vanilla sauce onto plates or bowls, cut the filo rolls into three pieces each, and arrange them on top of the sauce. Drizzle with the caramel-cinnamon sauce and finish with milk crumbles. Enjoy!
  • Passive Time: 15 min
  • Cook Time: 60 min

Cranberry Pistachio Biscotti

Cranberry Pistachio Biscotti

Cranberry Pistachio Biscotti

Cranberry Pistachio Biscotti

December 9, 2024 by Kimberly

These crispy, nutty biscotti are bursting with tart cranberries and crunchy pistachios, dipped in a silky layer of white chocolate. They’re festive, cozy, and perfect for coffee-dunking or gifting.

60 MINUTES

EASY

VEGETARIAN

ITALIAN

107 PER BISCOTTI

SWEET

EVERYDAY

SNACK

WINTER

INTRODUCTION

ABOUT THE RECIPE

These biscotti are everything you want in a cozy snack. Crunchy, nutty, and perfectly sweet, they combine tart cranberries, rich pistachios, and a touch of indulgence with a white chocolate coating. They’re ideal for holiday gifting, pairing with your coffee, or treating yourself to something a little special. The mix of textures and flavors makes them irresistible, and they look as beautiful as they taste.

How to serve
Serve these biscotti alongside a hot cup of coffee, tea, or even hot cocoa for the ultimate cozy vibe. They’re also fantastic as part of a dessert spread, paired with fresh fruit or a creamy mousse. And don’t forget – they make the perfect holiday gift, wrapped up in cute little bags or boxes.

How to store
Store the biscotti in an airtight container at room temperature for up to three weeks. If they’re coated in chocolate, keep them in a cool place to avoid melting. Perfect for make-ahead treats!

Hi, I'm Kimberly!

Hi, I'm Kimberly.

A passionate food lover who believes in the magic of homemade deliciousness that spreads love and warmth. Join me on this culinary adventure as I prepare wonderful dishes and let’s spread some happiness together!

Kimberly the Zett Signature

If you want to get to know me better, click here!


Cranberry Pistachio Biscotti
„Let’s make a piece of happiness“
Print
clock clock iconcutlery cutlery iconflag flag iconfolder folder iconinstagram instagram iconpinterest pinterest iconfacebook facebook iconprint print iconsquares squares iconheart heart iconheart solid heart solid icon
Cranberry Pistachio Biscotti

Cranberry Pistachio Biscotti


  • Author: Kimberly
  • Total Time: 60 min
  • Yield: 14-18 pieces 1x

Description

Recommended Equipment

  • 2 bowls
  • electric mixer
  • whisk
  • baking tray
  • parchment paper
  • sharp knife
  • spoon or spatula
  • food processor (optional, for chopping cranberries)

Ingredients

Units Scale
  • 125 grams all-purpose flour
  • 1/2 tsp baking powder
  • 1/4 tsp salt
  • 30 grams butter, room-temperature
  • 75 grams white sugar
  • 1 egg
  • 1 tsp vanilla extract
  • 50 grams pistachios
  • 50 grams fresh cranberries
  • 100 grams white chocolate

Instructions

  1. Roughly chop the cranberries and pistachios with a knife or a food processor, then set aside. Preheat the oven to 175°C/347°F.
  2. In one bowl, thoroughly mix the flour, baking powder, and salt.
  3. In another bowl, use an electric mixer to cream the soft butter and sugar until fluffy.
  4. Add the egg and vanilla extract to the butter-sugar mixture and mix well.
  5. Add the dry ingredients to the butter-egg mixture, along with the chopped pistachios and cranberries. Mix everything until you get a smooth dough. Only stir until no flour streaks remain.
  6. Place the dough onto a baking tray lined with parchment paper. Lightly dust your hands with flour and shape the dough into a flat, long rectangle (about 20-25 cm long and 6 cm wide).
  7. Bake the dough piece for about 30 minutes. Remove it from the oven and let it cool slightly.
  8. Use a bread knife or sharp knife to slice the baked dough into pieces (about 1.5–2 cm thick).
  9. Place the biscotti slices cut side down back onto the baking tray.
    • For a softer version: Bake each side for 5 minutes.
    • For a crunchier version: Bake each side for 10 minutes.
  10. Dip half of the biscotti in melted white chocolate and sprinkle with chopped pistachios. Let them cool on a wire rack until the chocolate hardens.
  • Passive Time: 40 min
  • Cook Time: 20 min

Pecan Caramel Pie Cobbler

Pecan Caramel Pie Cobbler

Pecan Caramel Pie Cobbler

Pecan Caramel Pie Cobbler

November 27, 2024 by Kimberly

This warm, gooey cobbler is the ultimate comfort dessert – melty caramel candies, crunchy pecans, and buttery dough baked into golden perfection. A cozy, sweet treat for every dessert lover out there!

75 MINUTES

EASY

VEGETARIAN

US AMERICAN

505 PER PORTION

COMFORT FOOD

CHRISTMAS

DESSERT

AUTUMN
WINTER

INTRODUCTION

ABOUT THE RECIPE

There’s something magical about desserts that feel like a warm hug, and this cobbler delivers just that. Melty caramel candies and crunchy pecans create a gooey filling, while the buttery dough bakes into a golden, rustic crust. It’s the perfect dessert for chilly evenings or holiday gatherings, combining the cozy flavors of caramel and pecans into one irresistible dish. Trust me, once you try this cobbler, it’ll quickly become a go-to comfort dessert for every season.

How to serve
This cobbler is best served warm, straight out of the oven, with a scoop of vanilla ice cream or a dollop of whipped cream on top. The cold creaminess of the topping perfectly balances the gooey caramel and crunchy pecans. Sprinkle a few extra pecans over the top for added texture. It’s perfect for family gatherings, dinner parties, or just a cozy night in.

How to store
Store any leftovers in an airtight container at room temperature for up to one day, or in the fridge for up to four days. Reheat individual portions in the microwave for 20-30 seconds to bring back the gooey, warm goodness.

Hi, I'm Kimberly!

Hi, I'm Kimberly.

A passionate food lover who believes in the magic of homemade deliciousness that spreads love and warmth. Join me on this culinary adventure as I prepare wonderful dishes and let’s spread some happiness together!

Kimberly the Zett Signature

If you want to get to know me better, click here!


Pecan Caramel Pie Cobbler
„Let’s make a piece of happiness“
Print
clock clock iconcutlery cutlery iconflag flag iconfolder folder iconinstagram instagram iconpinterest pinterest iconfacebook facebook iconprint print iconsquares squares iconheart heart iconheart solid heart solid icon
Pecan Caramel Pie Cobbler

Pecan Caramel Pie Cobbler


4.3 from 3 reviews

  • Author: Kimberly
  • Total Time: 75 min
  • Yield: 8 1x

Description

RECOMMENDED EQUIPMENT

  • baking dish (approx. 20×30 cm or similar)
  • mixing bowl
  • whisk or hand mixer
  • kettle (for boiling water)


Ingredients

Units Scale
  • 120 grams butter
  • 125 grams all-purpose flour
  • 125 grams white sugar
  • 3 tsp baking powder
  • 1/4 tsp salt
  • 170 milliliter full-fat cow milk
  • 1 tsp vanilla extract
  • 100 grams pecans
  • 50 grams brown sugar
  • 125 grams caramel candies
  • 250 milliliter boiling water
  • vanilla ice cream

Instructions

  1. Preheat the oven to 175°C / 350°F. Grab a baking dish, drop in the butter, and pop it into the oven for a few minutes and let it melt.
  2. In a bowl, combine flour, sugar, baking powder, and a pinch of salt. Stir in milk and a splash of vanilla extract until it’s all smooth, creamy, and totally lump-free.
  3. Carefully pull the now-buttery baking dish out of the oven. Pour the batter right over that melted butter. Trust the process – it looks weird now, but it’s all part of trust the process. Sprinkle pecans on top and follow up with a layer of brown sugar. Finally, add the caramel candies. Whole or crushed? Dealer’s choice.
  4. Next, get that kettle boiling and slowly pour the hot water over everything in the dish. Yes, everything. No stirring allowed! Just trust me on this one.
  5. Bake uncovered for 30–35 minutes or until the top is golden brown and smells like a caramel dream.
  6. Take it out and let it cool for about 30 minutes. Patience is key – the caramel sauce underneath thickens and gets all creamy during this time.
  7. Scoop it into bowls, drizzle with that caramel sauce hiding underneath, and top with a big ol’ scoop of vanilla ice cream.

  • Passive Time: 60 min
  • Cook Time: 15 min

Biscoff Cinnamon Banoffee Pie

Biscoff Cinnamon Banoffee Pie

Biscoff Cinnamon Banoffee Pie

Biscoff Cinnamon Banoffee Pie

November 19, 2024 by Kimberly

Dreamy layers of creamy dulce de leche, fresh banana slices, and cinnamon whipped cream, all on a buttery Biscoff cookie crust. This no-bake treat is pure, cozy dessert bliss in every bite!

40 MINUTES

EASY

VEGETARIAN

ENGLISH

311 PER SLICE

CREAMY

THANKSGIVING

DESSERT & SWEETS

AUTUMN
WINTER

INTRODUCTION

ABOUT THE RECIPE

This no-bake delight layers all the cozy flavors: a buttery Biscoff cookie crust, homemade dulce de leche, fresh banana slices, and a whipped cinnamon topping. It’s creamy, sweet, and has that dreamy, melt-in-your-mouth quality that’ll make you reach for seconds. No baking needed – just a quick assembly for a dessert that’s equally impressive and easy. It’s the perfect treat when you want a little something special without turning on the oven.

How to serve
Serve this pie chilled and straight from the fridge to get the best creamy texture and hold. For a little extra flair, sprinkle the top with crushed Biscoff cookies or some shavings of your favorite chocolate. Pair it with a warm coffee or your favorite cozy drink – the caramel-like dulce de leche and cinnamon cream make this pie the ultimate comfort dessert. It’s also a crowd-pleaser, so bring it along to your next gathering!

How to store
Store any leftovers in the fridge, covered, for up to 3 days. The whipped cream topping stays nicely set, and the crust holds well. This pie is best served cold, straight from the fridge, for that perfect creamy bite.

Hi, I'm Kimberly!

Hi, I'm Kimberly.

A passionate food lover who believes in the magic of homemade deliciousness that spreads love and warmth. Join me on this culinary adventure as I prepare wonderful dishes and let’s spread some happiness together!

Kimberly the Zett Signature

If you want to get to know me better, click here!


Biscoff Cinnamon Banoffee Pie

„Let’s make a piece of happiness“

Print
clock clock iconcutlery cutlery iconflag flag iconfolder folder iconinstagram instagram iconpinterest pinterest iconfacebook facebook iconprint print iconsquares squares iconheart heart iconheart solid heart solid icon
Biscoff Cinnamon Banoffee Pie

Biscoff Cinnamon Banoffee Pie


5 from 1 review

  • Author: Kimberly
  • Total Time: 3 hrs + 15 min
  • Yield: 8-16 1x

Description

Recommended Equipment

  • small pot with lid
  • food processor
  • pie dish
  • sharp knife
  • cutting board
  • electric mixer
  • tall container
  • vegetable peeler
  • can opener

Ingredients

Units Scale
  • 300 grams biscoff cookies
  • 140 grams butter, room temperature
  • 400 grams sweetened condensed milk
  • 2 bananas
  • 1 tbsp lemon juice
  • 250 grams heavy cream
  • 30 grams powdered sugar
  • 1 tsp vanilla
  • 1 tsp cinnamon

Instructions

PREPARATIONS

  • You can buy ready-made dulce de leche or order it online, but it’s also easy to make at home ahead of time. Just grab a 400g can of sweetened condensed milk, remove the label, and place the can in a pot. Fill with enough water to completely cover the can, then bring the water to a boil. Reduce the heat to low, cover the pot, and let it simmer for about 2 hours and 30 minutes. Be sure to keep the can covered with water the entire time – if the water evaporates, just add more. After the 2.5 hours, pour off the water and let the can cool completely before using the dulce de leche inside.

INSTRUCTIONS

  1. Use a food processor to blend the Biscoff cookies and softened butter until they’re crumbly. Press the mixture evenly into a pie dish, covering the bottom and sides completely. Chill the crust in the fridge for 20 minutes.
  2. Meanwhile, slice the bananas evenly and sprinkle with a little lemon juice to keep them from browning. Place the banana slices in the fridge until you’re ready to use them. Next, pour the cold cream into a tall container, add powdered sugar, vanilla extract, and cinnamon, and whip until stiff peaks form. Chill the whipped cream in the fridge until needed. Prepare the chocolate shavings by running a vegetable peeler along the narrow edge of a chocolate bar. Set the shavings aside.
  3. Open the can of dulce de leche and take the crust out of the fridge. Spread the entire can of dulce de leche evenly over the crust.
  4. Take the banana slices out of the fridge and arrange them over the dulce de leche so that the entire surface is covered.
  5. Now, take the whipped cream and spread it evenly over the bananas. Finally, sprinkle the chocolate shavings on top for decoration.
  6. Serve the pie immediately or keep it in the fridge until you’re ready to serve.
  • Passive Time: 2 hrs + 35 min
  • Cook Time: 40 min

Egg Salad

Egg Salad

Egg Salad

Egg Salad

November 17, 2023 by Kimberly

Creamy, tangy, and absolutely crave-worthy! This rich egg salad hits all the comfort notes with just the right balance of freshness and zing. Perfect on toast or as a party favorite.

15 MINUTES

EASY

VEGETARIAN

INT.

354 PER PORTION

CREAMY

CLASSICS

SALAD

ALL YEAR

INTRODUCTION

ABOUT THE RECIPE

This creamy egg salad is a cozy twist on a classic, with layers of rich flavor from a touch of Dijon and a sprinkle of fresh chives. It’s a go-to recipe for those moments when you need a quick, delicious meal with a bit of a zing. With its velvety texture and perfectly balanced tang, this salad makes you wonder why you’d ever buy pre-made again. One bite, and you’ll see why it’s so easy to fall in love with! If you’re not so confident with boiling eggs yet, read on for a full guide and get the best tips for achieving The Perfect Boiled Egg.

How to serve
This egg salad is endlessly versatile, perfect as a sandwich filling or spooned over crunchy toast for an easy lunch. It also makes a great dip for crackers or veggies when served at a gathering. Feeling fancy? Add it to a croissant or as a topping for a crisp salad. This dish is all about the comfort factor, so serve it however makes you feel the coziest – it’s that kind of meal.

How to store
To keep this egg salad fresh and tasty, store it in an airtight container in the fridge for up to 2 days. Just give it a stir before serving to freshen up the texture, and enjoy chilled. Perfect for make-ahead lunches or snack prep!

Hi, I'm Kimberly!

Hi, I'm Kimberly.

A passionate food lover who believes in the magic of homemade deliciousness that spreads love and warmth. Join me on this culinary adventure as I prepare wonderful dishes and let’s spread some happiness together!

Kimberly the Zett Signature

If you want to get to know me better, click here!


Egg Salad
Egg Salad
Egg Salad

„Let’s make a piece of happiness“

Print
clock clock iconcutlery cutlery iconflag flag iconfolder folder iconinstagram instagram iconpinterest pinterest iconfacebook facebook iconprint print iconsquares squares iconheart heart iconheart solid heart solid icon
Egg Salad

Egg Salad


  • Author: Kimberly
  • Total Time: 15 min
  • Yield: 2 1x

Description

Recommended Equipment

  • small saucepan
  • medium-sized bowl
  • sharp knife
  • cutting board

Ingredients

Units Scale
  • 4 eggs
  • 50 grams mayonnaise
  • 12 tsp white wine vinegar
  • 1/21 tsp Dijon mustard
  • chives
  • salt & pepper to taste

Instructions

  1. Boil the eggs for about 7-8 minutes until hard-boiled. If you’re not so confident with cooking eggs yet, read on for a full guide and get the best tips for achieving the perfect boiled egg.
  2. Meanwhile, finely chop the chives and place them in a bowl. Add the mayonnaise, white wine vinegar, Dijon mustard, salt, and pepper, and set aside for now.
  3. Once the eggs are cooked, place them in a bowl with cold water to cool for about 5 minutes. Peel the eggs, carefully score the egg whites, and gently separate them so the yolks remain whole. Separate all the eggs into whites and yolks, adding the yolks to the other ingredients in the bowl.
  4. Mash the yolks with the other ingredients until you get a smooth, light orange mixture.
  5. Cut the egg whites into small pieces and add them to the bowl with the other ingredients. Mix everything well and serve.
  • Passive Time: 5 min
  • Cook Time: 10 min

Classic Risotto

Classic Risotto

Classic Risotto

Classic Risotto

November 9, 2023 by Kimberly

Creamy, dreamy, and cozy, this Parmesan and white wine risotto is pure comfort in a bowl. It’s that no-fuss, indulgent dish perfect for when you crave a warm, savory hug.

45 MINUTES

EASY

VEGETARIAN

ITALIAN

722 PER PORTION

CREAMY

CLASSICS

DINNER

ALL YEAR

INTRODUCTION

ABOUT THE RECIPE

Imagine a creamy, warm risotto made with Parmesan and white wine, bringing pure comfort to your plate. This easy recipe is approachable, yet delivers an indulgent result that feels like a special treat. With simple steps and bold flavors, it’s perfect for any night you want to relax with something delicious. Ideal as a base for endless variations, this risotto keeps things cozy and straightforward while packing in all the richness and creaminess you crave. If you’re not so confident with preparing a risotto yet, read on for a full guide and get the best tips for achieving THE Perfect Risotto.

How to serve
Serve your risotto steaming hot in a wide bowl to showcase that lovely creamy texture. Garnish with fresh herbs like parsley or basil and a generous shave of extra Parmesan for an extra touch of umami. You could also add a drizzle of truffle oil or crispy pancetta for a sophisticated twist. Pair with a light side salad or a crisp white wine to complement the dish’s creamy, savory flavors.

How to store
If there are leftovers, place the risotto in an airtight container and refrigerate for up to three days. To reheat, add a splash of broth or water, and warm on the stove, stirring to bring back the creamy consistency.

Hi, I'm Kimberly!

Hi, I'm Kimberly.

A passionate food lover who believes in the magic of homemade deliciousness that spreads love and warmth. Join me on this culinary adventure as I prepare wonderful dishes and let’s spread some happiness together!

Kimberly the Zett Signature

If you want to get to know me better, click here!


Classic Risotto
Classic Risotto

„Let’s make a piece of happiness“

Print
clock clock iconcutlery cutlery iconflag flag iconfolder folder iconinstagram instagram iconpinterest pinterest iconfacebook facebook iconprint print iconsquares squares iconheart heart iconheart solid heart solid icon
Classic Risotto

Classic Risotto


5 from 1 review

  • Author: Kimberly
  • Total Time: 45 min
  • Yield: 2 1x

Description

RECOMMENDED EQUIPMENT
  • sharp knife
  • cutting board
  • medium-sized pot
  • measuring cup
  • grater

Ingredients

Units Scale
  • 200 grams risotto rice
  • 400 milliliter vegetable broth
  • 200 milliliter dry white wine
  • 300 milliliter water
  • 100 grams parmesan
  • 1 shallot
  • 1 tbsp olive oil
  • 1 tsp butter
  • salt & pepper to taste
  • parsley for garnish

Instructions

PREPARATIONS

  • Finely grate the Parmesan.
  • Cut the shallot into small pieces.

INSTRUCTIONS

  1. Heat 1 tbsp of olive oil in a pot over medium heat. Sauté the shallot until translucent. Add the butter and risotto rice, stirring everything well, and sauté for 1-2 minutes.
  2. Deglaze with the first 100ml (1/2 cup) of white wine, letting it reduce over medium heat until no liquid remains in the pot.
  3. Next, add 100ml (1/2 cup) of stock and let it simmer, stirring occasionally, until the liquid has mostly evaporated. Continue adding stock 100ml (1/2 cup) at a time, letting it simmer and be absorbed by the rice before each addition, until the remaining 200ml (1 cup) of stock has been used.
  4. Afterward, add 150ml (1/2 cup) of water, allowing the rice to absorb it as it cooks. Follow with another 100ml (1/2 cup) of white wine, then add the final 150ml (1/2 cup) of water, stirring as it cooks. The whole process should take around 40 minutes.
  5. Remove the pot from the heat and stir in the Parmesan until it melts. Season with salt and white pepper to taste.
  6. Divide the risotto between plates and top with additional grated Parmesan, freshly ground pepper, and parsley.
  • Prep Time: 5 min
  • Cook Time: 40 min