Good Morning Ginger Shot

Good Morning Ginger Shot

Good Morning Ginger Shot

Good Morning Ginger Shot

January 1, 2024 by Kimberly

Boost your immune system with a morning ginger shot—fresh ginger, turmeric, pepper, and lemon for vitality. Cheers!

This website uses affiliate links which may earn commission for purchases made at no additional cost to you.

TOTAL TIME

20 min

SERVES

7 drinks

DIET

vegan

EVERY RECIPE DESERVES

A Little Love Letter

Start your morning with a touch of wellness with this revitalizing ginger shot, the perfect way to start your day fresh. A morning ginger shot with lemon, turmeric and pepper on an empty stomach offers a potent blend of immune support, anti-inflammatory action, digestive aid, detoxification, metabolic stimulation and natural energy, promoting overall wellbeing.

Serve the shot chilled and experience the tangy fusion of fresh ginger, bright turmeric, a hint of hot pepper and tangy lemon juice. This drink is a powerhouse for your immune system. To enjoy the benefits of this drink, you should drink it on an empty stomach.

Either pour the juice into a large glass bottle and portion out the appropriate amount each day in a small glass or pour the juice directly into small glass bottles in portions. Store the bottles in the fridge. I prepare the juice a week in advance. For one person, that’s 350ml a week. Make the ritual of this ginger elixir your own and greet every morning with a sip of health and happiness.

Hi, I'm Kimberly!

Hi, I'm Kimberly.

A hopeless romantic when it comes to food. Every recipe I share is a love letter to food itself. I’m so glad you’re here. Make yourself at home and stay a while.

Love,
Kimberly

Kimberly the Zett Signature

If you want to get to know me better,
click here!


Good Morning Ginger Shot

LET’S MAKE A PIECE OF HAPPINESS

Print
clock clock iconcutlery cutlery iconflag flag iconfolder folder iconinstagram instagram iconpinterest pinterest iconfacebook facebook iconprint print iconsquares squares iconheart heart iconheart solid heart solid icon
Good Morning Ginger Shot

Good Morning Ginger Shot


5 Stars 4 Stars 3 Stars 2 Stars 1 Star

No reviews

  • Author: Kimberly
  • Total Time: 30 min
  • Yield: 7 portions

Description

GOOD TO HAVE ON HAND

  • juicer (or food processor or blender, in which case you will also need a fine mesh strainer)
  • sharp knife
  • chopping board
  • funnel
  • measuring cup


Ingredients

Units Scale
  • 3.5 lemons
  • 175 grams ginger or 75ml ginger juice
  • 1/2 tsp turmeric powder
  • a pinch of finely ground black pepper

Instructions

  1. If the ginger is not organic, please peel it first. If it is organic, you can skip this step.

PREPARATION WITH A JUICER

  1. Depending on the model, break the ginger into large pieces, remove the peel from the lemons and pass both through the juicer.
  2. Season the collected juice with turmeric and finely ground pepper.
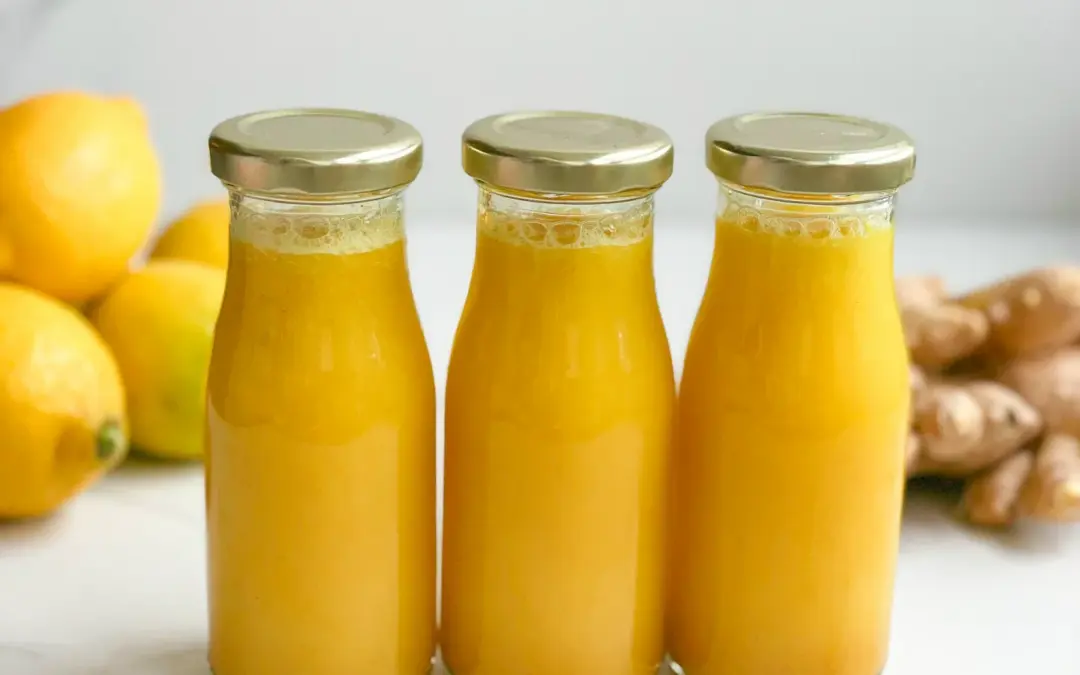
  3. Pour the juice into glass bottles in 50 ml portions.

PREPARATION WITH A FOOD PROCESSOR OR BLENDER

  1. Break the ginger into pieces, remove the zest from the lemons and place both in the food processor or blender. Blend on the highest setting until the mixture has turned yellow and there are no large pieces left.
  2. Now add the turmeric and pepper and blend again.
  3. Pass the entire mixture through a fine sieve and pour the collected juice into 50 ml portions in glass bottles.
  • Cook Time: 30 min

CRAVING MORE?

Follow along here & don’t forget to subscribe to my substack!

Tarte Flambée

Tarte Flambée

Tarte Flambée

Tarte Flambée

December 30, 2023 by Kimberly

A thin crust, full-bodied crème fraîche, spicy bacon and savory onions – the classic Alsatian tarte flambée.

This website uses affiliate links which may earn commission for purchases made at no additional cost to you.

TOTAL TIME

60 min

SERVES

4 portions

DIET

omnivore

EVERY RECIPE DESERVES

A Little Love Letter

Indulge in the delectable charm of Tarte Flambée, a French classic celebrated for its crispy thin crust, creamy allure, and the delightful interplay of savory bacon and onions. Hailing from the picturesque Alsace region, this dish is a culinary masterpiece that elevates the dining experience with its unique blend of flavors.

This culinary delight pairs perfectly with a light salad or stands alone for a satisfying meal, bringing the essence of French cuisine to your table.

For later enjoyment, store any leftover Tarte Flambée in an airtight container in the refrigerator. Reheat slices in the oven. Avoid microwaving to maintain its crispy texture.

Hi, I'm Kimberly!

Hi, I'm Kimberly.

A hopeless romantic when it comes to food. Every recipe I share is a love letter to food itself. I’m so glad you’re here. Make yourself at home and stay a while.

Love,
Kimberly

Kimberly the Zett Signature

If you want to get to know me better,
click here!


Tarte Flambée
Tarte Flambée

LET’S MAKE A PIECE OF HAPPINESS

Print
.tasty-recipe-responsive-iframe-container-926d2bcd { position: relative; overflow: hidden; padding-top: 177.62%; } .tasty-recipe-responsive-iframe-container-926d2bcd iframe { position: absolute; top: 0; left: 0; width: 100%; height: 100%; border: 0; } clock clock iconcutlery cutlery iconflag flag iconfolder folder iconinstagram instagram iconpinterest pinterest iconfacebook facebook iconprint print iconsquares squares iconheart heart iconheart solid heart solid icon
Tarte Flambée

Tarte Flambée


  • Author: Kimberly
  • Total Time: 1 hr
  • Yield: 1 baking tray

Description

GOOD TO HAVE ON HAND

  • large mixing bowl
  • sieve
  • sharp knife
  • cutting board


Ingredients

Units Scale
DOUGH
  • 250 grams all-purpose flour
  • 125 milliliters water
  • 2 tbsp olive oil
  • 2 tsp salt
TOPPINGS
  • 100 grams crème fraîche
  • 125 grams bacon
  • 1 red onion
  • salt
  • pepper
  • chives

Instructions

  1. Put the water, salt, olive oil and sifted flour in a bowl. Stir with a spoon until it is no longer sticky. Then remove everything from the bowl and work into a smooth dough with your hands for approx. 3 minutes. Do not add any more flour. Then wrap the dough in cling film and leave to rest at room temperature for approx. 30 minutes.
  2. Remove the skin from the onions and cut into thin stripes.
  3. Sprinkle a little flour on a work surface. Place the dough piece on top and also sprinkle with a little flour. Then use a rolling pin to roll out the dough to the size of a baking tray, approx. 40×30 cm (16×12 inches).
  4. Place the dough on a baking tray lined with baking paper and brush with crème fraîche. Season with salt. Then spread the onions and bacon evenly on top.
  5. Bake the pastry at 250°C (480°F) using the grill function for approx. 15 minutes. Take out and top with freshly cracked pepper and chives.
  • Passive Time: 45 min
  • Cook Time: 15 min

CRAVING MORE?

Follow along here & don’t forget to subscribe to my substack!

Chicken Schnitzel with Caramalized Onions & Sauce Hollandaise

Chicken Schnitzel with Caramalized Onions & Sauce Hollandaise

Chicken Schnitzel with Caramalized Onions & Sauce Hollandaise

Chicken Schnitzel with Caramalized Onions & Sauce Hollandaise

December 29, 2023 by Kimberly

Delicious Chicken Schnitzel topped with caramelized onions and drizzled with creamy Hollandaise sauce. A mouthwatering combination of flavors for a satisfying and comforting meal.

This website uses affiliate links which may earn commission for purchases made at no additional cost to you.

TOTAL TIME

55 min

SERVES

4 portions

DIET

omnivore

EVERY RECIPE DESERVES

A Little Love Letter

Treat yourself to some real comfort food with my chicken schnitzel topped with sweet caramelized onions and drizzled with a delicious hollandaise sauce. This recipe promises a symphony of flavors that will enhance your dining experience.

Serve this delectable Chicken Schnitzel on its own or alongside your favorite sides, such as my potato salad with eggs, bacon and pickles or a crisp cucumber salad. The crispy texture of the schnitzel, the sweetness of caramelized onions, and the richness of the Hollandaise sauce create a harmonious combination.

For optimal freshness, store any leftover Chicken Schnitzel in an airtight container in the refrigerator for up to two days. To reheat, use an oven or toaster oven to maintain its crispy texture. Avoid microwaving to preserve the schnitzel’s delightful crunch.

Hi, I'm Kimberly!

Hi, I'm Kimberly.

A hopeless romantic when it comes to food. Every recipe I share is a love letter to food itself. I’m so glad you’re here. Make yourself at home and stay a while.

Love,
Kimberly

Kimberly the Zett Signature

If you want to get to know me better,
click here!


Chicken Schnitzel with Caramalized Onions & Sauce Hollandaise

LET’S MAKE A PIECE OF HAPPINESS

Print
.tasty-recipe-responsive-iframe-container-cc3d7de1 { position: relative; overflow: hidden; padding-top: 177.62%; } .tasty-recipe-responsive-iframe-container-cc3d7de1 iframe { position: absolute; top: 0; left: 0; width: 100%; height: 100%; border: 0; } clock clock iconcutlery cutlery iconflag flag iconfolder folder iconinstagram instagram iconpinterest pinterest iconfacebook facebook iconprint print iconsquares squares iconheart heart iconheart solid heart solid icon
Chicken Schnitzel with Caramalized Onions & Sauce Hollandaise

Chicken Schnitzel with Caramalized Onions & Sauce Hollandaise


  • Author: Kimberly
  • Total Time: 55 min
  • Yield: 4

Description

RECOMMENDED EQUIPMENT

  • sharp knife
  • cutting board
  • two large pans
  • small pot

Ingredients

Units Scale
CHICKEN SCHNITZEL
  • 160 grams bread crumbs
  • 120 grams all-purpose flour
  • 2 eggs
  • 600 grams chicken breasts
  • 1 tbsp clarified butter
  • 1/4 tsp salt
  • 1/4 tsp pepper
CARAMELIZED ONIONS
  • 600 grams onions
  • 1/2 tsp salt
  • 1 tsp clarified butter
TOPPINGS
  • 1 lemon
  • parsley

Instructions

  1. Peel the onions and cut into thin stripes. Prepare three shallow plates of the same size. Pour flour into the first plate, break 2 eggs into the second plate and whisk with a fork. Season the egg with salt and pepper. Pour breadcrumbs into the third plate.
  2. Melt 1 teaspoon of clarified butter in a large frying pan. Add the onions and sprinkle with 1/2 teaspoon of salt. Now caramelize slowly over a medium heat until they are almost dark brown. This can take a good 30-40 minutes.
  3. Meanwhile, bread the chicken breast. To do this, cut the meat in a butterfly cut. Place the chicken breast fillets between two layers of cling film and pound with a little force and a meat mallet to a thickness of about 5-8 mm.
  4. Now dredge each piece of meat in the flour first and press down well on all sides. Next, pull through the egg so that the piece of meat is well coated on all sides and finally pull through the breadcrumbs and press down well.
  5. Heat 1 tbsp clarified butter in a large frying pan over a medium heat and allow to melt. Now fry the breaded chicken breast fillets in the fat until golden brown. Fry for about 4 minutes on each side, depending on how thick the meat is.
  6. While the meat is cooking, slowly heat the hollandaise sauce in a small pan over a low heat.
  7. Arrange the meat on plates, pour over the hollandaise sauce and top with the caramelized onions and freshly chopped parsley.
  • Cook Time: 55 min

CRAVING MORE?

Follow along here & don’t forget to subscribe to my substack!

Creamy Salsiccia & Caramalized Onion Pasta

Creamy Salsiccia & Caramalized Onion Pasta

Creamy Sausage & Caramalized Onion Pasta with Salsiccia

Creamy Salsiccia & Caramalized Onion Pasta

December 28, 2023 by Kimberly

Get ready for a cozy, indulgent meal! This pasta brings together rich, creamy flavors with a hint of spice and deep caramelized sweetness, perfect for a relaxing night in.

This website uses affiliate links which may earn commission for purchases made at no additional cost to you.

TOTAL TIME

40 min

SERVES

2-3 portions

DIET

omnivore

EVERY RECIPE DESERVES

A Little Love Letter

If you’re craving a comforting meal that’s both rich and full of flavor, this creamy pasta with sausage and caramelized onions will be your new favorite! Each bite is a perfect blend of deep, slow-cooked sweetness from the onions, paired with the bold, savory flavors of Italian sausage, all wrapped up in a smooth, creamy sauce. It’s an easy recipe that feels like a cozy hug on a plate, ideal for any night when you just want to treat yourself.

Serve this pasta piping hot, topped with freshly grated Parmesan and a sprinkle of parsley for extra color and flavor. Pair it with a light side salad or some crusty bread to soak up every bit of that creamy sauce. This dish shines with a glass of white wine, which complements the richness beautifully. It’s perfect for a weeknight dinner that feels like a restaurant treat or even a cozy date night at home.

Store any leftovers in an airtight container in the fridge for up to three days. To reheat, add a splash of stock in a pan over low heat, stirring occasionally until warmed through. It’s almost as good as fresh!

Hi, I'm Kimberly!

Hi, I'm Kimberly.

A hopeless romantic when it comes to food. Every recipe I share is a love letter to food itself. I’m so glad you’re here. Make yourself at home and stay a while.

Love,
Kimberly

Kimberly the Zett Signature

If you want to get to know me better,
click here!


Creamy Sausage & Caramalized Onion Pasta with Salsiccia

LET’S MAKE A PIECE OF HAPPINESS

Print
.tasty-recipe-responsive-iframe-container-99f09687 { position: relative; overflow: hidden; padding-top: 56.3%; } .tasty-recipe-responsive-iframe-container-99f09687 iframe { position: absolute; top: 0; left: 0; width: 100%; height: 100%; border: 0; } clock clock iconcutlery cutlery iconflag flag iconfolder folder iconinstagram instagram iconpinterest pinterest iconfacebook facebook iconprint print iconsquares squares iconheart heart iconheart solid heart solid icon
Creamy Sausage & Caramalized Onion Pasta with Salsiccia

Creamy Salsiccia & Caramalized Onion Pasta


  • Author: Kimberly
  • Total Time: 40 min
  • Yield: 2

Description

GOOD TO HAVE ON HAND

  • large pan
  • sharp knife
  • cutting board
  • large pot


Ingredients

Units Scale
  • 160 grams pasta of your choice (I used Tagliatelle)
  • 4 mid-sized white onions
  • 1 tsp butter
  • 1 tbsp olive oil
  • 150 grams fennel salsiccia
  • 2 garlic cloves
  • 1 tbsp tomato paste
  • 1 tsp dried oregano
  • 1 tsp smoked paprika powder
  • 1 tbsp balsamic vinegar
  • 1 tsp Dijon mustard
  • 50 milliliter dry white wine
  • 100 milliliter heavy cream
  • salt & pepper to taste
  • parmesan, for topping
  • fresh parsley, for topping

Instructions

PREPARATIONS

  • Peel the onions and cut them into thin half-rings. Set aside.
  • Remove the casing from the Salsiccia (or keep it on if it’s edible). Cut the sausage into small pieces and set aside.
  • Peel the garlic cloves. Set aside.

INSTRUCTIONS

  1. Place a large pan over medium heat and add butter. Toss in the onions and season with a pinch of salt. Lower the heat and let the onions cook down for about 15 minutes, until they’re soft and golden. Then, remove the onions from the pan.
  2. Put the pan back on the stove, add some olive oil, and heat it up. Add the Salsiccia, breaking it up with a wooden spoon so it resembles coarse ground meat. Turn the heat up to medium and cook until the pieces are golden brown.
  3. Mix in smoked paprika, tomato paste, and oregano, and let it cook briefly until it smells fragrant. Add the garlic to the pan – either finely grate it or press it through a garlic press. Put the onions back in the pan and mix everything well. Now, deglaze with white wine, scraping up the browned bits from the bottom. Add balsamic vinegar and mustard. Pour in the cream and let it simmer on low heat. Season generously with salt and pepper to taste.
  4. Meanwhile, cook the pasta al dente according to package instructions. Save a bit of the pasta water when draining. Add the pasta and some of the pasta water to the pan, tossing it all together until the creamy sauce coats the pasta. Serve on plates, topped with freshly grated Parmesan and parsley.
  • Prep Time: 10 min
  • Passive Time: 15 min
  • Cook Time: 15 min

CRAVING MORE?

Follow along here & don’t forget to subscribe to my substack!

Easy Ciabatta Buns

Easy Ciabatta Buns

Easy Ciabatta Buns

Easy Ciabatta Buns

December 27, 2023 by Kimberly

Soft and airy, easy ciabatta buns are perfect for sandwiches. Their golden crust and light texture make them a delightful choice for any meal or snack.

This website uses affiliate links which may earn commission for purchases made at no additional cost to you.

TOTAL TIME

4 hrs

SERVES

8 buns

DIET

vegan

EVERY RECIPE DESERVES

A Little Love Letter

Savor the simplicity of our easy ciabatta buns—a homemade delight with a golden crust and a soft, airy interior. Perfect for sandwiches or alongside a hearty meal, these buns require minimal effort for maximum flavor.

Serve these ciabatta buns fresh out of the oven for the ultimate experience. Ideal for crafting gourmet sandwiches or simply slathering with butter, their versatile nature complements any culinary creation. Embrace the warm, fluffy texture and revel in the homemade goodness.

To keep your ciabatta buns at their best, store them in a paper bag or bread box at room temperature. Avoid airtight containers to maintain the crisp crust. For longer freshness, freeze individually wrapped buns. Reheat in the oven for a few minutes to recapture that just-baked perfection.

Hi, I'm Kimberly!

Hi, I'm Kimberly.

A hopeless romantic when it comes to food. Every recipe I share is a love letter to food itself. I’m so glad you’re here. Make yourself at home and stay a while.

Love,
Kimberly

Kimberly the Zett Signature

If you want to get to know me better,
click here!


Easy Ciabatta Buns
Easy Ciabatta Buns
Easy Ciabatta Buns
Easy Ciabatta Buns

LET’S MAKE A PIECE OF HAPPINESS

Print
.tasty-recipe-responsive-iframe-container-19456ccb { position: relative; overflow: hidden; padding-top: 177.62%; } .tasty-recipe-responsive-iframe-container-19456ccb iframe { position: absolute; top: 0; left: 0; width: 100%; height: 100%; border: 0; } clock clock iconcutlery cutlery iconflag flag iconfolder folder iconinstagram instagram iconpinterest pinterest iconfacebook facebook iconprint print iconsquares squares iconheart heart iconheart solid heart solid icon
Easy Ciabatta Buns

Easy Ciabatta Buns


  • Author: Kimberly
  • Total Time: 4 hrs + 5 min
  • Yield: 8

Description

RECOMMENDED EQUIPMENT

  • large bowl
  • whisk
  • spatula
  • dough scraper (or blunt knife)
  • casserole dish (or ovenproof dish)

Ingredients

Units Scale
  • 350 milliliters lukewarm water
  • 1 tsp sugar
  • 1 tbsp oil
  • 7 grams instant yeast
  • 500 grams flour type 00 (pizza flour)
  • 1 tsp salt

Instructions

  1. Place the ingredients in a large bowl in the following order: warm water, 1 tsp sugar, 1 tbsp olive oil, dry yeast. Mix everything well with a whisk.
  2. Now add flour and 1 tsp salt. Mix everything well with a spatula so that the flour is incorporated and the edges can be scraped off. Now cover the bowl with a towel for 20 minutes and leave to rest.
  3. Wet your hands with a little water and grab the dough from four sides one after the other, pull it up and fold it in the middle so that the dough becomes rounder and has tension. Cover the bowl with a towel again and leave to rest for another 20 minutes.
  4. Repeat step 3 and cover the bowl with a towel again, but this time leave the dough to rest for approx. 2 hours.
  5. Sprinkle a little flour on a work surface and place the dough on top and also sprinkle with a little flour. Spread the dough out a little and divide into 8 equal portions. Pull the dough pieces in a semicircle on the worktop so that there is tension on the surface.
  6. Place baking paper on a baking tray and sprinkle with a little flour. Place the dough pieces on top, cover again with a towel and leave to rise for another hour.
  7. Now heat the oven to 230°C (446°F). Place a baking dish or ovenproof dish with water on the bottom of the oven. Instead of the bowl of water, you can also simply pour water into the oven with a spray bottle as soon as the tray is in the oven and then quickly close the door.
  8. Once the oven has heated up, place the baking tray with the rolls in the oven and bake for 10 minutes. Then remove the baking dish with water from the oven and bake for a further 10-15 minutes until the buns are golden brown.
  • Passive Time: 4 hrs
  • Cook Time: 5 min

CRAVING MORE?

Follow along here & don’t forget to subscribe to my substack!

Sandwich with Ham Tomato Fried Egg & Pickle Salsa (Strammer Max)

Sandwich with Ham Tomato Fried Egg & Pickle Salsa (Strammer Max)

Sandwich with Ham Tomato Fried Egg and Pickle Salsa (Strammer Max)

Sandwich with Ham Tomato Fried Egg and Pickle Salsa (Strammer Max)

December 24, 2023 by Kimberly

A variation on „Strammer Max“: ham and eggs on bread with a little twist. Simple, tasty and a delicious breakfast.

This website uses affiliate links which may earn commission for purchases made at no additional cost to you.

TOTAL TIME

15 min

SERVES

2 portions

DIET

omnivore

EVERY RECIPE DESERVES

A Little Love Letter

The „Stramme Max“ is originally a German dish traditionally served as a slice of sourdough bread with ham and fried eggs. There are countless variations and modifications, as it is super simple and makes a delicious breakfast. Here you will find my version as a slightly crisper one with fresh tomatoes and my pickle & red onion salsa as well as a freshly baked ciabatta bun. Let’s enjoy this bun of happiness.

To serve Strammer Max, start by toasting a slice of your favorite bread. Fry eggs to your desired doneness. Place the ham and eggs on the toasted bread. Add a touch of freshness with sliced tomatoes and a zesty pickle and red onion salsa. Serve it open-faced for a picturesque presentation.

While Strammer Max is best enjoyed fresh, you can prepare components in advance. Store ham and eggs separately in airtight containers in the refrigerator. Assemble just before serving to maintain the ideal texture. If you have leftover Strammer Max, refrigerate it, but be aware that the bread may lose its crispiness upon reheating.

Hi, I'm Kimberly!

Hi, I'm Kimberly.

A hopeless romantic when it comes to food. Every recipe I share is a love letter to food itself. I’m so glad you’re here. Make yourself at home and stay a while.

Love,
Kimberly

Kimberly the Zett Signature

If you want to get to know me better,
click here!


Sandwich with Ham Tomato Fried Egg and Pickle Salsa (Strammer Max)

LET’S MAKE A PIECE OF HAPPINESS

Print
.tasty-recipe-responsive-iframe-container-b6529bee { position: relative; overflow: hidden; padding-top: 177.62%; } .tasty-recipe-responsive-iframe-container-b6529bee iframe { position: absolute; top: 0; left: 0; width: 100%; height: 100%; border: 0; } clock clock iconcutlery cutlery iconflag flag iconfolder folder iconinstagram instagram iconpinterest pinterest iconfacebook facebook iconprint print iconsquares squares iconheart heart iconheart solid heart solid icon
Sandwich with Ham Tomato Fried Egg and Pickle Salsa (Strammer Max)

Sandwich with Ham Tomato Fried Egg & Pickle Salsa (Strammer Max)


  • Author: Kimberly
  • Total Time: 15 min
  • Yield: 2

Description

GOOD TO HAVE ON HAND

  • sharp knife
  • cutting board
  • small pan


Ingredients

Units Scale
  • 1 ciabatta bun
  • 1 tbsp butter
  • 4 tbsp pickles & red onion salsa
  • 50 grams deli ham
  • 2 tsp sweet mustard
  • 2 eggs
  • 1 tomato
  • chives
  • salt
  • pepper

Instructions

  1. Prepare the pickles & red onion salsa.
  2. Cut the ciabatta bun lengthwise down the middle.
  3. Cut the tomato into thin slices.
  4. Cut the chives into rolls.
  5. Melt 1 teaspoon of butter in a pan, crack in 2 eggs and fry over a medium heat until the egg whites are fully cooked but the yolks are still runny.
  6. Meanwhile, spread the rest of the butter and sweet mustard on the bun halves. Now place the ham and tomato slices on top of it.
  7. Place the fried egg on top, season with salt and pepper and top with the pickles and red onion salsa and some fresh chives.
  • Cook Time: 15 min

CRAVING MORE?

Follow along here & don’t forget to subscribe to my substack!