Pollo Tonnato

Pollo Tonnato

Pollo Tonnato

Pollo Tonnato

June 22, 2024 by Kimberly

Unleash the flavors with this delightful twist on the classic Vitello Tonnato! Tender chicken meets a creamy, tangy sauce for a dish that’s both satisfying and refreshingly different.

10 MINUTES

EASY

OMNIVORE

ITALIAN

439 PER PORTION

UMAMI
CREAMY

EVERDAY

LUNCH

ALL YEAR

INTRODUCTION

ABOUT THE RECIPE

Bring a slice of Italian flair to your table with Pollo Tonnato, a dish where simplicity and sophistication meet. This unique combination of tender chicken and a creamy tuna-based sauce offers a refreshing change from the usual veal recipe.

How to serve
Slice the chicken and drizzle with the rich tuna sauce, garnish with capers or lemon slices, and serve alongside a crisp green salad or fresh bread for a complete meal.

How to store
Store leftovers in an airtight container in the refrigerator. Enjoy within one day for the best freshness and taste.

Hi, I'm Kimberly!

Hi, I'm Kimberly.

A passionate food lover who believes in the magic of homemade deliciousness that spreads love and warmth. Join me on this culinary adventure as I prepare wonderful dishes and let’s spread some happiness together!

Kimberly the Zett Signature

If you want to get to know me better, click here!


Pollo Tonnato
Pollo Tonnato
Pollo Tonnato
„Let’s make a piece of happiness“
Print
clock clock iconcutlery cutlery iconflag flag iconfolder folder iconinstagram instagram iconpinterest pinterest iconfacebook facebook iconprint print iconsquares squares iconheart heart iconheart solid heart solid icon
Pollo Tonnato

Pollo Tonnato


5 Stars 4 Stars 3 Stars 2 Stars 1 Star

No reviews

  • Author: Kimberly
  • Total Time: 10 minutes
  • Yield: 2 as main 1x

Description

Recommended Equipment

  • glass jar
  • measuring spoons
  • immersion blender
  • large plate

Ingredients

Units Scale
  • 150 grams grilled chicken breast
  • 1 tsp capers
  • a hand full of arugula salad

SAUCE

  • 125 grams canned tuna in water, drained
  • 1 tbsp capers
  • 2 anchovies
  • 3 tbsp mayonnaise
  • juice of half a lemon
  • 4 tbsp extra-virgin olive oil
  • 1 tsp dijon mustard
  • salt to taste

Instructions

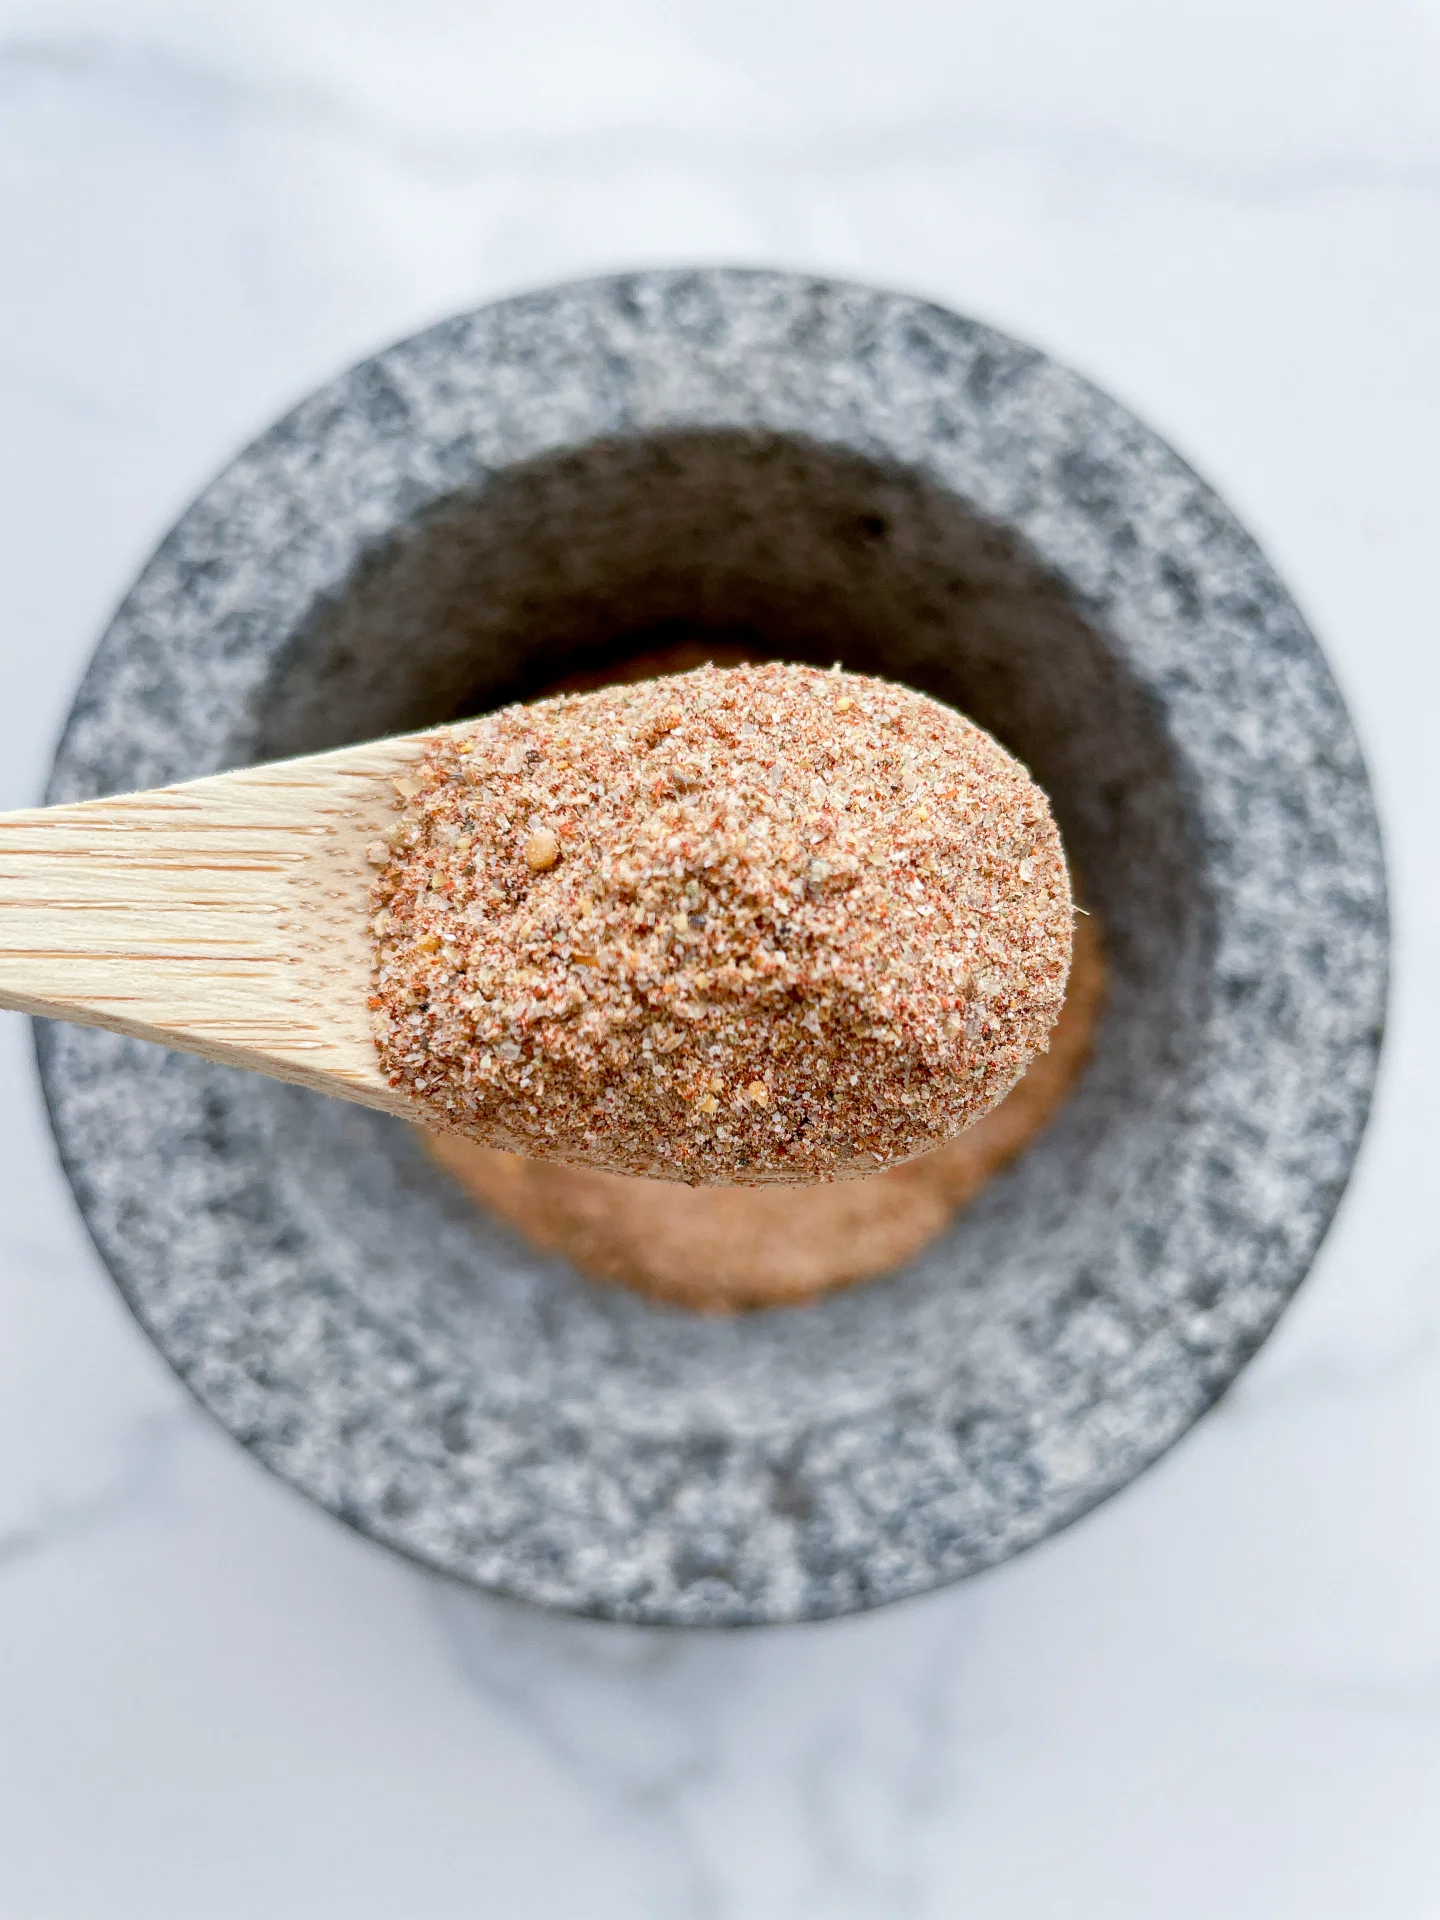
  • In a tall glass jar, add drained tuna and the following ingredients: 1 tbsp capers, 2 anchovies, 3 tbsp mayonnaise, the juice of half a lemon, 4 tbsp olive oil, and 1 tsp Dijon mustard. Then, use an immersion blender to puree everything into a creamy mixture. Season with salt to taste.
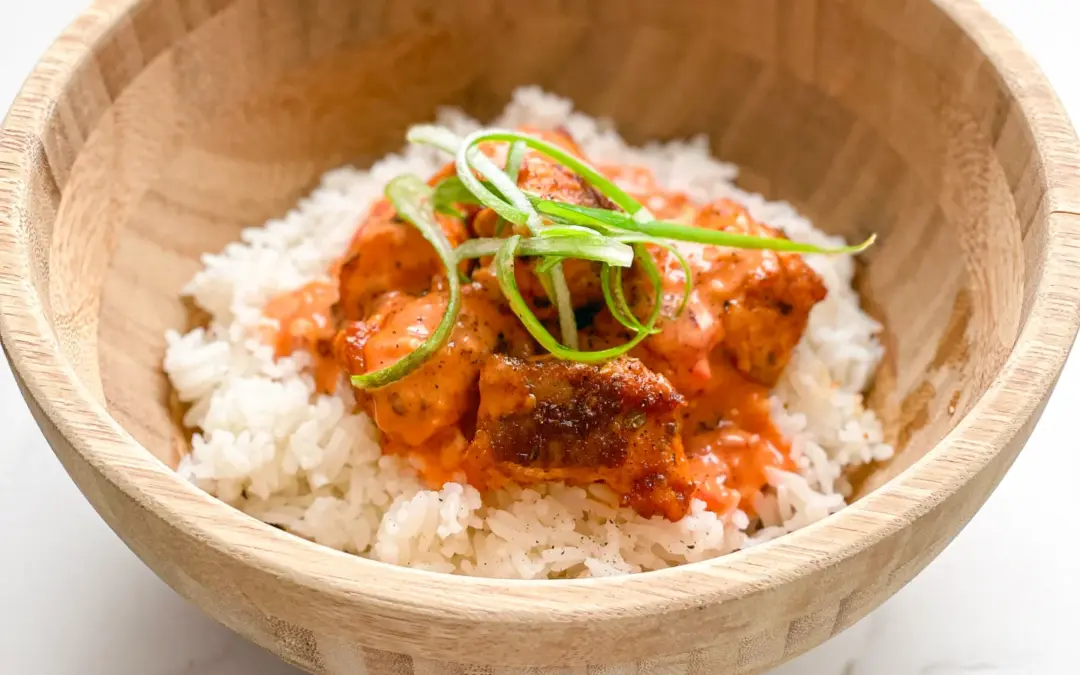
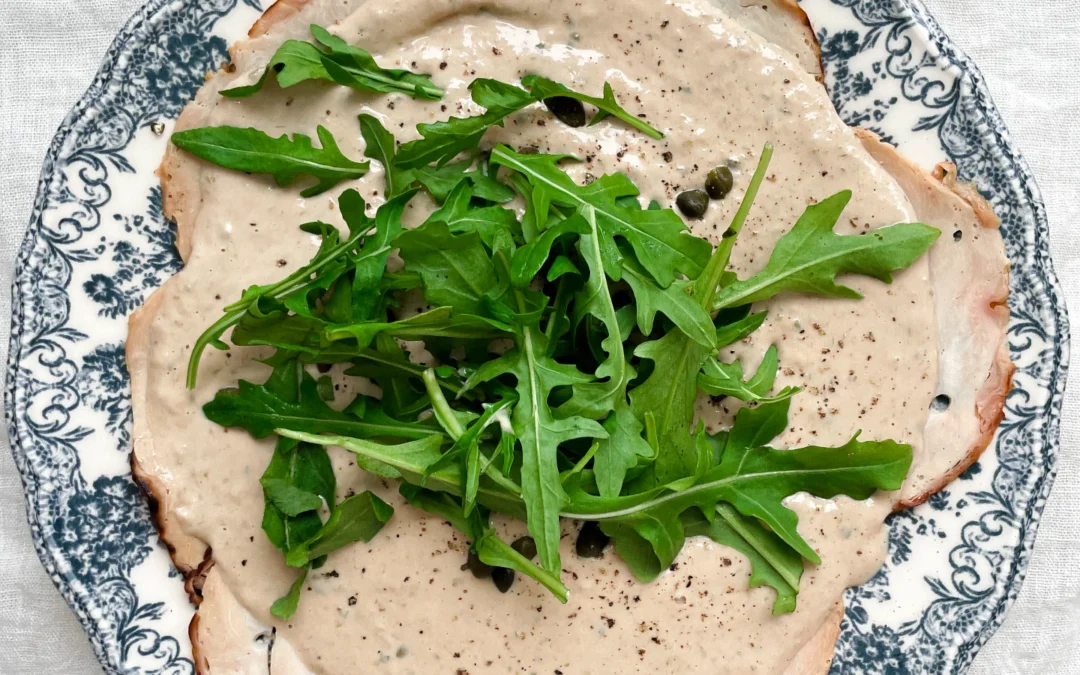
  • On a large plate, arrange the grilled chicken breast slices overlapping. Spread the tuna cream over the chicken slices, making sure some of the meat is still visible at the edges. Top with 1 tsp capers, grind fresh pepper over it, and place a handful of washed arugula in the center. Best served immediately or stored in the refrigerator until ready to eat.

Notes

The calorie information may vary depending on the product used, country and region.

  • Cook Time: 10 min

Salmon Flatbread with Slaw & Cilantro Yogurt Sauce

Salmon Flatbread with Slaw & Cilantro Yogurt Sauce

Salmon Flatbread with Slaw & Cilantro Yogurt Sauce

Salmon Flatbread with Slaw & Cilantro Yogurt Sauce

June 17, 2024 by Kimberly

Whip up this salmon flatbread for a delightful twist on dinner! Topped with crunchy slaw and a zesty cilantro yogurt sauce, it’s a fresh, flavorful favorite.

30 MINUTES

EASY

OMNIVORE

INT.

699 PER PORTION

COMFORT FOOD

EVERDAY

LUNCH
DINNER

SUMMER

INTRODUCTION

ABOUT THE RECIPE

Step up your meal game with this savory salmon flatbread, a perfect blend of nutritious and delicious. It’s simple enough for a weeknight yet impressive enough for guests. The combination of tender salmon, crispy slaw, and creamy cilantro yogurt sauce on a soft flatbread base makes every bite a delightful experience, ensuring this dish will become a new staple in your culinary repertoire.

How to serve
Serve this salmon flatbread freshly made to enjoy its full range of flavors. It’s perfect as a light, standalone dinner or can be paired with a side salad for a more filling meal. The zesty cilantro yogurt sauce brings a cool contrast to the warm, crispy salmon, making it a hit for any season. For an added twist, pair it with a chilled glass of white wine or sparkling water.

How to store
Best enjoyed fresh, if you must store it, keep the flatbread, salmon, and slaw separately in the fridge. The cilantro yogurt sauce can be refrigerated in an airtight container for up to three days.

Hi, I'm Kimberly!

Hi, I'm Kimberly.

A passionate food lover who believes in the magic of homemade deliciousness that spreads love and warmth. Join me on this culinary adventure as I prepare wonderful dishes and let’s spread some happiness together!

Kimberly the Zett Signature

If you want to get to know me better, click here!


Salmon Flatbread with Slaw & Cilantro Yogurt Sauce
„Let’s make a piece of happiness“
Print
clock clock iconcutlery cutlery iconflag flag iconfolder folder iconinstagram instagram iconpinterest pinterest iconfacebook facebook iconprint print iconsquares squares iconheart heart iconheart solid heart solid icon
Salmon Flatbread with Slaw & Cilantro Yogurt Sauce

Salmon Flatbread with Slaw & Cilantro Yogurt Sauce


  • Author: Kimberly
  • Total Time: 30 min
  • Yield: 4 1x

Description

Recommended Equipment

  • small bowl
  • grater
  • medium-sized bowl
  • sharp knife
  • cutting board
  • tall container
  • immersion blender (or food processor)
  • large skillet
  • oven (or toaster)

Ingredients

Units Scale
  • 500 grams salmon filet
  • 4 flatbreads

MARINADE

  • 1 tbsp olive oil
  • 1/4 tsp smoked paprika
  • 1/4 tsp salt
  • 1/4 tsp garlic powder
  • 1/4 tsp oregano
  • 1/8 tsp grounded pepper
  • 1/8 tsp chili flakes

SLAW

  • 200 grams red cabbage
  • 1/2 cucumber
  • 1 tbsp lemon juice
  • 1 tbsp olive oil
  • salt & pepper to taste

CILANTRO YOGURT SAUCE

  • 20 grams cilantro
  • 2 tbsp lime juice
  • 2 tbsp olive oil
  • 100 grams yogurt
  • 2 tbsp cold water
  • 1/2 avocado
  • 2 garlic cloves
  • salt & pepper to taste

Instructions

  1. In a small bowl, mix 1 tablespoon of olive oil with 1/4 teaspoon each of smoked paprika, salt, garlic powder, dried oregano, and 1/8 teaspoon each of ground pepper and chili powder into a paste. Spread this paste over the salmon fillet and rub it in well. Refrigerate the salmon until further use.
  2. For the coleslaw, finely shred the red cabbage and place it in a medium-sized bowl. Quarter the cucumber, slice it, and add to the cabbage. Add olive oil, lime juice, salt, and pepper to the bowl, mix well, and set aside.
  3. For the cilantro yogurt sauce, in a tall container, blend cilantro (leave some leaves for garnish), lime juice, olive oil, 2 tablespoons of water, yogurt, avocado, and peeled garlic cloves into a cream using an immersion blender. Add salt and pepper to taste. Set aside.
  4. In a large skillet, sear the salmon on both sides for 2-4 minutes, depending on thickness, until slightly translucent inside. Remove the salmon from the skillet and place it on a plate to rest for a bit.
  5. Meanwhile, warm the flatbreads in the oven or on the toaster for a few minutes.
  6. Spread 1-2 tablespoons of sauce on the warm bread, add the coleslaw, then place a salmon fillet on top and slightly shred it. Garnish with some sauce, fresh cilantro leaves, green onions, and lime slices.

Notes

The calorie information may vary depending on the product used, country and region.

  • Cook Time: 30 min

Spicy Salmon Fried Sushi Rolls

Spicy Salmon Fried Sushi Rolls

Spicy Salmon Baked Sushi Rolls

Spicy Salmon Fried Sushi Rolls

May 24, 2024 by Kimberly

Spicy salmon meets crispy, fried perfection in this delightful dish. With a kick of heat, rich flavors, and a comforting texture, every bite offers a cozy yet exciting sushi experience.

75 MINUTES

ADVANCED

OMNIVORE

JAPANESE

8 ROLLS

CRISPY

DATE NIGHT

APPETIZER

ALL YEAR

INTRODUCTION

ABOUT THE RECIPE

Imagine if your favorite spicy tuna roll and a sizzling tempura dish had a delicious rendezvous. Sounds intriguing, right? Well, let me introduce you to Crispy Spicy Salmon Sushi Rolls. They’re bursting with the bold flavors of traditional sushi but transformed into a delightful fried sensation. Wrapped in a light, crispy coating with a kick of spicy salmon nestled inside, you’ve just discovered your new favorite dish. Perfect for any gathering or a tantalizing meal at home!

How to serve
Serve these deep-fried spicy salmon rolls hot and crispy. Cut each roll into six even pieces for easy sharing. Drizzle them generously with the two sauces – a spicy mayo-Sriracha sauce and a sweet and savory soy-mirin sauce. For the final touch, sprinkle sesame seeds and thinly sliced spring onions over the top for a beautiful contrast in color and a burst of freshness. These rolls are packed with flavor, but if you enjoy a bit more heat, they also pair wonderfully with a dab of wasabi. This delightful combination of textures and tastes makes them a standout dish at any gathering.

How to store
Due to their crispy nature, it’s best to enjoy these spicy salmon rolls fresh. Once fried, they tend to lose their crunchiness if stored, so they are not recommended for later consumption. However, if you find yourself with leftovers, you can briefly re-fry them to bring back some of the crispiness. But really, these rolls are so delicious, consider it the perfect excuse to indulge and enjoy them all in one sitting!

Hi, I'm Kimberly!

Hi, I'm Kimberly.

A passionate food lover who believes in the magic of homemade deliciousness that spreads love and warmth. Join me on this culinary adventure as I prepare wonderful dishes and let’s spread some happiness together!

Kimberly the Zett Signature

If you want to get to know me better, click here!


Spicy Salmon Baked Sushi Rolls
„Let’s make a piece of happiness“
Print
clock clock iconcutlery cutlery iconflag flag iconfolder folder iconinstagram instagram iconpinterest pinterest iconfacebook facebook iconprint print iconsquares squares iconheart heart iconheart solid heart solid icon
Spicy Salmon Fried Sushi Rolls

Spicy Salmon Fried Sushi Rolls


5 from 1 review

  • Author: Kimberly
  • Total Time: 75 min
  • Yield: 4 1x

Description

RECOMMENDED EQUIPMENT

  • sharp knife
  • cutting board
  • rice cooker (or pot)
  • three small pots (or one that you wash twice)
  • two small bowls
  • squeeze bottles (or tablespoons)
  • two medium-sized bowls
  • bamboo rolling mat (called Makisu)
  • plastic wrap
  • large bowl
  • whisk
  • drinking glass
  • two flat dishes
  • two forks
  • foam spoon

Ingredients

Units Scale

SUSHI RICE

  • 150 grams sushi rice
  • 2 tbsp rice vinegar
  • 1 tbsp white sugar
  • 1/2 tsp salt

LIGHT SAUCE

  • 50 grams mayonnaise
  • 10 grams Sriracha (or any other hot sauce you like)

DARK SAUCE

  • 50 grams soy sauce
  • 50 grams Mirin
  • 50 grams white sugar

TEMPURA BATTER

  • 100 grams all-purpose flour
  • 100 grams corn starch
  • 1 egg
  • 100 milliliters ice-cold water
  • 1/2 tsp salt

FILLING

  • 150 grams salmon filet
  • 2 tbsp Sriracha (or any other hot sauce you like)

OTHER INGREDIENTS

  • 2 full-sized Nori sheets
  • 70 grams Panko (or regular bread crumbs)
  • 500 milliliters deep-frying oil
  • sesame seeds
  • spring onions

Instructions

  1. Let’s start with the sushi rice: Wash the rice under cold water until the water runs clear. This is important as it removes all the starch and prevents the rice from becoming mushy. Now, place the rice in a rice cooker or pot and add 400ml (1 + 2/3 cup) of water. I use a little less than 1:1.5 ratio rice to water, as there’s still water left on the rice from washing. Let the rice cook.
  2. To get that authentic sushi flavor, the rice will be soaked in a sauce. For this, heat rice vinegar, sugar, and salt in a small pot until the sugar and salt have dissolved. Set aside to cool. As it cools, the sauce will thicken slightly.
  3. Now, let’s prepare the salmon filling. Rinse the salmon under cold water, dry it, then chop it into rough cubes. In a bowl, mix it with Sriracha, and it’s ready. Keep the salmon chilled until use.
  4. By now, the rice should be cooked. Transfer it to a medium-sized bowl and pour over the rice vinegar-sugar-salt sauce. Mix everything until the sauce is distributed and absorbed by the rice. Let the rice cool completely.
  5. Meanwhile, prepare the topping sauces. For the light sauce, simply mix mayonnaise and Sriracha, thinning it with a bit of water to make it easier to spread. For the dark sauce, heat soy sauce, Mirin, and sugar in a small pan or pot until the sugar dissolves. Set aside to cool. Once the sauce is cold, it will thicken a bit. I like to pour the sauces into squeeze bottles, but you can also spoon them over the sushi later or use them for dipping. Keep the sauces chilled until use.
  6. In the meantime, you can prepare your work surface. Take a bamboo rolling mat, also known as Makisu, and wrap it on both sides with a layer of plastic wrap. Press the ends well onto the mat. Then fill a medium-sized bowl with a little water, as you’ll need it for your fingers to prevent the rice from sticking to them. Then you’ll need a cutting board and a sharp knife to halve the rolls. Finally, halve your Nori sheets and set them aside.
  7. Once the rice is cold, you can start rolling. Place the Makisu with the sticks horizontally in front of you. Place a Nori sheet with the shiny, smooth side down on the bamboo mat. Dip your fingers in the water and take about 1 heaped tablespoon of rice, spreading it with your fingers on the Nori sheet. It takes a bit of practice to handle the rice, but just take your time and moisten your fingers again if it becomes difficult to spread the rice. I press and push it in the direction I want it. I leave about 1/2-1cm (0.2″-0.4″) free at the top edge of the Nori sheet. When the rice is evenly distributed, turn the Nori sheet over so that the rice side is now facing down. Place a strip of the salmon filling in the center of the Nori sheet, a bit more than a finger thick. Now roll the Nori sheet so that the bottom end lands directly over the salmon filling. Then press everything tightly from the outside, then close the roll with a twist and press again. Take the finished sushi roll and halve it on the cutting board. Proceed the same way with the other rolls and set them aside.
  8. Now prepare the tempura batter. Mix flour, cornstarch, and salt in a large bowl. In a glass, stir the egg and ice-cold water starting with 100ml (3.5 oz) of water, and pour it into the dry ingredients. Quickly whisk everything until it’s creamy. If the batter is too thick, add 1 tablespoon of water and stir. We aim for a creamy-thick consistency. Better too thick than too thin, so really only adjust the water carefully. It also depends on how much liquid the egg brings. Pour the batter into a flat dish. Do the same with the Panko.
  9. Now you can bread the rolls. Take two forks and place the first roll in the tempura batter, distributing the batter over the entire roll. You can also gently turn it. Lift it up and let the excess batter drip off. Now place the roll directly into the Panko and press it onto the roll with the forks. You should now have a compact roll where the batter adheres well and nothing drips. Bread the rolls one by one and set aside.
  10. Now heat the frying oil to 190°C/375°F in a small, deep pot. Make sure to use enough oil so that the rolls can be completely submerged. I used solid vegetable fat in block form. Once the temperature is reached, place two rolls at a time into the oil. Be careful as the oil may bubble when the rolls are added. It’s best to use a foam spoon for this. The temperature will then drop to about 175°C/347°F. Fry the rolls in the oil for a total of 5 minutes. Each roll only absorbs about 10g (1/3 oz) of fat. I weighed the fat before and after 😀 This is because the fat is hot enough to instantly seal the crust. That’s why it’s also important to bring the fat to the right temperature. If the fat is too cold, the roll absorbs more fat and becomes soggy and not crispy.
  11. When the rolls are done frying, remove them from the fat and let them drain on a rack and cool slightly. Cut the rolls into 6 pieces each and arrange them on a plate. Next, drizzle the light and dark sauces over the rolls in a zigzag direction. Finally, you can sprinkle some sesame and finely chopped spring onions as a topping.

Notes

The calorie information may vary depending on the product used, country and region.

  • Passive Time: 20 min
  • Cook Time: 55 min

Tuna Melt

Tuna Melt

Tuna Melt

Tuna Melt

April 29, 2024 by Kimberly

Experience the ultimate comfort with this tuna melt – crispy bread, creamy tuna salad, melted cheese, and a little heat combine for a mouthwatering lunch you can’t resist!

20 MINUTES

EASY

OMNIVORE

US AMERICAN

617 PER SANDWICH

CRISPY
CHEESY
CREAMY

EVERYDAY

SANDWICH
LUNCH

ALL YEAR

INTRODUCTION

ABOUT THE RECIPE

Craving a quick and satisfying meal? Look no further than the classic Tuna Melt with a twist! It’s the perfect blend of creamy tuna, gooey melted cheese, and toasted bread – a true comfort food staple.

HOW TO SERVE
The best way to enjoy a Tuna Melt is freshly made and hot off the pan. Serve with a side of crispy potato chips or a light salad for a balanced meal. It’s ideal for a quick lunch or a casual dinner, guaranteed to please both kids and adults alike!

HOW TO STORE
For best results, consume your Tuna Melt fresh. However, if you need to store it, keep the unassembled tuna salad in the refrigerator in an airtight container for up to two days, and assemble before reheating to maintain the best quality.

Hi, I'm Kimberly!

Hi, I'm Kimberly.

A passionate food lover who believes in the magic of homemade deliciousness that spreads love and warmth. Join me on this culinary adventure as I prepare wonderful dishes and let’s spread some happiness together!

Kimberly the Zett Signature

If you want to get to know me better, click here!


Tuna Melt
Tuna Melt
Tuna Melt
„Let’s make a piece of happiness“
Print
clock clock iconcutlery cutlery iconflag flag iconfolder folder iconinstagram instagram iconpinterest pinterest iconfacebook facebook iconprint print iconsquares squares iconheart heart iconheart solid heart solid icon
Tuna Melt

Tuna Melt


  • Author: Kimberly
  • Total Time: 20 min
  • Yield: 2 sandwiches 1x

Description

RECOMMENDED EQUIPMENT

  • sharp knife
  • cutting board
  • medium-sized bowl
  • medium-sized frying pan
  • spatula

Ingredients

Units Scale

TUNA CREME

  • 150 grams canned tuna in water (drained)
  • 50 grams mayonnaise
  • 1 pickled cucumber
  • 1 tsp lemon juice
  • 1 garlic clove
  • 1/2 tsp dijon mustard
  • dill
  • chives
  • salt & pepper to taste

OTHER INGREDIENTS

  • 1/2 red onion
  • 4 slices bread of your choice
  • 2 slices cheddar cheese
  • 80 grams mozzarella cheese
  • 1 jalapeno
  • butter
  • Tabasco (optional)

Instructions

PREPARATIONS

  1. Peel the onion, halve it, and slice it into fine half circles. Set aside.
  2. Wash the jalapeño and slice it into thin rings. Set aside.
  3. Squeeze the mozzarella in paper towels to remove as much moisture as possible, then slice it thinly. Set aside.

COOKING

  1. For the tuna cream: Drain the can of tuna so there’s no water left. Place the tuna in a medium-sized bowl. Mix it with mayonnaise, lemon juice, Dijon mustard, salt, and pepper. Now chop the pickle into small pieces and add it to the bowl. Finely chop the dill and chives and add them to the bowl as well. Peel and finely chop the garlic clove, or press it into the bowl. Mix everything together. Season to taste and set aside.
  2. Heat a pan over medium heat without adding any additional fat. Meanwhile, spread a little butter on two slices of bread. Place the bread slices in the pan, buttered side down. Spread each with half of the tuna cream, then top with the red onions. Add half of the mozzarella and a slice of cheddar cheese to each. Top with the jalapeño slices. Let it all cook for a few minutes on low to medium heat.
  3. Meanwhile butter the other two bread slices. Once the bottom of the bread in the pan is golden brown and crispy, place the other bread slices, buttered side up, on top of the sandwiches in the pan. Use a spatula to lift the sandwich and quickly flip it, so it can brown on the other side.
  4. Let everything cook for another 5-8 minutes on low heat, allowing the cheese to melt and the bread slice to become crispy.
  5. Remove from the pan and cut in half. Serve immediately, drizzle with Tabasco to taste and enjoy your pieces of happiness.

Notes

The calorie information may vary depending on the product used, country and region.

  • Prep Time: 5 min
  • Cook Time: 15 min

Fresh Shrimp Tacos & Coleslaw

Fresh Shrimp Tacos & Coleslaw

Fresh Prawn Tacos & Slaw

Fresh Shrimp Tacos & Slaw

April 9, 2024 by Kimberly

Discover the joy of Fresh Shrimp Tacos & Slaw – a zesty, mouth-watering feast that’s perfect for any day. Easy, delicious, and absolutely unforgettable!

40 MINUTES

EASY

OMNIVORE

MEXICAN

147 PER TACO

REFRESHINGEVERYDAY

LUNCH 
DINNER

SPRING 
SUMMER

INTRODUCTION

ABOUT THE RECIPE

Dive into the delightful world of Fresh Shrimp Tacos & Slaw, your new go-to recipe for a quick, healthy, and utterly delicious meal. This dish combines the juicy, succulent flavors of fresh shrimps with the crisp, refreshing taste of homemade slaw, all wrapped up in a soft taco shell. It’s the perfect balance of textures and tastes, sure to tantalize your taste buds!

How to serve:
Serve these tacos fresh off the skillet for the best experience. Pair them with a side of lime wedges & extra slaw. Don’t forget a cold, refreshing drink to wash down the flavors. These shrimp tacos are not just food – they’re a vibrant, interactive dining experience that everyone can get excited about.

How to store:
Leftover shrimp fillings and slaw can be stored separately in airtight containers in the fridge. They’ll keep well for up to two days, making for an easy, delicious lunch or dinner option whenever you’re short on time.

Hi, I'm Kimberly!

Hi, I'm Kimberly.

A passionate food lover who believes in the magic of homemade deliciousness that spreads love and warmth. Join me on this culinary adventure as I prepare wonderful dishes and let’s spread some happiness together!

Kimberly the Zett Signature

If you want to get to know me better, click here!


Fresh Prawn Tacos & Slaw
„Let’s make a piece of happiness“

INGREDIENTS

FOR 12 TACOS

SLAW

  • 250g white cabbage (9 oz)
  • 250g red cabbage (9 oz)
  • 1 cup cilantro
  • 1 red onion
  • 200g low fat yogurt (7 oz)
  • salt & pepper to taste

SHRIMPS

  • 550g black tiger shrimps – 26/30 p. lb. frozen count (1.2 lb)
  • 2 tbsp olive oil for marinade
  • 2 tbsp olive oil for frying
  • 3 garlic cloves
  • 1 tsp cumin
  • 1 tsp smoked paprik
  • 1/2 tsp oregano
  • 1/2 tsp onion powder
  • 1/2 tsp garlic powder
  • 1/2 tsp salt
  • 1/4 tsp chili flakes

TOPPINGS & TACOS

  • 12 corn tortillas
  • 2 limes
  • 3 tbsp yogurt
  • 2 spring onions
  • cilantro
Fresh Prawn Tacos & Slaw
}

ACTIVE: 10 min

PASSIVE: –

PREPARATIONS

Recommended Equipment
  • sharp knife
  • cutting board
  • two medium-sized bowls
  • small pan
  • large pan
  • If you’re using frozen shrimp, let them thaw in a strainer with a drip tray in the fridge a day before you need them. Then wash them thoroughly and pat them dry before further use.
  • Rinse fresh shrimp with cold water and pat dry.
  • Cut the green part of the spring onions into fine strips lengthwise.
  • Quarter the limes.
}

ACTIVE: 25 min

PASSIVE: –

COOKING

1. Slice the red cabbage, white cabbage, and red onion into thin strips and put them in a medium-sized bowl. Pluck the coriander leaves from the stems, roughly chop them, and add to the bowl with the cabbage. Add yogurt, salt, and pepper as well, and stir everything well. Set aside.

2. Next, peel and finely chop or press the garlic cloves and mix them with olive oil, chili, cumin, salt, garlic powder, onion powder, smoked paprika, and oregano to create a paste. Coat the shrimp in the paste, ensuring they’re evenly covered. Let marinate for 15 minutes.

3. Meanwhile, in a small pan, lightly toast the corn tortillas on both sides without adding fat, so they’re warm but still bendable. Alternatively, you can warm them in the oven for a few minutes.

4. Heat 1-2 tablespoons of olive oil in a large pan and fry the shrimp on each side for about 1-2 minutes until they’re no longer transparent and have curled up.

5. Spread the tortillas on plates, top with the slaw, distribute 4 shrimps on each, and garnish with yogurt, coriander, spring onion, and lime juice.

NOTE: The calorie information may vary depending on the product used, country and region.

Cajun Bang Bang Salmon Rice Bowl

Cajun Bang Bang Salmon Rice Bowl

Cajun Bang Bang Salmon Rice Bowl

Cajun Bang Bang Salmon Rice Bowl

February 7, 2024 by Kimberly

Discover the taste of Cajun-spiced Salmon Bites, paired with fluffy rice for a quick, savory meal. Perfect for an easy, delightful seafood experience!

25 MINUTES

EASY

OMNIVORE

US AMERICAN

763 PER PORTION

SPICY

EVERYDAY

DINNER

ALL YEAR

INTRODUCTION

ABOUT THE RECIPE

Dive into the vibrant world of Cajun cuisine with my Cajun Salmon Recipe, a perfect blend of bold flavors and nutritious ingredients. These Spicy Salmon Bites offer a tantalizing experience, bringing the essence of Southern cooking right to your plate. Ideal for those who love Easy Seafood Meals, this dish combines the simplicity of cooking with an explosion of taste, making it a must-try for seafood enthusiasts.

How to serve:
The salmon bites, with their perfect Cajun seasoning, are best paired with fluffy, light rice, enhancing the rich flavors of the fish. This pairing makes for an irresistible combination and lands this dish among the top quick salmon dishes. Whether you’re hosting a dinner party or looking for a simple yet flavorful seafood recipe for your family, these Cajun Salmon Bites will not disappoint. Their versatility also makes them a great option for a healthy salmon idea, fitting into various meal plans.

How to store:
Keep any leftovers in an airtight container in the refrigerator, ensuring they stay fresh. Make sure to store each ingredient in a separate container. They can be easily reheated for a quick meal, maintaining their delicious taste and texture.

Hi, I'm Kimberly!

Hi, I'm Kimberly.

A passionate food lover who believes in the magic of homemade deliciousness that spreads love and warmth. Join me on this culinary adventure as I prepare wonderful dishes and let’s spread some happiness together!

Kimberly the Zett Signature

If you want to get to know me better, click here!


Cajun Bang Bang Salmon Rice Bowl

„Let’s make a piece of happiness“

INGREDIENTS

FOR 2 PORTIONS

SALMON


SAUCE

  • 50g mayonnaise (1/4 cup)
  • 50g sweet & sour sauce (1/4 cup)
  • 1 tbsp sriracha sauce
  • 1 tbsp lemon juice
  • 1 tsp crispy chili oil
  • 1 garlic clove

RICE

  • 300g jasmine rice (1.5 cups)
  • 400ml water (1 + 3/4 cups)

TOPPING

  • spring onions
Cajun Bang Bang Salmon Rice Bowl
}

ACTIVE: 10 min

PASSIVE: –

PREPARATIONS

Recommended Equipment
  • sharp knife
  • cutting board
  • medium bowl
  • small bowl
  • rice cooker (or pot with lid)
  • Preheat the oven to 180°C (350°F)
  • Cut the spring onions into thin strips.
  • Cut the lemon in half.
  • Peel the garlic clove.
  • Pat the salmon dry and cut into large pieces.
    }

    ACTIVE: 15 min

    PASSIVE: –

    COOKING

    1. Wash the rice until the water runs clear. Then cook the rice with 400ml (1 3/4 cups) of fresh water in the rice cooker. If you don’t have a rice cooker, you can cook the rice in a pot with a lid. To do so bring to a boil and then finish cooking on the lowest setting with the lid on.

    2. In a medium-sized bowl, mix together the marinade for the salmon. Stir together the olive oil and Cajun seasoning and add the salmon bites. Stir everything well and then place the salmon pieces on a baking tray lined with baking paper.

    3. Meanwhile, prepare the sauce. In a small bowl, mix together the mayonnaise, sweet and sour sauce, Sriracha, lemon juice, crispy chili oil and crushed garlic.

    4. Remove the salmon from the oven after 5-7 minutes. Now divide the rice into two bowls, place the salmon bites on top and spread the sauce over them. Finally, top with spring onions.

    NOTE: The calorie information may vary depending on the product used, country and region.