Vanilla Parfait with Chocolate Soil

Vanilla Parfait with Chocolate Soil

Vanilla Parfait with Chocolate Soil

Vanilla Parfait with Chocolate Soil

December 20, 2024 by Kimberly

This creamy vanilla parfait melts like a dream, paired with crunchy, bittersweet chocolate soil for a texture and flavor explosion. Dessert vibes: fancy enough to impress, cozy enough to devour solo.

4 HOURS
40 MINUTES

INTERMEDIATE

VEGETARIAN

FRENCH

245 PER PORTION

CREAMY
CRUNCHY

CHRISTMAS

DESSERT

ALL YEAR

INTRODUCTION

ABOUT THE RECIPE

If you’re looking for a dessert that feels both luxurious and approachable, this vanilla parfait with chocolate soil is it. The creamy, rich vanilla base perfectly contrasts the crunchy, bittersweet chocolate soil, creating a balance of flavors and textures. It’s the kind of dessert that wows at a dinner party but is easy enough to whip up for yourself when you need a little indulgence. Bonus: it’s no-bake and totally make-ahead friendly!

How to serve
Serve your parfait chilled in elegant bowls or plates for the ultimate dessert presentation. Spoon the creamy vanilla layer first and top with a generous sprinkle of chocolate soil for that perfect crunch. Want to elevate it even more? Add fresh berries, a drizzle of caramel or even a few drops of this Mint Oil.

How to store
Keep the parfait in an airtight container in the freezer for up to one week. Store the chocolate soil separately in a dry container to maintain its crunch. Assemble right before serving.

Hi, I'm Kimberly!

Hi, I'm Kimberly.

A passionate food lover who believes in the magic of homemade deliciousness that spreads love and warmth. Join me on this culinary adventure as I prepare wonderful dishes and let’s spread some happiness together!

Kimberly the Zett Signature

If you want to get to know me better, click here!


Vanilla Parfait with Chocolate Soil
„Let’s make a piece of happiness“
Print
clock clock iconcutlery cutlery iconflag flag iconfolder folder iconinstagram instagram iconpinterest pinterest iconfacebook facebook iconprint print iconsquares squares iconheart heart iconheart solid heart solid icon
Vanilla Parfait with Chocolate Soil

Vanilla Parfait with Chocolate Soil


5 Stars 4 Stars 3 Stars 2 Stars 1 Star

No reviews

  • Author: Kimberly
  • Total Time: 4 hrs + 40 min
  • Yield: 10-12 1x

Description

Recommended Equipment

  • two glass or metal mixing bowls
  • two small bowls
  • baking tray
  • small pot
  • whisk
  • silicone spatula
  • fine mesh strainer
  • molds for the parfait

Ingredients

Units Scale

PARFAIT

  • 4 egg yolks
  • 100 grams powdered sugar
  • 400 grams heavy cream
  • 1 vanilla pod

CHOCOLATE SOIL

  • 60 grams powdered sugar
  • 100 grams all-purpose flour
  • 15 grams unsweetened cocoa powder
  • 1/4 tsp salt
  • 50 grams butter
  • 1 tsp ground coffee

Instructions

  1. Whip the cream until stiff peaks form, then place it in the fridge to keep cold.
  2. Separate the eggs, placing the yolks in a glass or metal bowl. Scrape the vanilla pod and add the seeds to the yolks.
  3. Sift the powdered sugar through a fine mesh strainer into the yolks. Mix well with the vanilla seeds.
  4. Place the bowl over a pot of simmering water (double boiler setup), ensuring only the steam touches the bowl. Whisk the mixture until it reaches 80 °C (176 °F).
  5. Prepare an ice bath (a bowl with cold water and ice cubes). Once the yolk mixture reaches 80 °C, place the bowl in the ice bath and whisk until the mixture cools and becomes thick, sticky, and creamy.
  6. Gently fold the chilled whipped cream into the cooled yolk mixture using a silicone spatula until fully combined.
  7. Pour the parfait mixture into molds and freeze for about 4 hours.
  8. For the chocolate soil, preheat the oven to 160 °C (320 °F).
  9. Combine sugar, flour, cocoa powder, salt, and ground coffee in a bowl.
  10. Melt the butter and add it to the dry ingredients. Mix with your hands until a crumbly texture forms.
  11. Spread the mixture evenly on a small baking tray and bake for about 10 minutes.
  12. Remove the tray from the oven, let the mixture cool, then crumble it into pieces. Store in an airtight container.
  13. To serve, unmold the parfaits, arrange them on plates, and decorate with the chocolate soil around them.
  14. Optional: Garnish with mint oil, berry compote, marzipan sauce, or chocolate sauce.
  • Passive Time: 4 hours
  • Cook Time: 40 min

Cranberry Orange Glazed Pork Roast

Cranberry Orange Glazed Pork Roast

Cranberry Orange Glazed Pork Roast

Cranberry Orange Glazed Pork Roast

December 18, 2024 by Kimberly

This juicy, tender pork roast with a sweet-tangy cranberry orange glaze tastes like the holidays on a plate. Perfectly crispy on the outside and bursting with bold, festive flavors inside.

2 HOURS
40 MINUTES

INTERMEDIATE

OMNIVORE

GERMAN

500 PER PORTION

COMFORT FOOD

CHRISTMAS

DINNER

WINTER

INTRODUCTION

ABOUT THE RECIPE

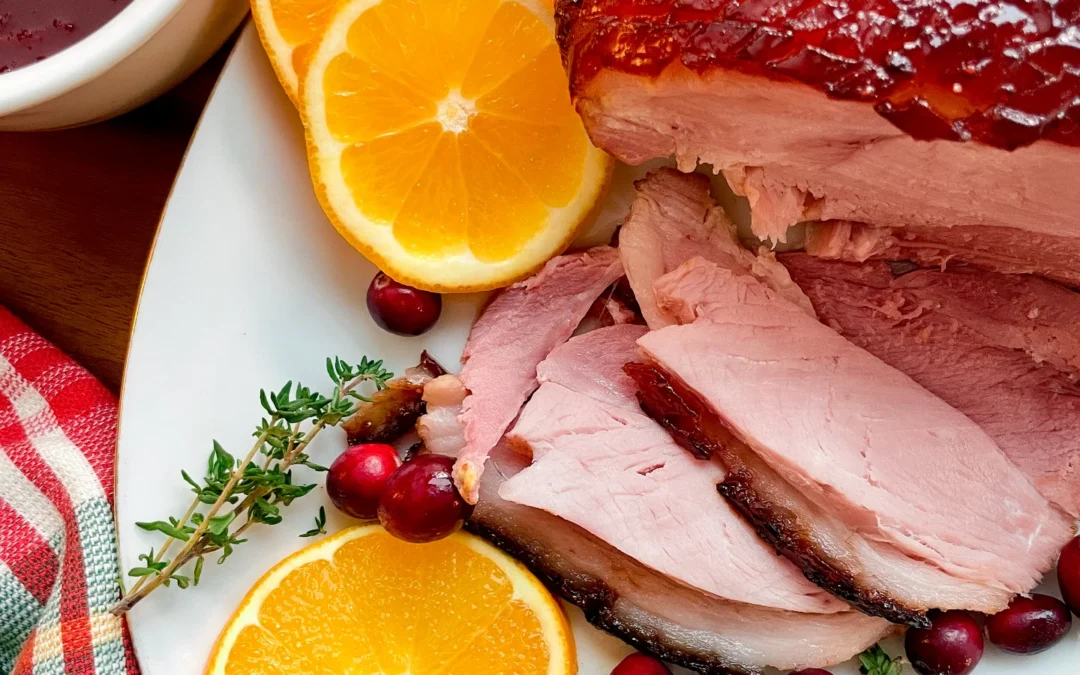
This roast is what holiday dreams are made of—crispy crackling, juicy pork, and a sweet-tangy cranberry orange glaze that brings all the festive vibes. The glaze is inspired by a classic Cumberland sauce, with tart cranberries, bright orange zest, and a splash of Port wine for richness. Whether it’s for a holiday feast or a special family dinner, this roast is guaranteed to steal the show and have everyone asking for seconds.

How to serve
Pair this roast with creamy mashed potatoes, roasted Brussels sprouts, or a crisp green salad to balance the richness. The cranberry orange glaze adds just the right amount of tang, so it shines with simple sides. For an extra festive touch, drizzle a bit of the warm glaze over the carved slices. The best part? This roast is just as amazing the next day! Slice it paper-thin and enjoy it as a snack, or layer it into a sandwich with some extra glaze for a seriously delicious leftover treat.

How to store
Wrap leftover pork in foil or store it in an airtight container in the fridge for up to three days. Enjoy it cold in a sandwich with a dollop of leftover glaze.

Hi, I'm Kimberly!

Hi, I'm Kimberly.

A passionate food lover who believes in the magic of homemade deliciousness that spreads love and warmth. Join me on this culinary adventure as I prepare wonderful dishes and let’s spread some happiness together!

Kimberly the Zett Signature

If you want to get to know me better, click here!


Cranberry Orange Glazed Pork Roast
„Let’s make a piece of happiness“
Print
clock clock iconcutlery cutlery iconflag flag iconfolder folder iconinstagram instagram iconpinterest pinterest iconfacebook facebook iconprint print iconsquares squares iconheart heart iconheart solid heart solid icon
Cranberry Orange Glazed Pork Roast

Cranberry Orange Glazed Pork Roast


  • Author: Kimberly
  • Total Time: 2 hrs + 40 min
  • Yield: 6 - 8 1x

Description

RECOMMENDED EQUIPMENT

  • deep baking dish or roasting pan
  • aluminum foil
  • sharp knife
  • cutting board
  • kitchen brush for glazing
  • meat thermometer
  • vegetable peeler
  • small pot

Ingredients

Units Scale

PORK HAM

  • 1.8 kilogramm cured pork ham with rind
  • 2 tsp dijon mustard
  • salt & pepper

COOKING LIQUID

  • 750 milliliter vegetable stock
  • 1.5 white onions
  • 3 garlic cloves
  • 2 carrots
  • 2 bay leaves
  • 1 tbsp black pepper corns

CRANBERRY ORANGE GLAZE

  • 1 lemon
  • 1 orange
  • 200 milliliter port wine
  • 1 shallot
  • 3/4 tsp fresh ginger, grated
  • 1 tsp dijon mustard
  • 100 grams fresh cranberries
  • 200 grams redcurrant jelly
  • salt & black pepper

Instructions

  1. Take the meat out of the fridge and let it rest at room temperature for about 30 minutes to ensure even cooking later.
  2. In the meantime, prepare the glaze. You can find the recipe for the cranberry-orange sauce here, which we’ll use both as a glaze and a sauce later.
  3. Preheat the oven to 150°C/300°F (fan).
  4. Peel the onions, garlic, and carrots, then cut them into large chunks.
  5. Pour vegetable broth into a deep baking dish or roasting pan and place the meat in it, rind side down. Distribute the chopped vegetables, pepper, and bay leaves around it.
  6. Cover the dish with aluminum foil and place it in the oven for 40 minutes.
  7. Remove the dish from the oven and transfer the meat to a cutting board, placing it rind side up. You now have two options: either remove the rind completely, leaving the fat layer intact, and score the fat closely with a sharp knife without cutting into the meat. Or, leave the rind on and score it diagonally in a tight pattern, again without cutting into the meat. Return the meat to the oven uncovered and roast for an additional hour.
  8. After 30 minutes, brush the rind with the first layer of glaze. Repeat this every 10 minutes (a total of 3 times). Be sure to save some of the glaze, as it will be used as a sauce later. Once the meat reaches an internal temperature of 65°C/149°F, switch the oven to grill mode and roast the rind for about 10 minutes until it becomes perfectly crispy. The roast should now have an internal temperature of around 68-69°C/154-156°F.
  9. Remove the meat from the oven, cover it with aluminum foil, and let it rest for 10-15 minutes. During this time, the internal temperature will rise to about 72°C/162°F, and the juices will redistribute within the meat.
  10. Slice the meat against the grain into thick slices for serving as a main course or into thin slices for making sandwiches. Enjoy!
  • Passive Time: 2 hrs + 10 min
  • Cook Time: 30 min

Blini Appetizers

Blini Appetizers

Blini Appetizers

Blini Appetizers

December 15, 2024 by Kimberly

Tiny pillows of heaven! These fluffy blini with a creamy ricotta base and versatile toppings bring bold flavors and cozy vibes. Perfect for casual nights or fancy parties!

40 MINUTES

EASY

OMNIVORE

RUSSIA

40-80 PER BLINI

FLUFFY

DINNER PARTY

APPETIZER

ALL YEAR

INTRODUCTION

ABOUT THE RECIPE

Imagine a table full of vibrant, delicious little bites that disappear as soon as you serve them! These foolproof blini are soft, golden mini pancakes topped with a silky ricotta cream that goes with anything. Whether you’re hosting a cozy brunch or an elegant dinner party, these creative toppings take your appetizer game to the next level. From smoky and herby to sweet and nutty, there’s a flavor for everyone. It’s all about the balance of textures, flavors, and a little drizzle of oil magic!

How to serve
Prepare the blini as mini pancakes, then spread a dollop of the ricotta cream on top and add your chosen toppings. You can serve them pre-assembled for easy grabbing or turn it into a fun DIY setup where everyone can mix and match their toppings. Perfect for any vibe – casual or fancy! You can also prepare the batter and ricotta cream in advance and keep it in the fridge for up to 24 hours. The blini pancakes can also be made ahead of time since they’re typically served cold.

How to store
Store the blini and ricotta cream separately in airtight containers. Keep the blini in the fridge for up to 2 days. The ricotta cream stays fresh in the fridge for 3-4 days.

Hi, I'm Kimberly!

Hi, I'm Kimberly.

A passionate food lover who believes in the magic of homemade deliciousness that spreads love and warmth. Join me on this culinary adventure as I prepare wonderful dishes and let’s spread some happiness together!

Kimberly the Zett Signature

If you want to get to know me better, click here!


Blini Appetizers
Blini Appetizers
Blini Appetizers
Blini Appetizers
„Let’s make a piece of happiness“
Print
clock clock iconcutlery cutlery iconflag flag iconfolder folder iconinstagram instagram iconpinterest pinterest iconfacebook facebook iconprint print iconsquares squares iconheart heart iconheart solid heart solid icon
Blini Appetizers

Blini Appetizers


  • Author: Kimberly
  • Total Time: 40 min
  • Yield: 20 blini 1x

Description

RECOMMENDED EQUIPMENT

  • mixing bowl
  • whisk
  • pan
  • spatula
  • cooling rack
  • piping bag (optional)
  • kitchen knife
  • cutting board


Ingredients

Units Scale

BATTER

  • 90 grams all-purpose flour
  • 1 tsp baking powder
  • 1 egg
  • 125 milliliter buttermilk
  • 1 tbsp olive oil
  • 1/4 tsp salt
  • oil for frying

RICOTTA CREAM

  • 250 grams ricotta
  • 1 tbsp olive oil
  • 1 tbsp lemon juice
  • salt & pepper to taste

BLINI TOPPING 1

  • walnuts
  • shallot
  • oil for frying
  • honey
  • chili oil
  • fresh thyme
  • red pepper flakes

BLINI TOPPING 2

  • fresh fig
  • gorgonzola
  • truffle oil
  • chives
  • black pepper

BLINI TOPPING 3

  • cooked salmon
  • red onion
  • capers
  • olive oil
  • fresh dill
  • black pepper

BLINI TOPPING 4

  • pastrami
  • cornichons
  • walnut oil
  • fresh parsley

BLINI TOPPING 5

  • radishes
  • cress
  • basil oil

Instructions

  1. First, we’re making the blini batter. Mix all the ingredients together until smooth, then let it chill for like 5-10 minutes. Once the batter’s had its lil rest, heat up a pan with a bit of oil or butter and spoon in small circles of batter. I usually use 3/4 of a tablespoon. Here’s the pro tip: when you see those cute little holes popping up on the surface, it’s time to flip them. Cook each side for about 2-3 minutes until they’re golden and gorgeous. Boom, your blinis are born. Pop them on a cooling rack to chill out – no soggy bottoms here.
  2. Grab a bowl and mix the ricotta cream. For this, stir together ricotta, olive oil, lemon juice, salt & pepper until it’s smooth and creamy. Then load it into a piping bag if you’re feeling fancy, or just keep a spoon handy for the easy aesthetic.
  3. Once your blinis are cool, dollop or pipe some ricotta cream onto each one. Get creative – a little swirl, a casual blob, whatever your heart desires. Now they’re ready for toppings.
  4. For Blini topping 1, toast the walnuts in a pan without adding additional fat. Take them out and let them cool. Thinly slice the shallots into delicate rings and fry them in a bit of oil until crispy. Set aside to cool. Add half a walnut onto the blini, as well as about 1 tsp of the crispy onions. Finish with a drizzle of honey and a sprinkle of pink peppercorns. Toss on a few fresh thyme leaves and finish with a few drops of chili oil for a spicy kick that ties it all together.
  5. For Blini topping 2, slice fresh figs into eighths. Place one fig wedge on the ricotta cream, then crumble some blue cheese on the other side – as much or as little as your vibe calls for. Add a few drops of truffle oil, sprinkle with freshly ground pepper, and garnish with a touch of chopped chives to seal the deal.
  6. For Blini topping 3, flake some cooked salmon into bite-sized pieces and nestle it onto the ricotta cream. Slice red onions into thin strips, then scatter a few pieces on top along with some capers. Add a few drops of olive oil, a grind of fresh black pepper, and finish with a couple of dill sprigs.
  7. For Blini topping 4, tear thin slices of pastrami into strips, roll them into little spirals, and press them onto the ricotta. Diagonally halve some cornichons and place one half on the blini. Drizzle a few drops of walnut oil for a rich, nutty twist. Top it all off with a sprig of fresh parsley for a classy finishing touch.
  8. For Blini topping 5, thinly slice radishes into delicate rounds and place two slices on one side of the blini. On the other side, gently press on a little bunch of radish cress for that pop of green. Finish with a few drops of basil oil for a fresh, herbaceous flair.
  9. Serve these cute appetizers on a platter and watch them disappear in seconds.

  • Cook Time: 40 min

Apple Pie Rolls with Vanilla & Caramel Sauce & Milk Crumble

Apple Pie Rolls with Vanilla & Caramel Sauce & Milk Crumble

Apple Pie Rolls with Vanilla & Caramel Sauce & Milk Crumble

Apple Pie Rolls with Vanilla & Caramel Sauce & Milk Crumble

December 14, 2024 by Kimberly

Golden rolls packed with spiced apples, drizzled with caramel, and topped with crunchy milk crumble – this dessert is a little masterpiece that’ll make your kitchen smell like pure magic.

75 MINUTES

INTERMEDIATE

VEGETARIAN

INT.

340 PER PORTION

COMFORT FOOD

DINNER PARTY

DESSERT

WINTER

INTRODUCTION

ABOUT THE RECIPE

These crispy golden rolls, filled with spiced apples and topped with caramel & vanilla sauce and milk crumble, are everything you love about desserts. They’re the perfect blend of sweet, buttery, and crunchy, delivering big seasonal vibes in every bite. Whether you’re making them for a dinner party or just for yourself, this dessert promises to steal the show and leave everyone asking for seconds.

How to serve
Lay the rolls on a warm puddle of vanilla sauce, drizzle generously with caramel, and finish with a sprinkle of milk crumble for that perfect texture. Serve them while they’re still warm to keep the filo dough crisp and the apple filling gooey.

How to store
Store leftover rolls in an airtight container in the fridge for up to 3 days. Reheat them in the oven at 180°C (350°F) for about 10 minutes to bring back their crisp texture.

Hi, I'm Kimberly!

Hi, I'm Kimberly.

A passionate food lover who believes in the magic of homemade deliciousness that spreads love and warmth. Join me on this culinary adventure as I prepare wonderful dishes and let’s spread some happiness together!

Kimberly the Zett Signature

If you want to get to know me better, click here!


Apple Pie Rolls with Vanilla & Caramel Sauce & Milk Crumble
„Let’s make a piece of happiness“
Print
clock clock iconcutlery cutlery iconflag flag iconfolder folder iconinstagram instagram iconpinterest pinterest iconfacebook facebook iconprint print iconsquares squares iconheart heart iconheart solid heart solid icon
Apple Pie Rolls with Vanilla & Caramel Sauce & Milk Crumble

Apple Pie Rolls with Vanilla & Caramel Sauce & Milk Crumble


  • Author: Kimberly
  • Total Time: 75 min
  • Yield: 4-6 1x

Description

Recommended Equipment

  • sharp knife
  • cutting board
  • two small pots
  • two small bowls
  • oven

Ingredients

Units Scale

APPLE PIE ROLLS

  • 8 filo pastry sheets
  • 1 apple
  • 150 milliliter apple juice
  • 2 tsp cornstarch
  • 15 grams white sugar
  • 1 tsp vanilla extract
  • 1 tsp lemon juice
  • 1/2 tsp cinnamon
  • 1/8 tsp nutmeg
  • pinch of salt

CARAMEL CINNAMON SAUCE

  • 75g white sugar
  • 2 tbsp water
  • 20 grams butter
  • 75 grams heavy cream
  • 1/2 tsp cinnamon
  • 1/4 tsp vanilla extract
  • pinch of salt

VANILLA SAUCE

  • 150 grams heavy cream
  • 150 milliliter full-fat milk
  • 3 egg yolks
  • 1 vanilla bean
  • 50 grams brown sugar
  • pinch of salt

MILK CRUMBLE

  • 30 grams full-fat milk powder
  • 50 grams all-purpose flour
  • 30 grams powdered sugar
  • 1/8 tsp salt
  • 25 grams butter
  • 45 grams white chocolate

Instructions

  1. For the apple filling, dice the apples and add them to a pot with apple juice, sugar, cinnamon, nutmeg, salt, vanilla extract, and lemon juice. Simmer over medium heat for about 10 minutes until the apples are soft. Mix cornstarch with 2 tbsp of cold water, then stir it into the apple mixture. Bring to a quick boil until it thickens, then remove from heat and let cool.
  2. For the caramel-cinnamon sauce, heat sugar and water in a pot until it reaches 170°C (340°F) and turns a light golden caramel (about 10–15 minutes). Remove from heat and carefully stir in butter and cream – it may clump, but just keep stirring. Add a pinch of salt, vanilla extract, and cinnamon, mix well, and let it cool.
  3. For the milk crumble, combine milk powder, flour, powdered sugar, and salt in a bowl. Add melted butter and mix with your hands until crumbly. Spread the mixture onto a baking sheet and bake at 140°C (285°F) for about 10 minutes. While it bakes, melt the white chocolate. Once the crumble is baked, transfer it to a bowl, drizzle the melted chocolate over it, and stir until it forms larger clusters. Set aside.
  4. Next, prepare the vanilla sauce. You can find the recipe here.
  5. For the filo rolls, place a heaping tablespoon of the apple filling on each sheet of filo dough. Fold in the sides, roll them up, and seal the ends with a bit of water. Arrange the rolls on a baking sheet lined with parchment paper, brush them with melted butter, and bake at 180°C (355°F) for about 15 minutes until golden brown.
  6. To serve, pour the vanilla sauce onto plates or bowls, cut the filo rolls into three pieces each, and arrange them on top of the sauce. Drizzle with the caramel-cinnamon sauce and finish with milk crumbles. Enjoy!
  • Passive Time: 15 min
  • Cook Time: 60 min

Classic Risotto

Classic Risotto

Classic Risotto

Classic Risotto

November 9, 2023 by Kimberly

Creamy, dreamy, and cozy, this Parmesan and white wine risotto is pure comfort in a bowl. It’s that no-fuss, indulgent dish perfect for when you crave a warm, savory hug.

45 MINUTES

EASY

VEGETARIAN

ITALIAN

722 PER PORTION

CREAMY

CLASSICS

DINNER

ALL YEAR

INTRODUCTION

ABOUT THE RECIPE

Imagine a creamy, warm risotto made with Parmesan and white wine, bringing pure comfort to your plate. This easy recipe is approachable, yet delivers an indulgent result that feels like a special treat. With simple steps and bold flavors, it’s perfect for any night you want to relax with something delicious. Ideal as a base for endless variations, this risotto keeps things cozy and straightforward while packing in all the richness and creaminess you crave. If you’re not so confident with preparing a risotto yet, read on for a full guide and get the best tips for achieving THE Perfect Risotto.

How to serve
Serve your risotto steaming hot in a wide bowl to showcase that lovely creamy texture. Garnish with fresh herbs like parsley or basil and a generous shave of extra Parmesan for an extra touch of umami. You could also add a drizzle of truffle oil or crispy pancetta for a sophisticated twist. Pair with a light side salad or a crisp white wine to complement the dish’s creamy, savory flavors.

How to store
If there are leftovers, place the risotto in an airtight container and refrigerate for up to three days. To reheat, add a splash of broth or water, and warm on the stove, stirring to bring back the creamy consistency.

Hi, I'm Kimberly!

Hi, I'm Kimberly.

A passionate food lover who believes in the magic of homemade deliciousness that spreads love and warmth. Join me on this culinary adventure as I prepare wonderful dishes and let’s spread some happiness together!

Kimberly the Zett Signature

If you want to get to know me better, click here!


Classic Risotto
Classic Risotto

„Let’s make a piece of happiness“

Print
clock clock iconcutlery cutlery iconflag flag iconfolder folder iconinstagram instagram iconpinterest pinterest iconfacebook facebook iconprint print iconsquares squares iconheart heart iconheart solid heart solid icon
Classic Risotto

Classic Risotto


  • Author: Kimberly
  • Total Time: 45 min
  • Yield: 2 1x

Description

RECOMMENDED EQUIPMENT
  • sharp knife
  • cutting board
  • medium-sized pot
  • measuring cup
  • grater

Ingredients

Units Scale
  • 200 grams risotto rice
  • 400 milliliter vegetable broth
  • 200 milliliter dry white wine
  • 300 milliliter water
  • 100 grams parmesan
  • 1 shallot
  • 1 tbsp olive oil
  • 1 tsp butter
  • salt & pepper to taste
  • parsley for garnish

Instructions

PREPARATIONS

  • Finely grate the Parmesan.
  • Cut the shallot into small pieces.

INSTRUCTIONS

  1. Heat 1 tbsp of olive oil in a pot over medium heat. Sauté the shallot until translucent. Add the butter and risotto rice, stirring everything well, and sauté for 1-2 minutes.
  2. Deglaze with the first 100ml (1/2 cup) of white wine, letting it reduce over medium heat until no liquid remains in the pot.
  3. Next, add 100ml (1/2 cup) of stock and let it simmer, stirring occasionally, until the liquid has mostly evaporated. Continue adding stock 100ml (1/2 cup) at a time, letting it simmer and be absorbed by the rice before each addition, until the remaining 200ml (1 cup) of stock has been used.
  4. Afterward, add 150ml (1/2 cup) of water, allowing the rice to absorb it as it cooks. Follow with another 100ml (1/2 cup) of white wine, then add the final 150ml (1/2 cup) of water, stirring as it cooks. The whole process should take around 40 minutes.
  5. Remove the pot from the heat and stir in the Parmesan until it melts. Season with salt and white pepper to taste.
  6. Divide the risotto between plates and top with additional grated Parmesan, freshly ground pepper, and parsley.
  • Prep Time: 5 min
  • Cook Time: 40 min

Chestnut Soup & Chili Cinnamon Croutons

Chestnut Soup & Chili Cinnamon Croutons

Chestnut Soup & Chili Cinnamon Croutons

Chestnut Soup & Chili Cinnamon Croutons

November 7, 2024 by Kimberly

Cozy up with this creamy chestnut soup, bursting with earthy sweetness and a hint of spice. Perfect for chilly days, it’s like a warm hug in a bowl. Pure comfort.

35 MINUTES

EASY

VEGETARIAN

INT.

469 PER PORTION

COMFORT FOOD

CHRISTMAS

DINNER

AUTUMN
WINTER

INTRODUCTION

ABOUT THE RECIPE

When the chill of fall hits, there’s nothing like a rich, velvety chestnut soup to warm things up. This soup blends the earthy sweetness of roasted chestnuts with a creamy texture that feels luxurious but easy. And, just to give it that something extra, a sprinkle of chili-cinnamon croutons adds a spicy, toasty crunch that makes every spoonful a delight. It’s like wrapping up in your favorite blanket – just with a bit more flavor and spice!

How to serve
This soup is best served in a cozy bowl, topped generously with chili-cinnamon croutons that bring a mix of heat and warm spice to the creamy chestnut base. A little drizzle of olive oil or try adding a drizzle of this leeks oil as a topping or add a sprinkle of fresh herbs like thyme or parsley can also add a fresh contrast to the roasted, nutty flavors. Pair it with a simple salad or even a slice of rustic bread on the side for a full, comforting meal that feels like it’s made for sharing. 

How to store
Just store any cooled soup in an airtight container in the fridge for up to 3 days. For best results, keep the croutons separate so they stay crunchy. Reheat the soup gently on the stove and add the croutons just before serving!

Hi, I'm Kimberly!

Hi, I'm Kimberly.

A passionate food lover who believes in the magic of homemade deliciousness that spreads love and warmth. Join me on this culinary adventure as I prepare wonderful dishes and let’s spread some happiness together!

Kimberly the Zett Signature

If you want to get to know me better, click here!


Chestnut Soup & Chili Cinnamon Croutons
„Let’s make a piece of happiness“
Print
clock clock iconcutlery cutlery iconflag flag iconfolder folder iconinstagram instagram iconpinterest pinterest iconfacebook facebook iconprint print iconsquares squares iconheart heart iconheart solid heart solid icon
Chestnut Soup & Chili Cinnamon Croutons

Chestnut Soup & Chili Cinnamon Croutons


  • Author: Kimberly
  • Total Time: 35 min
  • Yield: 4 to 6 1x

Description

Recommended Equipment

  • sharp knife
  • cutting board
  • medium pot
  • immersion blender
  • pan

Ingredients

Units Scale

SOUP

  • 400 grams vacuum-packed chestnuts
  • 1 shallot
  • 1 tbsp olive oil
  • 600 milliliters beef stock
  • 200 milliliters heavy cream
  • fresh thyme
  • nutmeg, salt & pepper to taste

CROUTONS

  • 2 slices white toast bread
  • 1 tbsp butter
  • 1/2 tsp cinnamon
  • 1/2 tsp chili flakes
  • pinch of salt

Instructions

  1. Peel and dice the onion. Roughly chop the pre-cooked chestnuts and set both aside.
  2. Heat a medium pot over medium heat with a bit of olive oil, then sauté the onions until translucent. Next, add the chestnuts and let them cook for 3-4 minutes.
  3. Add the beef broth and cream to the pot, bring to a boil, then cover and let it simmer on low heat for about 20-30 minutes, until the chestnuts are soft.
  4. While the soup is cooking, heat a large pan over medium heat and melt the butter. Meanwhile, cut the toast into cubes. Add cinnamon, dried chili flakes and salt to the butter, stirring well. Add the toast cubes and toss so they’re evenly coated in the spiced butter. Cook for a few minutes until the cubes are crispy. Set aside.
  5. Add thyme to the soup and blend everything with an immersion blender until smooth. Season the soup with salt, pepper, nutmeg, and more thyme if needed.
  6. Ladle the soup into bowls, garnish with cream and leek oil, and top with the toasted croutons. Optionally, sprinkle with a bit more ground pepper and enjoy!
  • Passive Time: 15 min
  • Cook Time: 20 min