Pink Grapefruit Cardamom Chutney

Pink Grapefruit Cardamom Chutney

Pink Grapefruit Cardamom Chutney

October 30, 2024 by Kimberly

A chutney that brings out the best in so many dishes – sweet, tangy, and spiced with cardamom, this pink grapefruit version adds a unique twist to meals from brunch spreads to savory dinners!

80 MINUTES

EASY

VEGAN

INT.

77 PER PORTION

SWEET
SPICY

EVERYDAY

DIPS & SPREADS

ALL YEAR

INTRODUCTION

ABOUT THE RECIPE

Imagine a chutney that surprises you with every bite – a unique mix of pink grapefruit, cardamom, ginger & cinnamon balancing sweetness and spice in the freshest way. It’s a versatile addition that shines on breakfast toast, pairs perfectly with your favorite cheese board, and even makes savory dishes like grilled meats and veggies pop with vibrant flavor. With a quick prep and simple ingredients, it’s a recipe you’ll love making again and again for that extra zing.

How to serve
This chutney works wonders as a dipping sauce, spread, or finishing touch. Try it with cheeses like brie or goat cheese for a dreamy pairing that feels just a bit gourmet. It’s delicious alongside roasted chicken or even mixed into a salad dressing for a twist. If you’re in the mood for brunch vibes, layer it on toast with cream cheese or as a sandwich spread – honestly, it’s so versatile, you’ll find yourself using it with everything! For an extra flavor boost, try swapping regular oil with my Grapefruit Oil!

How to store
Keep this chutney fresh by storing it in an airtight container in the fridge for up to two weeks. The flavors deepen over time, so it only gets better with each passing day. Just give it a stir before serving to rediscover that zingy brightness!

Hi, I'm Kimberly!

Hi, I'm Kimberly.

A passionate food lover who believes in the magic of homemade deliciousness that spreads love and warmth. Join me on this culinary adventure as I prepare wonderful dishes and let’s spread some happiness together!

Kimberly the Zett Signature

If you want to get to know me better, click here!


Pink Grapefruit Cardamom Chutney
„Let’s make a piece of happiness“
Print
clock clock iconcutlery cutlery iconflag flag iconfolder folder iconinstagram instagram iconpinterest pinterest iconfacebook facebook iconprint print iconsquares squares iconheart heart iconheart solid heart solid icon
Pink Grapefruit Cardamom Chutney

Pink Grapefruit Cardamom Chutney


5 Stars 4 Stars 3 Stars 2 Stars 1 Star

No reviews

  • Author: Kimberly
  • Total Time: 80 min
  • Yield: 8 1x

Description

Recommended Equipment

  • sharp knife
  • cutting board
  • small pot
  • jar with a screw-top lid

Ingredients

Units Scale
  • 2 pink grapefruits
  • 12 tbsp oil
  • 1 red onion
  • 1 tsp ginger, grated
  • 1 tsp cardamon, ground
  • 1 cinnamon stick
  • 100 grams brown sugar
  • 50 milliliters apple cider vinegar
  • 1 fresh chili pepper
  • pinch of salt

Instructions

PREPARATIONS

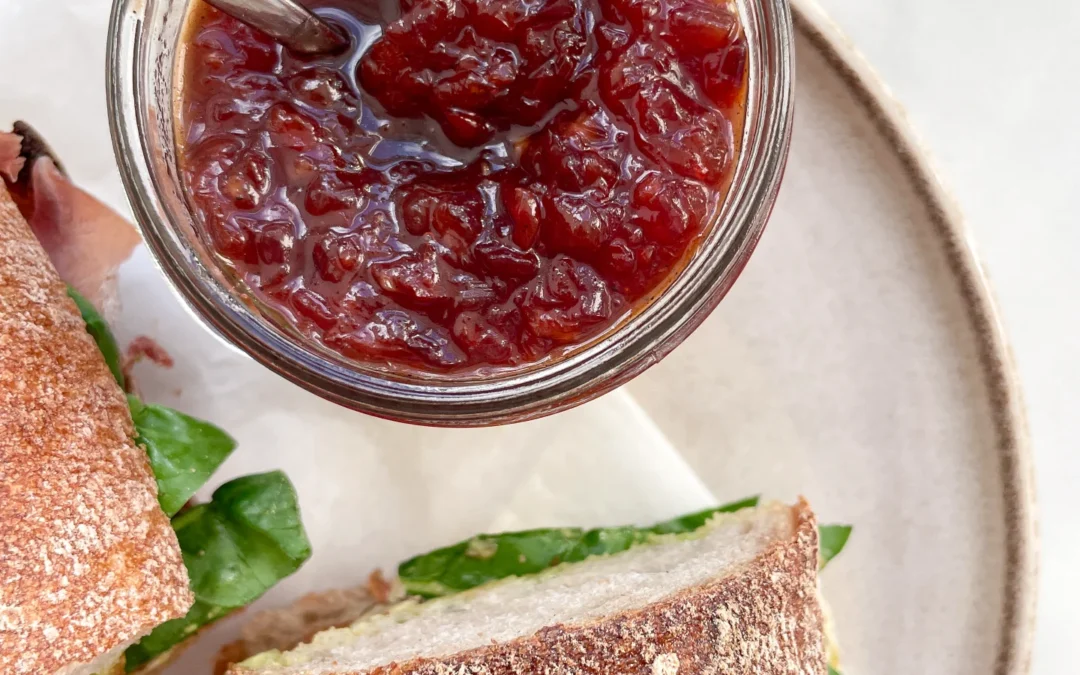
  • Rinse a screw-top jar with boiling water and let it drain. Set aside until the chutney is ready to be poured in. The jar should be large enough to hold about 200g.

INSTRUCTIONS

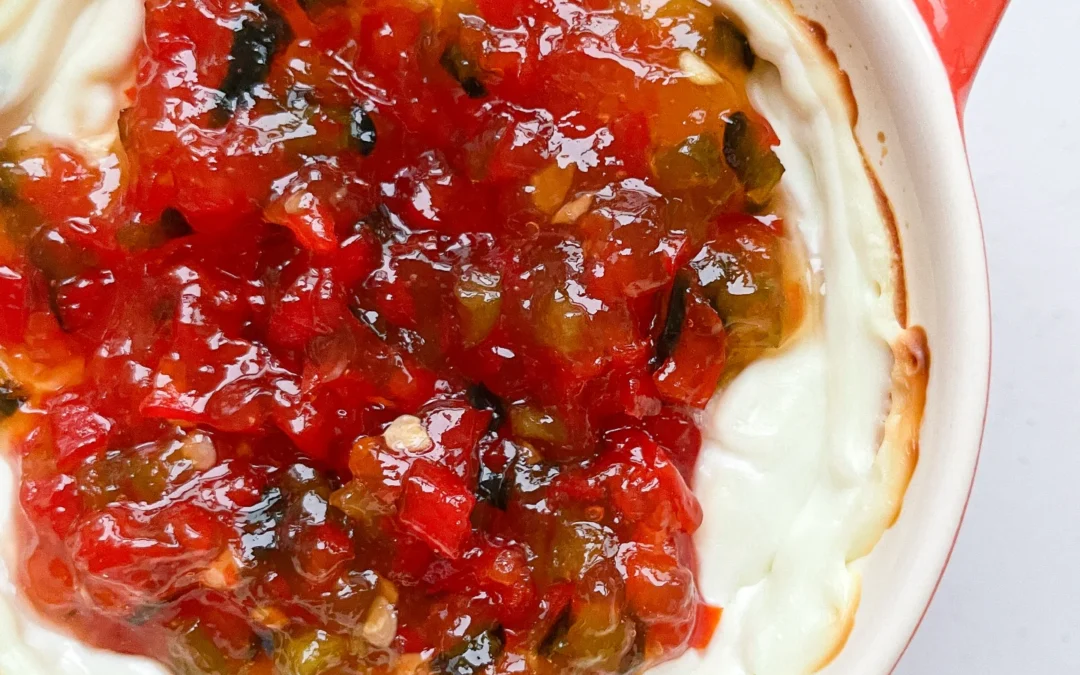
  1. Peel the grapefruits and remove the flesh, making sure to get rid of all the bitter white skin. Cut the fruit segments into small pieces, separating as much of the transparent skin as possible. Set aside.
  2. Peel the onion and ginger. Dice the onion into small pieces and finely chop or grate the ginger. Sauté both with a cinnamon stick and 1 tsp ground cardamom in a pot with 1-2 tbsp of oil over medium heat until the onion softens and the spices become fragrant. Meanwhile, chop the fresh chili pepper into small pieces and add it to the pot.
  3. Next, add the brown sugar to the pot and bring it to a low boil until the sugar melts.
  4. Now, add the grapefruit pieces, apple cider vinegar, and salt to the pot, stirring well. Let everything simmer on low heat for about 20 minutes until it starts to thicken. Adjust seasoning to taste, remove the cinnamon stick, and transfer the chutney to the jar. Seal and allow it to cool completely.
  • Prep Time: 5 min
  • Passive Time: 60 min
  • Cook Time: 15 min

Easy Same Day Basic Focaccia

Easy Same Day Basic Focaccia

Quick & Easy - The Best Focaccia Recipe

Easy Same Day Basic Focaccia

October 26, 2024 by Kimberly

Golden-crisp on the outside, airy and soft inside, this fresh focaccia is the ultimate comfort! Perfect for dipping, snacking, or as a side – it’s irresistible, warm, and baked-to-perfection bliss.

3 HOURS
30 MINUTES

EASY

VEGETARIAN

ITALIAN

386 PER PORTION

FLUFFY

EVERYDAY

BREAD

ALL YEAR

INTRODUCTION

ABOUT THE RECIPE

Craving something warm, cozy, and seriously easy to bake? This focaccia is your answer! It’s got that perfect golden crust that you can’t resist breaking into and a soft, fluffy center that just melts in your mouth. Whether you’re new to baking or a seasoned bread lover, this focaccia has that fresh-baked, olive-oil-kissed goodness that makes it the ultimate comfort food. Plus, it’s ready in just 3.5 hours – no need to wait around for endless rises. Just mix, bake, and enjoy some bakery-style vibes at home!

How to serve
This focaccia is so versatile – it pairs perfectly with just about anything! Tear off pieces to dip in olive oil and balsamic vinegar for a classic Italian feel, or serve it alongside a warm soup or pasta for a cozy meal. It also makes a great base for an open-faced sandwich or as an appetizer with some herby olive oil and fresh tomatoes. However you serve it, the fluffy texture and crispy edges will make it an instant favorite for everyone around the table. For an in-depth guide with secret tips & tricks, check out my ‚How-To Guide‘ for the Best Focaccia Recipe!


How to store
To keep that bakery-fresh vibe, store your focaccia in an airtight container or plastic wrap at room temperature for up to 2 days. You can also freeze it – wrap it tightly, and it’ll last up to 2 months. Just warm it in the oven to bring back the freshness.

Hi, I'm Kimberly!

Hi, I'm Kimberly.

A passionate food lover who believes in the magic of homemade deliciousness that spreads love and warmth. Join me on this culinary adventure as I prepare wonderful dishes and let’s spread some happiness together!

Kimberly the Zett Signature

If you want to get to know me better, click here!


Quick & Easy - The Best Focaccia Recipe
Basic Focaccia
„Let’s make a piece of happiness“
Print
clock clock iconcutlery cutlery iconflag flag iconfolder folder iconinstagram instagram iconpinterest pinterest iconfacebook facebook iconprint print iconsquares squares iconheart heart iconheart solid heart solid icon
Quick & Easy - The Best Focaccia Recipe

Easy Same Day Basic Focaccia


  • Author: Kimberly
  • Total Time: 3 hrs + 30 min

Description

Recommended Equipment

  • large bowl
  • kitchen scale
  • thermometer (even a medicine one works)
  • measuring cup
  • wooden spoon
  • cling film, beeswax wrap, or a shower cap
  • baking dish or tray (mine is 20x26cm / 8×10 inch)
  • oven


Ingredients

Units Scale
  • 500 grams pizza flour (type 00 in Germany)
  • 400 grams luke-warm water
  • 1.5 tsp active dry-yeast
  • 1 tbsp olive oil
  • 1 tsp honey
  • 1.5 tsp salt
  • 50 milliliters olive oil for greasing and dipping

Instructions

  1. Combine the active-dry yeast with warm water (between 34-38°C / 93-100°F), olive oil, and a teaspoon of honey to get things started. Let it sit for about 10 minutes until it becomes bubbly and the oil floats on top with the activated yeast. Meanwhile, in a large bowl, mix your flour with the salt.
  2. Pour the activated yeast mixture into the flour. Using a wooden spoon, mix everything together until it forms a dough and no dry flour is left. It might look a bit shaggy at first, but that’s totally fine! Scrape down any dough stuck to the sides and cover the bowl with cling film, a beeswax towel, or a shower cap. Let it sit for 20 minutes to allow the flour to hydrate and the dough to start developing elasticity.
  3. After 20 minutes, uncover the dough and prepare a small bowl of warm water to dip your hands in for the stretch & fold process. This technique helps develop the gluten without kneading. To do it, gently pull one side of the dough up, stretch it, and fold it over the center. Rotate the bowl a quarter turn and repeat on all four sides. You’ll do this about three times, letting the dough rest in between. This method strengthens the dough and helps create that light, airy texture! Follow these steps:
    • First stretch & fold, then let the dough rest for 20 minutes covered
    • Second stretch & fold, then rest another 20 minutes covered
    • Third stretch & fold, then let it rest for 60 minutes covered
  4. After the final 60-minute rest, grab your oven dish and drizzle 2-3 tablespoons of olive oil to coat it generously. Carefully transfer the dough to the dish, lifting it gently with both hands. Place it back in the dish, folding any hanging dough underneath itself to give it structure and elasticity.
  5. Cover the dish and let the dough rest for another 60 minutes. During this time, the dough will rise and settle into the dish, preparing for its final transformation.
  6. Preheat the oven to 220°C / 430°F. After the dough’s last rest, uncover it and drizzle a little extra olive oil over the top. Use your fingers to gently press into the dough, forming dimples. This will encourage those signature bubbles to form during baking.
  7. Bake the focaccia for 20-25 minutes, or until it’s golden and crisp. Enjoy your freshly baked focaccia! Let the focaccia cool to room temperature. If you cut it while it’s still hot, it might tear apart. But honestly, it tastes sooo good when it’s warm. Just tear it up and dip it into your favorite dips!

  • Passive Time: 3 hrs + 20 min
  • Cook Time: 10 min

Baked Goat Cream Cheese & Hot Pepper Jelly

Baked Goat Cream Cheese & Hot Pepper Jelly

Baked Goat Cream Cheese & Hot Pepper Jelly

Baked Goat Cream Cheese & Hot Pepper Jelly

October 20, 2024 by Kimberly

Imagine a warm, melty goat cream cheese, topped with a sweet-spicy hot pepper jelly as a dip for your favorite potato chips. It’s a burst of flavor that feels like a cozy, fiery hug.

40 MINUTES

EASY

VEGETARIAN

INT.

421 PER PORTION

CREAMY
TANGY
SWEET

EVERYDAY

APPETIZER
SNACK

AUTUMN
WINTER

INTRODUCTION

ABOUT THE RECIPE

This baked goat cream cheese dish is the perfect combo of creamy, tangy, and sweet with a little kick. The warm, melty center and the hot pepper jelly on top brings the perfect balance of sweet and spicy. It’s one of those appetizers that makes everyone go “wow” after the first bite, but it’s surprisingly easy to make. Whether you’re hosting friends or just treating yourself to something special, this warm, cozy snack is the ultimate crowd-pleaser.

How to serve
Serve this baked goat cheese dish with crispy crackers, warm slices of baguette, or even fresh veggies like cucumber or carrots for a light crunch. The sweet-spicy jelly on top works perfectly with some fresh herbs like thyme or chives. It’s an easy, yet impressive appetizer for dinner parties, game nights, or even a cozy night in. Trust me, people will be coming back for seconds – so maybe make a double batch!

How to store
If you have leftovers (which, let’s be real, you probably won’t), just pop the baked goat cheese in an airtight container in the fridge. It keeps for about 2 days and can be easily reheated in the oven.

Hi, I'm Kimberly!

Hi, I'm Kimberly.

A passionate food lover who believes in the magic of homemade deliciousness that spreads love and warmth. Join me on this culinary adventure as I prepare wonderful dishes and let’s spread some happiness together!

Kimberly the Zett Signature

If you want to get to know me better, click here!


Baked Goat Cream Cheese & Hot Pepper Jelly
„Let’s make a piece of happiness“
Print
clock clock iconcutlery cutlery iconflag flag iconfolder folder iconinstagram instagram iconpinterest pinterest iconfacebook facebook iconprint print iconsquares squares iconheart heart iconheart solid heart solid icon
Baked Goat Cream Cheese & Hot Pepper Jelly

Baked Goat Cream Cheese & Hot Pepper Jelly


5 from 1 review

  • Author: Kimberly
  • Total Time: 20 min
  • Yield: 40 min 1x

Description

Recommended Equipment

  • jar with a screw-on lid
  • sharp knife
  • cutting board
  • small pot
  • tongs
  • small plate
  • food processor

Ingredients

Units Scale

HOT PEPPER JELLY

  • 1/2 red bell pepper
  • 1/4 green bell pepper
  • 1/2 jalapeno
  • 1/2 fresh chili pepper
  • 75 grams preserving sugar
  • 30 grams apple cider vinegar

CHEESE

  • 150 grams cream cheese
  • 100 grams goat cream cheese
  • 1 garlic clove
  • 1 tbsp fresh chives
  • salt to taste

OTHER INGREDIENTS

  • bread, cracker or veggie sticks for dipping

Instructions

  1. For the hot pepper jelly, first pour boiling water over the jar and lid, and let them sit for about 10 minutes. Meanwhile, chop the red pepper, green pepper, jalapeno, and chili into small pieces. Put them in a small pot. Next, add the preserving sugar and apple cider vinegar, and stir well. Bring everything to a boil over medium-high heat and let it simmer for about 10 minutes. Use tongs to carefully remove the jar and lid from the hot water and let them drain. Set aside.
  2. Now, test if the jelly is ready by placing half a teaspoon of the mixture on a plate and tilting it back and forth. If it thickens and doesn’t run like water, it’s done and can be carefully poured into the sterilized jar. Let it cool in the fridge until further use.
  3. Preheat the oven to 200°C / 400°F. For the cheese cream, peel the garlic clove and finely chop the chives. Add both to a food processor along with the cream cheese, goat cheese, and a pinch of salt. Blend until smooth. Transfer the cream to a small ovenproof dish with a lid (or cover with foil) and bake for about 15 minutes. Then remove the lid and bake for another 5 minutes until the top is slightly browned. Take it out of the oven and let it cool briefly.
  4. Finally, spread the hot pepper jelly over the cheese and serve with bread or chips.

Notes

  • If you don’t have preserving sugar on hand, use 60-65g of regular sugar with 1-1.5g of pectin and 5ml of lemon juice instead of 75g preserving sugar.
  • Cook Time: 20 min

White Chocolate Cookies with Blue Spirulina Butter Cream Frosting

White Chocolate Cookies with Blue Spirulina Butter Cream Frosting

White Chocolate Cookies with Blue Spirulina Butter Cream Frosting

White Chocolate Cookies with Blue Spirulina Butter Cream Frosting

October 22, 2024 by Kimberly

Imagine biting into soft, buttery cookies with creamy frosting that’s as vibrant as the sky. These dreamy bites combine sweet indulgence with a fun, colorful twist that feels like pure joy!

1 HOUR
30 MINUTES

EASY

VEGETARIAN

INT.

507 PER COOKIE

BUTTERY

EVERYDAY

DESSERT

ALL YEAR

INTRODUCTION

ABOUT THE RECIPE

Ready to level up your cookie game? These soft, melt-in-your-mouth treats bring together creamy white chocolate and a frosting that’s as eye-catching as it is delicious. The vibrant blue spirulina frosting not only adds a pop of color but also gives a playful, natural twist to the classic buttercream. Perfect for making an impression at parties or just when you’re craving something special, these cookies are the kind of treat that feels like a celebration with every bite.

How to serve
These cookies are best served at room temperature, giving that perfect balance between a tender bite and creamy frosting. They’re ideal for a dessert table or as a show-stopping treat for a special occasion. You can serve them alongside a cup of tea, coffee, or even milk for the ultimate comfort experience. And let’s be real, they make for a pretty impressive addition to any cookie swap or holiday gathering.

How to store
To keep these cookies fresh, store them in an airtight container in the fridge for up to a 5 days. You can also freeze them (without the frosting) for up to a month and just whip up the buttercream fresh when you’re ready to serve.

Hi, I'm Kimberly!

Hi, I'm Kimberly.

A passionate food lover who believes in the magic of homemade deliciousness that spreads love and warmth. Join me on this culinary adventure as I prepare wonderful dishes and let’s spread some happiness together!

Kimberly the Zett Signature

If you want to get to know me better, click here!


White Chocolate Cookies with Blue Spirulina Butter Cream Frosting
„Let’s make a piece of happiness“
Print
clock clock iconcutlery cutlery iconflag flag iconfolder folder iconinstagram instagram iconpinterest pinterest iconfacebook facebook iconprint print iconsquares squares iconheart heart iconheart solid heart solid icon
White Chocolate Cookies with Blue Spirulina Butter Cream Frosting

White Chocolate Cookies with Blue Spirulina Butter Cream Frosting


  • Author: Kimberly
  • Total Time: 1 hr + 30 min
  • Yield: 12 1x

Description

Recommended Equipment

  • small pot (or microwave)
  • two medium-sized bowls
  • whisk
  • spatula
  • sharp knife
  • cutting board
  • cookie scoop
  • parchment paper

Ingredients

Units Scale

COOKIE DOUGH

  • 120 grams butter
  • 100 grams brown sugar
  • 100 grams white sugar
  • 2 tsp vanilla extract
  • 1 egg
  • 220 grams all-purpose flour
  • 1/2 tsp salt
  • 1/2 tsp baking soda
  • 150 grams white chocolate

BUTTERCREAM

  • 200 grams butter
  • 300 grams powdered sugar
  • 1 tbsp heavy cream
  • 1 tsp blue spirulina powder

Instructions

  1. Melt the butter in a small pot or microwave. In a medium-sized bowl, whisk together the melted butter, brown and white sugar, and vanilla extract for a few minutes. Then add the egg and mix again. Set aside.
  2. In another bowl, mix together the flour, baking soda, and salt. Set aside.
  3. Roughly chop the white chocolate and add it to the wet ingredients as well as the dry ingredients. Then mix with a spatula until there are no more visible streaks of flour.
  4. Use a medium-sized cookie scoop to form 12 evenly sized dough balls and place them on parchment paper. Chill the dough balls in the fridge for at least 1 hour.
  5. A few minutes before baking, preheat the oven to 150°C / 302°F. Place the cookies on a parchment-lined baking sheet, leaving enough space between them, and bake for 12-13 minutes or until the edges are lightly golden. Take them out of the oven and let them cool on a rack for about 10 minutes.
  6. Now, make the frosting. I recommend preparing it once the cookies have reached room temperature so the buttercream doesn’t melt when adding to the cookies. In a mixing bowl, beat the softened butter with an electric mixer until smooth and nearly white.
  7. Gradually add the powdered sugar, starting on low speed and then increasing to medium, mixing for 1 to 2 minutes until fully combined.
  8. Mix the cream with the spirulina powder and add it to the buttercream. Stir everything together until you get a vibrant blue color. Fill a piping bag with the buttercream, and once the cookies have cooled to room temperature, decorate them. Alternatively, you can spread the buttercream with a knife. Optionally, sprinkle a bit of spirulina powder on top of the frosting.
  • Passive Time: 1 hr + 20 min
  • Cook Time: 12 min

Pumpkin Tarte Flambée with Bacon Walnuts Gorgonzola & Lamb’s Lettuce

Pumpkin Tarte Flambée with Bacon Walnuts Gorgonzola & Lamb’s Lettuce

Pumpkin Tarte Flambée with Bacon Walnuts Gorgonzola & Lamb's Lettuce

Pumpkin Tarte Flambée with Bacon Walnuts Gorgonzola & Lamb’s Lettuce

October 12, 2024 by Kimberly

This cozy fall gem combines crispy bacon, rich Gorgonzola, crunchy walnuts, and and sweet pumpkin. The flavors are warm and savory, perfect for curling up on a chilly evening.

45 MINUTES

EASY

OMNIVORE

INT.

678 PER PORTION

CRISPY
UMAMI

EVERYDAY

DINNER

AUTUMN

INTRODUCTION

ABOUT THE RECIPE

Nothing says cozy fall like this delicious pumpkin tarte flambée. It’s packed with crispy bacon, creamy Gorgonzola, sweet pumpkin and the crunch of walnuts. This simple yet sophisticated dish brings the perfect blend of salty, sweet, and nutty flavors that will make you feel like you’re indulging in something extra special. Perfect for a weekend night or when you want something quick and comforting without too much effort. Pair it with a fresh salad, and you’ve got the ultimate cozy meal!

How to serve
Serve this flatbread hot and fresh, right from the oven! Slice it up into easy-to-grab pieces and drizzle with a bit of pumpkin oil for that extra touch of warmth. It’s ideal as a cozy dinner with a side of lamb’s lettuce tossed in a pumpkin oil dressing, or you can cut it into smaller squares for a party-ready appetizer. Pair it with a glass of white wine or a cold cider, and you’ve got the perfect fall feast. Pro tip: If you’re feeling fancy, swap the olive oil for some pumpkin infused oil.

How to store
If you have any leftovers, store the flatbread in an airtight container in the fridge for up to two days. To reheat, simply pop it in the oven or air fryer until it’s crispy again. Avoid the microwave as it can make the crust soggy.

Hi, I'm Kimberly!

Hi, I'm Kimberly.

A passionate food lover who believes in the magic of homemade deliciousness that spreads love and warmth. Join me on this culinary adventure as I prepare wonderful dishes and let’s spread some happiness together!

Kimberly the Zett Signature

If you want to get to know me better, click here!


Pumpkin Tarte Flambée with Bacon Walnuts Gorgonzola & Lamb's Lettuce
„Let’s make a piece of happiness“
Print
clock clock iconcutlery cutlery iconflag flag iconfolder folder iconinstagram instagram iconpinterest pinterest iconfacebook facebook iconprint print iconsquares squares iconheart heart iconheart solid heart solid icon
Pumpkin Tarte Flambée with Bacon Walnuts Gorgonzola & Lamb's Lettuce

Pumpkin Tarte Flambée with Bacon Walnuts Gorgonzola & Lamb’s Lettuce


  • Author: Kimberly
  • Total Time: 45 minutes
  • Yield: 6 1x

Description

This recipe uses affiliate links which may earn commission for purchase made at no additional cost to you.

Recommended Equipment


Ingredients

Units Scale

DOUGH

  • 250 grams all-purpose flour
  • 125 milliliters cold water
  • 1 tbsp olive oil
  • 1 tsp salt

PUMPKIN TOPPING

  • 250 grams hokkaido pumpkin
  • 3 tbsp olive oil
  • 1/2 tsp dried thyme

BACON WALNUT TOPPING

  • 300 grams bacon
  • 30 grams walnuts
  • 2 tsp honey
  • 1/4 tsp dried rosemary
  • 1/4 tsp cayenne pepper
  • 70 milliliters dry white wine
  • salt & pepper to taste

OTHER TOPPINGS

  • 1 big red onion
  • 150 grams gorgonzola cheese
  • 200 grams creme fraiche
  • black pepper

SALAD

  • 200 grams lamb’s lettuce
  • 2 tbsp fresh chives
  • 4 tbsp pumpkin seeds

DRESSING

  • 4 tbsp olive oil
  • 2 tbsp apple cider vinegar
  • 2 tsp honey
  • 2 tsp Dijon mustard
  • salt & pepper to taste

Instructions

  1. For the dough, add water, salt, olive oil, and flour into a bowl. Stir with a spoon until just combined. Transfer the dough to a clean surface and knead by hand for about 3 minutes until smooth. Wrap the dough in plastic wrap and let it rest at room temperature for about 30 minutes.
  2. Slice the pumpkin into thin pieces and place them in a shallow dish. Rub with oil and thyme, then set aside to marinate.
  3. Cut the bacon into chunks (or use pre-cut bacon) and place it in a cold pan. Fry over medium heat until golden brown without adding extra fat. Once you’ve got a nice crispy base, add walnuts, rosemary, and cayenne pepper. Deglaze with white wine and let it simmer until the wine has evaporated. Add honey at the end, season with salt and pepper, and stir well. Set aside.
  4. For the other toppings, cut the red onion into thin half-rings and set them aside. Have the Gorgonzola, crème fraîche, and pepper ready. Preheat the oven to 250°C (482°F) on the grill setting.
  5. Divide the dough into two equal pieces. On a lightly floured surface, roll them out as thin as possible. Place each dough on a baking sheet lined with parchment paper and spread an even layer of crème fraîche over the top. Sprinkle freshly ground black pepper. Then, layer the other toppings: first the bacon-walnut mixture, followed by the pumpkin slices and onion rings, and finally small dollops of Gorgonzola. Bake in the oven for about 8-11 minutes or until the cheese has melted and the crust is golden and crispy.
  6. While the dough is baking, prepare the salad and dressing. Wash the lamb’s lettuce thoroughly and place it in a large bowl. Sprinkle pumpkin seeds on top and slice the chives into rings. Set some of the chives aside to garnish the tarte flambée.
  7. For the dressing, mix oil, apple cider vinegar, honey, Dijon mustard, salt, and pepper well. Add the dressing to the salad right before serving to avoid sogginess.
  8. Remove the tarte flambée from the oven, slice it up, and serve with the salad.
  • Cook Time: 45 min

Crispy Sandwich with Egg Salad Spicy Bacon & Caramalized Onions

Crispy Sandwich with Egg Salad Spicy Bacon & Caramalized Onions

Crispy Sandwich with Egg Salad Spicy Bacon & Caramalized Onions

Crispy Sandwich with Egg Salad Spicy Bacon & Caramalized Onions

October 8, 2024 by Kimberly

Get ready for a crunchy, savory explosion in every bite! This sandwich layers rich flavors like creamy egg salad, crispy bacon, and caramelized onions with a tangy twist, leaving you totally satisfied.

50 MINUTES

EASY

OMNIVORE

INT.

750 PER SANDWICH

UMAMI
CREAMY
CRISPY

EVERYDAY

SANDWICH

ALL YEAR

INTRODUCTION

ABOUT THE RECIPE

Looking for a sandwich that hits all the right notes? This crispy masterpiece combines rich egg salad, spicy bacon, and sweet caramelized onions with a punchy dill gremolata and creamy, tangy picklenaise (pickle-infused mayo). The balance of crunchy, creamy, spicy, and tangy in every bite will make this sandwich your new go-to for lunch or a snack. It’s a burst of flavor that’ll have you craving it again and again.

How to serve
This sandwich is best served fresh and warm, right after toasting the bread to crispy perfection. Pair it with a side of fresh salad to make it a complete meal. The dill gremolata and picklenaise add an unexpected tangy touch, making it a great option for casual get-togethers or a solo lunch treat.

How to store
If you need to store this sandwich, keep the components separate – store the egg salad, bacon, and caramelized onions in airtight containers in the fridge for up to 2 days. Toast your bread fresh when ready to assemble for the best texture and taste!

Hi, I'm Kimberly!

Hi, I'm Kimberly.

A passionate food lover who believes in the magic of homemade deliciousness that spreads love and warmth. Join me on this culinary adventure as I prepare wonderful dishes and let’s spread some happiness together!

Kimberly the Zett Signature

If you want to get to know me better, click here!


Crispy Sandwich with Egg Salad Spicy Bacon & Caramalized Onions
„Let’s make a piece of happiness“
Print
clock clock iconcutlery cutlery iconflag flag iconfolder folder iconinstagram instagram iconpinterest pinterest iconfacebook facebook iconprint print iconsquares squares iconheart heart iconheart solid heart solid icon
Crispy Sandwich with Egg Salad Spicy Bacon & Caramalized Onions

Crispy Sandwich with Egg Salad Spicy Bacon & Caramalized Onions


  • Author: Kimberly
  • Total Time: 50 minutes
  • Yield: 4 1x

Description

Recommended Equipment

  • small pot
  • medium bowl
  • deep dish
  • sharp knife
  • cutting board
  • small bowl
  • large pan
  • parchment paper

Ingredients

Units Scale

EGG SALAD

  • 4 eggs
  • 1 tsp Dijon mustard
  • 1 tsp white wine vinegar
  • 1 tbsp picklenaise (or regular mayonnaise)
  • chives
  • salt & pepper to taste

GREMOLATA

  • 10 grams fresh dill
  • 5 grams fresh chives
  • 3 tbsp pickle oil (or any other oil you like)
  • 2 garlic cloves
  • juice of 1/2 lemon
  • salt & pepper to taste

CARAMALIZED ONIONS

  • 6 small white onions
  • 2 tbsp balsamic vinegar
  • 1 tsp clarified butter
  • salt

CRISPY BACON

  • 8 slices bacon
  • 4 tsp brown sugar
  • 4 tsp cayennepepper

OTHER INGREDIENTS

  • 60 grams picklenaise (or regular mayonnaise)
  • 8 slices white bread of choice
  • 4 romaine lettuce leaves
  • 60 grams gouda cheese

Instructions

PREPARATIONS

  • Here’s the recipe for the picklenaise. You’ll need about 6-8 tablespoons.
  • Here’s the recipe for the pickle oil. You’ll need about 3 tablespoons.

INSTRUCTIONS

  1. For the egg salad, fill a pot with water and bring it to a boil. Carefully add the eggs and set a timer for 8 minutes. While they cook, prepare a bowl of ice water. After 8 minutes, transfer the eggs to the ice water to stop them from cooking further. Let them cool completely. Peel the eggs, separate the yolks from the whites, and place the yolks in a deep dish. Chop the egg whites into small pieces and set aside. To the yolks, add Dijon mustard, pickle-mayo, salt, pepper, white wine vinegar, and chopped chives. Mix everything together, mashing the yolks with a fork. Finally, fold in the chopped egg whites and mix again. Place the salad in the fridge until you’re ready to use it.
  2. For the gremolata, finely chop the dill and slice the chives into small rings. Mix both in a small bowl with lemon juice and pickle oil. Peel the garlic cloves and grate them into the bowl. Stir everything well and season with salt and pepper. Set aside.
  3. For the caramelized onions, peel the onions and slice them into thin half-rings. Heat a large pan over medium heat, melt 1 teaspoon of butter, then add the onions and a pinch of salt. Stir well and cook for 15-20 minutes, stirring occasionally, until the onions are golden and creamy. Add balsamic vinegar and stir again. Set the onions aside.
  4. Meanwhile, prepare the crispy bacon. Lay the slices on parchment paper and sprinkle them evenly with brown sugar and cayenne pepper. Bake at 200°C / 392°F for about 15 minutes or until the sugar has melted and the bacon is a deep pink.
  5. Butter the outside of the white bread slices and cut the Gouda into thin slices. Wash and dry the lettuce leaves, and get the picklenaise ready.
  6. Heat a pan over low to medium heat and place the buttered bread slices, butter-side down, in the pan. Add Gouda to half of the slices. Cover the pan so the cheese can melt. Remove the bread once the cheese is soft and the bottoms are golden and crispy.
  7. Spread mayo on the plain bread slices and gremolata on the cheesy ones.
  8. Now layer the sandwich in this order: lettuce on the mayo side, followed by egg salad, bacon, and caramelized onions. Top it off with the cheese-gremolata slice. Cut the sandwich in half and enjoy!
  • Cook Time: 50 min