Dark Chocolate Mousse

Dark Chocolate Mousse

Dark Chocolate Mousse

Dark Chocolate Mousse

August 3, 2024 by Kimberly

Indulge in a silky, rich dessert that melts in your mouth, delivering an intense cocoa experience. It’s like a cozy, chocolatey hug that’s perfect for any occasion!

This website uses affiliate links which may earn commission for purchases made at no additional cost to you.

TOTAL TIME

20 min

SERVES

4 portions

DIET

vegetarian

EVERY RECIPE DESERVES

A Little Love Letter

Let’s dive into something irresistibly decadent: a rich, dark chocolate mousse that’s pure indulgence. With at least 70% cocoa, this mousse is a dessert dream come true, offering an intense chocolate experience that’s both luxurious and simple to make. Perfect for a cozy night in or a fancy dinner party, this recipe is all about enjoying the finer things in life without spending hours in the kitchen.

Spoon the silky mousse into elegant dessert glasses or ramekins, and let it chill until perfectly set. For a touch of elegance, top it with a dollop of whipped cream, a sprinkle of cocoa powder, or some fresh berries. This dessert is best served chilled, making it a refreshing yet indulgent end to any meal. Whether it’s a casual family dinner or a sophisticated soirée, this mousse always steals the show.

Store any leftover mousse in the refrigerator, covered with plastic wrap or in airtight containers. It will stay fresh and delicious for up to two days.

Hi, I'm Kimberly!

Hi, I'm Kimberly.

A hopeless romantic when it comes to food. Every recipe I share is a love letter to food itself. I’m so glad you’re here. Make yourself at home and stay a while.

Love,
Kimberly

Kimberly the Zett Signature

If you want to get to know me better,
click here!


Dark Chocolate Mousse

LET’S MAKE A PIECE OF HAPPINESS

Print
clock clock iconcutlery cutlery iconflag flag iconfolder folder iconinstagram instagram iconpinterest pinterest iconfacebook facebook iconprint print iconsquares squares iconheart heart iconheart solid heart solid icon
Dark Chocolate Mousse

Dark Chocolate Mousse


5 Stars 4 Stars 3 Stars 2 Stars 1 Star

No reviews

  • Author: Kimberly
  • Total Time: 20 min
  • Yield: 4

Description

Recommended Equipment

  • sharp knife
  • cutting board
  • medium-sized bowl
  • small pot
  • electric mixer
  • small bowl
  • tall container
  • spatula

Ingredients

Units Scale
WHIPPED CREAM
  • 250 grams heavy cream
  • 75 grams powdered sugar
GANACHE
  • 100 grams heavy cream
  • 100 grams dark chocolate at least 70% cocoa

Instructions

  1. For the ganache, finely grate or chop the chocolate and place it in a medium-sized bowl. Set aside. Heat the cream in a small pot until it starts to steam slightly, but do not let it boil. Pour the cream over the grated chocolate and let it sit for 1-2 minutes. Then, start stirring slowly until the chocolate is fully combined with the cream and the mixture becomes noticeably thicker. Set aside and let it cool a bit.
  2. Meanwhile, prepare the whipped cream. Measure the powdered sugar into a small bowl. In a tall container, whip the cream until stiff peaks form, gradually adding the powdered sugar as you go. Set the whipped cream aside.
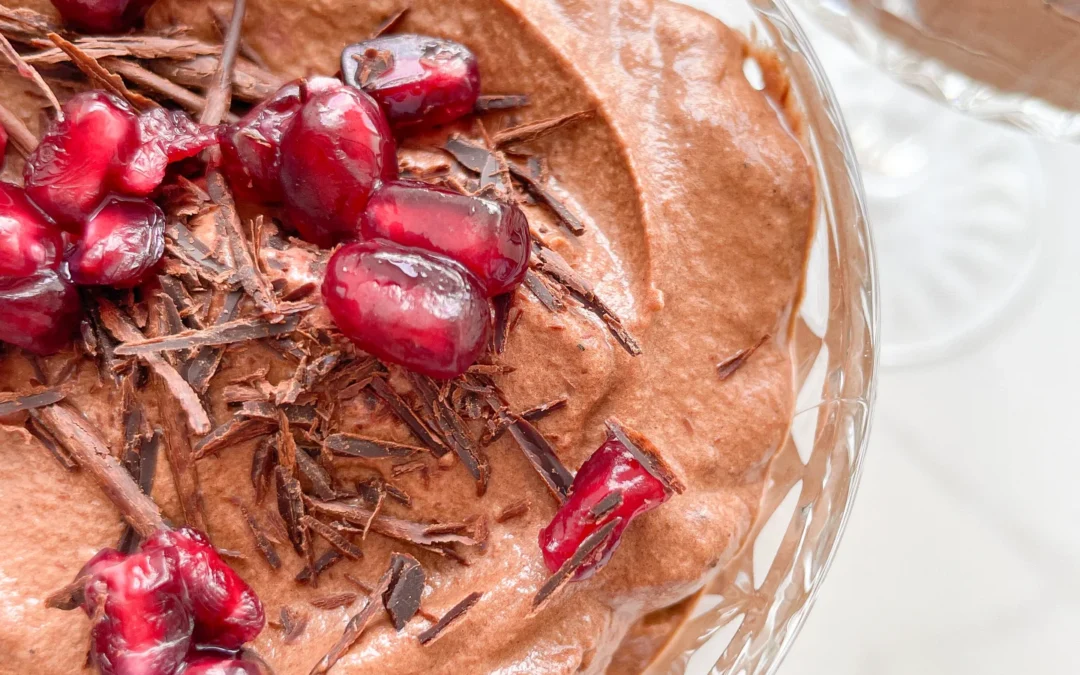
  3. Add the ganache to the whipped cream and gently fold everything together with a spatula until you have a medium-brown mousse.
  4. Spoon the mousse into dessert glasses and chill until ready to serve or enjoy immediately 🙂
  • Cook Time: 20 min

CRAVING MORE?

Follow along here & don’t forget to subscribe to my substack!

Mediterranean Pasta Salad

Mediterranean Pasta Salad

Mediterranean Pasta Salad

Mediterranean Pasta Salad

July 18, 2024 by Kimberly

Dive into summer with this zesty Mediterranean pasta salad! Packed with bold flavors, it’s a refreshing twist that’s perfect for any picnic or potluck.

This website uses affiliate links which may earn commission for purchases made at no additional cost to you.

TOTAL TIME

1 hr + 15 min

SERVES

8 portions

DIET

vegetarian

EVERY RECIPE DESERVES

A Little Love Letter

Whisk your taste buds away to the sunny Mediterranean with this vibrant pasta salad! It’s bursting with bold flavors and is the perfect quick and healthy dish for any occasion. Ideal for those looking for a delicious, fuss-free meal!

This pasta salad shines at room temperature, making it ideal for picnics and outdoor gatherings. Serve it as a hearty side with grilled meats or enjoy it as a light main course with crusty bread. It’s also great as a next-day lunch, so consider doubling the recipe!

Keep the pasta salad in a sealed container in the refrigerator. It beautifully holds its flavor and texture for up to three days, making it a fantastic choice for meal prep or leftovers.

Hi, I'm Kimberly!

Hi, I'm Kimberly.

A hopeless romantic when it comes to food. Every recipe I share is a love letter to food itself. I’m so glad you’re here. Make yourself at home and stay a while.

Love,
Kimberly

Kimberly the Zett Signature

If you want to get to know me better,
click here!


Mediterranean Pasta Salad

LET’S MAKE A PIECE OF HAPPINESS

Print
.tasty-recipe-responsive-iframe-container-0c0ae4ef { position: relative; overflow: hidden; padding-top: 56.3%; } .tasty-recipe-responsive-iframe-container-0c0ae4ef iframe { position: absolute; top: 0; left: 0; width: 100%; height: 100%; border: 0; } clock clock iconcutlery cutlery iconflag flag iconfolder folder iconinstagram instagram iconpinterest pinterest iconfacebook facebook iconprint print iconsquares squares iconheart heart iconheart solid heart solid icon
Mediterranean Pasta Salad

Mediterranean Pasta Salad


  • Author: Kimberly
  • Total Time: 1 hour + 15 min
  • Yield: 8

Description

GOOD TO HAVE ON HAND

  • large pot
  • large salad bowl
  • whisk
  • sharp knife
  • cutting board
  • small pan
  • colander


Ingredients

Units Scale
  • 500 grams penne pasta
  • 150 grams Kalamata olives
  • 180 gram dried tomatoes in oil
  • 60 grams capers
  • 2 tbsp pine nuts
  • 15 grams fresh parsley or basil
DRESSING
  • 4 tbsp olive oil (you can use the oil from the dried tomatoes)
  • 3 tbsp balsamic vinegar
  • 2 tsp Dijon mustard
  • 1 tbsp honey
  • 1/4 tsp oregano
  • 1/4 tsp thyme
  • 1/4 tsp rosemary
  • 1/4 tsp salt

Instructions

  1. Fill a large pot with water and bring it to a boil.
  2. Meanwhile, prepare the dressing in the salad bowl. Mix olive oil, balsamic vinegar, Dijon mustard, honey, oregano, thyme, rosemary, and salt with a whisk until smooth. Set the bowl aside.
  3. Add the pasta and 1 tablespoon of salt to the boiling water and cook according to the package instructions until al dente.
  4. While the pasta cooks, halve the olives and chop the tomatoes into small pieces. Pluck the parsley leaves from the stems and finely chop them. Drain and rinse the capers.
  5. Toast the pine nuts in a small pan without adding oil until golden brown.
  6. Drain the pasta and add it directly to the bowl with the dressing, mixing well.
  7. Add the tomatoes, olives, capers, pine nuts, and parsley and combine thoroughly. Season with salt and pepper to taste, then let it cool and marinate for about 1 hour or overnight.
  • Passive Time: 1 hour
  • Cook Time: 15 min

CRAVING MORE?

Follow along here & don’t forget to subscribe to my substack!

Blueberry Lemon Curd Dutch Baby

Blueberry Lemon Curd Dutch Baby

Blueberry Lemon Curd Dutch Baby

Blueberry Lemon Curd Dutch Baby

July 16, 2024 by Kimberly

Indulge in a delightful Blueberry Lemon Curd Dutch Baby, bursting with fresh flavors and a fluffy, pancake-like texture. Perfect for a cozy brunch or special breakfast treat!

This website uses affiliate links which may earn commission for purchases made at no additional cost to you.

TOTAL TIME

45 min

SERVES

4 portions

DIET

vegetarian

EVERY RECIPE DESERVES

A Little Love Letter

Have you ever tried a Dutch Baby? It’s like a giant, fluffy pancake that’s perfect for impressing guests or treating yourself to something special. This Blueberry Lemon Curd Dutch Baby is a game-changer, blending tart lemon curd with sweet blueberries for an irresistible flavor combo. Plus, it’s super easy to make, so you can whip it up anytime you want a delicious, crowd-pleasing breakfast.

Simply dust it with powdered sugar, drizzle a bit more lemon curd on top, and scatter fresh blueberries for a beautiful presentation. Pair it with a cup of coffee or a mimosa for the ultimate brunch experience. This dish is also versatile – add a dollop of whipped cream or a scoop of vanilla ice cream for a decadent dessert version. Whether it’s a lazy weekend or a special occasion, this Dutch Baby is sure to impress. And for an extra decadent touch, my vanilla oil is a perfect match. Just drizzle a bit on top and serve.

Simply let it cool completely, then cover it with plastic wrap or place it in an airtight container. Keep it in the fridge for up to 2 days, and reheat it in the oven to retain its fluffiness.

Hi, I'm Kimberly!

Hi, I'm Kimberly.

A hopeless romantic when it comes to food. Every recipe I share is a love letter to food itself. I’m so glad you’re here. Make yourself at home and stay a while.

Love,
Kimberly

Kimberly the Zett Signature

If you want to get to know me better,
click here!


Blueberry Lemon Curd Dutch Baby

LET’S MAKE A PIECE OF HAPPINESS

Print
clock clock iconcutlery cutlery iconflag flag iconfolder folder iconinstagram instagram iconpinterest pinterest iconfacebook facebook iconprint print iconsquares squares iconheart heart iconheart solid heart solid icon
Blueberry Lemon Curd Dutch Baby

Blueberry Lemon Curd Dutch Baby


  • Author: Kimberly
  • Total Time: 45 min
  • Yield: 4

Description

GOOD TO HAVE ON HAND

  • grater
  • food processor
  • medium metal bowl
  • electric mixer
  • small pot
  • whisk
  • sealable container (e.g., jam jar)
  • cast iron skillet
  • medium bowl
  • sharp knife
  • cutting board
  • small sieve


Ingredients

Units Scale
LEMON CURD
  • 2 lemons (we use the zest, the juice and the remaining lemon as garnish)
  • 150 grams white sugar
  • 2 eggs
  • 70 grams butter, room temperature
  • pinch of salt
DUTCH BABY BATTER
  • 2 eggs
  • 65 grams all-purpose flour
  • 120 milliliters whole-fat milk
  • 1 tbsp white sugar
  • 1/2 tsp vanilla extract
  • 1/8 tsp salt
  • 1 tbsp butter, for greasing the pan
TOPPINGS
  • blueberries
  • mint leaves
  • powdered sugar
  • lemon slices

Instructions

  1. First, make the lemon curd: Grate the zest of the two lemons and add them to a food processor with 150g / 3/4 cup of sugar. Mix for 1-1.5 minutes until the zest is finely chopped and blended with the sugar.
  2. Transfer the sugar to a metal bowl and mix in the butter with an electric mixer. Next, add one egg at a time, mixing in between. Juice 3 of the 4 lemon halves and add the juice to the butter-sugar-egg mixture along with a pinch of salt. Mix well.
  3. Fill a small pot halfway with water and bring to a simmer over medium heat. Place the metal bowl on top of the pot and whisk the mixture constantly until it thickens, about 10-15 minutes. The right consistency is reached when the mixture is around 80-85°C (175-185°F) or when it started to thicken.
  4. Remove the bowl from the pot and pour the lemon curd into a clean, sealable container (I used an old jam jar) and set aside. The lemon curd will make exactly 300g / 10.5 oz. It will become more firm the longer it sits.
  5. Now prepare the Dutch Baby. Preheat the oven to 210°C (410°F) and place a cast iron skillet inside to heat up.
  6. In a medium bowl, whisk the eggs with salt and vanilla extract. Add the flour and mix until creamy. Gradually add the milk, whisking until you have a smooth batter.
  7. Once the oven is preheated, use an oven mitt to remove the skillet and add 1 tbsp of butter. Coat the skillet with the melted butter and pour in the batter. Return the skillet to the oven and bake on the middle rack for 11-12 minutes.
  8. Meanwhile, wash and dry the blueberries and mint leaves. Slice the remaining lemon quarter. Have powdered sugar and a small sieve ready.
  9. Remove the skillet from the oven, spread the lemon curd over the Dutch Baby, and garnish with powdered sugar, blueberries, lemon slices, and mint leaves.
  10. And for an extra decadent touch, my vanilla oil is a perfect match. Just drizzle a bit on top and serve.
  • Passive Time: 15 min
  • Cook Time: 30 min

CRAVING MORE?

Follow along here & don’t forget to subscribe to my substack!

Whipped Ricotta & Tomato Confit

Whipped Ricotta & Tomato Confit

Whipped Ricotta & Tomato Confit

Whipped Ricotta & Tomato Confit

July 15, 2024 by Kimberly

Discover the creamy magic of whipped ricotta paired with sweet tomato confit. An easy, delightful dish that brings a touch of gourmet to your everyday meals!

This website uses affiliate links which may earn commission for purchases made at no additional cost to you.

TOTAL TIME

45 min

SERVES

4 portions

DIET

vegetarian

EVERY RECIPE DESERVES

A Little Love Letter

Bring a little gourmet to your table with this simple whipped ricotta and sweet tomato confit. It’s the perfect combination of creamy and rich flavors to elevate any meal!

Serve this creamy ricotta on a rustic slice of toasted bread or as a dip with crispy crackers. It’s perfect for impressing guests during a summer evening or adding a fancy touch to your family dinner. The sweet tomato confit complements the smooth ricotta beautifully, making each bite a delightful experience.

Keep leftover whipped ricotta and tomato confit in separate airtight containers in the fridge. They’ll stay fresh and tasty for up to two days.

Hi, I'm Kimberly!

Hi, I'm Kimberly.

A hopeless romantic when it comes to food. Every recipe I share is a love letter to food itself. I’m so glad you’re here. Make yourself at home and stay a while.

Love,
Kimberly

Kimberly the Zett Signature

If you want to get to know me better,
click here!


Whipped Ricotta & Tomato Confit

LET’S MAKE A PIECE OF HAPPINESS

Print
.tasty-recipe-responsive-iframe-container-935cabee { position: relative; overflow: hidden; padding-top: 56.3%; } .tasty-recipe-responsive-iframe-container-935cabee iframe { position: absolute; top: 0; left: 0; width: 100%; height: 100%; border: 0; } clock clock iconcutlery cutlery iconflag flag iconfolder folder iconinstagram instagram iconpinterest pinterest iconfacebook facebook iconprint print iconsquares squares iconheart heart iconheart solid heart solid icon
Whipped Ricotta & Tomato Confit

Whipped Ricotta & Tomato Confit


  • Author: Kimberly
  • Total Time: 45 min
  • Yield: 4

Description

GOOD TO HAVE ON HAND
  • sharp knife
  • cutting board
  • baking dish
  • food processor
  • frying pan


Ingredients

Units Scale
  • a few slices of your favorite baguette or ciabatta
WHIPPED RICOTTA
  • 250 grams ricotta
  • 1 tbsp olive oil
  • zest of half a lemon
  • 1 tbsp lemon juice
TOMATO CONFIT
  • 500 grams cocktail tomatoes
  • 50 milliliters olive oil
  • 8 garlic cloves
  • 1 tbsp balsamic vinegar
  • 1/4 tsp oregano
  • 1/4 tsp chili flakes
  • a few basil leaves
  • salt & pepper to taste
 

Instructions

  1. Preheat the oven to 175°C / 347°F.
  2. Wash the tomatoes, quarter them, and place them in an oven-safe dish. Peel and slice the garlic, and add it to the tomatoes. Cut the basil into fine strips and add it to the tomatoes as well. Next, add olive oil, balsamic vinegar, oregano, chili, salt, and pepper, stir well, and bake in the oven for 45 minutes.
  3. Meanwhile, prepare the ricotta cream. For this, blend the ricotta with lemon zest, lemon juice, 1 tablespoon of olive oil, salt, and pepper in a food processor until smooth. Spread the mixture on a flat plate and store in the refrigerator until further use.
  4. Slice the baguette and lightly butter each piece. Toast the slices in a pan on both sides until crispy. Tip: I also like to use the liquid that forms in the dish with the tomatoes. Dip one side of the bread into it and then toast it in the pan. Set the baguette aside until further use.
  5. Take the tomatoes out of the oven, let them cool slightly, and get the ricotta from the refrigerator. Place the tomatoes and their juice on the ricotta, and optionally drizzle with some honey. Serve with the baguette and enjoy 🙂
  • Passive Time: 20 min
  • Cook Time: 25 min

CRAVING MORE?

Follow along here & don’t forget to subscribe to my substack!

Cannelloni

Cannelloni

Cannelloni

Cannelloni

June 27, 2024 by Kimberly

Imagine biting into perfectly baked Cannelloni, stuffed with rich, savory beef filling, all wrapped in a golden, crispy bechamel parmesan top. It’s comfort food heaven in every bite!

This website uses affiliate links which may earn commission for purchases made at no additional cost to you.

TOTAL TIME

2 hrs + 55 min

SERVES

6 portions

DIET

omnivore

EVERY RECIPE DESERVES

A Little Love Letter

Cannelloni, the classic Italian comfort dish, is a true crowd-pleaser with its hearty fillings and rich, creamy sauce. Perfect for gatherings, it promises to be the star of your dining table.

Serve your Cannelloni fresh out of the oven, topped with parmesan for that irresistible cheese pull. Accompany it with a simple green salad and a glass of delicious red wine for an authentic Italian dining experience. Whether it’s a cozy family dinner or a more festive occasion, cannelloni adapts to both, pleasing everyone who takes a bite.

Leftover Cannelloni can be refrigerated in an airtight container for up to three days, making it a fantastic make-ahead dish. Simply reheat in the oven until thoroughly warm and enjoy!

Hi, I'm Kimberly!

Hi, I'm Kimberly.

A hopeless romantic when it comes to food. Every recipe I share is a love letter to food itself. I’m so glad you’re here. Make yourself at home and stay a while.

Love,
Kimberly

Kimberly the Zett Signature

If you want to get to know me better,
click here!


Cannelloni
Cannelloni

LET’S MAKE A PIECE OF HAPPINESS

Print
.tasty-recipe-responsive-iframe-container-a815c77c { position: relative; overflow: hidden; padding-top: 56.3%; } .tasty-recipe-responsive-iframe-container-a815c77c iframe { position: absolute; top: 0; left: 0; width: 100%; height: 100%; border: 0; } clock clock iconcutlery cutlery iconflag flag iconfolder folder iconinstagram instagram iconpinterest pinterest iconfacebook facebook iconprint print iconsquares squares iconheart heart iconheart solid heart solid icon
Cannelloni

Cannelloni


  • Author: Kimberly
  • Total Time: 2 hrs 55 min
  • Yield: 6

Description

GOOD TO HAVE ON HAND

  • sharp knife
  • cutting board
  • vegetable peeler
  • large pot
  • baking dish
  • medium-sized pot
  • whisk
  • medium-sized bowl
  • piping bag


Ingredients

Units Scale
  • 24 cannelloni roles
  • 40 grams parmesan
  • 125 grams mozzarella
  • fresh basil
BEEF SAUCE
  • 500 grams minced beef
  • 500 grams minced pork
  • 700 milliliters beef stock
  • 1 tbsp butter
  • 1 tbsp clarified butter
  • 1 white onion
  • 1/2 celery stick
  • 1 carrot
  • 4 garlic cloves
  • 100 milliliters dry white wine
  • 800 grams canned tomatoes
  • 2 tbsp tomato paste
  • 1/2 tsp oregano
  • 1/4 tsp cinnamon
  • 1/4 tsp chili flakes
  • 1 tsp salt
  • 1/4 tsp black pepper
BECHAMEL SAUCE
  • 500 milliliters full-fat cow milk
  • 50 grams butter
  • 50 grams all-purpose flour
  • 1/8 tsp white pepper
  • 3/8 tsp salt
  • freshly grated nutmeg to taste

Instructions

  1. Peel the carrots, onion, and garlic, and chop them along with the celery into very small pieces. Set aside.
  2. Melt the clarified butter in a large pot and thoroughly brown the minced meat until a nice crust forms on the bottom. Then remove the meat from the pot and set it aside in a bowl.
  3. Now add the carrots, onion, garlic, and celery to the pot with 1 tbsp butter and sauté for about 5 minutes until soft. Deglaze with white wine and scrape up the crusty from the bottom. Return the ground meat to the pot along with tomato paste and a pinch of salt. Sauté for 1-2 minutes.
  4. Add beef broth and canned tomatoes and simmer over medium heat for about 1 hour without a lid. The consistency should be creamy-thick, neither too liquid nor too solid, just firm enough so that it doesn’t run out of the cannelloni when filling them. Now add oregano, salt, pepper, chili, and cinnamon, and season well. Set the filling aside to cool slightly.
  5. Meanwhile, prepare the béchamel sauce. The recipe can be found here: Béchamel Sauce. Once prepared, set it aside. Preheat the oven to 200°C / 392°F.
  6. Set up your cannelloni filling station. You’ll need the meat filling in the pot, a piping bag, a baking dish, and a spoon. Place about 4 tablespoons of the meat filling at the bottom of the baking dish. Fill your piping bag with a few tablespoons of the filling and pipe it into the cannelloni. I recommend not overfilling the piping bag to maintain control. Fill all the cannelloni one by one and arrange them in a single layer over the sauce in your baking dish. Spread the remaining sauce over the cannelloni.
  7. Next, pour the béchamel over the cannelloni, ensuring all gaps are filled with sauce. Top with grated mozzarella and Parmesan.
  8. Cover the baking dish with aluminum foil and bake for 30 minutes. After 30 minutes, remove the foil, increase the oven temperature to 220°C / 428°F, and bake for an additional 15 minutes until the cheese is crispy. Optionally, you can slice fresh basil into fine strips and sprinkle over the cannelloni.

Notes

The calorie information may vary depending on the product used, country and region.

  • Passive Time: 1 hour 45 min
  • Cook Time: 60 min

CRAVING MORE?

Follow along here & don’t forget to subscribe to my substack!

Radish Cucumber Butter

Radish Cucumber Butter

Radish Cucumber Butter

Radish Cucumber Butter

June 24, 2024 by Kimberly

Whip up magic in your kitchen with this fresh, zesty butter blend! Perfect for giving a crunchy, creamy twist to any snack or sandwich.

This website uses affiliate links which may earn commission for purchases made at no additional cost to you.

TOTAL TIME

10 min

SERVES

4 portions

DIET

vegetarian

EVERY RECIPE DESERVES

A Little Love Letter

Radish cucumber butter combines the crisp freshness of radishes and cucumbers with creamy butter to create a spread that’s both light and invigorating. It’s a delightful way to add a burst of spring flavor to any dish.

This versatile butter is perfect slathered on warm bread, used as a savory topping for steamed vegetables, or as a refreshing twist in sandwiches. Its light, creamy texture and vibrant flavor profile make it an excellent complement to both casual and sophisticated culinary creations.

Keep the butter refrigerated in an airtight container. It maintains its best quality for up to 3 days, ensuring you can enjoy its fresh taste over several days.

Hi, I'm Kimberly!

Hi, I'm Kimberly.

A hopeless romantic when it comes to food. Every recipe I share is a love letter to food itself. I’m so glad you’re here. Make yourself at home and stay a while.

Love,
Kimberly

Kimberly the Zett Signature

If you want to get to know me better,
click here!


Radish Cucumber Butter

LET’S MAKE A PIECE OF HAPPINESS

Print
.tasty-recipe-responsive-iframe-container-4c2bffe2 { position: relative; overflow: hidden; padding-top: 56.3%; } .tasty-recipe-responsive-iframe-container-4c2bffe2 iframe { position: absolute; top: 0; left: 0; width: 100%; height: 100%; border: 0; } clock clock iconcutlery cutlery iconflag flag iconfolder folder iconinstagram instagram iconpinterest pinterest iconfacebook facebook iconprint print iconsquares squares iconheart heart iconheart solid heart solid icon
Radish Cucumber Butter

Radish Cucumber Butter


  • Author: Kimberly
  • Total Time: 10 minutes
  • Yield: 4

Description

GOOD TO HAVE ON HAND

  • sharp knife
  • cutting board
  • deep plate
  • paper towels
  • grater


Ingredients

Units Scale
  • 4 radishes
  • 1/4 cucumber
  • 125 grams butter
  • chives
  • salt to taste

Instructions

  1. Thoroughly wash the radishes, cucumber, and chives. Set up a deep plate and finely grate the radishes into it. Squeeze out the excess moisture from the grated radishes using paper towels. Repeat the process with the cucumber.
  2. Finely slice the chives and set them aside.
  3. Dry the plate, then add the softened butter to it. Incorporate the grated radishes and cucumber, mixing well. Season with salt and sprinkle the sliced chives on top.

Notes

The calorie information may vary depending on the product used, country and region.

  • Cook Time: 10 min

CRAVING MORE?

Follow along here & don’t forget to subscribe to my substack!